110-WS-S10 110-WS-S10 Portable Weather Station - NovaLynx Corporation
←
→
Page content transcription
If your browser does not render page correctly, please read the page content below
110-WS-S10
    User Manual

                             110-WS-S10 Portable Weather Station

                                          S-10 Portable Weather Station
                                                       With
                                       200-91000 Ultrasonic Anemometer

                                            Phone (530) 823-7185
                             Email nova@novalynx.com Website www.novalynx.com

DOC 110-WS-S10 UM 20210827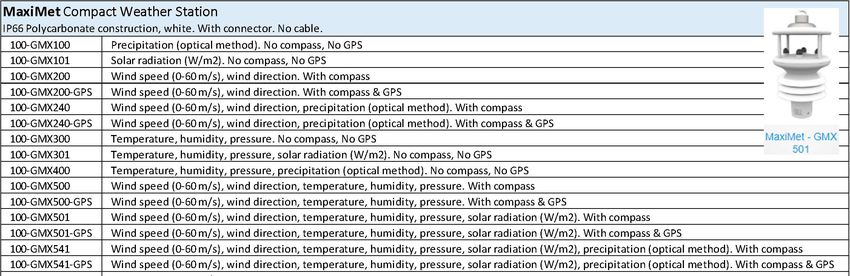
NovaLynx Corporation

   Receiving and Unpacking
   Carefully unpack all components and compare to the packing list. Notify NovaLynx Corporation
   immediately concerning any discrepancy. Inspect equipment to detect any damage that may have
   occurred during shipment. In the event of damage, any claim for loss must be filed immediately with
   the carrier by the consignee. Damages to equipment sent via Parcel Post or UPS require the consignee
   to contact NovaLynx Corporation for instructions.

   Returns
   If equipment is to be returned to the factory for any reason, call NovaLynx between 8:00 a.m. and 4:00
   p.m. Pacific Time to request a Return Authorization Number (RA#). Include with the returned
   equipment a description of the problem and the name, address, and daytime phone number of the
   sender. Carefully pack the equipment to prevent damage or additional damage during the return
   shipment. Call NovaLynx for packing instructions in the case of delicate or sensitive items. If packing
   facilities are not available take the equipment to the nearest Post Office, UPS, or other freight service
   and obtain assistance with the packaging. Please write the RA# on the outside of the box.

   Warranty
   NovaLynx Corporation warrants that its products are free from defects in material and workmanship
   under normal use and service for a period of one year from the date of shipment from the factory.
   NovaLynx Corporation's obligations under this warranty are limited to, at NovaLynx's option: (i)
   replacing; or (ii) repairing; any product determined to be defective. In no case shall NovaLynx
   Corporation's liability exceed product's original purchase price. This warranty does not apply to any
   equipment that has been repaired or altered, except by NovaLynx Corporation, or that has been
   subjected to misuse, negligence, or accident. It is expressly agreed that this warranty will be in lieu of
   all warranties of fitness and in lieu of the warranty of merchantability.

   Address
   NovaLynx Corporation
   431 Crown Point Circle, Suite 120
   Grass Valley, CA 95945-9531 USA
   Phone: (530) 823-7185
   Email: nova@novalynx.com
   Website: www.novalynx.com

   Copyright © 1988-2021 by NovaLynx Corporation

110-WS-S10                                          Page 2                                             August 2021
NovaLynx Corporation

      CONTENTS
1     FORWARD ....................................................................................................................................................................... 4
2     INTRODUCTION ............................................................................................................................................................... 4
3     PRECAUTIONS ................................................................................................................................................................. 4
4     SPECIFICATIONS .............................................................................................................................................................. 5
5     SITE SELECTION AND INSTALLATION............................................................................................................................... 5
    5.1      Tripod Installation ................................................................................................................................................... 6
    5.2      Sensor Installation................................................................................................................................................... 7
    5.3      Charger Connection ................................................................................................................................................ 7
    5.4      Earth Grounding ...................................................................................................................................................... 7
6     QUICK START INSTRUCTIONS .......................................................................................................................................... 8
    6.1      Power Supply .......................................................................................................................................................... 8
    6.2      Timekeeping ............................................................................................................................................................ 9
    6.3      SD Card .................................................................................................................................................................. 10
    6.4      Data Collection and Transfer ................................................................................................................................ 10
    6.5      Data Analysis ......................................................................................................................................................... 11
7     USB ADAPTER SETUP..................................................................................................................................................... 13
8     REAL-TIME MONITORING.............................................................................................................................................. 13
    8.1      View in TeraTerm (All Sensors) ............................................................................................................................. 13
    8.2      View in MetView (MaxiMet Compact Weather Stations) .................................................................................... 14
    8.3      View in WindView (WindSonic Ultrasonic Anemometers) ................................................................................... 15
9     BATTERY CHARGING...................................................................................................................................................... 16
10        CLOCK BATTERY REPLACEMENT................................................................................................................................ 16
11        WIRING DIAGRAM..................................................................................................................................................... 17
12        LOGGER SETTINGS..................................................................................................................................................... 18
13        SENSOR OPTIONS ...................................................................................................................................................... 20

110-WS-S10                                                                          Page 3                                                                            August 2021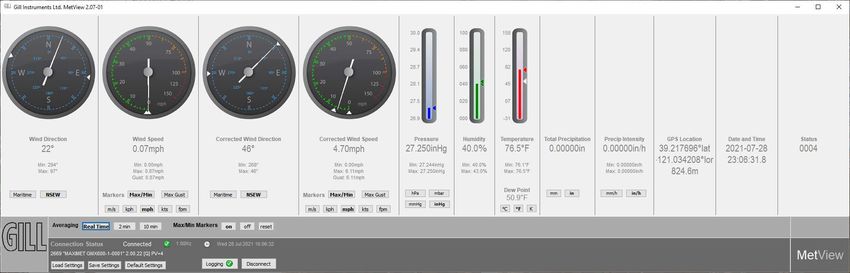
NovaLynx Corporation
1 FORWARD
Thank you for purchasing NovaLynx products. NovaLynx has been designing and manufacturing
weather instruments since 1988. NovaLynx represents several well-known brands of quality
manufacturers, including Gill Instruments, RM Young, Kipp & Zonen, and Vaisala. It is our hope that our
products will meet all your monitoring requirements.
2 INTRODUCTION
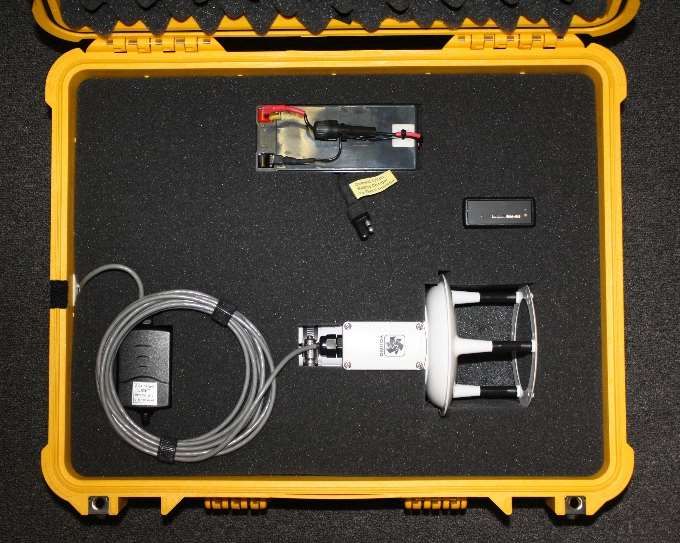
The 110-WS-S10 Portable Weather Station combines an easy-to-use logger with your choice of
weather instrument in an easy to carry package. The tripod, mast, and tie-downs are stored in a
separate padded carrying bag with shoulder strap. The system can be set up where needed within
minutes.
The logger stores serial data on a 2GB SD card. After logging, the card is removed and can be uploaded
by means of the included memory card reader. The daily .CSV files can be read and analyzed using
standard PC software.
The low power requirement of the logger and many of the available sensors make it possible for the unit
to run for several days before the battery must be recharged. For longer operation, the included battery
charger or an optional solar panel can be connected.
A USB cable is included for monitoring the output of the sensor in real-time (the logger can be
collecting data simultaneously). The USB cable also makes it possible to re-configure the sensor, in case
any parameters need to be changed.
This manual will focus on the set-up and operation of the logger, and will not cover all details regarding
the sensor. Information on sensor installation, operation, and configuration will be found in the
sensor's user manual.
3 PRECAUTIONS
WARNING – Do not install the system when a lightning storm is likely.
WARNING – Do not set up the tripod near power lines to avoid electric shock.
WARNING – Make sure there are no buried pipes or electrical lines where the spiral stake is installed.
CAUTION – Do not allow the exposed metal end of the USB connector or other metal objects to
contact the positive terminal of the battery. Sparks could result, and damage to the
electrical equipment could occur.
NOTICE – Do not remove the SD card while the logger's green LED is illuminated (Section 6.1).
110-WS-S10 Page 4 August 2021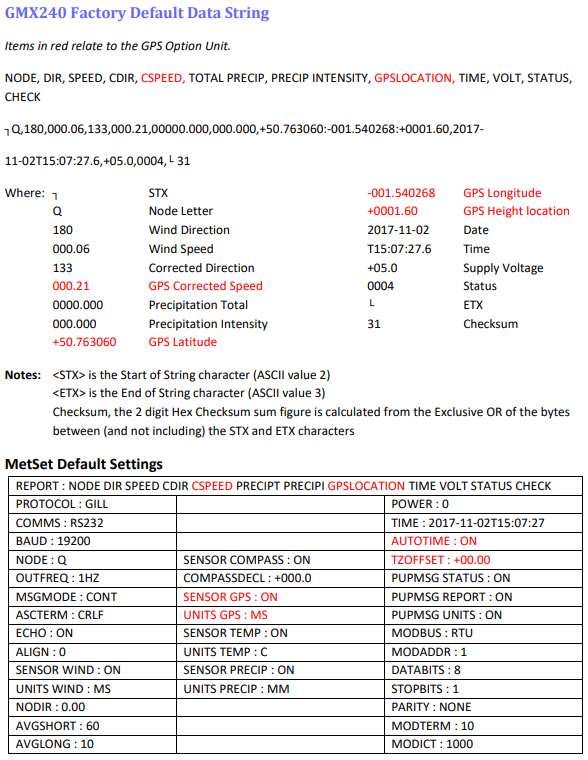
NovaLynx Corporation

4    SPECIFICATIONS

    S10 Data Logger
    Connections                       Screwless terminals (AWG 22 to 28)
    RS232 Input                       9600 Baud (default) or selectable from 110 to 115200 Baud
                                      Default: Records only the data between specified start (STX) and end (ETX)
    Data Sample
                                      Option: May be programmed to log everything (LOG_ALL=Y)
    Data Storage                      2 GByte (max) removable SD, MMC or MMC mobile card
    File System                       FAT16 or FAT32 with 8.3 file names. Sector size 512 Bytes
                                      Default: Log every data sample output by the device/sensor
    Logging Interval
                                      Option: Select logging interval from 1 to 60 seconds
                                      Green LED: Ready to record data
    Visual Indicators
                                      Red LED: Power on, Writing data to SD card
    Audible Indicator                 Status alert
    Real Time Clock Accuracy          ±40 ppm at 25 °C
    Clock Battery Backup              CR2032
    Power                             7 to 30 Vdc, (10mA @ 12Vdc typical)
    Temperature Range                 Operating: -25 °C to +70 °C | Storage: -40 °C to +70 °C
                                      CE marked - EMC directive 2004/108/EC
    EMC
                                      FCC/CFR 47: Part 15:2004

    Tripod with Carrying Case
    Assembled Height                  7'-2" (2.18 m)
    Construction                      Tripod: Galvanized steel, Mast: Aluminum
    Tripod Height (unfolded)          32"
    Tripod Width (unfolded)           32"
    Tripod Weight                     7.75 lbs (3.5 kg)
    Max mast diameter                 Ø1.75" (Ø44 mm)
    Leg diameter                      Ø1.25" (Ø32 mm)
    Mast (2 sections)                 Ø1.25" x 3' (Ø32 mm x 0.9 m), Swaged one end
    Spiral stake                      18" (45 cm), Zinc plated
    Ratcheting Tie Down               400 lb (180 kg) capacity
    Carrying Case                     42" (1 m) Padded nylon case with carrying straps
    Overall Weight                    12.5 lb (5.7 kg)

5    SITE SELECTION AND INSTALLATION

    Select a level area of bare soil or grass where the spiral stake can be installed. The area must be far
    enough away from buildings and vegetation that might affect the wind measurements (when installing
    an anemometer) or other weather parameters (when installing a compact weather station).

110-WS-S10                                         Page 5                                             August 2021
NovaLynx Corporation

                       Mast Segment

                       Eyebolt
                                                                             Release
                       Hooks                                                 Button

                                                                             Ratchet Handle

                       DWG 890-0050-03                                       Spiral Stake

5.1    Tripod Installation

      1) Select a level area of bare soil or grass where the spiral stake can be installed.
      2) Screw the stake into the soil until only the handle is exposed.
      3) Assemble the tripod with ONE mast section and tighten the bolts that hold the mast.
         (NOTE: Check which end of the mast best fits the base of the sensor. Place that end upwards.)
      4) Center the tripod over the spiral stake and attach the base of the ratchet to the hook that is on
         the spiral stake.
      5) Press the release button just above the ratchet handle and raise the handle to open the ratchet
         to the fullest extent (the handle will be pointing up).
      6) While holding the release button, pull up on the hook that is attached to the webbing and engage
         the hook in the eyebolt on the tripod, just below the mast.
      7) Ratchet the handle back and forth until the tripod is held down securely.
      8) Lower the ratchet handle to the fully closed position to lock the cam mechanism.

110-WS-S10                                        Page 6                                          August 2021
NovaLynx Corporation

5.2      Sensor Installation

       1)   Open the logger carrying case and carefully remove the sensor.
       2)   Assemble the sensor to the top mast section and secure it with the mounting screw or band.
       3)   Place one Velcro strap around the mast and sensor cable just below the sensor.
       4)   If the sensor monitors wind direction, locate the marking that indicates north.
       5)   Fit the upper mast section onto the tripod, making sure the north indicator (if any) faces north.
       6)   Wrap additional Velcro straps at intervals around mast and sensor cable to prevent the cable
            from whipping in the wind.

5.3      Charger Connection

      The S10 Portable Weather Station can operate for several days before the battery needs to be
      recharged. If operating for longer periods, the included AC charger can be used to keep the battery
      fully charged while the logger is operating. However, the charger is not weather-proof, so special
      precautions need to be taken if the AC charger is used (i.e., protect it from rain/sprinklers). A better
      solution, if charging is needed, is to install the NovaLynx 110-WS-25SP 10-Watt solar panel (sold
      separately). Both the AC charger and solar panel are equipped with quick-connect plugs.

      NOTE: Connect power to the logger BEFORE connecting the charger. When powering down, do the
      reverse (i.e., unplug the charger, then unplug the battery).

5.4      Earth Grounding

      Earth grounding helps dissipate static that can build up on a sensor due to friction of the air over the
      body of the sensor. Earth grounding is a simple matter for installations where the spiral stake is used.
      In locations where the spiral stake is not used another grounding method may be needed, such as
      installing a ground rod, or connecting to a metal pipe (cold water line) that is in contact with the earth.

       1) Connect the free end of the grounding wire to the copper lug on the side of the carrying case.
       2) Connect the clip end of the earth grounding wire to the spiral stake.

                             Clip             Lug

                                                                                                DWG 890-0050-03

110-WS-S10                                             Page 7                                                August 2021
NovaLynx Corporation
6 QUICK START INSTRUCTIONS
1) Power on ----------------------------------------------------------------------------------------------- Section 6.1
2) Set time and date------------------------------------------------------------------------------------- Section 6.2
3) Insert SD card------------------------------------------------------------------------------------------ Section 6.3
4) Start recording data --------------------------------------------------------------------------------- Section 6.3
5)
6) Stop recording data (press purge button) ----------------------------------------------------- Section 6.3
7) Remove card and transfer to PC to view and analyze data -------------------------------- Section 6.4
PURGE BUTTON
• Clock Synchronization CARD SLOT
• Stop Recording • Insert SD card
• Purge (save buffered data to card)
RED LED (Flashes)
• Power on
• Writing data to card
GREEN LED (Stays on)
• Ready to record data
S-10 FRONT PANEL DWG 890-0105-01
6.1 Power Supply
To turn the logger ON: Connect the red battery plug to the positive battery terminal.
To turn the logger OFF:
o Press the purge button and wait for the LEDs to turn off (data is transferred to the card)
o Remove the card
o Disconnect the red battery plug
The logger may operate for several days on the battery alone. Use the voltmeter supplied with the
system to check the voltage on the battery, and recharge it before it drops below 11.5 volts. Charging
more frequently is recommended, as the float charger will keep the battery fully charged without over-
charging. To prevent overheating, remove the charger from the foam pocket while charging.
The AC charger can be connected while collecting data. However, the AC charger must be housed in a
weather-tight enclosure, and the circuit powering the charger must be GFCI protected. An optional
solar panel is available (NovaLynx 110-WS-25SP) for remote locations where power is not available.
110-WS-S10 Page 8 August 2021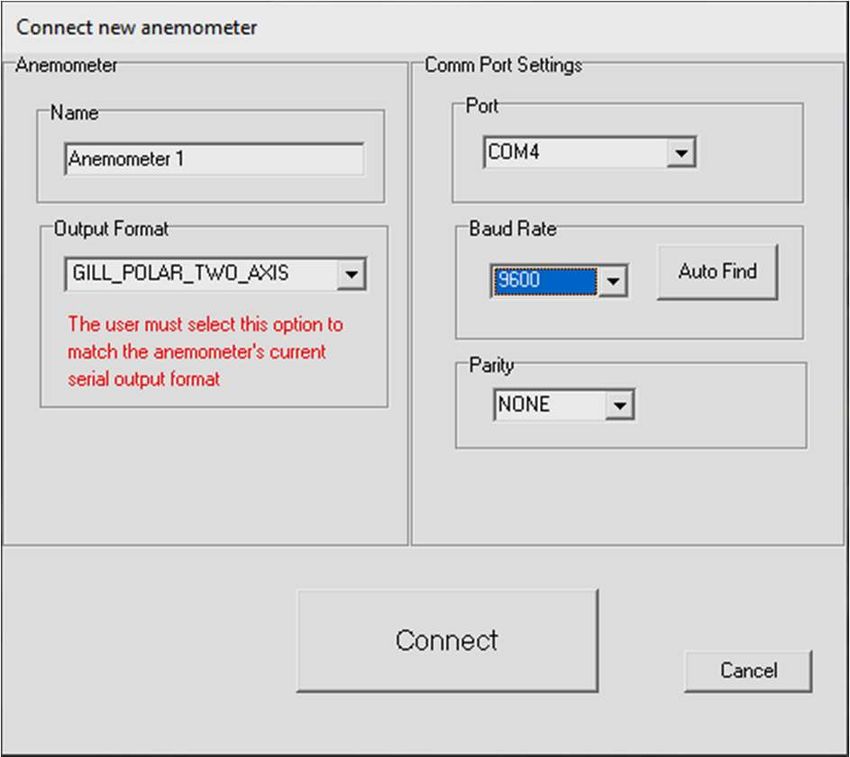
NovaLynx Corporation

6.2      Timekeeping

      The S10 logger has an internal battery to maintain the time and date when the power to the unit is
      switched off. The clock has been factory set to UTC time. When it is necessary to reset the time and
      date (or switch to a local time zone), please follow the steps below.

      To set the time and date for correct stamping of the data records, a file named SETUP.TXT must be
      created on the SD card. This file is read by the logger when the card is inserted into the logger and the
      purge button is pressed.

      Create the Setup File

       File contents:           WAIT
                                TIME=hh:mm:ss
                                DATE=DD/MM/YYYY

       1)   Install the memory card in the memory card reader.
       2)   Plug the memory card reader into a USB port on your Windows computer.
       3)   Use File Explorer to find and open the SETUPOLD.TXT file that is on the card.
       4)   Change the TIME to some value a few minutes in the future, when you will synchronize the clock.
       5)   Change the DATE parameter to the current date in this format: DD/MM/YYYY
       6)   Choose File / Save As and enter the file name SETUP.TXT then click Save.
       7)   In File Explorer, locate the USB Drive representing the memory card, right-click and select "Eject".
            When Windows indicates it is safe, remove the memory card reader from the computer.

      Synchronize the Clock

       1) Connect power to the logger.
       2) Insert the memory card into the logger (fits easily one way only – do not force). Both LEDs will
          turn on and stay on (the logger is executing the "WAIT" function).
       3) At the time saved in the SETUP.TXT file, press the button to the left of the card slot. The logger
          will "Beep" once and both LEDs will turn off. Release the button.
       4) The red LED may flicker on and off. Once the card has completed its initialization the green LED
          will come back on and remain on. The logger will begin storing any data received.
       5) After updating the time and date, the logger renames the file SETUP.TXT to SETUPOLD.TXT to
          avoid unintentionally repeating the commands next time the unit is switched on or the card re-
          inserted.

110-WS-S10                                            Page 9                                            August 2021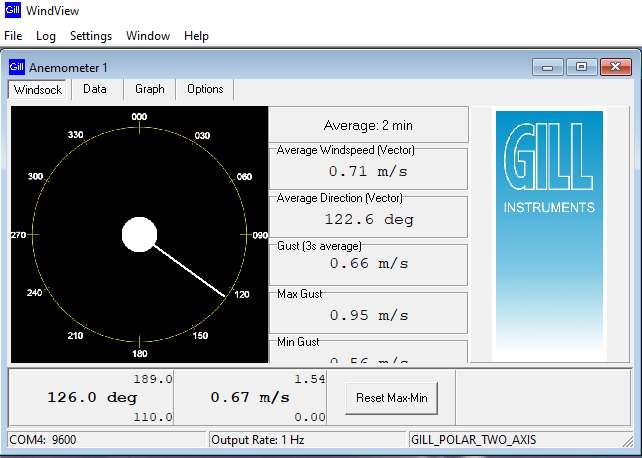
NovaLynx Corporation

6.3      SD Card

      The SD card is designed to fit easily into the card slot one way only. Do not bend the card or force it
      into the slot. The logger is compatible with SD cards up to 2GB capacity but not SDHC cards. MMC and
      MMC mobile cards up to 2GB capacity are also compatible.

      The SD card is used to set the time on the logger's internal clock as well as program logger functions.
      Once these tasks are done, the card is initialized. The length of time the memory card takes to initialize
      will depend on the formatting of the card and the amount of data already stored on it. The green LED
      will then switch on indicating that the unit is ‘Ready to Record Data’. The green LED will remain on
      while the unit is in this state. The red LED will flash briefly every time data is transferred to the card.

      It is not necessary to re-program the logger or set the clock each time it is used. Once initialized, simply
      turn on the logger and insert the memory card to begin logging. NOTE: if the green light on the logger
      does not come on when the card is inserted, remove the card, cycle the power, and re-insert the card.
      To avoid losing data or corrupting the card, never remove the card or disconnect the power supply
      when the red LED is flashing or blinking. Instead, press the purge button and wait for the LEDs to turn
      off (buffered data is transferred to the card). There will be an audio signal to indicate that the button
      has been pressed. The green LED will automatically switch off to indicate that the unit is no longer
      enabled to record data. Now it is safe to remove the card and/or power down the logger.
      When the memory card becomes full the logger will stop logging data; it will not overwrite files already
      saved. Files on the card can be copied to your computer and the old data files erased from the card in
      order to continue using the card. Do not erase the SETUPOLD.TXT or SETUPOLD(BACKUP).TXT files as
      you may need to use them again as templates.

6.4      Data Collection and Transfer

      Data from the sensor is recognized by the start (STX) and end (ETX) characters on the data packet. The
      logger inserts the time and date at the start of each data record and stores it temporarily in a buffer
      (1024 bytes). Data is transferred from the buffer to the SD card in 512 byte packages. The red LED
      blinks each time data is written to the card.

      Aside from the timestamp, which the logger adds to the beginning of a record, the data is recorded
      exactly as received from the sensor. Most of the sensors that are compatible with the S10 logger are
      programmable with regard to the parameters they report and the engineering units related to the
      data. Unless previously arranged, all sensors will report their default parameters and units (refer to the
      sensor's user manual). The user will be able to alter the settings on the sensor via the USB cable and
      software designed for the specific sensor.

110-WS-S10                                            Page 10                                            August 2021
NovaLynx Corporation
To retrieve data from the SD card, place the card in the memory card reader. Connect the reader to
your computer's USB port. Windows should recognize the reader as a USB Drive, which will appear in
File Explorer (Drive letter may vary):
Double-click on the DATA folder to view data files:
Notice the file name contains the date in YYYYMMDD format. Select the day you want to view and
double-click to open. Once the file is open you can insert a couple of rows at the top, and add column
headings into the new file. Save the file to your computer rather than to the card, since you have
altered it by adding the header.
To avoid completely filling the memory card (which would cause logging to stop), periodically copy all
the files you want to keep to your computer, then delete the original files from the card.
6.5 Data Analysis
In order to make sense of the data when it has been uploaded to a spreadsheet, first make a record of
the parameters and units that the sensor is reporting. This information can be found in the sensor
manual, where the default settings are listed. If the sensor has been re-programmed since leaving
NovaLynx, these parameters may have been changed, and it may be necessary to retrieve the settings
from the sensor itself.
Create a spreadsheet with the appropriate column headings and save it. Each time a log file is
imported to a spreadsheet, insert some blank rows at the top of the sheet, then copy the headings
from your saved headings file and paste it into the spreadsheet containing your data. Save the
modified file to your computer for analysis.
EXAMPLE:
DATE TIME NODE DIR SPEED CDIR CSPEED TOTAL PRECIP PRECIP INTENSITY GPSLOCATION TIME VOLT STATUS CHECK
DEG MS DEG MS MM MM
(Sample Data) Q 180 0.06 133 0.21 0 0 +50.763060:-001.540268:+0001.60 2017- 11-02T15:07:27.6 5 4 31
110-WS-S10 Page 11 August 2021NovaLynx Corporation
MAXIMET GMX240 EXAMPLE:
1) Collect Information from the MaxiMet User Manual: This is the parameter list, shown
in the order each sensor will be
recorded in a data report.
The default engineering
units are listed in the table.
2) Create spreadsheet column headings and save the file
DATE TIME NODE DIR SPEED CDIR CSPEED TOTAL PRECIP PRECIP INTENSITY GPSLOCATION TIME VOLT STATUS CHECK
DEG MS DEG MS MM MM
(Sample Data) Q 180 0.06 133 0.21 0 0 +50.763060:-001.540268:+0001.60 2017- 11-02T15:07:27.6 5 4 31
3) Each time a new data file is downloaded to your computer, insert rows at the top of the spreadsheet
and paste in the column headings.
110-WS-S10 Page 12 August 2021NovaLynx Corporation
7 USB ADAPTER SETUP
The S10 Portable Weather Station is provided with a USB cable that connects to the sensor. When
recognized by Windows, the adapter creates a virtual COM port that can be accessed by a terminal
program or the sensor's proprietary software. On most Windows computers, the appropriate driver
will be loaded automatically. For other operating systems, drivers may be downloaded here:
https://ftdichip.com/drivers/vcp-drivers/
Connect the USB cable to your computer. When the
USB adapter is recognized, a COM port is opened. If
you are uncertain which one it is, go to the Device
Manager on your machine and look for it under "Ports
(COM & LPT)". In the example shown here, COM4
is the virtual port.
8 REAL-TIME MONITORING
Real-time data can be viewed in a terminal program, such as TeraTerm. This may be useful if graphical
software was not provided with the sensor, or if the goal is to verify that the sensor is sending data.
TeraTerm is freeware that can be obtained from several sources on the internet.
8.1 View in TeraTerm (All Sensors)
1. Connect the USB cable to your computer and turn on the logger.
2. Launch TeraTerm.exe
3. Select the correct COM port (COM4 in this example).
4. Verify the Serial port setup
5. Click OK and watch the data come in!
110-WS-S10 Page 13 August 2021NovaLynx Corporation
8.2 View in MetView (MaxiMet Compact Weather Stations)
MaxiMet sensors may be monitored using MetView software. Download here:
http://gillinstruments.com/main/software.html
1. Begin by removing the SD card from the logger. (When MetView starts, a lot of communications
occur to let MetView know how to display the data. If the card were installed, these messages
would be logged.)
a. If the logger is operating, press the purge button to save the buffer contents to the memory
card, then remove the SD card from the logger.
b. If the logger is powered down, remove the SD card, then connect power to the logger by
connecting the red battery plug.
2. Connect the USB cable to your computer. Launch MetView.
3. Mark the "Connect to first device found" checkbox, then click "Scan"
4. The MetView dashboard will display the sensor data.
5. After MetView is loaded and the display is indicating data, the SD card can be inserted to log the
data. NOTE: MetView software can also log data, but this function is independent of the logging
performed by the S10 logger.
110-WS-S10 Page 14 August 2021NovaLynx Corporation
8.3 View in WindView (WindSonic Ultrasonic Anemometers)
The WindSonic Series of sensors may be monitored
using WindView software. Download here:
http://gillinstruments.com/main/software.html
1) Enter a name for the sensor (if desired)
2) Select the output format (default shown)
3) Set the COM port
4) Enter the Baud (9600)
5) Parity = None
6) Click "Connect"
7) In the next window, select one of the four
displays shown below:
Windsock Display Data Display
Graph Display Options
110-WS-S10 Page 15 August 2021NovaLynx Corporation
9 BATTERY CHARGING
A voltmeter is provided to check the battery. For best results recharge the battery after each use, but
certainly before it falls below 11.5 volts, as the life of the battery may be shortened otherwise. In general,
more frequent recharging is recommended.
1. Remove the memory card from the logger.
2. Connect the RED lead to the BATTERY.
3. Connect the AC charger connector to the logger's quick-connect plug.
4. Connect the AC plug of the charger to a duplex receptacle.
5. Observe the LED on the charger body. Red indicates the battery is being charged, Green indicates the
battery is fully charged.
If necessary the charger can be connected while doing a long-term logging session; however, precautions
must be taken as the charger is not rated for out-door use and must be protected from the weather.
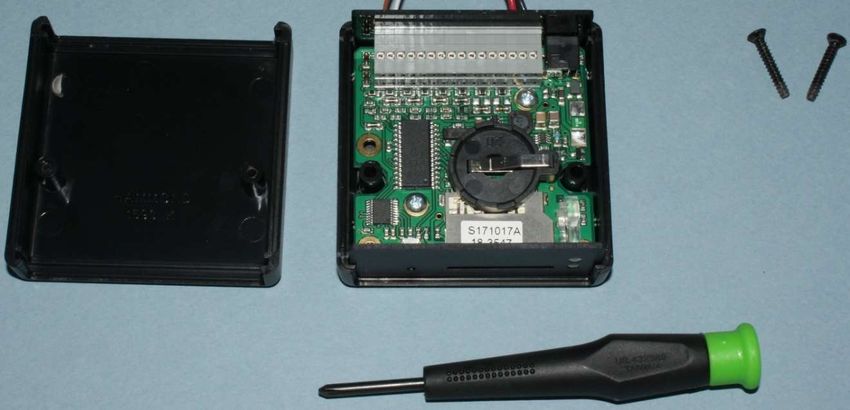
10 CLOCK BATTERY REPLACEMENT
The S10 Logger has an internal battery to maintain the time and date when the power to the unit is
switched off. Replace the battery if the clock no longer maintains the correct time when the logger
power is disconnected. The logger requires one CR2032 Lithium 3 volt battery.
1. Disconnect power to the S10 Logger by unplugging the red terminal wire from the 12V battery.
2. Carefully lift the logger out of the foam to expose the bottom shell of the logger enclosure.
3. Remove the two screws that hold the shell together, and lift the bottom shell off.
4. Slide the old battery out and dispose of properly.
5. Install the new battery with the positive side uppermost.
6. Replace the cover and install the screws.
7. Refer to Section 6.2 (Timekeeping) for instructions on setting the clock time.
110-WS-S10 Page 16 August 2021NovaLynx Corporation
11 WIRING DIAGRAM
S-10 Data Logger Logger Connections
(Back Panel)
1 Power GND 9 Switch GND 2
2 Supply +V 10 Switch input 2
3 GND 11 GND
4 N/A 12 RS232 output 2
POWER 5 GND 13 RS232 input 2
1 2 3 4 5 6 7 8 9 10 11 12 13 14 15 16 6 N/A 14 RS232 output 1
7 Switch GND1 15 RS232 input 1
8 Switch input 1 16 RS232 GND 1
(WHITE)
(GREEN)
Terminal Block Sensor Cable Sensor
(RED) +PWR +Vin
(BLACK) -PWR -Vin
(YELLOW) RS232 RXD TXD
RS232-USB (ORANGE) RS232 TXD RXD RS232
Adapter
(BLACK) RS232 GND Digital GND
Earth GND Shield
+PWR
-PWR
FUSE, 3AG
1A, SLO-BLO Charger
(GREEN 18GA)
Quick-Connect
BATTERY
12V, 7Ah
Earth Ground DWG 830-0015-02
SENSOR CONNECTION CHART
TM
Sensor Terminal Block WindSonic (Opt 1) MaxiMet ResponseONE
Cable (behind foam insert) 9-Way Connector 9-Way Connector Junction Box
Green RS232 GND 1 DGND 1 DGND REF
Black -PWR 2 -V 3 -V -PWR
Red +PWR 3 +V 2 +V +PWR
White RS232 RXD 5 TxD 5 TxD TX.B
Brown RS232 TXD 7 RxD 7 RxD RX.A
Silver Earth GND - Shield - Shield Shield
110-WS-S10 Page 17 August 2021NovaLynx Corporation
12 LOGGER SETTINGS
The pre-programmed logger settings are included in the SETUPOLD(BACKUP).TXT file on the memory
card. To restore or change settings on the logger, copy the file and re-name the copy as SETUP.TXT
Make any changes required in order to prepare it to configure the logger. A few of the adjustable
settings are discussed below; additional information is available in the logger's user manual.
The 110-WS-S10 Data Logger is pre-programmed to receive and store data from one sensor, using the
start (STX) and end (ETX) characters to identify each record. The default condition is to record every
message the sensor generates.
The number of messages a sensor generates for a given time interval depends on the sensor's own
configuration. This rate may be too fast (resulting in data files that are large), or too slow, not providing
enough detail. Check the sensor manual for information on setting the output of the sensor to a rate
that is suitable for your application. If the sensor is providing too much data and cannot be adjusted to
a suitable speed, the S10 logger can be programmed to ignore some messages and only log messages
that arrive at a specified interval (range 0 to 60 seconds). In the SETUP.TXT file:
RATE=R
R = 0 to 60
R should be set to a value greater than the sensor output interval or 0
If R = 0, every sample received by the S10 logger will be recorded
The S10 logger creates a new file each day for storing data. If preferred, all data may be set to record
to one continuous log file. In the SETUP.TXT file:
SINGLEFILE=F
F = Y or N
If F = Y, data is stored in a single log file
If F = N, data is stored in daily files
If required for formatting the logged data, a line break may be added at the end of each recorded data
set. In the SETUP.TXT file:
NEWLINE=L
L = Y or N
If L = Y, the characters are appended
If L = N, nothing is appended
The baud rate is selectable to match the connected device. In the SETUP.TXT file:
BAUD=B
Where B is the baud rate. Valid baud rates are 115200, 57600, 38400, 19200, 9600, 4800,
2400, 1200, 300 and 110 bits per second.
110-WS-S10 Page 18 August 2021NovaLynx Corporation
The date and time-stamping of data may be switched off. In the SETUP.TXT file:
TIMESTAMP=T
T = Y or N
If T = Y, the date and time stamp will be pre-pended on the data sample.
If T = N, data will not be date & time stamped
The following table lists the NovaLynx Settings that were loaded to make the logger compatible with the
selected sensor. The RESET Defaults will result if the RESET command line is included in the SETUP.TXT file.
RESET Defaults NovaLynx Settings Variance
WAIT
TIME=11:30:00 Time of Programming
DATE=27/07/2021 Date of Programming
STX=2 STX=2 Unchanged
ETX=10 ETX=13
SENTENCE2=N SENTENCE2=N Unchanged
STX2=2 STX2=2 Unchanged
ETX2=10 ETX2=10 Unchanged
LOGSTX=N LOGSTX=N Unchanged
LOGETX=Y LOGETX=Y Unchanged
LOGSTX2=N LOGSTX2=N Unchanged
LOGETX2=Y LOGETX2=Y Unchanged
SEPARATOR=N SEPARATOR=N Unchanged
NEWLINE=N NEWLINE=N Unchanged
TIMEOUT=0 TIMEOUT=0 Unchanged
RX2=N RX2=N Unchanged
BAUD=9600 BAUD=9600 Unchanged
PARITY=N,8 PARITY=N,8 Unchanged
RATE=0 RATE=0 Unchanged
SINGLEFILE=N SINGLEFILE=N Unchanged
FILE=20.CSV FILE=20.CSV Unchanged
TIMESTAMP=Y TIMESTAMP=Y Unchanged
LOG_ALL=N LOG_ALL=N Unchanged
OUTPUT=N OUTPUT=N Unchanged
HANDSHAKE=N HANDSHAKE=N Unchanged
RESPONSE="Q" RESPONSE="Q" Unchanged
RAW=N RAW=N Unchanged
SWITCH=N SWITCH=N Unchanged
STARTUP=N STARTUP=N Unchanged
RX_INV=N RX_INV=N Unchanged
PRIFIX=”..” PREFIX=
TRIGGER= TRIGGER= Unchanged
110-WS-S10 Page 19 August 2021NovaLynx Corporation 13 SENSOR OPTIONS 110-WS-S10 Page 20 August 2021
You can also read