Chapter 10. Ghostly, Shapely Windows
←
→
Page content transcription
If your browser does not render page correctly, please read the page content below
Windows Programming Using Java. Ch. 10 Ghostly, Shapely Windows         Draft #3 (13th June 08)

Chapter 10. Ghostly, Shapely Windows

It’s time to give your favorite application a makeover, perking up its tired, overly
familiar GUI.
A ghostly window is one that that can be translucent, and shapely means that the
window may be non-rectangular. Translucency utilizes the Win32 API’s layered
window support for alpha-blending (see Hack 10.1), while Win32 regions (rectangles,
rounded rectangles, polygons, ellipses, and combinations) can be employed to mask
portions of a window to change its shape (Hack 10.2).
Regions are easiest to work with when the window’s size is fixed, but Hack 10.3
shows an efficient way of handling resizing.
A shapely window implemented with regions can look a bit ugly since parts of the
title bar, borders, and components are cut away. Hack 10.4 suggests a few tricks for
fixing these problems, based around an undecorated JFrame and a specialized JPanel.
The undecorated JFrame and specialized panel makes an appearance in Hack 10.5 as
well, where we implement shapely windows using a transparent pixel color. This
approach allows a window to be almost any shape you wish.
It’s useful to divide translucency into two types: global translucency, applied to an
entire window and all its components (as seen in Hack 10.1), and a more versatile
form called per-pixel translucency. It allows different parts of a window to exhibit
different degrees of translucency, and is often used to soften the edges of curved
windows to give them a smoother look. Hack 10.6 demonstrates how to employ a per-
pixel translucent image to shape a JFrame.
Hack 10.7. utilizes global translucency and regions to animate a window’s closing
behavior. We describe two examples: a window that closes by fading away, and a
window that is gradually cut down to nothing.
A great way of improving a window’s appearance is to change its pluggable look and
feel (L&F). Hack 10.8 shows how to use Java’s standard L&Fs, and we also
experiment with some third-party L&Fs (Substance and Napkin).

The Consumer JRE
The Consumer JRE (also known as Java SE 6 Update N and Java SE 6 Update 10) is
a separate upgrade path for Java SE 6, distinct from the main version 6 releases
(which are up to Java SE 6 Update 5 as we write). The Consumer JRE’s focus is on
the user’s need for speed – one aim is to reduce the startup time for Java applications
and applets, and another is to lower the time a JRE takes to install and launch when
the user wants to run applets and Web Start applications on a machine without Java.
There are several other interesting features, including a new L&F called Nimbus, a
deployment toolkit, and graphics enhancements for Windows. A slightly old overview
article by Chet Hasse can be found at
http://java.sun.com/developer/technicalArticles/javase/consumerjre/, and the current
Consumer JRE build is available from https://jdk6.dev.java.net/6uNea.html.

                         1                           © Gayathri Singh and Andrew Davison 2008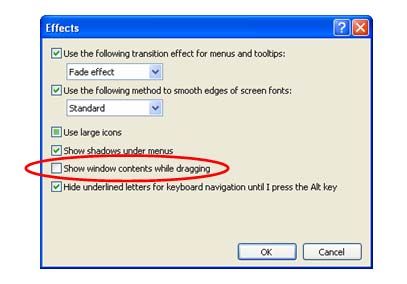
Windows Programming Using Java. Ch. 10 Ghostly, Shapely Windows         Draft #3 (13th June 08)

The Consumer JRE’s relevance for this chapter is it’s support for translucent and
shaped windows , added in build 10 (February 2008), making it possible to code our
hacks without utilizing J/Invoke. A good summary article by Kirill Grouchnikov
about these capabilities can be found at
http://today.java.net/pub/a/today/2008/03/18/translucent-and-shaped-swing-
windows.html.
The obvious question is why bother with J/Invoke when we can utilize the Consumer
JRE? The main reason is code portability: the Consumer JRE will only become an
official part of Java with the release of Java SE 7, which is slated for early 2009 at the
moment. In previous versions of Java, the J/Invoke approach is a good alternative.
In the hacks that follow, we’ll explain J/Invoke code first, and a comparable
Consumer JRE version, when applicable.

Do your Windows Lack Pizzazz?
Before we start liposuction, and the application of anti-aging cream and hair implants,
we need a sad-sack window to work on. Figure 10-1 shows the UsualWin application,
a JFrame sporting a button and a text field, as it appears in Windows XP and Vista.

                    Figure 10-1 The UsualWin GUI (XP and Vista).

When the user presses the button, the counter in the text field is incremented.
There’s nothing wrong with this program, apart from its visual over-familiarity. Our
efforts in this chapter are purely cosmetic; we won’t be switching to different GUI
components or modifying the event handling.
We’ll spare you most of the UsualWin code, since it’s (intentionally) quite standard.
The constructor gives a good overview of the class:

public UsualWin()
{
  super("\"Press Me\" Button");

  makeGUI();
  setDefaultCloseOperation(JFrame.EXIT_ON_CLOSE);
  pack();

  setResizable(false);
  setLocationRelativeTo(null);
  setVisible(true);
} // end of UsualWin()

                         2                           © Gayathri Singh and Andrew Davison 2008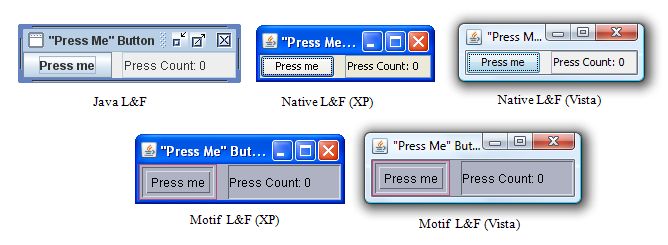
Windows Programming Using Java. Ch. 10 Ghostly, Shapely Windows              Draft #3 (13th June 08)

makeGUI() adds a JButton and JTextField to a horizontal BoxLayout, and an
anonymous ActionListener is attached to the JButton to increment the counter.

Hack 10.1 A Translucent Window (medium level)
Create a window with a specified level of translucency.
TranslucentWin is a translucent version of the UsualWin class, with the translucency
value optionally set on the command line when the class is invoked. The value can
range from 0 (fully transparent) to 255 (opaque). The default is 128, which is shown
applied to the window in Figure 10-2.

                             Figure 10-2. A Translucent Window.

For the effect to work smoothly, the use of DirectDraw should be switched off,
forcing Java to rely on OpenGL. This must be done before the window is created, and
a convenient place is at the start of main():

System.setProperty("sun.java2d.noddraw", "true");

Most of the code is unchanged from UsualWin, as the TranslucentWin constructor()
shows:

public TranslucentWin(int translucency)
{
  super("\"Press Me\" Button");

  JInvoke.initialize();

  makeGUI();
  setDefaultCloseOperation(JFrame.EXIT_ON_CLOSE);
  pack();
  setResizable(false);

  fadeWin(translucency);                // apply translucency to the window

  setLocationRelativeTo(null);
  setVisible(true);
} // end of TranslucentWin()

                            3                             © Gayathri Singh and Andrew Davison 2008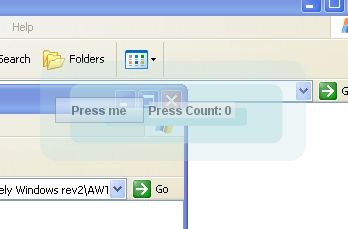
Windows Programming Using Java. Ch. 10 Ghostly, Shapely Windows         Draft #3 (13th June 08)

fadeWin() adds layered window support so the window can be made translucent by
alpha-blending.

// globals
public static final int DEFAULT_TRANSLUCENCY = 128;

@NativeImport(library="user32")
public static native boolean SetLayeredWindowAttributes(
           int hwnd, int colorRef, byte bAlpha, int dwFlags);

private static final int WS_EX_LAYERED = 0x80000;
private static final int LWA_ALPHA = 2;    // 0x2

private void fadeWin(int translucency)
// make the 'title' window translucent by the specified amount
{
  if ((translucency < 0) || (translucency > 255)) {
    System.out.println("Transparency out of range (0-255)");
    translucency = DEFAULT_TRANSLUCENCY;   // use default value
  }

  int hwnd = Util.getWindowHandle(this);

  /* add layered window support to the window so it can be made
     translucent (alpha-blended) */
  int winStyleInfo = User32.GetWindowLong(hwnd,
                                     WinConstants.GWL_EXSTYLE);
  winStyleInfo |= WS_EX_LAYERED;   // 'add' layered support
  User32.SetWindowLong(hwnd, WinConstants.GWL_EXSTYLE, winStyleInfo);

  SetLayeredWindowAttributes(hwnd, 0, (byte)translucency, LWA_ALPHA);
                // set the translucency value of the layered window
} // end of fadeWin()

The window’s handle is obtained using J/Invoke’s utility method
(Util.getWindowHandle(Component). The window must have been initialized, but it
doesn’t need to be visible. As a consequence, fadeWin() should be called after the
window have been created with a call to pack() or setSize().
User32.GetWindowLong() is utilized with the GWL_EXSTYLE flag to retrieve the
window’s extended styles/properties (stored in an integer), and layering is added to
them using a bitwise-or operation. Layering lets a window render complex shapes,
animation, and alpha blending more efficiently (see http://msdn2.microsoft.com/en-
us/library/ms632599(VS.85).aspx). The WS_EX_LAYERED property is described at
http://msdn2.microsoft.com/en-us/library/ms632680.aspx, as part of the
documentation for the CreateWindowEx() function.

The Win32 API function SetLayeredWindowAttributes() isn’t included in the version
of J/Invoke we’re using, so we defined it ourselves, basing the definition on the
MSDN documentation for the function at http://msdn2.microsoft.com/en-
us/library/ms633540.aspx, and on J/Invoke’s mapping between Java and Win32 C
types. The prototype of the MSDN C function is:

BOOL SetLayeredWindowAttributes(

                         4                           © Gayathri Singh and Andrew Davison 2008
Windows Programming Using Java. Ch. 10 Ghostly, Shapely Windows Draft #3 (13th June 08)
HWND hwnd, COLORREF crKey, BYTE bAlpha, DWORD dwFlags);
The dwFlags argument can be LWA_COLORKEY, which causes the crKey argument
to be used to specify a pixel color that represents transparency. However if dwFlags is
LWA_ALPHA (as in fadeWin()) then the bAlpha argument is employed to set the
translucency level for the entire window. we’ll make use of LWA_COLORKEY in
Hack 10.5.
A Consumer JRE Translucent Window
A Consumer JRE version of the application only requires a call to
setWindowOpacity() in the com.sun.AWTUtilities. This method replaces our
fadeWin() method of the previous example, resulting in the following constructor:
public class TranslucentWindow extends JFrame
{
private JTextField jtf;
private int pressCount = 1;
public TranslucentWindow()
{
super("Translucent window");
makeGUI();
setDefaultCloseOperation(JFrame.EXIT_ON_CLOSE);
pack();
setResizable(false);
setLocationRelativeTo(null);
AWTUtilities.setWindowOpacity(this, 0.5f); // 50 % translucency
setVisible(true);
} // end of TranslucentWindow()
The first argument of setWindowOpacity() is a reference to the window that’s being
made translucent, and the second value is the translucency, expressed as a float
between 0 and 1.
There’s also no need to switch off the use of DirectDraw by setting the
"sun.java2d.noddraw" property.
Compiling and running this example requires the download of the latest version of the
Consumer JRE from https://jdk6.dev.java.net/6uNea.html. On our test machine, it was
installed at C:\Program Files\Java\jdk1.6.0_10, and javac and java calls must use the
tools in its bin\ subdirectory. For example:
> "%ProgramFiles%\Java\jdk1.6.0_10\bin\javac" TranslucentWindow.java
> "%ProgramFiles%\Java\jdk1.6.0_10\bin\java" TranslucentWindow
The location of the AWTUtilities class in the Java package hierarchy will change in
Java SE 7, as these tools are integrated into the rest of AWT. It’s also likely that
5 © Gayathri Singh and Andrew Davison 2008Windows Programming Using Java. Ch. 10 Ghostly, Shapely Windows Draft #3 (13th June 08)
method names and arguments may be modified as well, so check the current
documentation.
Hack 10.2 A Shapely Window (medium level)
Create various kinds of non-rectangular windows.
ShapedWin is a shapely version of the UsualWin class, illustrating five non-
rectangular forms:
1. An elliptical window;
2. A rounded rectangular window;
3. A polygonal window; in this case, an arrow;
4. Two elliptical regions combined to make an 'eyes'-shaped window
5. An elliptical region subtracted from a larger ellipse to make a 'doughnut'-
shaped window.
The choice of shape is specified on the command line when ShapedWin is called.
All the examples use MS Windows’ region mechanism A region is an ellipse,
rectangle, polygon, or combinations of those shapes, which can be used to specify the
shape of a window (see http://msdn2.microsoft.com/en-
us/library/ms536684(VS.85).aspx for more details). Examples 4 and 5 employ more
complex regions, created by combining simple regions using set-like operations (e.g.
union and difference)”
The ShapedWin code is simplified by making the window a fixed size. Resizable
shaped windows are considered in Hack 10.3.
The ShapedWin() constructor is very similar to the constructor for TranslucentWin
(Hack 10.1), except for its call to shapeWin():
public ShapedWin(int shapeVal)
{
super("\"Press Me\" Button");
JInvoke.initialize();
makeGUI();
setDefaultCloseOperation(JFrame.EXIT_ON_CLOSE);
pack();
setResizable(false);
shapeWin(shapeVal);
setLocationRelativeTo(null);
setVisible(true);
} // end of ShapedWin()
The shapeVal variable contains an integer read from the command line which
represents the desired shape.
6 © Gayathri Singh and Andrew Davison 2008Windows Programming Using Java. Ch. 10 Ghostly, Shapely Windows Draft #3 (13th June 08)
shapeWin() changes the window shape by applying a region to it. The choice between
the five possible shapes is handled by a multi-way if-statement. In each branch, a
region is assigned to the regionHandle variable, and applied to the window by a call to
User32.SetWindowRgn().
// global
public static final int DEFAULT_SHAPE = 3; // the arrow shape
private void shapeWin(int shapeVal)
{
if ((shapeVal < 1) || (shapeVal > 5)) {
System.out.println("Shape value out of range (1-5)");
shapeVal = DEFAULT_SHAPE; // use default value
}
int hwnd = Util.getWindowHandle(this);
int w = getWidth(); // width and height of window
int h = getHeight();
// ------------ region creation ----------------
int regionHandle = Gdi32.CreateRectRgn(0, 0, w, h);
// a default initial shape, a plain rectangle
if (shapeVal == 1) // an ellipse
regionHandle = Gdi32.CreateEllipticRgn(0, 0, w, h);
else if (shapeVal == 2) // a rounded rectangle
regionHandle = Gdi32.CreateRoundRectRgn( 0, 0, w, h, 50, 50);
else if (shapeVal == 3) { // a polygon (an arrow)
com.jinvoke.win32.structs.Point[] pts = makeArrowPolygon(w, h);
regionHandle = Gdi32.CreatePolygonRgn( pts, pts.length,
WinConstants.ALTERNATE);
}
else if (shapeVal == 4) { // eyes shape
int leftHandle = Gdi32.CreateEllipticRgn(0, 0, w/2, h);
int rightHandle = Gdi32.CreateEllipticRgn(w/2, 0, w, h);
regionHandle = Gdi32.CreateRectRgn(0, 0, 0, 0); // dummy values
Gdi32.CombineRgn(regionHandle, leftHandle, rightHandle,
WinConstants.RGN_OR); // union
Gdi32.DeleteObject(leftHandle);
Gdi32.DeleteObject(rightHandle);
}
else if (shapeVal == 5) { // a doughnut shape
int outerHandle = Gdi32.CreateEllipticRgn(0, 0, w, h);
int innerHandle = Gdi32.CreateEllipticRgn(w/4, h/4, 3*w/4,3*h/4);
regionHandle = Gdi32.CreateRectRgn(0, 0, 0, 0); // dummy values
Gdi32.CombineRgn(regionHandle, outerHandle, innerHandle,
WinConstants.RGN_DIFF); // set difference
Gdi32.DeleteObject(outerHandle);
Gdi32.DeleteObject(innerHandle);
}
else // should not occur
System.out.println("Did not recognize shape value: " + shapeVal);
// ------------- end of region creation --------------
User32.SetWindowRgn(hwnd, regionHandle, true);
Gdi32.DeleteObject(regionHandle);
7 © Gayathri Singh and Andrew Davison 2008Windows Programming Using Java. Ch. 10 Ghostly, Shapely Windows Draft #3 (13th June 08)
} // end of shapeWin()
The function checks that shapeVal is within a specified range, then obtains the
window’s handle and dimensions. Util.getWindowHandle() can obtain a window
handle once the JFrame is initialized. (This is the same criteria as in TranslucentWin
in Hack 10.1)
shapeWin() is only called once, at object initialization, and uses the window’s initial
width and height (w and h) in its region calculations. This approach is possible since
the window is a fixed size.
A complete list of region functions can be found at http://msdn2.microsoft.com/en-
us/library/ms536680(VS.85).aspx.
Shape 1: An Ellipse
Figure 10-3 shows the window as an ellipse.
Figure 10-3. An Elliptical ShapedWin.
The application still works as before: pressing the button will increment the counter
shown in the text field. The window can be dragged, iconified and closed as usual, but
the area cut away by the region makes it a little tricky to select the close box. Also,
the shape doesn’t have a well defined border that can be selected and dragged to
resize the window. This illustrates a general problem with shapely windows –the
unusual shape may make the GUI harder to use. We address this issue in Hack 10.4.
The relevant call in shapeWin() is:
regionHandle = Gdi32.CreateEllipticRgn(0, 0, w, h);
The arguments specify the top-left and lower-right corners of the ellipse’s bounding
rectangle.
Another issue with regions is that they disable visual styles when applied to a
window. If you look closely at Figure 10-3, comparing it with the window in Figure
10-1, its visual style has changed to “Windows Classic” from “Windows XP”. The
same change can be seen in the other figures in this section (Figures 10-4 to 10-8).
Shape 2: A Rounded Rectangle
Figure 10-4 shows the window as a rounded rectangle.
8 © Gayathri Singh and Andrew Davison 2008Windows Programming Using Java. Ch. 10 Ghostly, Shapely Windows Draft #3 (13th June 08)
Figure 10-4. A Rounded Rectangular ShapedWin.
The relevant call in shapeWin() is:
regionHandle = Gdi32.CreateRoundRectRgn( 0, 0, w, h, 50, 50);
The first four arguments specify the top-left and lower-right corners of the shape’s
bounding rectangle; the fifth and sixth parameters are the width and height of the
ellipse used for the rounded corners.
Shape 3: A Polygon
Figure 10-5 shows a right facing arrow, a simple polygon.
Figure 10-5. A Polygonal ShapedWin.
The relevant code in shapeWin() is:
com.jinvoke.win32.structs.Point[] pts = makeArrowPolygon(w, h);
regionHandle = Gdi32.CreatePolygonRgn( pts, pts.length,
WinConstants.ALTERNATE);
Gdi32.CreatePolgonRgn() requires an array of points, the number of points in the
array, and a polygon-filling mode. The points define the vertices of a closed polygon,
so each vertex only needs to be specified once.
The two filling modes are ALTERNATE and WINDING, which only differ in their
behavior when a complex, overlapping polygon has to be filled (see the
SetPolyFillMode() documentation at http://msdn2.microsoft.com/en-
us/library/ms536642(VS.85).aspx for an example).
The series of points for the arrow are shown in Figure 10-6.
9 © Gayathri Singh and Andrew Davison 2008Windows Programming Using Java. Ch. 10 Ghostly, Shapely Windows Draft #3 (13th June 08)
Figure 10-6. The Points in the Arrow.
The array starts with point 0, progresses clockwise, and finishes with point 6. w and h
are the width and height of the underlying window.
makeArrowPolygon() creates the points and returns an array:
private com.jinvoke.win32.structs.Point[] makeArrowPolygon(
int w, int h)
// create a right facing arrow shape for the window
{
int numPoints = 7;
com.jinvoke.win32.structs.Point[] pts =
new com.jinvoke.win32.structs.Point[numPoints];
for (int i=0; i < numPoints; i++)
pts[i] = new com.jinvoke.win32.structs.Point();
int xHead = (85 * w)/100; // x coord of arrow head’s back edge
int yHeadOffset = (20 * h)/100; // y offset of head’s back edge
pts[0].x = 0; pts[0].y = yHeadOffset;
pts[1].x = xHead; pts[1].y = yHeadOffset;
pts[2].x = xHead; pts[2].y = 0;
pts[3].x = w; pts[3].y = h/2;
pts[4].x = xHead; pts[4].y = h;
pts[5].x = xHead; pts[5].y = h-yHeadOffset;
pts[6].x = 0; pts[6].y = h-yHeadOffset;
return pts;
} // end of makeArrowPolygon()
The fully qualified name for the Win32 Point class is used to differentiate it from
Java’s Point class.
Shape 4: The Eyes Have It
Figure 10-7 shows the window as a pair of eyes.
10 © Gayathri Singh and Andrew Davison 2008Windows Programming Using Java. Ch. 10 Ghostly, Shapely Windows Draft #3 (13th June 08)
Figure 10-7. An Eyes-shaped ShapedWin.
The relevant code fragment in shapeWin() is:
int leftHandle = Gdi32.CreateEllipticRgn(0, 0, w/2, h);
int rightHandle = Gdi32.CreateEllipticRgn(w/2, 0, w, h);
regionHandle = Gdi32.CreateRectRgn(0, 0, 0, 0); // dummy values
Gdi32.CombineRgn(regionHandle, leftHandle, rightHandle,
WinConstants.RGN_OR); // union
Gdi32.DeleteObject(leftHandle);
Gdi32.DeleteObject(rightHandle);
The eyes are two ellipses combined with Gdi32.CombineRgn(). The second and third
region arguments of the function are merged according to the flag given as its fourth
argument, and the result stored in the first argument. The flag values are set-based,
and include:
• RGN_AND: Create the intersection of the two input regions.
• RGN_OR: Create the union of the two input regions.
• RGN_XOR: Create the union of the two input regions except for any
overlapping areas.
• RGN_DIFF: Retain the parts of the first region (the second argument) that
aren’t in the other region (the third argument).
More details can be found at http://msdn2.microsoft.com/en-
us/library/ms536688(VS.85).aspx.
Shape 5. A Doughnut.
Figure 10-8 shows the window as a doughnut.
Figure 10-8. A Doughnut-shaped ShapedWin.
The relevant code fragment in shapeWin() is:
11 © Gayathri Singh and Andrew Davison 2008Windows Programming Using Java. Ch. 10 Ghostly, Shapely Windows Draft #3 (13th June 08)
int outerHandle = Gdi32.CreateEllipticRgn(0, 0, w, h);
int innerHandle = Gdi32.CreateEllipticRgn(w/4, h/4, 3*w/4, 3*h/4);
regionHandle = Gdi32.CreateRectRgn(0, 0, 0, 0); // dummy values
Gdi32.CombineRgn(regionHandle, outerHandle, innerHandle,
WinConstants.RGN_DIFF); // set difference
Gdi32.DeleteObject(outerHandle);
Gdi32.DeleteObject(innerHandle);
The trick is to combine two ellipses once again, but use the RGN_DIFF mode to
subtract the smaller ellipse’s region from the larger one.
A Consumer JRE Shaped Window
A Consumer JRE version of the application can employ
AWTUtilities.setWindowShape() to shape the window. The elliptical window in
Figure 10-3 can be coded as shown below:
public ShapedWindow()
{
super("Oval window");
makeGUI();
setDefaultCloseOperation(JFrame.EXIT_ON_CLOSE);
pack();
setResizable(false);
setLocationRelativeTo(null);
AWTUtilities.setWindowShape(this,
new Ellipse2D.Double(0, 0, getWidth(), getHeight()));
// oval shaped
setVisible(true);
} // end of ShapedWindow()
The call to setWindowShape() replaces our fadeWin() method, with the second
argument being any subclass of java.awt.Shape (in this case Ellipse2D.Double).
It’s also necessary to set the L&F to the default, via a call to
JFrame.setDefaultLookAndFeelDecorated(true) in main() before the window is
created. This results in Figure 10-9.
Figure 10-9. An Elliptical Window using AWTUtilities
We’ll talk more about Java L&F in Hack 10.8.
12 © Gayathri Singh and Andrew Davison 2008Windows Programming Using Java. Ch. 10 Ghostly, Shapely Windows Draft #3 (13th June 08)
The Win32 API approach and AWTUtilities.setWindowShape() can create complex
shapes in similar ways. Window regions are constructed using set operations (such as
union and intersection) while setWindowShape() can employ the Area subclass of
java.awt.Shape. An Area object can be built from other Area objects by using
operations such as area addition, subtraction, intersection, and exclusive-or. A shape
may also be defined using java.awt.geom.GeneralPath to construct it from straight
lines, and curves. Some simple examples of Area and GeneralPath can be found at
http://www.java2s.com/Code/Java/2D-Graphics-
GUI/AreaCalculationAddSubstractXOR.htm.
A Pure Java Approach to Shapely Windows
It’s possible to implement shapely windows without resorting to the Win32 API or the
Consumer JRE. The technique relies on taking a screenshot before the application is
made visible, and using a clipped portion of that screenshot as the application’s
background. The image will match up with the desktop behind, thereby creating the
illusion of transparency.
The details are explained in Swing Hacks, Marinacci and Adamson, O’Reilly 2005
(Hack #41, which is online at
http://www.onjava.com/pub/a/onjava/excerpt/swinghks_hack41/), and in the article
“Shapely (non-rectangular) Applications” available at
http://fivedots.coe.psu.ac.th/~ad/jg/ch045/.
The drawback is the overhead of updating the screenshot when the application is
moved. Also, it’s just about impossible for a pure Java program to detect when the
desktop behind the application changes, which should trigger another screenshot.
The answer may seem to be to update the screenshot frequently, but this causes the
application to flicker excessively. Each update requires the momentary hiding of the
window while the screenshot is taken, followed by a recalculation of the clipped area
for the background. Also, an appropriate update frequency isn’t easy to determine.
Hack 10.3 A Resizable Shapely Window (medium/high level)
An efficient way to resize a non-rectangular window.
ShapedWin in Hack 10.2 relies on the width and height of the window being fixed.
This hack illustrates how a rounded rectangular window can be resized at run-time.
The technique can be used to make any shapely window resizable.
There are two issues:
1. The rounded rectangle region must be recalculated whenever the window is
resized. This can be done by a component listener, acting in response to
window size changes.
2. The component listener has the drawback that it’s only triggered when the
window has finished being resized. This means that the rounded rectangle
won’t be modified while the user is dragging the window’s frame.
This problem could be fixed by doing frequent shape recalculations during
mouse dragging. This is both inefficient and visually ugly. Instead we’ll
13 © Gayathri Singh and Andrew Davison 2008Windows Programming Using Java. Ch. 10 Ghostly, Shapely Windows Draft #3 (13th June 08)
temporarily change MS Windows’ behavior to show only a window’s outline
while it’s being dragged (or moved). Since there’s only an outline on display
during resizing, there’s no need to recalculate the shape until the user releases
the mouse and finishes the resize.
The switching on and off of window outlining is managed by a Java window
focus listener which monitors when the application gains focus and loses it.
Figure 10-10 shows the rounded rectangle being resized in outline by mouse
dragging.
Figure 10-10. Resizing the Window by Dragging.
Figure 10-11 shows the final appearance of the window when the user releases the
mouse.
Figure 10-11. The Final Size of the Window.
The ShapedResizeWin constructor sets up the component and window listeners, and
manages the close box.
// global
private int hwnd; // window handle
public ShapedResizeWin()
{
super("\"Press Me\" Button");
JInvoke.initialize();
14 © Gayathri Singh and Andrew Davison 2008Windows Programming Using Java. Ch. 10 Ghostly, Shapely Windows Draft #3 (13th June 08)
makeGUI();
addWindowListener( new WindowAdapter() {
public void windowClosing(WindowEvent e)
{ resetWindowResizing();
System.exit(0);
}
});
pack();
hwnd = Util.getWindowHandle(this);
addComponentListener(this);
addWindowFocusListener(this);
setLocationRelativeTo(null);
setVisible(true);
} // end of ShapedResizeWin()
The outlining behavior is an OS-wide modification, so when the application finishes
it’s good manners to switch the behavior back to how it was initially. This is done by
resetWindowResizing() before the program exits.
The Component Listener
After the window has been resized, the componentResized() listener method is called
to recalculate the rounded rectangle’s dimensions, and apply the new region to the
window.
public void componentResized(ComponentEvent e)
{
int w = getWidth(); // new dimensions of the window
int h = getHeight();
int regionHandle = Gdi32.CreateRoundRectRgn( 0, 0, w, h, 50, 50);
User32.SetWindowRgn(hwnd, regionHandle, true);
Gdi32.DeleteObject(regionHandle);
} // end of componentResized()
The Window Focus Listener
When the window gains focus, outlined dragging should be switched on, and when
focus is lost the original behavior should be restored. This code is placed inside
windowGainedFocus() and windowLostFocus().
The relevant Win32 function is SystemParametersInfo(), along with the action
parameter for dragging windows (see http://msdn2.microsoft.com/en-
us/library/ms724947(VS.85).aspx for the complete, long list of possible parameters
for SystemParametersInfo()).
Outlined window dragging is a Windows Control Panel setting, found in Windows
XP at Control Panel > Display > Appearance tab > Effects > Show window contents
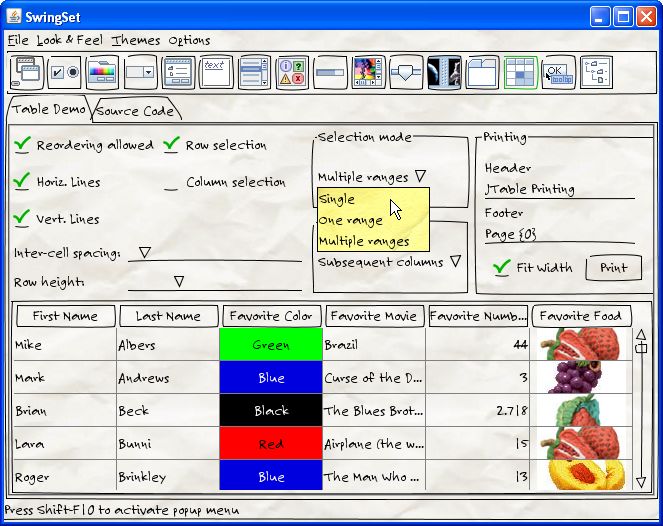
while dragging checkbox (see Figure 10-12).
15 © Gayathri Singh and Andrew Davison 2008Windows Programming Using Java. Ch. 10 Ghostly, Shapely Windows Draft #3 (13th June 08)
Figure 10-12. The Outlined Dragging Control Panel Setting in Windows XP.
On one of our test machines, the checkbox is unselected (as shown in Figure 10-12),
which means that windows are dragged in outline. On another test machine, the box is
selected which causes the windows contents to be shown.
On Vista, this setting can be found under: Control Panel > Appearance and
Personalization > Customize > Open classic appearance properties or more color
options > Advanced.
Since the feature is a control panel setting, SystemParametersInfo() must include flags
to access and update the WIN.INI file, and broadcast the changes. The current setting
is obtained with SystemParametersInfo() and SPI_GETDRAGFULLWINDOWS:
int[] setting = new int[1]; //to hold the retrieved setting
boolean res = User32.SystemParametersInfo(
WinConstants.SPI_GETDRAGFULLWINDOWS,
0, setting, WinConstants.SPIF_UPDATEINIFILE |
WinConstants.SPIF_SENDWININICHANGE);
System.out.println("Dragging setting: " + setting[0]);
If the checkbox is currently selected, setting[0] will contain 1, otherwise it will hold 0.
Changing the window behavior to outlined dragging requires the setting to be
switched to 0. The code for that employs SystemParametersInfo() and
SPI_SETDRAGFULLWINDOWS:
res = User32.SystemParametersInfo(
WinConstants.SPI_SETDRAGFULLWINDOWS,
0, setting, WinConstants.SPIF_UPDATEINIFILE |
WinConstants.SPIF_SENDWININICHANGE);
The second parameter of SystemParametersInfo() is 0 to switch to outlined dragging
(1 would change it to window contents dragging). The setting[] array isn’t used when
the feature is being changed.
16 © Gayathri Singh and Andrew Davison 2008Windows Programming Using Java. Ch. 10 Ghostly, Shapely Windows Draft #3 (13th June 08)
More examples of using SystemParametersInfo() to affect system-wide settings can
be found at http://support.microsoft.com/kb/97142.
windowGainedFocus() changes the setting (if necessary), and records the fact in a
boolean so the original setting can be restored later.
// global
private boolean switchedToWinOutline = false;
/* indicates whether this application changed the Win setting
so that only an outline is shown while a window is being
dragged */
public void windowGainedFocus(WindowEvent e)
{
// retrieve the window dragging setting
int[] setting = new int[1];
boolean res = User32.SystemParametersInfo(
WinConstants.SPI_GETDRAGFULLWINDOWS,
0, setting, WinConstants.SPIF_UPDATEINIFILE |
WinConstants.SPIF_SENDWININICHANGE);
if (res && (setting[0] == 1)) { // window contents are shown
res = User32.SystemParametersInfo( // switch to outline
WinConstants.SPI_SETDRAGFULLWINDOWS,
0, setting, WinConstants.SPIF_UPDATEINIFILE |
WinConstants.SPIF_SENDWININICHANGE);
if (res) // if dragging was changed
switchedToWinOutline = true;
}
} // end of windowGainedFocus()
windowLostFocus() must reset the window dragging behavior, so it calls
resetWindowResizing() (which is also used by windowClosing()).
public void windowLostFocus(WindowEvent e)
{ resetWindowResizing(); }
private void resetWindowResizing()
/* called when focus is lost or when the window is closed in order to
switch window dragging behavior back to how it was initially */
{
if (switchedToWinOutline) { // dragging behavior was changed
int[] setting = new int[1]; // an array is needed but not used
boolean res = User32.SystemParametersInfo(
WinConstants.SPI_SETDRAGFULLWINDOWS,
1, setting, WinConstants.SPIF_UPDATEINIFILE |
WinConstants.SPIF_SENDWININICHANGE);
if (res)
switchedToWinOutline = false;
}
} // end of resetWindowResizing()
17 © Gayathri Singh and Andrew Davison 2008Windows Programming Using Java. Ch. 10 Ghostly, Shapely Windows Draft #3 (13th June 08)
If switchedToWinOutline is true, then SystemParametersInfo() is called with
SPI_SETDRAGFULLWINDOWS and a second parameter value of 1 to switch back
to window contents dragging.
Hack 10.4 A Decorated Shapely Window (medium level)
Use a painted JPanel and undecorated JFrame to make a shapely window look more beautiful.
A limitation on a window shape is that it mustn’t completely obscure the title bar,
otherwise it becomes impossible to move the window, minimize/maximize, or close
it.
A drastic solution is to do away with the title bar altogether, and use an undecorated
JFrame. This removes any restrictions on the shape of the window. Instead window
movement, iconification, and termination are managed by mouse listeners
The underlying application in this hack is the same as previously, but the button and
text are placed inside a PaintedJPanel instance. This specialized JPanel puts an empty
border around the components to offset them from the edges of the JFrame, and
supports background images and gradient paints to make the application look better.
The GUI is a little different from previously – the JTextField for showing the press
count has been replaced by a JLabel since it looks better against the new backgrounds.
To keep things simple, the window is a fixed size.
Figure 10-13 shows that the application utilizes translucency (using code copied from
Hack 10.1), and an arrow shape borrowed from Hack 10.2
Figure 10-13. A Decorated Arrow Window.
The user has just right-clicked on the JPanel in Figure 10-13, causing a popup menu
to appear. The menu allows the user to iconify and close the application. The
application can be moved by dragging the mouse anywhere inside the shape.
The arrow shape’s decoration (the yellow edges, and gray interior) come from the
image shown in Figure 10-14.
18 © Gayathri Singh and Andrew Davison 2008Windows Programming Using Java. Ch. 10 Ghostly, Shapely Windows Draft #3 (13th June 08)
Figure 10-14. The Arrow Background Image.
The image is loaded by PaintedJPanel and painted onto its surface.
Figure 10-15 shows the arrow shape with a blue steel image tiled over the JPanel
instead of the arrow image.
Figure 10-15. The Arrow Window with a Blue Steel Background.
Figure 10-16 shows the use of a Java 2D paint gradient in PaintedJPanel rather than
an image.
Figure 10-16. The Arrow Window with a Painted Gradient Background.
The full range of Java 2D graphics can be utilized for decorating the shape via the
JPanel.
The Shaped Window
The ShapedJFrame() constructor utilizes translucency and shape code from Hacks
10.1 and 10.2.
public ShapedJFrame(String title, int translucency)
{
super(title);
JInvoke.initialize();
// listeners for dealing with iconification, closing, and dragging
addMouseListener(this);
addMouseMotionListener(this);
setUndecorated(true);
makeGUI();
setDefaultCloseOperation(JFrame.EXIT_ON_CLOSE);
pack();
shapeWin(title);
fadeWin(title, translucency);
setResizable(false);
19 © Gayathri Singh and Andrew Davison 2008Windows Programming Using Java. Ch. 10 Ghostly, Shapely Windows Draft #3 (13th June 08)
setLocationRelativeTo(null);
setVisible(true);
} // end of ShapedJFrame()
shapeWin() generates an arrow-shaped region using an array of points, while
fadeWin() sets the translucency according to a value supplied on the command line.
The only new code is the addition of the mouse listener and mouse motion listener.
Mouse Events
Mouse presses and releases are monitored by ShapedJFrame.
// global
private Point startPos; // cursor position in JFrame
public void mousePressed(MouseEvent e)
{ startPos = e.getPoint(); }
public void mouseReleased(MouseEvent e)
{ if (e.isPopupTrigger()) // the right button is pressed
showPopup(e);
}
A mouse press triggers the storage of the current mouse position, which becomes
useful if the user starts dragging the mouse.
A mouse release causes a test of the popup trigger (the right button in MS Windows),
and if the button is being held down, the popup menu is displayed.
private void showPopup(MouseEvent e)
// The popup supports iconification and closing
{
JPopupMenu popup = new JPopupMenu();
popup.add( new AbstractAction("Iconify") {
public void actionPerformed(ActionEvent e)
{ setState(JFrame.ICONIFIED); } // iconify the window
});
popup.add( new AbstractAction("Close") {
public void actionPerformed(ActionEvent e)
{ System.exit(0); }
});
popup.pack();
popup.show( e.getComponent(), e.getX(), e.getY());
} // end of showPopup()
The menu’s actions are simple enough to include as anonymous classes, and further
menu items and functionality could easily be added.
20 © Gayathri Singh and Andrew Davison 2008Windows Programming Using Java. Ch. 10 Ghostly, Shapely Windows Draft #3 (13th June 08)
Mouse Dragging
As the user drags the mouse, the distance that the cursor has moved inside the JFrame
relative to its starting position is used to move the entire window.
public void mouseDragged(MouseEvent e)
{
if (!SwingUtilities.isLeftMouseButton(e))
return; // only respond to the left button
Point distMoved = new Point(e.getX() - startPos.x,
e.getY() - startPos.y);
// calculate current cursor posn - start posn in the JFrame
if ((distMoved.x != 0) || (distMoved.y != 0)) { // if cursor moved
Point loc = getLocationOnScreen(); // get current loc of JFrame
setLocation(loc.x + distMoved.x, loc.y + distMoved.y);
// move JFrame by adding the cursor’s movement
}
} // end of mouseDragged()
The call to setLocation() at the end of mouseDragged() moves the window under the
cursor, so the cursor ends up back in its starting position relative to the JFrame.
The Paintable JPanel
The PaintedJPanel constructor loads a specified image, and sets up an invisible
border.
// globals
private static final int BORDER = 15;
// image used to cover panel
private static final String BACK_IM = "miniSteel.jpg";
// private static final String BACK_IM = "arrow.png";
private BufferedImage bImage;
public PaintedJPanel()
{
super();
bImage = loadImage(BACK_IM);
setLayout( new BoxLayout(this, BoxLayout.LINE_AXIS));
setBorder(new EmptyBorder(BORDER, BORDER, BORDER, BORDER));
setBackground(null); // use same colour as surrounding JFrame
setOpaque(false);
} // end of PaintedJPanel()
The border indents the panel’s components from its edges, which allows a greater
range of window shapes to 'cut into' the panel space without hiding the components.
21 © Gayathri Singh and Andrew Davison 2008Windows Programming Using Java. Ch. 10 Ghostly, Shapely Windows Draft #3 (13th June 08)
The JPanel’s paintComponent() draws the loaded image onto the panel, tiling it if the
image is smaller than the panel area (which is the case for the steel image used in
Figure 10-15).
public void paintComponent(Graphics g)
{
if(isOpaque())
super.paintComponent(g);
int panelWidth = getWidth();
int panelHeight = getHeight();
// display an image
if (bImage != null) {
int imWidth = bImage.getWidth(null);
int imHeight = bImage.getHeight(null);
// tile the image over the panel if necessary
for (int x = 0; x < panelWidth; x += imWidth)
for (int y = 0; y < panelHeight; y += imHeight)
g.drawImage(bImage, x, y, this);
}
} // end of paintComponent()
The gradient shown in Figure 10-16 is achieved by the following code fragment:
GradientPaint gp =
new GradientPaint(0, 0, Color.DARK_GRAY, 0, panelHeight/2,
Color.LIGHT_GRAY, true);
Graphics2D g2d = (Graphics2D)g;
g2d.setPaint(gp);
g2d.fillRect(0, 0, panelWidth, panelHeight);
An important point to remember is that whatever is painted onto the panel will be
clipped if it extends beyond the window region.
Hack 10.5 Windows of Any Shape (medium level)
Create a shapely window of any shape, not just a combination of ellipses, rectangles, and polygons.
Hack 10-2 is a little limiting since the resulting shape must be a combination of
rectangles, rounded rectangles, ellipses, and polygons. A different way of creating a
window shape is described in this hack, based on specifying a pixel transparency
color. Anything drawn in that color will be rendered transparent.
The code uses SetLayeredWindowAttributes(), first seen in Hack 10.1 where its
LWA_ALPHA flag was used to define a translucency level. This time we’ll be using
the LWA_COLORKEY flag which sets a transparency color.
22 © Gayathri Singh and Andrew Davison 2008Windows Programming Using Java. Ch. 10 Ghostly, Shapely Windows Draft #3 (13th June 08)
Figure 10-17 shows the BlobJFrame application, which uses a transparency color to
achieve its ‘blob’ like shape, and also supports translucency.
Figure 10-17. A Shapely and Translucent BlobJFrame.
The user has just right-clicked on the JPanel, causing a popup menu to appear. The
menu lets the user iconify and close the application. The application can be moved by
dragging the mouse anywhere inside the shape.
The code is quite similar to the example in Hack 10.4: BlobJFrame is a subclass of a
JFrame using mouse listeners in the same way as ShapedJFrame to implement a
popup menu and dragging. We also reuse PaintedJPanel from Hack 10.4, almost
unchanged, except that it paints the image shown in Figure 10-18.
Figure 10-18. The Blob Image.
The image is loaded by PaintedJPanel and painted on its surface. The transparency
color set by BlobJFrame is red, and so the red parts of the image aren’t rendered.
The Blob Window
Much of BlobJFrame is identical to ShapedJFrame, in particular the code for listening
to mouse presses, releases, and dragging, so we won’t describe it again. The important
difference occurs in the setup of the window in BlobJFrame().
public BlobJFrame(int translucency)
{
super("\"Press Me\" Button")
JInvoke.initialize();
// add listeners for iconification, closing, and dragging
addMouseListener(this);
addMouseMotionListener(this);
setUndecorated(true);
makeGUI();
23 © Gayathri Singh and Andrew Davison 2008Windows Programming Using Java. Ch. 10 Ghostly, Shapely Windows Draft #3 (13th June 08)
setDefaultCloseOperation(JFrame.EXIT_ON_CLOSE);
pack();
transparentWin(translucency);
setResizable(false);
setLocationRelativeTo(null);
setVisible(true);
} // end of BlobJFrame()
transparentWin() carries out two tasks – the setting of the translucency level (which
we’ve seen several times) and the setting of the pixel transparency color to red.
// globals
@NativeImport(library="user32")
public static native boolean SetLayeredWindowAttributes(
int hwnd, int colorRef, byte bAlpha, int dwFlags);
// see http://msdn2.microsoft.com/en-us/library/ms633540.aspx
public static final int DEFAULT_TRANSLUCENCY = 128;
private static final int WS_EX_LAYERED = 0x80000;
private static final int LWA_COLORKEY = 1; // 0x1
private static final int LWA_ALPHA = 2; // 0x2
private void transparentWin(int translucency)
{
if ((translucency < 0) || (translucency > 255)) {
System.out.println("Supplied translucency out of range (0-255)");
translucency = DEFAULT_TRANSLUCENCY; // use default value
}
System.out.println("Translucency: " + translucency);
int hwnd = Util.getWindowHandle(this);
/* add layered window support to the window so it can be made
translucent (alpha-blended) and transparent */
int winStyleInfo = User32.GetWindowLong( hwnd,
WinConstants.GWL_EXSTYLE);
winStyleInfo |= WS_EX_LAYERED;
User32.SetWindowLong(hwnd, WinConstants.GWL_EXSTYLE, winStyleInfo);
SetLayeredWindowAttributes(hwnd, 0x0000ff, (byte)translucency,
LWA_COLORKEY|LWA_ALPHA);
} // end of transparentWin()
The crucial line is the call to SetLayeredWindowAttributes() with both the
LWA_COLORKEY and LWA_ALPHA flags set. The transparency color is specified
in the second argument of SetLayeredWindowAttributes() as an integer with the
hexadecimal format 0x00bbggrr (00 for alpha, bb for blue, gg for green, and rr for
red). The value used in the example is 0x0000ff, a color consisting of no blue, no
green, and full-on red.
If only the transparency color is required, with no translucency, then the call would
become:
SetLayeredWindowAttributes(hwnd, 0x0000ff, (byte)0, LWA_COLORKEY);
24 © Gayathri Singh and Andrew Davison 2008Windows Programming Using Java. Ch. 10 Ghostly, Shapely Windows Draft #3 (13th June 08)
Hack 10.6 A Window Using Per-pixel Translucency (medium level)
Create a shaped window using a per-pixel translucent image.
Figure 10-19 shows the GUIJWindow application positioned in front of some other
windows.
Figure 10-19. The Per-Pixel Translucent Example.
A close look at the window reveals a nested series of increasingly opaque rounded
rectangles, with the now-familiar button and text label at their center. This shape is
supplied to the application in the form of a 32 bpp (bit per pixel) BMP file, shown in
Figure 10-20 loaded into the GIMP 2.4 image processing software (available from
http://www.gimp.org/).
Figure 10-20 The Translucent Bitmap.
The check board background in Figure 10-20 indicates that the rounded rectangles are
translucent (apart from the central one).
This application is our most complicated, involving three classes and a new J/Invoke
data structure, as shown in the class diagrams in Figure 10-21.
25 © Gayathri Singh and Andrew Davison 2008Windows Programming Using Java. Ch. 10 Ghostly, Shapely Windows Draft #3 (13th June 08)
Figure 10-21 Class Diagrams for the GUIJWindow Application.
GUIJWindow initializes the GUI components (the button and label), and places them
inside a TransJPanel instance. TransJPanel’s main task is to make the JWindow
completely transparent by painting the panel in a transparency color. GUIJWindow
uses User32.SetLayeredWindowAttributes() and the LWA_COLORKEY flag to
specify the color, a technique first employed back in Hack 10.6.
BGJFrame loads a translucent bitmap, and uses the Win32 API's layered windows and
User32.UpdateLayeredWindow() to draw it onto the frame, retaining the per-pixel
translucency of the bitmap.
The frame is undecorated, so movement, iconification, and termination are managed
by mouse listeners, and iconification and exiting are offered via a popup menu. (This
is the same approach as seen in Hacks 10.4 and 10.6.) BGJFrame is also a
WindowListener so it can detect when it is iconified and deiconified.
This application is unusual because it consists of two windows: a JFrame (BGJFrame)
and JWindow (GUIJWindow). BGJFrame retains a reference to the GUIJWindow
instance, so the JWindow can be moved when the JFrame is moved, and be made
invisible/visible when the JFrame is iconified/deiconified.
The reason for this two-window approach is a ‘feature’ of the Win32 API
User32.UpdateLayeredWindow() function used by GUIJFrame. When the function
draws a translucent bitmap to the screen, any children of the JFrame (e.g. GUI
components) are rendered invisible! This means that if we want the translucent
window to have visible components, they must be managed by a separate window,
which is the role played by GUIJWindow.
This may all seem rather complicated, but the separation of tasks between the three
classes (GUIJWindow, TransJPanel, and BGJFrame) makes it relatively easy to reuse
26 © Gayathri Singh and Andrew Davison 2008Windows Programming Using Java. Ch. 10 Ghostly, Shapely Windows Draft #3 (13th June 08)
this design for other translucent, shaped applications. Changing the translucent
background only requires the BMP file to be altered. Changing the GUI components
only requires modifications to the GUI code inside GUIJWindow.
Managing the GUI Components
GUIJWindow creates the GUI controls in the usual way, but places them inside a
TransJPanel instance; it also creates the translucent BGJFrame.
// global
private BGJFrame bgFrame;
public GUIJWindow()
{
bgFrame = new BGJFrame("Translucency Example", this);
JInvoke.initialize();
makeGUI( bgFrame.getBmpSize() );
pack();
transWin();
setLocation( bgFrame.getLocation() );
setVisible(true);
} // end of GUIJWindow()
The makeGUI() method is almost the same as previously, except that the controls are
added to a TransJPanel instance, created using:
// inside makeGUI()
TransJPanel p = new TransJPanel(bmpSize, TRANSPARENT_COLOR);
The panel’s dimensions are specified using bmpSize, and it paints over itself using the
color defined in TRANSPARENT_COLOR:
// global in GUIJWindow
private static final int TRANSPARENT_COLOR = 0x0000ff;
// red (format is 0xbbggrr)
The color is specified using the Win32 color reference format. TransJPanel converts
this into a Java Color object before using it for painting. Red is employed as the
transparency color since it isn’t used by any of the GUI components, and so they
won’t be affected by the transparency. (This is not quite true, as discussed in the “A
Problem with Per-Pixel Transparency” section below.)
The bmpSize value comes from BGJFrame, and is the size of the its loaded bitmap.
Sharing the same dimensions ensures that the JFrame, JWindow, and JPanel are all
the same size.
The location of GUI JWindow is set to be the same as the BGJFrame, with the line:
setLocation( bgFrame.getLocation() );
27 © Gayathri Singh and Andrew Davison 2008Windows Programming Using Java. Ch. 10 Ghostly, Shapely Windows Draft #3 (13th June 08)
Setting Translucency and Transparency
GUIJWindow calls transWin() to set the pixel transparency colour, and also to apply a
global 50% translucency effect to the components. This reduces their visibility,
making them blend more naturally with the per-pixel translucent background drawn
by BGJFrame.
// globals
@NativeImport(library="user32")
public static native boolean SetLayeredWindowAttributes(int hwnd,
int colorRef, byte bAlpha, int dwFlags);
// see http://msdn2.microsoft.com/en-us/library/ms633540.aspx
private static final byte TRANSLUCENCY = (byte) 128;
// 50% translucency
private static final int WS_EX_LAYERED = 0x80000;
private static final int LWA_COLORKEY = 1; // 0x1
private static final int LWA_ALPHA = 2; // 0x2
private void transWin()
{
int hwnd = Util.getWindowHandle(this);
/* add layered window support to the window so it can be made
translucent (alpha-blended) and use pixel transparency */
int winStyleInfo =
User32.GetWindowLong(hwnd, WinConstants.GWL_EXSTYLE);
winStyleInfo |= WS_EX_LAYERED;
User32.SetWindowLong(hwnd, WinConstants.GWL_EXSTYLE, winStyleInfo);
SetLayeredWindowAttributes(hwnd, TRANSPARENT_COLOR, TRANSLUCENCY,
LWA_COLORKEY|LWA_ALPHA);
} // end of transWin()
This code may be familiar, since we used the same approach in Hack 10.5.
Positioning Components and Handling Transparency
BGJWindow places its GUI components in TransJPanel, which puts them into a
horizontal line with a border to indent them from the shaped edges of the application.
TransJPanel is set to be the same size as the translucency BGJFrame.
// globals
private static final int BORDER = 15;
private BufferedImage bImage; // image used to cover the panel
public TransJPanel(Dimension bmpSize, int tColor)
{
super();
setPreferredSize(bmpSize);
Color transColor = convertTransColor(tColor);
bImage = buildImage(bmpSize, transColor);
28 © Gayathri Singh and Andrew Davison 2008Windows Programming Using Java. Ch. 10 Ghostly, Shapely Windows Draft #3 (13th June 08)
setLayout( new BoxLayout(this, BoxLayout.LINE_AXIS));
setBorder(new EmptyBorder(BORDER, BORDER, BORDER, BORDER));
setOpaque(false);
} // end of TransJPanel()
The transparency color (tColor) is converted into a Color object, and used to generate
an image the same size as the panel.
private Color convertTransColor(int tColor)
// convert tColor (format is 0xbbggrr) into a Color object
{
int blue = (tColor >> 16) & 0xFF;
int green = (tColor >> 8) & 0xFF;
int red = tColor & 0xFF;
Color transColor = new Color(red, green, blue);
return transColor;
} // end of convertTransColor()
private BufferedImage buildImage(Dimension bmpSize, Color transColor)
// generate a rectangular image of size bmpSize and color transColor
{
BufferedImage im =
new BufferedImage(bmpSize.width, bmpSize.height,
BufferedImage.TYPE_INT_ARGB);
Graphics2D g2d = im.createGraphics();
g2d.setColor(transColor);
g2d.fillRect(0, 0, bmpSize.width, bmpSize.height);
g2d.dispose();
return im;
} // end of buildImage()
The image is drawn over the panel by its paintComponent() method:
public void paintComponent(Graphics g)
{ g.drawImage(bImage, 0, 0, this); }
The image is a solid red rectangle, but since red is the transparency color, this
rectangle will ‘erase’ the background.
A simpler strategy is to utilize the transparency color as the background color of the
panel:
setBackground(transColor);
This erases the background but also makes the panel ‘solid’ in the sense that mouse
clicks and drags will be sent to TransJPanel instead of down to BGJFrame. We want
BGJFrame to handle the mouse, and so paint an image instead.
A Problem with Per-Pixel Transparency
The window’s background is made invisible by painting a red rectangle behind all the
components in TransJPanel. It works, as Figure 10-19 illustrates, but there’s an
irritating problem related to how some components are drawn.
29 © Gayathri Singh and Andrew Davison 2008Windows Programming Using Java. Ch. 10 Ghostly, Shapely Windows Draft #3 (13th June 08)
The "Press Count: " text is drawn in a JLabel, which normally has an invisible
background. Java uses anti-aliasing to smooth the text in the label, which basically
blends the text with the background color. This causes some of the red background
pixels to be darkened so they are no longer made invisible, as shown in Figure 10-22.
Figure 10-22 Text with a Red Tinge
Our solution is to make the JLabel opaque, causing its text to be smoothed against its
own background:
// global
private JLabel pressInfo;
// in makeGUI() in GUIJFrame
pressInfo = new JLabel("Press Count: 0 ");
pressInfo.setOpaque(true);
Dealing with Translucency and Mouse Actions
BGJFrame loads a translucent bitmap, and draws it onto the frame with the
User32.UpdateLayeredWindow() function.
As with the frames used in Hacks 10.4 and 10.6, BGJFrame is undecorated, so
movement, iconification, and termination are managed by mouse listeners, and
iconification and exiting are offered via a popup menu. BGJFrame is also a
WindowListener so it can detect when it is iconified and deiconified.
The listener code is slightly more complicated than in the previous hacks since it must
also move and control the visibility of GUIJWindow. In addition, the listener-
generated popup menu must be positioned carefully or a ‘feature’ of
UpdateLayeredWindow() will cause it to be rendered invisible.
Manipulating the Bitmap
BGJFrame simply loads and draw a bitmap. Unfortunately, the details are a little
tricky, requiring several Win32 API functions. The code is divided between several
methods, called from BGJFrame’s constructor:
// in BGJframe()
int hwnd = com.jinvoke.Util.getWindowHandle(this);
layerWin(hwnd);
int hwdBmp = loadBitmap(IM_FNM);
bmpSize = getImageSize(hwdBmp);
30 © Gayathri Singh and Andrew Davison 2008Windows Programming Using Java. Ch. 10 Ghostly, Shapely Windows Draft #3 (13th June 08)
setSize(bmpSize); // change JFrame's size to match bitmap’s size
modifyBitmap(hwdBmp, bmpSize);
drawBitmap(hwdBmp, bmpSize, hwnd);
We’ll consider each of the highlighted methods in turn.
Loading the Bitmap
User32.LoadImage() is a general purpose function that can load icons, cursors, or
bitmaps. This is reflected by the large number of flags available for the various
arguments, which are detailed at http://msdn2.microsoft.com/en-
us/library/ms648045.aspx. Fortunately, loading a bitmap file is fairly straightforward,
as shown in the loadBitmap() method from BGJFrame.
// global
private static final String IMAGES_DIR = "images/";
private int loadBitmap(String fnm)
// load the image from fnm as a bitmap
{
System.out.println("Loading background bitmap from " +
IMAGES_DIR + fnm);
int hwdBmp = User32.LoadImage(WinConstants.NULL, IMAGES_DIR + fnm,
WinConstants.IMAGE_BITMAP, 0, 0,
WinConstants.LR_LOADFROMFILE );
if (hwdBmp == WinConstants.NULL)
System.out.println("Image not loaded");
return hwdBmp;
} // end of loadBitmap()
What Size is the Bitmap?
Surprisingly, it’s somewhat harder to extract the bitmap’s dimensions than to load it.
The BITMAP data structure has to be accessed via a pointer, using the
Gdi32.GetObject() function. It’s defined at http://msdn2.microsoft.com/en-
us/library/ms533268.aspx as:
int GetObject(
HGDIOBJ hgdiobj, // handle to graphics object
int cbBuffer, // size of buffer for object information
LPVOID lpvObject // buffer for object information
);
The type of the pointer to the buffer is LPVOID which reflects the way that
GetObject() can be used to return information on a variety of graphical objects:
lbvObject can end up pointing to a structs such as BITMAP, DIBSECTION, and
EXTLOGPEN.
We’re only interested in getting a BITMAP struct, so we redefine GetObject() to take
a pointer to a J/Invoke Bitmap object:
31 © Gayathri Singh and Andrew Davison 2008You can also read