GENERAL VIEW - Bernardi Parts Acura

Page created by Cheryl Anderson
 
CONTINUE READING
GENERAL VIEW - Bernardi Parts Acura
Accessory                     Application                Publications No.

      INSTALLATION                                                                                                           VERSION 1
                                                               DECKLID SPOILER                  2021 TLX                       Issue Date
      INSTRUCTIONS                                                                                                            SEP 2020

GENERAL VIEW

                                                                                                         DECKLID
                                                                                                         SPOILER

FOR YOUR SAFETY (Read carefully.)
Warning Symbols
Safety: Your safety, and the safety of others, is important. To help you make informed decisions about service
procedures, we have provided safety messages where appropriate. Of course, it is not practical or possible to warn you
about all the hazards associated with servicing a vehicle - you must use your own good judgment.
You will find important safety messages preceded by one of following symbols:
*All symbols are not used in all installation instructions.

© 2020 American Honda Motor Co., Inc. – All Rights Reserved.               BII14301-07 (2009)                      08F10-TGV-2000-90        1 of 10
GENERAL VIEW - Bernardi Parts Acura
Procedure and Location Icons
These icons indicate the work location and the worker’s point of view.
*All icons are not used in all installation instructions.

Safety: General
• Observe all safety notes and precautions described in the service information, in addition to those described in this
  Installation Instruction. Be extremely careful for your safety and safety of others.
• Be careful not to damage the vehicle or the parts.
• Be extremely careful when handling retaining tabs and clips.
• Note the locations of the parts before removing them so they can be properly installed in their original positions.
• The illustrations may differ slightly from the actual accessory.

Safety: Accessory
• Always use the parts and tools specified in the installation instructions.
• Do not install the accessory on a dirty surface or in direct sunlight.
• Make sure the ambient air temperature is 60°F (15°C) or above when installing accessories that use a bonding
  material.
• When pressing the accessory firmly with the palm of your hand, be careful not to damage it or the vehicle.
• When applying adhesive material, make sure it is lined up properly before attaching. Once the adhesive material
  touches the surface, do not try to remove it. If you do, you could damage the part before the adhesive releases.
• Do not wash the vehicle for 24 hours to allow the adhesive to cure.

2 of 10                                              BII14301-07 (2009)          © 2020 American Honda Motor Co., Inc. – All Rights Reserved.
GENERAL VIEW - Bernardi Parts Acura
PARTS LIST
Decklid Spoiler Kit (P/N 08F10-TGV-200)
    Decklid spoiler                               Special bolts (3)                     Nuts (3)               Pins (2)

    Grommets (2)                                  Seals (2)                             Template               Alcohol wipes (2)

REQUIRED TOOLS AND SUPPLIES
•   Masking tape                                               • Center punch                      • Drill
•   3 mm Drill bit                                             • Touch-up paint                    • Torque wrench
•   File                                                       • Ratchet                           • 10 mm Socket
•   Eye protection (face shield, safety
    goggles, etc.)

The following tools are available through the Acura Tool and Equipment Program:
• Trim Tool Set (T/N SOJATP2014)                               • Plastic Trim Tool (T/N SILTRIMTL10) • Deburring Tool (T/N DEBUR300)
• Rubber Roller (T/N MHLE54D)                                  • Rotabroach Hole Cutting Kit (T/N
                                                                 BLR11201SO)

© 2020 American Honda Motor Co., Inc. – All Rights Reserved.               BII14301-07 (2009)                                      3 of 10
GENERAL VIEW - Bernardi Parts Acura
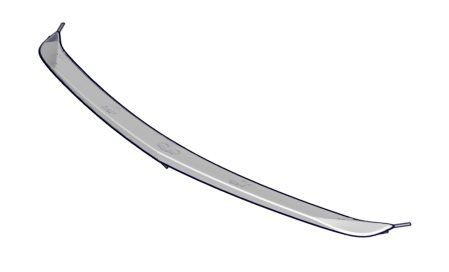
INSTALLATION                                                5.      Secure the template.

1.    Open the trunk lid.
                                                                                                                MASKING
                                                                                                                TAPE

              TRUNK
     CLIP     PANEL
     (long)                     9 CLIPS

                                            CLIP
                                            (long)

                                                             Line up with
                                                             the curve end.                       TRUNK LID

2.    Remove the trunk panel.
3.    Close the trunk lid.

                                TRUNK LID

                                                                                                     PRINTED LINE
                                                                 Line up with     TEMPLATE           (Line up with
                                                                 the curve end.                      the center of
                                                                                                     the vehicle.)

                                 MASKING
                                 TAPE

4.    Attach masking tape.

4 of 10                                        BII14301-07 (2009)                 © 2020 American Honda Motor Co., Inc. – All Rights Reserved.
6.     Mark the trunk lid.                                                            9.       Drill the trunk lid.

                                     NOTE
Set the center punch to the minimum setting.

                       CENTER
                       PUNCH
                                                                                                                      3 mm
                                                                                                                      DRILL BIT

                            2 MARKS                   MARK
                                                      (Left side only.)                                                                : 5 MARKS

7.     Remove the template.
8.     Flip the template, and repeat same procedures for                                                                   TRUNK LID
       the other side.

        Repeat steps 5 through 7.

© 2020 American Honda Motor Co., Inc. – All Rights Reserved.              BII14301-07 (2009)                                              5 of 10
10. Drill the trunk lid.                                            12. Remove the burrs.

                            NOTE                                                                 NOTE
Make sure to drill the correct position.                             To ensure proper clip engagement, be sure to remove
                                                                     any metal shavings or burrs.

                                                                            DEBURRING TOOL
                              7 mm
                              ROTABROACH BIT

                                           : 3 HOLES

                                                                    13. Clean the attaching area.

                                                                                                 NOTE
                                                                     • Any oil or dirt remaining on the trunk lid will affect the
                                                                       performance of the adhesive tape, which could
                : 2 HOLES
                                                                       cause gaps or spoiler lifting.
                                                                     • Allow to dry thoroughly.

               8.5 mm
               ROTABROACH BIT

11. Remove the masking tape.

                                                                                                                             2 ALCOHOL
                                                                                                                             WIPES

6 of 10                                                BII14301-07 (2009)               © 2020 American Honda Motor Co., Inc. – All Rights Reserved.
14. Install the seals.                                                     16. Install the special bolts and pins.

                                           2 SEALS                                              3 SPECIAL BOLTS

                                                                                4 PROJECTIONS               Line up with the
                                                                                                            center of the
                                                                                                            projections.
                     2 GROMMETS

15. Install the grommets.

                                     NOTE
To confirm clip engagement, listen for the “click” sound                                         DECKLID SPOILER
during installation.

                                                                             4 PROJECTIONS         2 PINS   Line up with the
                                                                                                            center of the
                                                                                                            projections.

   4 RETAINING
   TABS                   2 GROMMETS

                      2 GROMMETS

 TRUNK LID                       SECTION VIEW
         4 RETAINING
         TABS

© 2020 American Honda Motor Co., Inc. – All Rights Reserved.   BII14301-07 (2009)                                              7 of 10
17. Temporarily attach the tabs.                                    19. Secure the decklid spoiler.

            8 TABS

              MASKING
              TAPE

                        MASKING         2 TABS
                        TAPE

                                                                                 2 ADHESIVE
                                                                                 BACKINGS

                                                                    20. Secure the decklid spoiler.

                                   2 ADHESIVE
                                   BACKINGS

18. Install the decklid spoiler.

                          NOTE
• Do not apply excessive pressure.
• To confirm the pin engagement, listen for a click
  sound during installation. Using your hands, lift up
  on the pin area of the spoiler to confirm the pins are
  fully engaged.

                  SPECIAL BOLT
                  (Line up with the
    PIN           center hole first.)
                                                 PIN

             2 SPECIAL BOLTS

8 of 10                                                BII14301-07 (2009)            © 2020 American Honda Motor Co., Inc. – All Rights Reserved.
21. Secure the decklid spoiler.                                                23. Secure the decklid spoiler.

                                                      2 ADHESIVE                                                 2 ADHESIVE
                                                      BACKINGS                                                   BACKINGS

22. Secure the decklid spoiler.                                                24. Secure the decklid spoiler.

© 2020 American Honda Motor Co., Inc. – All Rights Reserved.       BII14301-07 (2009)                                     9 of 10
25. Open the trunk lid.

                      3 SPECIAL BOLTS

                          3 NUTS

                                   6.6 lb-ft
                                   (9.0 N·m)

26. Secure the decklid spoiler.
27. Check that all parts are installed properly.

                          NOTE
Make sure to secure the clips and the retaining tabs
properly to avoid separation.

28. Install all removed parts.

10 of 10                                               BII14301-07 (2009)   © 2020 American Honda Motor Co., Inc. – All Rights Reserved.
You can also read