Guide To Flood Protection In Northeastern Illinois - The Illinois Association for Floodplain and Stormwater Management
←
→
Page content transcription
If your browser does not render page correctly, please read the page content below

Guide To
   Flood Protection
In Northeastern Illinois

           March 2006

         The Illinois Association for
         Floodplain and
         Stormwater Management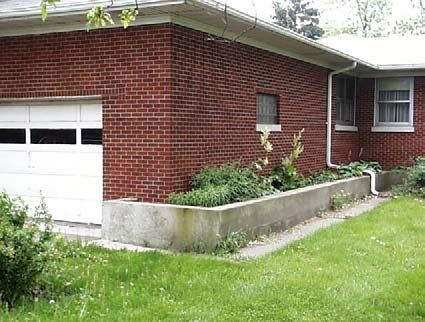
Important Numbers
Police and fire emergencies: 911        Gas hazards: 1-888/642-6748 (1-888/NICOR4U)
Ambulance: 911                     Electrical hazards: 1-800/334-7661 (1-800/EDISON-1)
Family meeting place after a flood: _______________________________________________
Insurance agent: ______________________________________________________________
Homeowner’s insurance: Company: ________________________ Policy No. ____________
Flood insurance:          Company: ________________________ Policy No. ____________
Neighbors:     ________________________________________________________________
____________________________________________________________________________

                               How to use this Guide
What’s your situation now?

9 Has a flood watch or warning just been issued or do you see flooding start? If so, go to
  Section 5, “During a Flood” on page 17. Later on, read section 6 on “After A Flood” to
  prepare for when you go back to your flooded property.

9 Have you just been flooded? If so, start with section 6 “After A Flood” on page 20. Then
  look through the rest of this Guide.

9 If you’re not in a rush and want to know how to protect yourself from the next flood, start
  on page 2.

If you would like more information on flood protection, visit the following websites:

   ─ www.floods.org
   ─ www.IllinoisFloods.org
   ─ www.louisianafloods.org (although in Louisiana, it has many useful links)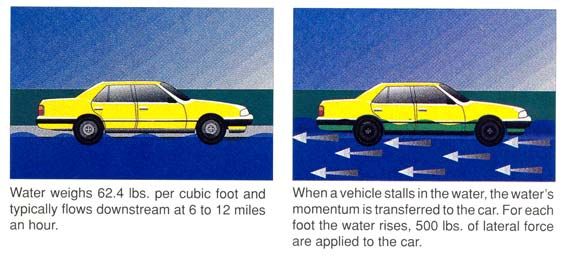
Contents
  1. Flooding in Northeastern Illinois .................................................................................2
  2. Flood Protection Checklist...........................................................................................4
  3. Flood Protection Laws .................................................................................................5
  4. Before the Flood - Protecting Your Property...............................................................6
     Elevation.......................................................................................................................6
     Barriers .........................................................................................................................7
     Dry Floodproofing........................................................................................................8
     Wet Floodproofing .......................................................................................................9
     Basement Problems: Sump Flooding ........................................................................10
     Basement Problems: Cracks......................................................................................11
     Basement Problems: Sewer Backup..........................................................................11
     Sanitary Sewer Backup Protection.............................................................................12
     Basement Protection Berm.........................................................................................14
     Dealing with Contractors ...........................................................................................15
     Insurance ....................................................................................................................16
  5. During a Flood ...........................................................................................................17
     What You Should Do .................................................................................................17
     Turning Off the Utilities.............................................................................................18
  6. After a Flood ..............................................................................................................20
     Step 1. Take Care of Yourself First............................................................................20
     Step 2. Give Your Home First Aid.............................................................................21
     Step 3. Start Cleaning.................................................................................................22
     Steps to File Your Flood Insurance Claim .................................................................23
  Flood Safety .................................................................................................... Back cover

This guide was prepared with funding support from the Kane County Division of Environmental
Management and the Illinois Emergency Management Agency and is being distributed by the
Illinois Association for Floodplain and Stormwater Management.

Disclaimer

This guide is designed to give the reader an overview of steps that can be taken to protect a
property from damage from the type of surface water flooding and sewer backup that faces most
of northeastern Illinois. The information provided is based on careful research and input from
experienced professionals.

The reader must assume responsibility for adapting this information to fit his or her conditions.
This guide is not intended to replace the advice and guidance of an experienced professional who
is able to examine a building and assess the needs of the particular situation.

Guide To Flood Protection                                            −1−                                                          March 2006
1. Flooding in Northeastern Illinois

Illinois can flood in any season. Floods have been caused by localized storms, rain over several
days on saturated ground, snow melt, and ice jams. Over the last two decades, a significant flood
has occurred somewhere in the state each year. Many of them received a state or federal disaster
declaration.

Overbank flooding: The most common and most damaging floods occur along the state’s
rivers and streams and this is called overbank flooding. Most floods are caused by too much
precipitation in the watershed. Larger rivers respond more slowly to rain and runoff than do the
smaller streams. But when floods do occur on the large rivers, they can last for days or weeks.

In urban areas, flash flooding can occur where impervious surfaces, gutters and storm sewers
increase rain and snowmelt runoff to the receiving stream. Flash floods also can be caused by
dam failure, the release of ice-jam flooding, or the collapse of a debris dam.

Drainage problems: Flooding can also occur in streets when rainwater can’t flow into a storm
sewer. Basements can flood when rainwater can’t flow away from the house or when the sewers
back up. These problems are usually caused by heavy local rains and are often not related to
overbank flooding or floodplain locations.

Sewer backup: Sanitary sewers should not be affected by stormwater because they are separate
from the storm sewers. However, there can be cross connections and leaks in sewer pipes that
receive inflows and infiltration which
can overload a sanitary line during
wet weather. With no place to go,
sewers back up and flow into the
lowest opening in the sewer line.
Sanitary sewers back up into base-
ments and storm sewers back up into
streets.

Impact of flooding: Most flooding
in northeastern Illinois is slow
moving and shallow. However, this
does not mean that floodwaters are
safe. A car will float in less than 2
feet of moving water and can be
swept downstream into deeper waters
(see graphic). This is one reason
floods kill more people trapped in
vehicles than anywhere else.
                                                      Effects of shallow water on cars

Guide To Flood Protection                     −2−                                        March 2006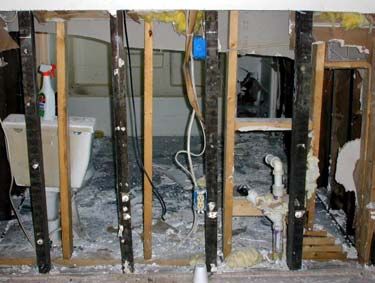
People die of heart attacks, especially from exertion during a flood fight. Electrocution is a cause
of flood deaths, claiming lives in flooded areas that carry a live current created when electrical
components short out. Floods also can damage gas lines, floors, and stairs, creating secondary
hazards such as gas leaks, unsafe structures, and fires.

Health: Floodwaters carry whatever was on the ground that the upstream runoff picked up,
including dirt, oil, animal waste, and lawn, farm and industrial chemicals. Pastures and areas
where cattle and hogs are kept can contribute polluted waters to the receiving streams.
Overloaded sewer lines back up into low lying areas and some homes. Even though diluted by
flood waters, raw sewage can be a breeding ground for bacteria, such as e coli, and other disease
causing agents.

Another type of health problem comes after the water
is gone. Stagnant pools become breeding grounds for
mosquitoes, and wet areas of a building that have not
been cleaned breed mold and mildew. A building that
is not thoroughly and properly cleaned becomes a
health hazard, especially for small children and the
elderly. Another health hazard occurs when heating
ducts in a forced-air system are not properly cleaned
after inundation. When the furnace or air conditioner
is turned on, the sediments left in the ducts are
circulated throughout the building and breathed in by
the occupants.                                                   Post-flood silt, mold and mildew

Buildings: Due to the relatively low velocities and
shallow flood depths in the area, the most common
type of building damage inflicted by a flood is caused
by soaking. When soaked, many materials change
their composition or shape. Wet wood will swell and,
if dried too quickly, will crack, split or warp. Plywood
can come apart. Gypsum wallboard will fall apart if it
is bumped before drying out. The longer these
materials are wet, the more moisture, sediment and
pollutants they will absorb.

Soaking can cause extensive damage to household               Effects of soaking on walls and floors
goods. Wooden furniture may become so badly
warped that it cannot be used. Other furnishings such as upholstery, carpeting, mattresses, and
books usually are not worth drying out and restoring. Electrical appliances and gasoline engines
will not work safely until they are professionally dried and cleaned.

In short, while a building may look sound and unharmed after a flood, the waters can cause a lot
of damage. As shown in the above photo, to properly clean a flooded building, the walls and
floors should be stripped, cleaned, and allowed to dry before being recovered. This can take
weeks and is expensive. It is better to be prepared and prevent flood damage.

Guide To Flood Protection                       −3−                                       March 2006
2. Flood Protection Checklist

1. Check with your local building, planning or engineering department on flooding in your area.

   9   Where does the water come from?
   9   Are you in the mapped Special Flood Hazard Area or floodway?
   9   How bad has it been in the past?
   9   How bad could it be? (Remember, the next flood can be worse than the last one.)
   9   What is an appropriate flood protection level? (How high should you prepare for?)

2. Check out your local drainage situation.

   9   Does water flow away from your house or does it tend to stand next to your walls?
   9   Is the ditch, stream or storm sewer that takes water away clear of debris or obstructions?
   9   Do the downspouts from your roof gutters direct water well away from your house?
   9   Do you have a sump pump? If so, does it direct water well away from your house?
   9   If you are in a city or village, ask your local public works office if your area is served by
       a combined or separate sewer system.

3. Prepare for flooding by doing the following:

   9 Know the flood safety guidance on the back of this guide.
   9 Mark your fuse or breaker box to show the circuits to the floodable areas.
   9 Know how to shut off the electricity and gas to your house when a flood comes.
   9 Make a list of emergency numbers and identify a safe place to go to (see inside cover).
   9 Make a household inventory, especially of basement contents.
   9 Put insurance policies, valuable papers, medicine, etc., in a safe
     place.
   9 Develop a disaster response plan – get a copy of the brochure
     “Your Family Disaster Plan” from your local Red Cross chapter
     or check the Red Cross’ website for ideas: www.redcross.org/
     services/disaster/beprepared/familyplan.html
   9 Put cleaning supplies, batteries, camera, waterproof boots, etc.
     in a safe place.

4. Read the next section on construction and stream dumping
   regulations. Follow these rules, get permits for all your work, and
   report violations to your building department.

5. Construct or install appropriate flood protection measures (see
   section 4 − Protecting Your Property, page 6).

6. Purchase flood insurance coverage (see page 16).

Guide To Flood Protection                      −4−                                       March 2006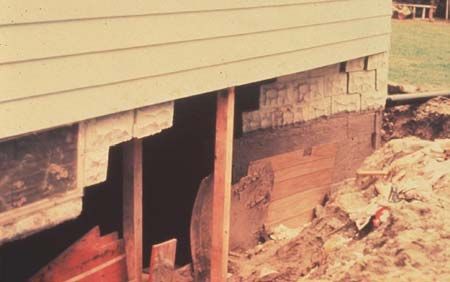
3. Flood Protection Laws

Development in floodprone areas is development in harm’s way. New construction in the
floodplain increases the amount of development exposed to damage and can aggravate flooding
on neighboring properties.

Development outside a floodplain can also contribute to flooding problems. Stormwater runoff is
increased when natural ground cover is replaced by urban development. Development in the
watershed that drains to a river can aggravate downstream flooding, overload the drainage
system, cause erosion, and impair water quality. Accordingly, most communities have enacted
several ordinances to protect people from activities that may cause flooding or drainage
problems.

9 Before you build on, fill, alter, or regrade your property, always check with your building
  department. A permit is probably needed to ensure that such projects do not cause problems
  on other properties.
9 Do not dump or throw anything into the storm sewers, inlets, ditches or basins.
  Dumping in ditches, storage basins, and wetlands is a violation of local codes.
9 Every piece of trash can contribute to flooding. Even leaves, grass clippings and branches
  can accumulate, plug storm drain inlets and channels, or kill vegetation and contribute to
  erosion. If your property is next to a ditch or storage basin, do your part and keep the banks
  clear of brush and debris.
9 If you see dumping or debris in the ditches or basins, filling or construction near property
  lot lines, or filling or construction in a mapped floodplain without a permit sign posted,
  contact your building department. The debris or project may cause flooding on your property.

New buildings in the floodplain must be protected from flood damage. Local laws require that
the lowest floor (including basement) of new residential buildings must be elevated above the
base (or 100-year) flood level. There are additional local and state restrictions on filling, grading
or building in a mapped floodway.

Local codes also require that substantial improvements to a building be treated as a new building.
A substantial improvement is when the value of an addition, alteration, repair or reconstruction
project equals or exceeds 50% of the value of the existing building. In the case of an addition,
only the addition must be protected. In the case of an improvement to the original building, the
entire building must be protected.

For example, if a house in the floodplain is flooded, has a fire, is hit by a tornado, or is otherwise
damaged so that the value of the repairs equals or exceeds 50% of the value of the building
before the damage, then the house must be elevated above the base flood level. In some
communities, improvements are cumulated, so small projects add up to 50% over time.

              These regulations are designed to protect you and your neighbors.
     By keeping the drainage system clear and getting the proper permits before you build,
                 you can help prevent flooding and other drainage problems.

Guide To Flood Protection                       −5−                                       March 2006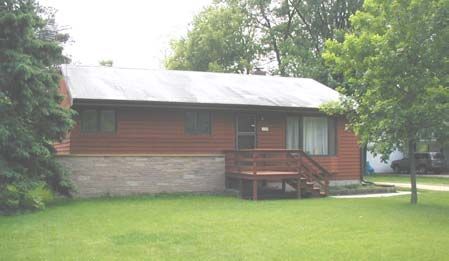
4. Before the Flood - Protecting Your Property

Because most flooding is shallow and slow moving, there are many ways you can protect your
home, garage or other property from flood damage. Different techniques are appropriate for
different types of buildings. Use the following as a guideline:

9 If your house is on a crawlspace           → Read the sections on elevation, barriers, and
                                               wet floodproofing (pages 6, 7 and 9)

9 If your house is on a slab foundation      → Read the sections on barriers and dry flood
                                               proofing (pages 7 and 8)

9 If you have a basement, split level,       → Read the sections on barriers, wet floodproofing,
  or other floor below ground level            and basement protection (pages 7, 9 and 10 − 14)

Additional information on flood protection is available from FEMA
publications, including Homeowner’s Guide to Retrofitting: Six Ways
to protect Your House from Flooding. This publication can be viewed
on FEMA’s website: www.fema.gov/hazards/floods/lib312.shtm.
Another good publication is FEMA’s Protecting Building Utilities From
Flood Damage, which is at www.fema.gov/hazards/floods/pbuffd.shtm

It is important to note that these protection measures are for existing
buildings. There are different requirements for new buildings. These
measures will not relieve you from the need to buy flood insurance if
your building is in a mapped floodplain.

Elevation

Short of removing it from the floodplain, the best way to protect a house from surface flooding is
to raise it above the flood level. The area below the flood level is left open to allow floodwaters
to flow under the building, causing little or no damage. Elevation is required by law whenever a
new house is constructed in the floodplain.

Elevation is usually most cost-effective for
buildings on crawlspaces because it is easiest
to get lifting equipment under the floor and
disruption of the habitable part of the house is
minimal. Because northeastern Illinois flood-
waters are usually not very deep, the appear-
ance of the elevated house is similar to that of
a house on a two- or three-foot crawlspace. If
the house is raised two feet, the front door
would be three steps higher than before.
                                                         This house was elevated one foot above the
                                                         100-year flood level on the Des Plaines River

Guide To Flood Protection                          −6−                                        March 2006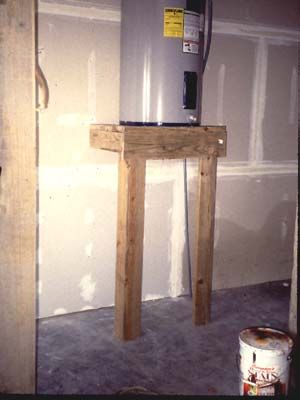
Barriers

Barriers keep surface floodwaters from reaching a building. A barrier can be built of dirt or soil
(“berm”) or concrete or steel (“floodwall”). The standard design for earthen berms is three
horizontal feet for each vertical foot (3: 1 slope). As a result, you should plan on needing an area
six feet wide (at a minimum) for each foot in height.

       This berm protects the home from flooding         This home has a floodwall to protect it
               from the stream to the left.                     from low level flooding.

Depending on how porous your ground is, if floodwaters will stay up for more than an hour or
two, your barrier will need to handle leaks, seepage of water underneath, and rainwater that falls
inside the perimeter. You will need a sump and/or drain to collect the internal groundwater and
surface water. A pump and pipe is also needed to pump the internal drainage over the barrier.

A berm or floodwall should be as far from the building as possible to reduce the threat of see-
page and hydrostatic pressure. However, it must not interfere with drainage along your property
line. Where the house is close to the property line, you may need place the berm next to the wall
as discussed on page 14.

Don’t forget: a permit is needed for filling or regrading a yard. There may be restrictions on
bringing fill onto your site if it blocks the flow of flooding or displaces floodwater storage areas.
For example, state regulations require that barriers located within the regulatory floodway be
within ten feet of the structure (as in the example on the right, above).

Precautions: Barriers can only be built so high. They can be overtopped by a flood higher than
expected. Earthen berms are susceptible to erosion from rain and floodwaters if they are not
properly sloped and covered with grass and maintained. Don’t plant trees or shrubs on a berm
(their roots can cause leaks). Barriers can settle over time, lowering their protection levels.

Some barriers have openings for driveways and sidewalks (as in the example on the right,
above). Closing these openings is dependent on someone being available and strong enough to
put the closure in place. You also need to account for water in the sewer lines that may back up
under the barrier and flood inside your house (see the sewer backup section on page 12).

Guide To Flood Protection                          −7−                                       March 2006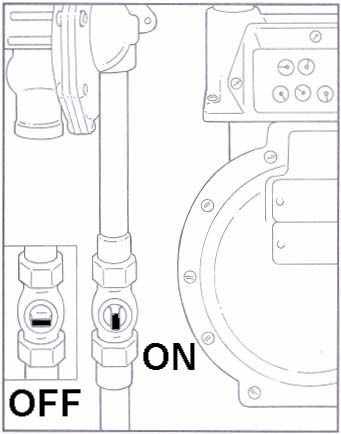
Dry Floodproofing

This term covers several techniques for sealing up a building to ensure that floodwaters cannot
get inside it. For dry floodproofing, all areas below the flood protection level are made
watertight. Walls are coated with waterproofing compounds or plastic sheeting. Openings (doors,
windows, and vents) are closed, either permanently, with removable shields, or with sandbags.
Many dry floodproofed buildings do not look any different from those that have not been
modified.

Dry floodproofing is only appropriate for buildings on concrete slab floors (without basements)
and with no cracks. To ensure that the slab is watertight and sound, an engineering analysis is
recommended.

The maximum flood protection level is two feet above the slab (see below, left). The walls and
slab floor were not built to withstand the type of pressures exerted by deeper water. It is smarter
to let deep water into your house than to risk losing your walls or floor (see below, right).

    These walls were sealed with plastic sheeting         Dry floodproofing is not recommended for
  covered by brick facing for projection from sunlight   keeping surface water out of a basement. The
                    and punctures.                       water pressure can break the walls and floor.

Precautions: It is very tempting for the owner of a dry floodproofed building to try to keep the
flood out if floodwaters get deeper than two or three feet. This can result in collapsed walls,
buckled floors, and danger to the occupants.

It is difficult to waterproof a crawl space to protect it from underseepage. Basements should not
be dry floodproofed to protect them from surface flooding because of the water pressure on the
walls and floors. See page 14 on the basement protection berm for an alternative approach.

Many commercial waterproofing compounds are made to protect wood from rain, but they will
not withstand the pressures of standing water. Some deteriorate over time, so check with the
supplier to be sure the waterproofing compound is appropriate for sealing your basement walls
from water. Installing closures and seals over doors and windows requires enough warning and
having someone at the building who knows what to do.

Guide To Flood Protection                          −8−                                       March 2006
Wet Floodproofing
Wet floodproofing means letting the water in and removing everything that could be damaged by
a flood. There are several ways to modify a building so that floodwaters are allowed inside, but
minimal damage is done to the building and its contents. These techniques range from moving a
few valuable items to rebuilding the floodprone area.
In the latter case, structural components below the flood level
are replaced with materials that are not subject to water
damage. For example, concrete block walls are used instead
of wooden studs and gypsum wallboard. The furnace, water
heater, and laundry facilities are permanently relocated to a
higher floor. Another approach is to raise these items on
blocks or platforms where the flooding is not deep (see
photo).
Wet floodproofing is not feasible for one-story houses
because the flooded areas are the living areas. However, many
people wet floodproof their basements, garages, and accessory
buildings simply by relocating all hard-to-move valuables,
such as heavy furniture and electrical outlets. Light or
moveable items, like lawn furniture and bicycles, can be This wet floodproofed garage has
moved if there is enough warning. Fuse and electric breaker bare concrete, unfinished drywall
(for fire protection), and an
boxes should be located so you can safely turn the power off elevated water heater.
to the circuits serving floodprone areas.
Another approach is to wet floodproof a crawlspace. If
your crawlspace has a furnace in it or is used for storage,
these items could be moved to the first or second floor.
Vents should be placed on the foundation walls to ensure
that floodwaters can get into the crawlspace to equalize
water pressure.
Wet floodproofing has one advantage over the other
approaches: no matter how little you do, you will reduce
Even a minor wet floodproofing project
your potential for damage. Thousands of dollars in
will reduce flood losses to a home. damage can be prevented by simply moving furniture
and electrical appliances out of a basement.
Precautions: Moving contents is dependent on adequate warning and the presence of someone
who knows what to do. Flooding a basement or garage where there is electricity, paint, gasoline,
pesticides, or other hazardous materials creates a safety hazard. There will still be a need for
cleanup, with its accompanying health problems. Moving water lines, furnaces, or electric
service boxes requires a permit from your building department.
Guide To Flood Protection −9− March 2006Basement Problems: Sump Flooding
Basement flooding caused by saturated ground can be corrected by installing a footing drain
around the foundation (see illustration below). The drain collects groundwater and directs it to a
sump. When the sump fills, water is pumped out, usually onto the ground away from the
building. Depending on local conditions, the drain and pumping system may have to handle large
volumes of water.
If the pump gets overloaded, or if there is a loss of power, the system designed to keep ground-
water out of your basement can act as a conduit to bring water in. You can prevent sump
flooding by doing one or more of these floodproofing projects:
9 Install a larger sump pump,
9 Add a second battery backup sump pump,
9 Be certain that downspouts are not connected to the footing drain,
9 Make sure the downspouts drain away from the house,
9 Redirect the downspouts and sump pump outfall farther away from the house, and/or
9 Run the sump pump outfall above ground level or use a check valve to prevent back flow.
Precautions: When there is water in your basement, it is hard to tell how it got in. It’s a good
idea to check for cracks in the walls and install sewer backup protection, too. Using a battery
backup sump pump is the safest alternative, plus you do not have to be home to start it. If your
existing backup sump pump uses a generator for a power source, be sure the generator is set up
outside (where it won’t flood) or vented to the outside to direct deadly carbon monoxide exhaust
fumes outdoors.
Typical basement drain and sewer arrangement
Note: Your floor drain may or may not be connected to the sanitary sewer line
Guide To Flood Protection − 10 − March 2006Basement Problems: Cracks
Groundwater can seep into your basement around pipes or through cracks in the walls or floor.
This may be difficult to determine if the walls have been covered with paneling or other
finishing. The best way to deal with a groundwater problem is to waterproof the walls and
relieve the water pressure through a footing drain system and sump (see previous page). Footing
drains are typically installed around the perimeter of the house, along the foundation. If this is
not possible, drains can be installed on the interior of the basement, along the basement walls,
and directed toward the sump pump pit.
Cracks can be repaired and the walls can be waterproofed from inside or outside. Waterproofing
on the outside is more effective because groundwater pressure forces the sealer into the
foundation. The best technique is to dig a ditch around the basement wall so that you can apply
an epoxy sealant to the exterior walls. This can be done by the handyperson (many home
maintenance manuals have instructions for this) or a commercial waterproofing company.
Precautions: Waterproofing alone is only recommended for groundwater problems. Surface
water will put much more pressure on the building’s walls and can even break them. If the
building is affected by surface flooding, you should also install a barrier (see pages 7 and 14).
Basement Problems: Sewer Backup
The illustration on the previous page shows the sewer arrangements for a typical house with a
basement. The sanitary sewer line drains toilet waste, laundry tubs, and (sometimes) the
basement floor drain to the sanitary sewer main in the street. Clean stormwater and groundwater
is handled by downspouts, footing drains, and sump pumps.
Often basement flooding is caused by these two sewer systems being interconnected. Some
houses have the downspouts, footing drain, and/or the sump pump connected to the sanitary
sewer service. During a heavy rain, stormwater enters the sanitary sewers, causing backups into
one house and overloading the main lines, contributing to backups in other houses.
Sewer backups can also be caused by
events not related to storms or flooding. Don’t cause your own flood! Keep your sewer lines clear
Individual service lines can be plugged 9 Keep roots from trees and shrubs out with root killer.
by grease, waste, tree roots, breaks in 9 Make sure your yard clean-out vent will keep debris out.
the pipe, or saturated ground. Proper 9 Don’t pour dangerous liquids down the drain (motor oil,
maintenance, like pouring tree root paint, pesticides, poisons, epoxies, etc.).
killer down the toilet or floor drain can 9 Don’t pour grease, fat or cooking oil down the drain (they
solidify later).
prevent most of these problems.
9 Don’t flush large solids, such as diapers, down the toilet.
The sewer mains can also be plugged by
the same causes, or by vandalism or illegal dumping in manholes. These problems can be fixed
by the owner or your municipality, depending on where the stoppage occurs.
Guide To Flood Protection − 11 − March 2006Sanitary Sewer Backup Protection
The next three sections of this Guide focus on protection measures that deal with sanitary sewer
backup that occurs when the sewer main is overloaded and backs up through the sanitary service
line into the house. There are four ways to stop sewer backup: floor drain plug, floor drain
standpipe, overhead sewer, and backup valve. Each of these measures work for buildings with
basements or below-grade floors.
Floor Drain Backup Prevention: The simplest way to stop sewer backup is to plug the opening
where it first occurs. This is at the floor drain, the sanitary sewer system’s lowest opening in the
house. Two inexpensive measures can be used: a plug or a standpipe. Both can be purchased at
local hardware stores and are easy for the handyperson to install.
Plug: The flood drain plug stops water from flowing in either
direction. Therefore, if the laundry tub overflows or other spillage
occurs, it will stay in the basement unless the plug is removed.
Because of this, it may be best to leave the plug out under normal
circumstances and put it in place only during heavy rains.
One variation is a plug with a float. It allows water to drain out of
the basement (see illustration, left side). When the sewer backs up, Floor drain float plug
the float rises and plugs the drain (see illustration, right side). A
float plug permanently installed will not interfere with the floor drain’s normal operation.
If the plug is not tight enough, pressure can eject it. Therefore, a plug is not recommended for
flood depths greater than one foot.
Standpipe: A standpipe is an inexpensive alternative to a floor drain plug.
When the sewer backs up, the water moves up the pipe. If properly installed,
water pressure cannot build up to blow a standpipe out of the floor drain. The
system works unless the backup is so deep that it goes over the top of the pipe.
Precautions: A plug left in the floor drain may contribute to a wet basement
if water from a laundry tub spill or a leaky pipe cannot drain out. Float plugs
are known to have been jammed open by a small amount of debris. A plug
does not tell you if there is a problem in your sewer service line.
Neither the plug or standpipe stops backup from coming out of the next lower
opening, like a laundry tub or basement toilet. Sealing the base of the toilet to
Standpipe
the floor will protect you until the water backs up higher than the top of the
bowl.
Because water pressure depends on the height of water in the pipes, a standpipe does not reduce
the pressure in the pipes (or under the floor, if the pipes leak). Because the pressure under the
floor is the same with a standpipe or a plug, standpipes and plugs are only recommended for
flood depths of one foot or less and for buildings with cast iron sewer lines underneath the floor.
Guide To Flood Protection − 12 − March 2006Overhead Sewer: An overhead sewer is generally viewed as the most effective sewer backup protection measure. It acts like a standpipe but without the shortcomings. A sump is installed under the basement floor to intercept sewage flowing from basement fixtures and the basement floor drain. An ejector pump in the sump pushes sewage up above the flood level. From there it can drain by gravity into the sewer service line. Plumbing fixtures on the first floor continue to drain by gravity to the service line. Unless the house is subject to overbank flooding, it is unlikely that the sewers will back up above ground level. If water does go higher, a check valve in the pipe from the ejector pump keeps it in the pipes. Backed up sewage is enclosed in the sewer pipes and doesn’t overflow laundry tubs or basement toilets. Although more dependable than a standpipe, an overhead sewer is more expensive. A plumbing contractor must reconstruct the pipes in the basement and install the ejector pump. It can cost ⊗ Check valve $3,000 − $7,000. Floor drain Precautions: The ejector pump requires electricity to work, so battery backups are recommended. The basement is disrupted during Sump pump Ejector pump construction and the ejector pump needs periodic maintenance. This work requires a licensed Overhead sewer arrangement plumber and a permit from your building department. Sewer Backup Valve: A backup valve stops the water in the sewer pipes. While not as foolproof as an overhead sewer, their installations are less disruptive of the basement. Older versions of this approach were located in the basement floor and relied on gravity to close the valve. If debris got caught in the flapper, the valve did not close tight. Because of its unreli- ability, valves were discouraged and even prohibited in some communities. Today’s systems are more secure. They include installing two valves in line, using better, more watertight materials, or counterweights that keep the valve open all the time so debris won’t catch and clog it. Larger valve systems are usually installed in a manhole in the yard, well away from the basement wall, so there is less disruption during construction and no concerns over breaking the pipes under the basement floor. The cost of this type of backup valve is comparable to the cost of an overhead sewer, in the $4,000 − $6,000 range. Precautions: The ejector pump and the valve require maintenance. This work requires a licensed plumber and a permit from your building department. Guide To Flood Protection − 13 − March 2006
Basement Protection Berm

Basements and the lower floors of split levels can be protected from surface water by
construction of low walls around stairwells or using backfill. Waterproofed walls, sewer backup
protection, drain tile and a sump pump are a must. The drains and pumps can keep up with the
seepage before it gets through the berm and reaches your house.

Walls are built up around the window wells and basement stairwells (don’t block basement
windows that are needed for emergency exits). An earthen berm can be filled against the
waterproofed side of the house.

A subsurface drain and one
or two correctly sized sump
pumps are a must. The drains
and pumps can keep up with
the seepage before it gets
through the berm and reaches
your house.

The objective is to not let
floodwaters touch the house.
If water on the surface of the
ground gets up against the
house, it probably will seep                        Basement protection berm
down the gap between the
basement walls and the surrounding soil. This will greatly increase the amount of water pressure
against the basement walls.

Sump pumps cannot keep up with surface water. If you have sandy or permeable soil, you should
consult an engineer or soils expert to ensure that the berm will extend far enough away from the
walls. Don’t forget: filling or grading in your yard requires a permit.

                                             Precautions: The berm can only be built so high. It
                                             can be overtopped by a flood higher than expected.
                                             Being made of earth, it is susceptible to erosion from
                                             rain and floodwaters if not properly sloped and
                                             covered with grass and maintained. A berm can settle
                                             over time, lowering its protection level. The small
                                             floodwalls can crack and lose their watertight seals.

                                             You also need to account for water in the sewer lines,
                                             footing drain and sump pump outfall. They may carry
                                             water under the barrier and flood inside your house.
    This house is protected by a raised      See the section on sewer backup prevention on
 stairwell and a berm covered with gravel.   page 12.

Guide To Flood Protection                      − 14 −                                   March 2006
Dealing with Contractors Most building departments in northeastern Illinois require that certain work be done only by licensed contractors. Building departments usually have a register of licensed contractors, listed by their areas of expertise. If you have been satisfied with work done by licensed local contractors, try them first. If they cannot help you, ask them for recommendations. If you must hire a contractor you do not know, talk to several contractors before you sign anything. Reputable contractors agree that you should take the following steps: 9 Check several firms and their reputations: The Better Business Bureau, Home Builders Association, or building trades council are excellent sources. 9 Look out for “special deals” or contractors who want to use your home as a “model home.” 9 Ask for proof of insurance: Worker’s compensation and general liability insurance are essential. If the contractor is not insured, you may be liable for accidents on your property. 9 Ask for references: Contractors should be willing to provide names of previous customers. Call some of the customers and ask if they would hire the contractor again. 9 Ask for a written estimate and check it carefully. 9 Ask for a contract: Never sign a blank contract or one with blank spaces. If a lot of money is involved, it may be worth your while to have the contract reviewed by a lawyer. 9 Avoid cash payments: Beware if you are asked to pay cash on the spot instead of a check made out to the contracting company. A reasonable down payment is 10%–30% of the total cost of the project. 9 Don’t sign off before the job is finished: A reputable contractor will not threaten you or pressure you to sign if the job is not finished. 9 Get your permits: Most plumbing work, home improvements, filling, fences, and other yard work require a permit from your building department to be sure that it meets code and will not cause a drainage problem on your neighbors. 9 Get your inspections: When the project is finished make sure your contractor calls you and the building department to inspect work before it is covered over. Some will be hidden from view and you won’t know if there is a problem until the next flood. 9 Get help: If you are a victim of fraud or have problems with a less than reputable contractor, check with the Illinois Attorney General’s Consumer Protection Division (312/345-2400 or www.illinoisattorneygeneral.gov/consumers/index.html). Your building department would also like to know of problems in case it needs to revoke a license. Guide To Flood Protection − 15 − March 2006
Insurance

Flood insurance: Flood insurance is highly recommended. Remember, even if the last storm or
flood missed you and even if your home has been floodproofed, the next flood could be worse.
Most homeowners insurance policies do not cover property for flood damage.

Almost all of the communities in northeastern Illinois participate in the National Flood Insurance
Program. Local insurance agents can sell a flood insurance policy under rules and rates set by the
Federal government. Any agent can sell a policy and all agents must charge the same rates.

Any house can be covered by a flood insurance policy. It does not matter if it is in the mapped
floodplain or out of it. Detached garages and accessory buildings are covered under the policy
for the lot’s main building. Separate coverage can be obtained for the building’s structure and for
its contents (except for money, valuable papers, and the like). The structure generally includes
everything that stays with a house when it is sold, including the furnace, cabinets, built-in
appliances, and wall-to-wall carpeting.

There is no coverage for things outside the house, like the driveway and landscaping. Renters
can buy contents coverage, even if the owner does not buy structural coverage on the building.

                                       Some people have purchased flood insurance because it was
                                       required by the bank when they got a mortgage or home
             Don’t wait for the next   improvement loan. If you have a policy, check it closely. You
 flood to buy insurance protection.    may only have structural coverage (because that’s all that
 There is a 30 day waiting period      banks require). During the kind of flooding that happens in
 before National Flood Insurance
 coverage takes effect. Contact your   northeastern Illinois, there may be more damage to the
 insurance agent for more informa-     furniture and contents than there is to the structure.
 tion on rates and coverage.

                                    Sewer backup insurance: Several insurance companies
have sump pump failure or sewer backup coverage that can be added to a homeowner’s
insurance policy. Each company has different amounts of coverage, exclusions, deductibles, and
arrangements. Most are riders that cost extra. Most exclude damage from surface flooding that
would be covered by a National Flood Insurance policy. The cost varies from nothing to up to
about $75 for a rider on your homeowner’s premium.

Basements, split levels and bilevels: There is limited coverage for basements and the below
grade floors of bilevels and trilevels. The National Flood Insurance Program defines “basement”
as “any area of the building, including any sunken room or sunken portion of a room, having its
floor below ground level (subgrade) on all sides.” This includes split levels and bilevels.

Coverage under building or structural coverage is limited to specific items needed for the
operation of the building, such as a furnace, water heater, clothes washer and dryer. There is very
limited coverage for finishings, such as wallpaper and carpeting, and contents. Flood insurance
only covers damage when there is a general condition of surface flooding in the area.

Guide To Flood Protection                       − 16 −                                   March 2006
5. During a Flood While it can take several days for the larger rivers to flood, flooding caused by ice jams, flooding on the smaller streams, local drainage problems, and sewer backup can come with little warning. If weather conditions look like flooding, the National Weather Service issues two types of flood notices: 9 Flood watch: flooding is possible within the area described by the notice. 9 Flood warning: flooding is imminent or occurring. To stay abreast of weather warnings, listen to NOAA Weather Radio. This is a radio station operated by the Weather Service. You can buy a special battery-operated weather radio at a local electronics store for $20–$35. It issues an alert signal if a watch or warning is being issued. (see also www.crh.noaa.gov/lot/nwr.php). There are several locations on the larger rivers where the Weather Service monitors river levels. You can see their “real time” levels at www.crh.noaa.gov/ahps2/index.php?wfo=lot. These can tell you if the streams are rising or falling. If you hear a siren or a severe weather watch or warning, check the latest instructions on local radio and TV stations. Once the emergency management agencies are sure that the danger has passed, they will issue an “all clear” message. Remember: You may not get a flash flood warning before flooding actually begins. Play it safe in stormy weather, and read the next section. What You Should Do Once you hear a flood watch or warning, you should take the following steps: 1. If the radio, television, or emergency vehicle announced what to do, follow those instructions. 2. Implement your flood response plan, if you have one. If a flood watch was issued, you can still make a flood response plan that includes the items in section 3 on see page 4. 3. If you are in the mapped floodplain or suspect you are subject to deep flooding that will get inside your house: a. Turn off the electricity and gas (see pages 18 – 19). b. Read “Flood Safety Outdoors” on the back cover. c. Lock your doors and evacuate 4. If you don’t have a place on high ground where you can stay, listen to the radio or TV for information on public shelters. Guide To Flood Protection − 17 − March 2006
5. If you are not in the mapped floodplain, it is unlikely that you will be flooded deeply. If the
   streets are underwater, you are better off staying in your house (See the graphic on page
   2). Read “Flood Safety Indoors” on the back cover.

6. If you are not in the mapped floodplain, but you know that your basement floods:

   a.     Turn off the basement electricity (see below).
   b.     Turn off the gas (see the next page).
   c.     Move any valuables upstairs.
   d.     Stay out of the basement if the water outdoors is touching the house (the water pressure
          could collapse the walls).

Turning Off the Utilities

If your house or basement could get flooded, turn off your utilities to prevent greater damage.
This section provides directions on how you can do this safely. If you are unsure of how to do
these things, ask a friend or neighbor to help you, or don’t do them at all.

Electricity: The most important utility to turn off is electricity. You have a fuse box or a
breaker box in the house. The breaker box is more common in newer buildings or if you have
had some electrical work done in the last 10 – 20 years. The illustrations below shows how to
turn off the power.

                   To turn off the electricity                                To turn off the electricity
                       at a breaker box                                             at a fuse box

        1. Stand on a dry spot.                                     1. Stand on a dry spot.
        2. Use a dry wooden stick or pole to open the               2. If your box has a handle on the side, use a
           door.                                                       dry wooden stick or pole to pull the handle
                                                                       to OFF.
        3. Use the stick to push the main breaker
           switch to OFF.                                           3. Use the stick to open the door.
        4. Use the stick to turn each circuit breaker to            4. Carefully pull out the main fuses.
           OFF.                                                     5. Unscrew and remove each circuit’s fuse.

Guide To Flood Protection                                  − 18 −                                            March 2006
Gas: Floodwaters may knock out pilot lights and silt may get into burners. To prevent a fire and
safety hazard, you should turn off the gas before you leave. There is a valve next to the gas
meter. If the valve handle is parallel to the pipe, the gas is on. You may need a pair of pliers or a
wrench to turn the valve. Turn it 90 degrees (a quarter turn) so the handle is perpendicular to the
pipe to shut the gas off.
Most gas meter valves have a hole in
the handle that lines up with a hole in
To turn off the gas
the valve body when the gas is shut off.
1. There is a valve next to the
gas meter. If it is parallel to
This hole is used by the gas company to
the pipe, the gas is on. lock or seal the valve closed when the
2. Use pliers or a wrench and building is vacant. When the holes are
turn it 90 degrees. lined up, you know that the gas supply
3. To be sure the gas is off, has been shut off. If you have any
write down the numbers on
all the dials on the meter.
doubts, play it safe and call your gas
4. Check the dials at least 5 company.
minutes later. If the
numbers have changed, Fuel oil tanks: If you have a fuel oil or
the valve is not closed.
propane tank, turn off the fuel valve at
the tank.
Gas or oil leaks: Check for leaky fuel pipes by smelling for gas.
A chemical that has a disagreeable, distinctive odor is added to
natural gas and propane to tell you if there is a leak. If you have
any doubts, have a professional check for you. Do not use open
flames.
Make sure the valve that leads to each appliance is closed. If you
find any pipes that moved or any area that smells like gas, brush
soapy water on each pipe connection (as illustrated). The pressure
in the pipes will make bubbles appear where there is a leak.
If you find a leak, turn off the gas. Unscrew the pipe connection,
clean the joint, and apply pipe joint compound or pipe tape If you find any pipes that
(available at hardware stores) on the threads. Screw the pieces smells like gas, brush soapy
back together tightly. Turn on the gas and check the connection water on each pipe connec-
tion. The pressure in the
again with soapy water. If you have a leak, or you are not sure pipes will make bubbles
your system is safe, turn off the gas and call a professional appear where there is a leak.
immediately.
Water. Since your water faucets are usually turned off, you shouldn’t have to worry about
turning all the water to the house off. However, if your washing machine is in the basement, or if
the floodwaters around your house could be several feet deep, the floodwaters could get into the
water lines through the appliances. If you have the time, turn off the water to the house. There
should be a valve near the water meter, similar to a faucet knob. Turn it all the way clockwise.
Guide To Flood Protection − 19 − March 20066. After a Flood
If you’ve been flooded, your home and its contents may look beyond hope, but many of your
belongings can be restored. If you do things right, your flooded home can be cleaned up, dried
out, rebuilt, and reoccupied sooner than you think.
You should get a copy of Repairing Your Flooded Home (ARC4477), published jointly by the
American Red Cross and the Federal Emergency Management Agency. Copies of the book are
available free from your local Red Cross chapter or you can see it at www.redcross.org/services/
disaster/ (go to “after a disaster,” then “floods”).
Here are some of the first things you can do after a flood. The next steps are explained (along
with more details) in Repairing Your Flooded Home.
Ask for help. Many people can do a lot of the clean up and repairs discussed in this guide. But if
you have technical questions or do not feel comfortable doing something, get professional help.
If there is a federal disaster declaration, a telephone “hotline” will often be publicized to provide
information about public, private, and voluntary agency programs to help you recover.
Step 1. Take Care of Yourself First
You and your family have been through a disaster. Your life has been disrupted and you must
allow time for things to return to normal. You should recognize that the flood can take its toll on
you as well as your property. You need to look after yourself and your family while you focus on
cleanup and recovery.
Play it safe. The dangers are not over when the water goes
Important Health Notes
down. Your home’s foundation may have been weakened, the
electrical system may have shorted out, and floodwaters may 9 Wash your hands thoroughly.
This is especially important
have left behind things that could make you sick. When in before eating, cooking, or
doubt, throw it out. Don’t risk injury or infection. smoking.
9 Confirm that the water is clean
Watch for signs of stress. Your hidden enemy is stress. and safe. Don’t drink it or wash
Watch for signs of trouble like short tempers, getting upset dishes until you’re sure.
over little things, having difficulty sleeping, bad dreams, 9 Disinfect dishes and all items
that floodwaters touched.
aches, pains, stomach problems, apathy, and depression. These
are ways your body tells you that times are difficult. Reactions 9 Watch out for fatigue. When
your body is tired, you are
to stress are common and usually temporary. If you cannot more prone to accidents, back
shake feelings of despair or other telltale signs of stress, get strain, and depression.
professional help. 9 Report health hazards. Call
your local health department if
Care for your children. Watch your children closely. You there are animal carcasses,
rats, dangerous chemicals, or
can expect to see them display fear or symptoms of stress. Be other hazards on your
understanding. Remember, they are going through a rough property.
time too.
Guide To Flood Protection − 20 − March 2006Step 2. Give Your Home First Aid Read the safety precautions on the back cover of this guide. Each year about 150 people die because of floods. Many of those fatalities are due to electrocution or other accidents that occur after the floodwaters have gone down. Your first job is to make sure everything is safe. Follow these steps: Check with your insurance agent to see if some of your cleanup and repair work is covered. If so, you may want to hire professional help for the rest of these steps. Walk around the outside of your house and check for loose power lines and gas leaks. You can detect leaking gas by the putrid, rotten egg smell of chemicals that have been added to it to make a leak noticeable. If you find downed lines or leaks, call the power or gas company (see “Important Numbers” inside the front cover). Remove tree limbs or other trash that may have landed on or floated into the house. Check the foundation for cracks or other damage. Examine porch roofs and overhangs to be sure they still have all their supports. Look for gaps between the steps and the house. If you see obvious damage, have a building inspector check the house before you go in. Turn off the electricity at your house, even if the power company has turned it off (they may turn it back on when you’re not ready). If you have to go through water to get to your fuse box or breaker box, if the boxes are wet, or if you’re not comfortable with electrical matters, call an electrician. Otherwise, you can follow the instructions on page 18. Turn off the gas. See the instructions on page 19. Go inside carefully. It may be easier to enter your house through a window if the door won’t open easily. Look carefully at the ceiling before you go in to be sure it is not ready to fall. Do not smoke or use candles, gas lanterns, or other open flames until the house has been well ventilated. There may be explosive gas. Rescue the most valuable items. Find and protect the “irreplaceables,” like money, jewelry, insurance papers, photographs, and family heirlooms. Wash the mud off before they have a chance to dry. Put them in a safe place like the upper story (if it’s dry), a plastic bag, or take them to a friend’s home. Wash the mud off photographs and papers and put them in a freezer for clean up later when you have the time to do a careful job. Keep the damage from getting worse. Open the windows and doors (if weather permits) to reduce the moisture and get rid of any gas. Cover holes in the roof, walls, or windows with boards, tarps, or plastic sheeting to keep out the wind and rain. Check for broken or leaking water pipes. If you find any, cut off the water supply by turning off the valve at your water meter. If sewer and water lines are damaged, don’t use toilets or sinks. If the water pipes are not leaking, you can use your tap water for hosing things down and cleaning. But do not drink or cook with tap water until the health department declares it safe. Guide To Flood Protection − 21 − March 2006
Step 3. Start Cleaning

Drain your basement carefully. Water in the saturated
                                                                     How to Drain a Basement
ground puts tremendous pressure on your basement walls
and floors (see the photo on page 8). The water inside          Pumping a basement out too fast can
                                                                result in broken walls and floors if there
your flooded basement is counteracting this pressure. If        is still water in the ground. To do it
you don’t follow the instructions in the box for emptying       safely, follow these steps:
the basement gradually, your walls and floor will lose the      1. Make sure the electricity is off.
support they need to counteract the pressure from the           2. If there is no floodwater on top of the
water outside. The weight of the saturated earth could             ground, start pumping the water out
then cause the walls to crack and collapse, buckling the           of the basement.
floors and seriously damaging your home.                        3. Pump the water level down two to
                                                                   three feet. Mark the level and wait
                                                                   overnight.
Get rid of the mud and silt. Most of the health hazards
brought by a flood are in the mud and silt that is left after   4. Check the water level the next day. If
                                                                   the water went back up, it’s still too
the water drains away. It is therefore very important to           early to try to drain the basement.
clean it out as soon as possible. This is a lot easier if you
                                                                5. Wait overnight. Then pump the water
do it before the mud dries out. Follow these steps:                down two to three feet again. Check
                                                                   the level the next day.
9 First, shovel out the mud.                                    6. When the water stops going back
                                                                   up, pump down another two to three
9 Next, make sure the electricity is turned off. Remove            feet and wait overnight. Repeat
  all light bulbs from sockets that have been flooded.             steps 4 through 6 until all water is
                                                                   pumped out of the basement.
  Throw away flooded wall switches and outlets. They
  should be replaced later with new ones.
9 Hose the house down, inside and out. If you have an
  attachment that sprays soap, wash and then rinse the
  walls and floors. Hose the furniture, too, and other major
  items that got muddy.
9 Double check that the electricity is off, then thoroughly
  hose out the electrical outlets, switch boxes, and light
  sockets that you opened up.
9 Don’t let the water sit on the floor too long. Mop it up
  right away, especially if your floor is particle board or
  another wood product that tends to fall apart when wet.

Clean everything that got wet. Flood waters have picked up
sewage and chemicals from roads, farms, factories, and
storage buildings. Spoiled food and flooded cosmetics and           Repairing Your Flooded Home can
medicines are health hazards. When in doubt, throw them             be obtained free from your local
out.                                                                Red Cross chapter or you can see
                                                                    it at www.redcross.org/services/
                                                                    disaster/ (go to “after a disaster,”
Follow the rest of the guidance in Repairing Your Flooded           then “floods”).
Home (see box).

Guide To Flood Protection                       − 22 −                                         March 2006
You can also read