Home Fruit Orchard Pruning Techniques - University of Georgia
←
→
Page content transcription
If your browser does not render page correctly, please read the page content below
Home Fruit Orchard
Pruning Techniques

Erick Smith, Bob Westerfield, and Dario Chavez
University of Georgia Horticulture

To thrive in the home garden, deciduous fruiting trees, bushes, and vines require a care
regimen just like commercial trees. The most commonly neglected practice is pruning.
Training and pruning will develop proper shape and form, ensure good fruit quality,
enhance longevity, and minimize damage and disease. Good pruning and training
practices promote strength in the framework and remove dead, damaged, and diseased
wood. Pruning will open the canopy to light penetration and allow the plant to carry fruit
to maturity.
Pruning and training invigorates new growth and enhances the ability of a plant to
develop high quality fruit. However, not all fruit trees and shrubs are pruned the same
way. The technique and timing of pruning fruit-bearing plants varies depending on the
variety and the desired results.
To consolidate the pruning techniques of various fruiting crops, information in this
publication has been excerpted from previous UGA publications. Access UGA Extension
publications online for further information on pruning woody plants (B 949) and the
cultivation of apples (C 740), pears (C 742), figs (C 945), peaches (C 1063), raspberries
and blackberries (C 766), blueberries (C 946), grapes (C 949), and pomegranates (C
997) in home gardens.
Leader

                                                                                               Scaffold
                                                                                               limb

                                                                                               Water
                                                                                               sprout

                                                                                            Secondary
                                                                                            scaffold

                                                                                       Crotch

           Trunk                                                                       Sucker sprout

                                Figure 1. Common terms used in pruning and training fruit trees.
     From Training and Pruning Your Home Orchard (PWN Cooperative Extension Service Bulletin 400) by J. Olsen, 2011.

Common Terms
Branch collar – The raised tissue at the base of every branch. It contains specialized cells that grow over the
wound, preventing infection.
Crotch angle – The angle formed between the trunk and a limb. An angle of 45 to 60 degrees has the greatest
strength.
Crown – The base of the trunk where the tree meets the soil.
Heading – A pruning cut that removes only part of the branch.
Lateral branch – A side shoot emerging from another branch, usually at a horizontal angle.
Leader – The apex of a scaffold limb. Fruiting trees can be trained to single or multiple leader systems.
Scaffold limb – A large limb that forms a tree’s framework.
Shoot – The length of a branch grown in a single season. Bud scale scars, which look like a ring of small ridges,
mark the start of a season’s growth.
Spur – A short shoot that fruits.
Stub – The part of a branch left after a pruning cut. Proper pruning practices will avoid leaving stubs.
Sucker sprout – A shoot that grows from the root within a season.
Terminal – The end of a shoot.
Thinning cut – A pruning cut that removes an entire branch from its point of origin.
Vertical branch – An upright growing branch.
Water sprout – A vigorous upright growing branch that tends to develop on upper surfaces of horizontal limbs

UGA Cooperative Extension Circular 1087 • Home Fruit Orchard Pruning Techniques                                        2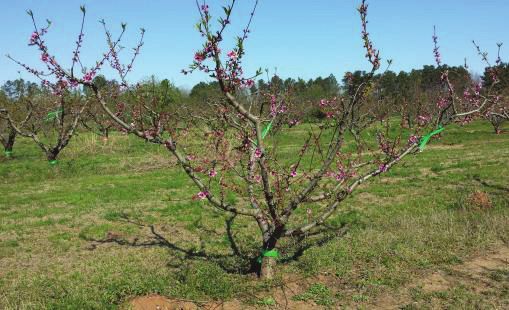
Pruning and Training1
Pruning is the removal of a portion of the plant. The purpose of pruning is to balance the plant between fruit
quality and structure.
Training is manipulation of the plant. Training involves spreading limbs, tying the plant to a trellis, and/or using
a rootstock for growth control.
Pruning and training starts at planting and is continued through the life of the plant. In the first few years of
establishing a fruiting plant, the grower should be thinking about its form or structure. The plant should be
shaped for ease of harvest, aesthetics, and continued annual pruning and training. If done properly, the plant will
require minimal effort each year to maintain the plant. Both pruning and training are activities that can be done
during dormancy and summer with great effect.

Dormant and Summer Pruning and Training
Training can take place year-
round. Mechanical manipulation               Bark                                              Bark
of branches, vines, or canes is                Cambium                                       Inclusion
best accomplished before
the tissue has become stiff or                    Wood (xylem)
hardened-off. However, supple
tissue can also be easily broken,
warranting careful consideration
of the timing for training.
Training is done to control the
direction of growth, reduce
narrow-angled branching, and
devigorate growth. Shoots or
limbs having narrow-angled
crotches are weaker than those
having wide crotch angles
(Figure 2). The bark of the
adjoining branches becomes
tightly compressed or included,                                          Collar
preventing normal                                                        Tissue
wood development.                           Wide Crotch                                 Narrow Crotch
Dormant pruning takes place
in late winter or early spring
                                         Figure 2. Wide crotches (left) are stronger than weak, narrow crotches (right).
to avoid damaging freezes.
Dormant pruning is an invigorating process. Carbohydrates are produced by the plant and stored in the roots
and trunk for the initial burst of spring growth. By removing branches and limbs during dormant pruning, there
will be fewer growing points, and the tree will respond by producing new vigorous, upright shoots, called water
sprouts. Water sprouts and excessive vegetative growth from severe dormant pruning may be corrected with
summer pruning.
Summer pruning is devigorating for the plant by reducing the amount of carbohydrates being stored. Summer
pruning removes the vigorous water sprouts and excessive vegetative growth. Summer pruning may begin
from early bud growth to the end of July. Pruning into late summer and early fall can increase the potential for
winter injury.
UGA Cooperative Extension Circular 1087 • Home Fruit Orchard Pruning Techniques                                        3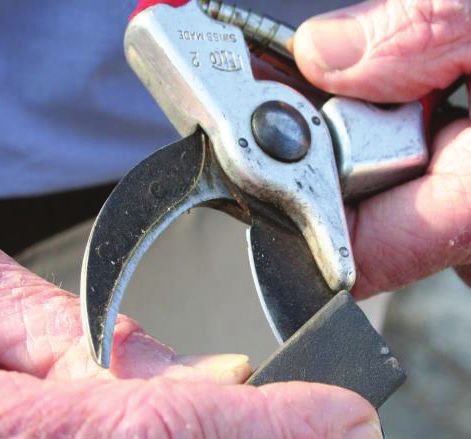
Pruning Cuts
Heading Cut
A heading cut removes the terminal
part of a branch (Figure 3). Heading
cuts are used to invigorate and
promote lateral branching. Heading
1-year-old wood will stimulate
branching within 12 to 15 inches from
the cut and strengthen the headed
branch. For older trees, heading wood
that’s at least 2 years old will help it
to maintain form. Other names for
heading cuts are topping, dehorning,
hedging, and clipping.                                    Figure 3. Heading removes a part of a shoot or limb.

Thinning Cut
A thinning cut removes the entire
branch from its point of origin at the
lateral or main branch (Figure 4).
Thinning cuts remove wood from
the branch collar (the raised tissue at
the base of the branch) and does not
leave a stub. Thinning cuts are used to
shorten limbs, remove water sprouts,
and clear excessive vegetative growth
to improve light penetration and direct
the growth of shoots and limbs.
                                                          Figure 4. Thinning removes the entire shoot or limb.
Drop-crotching
A form of thinning used to reduce the size of large trees, drop-crotching involves the removal of a main branch
or leader by cutting it back to a large, lateral branch. The cut through the main branch is made parallel to the
angle of the remaining lateral. When removing large tree limbs, a series of three cuts are recommended to avoid
tearing the bark along the main trunk and opening a large wound that could become infected (Figure 5).

                               a                                            b
  Second Cut
 First Cut
                                                                                                          Second Cut
  (notch)
                                                                                                            First Cut
                                                                                                            (notch)
                                                                                            Third Cut

       Third Cut                             Bark Ridge                                       Collar Tissue

                          Figure 5. Types of thinning cuts: (a) drop crotching and (b) limb removal.

UGA Cooperative Extension Circular 1087 • Home Fruit Orchard Pruning Techniques                                         4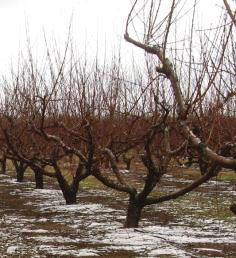
The bench cut is the removal of vigorous upright limbs to a horizontal limb that often results in water sprouts.
Careful consideration of limb removal should be observed to avoid weakened regrowth. The correct method
is to make cuts that are similar to the limb being removed but not greater than 45 to 60 degrees from vertical
(Figure 6).

               Wrong                                                                     Right
                              Figure 6. Compare the bench cut (left) with correct method (right).

Healing Response to Pruning                                                                    Crotch
Healing naturally follows pruning or
wounding. It starts in the cambium, a
thin layer of cells between the wood and
bark. Two areas of the cambium, the
                                                                      a    Bark
bark ridge at the junction of two limbs,                                   Ridge
and the branch collar, a ring of slightly
raised tissue where the lateral branch joins
the main limb, function to close off the
wound between the plant and the pruning
cut. For fastest healing, prune close to
the main branch without injuring the
bark ridge or branch collar areas (Figure
7). Leaving a stub will slow healing and
                                                                                                     b   Collar
invite decay. There is no clear evidence                                                                 Tissue
that wound dressings reduce wood rots;
however, using an approved fungicide                           Figure 7. Areas of cambium important for healing:
                                                                       (a) bark ridge and (b) collar tissue.
after pruning will minimize infection.

Selection and Maintenance of Pruning Equipment
Pruning equipment does not have to be sophisticated, but it should be of the best quality you can afford. A
quality pair of bypass, scissor-type hand pruners will go a long way toward accomplishing simple orchard
pruning. Select a pair that are comfortable in your hand and are made of quality materials that have replaceable
components. Inexpensive hand pruners will not last as long as a quality pair, and they may not perform as well.
A quality pair of lopping clippers is also vital for good orchard maintenance. The lopping shears, just like the
hand clippers, should be of the bypass type. Loppers with longer handles will allow you to develop more torque
when taking off larger diameter branches.
A pruning pole and handsaw are two other important tools you want to have on hand, particularly if you are
growing fruit trees. Pruning poles can reach to the top of trees to a height of 15 to 20 feet, which would be
useful if you were pruning out something like fire blight from an apple tree. A small foldable hand saw will

UGA Cooperative Extension Circular 1087 • Home Fruit Orchard Pruning Techniques                                    5
make quick work of lower, accessible branches that are
                                                            too big for the hand pruners or lopping shears.
                                                            All of your pruning tools should be kept sharp and
                                                            clean so that they are always ready for the next job.
                                                            Sharpening is best accomplished by using a small mill
                                                            file followed by some type of stone or diamond
                                                            sharpener to create a razor sharp edge (Figure 8).
                                                            Always maintain the sharpening angle on the blade that
                                                            was intended by the manufacturer. Clippers should be
                                                            disinfected with a light diluted alcohol mix (1 part
                                                            alcohol to 4 parts water) or a disinfectant spray solution
                                                            (1 part bleach to 9 parts water) to help protect against
                                                            transfer of viruses and other disease pathogens.
                                                            Disinfect pruning tools between each plant, and when
                                                            removing diseased plant tissue, disinfect after each cut
  Figure 8. Proper sharpening of bypass hand clippers.
                                                            to minimize further infection. When pruning, have a kit
                                                            handy with a sharpening tool and spray bottle filled
                                                            with disinfectant.

The Art and Science of Pruning and Training
Pruning and training starts at planting and continues throughout the life of the fruiting plant. The pruning
practice or strategy used depends on the fruiting plant, space allotted, and environmental conditions. When
selecting a fruiting crop, learn whether the plant is self-fertile or needs cross pollination, how many chilling
hours are required for the plant to flower, and how susceptible the plant is to freeze damage (cold hardiness).
Also, carefully consider the plant’s susceptibility to diseases and insects that may limit the plant’s survivability.
Pruning out fire blight, twig borers, and freeze damage can limit fruit production and require considerable effort.
Fruit thinning should be considered throughout the life of the plant. Tree fruit crops such as apple and peach
tend to overcrop, causing limb breakage. In the first year after planting, all fruit or flowers should be removed to
promote shoot and root growth.
Read through the following sections to learn pruning methods for various fruiting crops.

UGA Cooperative Extension Circular 1087 • Home Fruit Orchard Pruning Techniques                                      6
Tree Fruits
Apples2
Pruning apple trees should start at planting to develop a strong, well-balanced framework of scaffold branches.
Remove unwanted branches, or cut them back early to avoid the necessity of large cuts later. Apple trees are
available in a number of scion/rootstock combinations and purchasing the appropriate combination to fill the
space selected in the yard will reduce the amount of pruning needed each year. Although apple trees are trained
in a number of configurations, the central leader training method is widely recommended and is the method
shown in the following.
At Planting: Whether you obtain a small unbranched whip or a larger
branched tree, it is necessary to prune the tree at planting. Head the
unbranched whip back to 24 to 30 inches from the ground (Figure 9). This
will cause the buds just below the cut to grow and form scaffold branches.
If branched 1- or 2-year-old trees are planted, select four or five lateral
branches with wide-angled crotches that are spaced equidistant around the
tree and 2 to 5 inches apart vertically. The selected laterals should be no
lower than 18 inches above the ground, and they should be pruned back
slightly by cutting off one-fourth of each limb’s length.
Figure 9. Heading cut at planting.
First Growing Season: When the tree has grown 2 to 3 inches,
begin the training process. Fasten wooden, spring-loaded clothespins
between the main branch and the new succulent growth (Figure 10).
The clothespins force the new growth outward and upward to form the
strong crotch angles needed to support the fruit load in years to come. The
clothespins should be left on the tree for about 6 weeks.
Figure 10. Clothespin training.
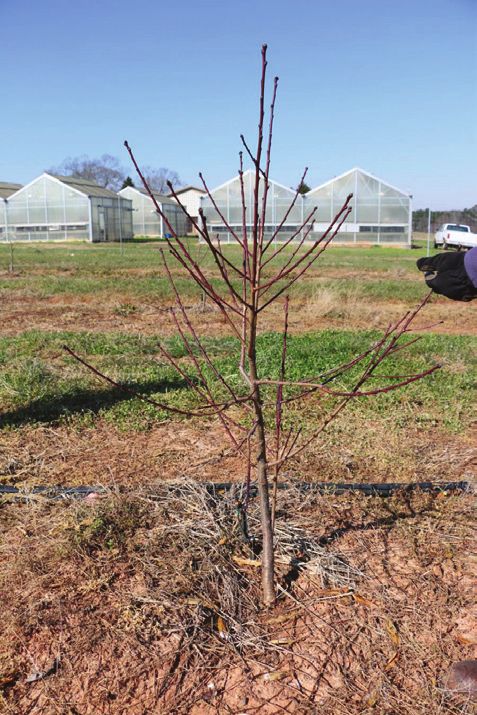
One Year Old: A number of branches should have developed after
the first growing season, and if they were clothespinned, they should have
good, wide crotch angles. The objective now is to develop a strong central
leader and framework of scaffold branches. In Figure 11, we can see the
1-year-old tree before and after pruning. Note that we have left only four
scaffold branches spaced around the tree. All of the remaining branches,
as well as the central leader, have been pruned back by about one-fourth.
Always make sure the ends of the scaffold branches are below the end of
the central leader after they have been pruned.
Figure 11. First year before (left)
and (after) dormant pruning.
Second Growing Season: During the second growing season,
develop a second layer of scaffolds on the central leader 24 to 30 inches
above the scaffolds you established the year before. Be sure to use the
clothespins on new succulent growth, particularly shoots that develop
below the central leader pruning cut, so you will develop wide crotch
angles. Figure 12 illustrates a properly trained apple tree in late May of
the second growing season.
Figure 12. Properly trained tree.
UGA Cooperative Extension Circular 1087 • Home Fruit Orchard Pruning Techniques 7Two Years Old: The use of limb spreaders can help bring about
earlier fruit production, improved tree shape, and strong crotch angles.
Spreaders can either be short pieces of wood with sharpened nails driven
into each end or sharpened metal rods. Limbs should be spread to a
45- to 60-degree angle, but not above a 60-degree angle from the main
trunk. Limbs spread wider than 60 degrees have a tendency to produce
vigorous suckers along the top-side of the branch and may stop terminal
shoot growth. The spreaders will need to remain in place for about six
weeks until the wood “stiffens up.” Figure 13 illustrates a 2-year-old
tree after pruning in which metal rods have been used as spreaders.
Pruning consists of entirely removing undesirable limbs and, only where
Figure 13. Note the spreaders. necessary, reducing the length of terminal scaffolds by one-fourth. Unless
they’re excessively long, weaker side limbs should not be pruned so that
they can develop flower buds. Excessive and unnecessary pruning will
invigorate a tree and delay fruit production.
Proper training, spreading, and pruning have resulted in the development
of flower buds that will produce a good crop in the coming season
(Figure 14).
Notice that the upper (second) set of scaffolds should be shorter than
lower (first) set. The second and any succeeding scaffold layers should
always be kept shorter by dormant pruning. A properly trained and
pruned central leader tree should conform to roughly a pyramidal
Figure 14. Properly trained (Christmas tree) shape.
4-year-old apple tree.
Pruning Neglected Apple Trees: Many people purchase homes
that have older apple trees on the property. In many cases, the previous
owner did not take the time to properly prune the trees, and the result
is similar to Figure 15. The tree has become bushy and weak and
will produce very poor quality apples. Such a tree requires extensive
corrective pruning.
The main objective in pruning such a tree is to try and open up the interior
to allow good light penetration. The first step is to remove all the upright,
vigorous growing shoots (at their base) that are shading the interior. As
Figure 15. Unpruned apple tree. with the young apple trees, it is necessary to select three to five lower
scaffold branches with good crotch angles that are spaced around the tree.
Limbs with poor angles and excess scaffold limbs should be removed at
their base. In some cases it is advisable to spread the corrective pruning
over two to three seasons. When severe pruning is done in the winter, do
not fertilize the trees that spring.
Figure 16 is the same tree after the first season’s pruning. The next year, it
will be necessary to remove more limbs, especially on the left side. Note
that most of the cuts were thinning types; that is, the wood was removed
to its base or point of origin.
Figure 16. After pruning. The remaining limbs can be pruned back to a fourth of their length to a
side limb if it is desired to stiffen them. If you don’t cut them back, the
limbs may bend and/or break under a heavy crop load.
UGA Cooperative Extension Circular 1087 • Home Fruit Orchard Pruning Techniques 8Pruning and Training to the Trellis: Non-spur varieties on M 9 and M 26 and spur varieties on M 7
rootstock are the best to train to a trellis. To train trees to a trellis, start by planting the trees midway between the
posts (Figure 17). Remember to keep the graft union above the ground. Cut the trees off at 24 inches high and
loosely tie them to the bottom trellis wire. Allow young shoots to develop in spring and early summer.
Some shoots will develop outside the plane of the trellis (projecting away from the wire). Remove them, or
bend and tie them to the wire so they fit the plane.
After the first growing season, tie the developed limbs to the wire so that each will form a 45-degree angle with
the main trunk (Figure 17). Avoid training limbs horizontally or flat along the wire, as vigorous upright sprouts
will develop along the upper surface of the limb at the expense of flower buds.
5-inch pressure
treated posts No. 9 wire
18”
45° 18”
6 ft.
18”
18”
8 ft.
3 ft. Tree after 1 Tree after 4
year’s growth years’ growth
Figure 17. Trellis training for non-spur apple varieties on dwarf and semi-dwarfing rootstocks.
Remove undesirable limbs. Prune back the terminals of the tied limbs as well as the central trunk.
Pruning after the second growing season should be done similarly to the first season. Your goal is to fill the
trellis area with limbs the first 2 or 3 years following planting to encourage tree growth. Once fruiting begins,
the amount of necessary pruning will be reduced.
Periodically, limbs get old and production decreases. If a limb starts declining, prune it out and train a new one
to take its place.
Girdling may result where the limbs and trunk are tied to the wires. Check these ties periodically to make sure
they are still loose.
UGA Cooperative Extension Circular 1087 • Home Fruit Orchard Pruning Techniques 9Pears3
Like apples, pears are usually trained as a central leader. The same steps that apply to apple trees will work for
pear trees. At planting, prune the trees back to single whips 24 to 30 inches from the ground line. After a single
growing season, your tree should look similar to the tree in Figure 18a. Prune off any limbs that are less than 18
inches from the ground, leaving four to six limbs to be the scaffolds (the main fruiting limbs on a mature tree).
Figure 18b illustrates what Figure 18a should look like after pruning.
Cut
Tip back
here
Thin out
Figure 18a. A 1-year-old pear tree before dormant pruning. Figure 18b. A 1-year-old pear tree after dormant pruning.
After the second season, tie
Cut back here Remove vigorous
down the lower scaffolds to a
upright sprouts
45-degree angle to help open
up the tree to light. Prune
out crossing, broken, and/
or diseased limbs, as well as
vigorous upright (vertical)
sprouts that may develop
along the limb (Figure 19).
Pruner’s note: Pear and
apple trees are extremely
susceptible to fire blight,
a disease that kills limbs
or whole trees. Remove
diseased branches as soon as
they appear. When pruning Figure 19. A 2-year-old tree properly trained with strings on scaffold limbs
out a diseased limb, cut at in the dormant season. Train limbs to a 45-degree angle.
least 6 inches below the area
where any infection appears. After each cut, dip or spray the cutting surfaces of your pruners with a rubbing
alcohol solution (1 part alcohol to 4 parts water) or chlorine bleach solution (1 part chlorine bleach to 9 parts
water). Burn the diseased material, or have the garbage collector haul them off.
UGA Cooperative Extension Circular 1087 • Home Fruit Orchard Pruning Techniques 10Figs4
Although fig plants can be trained to either tree or bush form, the tree form is not practical for the Piedmont area
of Georgia. In this region, fig plants are frequently frozen back to the ground, making the tree form difficult to
maintain.
Bush form is generally recommended for other areas of the state as well. In the bush form, more of the fruit will
be closer to ground level and easier to pick.
Begin training to bush form at the time of planting by cutting off one-third of the young plant. This forces
shoots to grow from the base of the plant. Let these shoots grow through the first season. Then, late during the
winter after the first growing season, select three to eight vigorous, widely spaced shoots to serve as leaders.
Remove all other shoots.
Be sure the leaders you select are far enough apart to grow to 3 to 4 inches in diameter without crowding each
other. If they are too close together, the leaders cannot grow thick enough to support themselves and their crop,
and they tend to fall over or split off under stress of high winds. If this happens, remove the damaged leader and
select a new one late the next winter by choosing one of the many suckers that arise annually.
If more branching is desired, head back the bush each spring beginning the second year after planting, after
danger of frost is past but before the start of growth. Do this by removing about one-third to one-half the length
of the last year’s growth.
Also, prune all dead wood and remove branches that interfere with the leaders’ growth. Cut off low-growing
lateral branches and all sucker growth that is not needed to replace broken leaders.
Do not leave bare, unproductive stubs when you prune. These stubs are entry points for wood decay organisms.
Make all pruning cuts a thinning cut back to a bud or branch.
Peaches5
Pruning and training is necessary for peach trees to develop a proper shape and form. If correctly maintained,
trees will fruit well, live long, and become strong and able to support a high fruit yield in the future. The
training needs to start within the first year of planting in order to achieve a proper form. Pruning is usually
performed in early spring, after the danger of frost is over but when the trees are still in the dormant state. Two
commonly used training techniques are:
• Open center or vase shape system
• The Kearney Agricultural Center Perpendicular “V” Orchard System
Open Center or Vase Shape System
Trees pruned in this manner have a short trunk with three to four scaffold branches around an open center. To
achieve this form, follow the steps below:
• Peach trees can be planted about 18 to 20 feet apart within a row (Figure 20). The tree spacing within
a row can change depending on the vigor of the rootstock being used (‘MP-29’ is semi-dwarf and
‘Guardian’ is a vigorous rootstock).
• Immediately after planting, head the tree back to 24 to 30 inches.
• Cut all the branches below that cut in half to encourage growth of strong, wide angled branches.
UGA Cooperative Extension Circular 1087 • Home Fruit Orchard Pruning Techniques 11• Prune any limbs that are up to 15 inches from the ground.
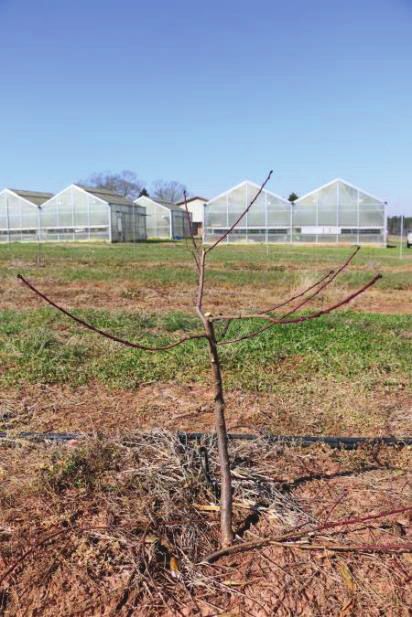
• In early spring, the year after planting, choose three to four well
developed wide angled branches (Figure 21) and cut them to about
30 inches long while removing all other branches (Figure 22).
These branches will become the main scaffolds or fruit bearing limbs.
• Pull out all the suckers that grow along the tree trunk. Hand-pulling
them, especially when they are young, increases the probability that
they will not regrow in the future.
• Maintain the size and shape of the mature tree by annually removing
branches below the main scaffolds, including the ones that are
broken or dead. Next, prune vigorous upright limbs growing along Figure 20. Mature peach
orchard at 18-foot spacing
the scaffolds. To maintain the tree height (9 to 10 feet), head back (Photo by Dario J. Chavez).
scaffolds branches growing outward to a desired height (Figure 23).
Figure 21. Open vase Figure 22. Open vase after
pruning in the second year, pruning in the second year Figure 23. Open vase mature and maintained tree (Photo by D. J.
with red lines indicating (Photo by D. J. Chavez). Chavez).
cuts (Photo by D. J.
Chavez).
The Kearney Agricultural Center
Perpendicular “V” System
Perpendicular “V” System (Figure 24) has several benefits when
compared with open vase training. The trees typically have a higher
fruit yield by 15 to 125 percent starting in years 2 through 6. From
year 8 and beyond the yield is the same or greater than trees pruned
in an open vase shape. The V system reduces summer pruning to
a minimum. Thanks to this simplified form, pruning, thinning, and
harvesting are fairly easy. The simple and open form also allows
plenty of air and sunlight to flow freely inside the tree canopy
preventing shading and keeping it healthy.
Figure 24. Perpendicular ”V” System
(Photo by D. J. Chavez).
UGA Cooperative Extension Circular 1087 • Home Fruit Orchard Pruning Techniques 12Trees pruned according to Perpendicular “V” system have a low trunk and an open center with two main
scaffold branches. To achieve this form, do as follows:
• Plant peach trees in January or February in Georgia. Plant them 5 to 6.5 feet apart within the row and
18 to 20 feet between rows or even closer (12 to 14 feet), especially in a home orchard that does not use
heavy equipment.
• After planting, head the tree back to a height of 20 to 30 inches and remove any lateral shoots.
• In the spring when the side braches are about 15 to 24 inches long, select two primary scaffolds that
are oriented in the same plane, perpendicular to the row. These two branches should form a “V.” Do not
bench cut selected scaffolds to prevent water sprouts growth.
• Follow up with pruning in mid-summer and remove any vigorous growth in order to maintain the “V”
shape. Remove by hand all the water sprouts that may grow in the tree crotch or along the scaffolds.
• In the second year after planting, prune the trees in February and remove non-fruiting wood. Leave only
enough fruiting wood to support 18 to 24 fruit per scaffold.
• In mid-May, again remove all water sprouts and vertical shoots. Repeat the process in July or August.
The goal is to let the light infiltrate the growth that will initiate flower buds.
Although Perpendicular “V” System is a high-density system for orchards having from 375 to 580 trees per
acre, this type of training can also be used in home gardens. If used, the trees will be planted closer together
compared to the open center system, thus saving the space for another crop.
UGA Cooperative Extension Circular 1087 • Home Fruit Orchard Pruning Techniques 13Small Fruits
Blackberries/Raspberries6
Brambles have two specific fruiting patterns. Annual bearing types fruit on the cane that is grown in the
same season and is mowed down in the dormant season (fruiting primocane). The biennial bearing brambles
are more common and have primocanes and floricanes. Primocanes occur in the first year of growth, are
vegetative throughout the growing season, form fruiting buds in late summer to early fall, and are retained
for next season’s fruit. In the second year, the floricanes flower, set fruit, begin to die soon after fruit ripening,
and are removed. New canes are produced each season, so fruiting canes are present annually after the first
year of planting.
First Year: Little pruning is necessary for trailing brambles the year they are planted. Place a mulch of
pine straw, hay, newspaper, or plastic on the ground around the plants.
Second Year: After the fruiting season, remove the old canes that are in the process of dying. Tie the
new canes of trailing blackberries to the trellis and tip them 6 inches above the top wire to encourage branching.
During the following winter, train canes in a fan pattern away from the crown, and place ties where canes cross
each trellis wire. Lateral shoots may be shortened to lengths of 10 to 20 inches if necessary. In the second year,
plants should have a total cane length of 20 to 50 feet, with larger, vigorous plants retaining more wood. As the
plants age, more canes can be left. Exceptionally vigorous plants may be able to support up to 100 feet of canes.
Plants with low vigor should be pruned to retain fewer canes.
For Dormanred raspberries, let the canes lay on top of the mulch until late February, then tie them to the trellis.
This will reduce winter damage to the canes. After the first fruiting season (second year of establishment), the
fruiting canes will die. Prune out the dead canes.
Confine new canes (those that will produce fruit the next season) to the ground under the trellis so you do not
run over them with a mower. In late winter, train the new canes to the wires. Because some of these new canes
to be trellised may be 15 or more feet long, estimate the length of individual canes needed to fit on the trellis.
While the canes are still on the ground, cut them to this estimated length, lift them off the ground and tie them
to the trellis. Figure 25 shows a job well done with Dormanred raspberries. When lifting the canes, do not bend
them excessively or they may break.
18”
18”
24”
Figure 25. A proper trellis for trailing blackberries or Dormanred raspberries.
UGA Cooperative Extension Circular 1087 • Home Fruit Orchard Pruning Techniques 14Blueberries7
2’
For the homeowner, rabbiteye blueberry will Cut
perform well throughout Georgia. Highbush
blueberry is divided into subspecies, Northern
and Southern highbush, where chill hour
requirements are a major characteristic that
separates them. Be aware of this difference when 1’
choosing blueberry plants.
At planting for highbush and rabbiteye blueberry,
prune the plant back 1/3 to 1⁄2. Remove low
twiggy growth entirely, and tip remaining shoots
to remove all the flower buds (Figure 26).
The first year, remove any flowers or fruit that
escaped the pruning process. This allows plants Figure 26. Blueberry pruning at planting.
to expend energy on establishment rather than
producing fruit. 6’
After establishment, rabbiteye blueberries require
little pruning until they reach about 4 to 6 feet 5’
in height. At this point, a cane renewal pruning
program should be started. Remove one to three
4’
of the largest canes each winter at 0 to 24 inches
from ground level or a total of about 20 percent
of the canopy (Figure 27). In areas where stem 3’
borers are a problem, make the pruning cuts at 24
inches. Over a period of five years, the bush will 2’
be totally renewed. New, more productive canes
will sprout from the old canes and will sprout
below ground level. In addition, excessively tall 1’
canes can be pruned back to 6 feet each winter.
Highbush blueberry often overproduce and
annual pruning is usually necessary to keep the
bushes healthy. On 3- and 4-year-old plants, Figure 27. Cane renewal rabbiteye blueberry.
remove low spreading branches and excessively
twiggy growth with too many flower buds. When
the bushes are about 4 or 5 feet tall, begin a
cane-renewal pruning program (Figure 28). First
remove the oldest, weakest canes or diseased
canes entirely. Then, among the remaining
canes, start with the older ones and prune back
approximately two per year either to strong
laterals or to within 1 foot of the ground. New
strong canes will usually develop below the cut.
Over a period of 4 or 5 years, a new rejuvenated
bush framework will be developed.
Figure 28. Cane renewal pruning and branch
thinning of highbush blueberry.
UGA Cooperative Extension Circular 1087 • Home Fruit Orchard Pruning Techniques 15Grapes8
Backyard Trellis Design:
The one-wire trellis (Figure 29) and the double-curtain trellis (Figure 31) are the two most common trellises
used by backyard gardeners. The one-wire trellis is easier to construct, but yields are greater from the double-
curtain. The two-wire — or four-arm Kniffin — system (Figure 30) is used to devigorate American type bunch
grapes and the single-wire low trellis with catch wire (Figure 32) is used with French hybrid and European
bunch grapes. If space is limited, the double-curtain should be used to maximize production.
One-Wire Trellis — Use the single wire trellis Arms
system in South Georgia because of fruit disease
problems. End posts should be 5- or 6-inch pressure- Spurs
treated, 8-foot posts. Set them 3 feet deep and angle No. 9 Wire Arms
them slightly away from each other. Line post(s)
should be 4 inches in diameter and 7 feet long. Set
them 2 feet deep in a vertical position. Use number
Trunks
9 wire to support the vines. Wrap the trellis wire
5’
around one end post near the top. Staple it securely
several times. Then run it across the top of the end 20’
post and staple it loosely. Next, run the wire over the
tops of the line posts. Staple the wire loosely to the
tops of these posts. Staple the wire loosely to the top 3’
5” Pressure-treated Post
of the other end post. Then, pull the wire tight. Wrap
it around the end post and staple it tightly several
times. The wire should be 5 feet above and parallel Figure 29. A one-wire trellis with established vine.
to the ground.
Two-Wire Vertical Trellis — The two-wire vertical trellis used for the four-arm Kniffin training system
is considerably less expensive to construct than the double curtain trellis. However, shading of the foliage on
the lower fruiting canes by the upper canes reduces the quality and productivity of the grapes on the lower
wire. Figure 30 illustrates the construction of the two-wire vertical trellis. The primary use for this trellis is in
situations where space is limited, but where there is good direct sun exposure. If direct sun exposure is limited,
use the double curtain or single-wire trellis.
4” min. diameter 3” min. diameter
post
No. 9 wire
2.5’
No. 9 wire
5.5’ ire
w
.9
No ed 3’
ist
tw
8’ 20’
2.5’ 1.5’
Figure 30. A two-wire vertical trellis (four-arm Kniffin).
UGA Cooperative Extension Circular 1087 • Home Fruit Orchard Pruning Techniques 16Double-Curtain Trellis — The double 4’x4’ Pressure-treated cross arm
curtain trellis provides two wires 4 feet apart and
5 feet above ground. This permits each vine to 4’
produce 40 feet of fruiting arm rather than the
conventional 20 feet with the one-wire system.
Figure 31 is an example of a double curtain trellis
1/2” Bolt
made with pressure-treated wood. At 4-inch
galvanized pipe welded to form the “T” shaped 5’
end posts can also be used. Regardless of the 20’
2”x4” Braces
materials used, they should conform closely to (Pressure-treated)
the specifications shown in Figure 31. The wires 3’
should be parallel to the ground. 6” Pressure-treated Post
Figure 31. A double curtain trellis with established vines.
Single-Wire Low Trellis with Catch
Wires (or Low Trellis Cordon System) —
10”
French hybrid and European bunch grapes have new
shoots that naturally grow upward. Two removable
catch wires above the cordons (arms) further encourage 10”
this growth habit and allow good exposure of the fruit
3’
to sunlight and fungicide sprays. The low-trellis cordon Catch
system establishes the cordons 3 to 3.5 feet above wires
the ground and includes two removable catch wires Wire for
positioned at 10-inch intervals above the cordon wire. cordon
This system promotes vertical growth, resulting in a
narrow, upright vertical canopy (Figure 32).
Figure 32. Single-wire low trellis with catch wire.
Training:
First Year — Regardless of the training system to be followed, your goal is to establish a well-developed
root system. It is recommended that after planting, the strongest cane be cut back to two or three strong buds.
Remove any other canes present. Because it is sometimes difficult to determine the condition of a dormant
vine, however, some growers prefer to leave five to six buds and then, when growth starts, only allow the most
vigorous or desirable buds to develop into shoots.
If the trellis cannot be constructed the first growing season, then a stake 4 to 5 feet high should be driven in the
soil near each vine and the new growth should be trained to it. Tie the shoots loosely, or with plastic tape, to
avoid the possibility of girdling. In cool areas of the country, growth rates are slow, and vines are often pruned
back to near ground level the first winter to help develop a vigorous trunk the second year. In Georgia the
growing season is long, and vines often make impressive growth the first year.
One-Wire Trellis — Tie the free end of the string to the trellis wire. Train the shoot to the string. Pinch off side
shoots as they develop. When the shoot reaches the top wire, pinch it off just below the wire. Let the top two
buds form the two arms along the trellis wire.
Double-Curtain Trellis — Develop a double trunk (Y shape) for each vine approximately 30 inches above the
ground. This is done by pinching out the growing point and forcing two shoots to develop. One trunk should be
allowed to grow to one of the trellis wires and the other trunk to the other wire. Just below the wire, pinch out
the tip of the growing shoots to encourage side branches. Under good conditions, the trunk system for the grape
vine should be developed by the end of the first growing season.
UGA Cooperative Extension Circular 1087 • Home Fruit Orchard Pruning Techniques 17Two-Wire Vertical Trellis — Develop a single strong shoot arising from the young plant by removing
competing shoots. Train this shoot to a string or stake running from the upper wire of the trellis to the ground.
Just below each wire, pinch out the tip to encourage two side arms to develop.
Single-Wire Trellis High Trellis and Single-Wire Low Trellis with Catch Wires — One shoot should be
allowed to develop into the trunk. Train the trunk to a string or a training stake. When the tip reaches the wire,
pinch it out and select two shoots growing about 8 inches below the wire. Shoots positioned to grow on the
trellis wire should be allowed to grow 12 to 18 inches long before they are tied down to the wires. Never tie
the growing shoot tips to the wire because they will lose vigor. Always leave at least 6 inches of shoot tip free
beyond the last tie so it can grow in an upward
direction to maintain vigor.
Fruiting canes
Second Year — The second year should be
devoted to training and developing a strong plant
structure that can support some fruiting during the Renewal
spurs
third season. Figure 33 illustrates vines properly
trained to the double-curtain trellis, while Figure 5’ Double
trunks
34 illustrates pruning and training to the two-wire
vertical trellis (Kniffin system).
Assuming normal growth has been obtained during 10’
the first growing season; all buds on the trunk
remaining after pruning are capable of developing
into shoots and producing fruit. Fruit production Main trunks 5’
at this stage of vine development will reduce
vegetative growth and, therefore, is not desirable. Figure 33. The double curtain trellis showing double
Removal of flower clusters when they occur is trunks, fruiting canes, and renewal spurs after pruning.
recommended. All shoots below the bottom trellis
wire should be removed, including suckers from the
base of the vine. Continue to develop the permanent
cordons (arms). Pinch off developing flowers unless
the vines have made tremendous growth the first
year. Even then, leave no more than a cluster or two
of fruit. Remember that your goal is training, not
fruit production.
Tie Cordon
Pruning a Bearing Vine: shoot
Grapes require heavy annual pruning to maintain
quality and productivity. Prune during the dormant
season. Because of our mild climate, prune during
February. Late winter or spring pruning will
cause “bleeding” (flow of sap through the pruning Figure 34. Single-wire low trellis with catch wires. Tie the
wounds), but this should not cause alarm since it cordon shoots to the cordon wire only after they are 1.5 to 2
does not damage the plant. feet long (From S.C. Master Gardener Training Manual).
Cane and spur pruning are the methods used for grapes. American-type bunch grapes can be pruned by
either cane or spur pruning. French hybrid type bunch grapes and muscadines are typically spur pruned.
With cane pruning, only the trunk is permanent. The cordons (arms) are formed by leaving several of last
year’s canes. With spur pruning, the trunk and the cordons are permanent and the 1-year-old canes are cut
back to short shoots (spurs).
UGA Cooperative Extension Circular 1087 • Home Fruit Orchard Pruning Techniques 18Cane Pruning (American type bunch grapes)
Do not over crop third year
vines. Thin the fruit clusters Renewal spurs - 2 buds
to one per shoot. Most mature
vines (typically 4 years and
older) should be pruned to
have between 30 and 60
buds. The more vigorous the
vine, the more buds should
be left. Balanced pruning, a
Fruit canes
method of pruning to balance (previous season’s growth)
production and vine vigor,
is recommended for two-
wire systems. To balance Figure 35. Grape vine properly pruned showing fruiting canes
prune, select four canes of and renewal spurs. Each cane on the double-curtain or two-wire
last summer’s growth, one vertical trellis should be pruned similarly.
for each direction on the two
wires. See Figure 35.
These should be selected from canes arising from the head of the vine. Canes about the diameter of a pencil
are most desirable. Cut each of these back to leave 15 to 20 buds per cane. Gather up all of last season’s canes
pruned from the vine and weigh them. Note: Do not weigh older wood. As a rule of thumb, 30 buds should be
left on the vine for the first pound of prunings removed, and 10 buds for each additional pound. Vines producing
less than ¾ pound of prunings should not be cropped. As an example, suppose a vine after pruning where 60
buds were left yielded 3½ pounds of prunings. Then the number of buds to be left would be about 55 (30 for the
first pound and 25 for the other 2½ pounds). Each of the four canes left should be pruned back to have about 14
buds each. If balanced pruning is not to be done, then 30 to 60 buds should be left; the greater number being left
on the most vigorous vines.
Leave renewal spurs to form canes for next year. These spurs are also canes of last season’s growth pruned back
to leave only two buds each. The fruiting canes for next year will grow from these spurs. Renewal spurs should
be located as near the trunk(s) as possible.
9
Spur Pruning (French hybrid bunch and Muscadine grapes)
Spur pruning is recommended for French hybrid and muscadine grapes and can also be used for American type
bunch grapes, however, cane pruning of American bunch grapes may reduce disease pressure by removing
almost all the old wood each winter.
Single-wire low trellis with catch arms — In late winter, cut back side shoots that grew the previous summer.
This forms the “spurs.” Leave two to three buds per spur for French hybrid grapes and four to six buds on
American type bunch grapes. Select shoots that grew upward in a well-lighted environment to have the most
fruitful spurs. Remove weak shoots. Thin the side shoots to about 6 inches apart.
The second step is to remove water sprouts, suckers, and any tendrils attached to the trunk or cordons. Finally,
prune back cordon growth beyond the 4-foot point or halfway to the next vine. In the spring, allow four to six
shoots per foot of cordon to develop, removing shoots where necessary. Also selectively remove leaves from
around the fruit clusters to improve fruit quality and help reduce disease pressure. These leaves can be removed
shortly after bloom but before the berries begin to change color and soften. Do not remove leaves after the
berries begin to soften, because sunburn may result. Thin fruit clusters to no more than two per shoot. As the
new shoots become long enough, place them into the catch wires (Figures 36 and 37).
UGA Cooperative Extension Circular 1087 • Home Fruit Orchard Pruning Techniques 19Cut back to two buds
per spur
Vertical arm shoots
(2 per spur)
Figure 36. Mature French hybrid on low-wire cordon Figure 37. Mature French hybrid on low-wire cordon
before winter pruning. after pruning.
Since muscadine fruit are borne on new shoots arising from last year’s growth, you should prune back the
canes that grew the previous year, leaving about 3 inches of growth to form spurs similar to French hybrid spur
pruning (Figures 36 and 37). Prune in February or early March. Don’t be alarmed if the vines “bleed” at pruning
cuts. Bleeding does not harm the vines.
When you leave too many buds on the vine, the plant over produces and the fruit are poor. After 3 or 4 years of
production, you will need to remove every other spur cluster to prevent overcrowding. Try to leave spurs that
are on the top of the arms. It is a good idea to remove old fruit stems since they are a source of disease.
For all grapes, remove tendrils that wrap around the arms or spurs. Tendrils are finger-like plant parts that
grapes use to attach themselves to their supporting structure. If tendrils are not removed, they will girdle the
arms or spurs and cause reduced production. Remove old fruit stems if fruit rots are a problem since the disease
may overwinter in the old stem.
Pomegranate10
There are two common approaches for training a pomegranate plant: single- or multi-trunked. The multi-
trunked form is probably best in Georgia. The single-trunk plant has a short (12- to 18-inch) trunk with five
to six major branches diverging to form a vase-shaped structure. The multi-trunk plant has three to six of the
strong branches developed directly from the ground.
The single-trunk approach has the advantages of easier orchard floor maintenance and reduced costs associated
with pruning suckers. Though this approach is popular in California, Spain, and Israel, other pomegranate-
producing regions of the world have not readily adopted it.
One major advantage of the multi-trunk approach is that if a freeze event occurs and damages a portion of
branches, you can simply remove them and train a vigorous sucker to take their place without a significant loss
in production. In the single-trunk system, you would have to replace the entire tree.
The single-trunk system requires more labor while establishing the canopy architecture and placing supporting
wires, but requires less labor after the orchard is established relative to the perpetual removal of suckers
required in the multi-trunk system. However, the multi-trunk system will not require as many supporting wires.
For single-trunk production, remove all but the strongest sucker and select branches off this sucker. For a multi-
trunk system, select five or six vigorous suckers and allow them to grow, or, as a compromise between the two
approaches, use a triple-trunk system (Figure 38).
UGA Cooperative Extension Circular 1087 • Home Fruit Orchard Pruning Techniques 20Figure 38. Examples of multi-trunk (left), single-trunk (center), and triple-trunk (right) tree training strategies. Pomegranates require pruning each year, and unneeded growth and suckers should be thinned. Short fruiting spurs appear primarily on 2- or 3-year-old wood, and are found growing mostly on the outer perimeter of the canopy. Light annual pruning encourages growth of new fruit spurs, while more aggressive pruning will significantly impact yield. Therefore, pruning must be performed on an annual or semi-annual basis in order to minimize the onerous task of aggressive pruning, and to reduce the likelihood of removing excessive amounts of fruit-bearing (older) wood. Major pruning should take place during the winter months prior to bud break, with minor pruning for sucker removal in mid-summer. Major pruning is where the tree architecture is established. Efforts should be made to maintain an open, vase-shaped tree with enough lateral branches to support the tree (including the weight of the fruit) without excessively inhibiting airflow, sunlight penetration or excessive fruit rub on windy days. The weight of the fruit on a branch can be substantial. Support these branches to ensure that fruit does not come into contact with the orchard floor, remains clear of mechanical equipment, and is away from ground-level critters. Injury from wind, called limb rub or wind scars, are wounds that can have a major impact on the quality of the fruit. Trees should be maintained at a height that minimizes ladder work. UGA Cooperative Extension Circular 1087 • Home Fruit Orchard Pruning Techniques 21
1Wade, G.L., & Westerfield, R. (2015, February). Basic Principles of Pruning Woody Plants (Bulletin 949). Retrieved from University
        of Georgia Cooperative Extension website:
        http://extension.uga.edu/publications/detail.cfm?number=B949
 2Lockwood, D. W. (2012, April). Home Garden Apples (Circular 740). Retrieved from University of Georgia Cooperative Extension
        website:
        http://extension.uga.edu/publications/detail.cfm?number=C740
 3Krewer, G.W., & Bertrand, P. (2012, March). Home Garden Pears (Circular 742). Retrieved from University of Georgia Cooperative
        Extension website:
        http://extension.uga.edu/publications/detail.cfm?number=C742
 4Krewer, G.W., & Hendrix, F. (2012, April). Home Garden Figs (Circular 945). Retrieved from University of Georgia Cooperative
        Extension website:
        http://extension.uga.edu/publications/detail.cfm?number=C945
 5Chavez, D. (2015, February). Home Garden Peaches (Circular 1063). Retrieved from University of Georgia Cooperative Extension
        website:
        http://extension.uga.edu/publications/detail.cfm?number=C1063
 6Krewer, G.W., Fonseca, M., Brannen, P., Horton, D., & Westerfield, R. (2013, October). Home Raspberries and Blackberries
        (Circular 766). Retrieved from University of Georgia Cooperative Extension website:
        http://extension.uga.edu/publications/detail.cfm?number=C766
 7Krewer, G.W., & NeSmith, D.S. (2012, March). Home Garden Blueberries (Circular 946). Retrieved from University of Georgia
        Cooperative Extension website:
        http://extension.uga.edu/publications/detail.cfm?number=C946
 8Krewer, G. (2014, January). Home Garden Bunch Grapes (Bulletin 807). Retrieved from University of Georgia Cooperative
        Extension website:
        http://extension.uga.edu/publications/detail.cfm?number=B807
 9Krewer, G.W., & Westerfield, R. (2015, March). Home Garden Muscadines (Circular 949). Retrieved from University of Georgia
        Cooperative Extension website:
        http://extension.uga.edu/publications/detail.cfm?number=C949
 10MacLean, D., Martino, K., Scherm, H., Horton, D., & Westerfield, R. (2014, January). Pomegranate Production (Circular 997).
        Retrieved from University of Georgia Cooperative Extension website:
        http://extension.uga.edu/publications/detail.cfm?number=C997

                                                                                    extension.uga.edu
Circular 1087                                                                                                                                                                                               June 2016
Published by the University of Georgia in cooperation with Fort Valley State University, the U.S. Department of Agriculture, and counties of the state. For more information, contact your local UGA Cooperative Extension office.
                                                                 The University of Georgia is committed to principles of equal opportunity and affirmative action.
You can also read