Instruction Manual - 40LED01 40" Full HD 1080P LED TV - Altimo
←
→
Page content transcription
If your browser does not render page correctly, please read the page content below
Instruction Manual

40" Full HD 1080P LED TV

       40LED01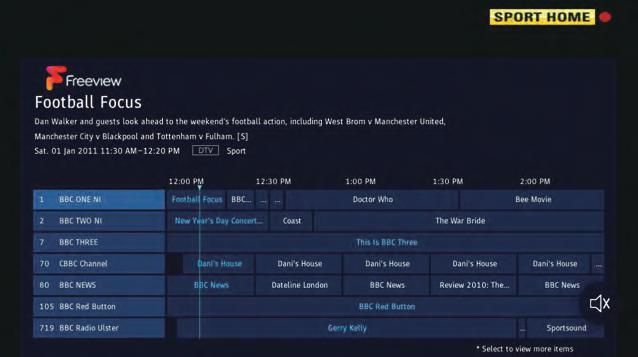
CONTENTS
Important Safety Instructions             2
Safety Information                        3
Preparation                               4
  What is Included                        4
  Front View                              5
  Rear View                               6
  Installing the Stand                    7
  Removing the Stand for Wall-Mounting    7
  Wall-Mounting Screws                    7
  Remote Control                          8
Connecting External Devices              10
Basic Operations                         11
  First Time Installation                11
  Quick Settings                         13
  Picture                                14
  Sound                                  16
  Channel                                18
  EPG                                    21
  Nextwork                               24
  Time                                   25
  System                                 27
  Movies                                 30
  Music                                  31
  Photos                                 32
  Sources                                33
CI (Common Interface)(DTV mode)          34
Parental Control                         35
Troubleshooting                          36
Maintaining                              38
Plug Replacement-UK                      38
Specification                            39
Disposal Information                     39

                                         1
IMPORTANT SAFETY INSTRUCTIONS
• Read these instructions – All the safety and operating instructions should be read before this product is
  operated.
• Keep these instructions – The safety and operating instructions should be retained for future reference.
• Heed all warnings – All warnings on the appliance and in the operating instructions should be adhered to.
• Follow all instructions – All operating and use instructions should be followed.
• Do not use this apparatus near water – The appliance should not be used near water or moisture – for
  example, in a wet basement or near a swimming pool, and the like.
• Clean only with dry cloth.
• Do not block any ventilation openings. Install in accordance with the manufacture’s instructions.
• Do not install near any heat sources such as radiators, heat registers, stoves, or other apparatus (including
  ampliiers) that produce heat.
• Do not defeat the safety purpose of the polarized or grounding-type plug. A polarized plug has two blades
  with one wider than the other. A grounding-type plug has two blades and a third grounding prong. The wide
  blade or the third prong are provided for your safety. If the provided plug does not it into your outlet, consult
  an electrician for replacement of the obsolete outlet.
• Protect the power cord from being walked on or pinched particularly at plugs, convenience receptacles, and
  the point where they exit from the apparatus.
• Only use attachments/accessories speciied by the manufacturer.
• Use only with the cart, stand, tripod, bracket, or table speciied by the manufacturer,or
  sold with the apparatus. When a cart is used, use caution when moving the cart/apparatus
  combination to avoid injury from tip-over.
• Unplug this apparatus during lightning storms or when unused for long periods of time.
• Refer all servicing to qualified service personnel. Servicing is required when the apparatus has been
  damaged in any way, such as power-supply cord or plug is damaged, liquid has been spilled or objects
  have fallen into the apparatus, the apparatus has been exposed to rain or moisture, does not operate
  normally, or has been dropped.
• Please keep the unit in a well-ventilated environment.
• WARNING: To reduce the risk of fire or electric shock, do not expose this apparatus to rain or
  moisture. The apparatus shall not be exposed to dripping or splashing. Objects illed with liquids,
  such as vases should not be placed on apparatus.
• WARNING: The batteries shall not be exposed to excessive heat such as sunshine, ire or the like.
• WARNING: The mains plug is used as disconnect device, the disconnect device shall remain readily
  operable.
• WARNING: To reduce the risk of electric shock, do not remove cover (or back) as there are no user-
    serviceable parts inside. Refer servicing to qualiied personnel.

          This lightning lash with arrowhead symbol within an equilateral
          triangle is intended to alert the user to the presence of non-
          insulated “dangerous voltage” within the product’s enclosure
          that may be of sufficient magnitude to constitute a risk of
          electric shock.
          The exclamation point within an equilateral triangle is intended to alert the user to
          the presence of important operating and maintenance instructions in the literature
          accompanying the appliance.
          This equipment is a Class II or double insulated electrical appliance. It has been designed
          in such a way that it does not require a safety connection to electrical earth.

                                                               The terms HDMI and HDMI High-Definition Multimedia
                                                               Interface, and the HDMI Logo are trademarks or
                                                               registered trademarks of HDMI Licensing Administrator,
                                                               Inc in the United States and other countries.

2
SAFETY INFORMATION
           This product contains electrical or electronic materials. The presence of these materials may, if not disposed of
           properly, have potential adverse efects on the environment and human health.
           Presence of this label on the product means it should not be disposed of as unsorted waste and must be collected
           separately. As a consumer, you are responsible for ensuring that this product is disposed of properly.
WARNING: To prevent injury, this apparatus must be securely attached to the floor/wall in
accordance with the installation instruction.
To ensure reliable and safe operation of this equipment, please carefully read all the instructions in
this user guide, especially the safety information below.
Electrical Safety
• The TV set should only be connected to a main power supply with voltage that matches the label at the
  rear of the product.
• To prevent overload, do not share the same power supply socket with too many other electronic
  components.
• Do not place any connecting wires where they may be stepped on or tripped over.
• Do not place heavy items on any connecting wire, which may damage the wire.
• Hold the main plug, not the wires, when removing from a socket.
• During a thunderstorm, or when not using the television for extended period of time, turn of the power
  switch on the back of the television.
• Do not allow water or moisture to enter the TV or power adapter. Do NOT use in wet, moist areas, such
  as bathrooms, steamy kitchens or near swimming pools.
• Pull the plug out immediately, and seek professional help if the main plug or cable is damaged, liquid
  is spilled onto the set, if the TV set accidentally exposed to water or moisture, if anything accidentally
  penetrates the ventilation slots or if the TV set does not work normally.
• Do not remove the safety covers. There are no user-serviceable parts inside. Trying to service the unit
  yourself is dangerous and may invalidate the product’s warranty. Qualiied personnel must only service
  this apparatus.
• To avoid a battery leakage, remove batteries from the remote control, when the remote is not use for long
  period, or when the batteries are exhausted.
• Do not break open or throw exhausted batteries into a ire.
• For best results, use type AAA (example-alkaline, carbon-zinc, etc.) batteries.
• Install only new batteries of the same type in your product.
• Failure to insert batteries in the correct polarity, as indicated in the battery compartment, may shorten the
  life of the batteries or cause batteries to leak.
• Do not mix old and new batteries.
• Do not mix Alkaline, Standard (Carbon-Zinc) or Rechargeable (Nickel Cadmium) or (Nickel Metal Hydride)
  batteries.
• Batteries should be recycled or disposed of as per state and local guidelines.
• Do not attempt to recharge disposable batteries.
• Do not short circuit battery terminals.
• Keep away from children.
Physical Safety
• Do not block ventilation slots in the back cover. You may place the TV in a cabinet, but ensure at least
  5cm (2’’) clearance all around.
• Do not tap or shake the TV screen, or you may damage the internal circuits. Take good care of the
  remote control.
• To clean the TV use a soft dry cloth. Do not use solvents or petroleum based luids.
• Do not install near any heat sources such as radiators, heat registers, stoves or other apparatus (including
  ampliiers) that produce heat.
• Do not defeat the safety purpose of the polarized or grounding-type plug. A polarized plug has two blades
  with one wider than the other. A grounding plug has two blades and a third grounding prong. The wide
  blade, or the third prong is provided for your safety. If the provided plug does not fit into your outlet,
  consult an electrician for replacement of the obsolete outlet.
• Protect the power cord from being walked on or pinched particularly at plugs.
• Unplug the apparatus during lightning storms or when unused for long periods.
• Refer all servicing to a qualiied service personnel. Servicing is required if the apparatus does not operate
  normally or if the apparatus, including the power supply cord or plug, has been damaged in any way.
• Servicing is also required if liquid has been spilled, or objects have fallen into the apparatus; when the
  apparatus has been exposed to rain or moisture; or if the apparatus has been dropped.

                                                                                                                         3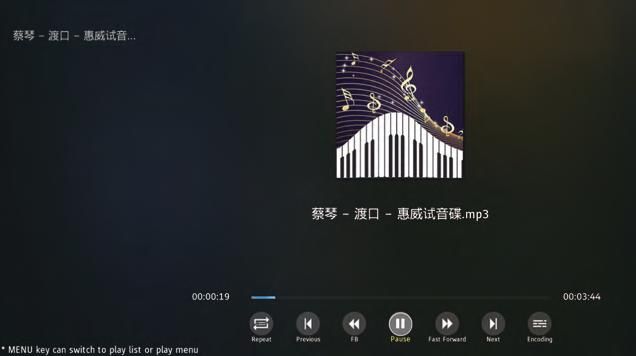
PREPARATION
      What is Included

               TV Set        Remote Control with Batteries

             Base Stand               Screws x4

                                                 Quic
                                  User Manual Start k
             MINI AV cable                         Guid   e

                                    User Manual &
                                   Quick Start Guide

          MINI YPBPR cable

4
PREPARATION
Front View
POWER Indicator
IR (Infrared Receiver)
• VOL +/- button
Press to adjust the volume.
• CH / button
Press to select the channel.
• Menu button
Display the main menu.
• Source button
• STANDBY button
Switch the TV between On/Standby mode.
• POWER Indicator
Illuminate blue when the TV is turned on. Illuminate red when the TV is in standby mode.
• IR (Infrared Receiver)
Receive IR signals from the remote control.
5PREPARATION
Rear View
11
10
9
8
7
6
1 2 3 4 5 6
1. Power Cord 8. MINI AV
Connect to AC power outlet. Connect to the composite VIDEO and
2. LAN AUDIO (L/R) output sockets on external
Network connection port. video devices.
9. MINI YPBPR
3. SCART Socket
Connect to AV devices with component
Connect to SCART cable between
(Y/Pb/Pr) video and audio output
the SCART socket on the TV and the
sockets. COMPONENT&VIDEO share
SCART socket on the external device.
with AUDIO IN(L/R)subscribe to.
4. COAX 10. CI Slot
Connect a digital sound system to this Used to insert a CI card. A CI card allows
jack. you to view all the channels that you
5. DTV/TV Input subscribe to.
Connect to the antenna (75Ω VHF/UHF) 11. Headphone Socket
socket with the RF coaxial cable. Connect to the Headphones.
6. HDMI Input
output device.
7. USB Input
Connect to a USB storage device to play
6PREPARATION
Installing the Stand
1.
cushioned surface to avoid damaging
or scratching.
2.Fix the stand assembly to the TV using
the 4 pcs provided screws.
Removing the Stand for Wall-Mouting
1.
cushioned surface to avoid damaging
or scratching.
2. Untighten the 4 pcs screws holding
the stand assembly and remove them.
3. Attach the wall-mount bracket to the
TV using the mounting holes on the
back of the TV. Mount this TV
according to the instructions included
in the wall-mount bracket.
Wall-Mounting Screws
• Mount the VESA bracket using 4*M6*10 isometric threaded screws (not included).
accordance with the installation instruction.
WARNING:
Never place a television set in an unstable location. A television set may fall, causing serious
personal injury or death. Many injuries, particularly to children, can be acoided by taking
simple precautions such as:
• Using cabinets or stands recommended by the manufacturer of the television set.
• Only using furniture that can safely support the television set.
• Ensuring the television set is not overhanging the edge of the supporting furniture.
• Not placing the television set on tall furniture(for example, cupboards or bookcases)
without anchoring both the furniture and the television set to a suitable support.
• Not placing the television set on cloth or other materials that may be located between
the television set and supporting furniture.
• Attention should be drawn to the environmental aspects of battery disposal.
• Educating children about the dangers of climbing on furniture to reach the television
set or its controls
If your existing television set is being retained and relocated, the same considerations
as above should be applied.
7PREPARATION
Remote Control
1. : Switch the TV between and standby
mode.
2. : Mute and restore your TV sound.
1 2 3. 0~9: Select a program.(ATV/DTV mode).
4. CH.LIST: Display channel list.(ATV/DTV
mode).
5. : Return to previous viewing channel.
6. P.MODE : Select picture mode:
3 standard/ mild/ personal/ dynamic.
7. S.MODE : Select sound mode: standard/
music/ movie / personal.
4 5 8. ASPECT: Select from the following
7 mode settings: 16:9/Zoom1/Zoom2/
6 8 Auto/4:3.
9. TV.RD: Select TV program or Radio
9 program.(DTV mode).
10. MENU: Display the OSD(on screen
10 11 display) menu.
11. SOURCE: Select among the diferent
input singal sources:Antenna/Cable/
12 Satellite/ATV/AV/YPbPr/HDMI/PC/
Media Player.
13 12. OK: Conirm the selection in the OSD(on
screen display) menus.
13. : Allows you to navigate the
OSD menus and adjust the syestem
14 15 setting to your perference.
16 14. DISPLAY: Display the present screen
information such as the current channel
17 18 and the input source .
15. EXIT: Exit the OSD menu.
19 16. EPG: Display the EPG(Electronic
20 Program Guide).(DTV mode).
23 17. VOL+/-: Adjust the volume.
21 18. CH+/-: Select a channel.
24
22 19. : Record the current programme.
25 (DTV mode)
26 20. : To start or pause the timeshift
27 playback.(DTV mode).
30 To start playback or pause.(USB mode).
28 TIMESHIFT: Start the time-shift function.
31
(DTV mode).
29 32
8PREPARATION
Remote Control
21. : To skip to the beginning of the previous chapter/track/photo.(USB mode).
TTX : Turn on and of the Teletext function.(ATV/DTV/AV/YPBPR mode).
22. : To reverse playback rapidly.(USB/DTV mode).
CANCEL : To cancel the teletext mode.(ATV/DTV/AV/YPBPR mode).
23. : To skip to the beginning of the next chapter/track/photo.(USB mode).
HOLD : Freezes a multi-page passage on screen in teletext.(ATV/DTV/AV/YPBPR mode).
24. : Press to stop the playback, the time shift or the recording.(USB/DTV mode).
FAV : Display the Favourite Channel list.(ATV/DTV mode).
25. : To advance playback rapidly.(USB/DTV mode).
REVEAL : Reveals hidden information such as the answer to a quiz in teletext.(ATV/DTV/
AV/YPBPR mode).
26.COLOUR BUTTON:Access to corresponding function in APP service.(ATV/DTV/AV/
YPBPR mode)
27.SIZE : To enlarge the picture on the TV in teletext.(ATV/DTV/
AV/YPBPR mode).
28.INDEX : To select the page number of the index from teletext.(ATV/DTV/
AV/YPBPR mode).
29.NICAM : Switch between diferent audio channels.(only applicable when the TV
programme has this feature).
LANG : Select DTV audio language.(DTV mode).
30.SUBPAGE : Switch between diferent audio channels.(ATV/DTV/ AV/YPBPR mode).
31.SUBTITLE : Display the subtitle which is broadcast wiht the program.(DTV mode).
32.SLEEP : Set the TV sleep timer.
9CONNECTING EXTERNAL DEVICES
Coaxial Cable
10BASIC OPERATIONS
First Time Installation
Connect an RF cable from the Tv’s input called “RF-In” and to your TV Aerial socket
Press OK button to select the Start Setting.
Press 【 ▼ 】/【▲ 】/【◄】/【►】button to select the language.
Press OK button to sure.
Press 【 ▼ 】/【▲ 】/【◄】/【►】button to select the country.
Press OK button to sure.
11BASIC OPERATION Press 【◄】/【►】button to select the environment. Press OK button to sure. Press 【 ▼ 】/【▲ 】/【◄】/【►】button to select the default source. Press OK button to sure. Press OK button to into home page. 12
BASIC OPERATION

      Quick Settings

Press 【◄】/【►】 button to select Quick Settings .

Press OK to enter setting.

1. Press【▼ 】/【▲】to select : Audio Language/Subtitle Language/Record List/Event List.

2. Press OK to adjust or select.

Audio Langua                 Select the audio language.

Subtitle Language            Select the subtitle language.

Record List                  View the program list you have record.

Event List                   View the event list that you have make an appointment to record.

                                                                                                13
BASIC OPERATION
Picture
Press 【◄】/【►】 button to select PICTURE .
Press OK to enter setting.
1. Press【▼ 】/【▲】to select : Picture Mode/ Aspect Ratio/ Advanced Settings
2. Press【 ◄ 】/ 【 ► 】to adjust or select.
Picture Mode
Press 【 ▼ 】/【 ▲】 button to select Picture Mode, then press【 ◄ 】/【 ► 】 button to select.
(O ptional : Standard /Personal/ Dynamic/ Movie/ Economy)
Standard The default mode, to make users experience high-quality images under normal light.
Personal Personal-defined picture settings.
Dynamic Image colors more beautiful, more vivid picture.
Movie This mode is more suitable for watching movies.
Economy Reduce screen brightness, improved contrast for energy saving.
(NOTE:The Brightness/ Contrast/ Colour/ Tint / Sharpness/ Backlight function could be adjusted
only in Personal picture mode.)
14BASIC OPERATION
Aspect Ratio
Select the picture size: Auto/ 16:9/ 4:3/ Zoom1/ Zoom2
Advanced Settings
Select the settings:OverScan/ Colour Temperature/ Dynamic Contrast/ Noise Reduction.
Over Scan Select ON/OFF.
Colour Temperature Select to a djust the overall color of the image : Standard/ Cold/ Warm
Dynamic Contrast Select to adjust image contrast: ON/OFF.
Noise Reduction Select to eliminate image noise intensity: Off/ Low/ Medium/ High
15BASIC OPERATION
Sound
es 【 】/【 】 utt elec
es OK t te ett
1. ess【▼ 】/【▲】t select : S u de Su u u d/ S eake A Ad a ce ett s
2. ess【 】/ 【 】t djus elect
Sound Mode
ess【 】/【 】 utt elec Sound Mode e ess【 】/【 】 utt elect
t al Sta da d us c S t e e s al ).
Standard duce ala ce u l e ts
Music ese e a u d us ca a s
Sports a ce cal ud
Movie a ce e l as c u e e ce
Personal elec ust ctu ett s
16BASIC OPERATION
Surround Sound
Set the Surround Sound control.Select ON/OFF.
Speaker
Set the Audio Out/ Digital Audio Delay.
Digital Audio Output Select PCM/ RAW/ Off.
Digital Audio Delay A djust the delay time.
Lip Sync Adjust the Lip Sync.
AVC
Press 【 ▼ 】/【▲ 】button to select AVC , then press【◄】/【►】 button to choose ON/OFF.
(NOTE: After opening the AVC,Once the volume is set, regardless of any difference TV Version printed
on each channel, it can make the speaker volume remained stable.)
Advanced Settings
Select the settings:Balance/ Equalizer
Balance Adjust the balance of left and right channel output.
Equalizer Adjust the equalizer.
Audio Description Select description On/Off.
17BASIC OPERATION
Channel
Press【◄】/【►】 button to select Channel.
Press OK to enter setting.
1. P ress【▼ 】/【▲】to select : DVB Antenna/Auto Scan/Digital Manual Scan/CAM Setting/
Signal Information.
2. Press【 ◄ 】/ 【 ► 】to adjust or select.
Auto Scan
Press【 ▼ 】/【▲ 】button to select Auto Scan, p ress OK to search program automatically .
Analogue
Digital
Digital+Analogue
18BASIC OPERATION
Digital Manual Scan
Press【 ▼ 】/【▲ 】button to select Digital Manual Scan.
ATV Manual Scan
Press【 ▼ 】/【▲ 】button to select Analog Manual Scan.
Signal Information
Press 【 ▼ 】/【▲ 】button to view the signal information.
19BASIC OPERATION
Channel List
Press 【 ▼ 】/【▲ 】button to enter channel List .
Press ▼ / ▲ to highlight the channel you want to select.
(Optional:Lock/FAV/Delete.)
EPG
Press / button to enter record .
Press to stop recording and playing.
Press to pause recording.
Press to play backward.
Press to play forward.
20BASIC OPERATION
EPG
Press EPG button to enter setting .
Info
View the information of the program.
21BASIC OPERATION
Record
Set an appointment to record the program automaticlly.
Press the Record Time to set the time to record automatically.
22BASIC OPERATION
Remind
Set an appointment to remind you the program automaticlly.
Press the Remind Time to set the time to remind you automatically.
23BASIC OPERATION
Nextwork
Press【◄】/【►】 button to select Network.
Press OK to enter setting.
1. Press【▼ 】/【▲】to select : Cable/ Network Test
2. Press【 ◄ 】/【 ► 】to adjust or select.
24BASIC OPERATION
Time
Press【◄】/【►】 button to select Time.
Press OK to enter setting.
1. P ress【▼ 】/【▲】to select : Time/ On Time/ Off Time/ Sleep Timer/ O SD Timer /
Auto Standby.
2. Press【 ◄ 】/ 【 ► 】to adjust or select.
Time
Set the current time.
On Time
Set the default setting when turn on the TV automatically.
On Time Set the time to turn on the TV automatically.
Input Source Set the default source when turning on the TV automatically.
Channel Set the Channel when turning on the TV automatically.
Volume Set the default volume when turning on the TV automatically.
25BASIC OPERATION
Off Time
Set the time to turn off the TV automatically.
Sleep Timer
Set the time to turn off the TV automatically without any operation in some time.
(Optional:Off/ 10 Min/ 20 Min/ 30 Min/ 60 Min/ 90 Min/ 120 Min/ 180 Min/ 240 Min)
OSD Timer
Set the OSD show time.
(Optional:Never/ 5 S/ 10 S/ 15 S/ 20 S/ 30 S/ 60 S/ 180 S)
Auto Standby
Set the standby time.
(Optional:Off/ 3 H/4 H/ 5 H)
26BASIC OPERATION
System
Press【◄】/【►】 button to select System.
Press OK to enter setting.
1. Press【▼ 】/【▲】to select : Country/ Language/ Lock/ HDMI LNK/ Advanced Settings
2. Press【 ◄ 】/ 【 ► 】to adjust or select.
Country
Select the country.
Language
Select the menu language.
Lock
Select to lock/unlock the TV.
HDMI LINK
Select ON/OFF the HDMI LINK function.
27BASIC OPERATION
Advanced Settings
PVR&Time-Shift Settings PVR&Time-shift Settings .
Hearing Impaired Select on or off the hearing impaired.
Blue Screen Select ON/OFF the blue screen.
Setup Wizard Select to enter the FTI.(Show in page 1)
Entertainment Select on or off the entertainment on/off.
Restore to Default Select to restore factory default.
28BASIC OPERATION
Media
Press 【 INPUT】to enter input source,and press 【◄】/【►】 button to select Media.
29BASIC OPERATION
Movies
Press ▼ / ▲ to select Movies.
Press to play previous movie.
Press to play fast backward.
Press to stop/play the movie.
Press to play fast forward.
Press to play next movie.
Press to repeat the movie.
Press to view the play list of the movie.
Press to view the information of the movie.
Press to select Auto/4:3/16:9.
30BASIC OPERATION
Music
Press ▼ / ▲ to select Music.
Press to repeat the music.
Press to play previous music.
Press to play fast backward.
Press to stop/play the music.
Press to play fast forward.
Press to play next music.
Press to encorde the music.
31BASIC OPERATION
Photos
Press ▼ / ▲ to select Photos.
Press to play previous picture.
Press to rotate anticlockwise the picture.
Press to stop/play the picture.
Press to rotate clockwise the picture.
Press to play next picture.
Press to repeat the picture.
Press to view the play list of the picture.
Press to view the information of the picture.
32BASIC OPERATION
Sources
Press【◄】/【►】 button to select Source in HOME page.
Press OK to enter setting.
33CI (Common Interface)(DTV mode)
NOTE: this function is available only when the Common Access Module is inserted
to the CI slot.
This function allows you to view the common interface module information.
• Use the button to select CI Information from the menu then press the OK
button to enter.
• Press the buttons to select the items and press the OK button to conirm.
The common interface allows the use of a Common Access Module to enable you
to unscramble (pay to view) services. These services are provided by other service
providers than free to view TV channels.
Important: Do not keep removing and reitting the Common Access Module as it
could damage the interface and cause a malfunction.
Fitting the Common Access Module
Note: This feature is not available in all countries.
1. Before inserting the Common Access Module, please switch the TV of.
2. If you feel resistance when inserting the CAM, turn it over and try again.
3. Switch the TV on and you will be able toaccess the encrypted channels from
the service provider.
Removing the Common Access Module
1. Before removing the CAM ensure the TV is switched of at the mains.
2. Pull the CAM out of the CI slot in the side of the TV.
3. Switch the TV back on at the mains.
34PARENTAL CONTROL
Press the MENU button on the main unit or on the remote control and then press the
buttons to select LOCK menu. Use the 0-9 buttons to input 4-digit password to enter the
LOCK menu. If used, this option feature can "block'' undesirable programming from appearing
on the TV. Parental Control ofers the user a wide variety of options and settings that restrict
or "block'' the programming that can appear on the TV. Parental Control allows the user the
capability of defining which program rating they consider acceptable to the younger more
sensitive viewer. It can be preset and turned either on or of by the user who speciies the
secret 4-number code, the password. The number of hours blocked are speciied. General
audiences and children blocks should be both programmed into the TV's memory. Viewer
ratings are speciied for both TV and the motion picture Industry; both rating systems should
be used, for complete coverage. The ratings are based on the ages of children.
Overview
To ensure complete coverage for all TV programs, (movies and regular TV shows) choose a
rating for MPAA, from the selections below,as well as ratings from the TV Parental Guidelines
Rating Systems below, using the Age Block option for General Audiences, and for children.
In addition to those, you may wish to add additional restrictions from the content block menu,
and submenus examples below.
Things to Consider before Setting up Parental Control
Determine which rating you consider acceptable to the viewer. (For example,if you choose
TV-PG, more restrictive ratings will be automatically blocked; the viewer will not be able to
see: TV-PG,TV-14,or TV-MA rated programming.) Do you want to block the auxiliary video
source entirely? (Blocks the signal sent by the equipment, such as VCR, connected to the TV
Audio/VIdeo Input Jacks) Or leave unblocked, then choose allowable ratings. Block program
"Content" based on individual parameters such as: Strong Dialog, Bad Language, Sex
Scenes,Violence Scenes, or Fantasy. Violent Scenes; in Content Blk option. Select a secret
password, in the Set Password option, using the numbers keys on the remote control.Do not
forget the password, it is the only way you can access the Parental Control menu and change
rating selections, or turn Parental Control of.Do you want the Parental Control to be active at
all times? If not, you can turn it on or of with the Lock On/Of option.
• You can set diferent Parental Control viewing restrictions for general audiences and for
children, both can be active at the same time.
• Simply specifying one content block such as Sex Scenes, will not automatically restrict the
programming that appears from the video sources.
• Even If you choose to leave the AUX Inputs unblocked, the ratings you specify will
automatically restrict the programming that appears from the video sources.
• You can not disable Parental Control by disconnecting the TV from power. Block hours will
be automatically reset to the original block time setting speciied if power is disconnected.
35TROUBLESHOOTING
If your TV does not operate normally or cannot be turned on, please check the
following troubleshooting questions. Remember also to check any other connected
electronic device, such as DVD or Blu-ray player to pinpoint the problem. If the TV
still fails to operate normally, please contact technical support.
The TV does not operate properly
• The TV may freeze up during use. Disconnect the power
The TV does not respond
cord from the power socket for a few minutes. Reconnect the
when pressing any buttons
power cord and try to operate it again as usual.
• Check that the TV is connected to the power supply.
TV cannot be switched on • Make sure all connected AV devices are switched of before
switching on your TV.
• Check to see if there are any objects between the TV and the
remote control causing an obstruction. Ensure that you are
The remote control does not pointing the remote control directly at the TV.
work • Ensure that the batteries are installed with the correct polarity
(+ to +, - to -).
• Install new batteries.
• Check the power of the TV. The power supply maybe
interrupted.
Power is suddenly turned of
• Check if the sleep timer is set.
• Check whether the Auto Standby is activated.
The video function does not work
• Check whether the TV is switched on.
No picture & No Sound • Try another channel. The problem may be caused by the
broadcaster.
• This is normal; the image is muted during the TV startup
Picture appears slowly after
process. Please contact your service centre if the picture has
switching on
not appeared after ive minutes.
• Adjust the settings in the PICTURE menu.
No or poor colour or poor • Try another channel. The problem may be caused by the
picture broadcaster.
• Check if video cables are connected properly.
Horizontal/Vertical bar or • Check for local interference such as an electrical appliance
picture shaking or power tool.
• The station or cable channel may be experiencing problems;
tune to another station.
Poor reception on some
• Station signal may be weak, reposition the antenna for better
channels
reception.
• Check for sources of possible interference.
Lines or streaks in pictures • Check antenna (change the position of the antenna.)
No pictures when connecting
• Check if the input source is HDMI.
HDMI
Pictures appear in wrong • Adjust the Aspect Ratio settings in the SETUP menu or press
ratio the ASPECT button on the remote control.
36TROUBLESHOOTING
The audio function does not work
• Press the VOL +/- buttons.
• Sound muted? Press the MUTE button.
Picture OK but no sound
• Try another channel. The problem may be caused by the
broadcaster.
No output from one of the
• Adjust the Balance settings in the AUDIO menu.
speakers
• A change in ambient humidity or temperature may result in
Unusual sound from inside
an unusual noise when the TV is switched on or of and does
the TV
not indicate a fault with the TV.
No sound when connecting
• Check if the input source is HDMI.
HDMI
• Keep the RF coaxial cable away from the other connected
Audio noise
cables.
Password
• Select the SET Password setting in the LOCK menu, then
enter the following master password “8899”. The master
Lost password
password clears your previous password and allows you to
enter a new password.
There is a problem in PC mode
The signal is out of range • Adjust the resolution, horizontal frequency, or vertical
(invalid format) frequency.
Vertical bar or stripe on
background and Horizontal • Use Auto conigures or adjust clock, phase, or H/V position.
Noise and Incorrect position
Screen colour is unstable or • Check the signal cable.
show a single colour • Reinstall the PC video card.
37Maintaining
• Do not use your TV in areas that are too hot or too cold, because the cabinet
may warp or the screen may malfunction. Your TV works best in temperatures
that are comfortable to you.
• Storage temperatures are 32° to 122°F(0° to 50°C)
• Working temperatures are 32° to 95°F(0° to 35°C)
• Do not place your TV in direct sunlight or near a heat source
-minmum 5 cm distances around the apparatus for sufficient ventilation.
-the ventilation should not be impeded by covering the ventilation
openings with items,such as newspapers,table-cloths,curtains,ect;
-no naked lame sources,such as lighted candles,should be placed on the apparatus;
-attention should be drawn to the environmental aspects of battery diaposal.
Plug replacement-UK
Should you need to replace the plug; the wires in
the power cable are coloured in the following way:
Blue – Neutral ‘N’
Brown – Live ‘L’
As the colours of the wires in the power cable
may not correspond with the coloured markings
identifying the terminals in your plug, and proceed
as follows:
The blue wire must be connected to the terminal
that is marked with the letter N.
The brown wire must be connected to the terminal
that is marked with the letter L.
If the power lead is damaged, it must be replaced by
a qualiied electrician.
38SPECIFICATION
Panel Size 40 inch diagonally
Display Type LED
Panel Technology TFT
Panel 60 Hz Vs. 120 Hz 60 Hz
Display Resolution 720P
HDMI Support Up to 1080P
Panel Resolution 1920 x 1080
Aspect Ratio 16:9
Dynamic Contrast Ratio-Panel 3500~5000:1
Response Time (G To G) 9.5 ms
Lamp Life (Typ. Hours) >30,000 hours
Horizontal Viewing Angle (At CR>10) 178
Vertical Viewing Angle (At CR>10) 178
Wall-mount(LxW-mm) 200* 200(mm)VESA
Reserve the right to change the parameters without prior notice.
DISPOSAL INFORMATION
Instructions for waste disposal:
Packaging and packaging aids are recyclable and
should principally be recycled. Packaging materials, contains a small amount of mercury; please follow
such as foil bag, must be kept away from children. the local laws or regulations for disposal.
Information for Users on Disposal of Information for Users in European
old Equipment and Batteries (European Union Countries
Union only)
These symbols indicate that equipment with these This symbol on the product or on its packaging
symbols should not be disposed of as general means that your electrical and electronic device
household waste. If you want to dispose of the should be disposed of at the end of its service life
product or battery, please consider the collection separately from your household wastes. There are
systems or facilities for appropriate recycling. separate collection systems for recycling in EU.
Notice: The sign Pb For more information, please contact
below the symbol for the local authority or the dealer
batteries indicates that where you purchased the product.
this battery contains
lead.
We hereby declare that this 40'' FHD
LED TV is in compliance with the
essential requirements and other
relevant provisions of Directive
2014/53/EU.
39www.altimo.co.uk For customer service call: 0330 041 7490
You can also read