INTERWORX SERVER ADMINISTRATOR MYSQL GUIDE - BY INTERWORX LLC
←
→
Page content transcription
If your browser does not render page correctly, please read the page content below

InterWorx Server Administrator MySQL Guide

               by InterWorx LLC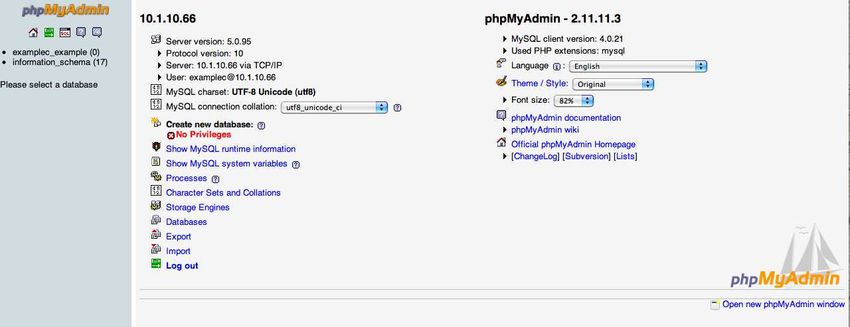
Contents

I MySQL administration via NodeWorx                                                                                                                                                         3
1   An Introduction to InterWorx’s MySQL Integration                                                                                                                                        4
    1.1 Compatibility With InterWorx . . . . . . . . . . . . . . . . . . . . . . . . . . . . . . . . . . . . . .                                                                            4
    1.2 Additional abilities . . . . . . . . . . . . . . . . . . . . . . . . . . . . . . . . . . . . . . . . . . . .                                                                        4

2   NodeWorx MySQL Overview Page                                                                                                                                                            6
    2.1 Detailed descriptions of Settings found on Overview Screen . . . . . . . . . . . . . . . . . . . . . .                                                                              6
    2.2 Additional features of Overview Page . . . . . . . . . . . . . . . . . . . . . . . . . . . . . . . . . .                                                                           10

3   Remote Servers                                                                                                                                                                         13
    3.1 The Remote Servers Screen . . . . . .      .   .   .   .   .   .   .   .   .   .   .   .   .   .   .   .   .   .   .   .   .   .   .   .   .   .   .   .   .   .   .   .   .   .   13
    3.2 Adding a remote server . . . . . . . .     .   .   .   .   .   .   .   .   .   .   .   .   .   .   .   .   .   .   .   .   .   .   .   .   .   .   .   .   .   .   .   .   .   .   13
    3.3 Setting a default MySQL server . . .       .   .   .   .   .   .   .   .   .   .   .   .   .   .   .   .   .   .   .   .   .   .   .   .   .   .   .   .   .   .   .   .   .   .   14
    3.4 Deleting a remote server . . . . . . .     .   .   .   .   .   .   .   .   .   .   .   .   .   .   .   .   .   .   .   .   .   .   .   .   .   .   .   .   .   .   .   .   .   .   14
    3.5 Managing/Configuring a remote server       .   .   .   .   .   .   .   .   .   .   .   .   .   .   .   .   .   .   .   .   .   .   .   .   .   .   .   .   .   .   .   .   .   .   15

4   phpMyAdmin                                                                                                                                                                             16
    4.1 Basics . . . . . . . . . . . . . . . . . . . . . . . . . . . . . . . . . . . . . . . . . . . . . . . . . . .                                                                       16
    4.2 Common Session Issue . . . . . . . . . . . . . . . . . . . . . . . . . . . . . . . . . . . . . . . . . .                                                                           16

II Advanced MySQL Administration and Management                                                                                                                                            18
5   Tracking down load issues                                                                                                                                                              19
    5.1 Installing mytop . . . . . . . . . . . . . . . . . . . . . . .                         .   .   .   .   .   .   .   .   .   .   .   .   .   .   .   .   .   .   .   .   .   .   .   19
    5.2 Using mytop and logging into the MySQL database as root                                .   .   .   .   .   .   .   .   .   .   .   .   .   .   .   .   .   .   .   .   .   .   .   20
    5.3 mytop Display (From Official Documentation) . . . . . . .                              .   .   .   .   .   .   .   .   .   .   .   .   .   .   .   .   .   .   .   .   .   .   .   20
    5.4 General Paradigm for Tracking Load Issues . . . . . . . .                              .   .   .   .   .   .   .   .   .   .   .   .   .   .   .   .   .   .   .   .   .   .   .   22

6   Data backup, repair, recovery                                                                                                                                                          23
    6.1 Backup inside InterWorx . . . . . . . . . . . . . . . . . . . . . . . . . . . . . . . . . . . . . . . . .                                                                          23
    6.2 Backup on Command Line . . . . . . . . . . . . . . . . . . . . . . . . . . . . . . . . . . . . . . . .                                                                             29
    6.3 Checking and Repairing corrupted data . . . . . . . . . . . . . . . . . . . . . . . . . . . . . . . . .                                                                            31

7   Migrating a SiteWorx account to a different MySQL server                                                                                                                               33

8   Odds and Ends                                                                                                                                                                          34
    8.1 Command-Line Reference . . . . . . . . . . . . . . . . . . . . . . . . . . . . . . . . . . . . . . . .                                                                             34
    8.2 How MySQL users and databases are mapped to SiteWorx accounts . . . . . . . . . . . . . . . . . .                                                                                  35
    8.3 Clustering Considerations . . . . . . . . . . . . . . . . . . . . . . . . . . . . . . . . . . . . . . . . .                                                                        35

                                                                       1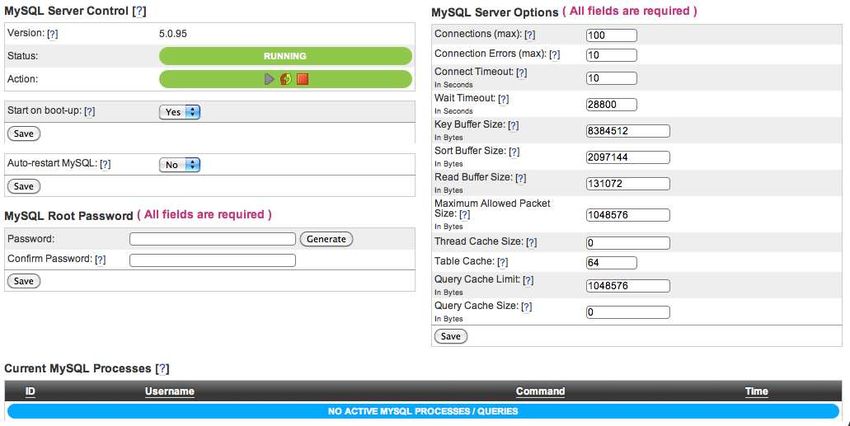
Preface

Databases are the fundamental data storage mechanism for web applications today on the internet. The InterWorx
hosting control panel supports the web’s most ubiquitous database server, MySQL. It’s an open source SQL relational
database server currently maintained by Oracle Corporation. Due to it’s wide deployment and integration, most users
feel comfortable using the MySQL database system. In addition, the online documentation for the software is very
robust, making it easier than ever to become an expert in the database system.
    In order to get the most out of this guide, we recommend that a server administrator have some experience with
the following:
   • Linux command-line
   • Starting/Stopping daemons using /etc/init.d/servicename or the “service” command
   • Basic SQL queries (SELECT, INSERT, UPDATE, DELETE)
   • phpMyAdmin
   • MySQL server administration knowledge (/etc/my.cnf, /var/lib/mysql/*, mysql CLI client, mysqldump, mysqlcheck)
If you don’t have experience with one of the above items, you can still probably get use out of this guide, albeit with
perhaps occasionally relying on Google to look up unknown terms or proper use of a piece of software. We try to leave
most of the explaining of how MySQL works to the MySQL documentation and instead try to provide documentation
here that is useful to an InterWorx server administrator.

                                                          2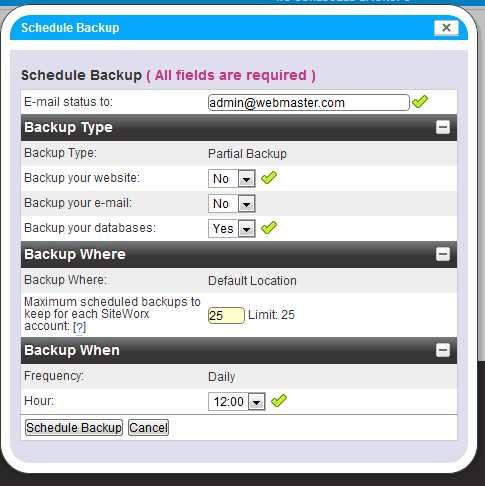
Part I

MySQL administration via NodeWorx

                3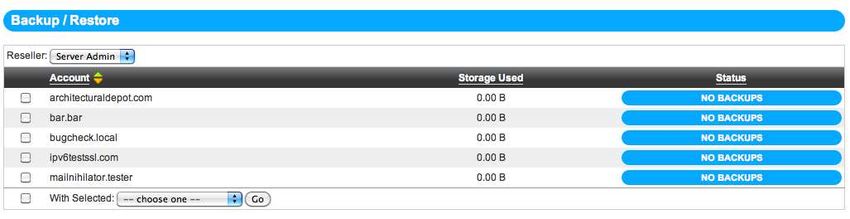
Chapter 1

An Introduction to InterWorx’s MySQL
Integration

InterWorx interfaces with the MySQL server software much like you’d expect. For example, configuring options
interacts with the server’s main configuration file /etc/my.cnf. Additionally, in order to determine whether the service
is online, the /etc/init.d service control script is used to query the status of the service. The user-friendly web interface
can be located inside NodeWorx under System Services ⊲ MySQL Server.

1.1 Compatibility With InterWorx
InterWorx does not provide the RPM package for the mysql server. Instead, we rely on the operating system’s main-
tainers to build and distribute the MySQL package for their system. It is always possible to upgrade or switch sources
of your MySQL server as long as the following requirements are met:

    • The MySQL server version must be version 4.0 or higher.
    • In the /etc/my.cnf, the old-passwords setting must be turned on (set to true). This is because the MySQL client
      that InterWorx uses to interact with the system MySQL server is a 4.0 client, which allows for compatibility
      across multiple MySQL server versions.
    • On InterWorx install, InterWorx should be able to access the root user of the MySQL without a password. This
      is the default for most Red Hat based fresh OS installs.

1.2 Additional abilities
1.2.1 phpMyAdmin
InterWorx has a fully integrated version of phpMyAdmin which allows SiteWorx users and NodeWorx resellers to
manage all MySQL databases under their account, even if the databases are segregated across multiple MySQL users.
In addition, from NodeWorx, administrators are able to see all databases for all users on their servers and manage them
via phpMyAdmin. Our version of phpMyAdmin sits behind the authentication mechanism of InterWorx and thus is
not accessible from the outside without providing correct NodeWorx or SiteWorx credentials (depending what panel
you are logging in to).

1.2.2 Remote Servers
In the event you don’t want to use the localhost MySQL server, InterWorx supports adding “remote” servers and
assigning SiteWorx accounts to the remote servers. This allows you to segregate MySQL CPU and memory require-
ments on a separate server. This also allows you to scale the memory allotted to the server up for superior performance
since a remote MySQL server can be set to do “only” MySQL. In addition, the remote server is not required to run

                                                             4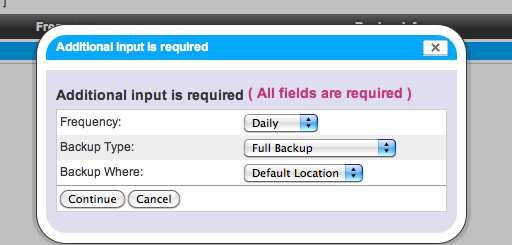
CHAPTER 1. AN INTRODUCTION TO INTERWORX’S MYSQL INTEGRATION                                                           5

InterWorx or even an RHEL compatible operating system - you can choose what ever operating system you feel most
comfortable administering a MySQL server on.
    If you never want to use the localhost server, it is also possible to designate a remote server as the default MySQL
server, and all SiteWorx accounts will use the remote MySQL server by default. This is covered in more depth in
section 3.3.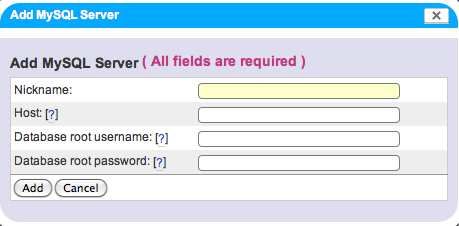
Chapter 2

NodeWorx MySQL Overview Page

The overview page, located in NodeWorx under System Services ⊲ MySQL Server ⊲ Overview, allows your standard
InterWorx Start/Stop/Restart of the MySQL server daemon. In addition, you are able to modify whether the service
starts on boot1. Auto-restart MySQL will cause InterWorx to meticulously monitor the mysql service and attempt to
start it back up if the service remains down for a predetermined amount of time (this will prevent InterWorx from
restarting the daemon in the event the service is already restarting automatically due to log rotation or manual restart).
While these are pretty standard for all InterWorx services, what is not standard are the server-specific settings which
are configured by modifying the /etc/my.cnf configuration live.

2.1 Detailed descriptions of Settings found on Overview Screen
Tweaking your MySQL configuration is fairly simple via the MySQL overview screen

2.1.1 Connections(max)
This determines the maximum number of simultaneous client connections. Keep in mind increasing this value also
increases the maximum amount of UNIX file descriptors that the server needs. If that statement means nothing to you,
just interpret it as “the maximum resources my server will need will increase”. You need more memory to manage all
those connections, more CPU time to handle all the concurrent activity. On the other hand, if your MySQL server is
not particularly greedy, you may be starving the applications which rely on the server for data storage. According to
MySQL’s documentation, the default connection count is 151. Keep in mind that in a typically single page load for
something like WordPress, a connection is held open for a fraction of a second. The value of your MySQL connection
count should only be raised if you find that your applications are reporting errors of being unable to connect due to
the max connection limit being hit (MySQL will tell you this). These errors will typically manifest themselves in the
error logs of the SiteWorx account with the application installed.

2.1.2 Connection Errors (max)
This sets the /etc/my.cnf value max_connect_errors. The MySQL documentation says the following:
         If more than this many successive connection requests from a host are interrupted without a successful
         connection, the server blocks that host from further connections. You can unblock blocked hosts by flush-
         ing the host cache. To do so, issue a FLUSH HOSTS statement or execute a mysqladmin flush-hosts
         command. If a connection is established successfully within fewer than max_connect_errors attempts
         after a previous connection was interrupted, the error count for the host is cleared to zero. However, once
         a host is blocked, flushing the host cache is the only way to unblock it.2
  1 This    is done on the back-end by setting the service to “on” via chkconfig
  2
      http://dev.mysql.com/doc/refman/5.5/en/server-system-variables.html#sysvar_max_connect_errors

                                                                      6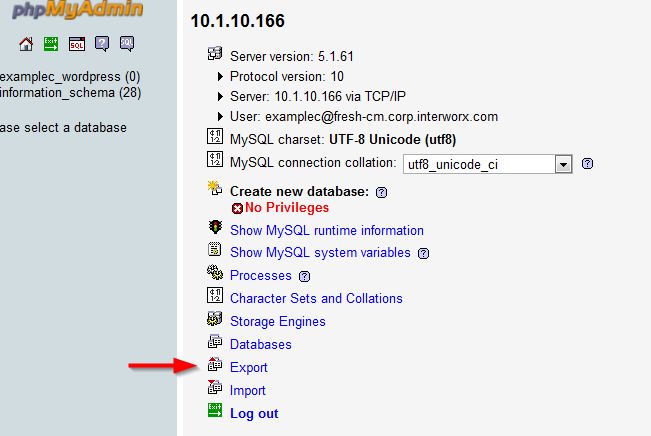
CHAPTER 2. NODEWORX MYSQL OVERVIEW PAGE                                                                                7

                                       Figure 2.1: The MySQL Overview Page

Basically, the setting is a security setting that is designed to combat brute-force password guessing attacks. Most hosts
don’t enforce it because none of the users are permitted remote login, or TCP port 3306 is blocked in the firewall. If
you have clients connecting direct to your MySQL server remotely though, you may want to lower this to a reasonable
amount to prevent brute-force login attempts. The default is 10.

2.1.3 Connect Timeout
This specifies how long it takes for the server to wait on a connect packet before the server deems that the connec-
tion has timed out. This value is normally not that critical but it may be helpful to modify it if clients frequently
encounter errors of the form: Lost onne tion to MySQL server at 'XXX', system error: errno. The
default MySQL value is 10.
    What does it mean to wait for a connect packet? A connection to a MySQL server requires 2 things - a TCP
connection, and then via MySQL’s protocol, a request to connect. Connect timeout will become a factor only when a
remote client has initiated a TCP connection to port 3306 - but has not sent a request to connect to the MySQL server
proper. In layman’s terms: the MySQL server is aware that there is some computer connected to it, but it will not
consider it a client to it’s service until the remote computer says “I know you are a MySQL server, I want to connect
to your service!”. If the remote computer fails to provide this within the connect timeout window, MySQL will drop
the connection.

2.1.4 Wait Timeout
This specifies how long a MySQL connection can remain open with nothing happening on it before the server kills the
connection. If you for some reason need to remain connected to your MySQL server for long periods of time, you may
want to increase this. On the other hand, consider that a connection open is eating up one of your max_connections
slots. You may want to lower the timeout to prevent a bunch of users from sitting connected for a lengthy period of
time. The default is 28800 seconds.

2.1.5 Key Buffer Size
When defining MySQL tables, you occasionally may define one of the columns as a Primary Key, Unique, or Index
column. I show an example of this in Figure 2.2. You may do it for the ability to put restrictions on what rows you
CHAPTER 2. NODEWORX MYSQL OVERVIEW PAGE 8
CREATE TABLE u s e r s (
userid integer ,
Last_Name v a r c h a r ( 3 0 ) ,
First_Name v arch ar ( 3 0 ) ,
PRIMARY KEY ( u s e r i d )
);
Figure 2.2: An example of creating a table with a primary key
can insert into your table. I.e if I have a column for “userid” I don’t want 2 different users with the same userid, so I
would set the column to be a primary key or unique so that the database system doesn’t allow me to accidentally insert
a record with an identical ID.
The column key designation also has the additional effect of making data look-ups faster. For example, if I have a
column userid in a table users, and I have 1 million users in my database, a query like SELECT * FROM users WHERE
userid=10 will be trivial for MySQL to perform because each row in the table will be “optimized” to be looked up
by the userid3 . In order to speed things up even more, commonly used meta data4 that is used by the server to find
rows quickly is cached in memory. This is known as the K EY B UFFER or K EY CACHE and you can control it’s size.
By default, most users will want to stay with what ever the key buffer size is on operating install. But if you are more
adventurous or you have a lot of memory that you can devote to the MySQL server, changing the value may be in your
interest. To give more detailed information on modifying this value, we will quote the MySQL documentation again:
The maximum permissible setting for key_buffer_size is 4GB on 32-bit platforms. As of MySQL
5.0.52, values larger than 4GB are permitted for 64-bit platforms (except 64-bit Windows, for which large
values are truncated to 4GB with a warning). The effective maximum size might be less, depending on
your available physical RAM and per-process RAM limits imposed by your operating system or hardware
platform. The value of this variable indicates the amount of memory requested. Internally, the server
allocates as much memory as possible up to this amount, but the actual allocation might be less.
You can increase the value to get better index handling for all reads and multiple writes; on a system
whose primary function is to run MySQL using the MyISAM storage engine, 25% of the machine’s total
memory is an acceptable value for this variable. However, you should be aware that, if you make the value
too large (for example, more than 50% of the machine’s total memory), your system might start to page
and become extremely slow. This is because MySQL relies on the operating system to perform file system
caching for data reads, so you must leave some room for the file system cache. You should also consider
the memory requirements of any other storage engines that you may be using in addition to MyISAM.5
It should be noted here that your InterWorx server is not only running MySQL and dedicating 25% of your system’s
memory to the MySQL key cache is not recommended. 25% should probably be the maximum memory footprint that
the entire MySQL service takes up.
2.1.6 Sort Buffer Size
The sort buffer is a per-session (read: per connection) buffer that is created on demand when sorting or grouping needs
to happen in order to process a query. In SQL this translates to when ORDER BY or GROUP BY are used to try and
filter/sort data. By default this value is set to 2MB and it is generally recommended to keep this value at default or
within 256KB-4MB since this is a per session cache. 100 concurrent sessions doing heavy sorting would eat 200MB
of memory solely for sorting (not including various other caches). In general, MySQL recommends that if you have
slow queries with ORDER BY or GROUP BY in them, you should investigate better query optimization or improved
indexing instead of messing with the sort buffer size first. The maximum size for the sort buffer is 4GB, but again -
you don’t want huge sort buffers.
3 This is because on the back-end, the primary key is fed into a hashing algorithm to find the correct row in the file that backs your database.
4 index blocks which more than likely contain hash tables for rapid look-ups of specific rows based on keys
5 http://dev.mysql.com/doc/refman/5.5/en/server-system-variables.html#sysvar_key_buffer_sizeCHAPTER 2. NODEWORX MYSQL OVERVIEW PAGE 9
2.1.7 Read Buffer Size
Any MySQL query that needs to do a sequential (read: in order) scan of a given table needs somewhere to store in
memory what it has read thus far as it traverses down the table. This is the read buffer and its size is controlled by the
read_buffer_size option. By default MySQL sets the value to 131072 bytes, or 128Kbytes. The thing to note about the
read buffer size is that the byte size should be a multiple of 4KB or 4096 bytes, the default page size of most operating
systems on x86. If the value entered is not a multiple of 4KB, it will be rounded down to the nearest multiple when
the server daemon is started. You may want to increase this value if you have extra memory and some of the tables
that are getting scanned are quite big.
2.1.8 Maximum Allowed Packet Size
While packets or frames have different meanings in the context of Ethernet and TCP/IP protocols, in MySQL land the
communication packet refers to the set of data that a client issues to a server when making an SQL query, or the set of
data corresponding to a single table row being sent back to the client. For the most part, the maximum allowed packet
size is not something that is typically going to be modified by most hosts since the default of 1MB is sufficient in most
cases. On the other hand, certain applications may make use of the BLOB or TEXT column type, which can accept
very large data inputs. If you have clients storing large sets of data in their database columns and they are getting
errors such as “ Pa kets larger than max_allowed_pa ket are not allowed” when they attempt to insert or
select large table rows, you will want to increase this value to accommodate that data set.
2.1.9 Thread Cache Size
In order to concurrently serve the SQL queries of multiple applications and MySQL clients at once, the MySQL server
uses threads. For the non-programmer, a thread is like a mini processes that runs inside the process of the MySQL
daemon. It basically operates independent of the execution of other threads, including the one that was started with the
program. This allows for the MySQL daemon to concurrently handle multiple connections and queries simultaneously.
When a new connection comes in, MySQL (and possibly the operating system) has to expend some CPU time and
memory to initialize a new thread to handle the session. The the thread cache allows MySQL to save some threads
instead of just letting them die at the end of handling a connection so that the next connection can be serviced quicker.
This variable is typically only really worth modifying if you know you have hundreds of new connections per
second and you are seeing a huge performance hit. The default is 0, connection threads are not cached.
2.1.10 Table Cache
This is the number of tables that MySQL can have open concurrently. It is important to note that MySQL will “open”
a table once per connection - that means that even if you have a single table in your database, if 100 connections need
that table, MySQL will attempt to open that table up to table_cache times.
Table cache is lightly related to the Connections(Max) field as described in section 2.1.2. Basically if you are
expecting a certain number of connections, let’s say for example 100, you want table cache to be set to 100*N where
N is the maximum number of tables you are JOIN-ing together in a given query. Understandably, this value is hard
to guess and as such, it is safe to say on a default InterWorx install, you can leave this value unchanged until either
the concurrent number of connections on your MySQL server increases, or you notice that queries going through are
JOIN-ing a significant number of tables.
Another thing to bear in mind with the Table Cache is that each open table requires an additional Linux file descrip-
tor. Occasionally operating system security, VPS security (if you are inside a VPS), or even MySQL’s open-files-limit
can cap the number of file descriptors that are allowed to be open by the MySQL daemon process. If MySQL hits this
limit, it will “panic” and disallow any new connections. The MySQL documentation says the following:
“Make sure that your operating system can handle the number of open file descriptors implied by the
table_cache setting. If table_cache is set too high, MySQL may run out of file descriptors and refuse
connections, fail to perform queries, and be very unreliable. You also have to take into account that
the MyISAM storage engine needs two file descriptors for each unique open table. A MyISAM table is
opened for each concurrent access. This means the table needs to be opened twice if two threads access
the same table or if a thread accesses the table twice in the same query (for example, by joining the tableCHAPTER 2. NODEWORX MYSQL OVERVIEW PAGE 10
to itself). Each concurrent open requires an entry in the table cache. The first open of any MyISAM table
takes two file descriptors: one for the data file and one for the index file. Each additional use of the table
takes only one file descriptor for the data file. The index file descriptor is shared among all threads.” 6
The cache of open tables is kept at a level of TABLE C ACHE entries. The default value is 64. Note that MySQL may
temporarily open more tables than this to execute queries. MySQL closes an unused table and removes it from the
table cache under the following circumstances:
• When the cache is full and a thread tries to open a table that is not in the cache.
• When the cache contains more than table_cache entries and a table in the cache is no longer being used by any
threads.
• When a table flushing operation occurs. This happens when someone issues a FLUSH TABLES statement or
executes a mysqladmin flush-tables or mysqladmin refresh command.
When the table cache fills up, the server uses the following procedure to locate a cache entry to use:
• Tables that are not currently in use are released, beginning with the table least recently used.
• If a new table needs to be opened, but the cache is full and no tables can be released, the cache is temporarily
extended as necessary. When the cache is in a temporarily extended state and a table goes from a used to unused
state, the table is closed and released from the cache.
2.1.11 Query Cache Limit
By default, MySQL will try to cache the results of a SELECT statement so that if the query is issued often and the data
backing the query doesn’t change, the expensive computation needed to return the query doesn’t have to be performed
a second time. Most applications change their databases less often than how often data is requested from the database.
As such, MySQL is able to return the result of query much faster if it has the result already sitting in memory.
The Q UERY L IMIT C ACHE controls what the maximum size of a result is that is allowed to go into a cache. By
default, this is set to 1MB. You can increase this to improve performance on queries which return large data sets, but
you do so at the risk of significantly increasing the memory footprint of the MySQL server.
2.1.12 Query Cache Size
The Q UERY C ACHE S IZE variable controls the size to allocate to query caching on the MySQL server. This value
must be a multiple of 1024 bytes, and must be at minimum of 40KB to allocate the data structures required for
caching. According to MySQL, the default is 0 (as in, no caching will occur). 64-256MB is not unreasonable, though,
depending on your resources available.
2.2 Additional features of Overview Page
In addition to manipulating settings found in the /etc/my.cnf MySQL configuration file, this page also allowed you to
set the MySQL root password, and view active processes.
2.2.1 The MySQL Server Root Password
A common question InterWorx gets is - what is my MySQL server’s root password? During installation, InterWorx
connects to the MySQL database using the MySQL root user since the root user should not have a password after
Operating System install. InterWorx creates a special iworx user that has all root privileges which is what InterWorx
will use from that point on to interact with the MySQL server. InterWorx then sets a random, scrambled, gibberish
password for the MySQL root user so that it is not accessible without a password anymore.
Therefore, by default, no one knows your root MySQL password. Since InterWorx’s iworx user has root privi-
leges, InterWorx is able to set your root password if you wish to access the database by that user. This can be done
through MySQL root password box, visible in figure 2.1.
6 http://dev.mysql.com/doc/refman/5.0/en/table-cache.htmlCHAPTER 2. NODEWORX MYSQL OVERVIEW PAGE 11
Value Meaning
Binlog Dump This is a thread on a master server for sending binary log contents to a slave server.
Change user The thread is executing a change-user operation.
Close stmt The thread is closing a prepared statement.
Connect A replication slave is connected to its master.
Connect Out A replication slave is connecting to its master.
Create DB The thread is executing a create-database operation.
Daemon This thread is internal to the server, not a thread that services a client connection.
Debug The thread is generating debugging information.
Delayed insert The thread is a delayed-insert handler.
Drop DB The thread is executing a drop-database operation.
Error Bad things.
Execute The thread is executing a prepared statement.
Fetch The thread is fetching the results from executing a prepared statement.
Field List The thread is retrieving information for table columns.
Init DB The thread is selecting a default database.
Kill The thread is killing another thread.
Long Data The thread is retrieving long data in the result of executing a prepared statement.
Ping The thread is handling a server-ping request.
Prepare The thread is preparing a prepared statement.
Processlist The thread is producing information about server threads.
Query The thread is executing a statement.
Quit The thread is terminating.
The thread is flushing table, logs, or caches, or resetting status variable or replication
Refresh
server information.
Register Slave The thread is registering a slave server.
Reset stmt The thread is resetting a prepared statement.
Set option The thread is setting or resetting a client statement-execution option.
Shutdown The thread is shutting down the server.
Sleep The thread is waiting for the client to send a new statement to it.
Statistics The thread is producing server-status information.
Table Dump The thread is sending table contents to a slave server.
Table 2.1: Values for the “Command” field and their meanings
2.2.2 Current MySQL Processes
This table will show you the current snapshot of MySQL processes which is done by running SHOW PROCESSLIST
as the iworx user (which has root privileges as described in section 2.2.1).
ID is the the “connection identifier”, or how MySQL internally references the connection that issued the query.
User is the MySQL user that is currently connected. This can be particularly if you have many SiteWorx accounts
and you are trying to track down particularly resource abusive sites. Users with high process run time and many
processes in this list will probably be issuing extremely inefficient queries. Alternatively, their data sets may
have grown large enough that some tweaking needs to be performed in order to improve server performance.
Command is the type of command the thread is currently executing. Keep in mind that this is not analogous to what
query was executed, but what “internal” procedure the thread is performing. They can take on the values seen
in table 2.1. Essentially this is the “state” the thread is in. Most of the time, threads are busy in the Query
state. With the popularity of using prepared statements, though, you may see other states occasionally on a busy
server.
Time is the amount of time in seconds a thread has been in its current state.CHAPTER 2. NODEWORX MYSQL OVERVIEW PAGE 12
Figure 2.3: The MySQL RRD Graph
2.2.3 RRD Graph
As a web host, you often want to track basic statistics of your server in order to determine if work load or resource
usage has changed over time. Also on the MySQL overview page is a graph of the average number of MySQL queries
over time, with the X-axis representing time and the Y-axis representing the number of queries. A picture of a (blank)
graph can be seen in figure 2.3. This can be useful if you notice your MySQL server has been using more resources
lately - the graph can demonstrate whether that is due to an increase query workload or not.Chapter 3
Remote Servers
The remote servers feature, as stated earlier, allows you as a web host to remove the responsibility of running a
MySQL database server from the InterWorx server and move it to it’s own segregated server. Furthermore, if one
MySQL server becomes overwhelmed, you can additional MySQL servers for new accounts to use. Remote servers
can be managed in NodeWorx under System Services ⊲ MySQL Server ⊲ Remote Servers
3.1 The Remote Servers Screen
As seen in Figure 3.1, the remote servers screen lists all the servers, including the one running locally on the InterWorx
box (localhost). The main purpose of this screen is to give you a quick look at all the servers available for you and your
resellers to assign SiteWorx accounts to, as well as their status (Online/Offline/Connected/Disconnected) and version.
This screen also allows you to set what the “default” MySQL server, and remove remote servers if you no longer want
them available to your InterWorx server. By default, when you visit this screen all you’ll see is the localhost server.
Keep in mind that changing MySQL servers of a SiteWorx account after it’s created is not a trivial process as data
may need to be migrated, and version discrepancies may create issues. See chapter 7 for details on how this is done.
3.2 Adding a remote server
As discussed in section 1.1 and section 1.2.2, the requirements for a remote server are:
• The MySQL server version must be between 4 and 5.5.
• In the /etc/my.cnf, the old-passwords setting must be turned on (set to true). This is because the MySQL
client that InterWorx uses to interact with the system MySQL server is a 4.0 client.
• You must know the root MySQL password for InterWorx to interact with the server.
• The InterWorx server must be able to communicate with the MySQL server on TCP port 3306.
• The remote MySQL server must be setup to receive incoming connections, particularly for the root MySQL
user.
Figure 3.1: The Remote Servers screen
13CHAPTER 3. REMOTE SERVERS 14
Figure 3.2: Adding a new remote MySQL server
Figure 3.3: Setting a default MySQL server
As you can see in figure 3.2, adding a new server is fairly straight forward. You need to pick a “nickname” for the
MySQL server which will be used by InterWorx to refer to that server easily instead of using host name or IP. This
also makes it easier when adding new accounts through our API or CLI because you specify the MySQL server to use
via nickname. It also is easier to remember what server is for what when you are adding new MySQL servers by IP
address.
3.3 Setting a default MySQL server
As you can see in figure 3.3, setting a default server is as simple as clicking a “favorite” star next to the preferred
server. By setting a default MySQL server, you are setting the server that will be used automatically when creating
a SiteWorx account without an explicitly set remote server. Most billing systems interact with InterWorx on a very
basic level, and many don’t go out of their way to specify which MySQL server to use since that is not the concern of
most billing systems. By setting a default MySQL server, you are ensuring that unless otherwise specified, a SiteWorx
account will be mapped to the correct server.
Another benefit of the default server setting is when creating a SiteWorx account manually through the interface,
the default server will be selected by default in the drop down menu.
3.4 Deleting a remote server
Deleting a server from InterWorx is quite easy, you simply click delete and the system will prompt you to make sure
you are sure you want to remove the server. By default, InterWorx will not permit you to remove MySQL servers
that are currently in use by SiteWorx accounts. Once deleted, you will not be able to map SiteWorx accounts to that
database and if it was a default server, the default will return to localhost. You can never delete the localhost server,
only turn it off.CHAPTER 3. REMOTE SERVERS 15 3.5 Managing/Configuring a remote server Unfortunately InterWorx isn’t magical and can’t change /etc/my.cnf settings on the other box without opening an SSH session. Therefore, when clicking [Configuration] on the Remote Servers screen, you will see a simplified version of the overview page for the localhost server which details the status of the server (up or down), the ability to change root password, and also active threads/processes. Essentially, you are limited to what can be accessed via the MySQL client. In order to manipulate settings, you will have to do so outside of InterWorx directly on the server itself. The MySQL documentation is a fantastic resource that can guide you on configuring your remote server.
Chapter 4

phpMyAdmin

This will be a rather brief chapter for 2 reasons:
   1. phpMyAdmin is rather user friendly and intuitive to use.
   2. phpMyAdmin has it’s own documentation if you actually are stuck.

4.1 Basics
phpMyAdmin is a nice web-based front end to a MySQL server and its databases. By default, it only shows you the
databases that the MySQL user you are logged in as is permitted to see. A screen shot is shown in figure 4.1.

4.1.1 phpMyAdmin inside NodeWorx
When using phpMyAdmin in NodeWorx, you are logged in as the iworx MySQL user, which has root privileges. As
a result, you will be able to see all databases and tables on your MySQL server, as well as modify them freely.
    In the event that you have remote servers or you have debugging mode enabled1, when clicking the phpMyAdmin
link, you will be taken to a landing page which will display a drop down box of all the database servers that InterWorx
can interface with. The reason debugging mode causes this to occur is because debugging mode will allow you to
see the control panel’s database server (the separate, segregated server that the control panel uses to store NodeWorx
and SiteWorx meta data). This is useful if you are a more technical user and have enough experience to look at the
InterWorx database. We strongly discourage modifying anything directly in the InterWorx database without guidance
from InterWorx support. This could lead to unexpected results and or serious issues for your server.

4.1.2 phpMyAdmin in SiteWorx
In SiteWorx, phpMyAdmin operates a bit differently. Since there can be multiple MySQL users in a SiteWorx account,
we can’t just log the user in as a given user and expect them to see all their databases. Instead, InterWorx creates a
temporary MySQL user on demand which has access to all the databases of a given SiteWorx account.
    phpMyAdmin can be an invaluable tool for debugging issues with web applications, fixing data integrity issues,
importing large data sets, exporting large data sets, creating new databases, and designing the database structure.

4.2 Common Session Issue
The most common issue we see is that NodeWorx admins (read: users who are able to log in and out of different
SiteWorx accounts) often will go into phpMyAdmin in multiple accounts, or go into phpMyAdmin in NodeWorx,
then log into a SiteWorx account and go to phpMyAdmin in SiteWorx without explicitly clicking the logout button
in phpMyAdmin. Since phpMyAdmin is opened in a tab, often users will simply close their tab instead of explicitly
  1 Debugging   mode can be activated in NodeWorx under Server ⊲ Settings

                                                                     16
CHAPTER 4. PHPMYADMIN 17
Figure 4.1: phpMyAdmin
clicking logout. While this does not matter for a SiteWorx user with multiple accounts, occasionally NodeWorx
administrators who move between SiteWorx account’s phpMyAdmin or move between NodeWorx phpMyAdmin and
SiteWorx phpMyAdmin without explicitly clicking the green logout button will see that the session from the last-used
phpMyAdmin session will appear instead of the one they were expecting.
InterWorx tries to mitigate reloading and re-creation of the temporary SiteWorx MySQL accounts unnecessarily,
and thus it defaults to using the last session, if it’s still valid. If you have not closed your browser and you switch
between phpMyAdmin’s, it will appear that a SiteWorx account might be seeing someone ease’s data when in reality
it is only your web browser (as the NodeWorx server admin) that has the capability (temporarily). This can be fixed by
clicking the green logout button in phpMyAdmin, (as that will explicitly flush the phpMyAdmin session), and clicking
the phpMyAdmin button again. Alternatively, you can just close your web browser and re-open it.Part II
Advanced MySQL Administration and
Management
18Chapter 5
Tracking down load issues
Overtime as you add more accounts and more users on your system, occasionally you’ll get the few bad apples with
poorly-coded web applications that hammer your MySQL server with LEFT JOIN’s with SORT BY’s and GROUP
BY’s on one million row tables that completely obliterates your server. If you have a large number of SiteWorx
accounts, tracking down which one is responsible for MySQL sucking up your server’s resources may prove difficult.
The tool that InterWorx support will typically use is called mytop. Mytop is a Perl application that continuously
queries the MySQL server with SHOW PROCESSLIST and produces produces output anolgous to the linux system
load monitoring tool, top. This allows you to see a somewhat-in-real-time picture of what’s going on with your server.
5.1 Installing mytop
1. You can download mytop from the MyTop homepage. You can just download it to your /root/ folder. You can
run:
wget HTTP://jeremy.zawodny. om/mysql/mytop/mytop-1.6.tar.gz
2. Extract the tarball with:
tar xvzf mytop-1.6.tar.gz .
3. Try running it by cd’ing to the directory that was just created and running:
./mytop.
4. If you get a warning about Term::ReadKey not being installed, we will need to try and install it via CPAN (which
is like a package manager for perl modules).
5. Check if you have CPAN by just running pan on your terminal. If not, try installing it with :
yum install perl-CPAN.
6. Once you have run pan, CPAN might ask you if you want it to configure itself. Simply hit enter to have CPAN
automatically configure itself.
7. Once at the prompt, enter install Term::ReadKey in order to have cpan download and install the package.
Then enter quit to exit.
8. At this point you should be good to go. You may be missing other dependencies, most of which should be
obtainable via CPAN if needed.
9. If you get an error when running mytop: ’ Error in option spe : "long|!" ’, then you should open the
./mytop file in your preferred text editor, go to the line that looks like:
"long|!" => \$ onfig{long_nums},
and comment it out with a # character in front of that text. On our version (1.6), the line was number 159.
19CHAPTER 5. TRACKING DOWN LOAD ISSUES 20
Figure 5.1: An example mytop display from http://jeremy.zawodny.com/mysql/mytop/
5.2 Using mytop and logging into the MySQL database as root
In order to use mytop, you need to provide server and login information. Typically most users don’t know their iworx
MySQL password to the localhost database. We recommend instead manually setting the root password in NodeWorx
under System Services ⊲ MySQL Server ⊲ Overview for your localhost MySQL server. If you need to set the root
password for a remote server, this can also be accomplished by visiting System Services ⊲ MySQL Server ⊲ Remote
Servers and clicking [Configuration] next to the remote server you wish to set the password for.
5.2.1 Connecting to your database server with mytop
In order to connect with mytop now, you can run the following:
./mytop -S /var/lib/mysql/mysql.so k -u root -p [PASSWORD HERE℄ -d mysql
The -d mysql is added because a database needs to be selected. As all servers have a mysql database (it stores meta
data like users and permissions), that is a safe database to choose. As root user, though, you will see all activity across
all databases and users.
5.3 mytop Display (From Official Documentation)
This documentation can be found at http://jeremy.zawodny.com/mysql/mytop/mytop.html. The mytop display screen
is really broken into two parts and is shown in figure 5.1. The top 4 lines (header) contain summary information about
your MySQL server.CHAPTER 5. TRACKING DOWN LOAD ISSUES 21
• The first line identified the host name of the server (localhost) and the version of MySQL it is running. The
right had side shows the uptime of the MySQL server process in days+hours:minutes:seconds format (much like
FreeBSD’s top) as well as the current time.
• The second line displays the total number of queries the server has processed, the average number of queries per
second, the real-time number of queries per second, and the number of slow queries.
• The third line deals with threads. Versions of MySQL before 3.23.x didn’t give out this information, so you’ll
see all zeros.
• And the fourth line displays key buffer efficiency (how often keys are read from the buffer rather than disk) and
the number of bytes that MySQL has sent and received.
You can toggle the header by hitting h when running mytop. The second part of the display lists as many threads as
can fit on screen. By default they are sorted according to their idle time (least idle first). As you can see, the thread id,
username, host from which the user is connecting, database to which the user is connected, number of seconds of idle
time, the command the thread is executing, and the query info are all displayed. Often times the query info is what
you are really interested in, so it is good to run mytop in an xterm that is wider than the normal 80 columns if possible.
The thread display color-codes the threads if you have installed color support. The current color scheme only works
well in a window with a dark (like black) background. The colors are selected according to the Command column of
the display:
• Query - Yellow
• Sleep - White
• Connect - Green
Those are purely arbitrary and will be customizable in a future release. If they annoy you just start mytop with the
-nocolor flag or adjust your config file appropriately.
Instead of always using bulky command-line parameters, you can also use a config file in your home directory
(~/.mytop). If present, mytop will read it automatically. It is read before any of your command-line arguments are
processed, so your command-line arguments will override directives in the config file.
Here is a sample config file ~/.mytop which implements the defaults described above:
user=root
pass=
host= localhost
db= t e s t
d e l a y =5
p o r t =3306
socket=
b atch m o d e =0
h e a d e r =1
c o l o r =1
i d l e =1
Using a config file will help to ensure that your database password isn’t visible to users on the command-line. Just
make sure that the permissions on ~/.mytop are such that others cannot read it (unless you want them to, of course).
You may have white space on either side of the = in lines of the config file.
Shortcut Keys The following keys perform various actions while mytop is running. This list has been abridged to
those keys that will probably be helpful during trouble-shooting load issues.
• ? Display help.
• d Show only threads connected to a particular database.
• f Given a thread id, display the entire query that thread was (and still may be) running.CHAPTER 5. TRACKING DOWN LOAD ISSUES 22
• F Disable all filtering (host, user, and db).
• i Toggle the display of idle (sleeping) threads. If sleeping threads are filtered, the default sorting order is reversed
so that the longest running queries appear at the top of the list.
• k Kill a thread.
• m Toggle modes. Currently this switches from ‘top’ mode to ‘qps’ (Queries Per Second Mode). In this mode,
mytop will write out one integer per second. The number written reflects the number of queries executed by the
server in the previous one second interval. More modes may be added in the future.
• o Reverse the default sort order.
• p Pause display.
• q Quit mytop
• s Change the sleep time (number of seconds between display refreshes).
• u Show only threads owned by a giver user.
5.4 General Paradigm for Tracking Load Issues
In general, you want to look for either:
1. Queries which have been running for an excessively long time (high Time value)
2. Multiple threads mostly owned by the same user.
The combination of these two can often help sort out the nature of what’s going on with load. If a user has excessive
queries, they might be getting a lot of traffic and it might be time to segregate that user on their own MySQL server,
or even move them to a less busy server with more resources. If you are seeing long-running queries, you may want
to try and work with the host to improve their application’s code base, or alternatively ask them to pay more for their
resource use. Again, how you handle situation with single SiteWorx accounts depends on your policy and service
agreement with your client. This guide’s purpose is to help you root the cause of high MySQL usage.Chapter 6
Data backup, repair, recovery
Databases are often the most valuable part of an application on the internet. Unfortunately, databases and the data they
maintain are subject to failure. The hardware backing the filesystem your database run on could die, power could be
cut and the hard disk cache might not be able to write cached data back to the magnetic platters, the filesystem might
be unable to figure out what is missing and make entire files “disappear”, the raid controller might die, and you get the
idea. Even though newer MySQL datastores are more reliable, things can still go awry. This chapter deals primarily
with 2 things:
1. How you can have InterWorx backup MySQL data for you
2. How to try and recover when your database becomes corrupted
6.1 Backup inside InterWorx
The interface that InterWorx provides allows you to generate backups of SiteWorx accounts, which by default contain
a dump of all the databases tied to this account. The SiteWorx interface also allows you to make partial backups that
contain only MySQL database dumps. These partial backups can be used to take snapshots of valid database states. It
is important to keep in mind that if your database is corrupted, the process which dumps your database will be unable
to make a database dump and the backup process will fail. This is both to your advantage (if the database is corrupted
you aren’t taking snapshots of bad data) and disadvantage (if you aren’t paying attention to the alert emails, you might
miss that automated backups are failing).
6.1.1 From NodeWorx
Inside NodeWorx under SiteWorx ⊲ Backup / Restore, you have the ability to do bulk backups of multiple SiteWorx
accounts. This is shown in figure 6.1. This is good if your clients aren’t very prone to backing up their content
Figure 6.1: NodeWorx Backup/Restore Screen
23CHAPTER 6. DATA BACKUP, REPAIR, RECOVERY 24
Figure 6.2: The Backup Now starting prompt
regularly. Select the SiteWorx accounts you wish to backup, and on the “With Selected:” drop down, select “Full-
Backup”. “Structure-only” will not backup the databases and thus is not helpful when trying to preserve MySQL
data.
6.1.2 From SiteWorx
From inside SiteWorx accounts, you are given much more control of the backups and are able to create database-only
backups. In additional you can schedule backups to occur regularly which allows for a hands-free approach to backing
up.
6.1.2.1 Backup Now
Inside a SiteWorx account, under Backups ⊲ Backup Now, you can create a backup on demand for your database, with
the additional ability to have it sent to a remote server when the backup process completes. (Backups are tar’d and
gzip’d which might take some time depending on the size of the database). As you can see in figure 6.2, you are asked
for 2 things when you Backup Now.
Backup Type is how complete of a backup do you want for the SiteWorx account. In this case, you want to choose is
“Partial Backup”. Don’t worry, you will be asked next what you want to backup.
Backup Where is where you want the completed file to be stored. The default location is /home/[SiteWorx linux
user℄ /[a tive domain℄ /iworx-ba kup. Backups placed in this directory are recognized by InterWorx
when attempting a restore from NodeWorx. The alternatives to default location are:
Local File: You don’t want InterWorx to name and place the file for you, you want to dictate filename and
where the backup ends up.
FTP: The file will be FTP’d to another server on completion. You need to know FTP login credentials and the
path structure of the remote server.
SFTP/SCP: The SCP command will be used to send the file to another server. You need to know a linux user
login on the remote server to use this.
The next step of the process is shown in figure 6.3. As you selected partial backup in the previous step, you are
now prompted for what specifically you want to backup from the site. Since we are interested in preserving databases,
“Backup your databases” should be checked. Depending on what you selected for “Backup Where” with the exception
of Default Location, you will be prompted for paths and login credentials for sending the completed backup file to it’s
storage location. Clicking the Backup button will begin the backup process and you will be notified via email (based
on what you put in “Email Status To”) when the backup completes successfully or if there’s an issue of some sort.
6.1.2.2 Schedule
Setting up a scheduled backup is similar to Backup Now, as discussed in the previous section, with the additional re-
sponsibilities of electing backup frequency, and how many backups to store at once (old ones are removed). Scheduling
backups is done in SiteWorx under Backups ⊲ Schedule. A screen shot of the dialog that appears when you click [Cre-
ate Scheduled Backup] is shown in figure 6.4. Once you select your desired backup frequency, a dialog similar to whatCHAPTER 6. DATA BACKUP, REPAIR, RECOVERY 25
Figure 6.3: Backup Now with Partial Backup as Backup Type and FTP for Backup Where
Figure 6.4: Scheduling a Backup ScreenCHAPTER 6. DATA BACKUP, REPAIR, RECOVERY 26
Figure 6.5: Setting up a scheduled backup
you saw in Backup Now appears. This is shown in figure 6.5. As you can see, you are able to set the maximum number
of backups to store at a given time. As a NodeWorx admin, you are able to control the max limit in NodeWorx, and
this is covered in depth in the Backup guide. Setting this value to something reasonable will ensure that you don’t run
out of disk space on the storage medium that will hold the backup.
6.1.2.3 Using phpMyAdmin to backup
The nice thing about phpMyAdmin is that is has some great capabilities for generating backups on the fly through an
interface instead of command-line. If you just want a raw MySQL dump of your database, you may elect to take this
option for convenience. Under Hosting Features ⊲ MySQL ⊲ PhpMyAdmin, you can get access to the phpMyAdmin
for the current SiteWorx account. Figure 6.6 shows where you can find the “Export” link in phpMyAdmin. From
the export page you can determine the exact characteristics of the SQL dump of your database(s). The export page is
shown in figure 6.7. Let’s walk through all the settings on this page, in case you aren’t feeling comfortable with all
that is there.
Export This box contains 2 choices, the databases you want to export, and what format the export should be in. For
database selection, you probably want to backup everything with the exception of the information_schema table. The
information_schema is a meta-data table that MySQL maintains to make statistics and information about databases
available to the user. It is not actually stored on disk anywhere - any SELECTS on this table have results generated
on-demand by the MySQL server. Thus, backing it up is somewhat silly.
For export type, you will probably want to go with SQL for backup purposes. These are the raw SQL commands
which would re-generate your database and data on the fly. Other formats might be really convenient for examining
data by human eye or exporting your data to excel sheets for statistics analysis.
Options Let’s go down the list of options one-by-one:
Add custom comment into header allows you to add a special comment to your SQL output. It is possible to make
comments - i.e. non-executable SQL statements - inside SQL files and the export function will gratuitously add
comments to make the SQL dump easier to read for humans. If you wish, you can add a special comment at the
top with some information important to you.
Enclose export in a transaction only matters if you are using InnoDB as your storage engine for your database
tables. By default, tables are created using MyISAM as the storage engine which does not support the transaction
model. Transactions allow you to guarantee that the data you get is in a “balanced” state. For example, if whenCHAPTER 6. DATA BACKUP, REPAIR, RECOVERY 27
Figure 6.6: phpMyAdmin’s Export Link
you add a new user to your web application, you need to do INSERTs on 5 different tables, those are each
independent INSERTs that occur independent of each other. If you happen to do a dump while the INSERTs are
occuring, you might not get all the data needed for that new user. Transactions are a way of grouping queries
together so they occur as a single functional unit - and any changes that are going to be done to the database
have to wait until the dump has completed to occur. This ensures you don’t get any non-consistent states in your
dump.
Disable foreign key checks also only matters if you are using InnoDB tables. Foreign keys are a way of telling the
database that one column of one table references the exact same data in another table. For example a user table
and a purchase record might have the userid of the user who purchased something in the purchase record table.
The foreign key tells the database that userid in purchase record refers to userid in user table, and that if for some
reason the user is deleted, that the purchase records relating to that user either need to be deleted or changed to a
different userid. Disabling the foreign key checks would make it so when re-creating the database, foreign keys
aren’t enforced.
Add DROP DATABASE will add a DROP DATABASE for the database being re-created at the beginning of the
import. This guarantees that any bad data is wiped away before the import process begins. This also guarantees
that any data you have in your database currently is gone, so use with caution.
Add DROP TABLE / VIEW / PROCEDURE / FUNCTION is similar to Add DROP DATABASE. This will delete
each table being re-created before it is imported again.
Add IF NOT EXISTS will only re-create tables if they don’t exist already. This might be helpful if you are trying to
make a backup that isn’t destructive to the current data set.
Add AUTO_INCREMENT value is useful if you have columns which rely on auto_increment (many id number
columns use this). It’s probably best to have this on.
Enclose table and field names with backquotes ensures that names are properly enclosed in backquotes - this isn’t
100% necessary but it explicitly defines a table and field name to the SQL system which is important if your
column or field name is a MySQL reserved word. 1
Add CREATE PROCEDURE / FUNCTION any procedures or functions you have will attempt to be recreated.
Procedures and functions allow you to push some of the data manipulation tasks to the database management
system instead of having PHP or whatever web language handle it.
1 Reserved words can be seen here: http://dev.mysql.com/doc/refman/5.5/en/reserved-words.html#table-reserved-words-5.5.27CHAPTER 6. DATA BACKUP, REPAIR, RECOVERY 28
Figure 6.7: phpMyAdmin’s export settings screenCHAPTER 6. DATA BACKUP, REPAIR, RECOVERY 29
Creation/Update/Check dates will add to every table when it created/updated/checked in the comments surrounding
it.
Complete inserts adds the column names to the SQL dump. This parameter improves the readability and reliability
of the dump. Adding the column names increases the size of the dump, but when combined with Extended
inserts it’s negligible.
Extended inserts combines multiple rows of data into a single INSERT query. This will significantly decrease filesize
for large SQL dumps, increases the INSERT speed when imported, and is generally recommended.
Maximal length of created query the maximum length in characters of an extended query
Use delayed inserts will increase the speed of the import, which might be helpful if you are going to use this SQL
file on a very busy server. Normally an insert will return “OK” when the data base has safely stored the data. A
delayed insert will return OK immediately, and then queue the insert for when there is a free thread available to
service the insert. On busy MySQL servers, you may want this to avoid having a giant import take a long time
while it waits for free threads to service each insert.
Use ignore inserts means that errors that occur while executing the INSERT statement are treated as warnings instead.
For example, without IGNORE, a row that duplicates an existing UNIQUE index or PRIMARY KEY value in
the table causes a duplicate-key error and the statement is aborted. With IGNORE, the row still is not inserted,
but no error is issued.
Use hexadecimal for BLOB will use hexadecimal2 representation for BLOB (Binary Large Object) columns. These
are typically used when storing files, images, data in the database. This is recommended if you have blob
columns.
Export type controls how data is put into tables. INSERT is your generic table insert - it will fail if the primary key
of the row you are inserting matches an existing primary key. UPDATE will only add the data if there is an
existing row with a primary key that matches the one in the row you are updating. REPLACE behaves a lot like
INSERT, but instead will delete a row if its primary key matches the row you are REPLACE-ing.
File Name Template will control what the filename will be when downloading the dump from the server. Keep in
mind that you can always save the SQL file as what ever you choose from your browser.
Compression controls whether the dump will be compressed before making it available for you to download. This
may be desirable if the file is extremely large ( over 100 MB ).
The default selections should work fine in most cases, but you may wish to tweak the options if you are trying to
produce an SQL backup that is non-destructive to existing data.
6.2 Backup on Command Line
If you are an advanced user who wants a bit more control over the backup process on your system, it might be better
to do backups via the command-line instead of the interface. While the interface will handle most needs just fine, you
may want to increase the rate of how often backups are done, or elect to go around InterWorx’s backup system entirely
to just have raw MySQL dumps as seen in section 6.1.2.3.
6.2.1 Using the command-line backup script
The command line backup script is located at /home/interworx/bin/backup.pex. This is actually the script that gets
executed by the panel on your behalf when doing any sort of backup operation. The command line backup interface is
less user-friendly, but you have a lot more options at your disposal. Using the command line interface is most useful
when you want to automate (e.g., via CRON) the creation of SiteWorx account backups.
In order to use the command-line script, SSH into the server and su to the iworx system user. You may need to
switch to the root user first (if you’re not already logged in as the root user). Alternatively, you can also switch to
2 http://en.wikipedia.org/wiki/HexadecimalYou can also read