Introduction to SWIFT - User Guide Minnesota Management and Budget (MMB) - Minnesota.gov
←
→
Page content transcription
If your browser does not render page correctly, please read the page content below
Introduction to SWIFT

                              User Guide

                                  Version 3

                             Updated May 2021

                     Original Publication December 2017

       Minnesota Management and Budget (MMB)

For more information, please see the see SWIFT Training and Support Resources.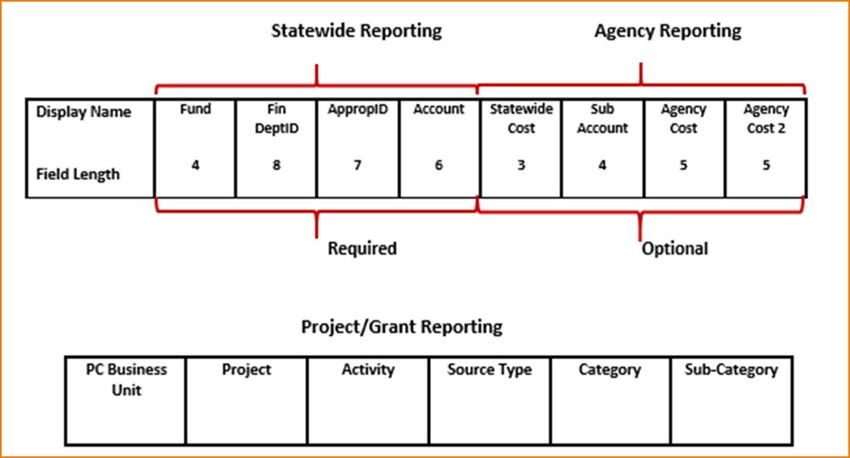
Introduction to SWIFT
To jump to an area within the User Guide, select a topic in the Table of Contents.

Table of Contents
COURSE OVERVIEW.......................................................................................................................................... 5
LESSON 1: FINANCIAL MANAGEMENT SYSTEM ................................................................................................. 6
   LESSON OVERVIEW............................................................................................................................................ 6

   BACKGROUND INFORMATION .............................................................................................................................. 6

      Topic Overview ................................................................................................................................................... 6

      State Budget Basics ............................................................................................................................................ 6

      SWIFT Upgrade ................................................................................................................................................... 8

      Security Roles ..................................................................................................................................................... 8

      Log in to SWIFT ................................................................................................................................................... 8

      Process Steps ...................................................................................................................................................... 9

   NAVIGATING SWIFT ....................................................................................................................................... 10

      Topic Overview ................................................................................................................................................. 10

      Clear the cache ................................................................................................................................................. 10

      My Homepage .................................................................................................................................................. 11

      Home ................................................................................................................................................................ 11

      Global/Elastic Search........................................................................................................................................ 11

      Notifications ..................................................................................................................................................... 12

      Actions List ....................................................................................................................................................... 12

      Add to My Favorites ......................................................................................................................................... 12

      Process Steps to add a page to My Favorites (from the Navigation Collection) .. Error! Bookmark not defined.

      NavBar .............................................................................................................................................................. 13

      Process Steps to add a page to My Favorites (using the Navigator)................................................................ 15

      Need Help? ....................................................................................................................................................... 16

      Personalize SWIFT ............................................................................................................................................ 17

      Tiles .................................................................................................................................................................. 23
Updated May 2021 (Version 3)
                                                                                                                                                                       Page i
NAV – Introduction to SWIFT

     Navigation Options........................................................................................................................................... 23

     Navigation Collection ....................................................................................................................................... 24

     WorkCenter ...................................................................................................................................................... 25

     Pages and left-menus ....................................................................................................................................... 27

     Tabs .................................................................................................................................................................. 28

     Fields................................................................................................................................................................. 28

     Drop-down lists and search options ................................................................................................................. 28

     Wildcards.......................................................................................................................................................... 29

     Look up glass .................................................................................................................................................... 29

     Buttons ............................................................................................................................................................. 29

     Links .................................................................................................................................................................. 30

     Perform Searches in SWIFT............................................................................................................................... 30

     Process Steps .................................................................................................................................................... 30

     ChartFields ........................................................................................................................................................ 33

     Effective Date ................................................................................................................................................... 34

     Process Steps .................................................................................................................................................... 34

  LESSON SUMMARY .......................................................................................................................................... 38

LESSON 2: SYSTEM MODULES......................................................................................................................... 39
  LESSON OVERVIEW.......................................................................................................................................... 39

  PROCUREMENT .............................................................................................................................................. 39

     Procurement / EProcurement ........................................................................................................................... 39

     Purchasing / Purchase Orders .......................................................................................................................... 40

     Strategic Sourcing ............................................................................................................................................ 40

     Supplier Contract .............................................................................................................................................. 40

     Catalog Management & Inventory .................................................................................................................. 41

  ACCOUNTING ................................................................................................................................................. 41

     General Ledger ................................................................................................................................................. 41

Updated May 2021 (Version 3)
                                                                                                                                                                     Page ii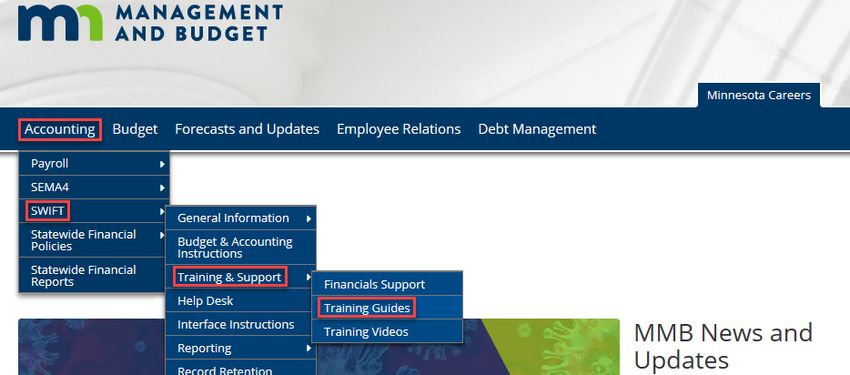
NAV – Introduction to SWIFT

     Accounts Payable ............................................................................................................................................. 42

     Billing ................................................................................................................................................................ 42

     Accounts Receivable ......................................................................................................................................... 42

     Commitment Control ........................................................................................................................................ 42

     Asset Management .......................................................................................................................................... 43

     Grants Management ........................................................................................................................................ 43

     Project Costing ................................................................................................................................................. 43

     Cash Management and Cost Allocation ........................................................................................................... 43

     Supplier ............................................................................................................................................................. 43

  REPORTING ................................................................................................................................................... 44

     Reporting Overview .......................................................................................................................................... 44

     Inquiries ............................................................................................................................................................ 44

     Process Steps .................................................................................................................................................... 44

     Queries ............................................................................................................................................................. 47

     Process Steps .................................................................................................................................................... 47

     Reports ............................................................................................................................................................. 49

     Process Steps .................................................................................................................................................... 49

  ADDITIONAL REPORTING OPTIONS...................................................................................................................... 54

     Additional Reporting Options Overview ........................................................................................................... 54

     SWIFT Data Warehouse ................................................................................................................................... 54

     Information Access (IA) Warehouse ................................................................................................................. 54

  LESSON SUMMARY .......................................................................................................................................... 54

LESSON 3: SWIFT TRAINING RESOURCES ........................................................................................................ 55
  LESSON OVERVIEW.......................................................................................................................................... 55

  TRAINING ...................................................................................................................................................... 55

     Topic Overview ................................................................................................................................................. 55

Updated May 2021 (Version 3)
                                                                                                                                                                    Page iii
NAV – Introduction to SWIFT

      Classes .............................................................................................................................................................. 55

      Process Steps .................................................................................................................................................... 55

      User Guides ...................................................................................................................................................... 58

      Process Steps to access User Guides and Quick Reference Guides .................................................................. 58

   HELP DESK SUPPORT ....................................................................................................................................... 60

      Topic Overview ................................................................................................................................................. 61

      Help Desk Hours and Contact Information ....................................................................................................... 61

      Vendor Help ...................................................................................................................................................... 61

   WEEKLY UPDATES ........................................................................................................................................... 61

      Topic Overview ................................................................................................................................................. 61

      Overview........................................................................................................................................................... 62

      Process Steps .................................................................................................................................................... 62

   LESSON SUMMARY .......................................................................................................................................... 64

COURSE SUMMARY........................................................................................................................................ 64

Updated May 2021 (Version 3)
                                                                                                                                                                   Page iv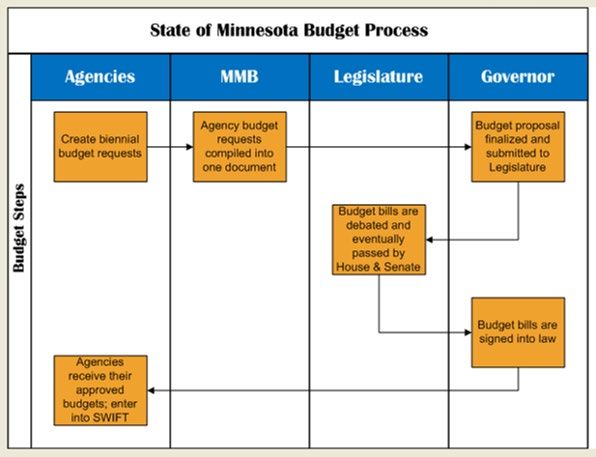
NAV – Introduction to SWIFT

Introduction to SWIFT

Course Overview
SWIFT stands for Statewide Integrated Financial Tools. SWIFT refers to the State of Minnesota’s online financial
management system for business processes across State agencies. Agencies may use SWIFT for procurement,
accounting, and reporting functionalities, such as the following processes:

     •    Making purchases
     •    Creating contracts
     •    Managing transactions
     •    Paying bills
     •    Receiving payments
     •    Working with suppliers
     •    Reporting

This user guide provides an overview of SWIFT in three lessons:

     •    Lesson 1: The Financial Management System – Background and navigation of SWIFT
     •    Lesson 2: System Modules – Modules for Procurement, Accounting and Reporting
     •    Lesson 3: Resources – Training, Help Desk Support, and Weekly Updates

Updated May 2021 (Version 3)
                                                                                                          Page 5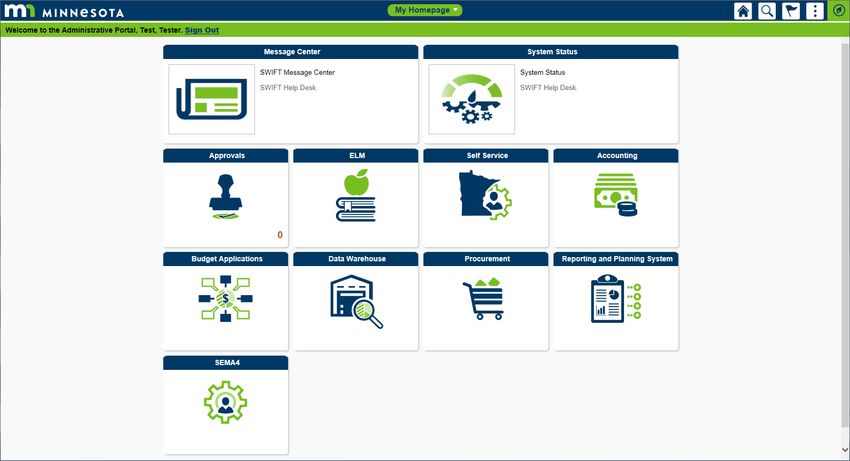
NAV – Introduction to SWIFT

Lesson 1: Financial Management System

Lesson Overview

SWIFT is the financial management system for Minnesota State agencies.

After completing this lesson, you should be able to:

     •    Log in to SWIFT.
     •    Navigate SWIFT.

Background Information

Topic Overview

This topic covers background information about SWIFT.

After completing this topic, you should be able to:

     •    Comprehend State budget basics.
     •    Know about the upgrade to SWIFT.
     •    Identify Security Roles assigned to SWIFT users.
     •    Know how to log in to SWIFT.

State Budget Basics

The State of Minnesota enacts state budgets according to a cycle of two fiscal years, known as a biennium.

A fiscal year is the 12-month budgeting period between one annual settlement of financial accounts and the
next. The fiscal year for the State of Minnesota runs from July 1 to June 30.

     •    A fiscal year is abbreviated by “FY” plus the year in which it ends in June.
     •    For example, the fiscal year for July 1, 2017 through June 30, 2018 is FY 2018.

A biennium is a two-year budget cycle.

     •    A biennium is abbreviated by “FY” plus an even-numbered fiscal year followed by the next year.
     •    For example, the biennium for July 1, 2019 through June 30, 2021 is FY 2020-21 Biennium.

Updated May 2021 (Version 3)
                                                                                                           Page 6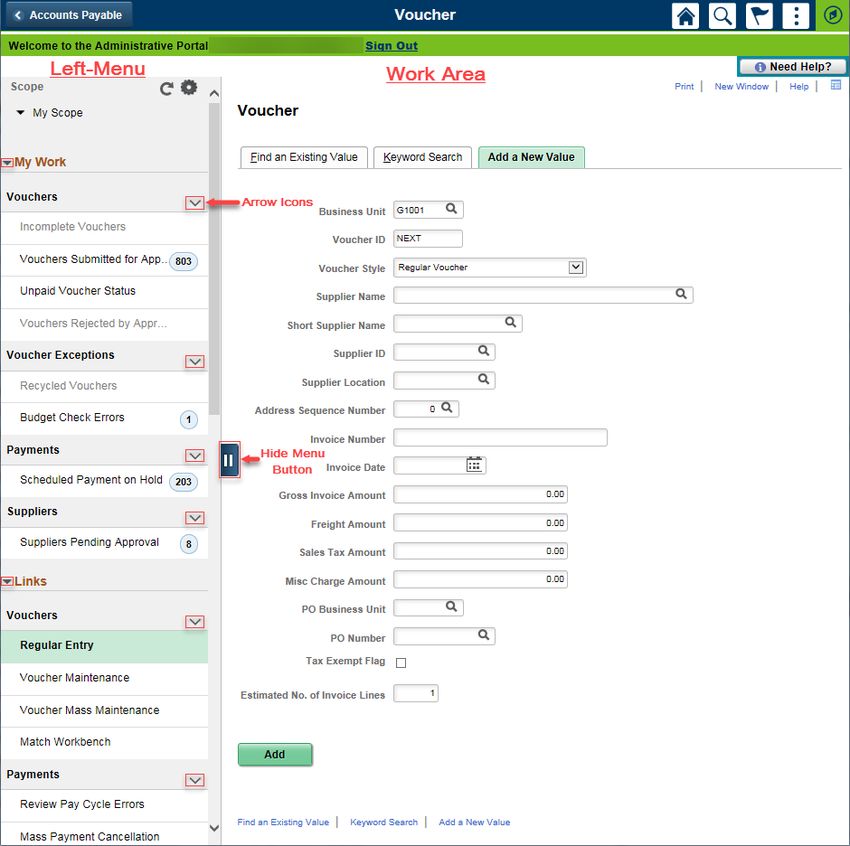
NAV – Introduction to SWIFT

The budget process involves MMB, agencies, the governor, and the legislature.

This budget process consists of six steps.

     1) MMB issues the budget process to agencies, and agencies create budget requests.
     2) MMB compiles the budget requests from the agencies.
     3) The governor reviews the budget requests and submits a budget proposal.
     4) The legislature debates, modifies, and passes a budget bill.
     5) The governor signs the budget bill into law.
     6) Agencies receive their approved budgets and enter them in SWIFT.

Updated May 2021 (Version 3)
                                                                                                       Page 7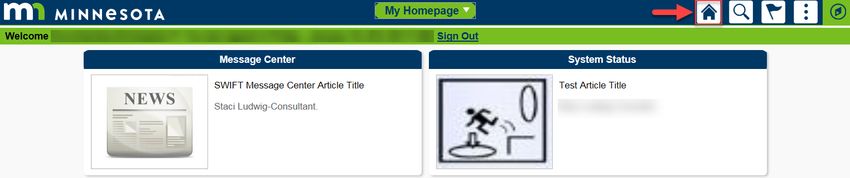
NAV – Introduction to SWIFT

SWIFT Upgrade

On July 1, 2011, SWIFT replaced the previous financial management system, known as the Minnesota
Accounting and Procurement System (MAPS). State agencies use SWIFT to integrate business-process
functionalities, including procurement, accounting, reporting, and supplier registration.
In December 2019, SWIFT underwent an upgrade, which included an updated fluid display as well as changes to
navigation.

     •    Fluid display is an Oracle PeopleSoft functionality that recognizes the device used to access SWIFT. Fluid
          display adjusts the screen display to configure to desktop, tablet, or mobile device.
     •    Navigation changes in SWIFT replaced menus and submenus with tile-based navigation as well as a
          Navigation Bar (NavBar). (See Navigating SWIFT for more details.)

Security Roles

All State employees who are users of SWIFT have assigned security roles. These roles determine what business
functions users have access to in SWIFT. Security roles are based on job duties (as determined by agencies).

For example, job duties for Accounts Receivable Specialists include processing accounts receivable credits and
debits and initiating refunds; therefore, their business functions in SWIFT include access to creating statements,
updating account items, and reviewing payments.
For questions or concerns about security roles, ask your manager to contact your Agency Security Administrator.

Log in to SWIFT

Users can log in to SWIFT using the Administrative Portal.

Note: After logging in to SWIFT, the SWIFT session will automatically time out if there has not been any activity
for 20 minutes. All open browser windows running SWIFT will count toward this 20-minute timeout, so make
sure to close any windows not needed. A warning message will display when you are about to be timed out.

Updated May 2021 (Version 3)
                                                                                                              Page 8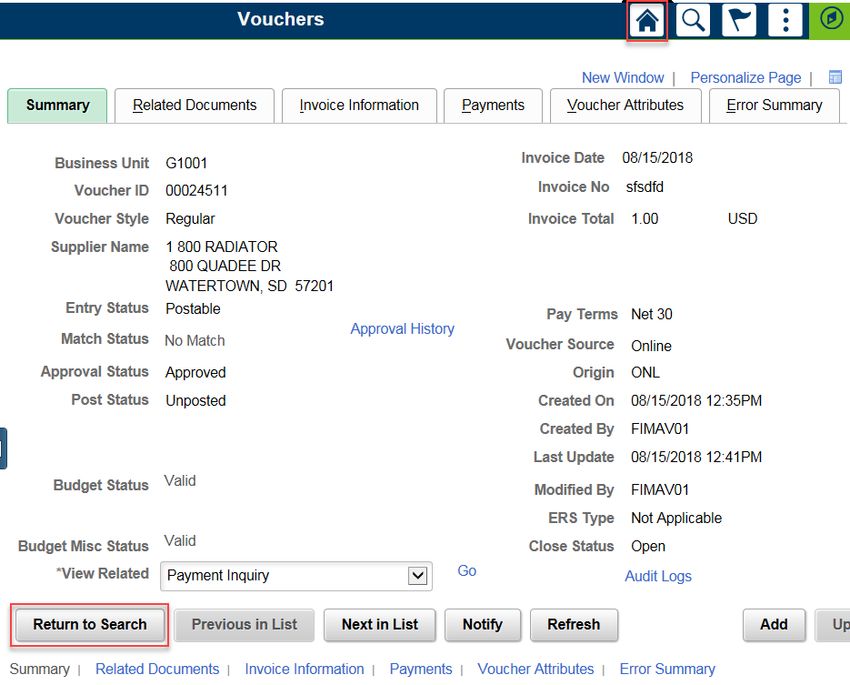
NAV – Introduction to SWIFT

Process Steps

     •    Step 1: Open the Administrative Portal.
     •    Step 2: Sign in to the Administrative Portal to access SWIFT.

Step 1: Open the Administrative Portal.

     1. Open your Internet browser.
          Note: You may use Microsoft Edge, Google Chrome, or Mozilla Firefox to access SWIFT.
     2. Open the Administrative Portal using the Administrative Portal URL: mn.gov/adminportal.

Step 2: Sign in to the Administrative Portal to access SWIFT.

     1. The Administrative Portal login window will display. Input your Employee ID in the User ID field.
          Note: Employee ID is an eight-digit numeric identification number.
     2. Input your password in the Password field.
          Note: Passwords must have at least eight characters, one number, and one special character. Strong
          passwords have at least three of the four types of characters:

          •    At least one uppercase letter (A, B, C, etc.)
          •    At least one lowercase letter (a, b, c, etc.)
          •    At least one numbers (1, 2, 3, etc.)
          •    At least one special character (=, -, $, %, etc.)
          For more details on passwords, see Statewide Systems Password Information.
     3. Press the Sign In button.

          Note: To enable the screen reader, check mark the Enable Screen Reader Mode box prior to pressing
          the Sign In button.

Updated May 2021 (Version 3)
                                                                                                            Page 9
NAV – Introduction to SWIFT
Navigating SWIFT
Topic Overview
After logging in to SWIFT, My Homepage will display. However, if this page does not load correctly, you may
need to clear the cache before you can continue using SWIFT.
After completing this topic, you should be able to:
• Clear the cache.
• View My Homepage.
• Understand the Home icon, Global/Elastic Search, Notifications, Actions List, and NavBar.
• Personalize SWIFT.
• Use tiles, navigation options, pages and left-menus, tabs, fields, drop-down lists and search options,
wildcards, look up glasses, buttons, and links.
• Perform searches.
• Add and edit tiles to My Favorites.
• Understand how to read ChartFields.
• Update Effective Dates.
Clear the cache
If you experience difficulties trying to view data or access the login page in SWIFT, clearing your browsing history
may help resolve these issues. This is commonly referred to as “clearing the cache.”
For process steps on how to clear the cache, see the Clear Browsing History and Cache Quick Reference Guide.
Updated May 2021 (Version 3)
Page 10NAV – Introduction to SWIFT
My Homepage
After logging in to SWIFT, My Homepage will display. This page includes the following top-bar icons.
Home: Select this icon to return to My Homepage anytime when navigating SWIFT.
Global/Elastic Search: Use this function to search for transactions across modules in SWIFT.
• Select the drop-down list to search in a specific module, or select “All” to search across all modules.
• Type your search criteria in the Search field, and press the Search (>>) button.
• Example: Look up a Supplier using Global/Elastic Search.
− Select “All” from the drop-down list, type the Supplier ID in the Search field, and press Search.
− On the Search Results page, select a Category (for example, Suppliers) to narrow the search results.
− Press the x to remove or unselect the Category.
Updated May 2021 (Version 3)
Page 11NAV – Introduction to SWIFT
Notifications: Select the flag icon to review messages about Actions or Alerts in SWIFT.
• Actions are messages about approvals (if a voucher was denied for approval).
• Alerts list business transactions pending action in a user’s workflow (what work items to complete next).
Note: What Actions or Alerts appear in Notifications will depend on your security roles.
Actions List: Select this icon to access the following additional options:
• Personalize Homepage: Personalize My Homepage in SWIFT.
• My Preferences: Access options to change default settings in SWIFT.
• Sign Out: Sign out of SWIFT.
Add to My Favorites: When you open the Actions List on a page, you will also see Add to Favorites as an option.
Select this option to add the page to My Favorites list—see Process Steps below.
Updated May 2021 (Version 3)
Page 12NAV – Introduction to SWIFT
NavBar: Select the Navigation Bar to access My Favorites, Recent Places, and Navigator.
• My Favorites: Select to view and edit pages added to your favorites list.
• Recent Places: Select to view or backtrack to recently opened pages in SWIFT.
Updated May 2021 (Version 3)
Page 13NAV – Introduction to SWIFT
• Navigator: Select to navigate through all available menu options and pages in SWIFT.
Note: The difference between the Navigator and tiles is that the Navigator lets you access all available
menu options, including those not displayed as tiles on My Homepage.
Example: You can navigate to the Regular Entry page by scrolling through these NavBar menu options:
Navigation Option Navigation Path
NavBar Navigator, SWIFT, Accounts Payable, Vouchers, Add/Update, Regular Entry.
• Select the left-arrow Back button to navigate back to the previous menu option on the Navigator.
• Select the up-arrow Back to Root button to return to the original starting point on the Navigator.
Updated May 2021 (Version 3)
Page 14NAV – Introduction to SWIFT
Process Steps to add a page to My Favorites (using the Navigator)
1. After navigating to a page using the Navigator, select the Actions List icon.
2. Select the Add to My Favorites option.
3. The Add to Favorites window will display. Press the Add button.
4. A confirmation message will display. Press OK.
5. Select the NavBar to access My Favorites—see NavBar above.
Updated May 2021 (Version 3)
Page 15NAV – Introduction to SWIFT
Need Help?: If you need assistance while in a SWIFT module, press the Need Help? button, which you’ll find
right below the NavBar.
• The Quick Reference Guide (QRG) list will open by default, which provides links to QRGs for the module
you’re working in currently. Select a guide to open it in another browser tab.
• Scroll down and select the Common Utilities list to open links to reporting tools (Process Monitor, Query
Viewer, Query Manager, and Report Manager). Select a reporting tool to open it in a new browser tab.
Updated May 2021 (Version 3)
Page 16NAV – Introduction to SWIFT
• Scroll down and select SWIFT Help Desk to open contact information for the SWIFT Help Desk. You may
contact the SWIFT Help Desk, Monday through Friday, anytime between 7:30 a.m. and 4:00 p.m.
• To close the QRG, Common Utilities, and SWIFT Help Desk lists, press the Need Help? button again.
Personalize SWIFT
To change how SWIFT displays navigation options on tiles, pages, and lines, you can personalize the default
navigation settings by adding tiles to the NavBar, rearranging the tabbing order on pages, and adding or hiding
fields on lines. In sum, you can personalize the three following features on SWIFT:
• Personalize NavBar.
• Personalize Pages.
• Personalize Lines.
Personalize NavBar.
1. Open the NavBar and select the Personalize NavBar icon.
2. The Personalize NavBar area will display. Press the Add Tile button.
Updated May 2021 (Version 3)
Page 17NAV – Introduction to SWIFT
3. The Add Tile area will display. Find a tile from the list below, or search for a tile using the Search field.
Then select the tile to add it to the Personalize NavBar area.
4. To remove a tile from the NavBar, press the x icon next to the tile.
5. To save changes in the Personalize NavBar area, press the Done button.
Personalize Pages.
1. Before you can personalize pages, you will need to turn on the Customize Page Settings option within
General Settings. To do so, open the Actions List, and select My Preferences.
Updated May 2021 (Version 3)
Page 18NAV – Introduction to SWIFT
2. The General Settings page will open. Select the Customize Page Settings option to activate it.
3. After activating the Customize Page Settings option, its setting will switch from No to Yes. To save this
setting, select the Save button.
4. You will now be able to personalize pages on SWIFT. To personalize a page, navigate to the page and
press the Personalize Page link toward the top-right.
5. The Page Personalization page will display, which lets you change the page’s tabbing order by pressing
the radio buttons and numbered items. Check mark the Save tabbing order personalized below box.
Updated May 2021 (Version 3)
Page 19NAV – Introduction to SWIFT
6. For example, to rearrange the tabbing order on the Regular Deposit page, select one of the following
radio buttons, and then select the numbered items below.
• Remove From Order: Press this radio button, and then select the numbered items below to remove
them from the tabbing order (removed items will be indicated by an X).
• Move Up In Order: Press this radio button, and then select the numbered items below to move
them up in the tabbing order (the number will change to an earlier sequence term).
• Move Down In Order: Press this radio button, and then select the numbered items below to move
them down in the tabbing order (the number will change to a later sequence term).
7. To define a new order, press the Clear Tabbing Order button, and then select the numbered items
below to create a new tabbing order (the item will change from an X to a sequence term).
Note: Do not use the Include in Tabbing Order radio button. The Include in Tabbing Order radio button
will be selected automatically after pressing the Clear Tabbing Order button.
8. Press the Restore Default button to restore the prior default settings for the tabbing order.
Updated May 2021 (Version 3)
Page 20NAV – Introduction to SWIFT
Personalize Lines.
1. To personalize lines on a page (for example, Distribution Lines on the Regular Entry page), navigate to
the page, press the Grid Action Menu icon above the lines, and press the “Personalize” option.
2. Under the Column Order section, press the following buttons and boxes to personalize the Lines.
• Select a tab or a column, and then press the up or down buttons to move that tab or column over in
ascending or descending order on the line.
• Check mark the “Hidden” box to ‘hide’ a tab or a column, which means it will not appear on the line.
• Check mark the “Frozen” box to ‘freeze’ a tab or a column, which means it will appear on every one
of the line’s tabs.
Hint: Tabs vs. Columns
• Tabs: Under the Column Order section, tabs are indicated by the word “Tab.”
In this example, the tabs include Tab GL Chart, Tab Exchange Rate, Tab Statistics, and Tab Assets.
Updated May 2021 (Version 3)
Page 21NAV – Introduction to SWIFT
• Columns: All other options in the Column Order section without the word “Tab” are columns.
Note: If you move all columns from one tab to another, the blank tab will disappear after pressing OK.
3. The Sort Order section is not used in Grid Customization. Only the Column Order section is used.
4. Press the Preview button to preview personalizations.
Updated May 2021 (Version 3)
Page 22NAV – Introduction to SWIFT
5. Press the OK button to save personalizations, or press the Cancel button to cancel them.
Note: The Copy Settings link is not used.
6. After personalizing a line, it’s possible to view the line so that it displays all columns without tabs. To
view all columns without tabs, select the Show all columns icon to the right of the tabs on a line.
7. To view the columns organized in tabs again, select the Show tabs icon.
Tiles
Tile icons are menu options to access applications in SWIFT.
• Starting on My Homepage, select a tile to open up menu options.
• For example, select the Accounting tile to open up menu options in the Accounting module.
Note: What tiles display will depend on what security roles you’ve been assigned.
Navigation Options
There are two tile-based navigation options that allow you to open pages in SWIFT.
Updated May 2021 (Version 3)
Page 23NAV – Introduction to SWIFT
• Navigation Collection: Drill down through tiles to open a page within a module.
• WorkCenter: Open a module’s WorkCenter, which is a one-stop shop with access to commonly used
pages within a module.
Navigation Collection
To open a page within a module, drill down through the tiles until you arrive at the page. For example, open the
Voucher Regular Entry page in the Accounts Payable module by selecting the following tiles.
1. From the Homepage, select the Accounting tile.
2. Select the Accounts Payable tile to open the Accounts Payable module.
3. Select the Vouchers tile.
The Voucher Regular Entry page displays on the right side, while folders to open other pages displays on
the left-menu. (See Pages and left-menus for details about this layout.)
Updated May 2021 (Version 3)
Page 24NAV – Introduction to SWIFT
In the training guides, this type of navigation collection will be summarized as follows:
Navigation Option Navigation Path
Navigation Collection Accounting, Accounts Payable, Vouchers.
The Voucher Regular Entry page will display by default.
WorkCenter
Most in a module can be done by navigating to its WorkCenter, which is a one-stop shop with access to several
pages within a module, including frequently used pages, queries, and reports.
To open a WorkCenter and access several pages within a module, select the module’s WorkCenter tile.
For example, to open the AP WorkCenter, open the AP module and select the AP WorkCenter Tile.
1. From the Homepage, select the Accounting tile.
2. Select the Accounts Payable tile to open the Accounts Payable module.
Updated May 2021 (Version 3)
Page 25NAV – Introduction to SWIFT
3. Select the AP WorkCenter tile.
After opening the WorkCenter, the left-menu and the work area will display.
The left-menu allows you to select pages in folders, which are organized according to these categories:
• My Work (your work in progress)
• Links (commonly used pages)
• Queries (commonly used Queries)
• Reports/Processes (reporting)
You can open or close these categories and the folders below them by pressing the arrow icons.
4. Open a page by selecting it from the left-menu. After selecting a page, it will display in the work area to
the right.
5. After opening a page, you can press the Hide Menu button to hide the left-menu.
Updated May 2021 (Version 3)
Page 26NAV – Introduction to SWIFT
Pages and left-menus
The left-menu displays on the left side of the screen, while pages display to the right.
• To hide or unhide the left-menu, select the double-bar icon.
• Press the down or up arrow icon to open or close a folder under the left-menu.
• Press the page name under a folder to open a SWIFT page in the work area to the right.
Updated May 2021 (Version 3)
Page 27NAV – Introduction to SWIFT
Tabs
Tabs appear on pages in SWIFT to display sets of information.
• Tabs are indicated by the tabular icon. When selected, the tab displays highlighted.
• For example, on the Voucher Regular Entry page, select the Find an Existing Value tab.
Fields
Fields appear on pages in SWIFT to enter information.
• Fields are indicated by rectangular boxes that let you type information inside.
• For example, on the Find Existing Value tab of the Voucher Regular Entry page is the Voucher ID field.
Drop-down lists and search options
Drop-down lists appear by fields in SWIFT to aid searches.
• Drop-down lists are indicated by the downward arrow icon.
• For example, by the Voucher ID field, select the drop-down list to display more options.
From these drop-down lists, you can use the following search options:
Updated May 2021 (Version 3)
Page 28NAV – Introduction to SWIFT
• begins with type the beginning of what you are searching for
• contains type part of what your searching for
• = type exactly what you are searching for
Wildcards
In search fields in SWIFT, you can also use wildcards to aid searches.
• A wildcard (%) is a symbol that acts as a placeholder for unknown information.
• For example, if you need to enter an eight-digit number but only know the first five digits, use a wildcard
after the fifth digit.
Look up glass
The Look up glass appears by fields in SWIFT to let you search for information.
• The Look up glass is indicated by the magnifying glass icon.
• For example, select the Look up glass to open the Look Up Supplier ID search function.
Buttons
Buttons appears on pages in SWIFT to execute certain functions.
• Buttons are indicated by rectangular button icons.
• For example, in the Look Up Supplier ID search function, press the Search, Clear, or Cancel button.
Updated May 2021 (Version 3)
Page 29NAV – Introduction to SWIFT
Links
Select a link to view and toggle between additional options (for example, Basic and Advanced search options).
• Links are indicated by blue text (sometimes underlined).
• For example, in the Look Up Supplier ID search function, select the Basic Lookup link to display only Basic
search options.
Then select the Advanced Lookup link to display Advanced search options.
Perform Searches in SWIFT
Use the tiles, navigation options, pages and left-menus, tabs, fields, drop-down lists and search options, look up
glass, buttons, and links to perform searches in SWIFT.
Process Steps
Example: Search for a voucher.
Search for a voucher in SWIFT that begins with the following digits: 0002.
• Step 1: Open to the Voucher Regular Entry page.
• Step 2: Search for vouchers that begin with 0002.
Updated May 2021 (Version 3)
Page 30NAV – Introduction to SWIFT
Step 1: Open to the Voucher Regular Entry page.
1. Navigate to the Voucher Regular Entry page.
Navigation Option Navigation Path
Navigation Collection Accounting, Accounts Payable, Vouchers.
The Voucher Regular Entry page will display by default.
WorkCenter Accounting, Accounts Payable, AP WorkCenter, left-menu, Links section, Regular Entry.
2. Select the Find an Existing Value tab.
Step 2: Search for vouchers that begin with 0002.
1. Select the drop-down arrow next to the Voucher ID field and select the “contains” search option.
2. Type “0002” into the Voucher ID field and then press the Search button.
3. Search Results will display with Voucher IDs that begin with 0002.
Updated May 2021 (Version 3)
Page 31NAV – Introduction to SWIFT
4. Select a voucher number under the Voucher ID column under Search Results to view voucher details.
5. You will be redirected the voucher information on the Voucher Regular Entry page.
To return to the previous search results, press the Return to Search button toward the bottom left.
To return to the My Homepage, select the Home icon toward the top right.
Updated May 2021 (Version 3)
Page 32NAV – Introduction to SWIFT
ChartFields
ChartFields are fields in SWIFT that provide the basic structure to segregate and categorize transactional and
budget data, especially for processing and reporting purposes.
There are three classifications of ChartFields in SWIFT:
• Statewide ChartFields include Fund, Financial Department Identification (Fin DeptID), Appropriation ID
and Account fields.
• Agency Reporting ChartFields include Statewide Cost, Agency Cost, SubAccount, Agency Cost 1 and
Agency Cost 2 fields.
• Project/Grant Reporting ChartFields include PC Business Unit, Project, Activity, Source Type, Category
and Sub-Category fields.
Updated May 2021 (Version 3)
Page 33NAV – Introduction to SWIFT
Effective Date
Effective Dates are dates when updates to information take effect in SWIFT.
• The purpose of an Effective Date is to track when updates to information must occur in SWIFT.
• Updates may include changes to Asset, Project, Grant, Customer, or Supplier information.
Note: Whenever you make updates to information in these modules, you must update the effective
date using the Effective Date field—see Process Steps below for an example.
Process Steps
Example: Update the Effective Date for an asset
Update the Effective Date after making changes to the location of an asset.
• Step 1: Search for the asset.
• Step 2: Add a new row of information for the asset’s location.
• Step 3: Update the Effective Date.
• Step 4: Update the Location Code.
Step 1: Search for the asset.
1. Navigate to the Asset Basic Information page.
Updated May 2021 (Version 3)
Page 34NAV – Introduction to SWIFT
Navigation Option Navigation Path
Navigation Collection Accounting, Asset Management, Asset Lifecycle, left-menu, Basic Add.
WorkCenter Accounting, Asset Management, Asset Management WorkCenter, left-menu, Links
section, Manage Assets, Basic Add.
2. On the Asset Basic Information page, make sure the Find an Existing Value tab is selected.
3. Under the Search Criteria section, make sure “G1001” is in the Business Unit field.
4. Type the asset number in the Asset Identification field.
5. Press the Search button.
6. The asset information will display. Select the Location/Comments/Attributes tab.
Notice that the number of rows will read “1 of 1.”
Updated May 2021 (Version 3)
Page 35NAV – Introduction to SWIFT
Step 2: Add a new row of information for the asset’s location.
1. Select the plus (+) button to add a new row to the Location section.
2. The Location section will now read “1 of 2” (indicating a new row has been added to the Location
section), and a new date will show in the Effective Date field.
Step 3: Update the Effective Date.
1. To ensure the Effective Date field has the current date, select the calendar icon.
2. When the calendar displays, select the Current Date link.
Updated May 2021 (Version 3)
Page 36NAV – Introduction to SWIFT
Step 4: Update the Location Code.
1. Select the location code for the Department of Admin Human Resources by selecting the Look up glass
for the Location field.
2. The Look Up Location window will display. Type “G02015%” in the Location Code field.
3. Press the Search button.
4. From the Search Results, select ADMIN/HUMAN RESOURCES.
5. Address information for ADMIN/HUMAN RESOURCES will now appear in the Address field.
Press the Save button to save the updates to the location for the asset.
Updated May 2021 (Version 3)
Page 37NAV – Introduction to SWIFT
Lesson Summary
Having completed this lesson, you should now be able to:
• Understand background information about SWIFT, including:
− State budget basics
− The upgrade to SWIFT
− Security roles for SWIFT
− How to log in to SWIFT
• Navigate SWIFT and perform the following tasks:
− Clear the cache.
− View My Homepage.
− Use the Home, Global/Elastic Search, Notifications, Actions List, and NavBar.
− Personalize SWIFT.
− Use tiles, navigation options, pages and left-menus, tabs, fields, drop-down lists and search options,
wildcards, look up glasses, buttons and links.
− Perform searches.
− Add and edit tiles to My Favorites.
− Read ChartFields.
− Update Effective Dates.
Updated May 2021 (Version 3)
Page 38NAV – Introduction to SWIFT
Lesson 2: System Modules
Lesson Overview
SWIFT includes seventeen modules that organize procurement, accounting, and reporting functionalities.
After completing this lesson, you should be able to:
• Understand Procurement, Accounting, and Reporting functionalities.
• Recognize definitions and abbreviations of modules in SWIFT modules.
• Run inquiries, queries, and reports.
Procurement
Procurement includes six modules for purchasing goods/services.
• Procurement / EProcurement
• Purchasing / Purchase Orders
• Strategic Sourcing
• Supplier Contract
• Catalog Management
• Inventory
Procurement / EProcurement
Procurement: create and manage purchase orders for goods/services to establish an encumbrance.
• Purchase Order (PO): a document to authorize a purchase and establish an encumbrance.
• Encumbrance: an amount committed for spending on a purchase.
EProcurement (EPRO): create and manage requisitions.
• Requisition: a document to initiate purchase and establishes a pre-encumbrance.
• Pre-encumbrance: an amount expected to be spent on a purchase.
For more information on EPRO, see EPRO Training Guides.
Updated May 2021 (Version 3)
Page 39NAV – Introduction to SWIFT
Purchasing / Purchase Orders
Purchasing, or Purchase Orders (POs): issue documents to procure goods/services.
• Buyer (Administrator): an agency employee who creates the PO (for example, administers contracts,
encumbers funds and enters POs in SWIFT).
• Receipt: a document that confirms the receipt of goods/services.
Note: POs refer to documentation for procuring goods/services; POs do not refer to the actual process
of procuring goods/services (for example, soliciting bids, creating term contracts and acquisitions, etc.),
which are carried out by the Office of State Procurement (OSP).
For more information on POs, see Purchase Orders Training Guides.
Strategic Sourcing
Strategic Sourcing (SS): solicit bids and award events, which result in contracts or purchase orders for
goods/services provided by registered suppliers.
• Supplier (Vendor): the person/organization that supplies goods/services.
• Event (Solicitation): a document requesting a response from suppliers for goods/services.
• Bid: a response to an event submitted by suppliers.
• Award: choosing a supplier for goods/services.
For more information on SS, see Strategic Sourcing Training Guides.
Supplier Contract
Supplier Contract (SC): create and manage contracts for suppliers.
• Contract: an agreement between two or more parties to create an obligation, which is enforceable or
otherwise recognizable by law.
• Obligation: when one party provides goods/services, and the other party pays for the obligation.
There are two types of contracts:
• Commodity Contracts: contracts for construction, goods, or non-technical/non-professional services.
• Professional Contracts: contracts for intellectual services, including consultation, analysis, evaluation,
prediction, planning, programming or recommendation.
For more information on SCs, see Supplier Contract Training Guides.
Updated May 2021 (Version 3)
Page 40NAV – Introduction to SWIFT
Catalog Management & Inventory
Catalog Management (CG): manage data used to procure goods/services, including data to define items and
manage codes for categories.
• Item: a product, material or service.
• Category: grouping similar goods/services for reporting and analysis, as represented by the UNSPSC.
• United National Standard Products and Services Code (UNSPSC): a universal coding system to classify
products and services.
Inventory (IN): track and manage inventory requests.
For more information on CG and IN, see Supplier Contracts and Purchase Orders Training Guides.
Accounting
Accounting includes eleven modules in SWIFT for managing money, including General Ledgers (GLs) for agencies
and Automated Clearing House (ACH) transactions and checks for suppliers.
• General Ledger
• Accounts Payable
• Billing
• Accounts Receivable
• Commitment Control
• Asset Management
• Grants Management
• Project Costing
• Cash Management
• Cost Allocation
• Supplier
General Ledger
General Ledger (GL): review an online repository for financial transactions in SWIFT, including data for business
units and journal entries.
• Business Unit: an entity in SWIFT that typically corresponds to an agency (all agencies use MN001).
• Journal Entry: a summary of a financial transaction.
For more information on GL, see Accounts Payable and Accounts Receivable Training Guides.
Updated May 2021 (Version 3)
Page 41NAV – Introduction to SWIFT
Accounts Payable
Accounts Payable (AP): create and manage payments to suppliers using vouchers.
• Voucher: invoice data to request a payment.
• Invoice: a document received from the supplier requesting a payment.
• Matching: consistency between PO, receipt, and voucher.
For more information on AP, see Accounts Payable Training Guides.
Billing
Billing (Bi): create and manage bills to customers purchasing goods/services.
• Billing invoice: a bill that has been printed (equivalent to an Item in AR).
• Pro Forma: a copy of the invoice to proofread and correct for errors.
For more information on Bi, see Billing Training Guides.
Accounts Receivable
Accounts Receivable (AR): manage payments to the State.
• Item: an invoice when it moves into Accounts Receivable status (equivalent to a Billing Invoice in Bi).
• Payment Predictor: the process that automatically applies payments and closes items.
• Dunning Letter: a notification to customer that an item is past due.
For more information on AR, see Accounts Receivable Training Guides.
Commitment Control
Commitment Control (KK): manage transactions and run budget reports.
• Budget Check: verifying funds and their availability.
• Budget Period: the time segment to divide budgets (fiscal year for non-projects; original year for
continuing appropriations).
For more information on KK, see Budget Commitment Control Training Guides.
Updated May 2021 (Version 3)
Page 42NAV – Introduction to SWIFT
Asset Management
Asset Management (AM): track state-owned assets.
• Assets: tangible and intangible items owned or leased by the State, including capital, non-capital and
sensitive assets.
For more information on AM and assets, see Asset Management Training Guides.
Grants Management
Grants Management (GM): track grants to the State.
• Sponsor: an entity providing grant(s) or funding for project(s).
• Proposal: details about the sponsor and project funded by a grant.
For more information on GM, see Grants (Incoming) Training Guides.
Project Costing
Project Costing (PC): track and report costs for projects.
• Project ID: the unique number assigned to identify a project.
• Project Status: the status that determines if a project is still active.
• Control Dates: the start date and the end date for a project.
For more information on PC, see Project Costing Training Guides.
Cash Management and Cost Allocation
Cash Management (CM): review banking pages, reconcile financial transactions in bilateral netting, and run
reports and queries.
Cost Allocation (CA): distribute amounts to business units, projects, etc.
Supplier
Supplier (SUP): manage supplier information required to purchase and pay for goods/services.
• Supplier (Vendor): the person or organization that supplies goods/services.
• Supplier Portal: the system suppliers use to manage their information and interactions with the State,
including purchasing, bidding, and payments.
For more information on SUP, see Supplier Training Guides.
Updated May 2021 (Version 3)
Page 43NAV – Introduction to SWIFT
Reporting
Reporting Overview
There are three methods to look up procurement and financial information in SWIFT.
• Inquiries: Search for data associated with fields on a page (for example, search for a particular voucher
on the voucher page).
• Queries: Perform a customized search for data within a module (for example, search for DBA names in
the Supplier module).
• Reports: Review processing details on individual transactions or batch processes (for example, review
the budget checking status of vouchers).
Inquiries
Inquiries, which let you search for data associated with fields on a page, are located in modules.
• For example, use the Purchase Order Inquiry to search for data from the Purchase Order page
(Add/Update POs)—see Process Steps below for an example.
Process Steps
Example: Run an Inquiry for a Purchase Order
• Step 1: Navigate to the Inquiry in the PO module and enter search criteria.
• Step 2: View a search result from the Inquiry, or run a new Inquiry.
Step 1: Navigate to the Inquiry in the PO module and enter search criteria.
1. Navigate to the Purchase Order Inquiry page.
Navigation Option Navigation Path
Navigation Collection Procurement, Purchasing, Purchase Order, left-menu, PO Inquiry, Purchase Orders.
WorkCenter Procurement, Purchasing, Buyer WorkCenter, left-menu, Main tab, Links section,
Review Purchase Orders.
Updated May 2021 (Version 3)
Page 44NAV – Introduction to SWIFT
2. When the Purchase Order Inquiry page displays, make sure the Find an Existing Value tab is selected.
3. Enter the relevant data in fields under the Search Criteria section to search for a PO, such as PO ID,
Origin, Contract ID, etc.
4. Press the Search button. A list of search results will display below the Search Results section.
Updated May 2021 (Version 3)
Page 45NAV – Introduction to SWIFT
Step 2: View a search result from the Inquiry, or run a new Inquiry.
1. From the list of Search Results, select the PO. The Purchase Order Inquiry page will display.
2. To run a new Inquiry, press the Return to Search button.
Updated May 2021 (Version 3)
Page 46NAV – Introduction to SWIFT
Queries
Queries let you perform customized searches for information in a particular module. For example, you can run a
query to look up supplier names and numbers in the Supplier module. Queries are located under the Reporting
Tools Menu.
Note on Query Naming Conventions:
To run a query in SWIFT, you will need to know the naming convention for the query. Naming conventions for
queries use the following abbreviations:
• M stands for Minnesota. All naming conventions begin with this letter.
• XX or XXX is the two- or three-letter abbreviation of a SWIFT module (for example., AP = Accounts
Payable, VND = Vendor module)
• GBL stands for global.
• Use the underscore symbol (_) between these parts of the query.
Process Steps
To run a Query, complete the following steps:
• Step 1: Open a query using the Query Viewer.
• Step 2: Run a query and view the search results.
Step 1: Use the Navigator (in NavBar) to open the Query Viewer.
1. Navigate to the Query Viewer page.
Navigation Option Navigation Path
NavBar Navigator, SWIFT, Reporting Tools, Query, Query Viewer.
2. The Query Viewer page will display. From the Search By field, select the “Query Name” option.
3. In the begins with field, enter the naming convention for the query you want to run.
Naming conventions for queries begin with “M_XX” to abbreviate the following information:
• M = Minnesota – always start with this letter
• XX = abbreviation of SWIFT module (for example, AP = Accounts Payable, VND = Vendor module)
Note: If you only type the “M_XX” abbreviation, SWIFT will open all the queries in that module.
4. Press the Search button. A list of Search Results for queries will display below the Query section.
The Search Results show the queries available for a particular module.
Updated May 2021 (Version 3)
Page 47You can also read