Kegerator Assembly Instructions - REFR6 - The Outdoor Appliance Store
←
→
Page content transcription
If your browser does not render page correctly, please read the page content below
Kegerator Assembly Instructions - REFR6
Installation Steps
Read all instructions before beginning installation.
Tools needed: Flat head screw driver and adjustable wrench
Before starting the installation steps below: attach the door handle, place your kegerator in the
desired location, plug it in and set the temperature between 36° and 40°F.
Note: The CO2 tank (provided) is empty when you receive it. Visit your local beer keg provider, air/
gas or welding supplier, or sporting goods store to get it filled.
REMOVE PLUG & INSERT LINE HOSE
Remove black plastic plug. Align the black rubber gasket over the
screw holes then feed the hex nut and line hose (9) through the hole.
SECURE TOWER
Align the beer tower on top of the gasket. Insure your tower is facing
the front of the cabinet then secure tower with supplied screws.
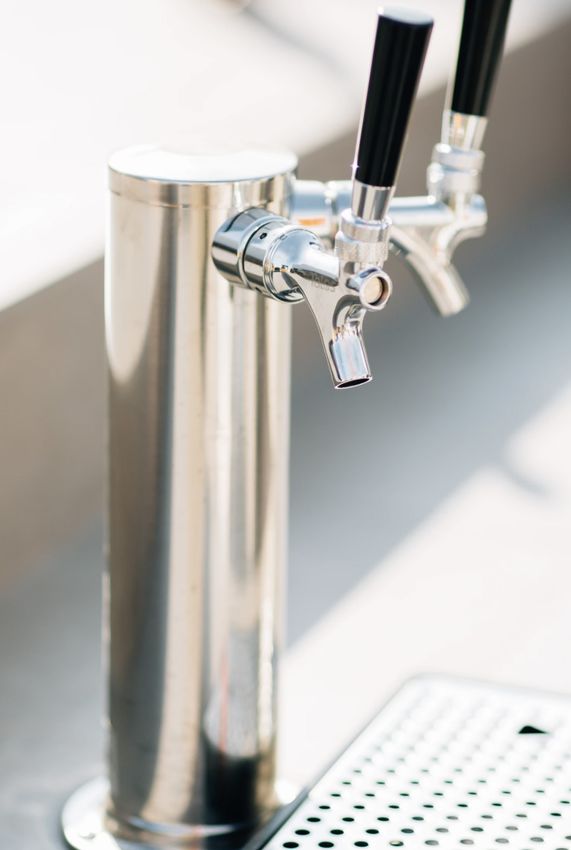
ATTACH TAP HANDLES
Screw black plastic tap handles clockwise on the beer tap pulls. Place
drip tray below faucet.
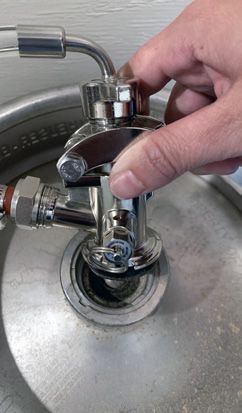
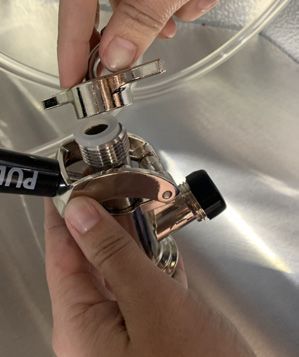
ATTACH HOSE’S TO KEG COUPLER
Attach the line hose (9) to the top of the keg coupler (8).
Connect the red hose to the other end of the keg coupler, lock
connection firmly with clamp. Insure all connections are secure
using a wrench and flat head screw driver.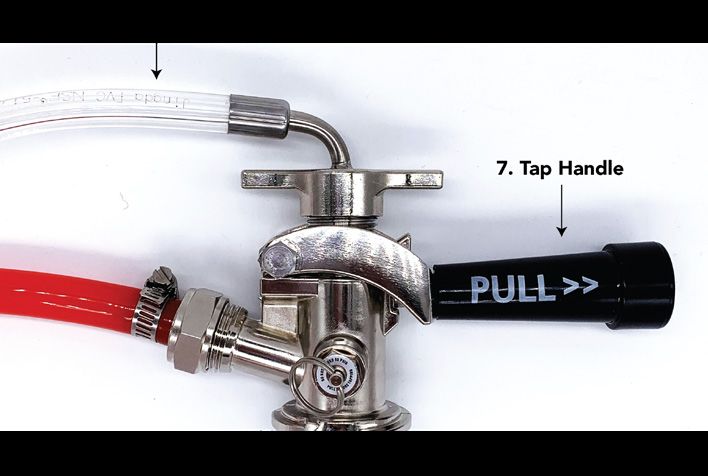
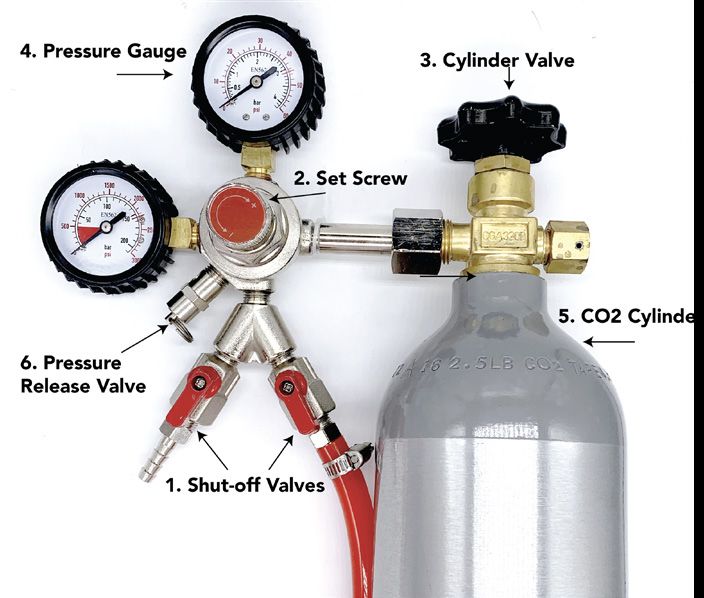
ATTACH CO2
Tightly screw the regulator to the CO2 cylinder (only use
beverage/food grade CO2). Connect red hose to regulator, lock
connection firmly with clamp. Insure all connections are
secure using a wrench and flat head screw driver.
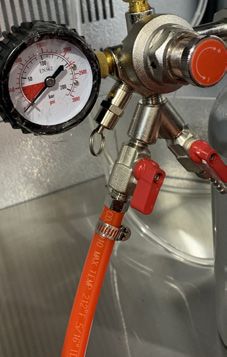
TURNING ON THE CO2
Make sure that the red shut-off valves (1) on the regulator are closed (horizontal), then open
the cylinder valve on the CO2 tank (3) completely. Turn the set screw (2) located in the center
of the regulator until the desired pressure is shown on the output pressure gauge (4). Slowly
turn the set screw (2) clockwise until the top gauge reads “10 PSI” .
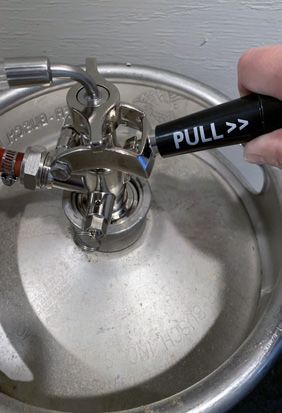
TAPPING THE KEG
Align keg coupler with locking neck of the beer keg and rotate
clockwise until coupler is in locked position. Pull the handle (7)
out, away from the keg coupler, and push down until it locks into
position. Some beer will flow into the clear tube.
CO2 TO KEG
Open the red shut-off valve (1) on the regulator to allow CO2 gas to flow from the regulator to
the keg. NOTE: You will hear the keg pressurizing. The output needle on the regulator should drop momentarily until
the pressure has equalized, then the needle will return to the previously set pressure.
RELEASE VALVE
There is a pressure release valve (6) on the regulator. Briefly pull the ring on the pressure
release valve to allow gas out. There will be a sharp hissing noise once you pull the pressure
release valve. Readjust set screw if needed. NOTE: This is important to do, it helps gas flow through the
regulator and obtain a more accurate reading on the pressure gauge.
CAREFULLY PLACE CO2 & KEG IN KEGERATOR
Place your CO2 in a spot where it will not tip over, this is highly pressurized compressed gas in
the tank. Carefully place your keg in the kegerator.
POUR YOUR BEER
Pull the black tap handle on the top of your beer tower. Your first beer might be slightly foamy.
If needed, adjust your CO2 PSI or temperature of your Kegerator.
Make sure to clean your keg lines regularly.
When replacing the beer keg, first turn off the shut-off valves (1) on the CO2 regulator, turn off the
CO2 tank and pull the pressure release valve (6), then remove the keg coupler (8) from the keg.
When replacing the CO2 gas cylinder, turn off the shut-off valves (1) on the CO2 regulator, turn off
the CO2 tank and pull the pressure release valve (6). Use a wrench to loosen the hexagonal nut port
connecting the CO2 regulator valve with the CO2 tank.
SAFETY GUIDELINES:
During the installation process, be sure that all parts are connected tightly and that there are no
leaks.
-To check for CO2 leaks, drip some soapy water on the CO2 cylinder and regulator connection. If
soapy bubbles form, you may need to tighten.
If the high-pressure compressed gas in the CO2 tank is not handled properly, it could be
dangerous:
CO2 gas canisters contain high-pressure compressed gas, which can be hazardous if not
handled properly. Make sure you thoroughly read and understand the following precautions and
procedures for CO2 canisters prior to installation of the unit.
1. Always connect the CO2 canister to a regulator. Failure to do so could result in an explosion,
injuries, or death when the canister valve is opened.
2.. ever connect the CO2 canister directly to the product container.
3. Always follow proper procedures to change the canisters.
4. Always secure the canister in an upright position.
5.. ever drop or throw a CO2 canister, as this could result in injuries or death.
6. Always keep a CO2 canister away from direct heat. Store extra canisters in a cool place with a
stable temperature around 70°F (21.1°C), and secure them in an upright position using a chain.
7. Always make sure to immediately ventilate and vacate the area if a CO2 leakage has occurred.
8. Always check the D.O.T. test date on the canister neck before installing it. If over five (5) years
has passed, do not use the canister, and return it to the supplier.
9.. ever connect a keg to the canister unless there are two (2) safeties in the pressure system:
            a. At or on the CO2 regulator
            b. At or on the product coupler/in the pressure gas line

 If you have questions on your Kegerator please contact us or visit our website for more information.

   WEBSITE
   RCSGasGrills.com
   EMAIL
   Info@RCSGasGrills.com
   PHONE
   (800) 833-599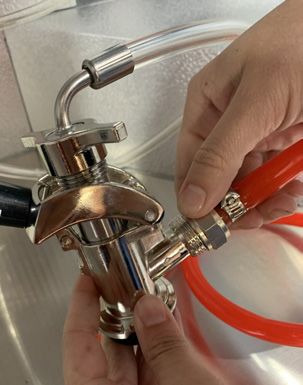

You can also read