Mirage 304K (Bm.1) User Guide 020-101778-14 - Christie Digital
←
→
Page content transcription
If your browser does not render page correctly, please read the page content below

User Guide
             020-101778-14

Mirage 304K (Bm.1)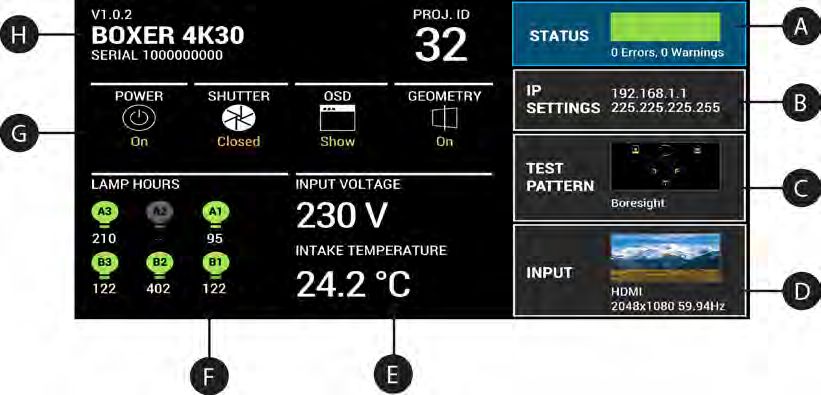
NOTICES
COPYRIGHT AND TRADEMARKS
Copyright © 2021 Christie Digital Systems USA Inc. All rights reserved.
All brand names and product names are trademarks, registered trademarks or trade names of their respective holders.
GENERAL
Every effort has been made to ensure accuracy, however in some cases changes in the products or availability could occur which may not be reflected in this
document. Christie reserves the right to make changes to specifications at any time without notice. Performance specifications are typical, but may vary
depending on conditions beyond Christie's control such as maintenance of the product in proper working conditions. Performance specifications are based on
information available at the time of printing. Christie makes no warranty of any kind with regard to this material, including, but not limited to, implied
warranties of fitness for a particular purpose. Christie will not be liable for errors contained herein or for incidental or consequential damages in connection
with the performance or use of this material. Manufacturing facilities in Canada and China are ISO 9001 certified.

Warranty
Products are warranted under Christie’s standard limited warranty, the details of which are available at https://www.christiedigital.com/help-center/
warranties/ or by contacting your Christie dealer or Christie.
PREVENTATIVE MAINTENANCE
Preventative maintenance is an important part of the continued and proper operation of your product. Failure to perform maintenance as required, and in
accordance with the maintenance schedule specified by Christie, will void the warranty.
REGULATORY
The product has been tested and found to comply with the limits for a Class A digital device, pursuant to Part 15 of the FCC Rules. These limits are designed
to provide reasonable protection against harmful interference when the product is operated in a commercial environment. The product generates, uses, and
can radiate radio frequency energy and, if not installed and used in accordance with the instruction manual, may cause harmful interference to radio
communications. Operation of the product in a residential area is likely to cause harmful interference in which case the user will be required to correct the
interference at the user’s own expense. Changes or modifications not expressly approved by the party responsible for compliance could void the user's
authority to operate the equipment
CAN ICES-3 (A) / NMB-3 (A)
이 기기는 업무용(A급)으로 전자파적합등록을 한 기기이오니 판매자 또는 사용자는 이점을 주의하시기 바라며, 가정 외의 지역에서 사용하는 것을 목적으로 합니다.
ENVIRONMENTAL
The product is designed and manufactured with high-quality materials and components that can be recycled and reused. This symbol            means that electrical
and electronic equipment, at their end-of-life, should be disposed of separately from regular waste. Please dispose of the product appropriately and according
to local regulations. In the European Union, there are separate collection systems for used electrical and electronic products. Please help us to conserve the
environment we live in!
Content
Introduction. . . . . . . . . . . . . . . . . . . . . . . . . . . . . . . . . . . . . . . . . . . . . . . . . . . . . . 8
    Safety and warning guidelines. . . . . . . . . . . . . . . . . . . . . . . . . . . . . . . . . . . . . . . . . . . 8
         Light intensity hazard distance. . . . . . . . . . . . . . . . . . . . . . . . . . . . . . . . . . . . . . . . . 9
         Product labels. . . . . . . . . . . . . . . . . . . . . . . . . . . . . . . . . . . . . . . . . . . . . . . . . . . 10
    Projector overview. . . . . . . . . . . . . . . . . . . . . . . . . . . . . . . . . . . . . . . . . . . . . . . . . . 12
    Contact your dealer. . . . . . . . . . . . . . . . . . . . . . . . . . . . . . . . . . . . . . . . . . . . . . . . . 12
    Key features. . . . . . . . . . . . . . . . . . . . . . . . . . . . . . . . . . . . . . . . . . . . . . . . . . . . . .13
    How the projector works. . . . . . . . . . . . . . . . . . . . . . . . . . . . . . . . . . . . . . . . . . . . . . 13
    List of components. . . . . . . . . . . . . . . . . . . . . . . . . . . . . . . . . . . . . . . . . . . . . . . . . .13
    Product documentation. . . . . . . . . . . . . . . . . . . . . . . . . . . . . . . . . . . . . . . . . . . . . . . 14
         Related documentation. . . . . . . . . . . . . . . . . . . . . . . . . . . . . . . . . . . . . . . . . . . . . 14
    Site requirements. . . . . . . . . . . . . . . . . . . . . . . . . . . . . . . . . . . . . . . . . . . . . . . . . . 14
         Physical operating environment. . . . . . . . . . . . . . . . . . . . . . . . . . . . . . . . . . . . . . . . 14
         Power connection. . . . . . . . . . . . . . . . . . . . . . . . . . . . . . . . . . . . . . . . . . . . . . . . 15
    Projector components. . . . . . . . . . . . . . . . . . . . . . . . . . . . . . . . . . . . . . . . . . . . . . . . 15
    IR remote keypad. . . . . . . . . . . . . . . . . . . . . . . . . . . . . . . . . . . . . . . . . . . . . . . . . . 16
    Display panel components. . . . . . . . . . . . . . . . . . . . . . . . . . . . . . . . . . . . . . . . . . . . . 19
    Turning on the projector. . . . . . . . . . . . . . . . . . . . . . . . . . . . . . . . . . . . . . . . . . . . . . 20
         Projector LED status indicators. . . . . . . . . . . . . . . . . . . . . . . . . . . . . . . . . . . . . . . . 20
         Projector LED shutter indicators. . . . . . . . . . . . . . . . . . . . . . . . . . . . . . . . . . . . . . . 21
    Turning off the projector. . . . . . . . . . . . . . . . . . . . . . . . . . . . . . . . . . . . . . . . . . . . . . 21

Adjusting the image. . . . . . . . . . . . . . . . . . . . . . . . . . . . . . . . . . . . . . . . . . . . . . . 22
    Selecting screen image orientation. . . . . . . . . . . . . . . . . . . . . . . . . . . . . . . . . . . . . . . . 22
    Setting the image resize preset. . . . . . . . . . . . . . . . . . . . . . . . . . . . . . . . . . . . . . . . . . 22
    Adjusting lens settings. . . . . . . . . . . . . . . . . . . . . . . . . . . . . . . . . . . . . . . . . . . . . . . 22
         Adjusting offset. . . . . . . . . . . . . . . . . . . . . . . . . . . . . . . . . . . . . . . . . . . . . . . . . .22
         Resetting the lens to home position. . . . . . . . . . . . . . . . . . . . . . . . . . . . . . . . . . . . . 23
         Aligning the image with lens zoom and focus. . . . . . . . . . . . . . . . . . . . . . . . . . . . . . . 23
         Locking the lens motor. . . . . . . . . . . . . . . . . . . . . . . . . . . . . . . . . . . . . . . . . . . . . 23
         Calibrating the zoom motor. . . . . . . . . . . . . . . . . . . . . . . . . . . . . . . . . . . . . . . . . . 23
         Determining what lens warnings are displayed. . . . . . . . . . . . . . . . . . . . . . . . . . . . . . 24
         Lens control limitations. . . . . . . . . . . . . . . . . . . . . . . . . . . . . . . . . . . . . . . . . . . . . 25
         Ultra short throw lens control limitations. . . . . . . . . . . . . . . . . . . . . . . . . . . . . . . . . . 26

Mirage 304K (Bm.1) User Guide                                                                                                3
020-101778-14 Rev. 1 (03-2021)
Copyright © 2021 Christie Digital Systems USA, Inc. All rights reserved.
Content
Enabling the ultra short throw lens keep-out area. . . . . . . . . . . . . . . . . . . . . . . . . . . . 26
Adjusting primary colors. . . . . . . . . . . . . . . . . . . . . . . . . . . . . . . . . . . . . . . . . . . . . . 27
DMD color correction. . . . . . . . . . . . . . . . . . . . . . . . . . . . . . . . . . . . . . . . . . . . . . . . 27
Adjusting color by precise chromaticity values. . . . . . . . . . . . . . . . . . . . . . . . . . . . . . .27
Adjusting color by saturation. . . . . . . . . . . . . . . . . . . . . . . . . . . . . . . . . . . . . . . . . 28
Signal color correction. . . . . . . . . . . . . . . . . . . . . . . . . . . . . . . . . . . . . . . . . . . . . . . 28
Adjusting the color space. . . . . . . . . . . . . . . . . . . . . . . . . . . . . . . . . . . . . . . . . . . .28
Adjusting color by temperature. . . . . . . . . . . . . . . . . . . . . . . . . . . . . . . . . . . . . . . . 28
Adjusting color values based on gamma function. . . . . . . . . . . . . . . . . . . . . . . . . . . . . 29
Selecting the color correction mode. . . . . . . . . . . . . . . . . . . . . . . . . . . . . . . . . . . . . 29
Correcting for ambient light. . . . . . . . . . . . . . . . . . . . . . . . . . . . . . . . . . . . . . . . . . 29
Setting the frame delay. . . . . . . . . . . . . . . . . . . . . . . . . . . . . . . . . . . . . . . . . . . . . . .30
Enabling film mode detect. . . . . . . . . . . . . . . . . . . . . . . . . . . . . . . . . . . . . . . . . . . . . 30
Adjusting the image sharpness. . . . . . . . . . . . . . . . . . . . . . . . . . . . . . . . . . . . . . . . . . 30
Creating a seamless image with edge blending. . . . . . . . . . . . . . . . . . . . . . . . . . . . . . . . 30
Adding edge blends to the projector. . . . . . . . . . . . . . . . . . . . . . . . . . . . . . . . . . . . . 30
Enabling basic edge blending. . . . . . . . . . . . . . . . . . . . . . . . . . . . . . . . . . . . . . . . . 31
Resetting edge blending. . . . . . . . . . . . . . . . . . . . . . . . . . . . . . . . . . . . . . . . . . . . 31
Geometry correction. . . . . . . . . . . . . . . . . . . . . . . . . . . . . . . . . . . . . . . . . . . . . . . . .31
Enabling warping. . . . . . . . . . . . . . . . . . . . . . . . . . . . . . . . . . . . . . . . . . . . . . . . . 31
Correcting the shape of a keystoned image. . . . . . . . . . . . . . . . . . . . . . . . . . . . . . . . 32
Cropping pixels from the display edges. . . . . . . . . . . . . . . . . . . . . . . . . . . . . . . . . . . . . 34
Configuring system settings. . . . . . . . . . . . . . . . . . . . . . . . . . . . . . . . . . . . . . . . . 35
Setting the date. . . . . . . . . . . . . . . . . . . . . . . . . . . . . . . . . . . . . . . . . . . . . . . . . . . 35
Setting the time. . . . . . . . . . . . . . . . . . . . . . . . . . . . . . . . . . . . . . . . . . . . . . . . . . . 35
Synchronizing the date and time. . . . . . . . . . . . . . . . . . . . . . . . . . . . . . . . . . . . . . . . . 35
Changing the splash screen. . . . . . . . . . . . . . . . . . . . . . . . . . . . . . . . . . . . . . . . . . . . 35
Determining the on-screen display position. . . . . . . . . . . . . . . . . . . . . . . . . . . . . . . . . . 36
Changing the language. . . . . . . . . . . . . . . . . . . . . . . . . . . . . . . . . . . . . . . . . . . . . . . 36
Changing the temperature units. . . . . . . . . . . . . . . . . . . . . . . . . . . . . . . . . . . . . . . . . 36
Changing the user account password. . . . . . . . . . . . . . . . . . . . . . . . . . . . . . . . . . . . . . 36
Accessing the generated user account password. . . . . . . . . . . . . . . . . . . . . . . . . . . . . 37
Resuming projector operation after an AC power interruption. . . . . . . . . . . . . . . . . . . . . . . 37
Keeping electronics on in standby mode. . . . . . . . . . . . . . . . . . . . . . . . . . . . . . . . . . . . 37
Enabling direct pass-through of HDMI, 3G, and DisplayPort input signals. . . . . . . . . . . . . . . . 38
Configuring video input. . . . . . . . . . . . . . . . . . . . . . . . . . . . . . . . . . . . . . . . . . . . . . . 38
Disabling secondary DVI receivers. . . . . . . . . . . . . . . . . . . . . . . . . . . . . . . . . . . . . . . . 38
Informing the source of signal preferences. . . . . . . . . . . . . . . . . . . . . . . . . . . . . . . . . . . 38
Mirage 304K (Bm.1) User Guide 4
020-101778-14 Rev. 1 (03-2021)
Copyright © 2021 Christie Digital Systems USA, Inc. All rights reserved.Content
Adjusting lamp power. . . . . . . . . . . . . . . . . . . . . . . . . . . . . . . . . . . . . . . . . . . . . . . . 39
BrightSelect™. . . . . . . . . . . . . . . . . . . . . . . . . . . . . . . . . . . . . . . . . . . . . . . . . . . . . 39
Selecting lamps using BrightSelect™. . . . . . . . . . . . . . . . . . . . . . . . . . . . . . . . . . . . . 39
Turning on the projector with low voltage. . . . . . . . . . . . . . . . . . . . . . . . . . . . . . . . . . . .39
Implementing Stealth mode. . . . . . . . . . . . . . . . . . . . . . . . . . . . . . . . . . . . . . . . . . . . 40
Configuring communications. . . . . . . . . . . . . . . . . . . . . . . . . . . . . . . . . . . . . . . . 41
Enabling projector communication. . . . . . . . . . . . . . . . . . . . . . . . . . . . . . . . . . . . . . . . 41
Setting the remote access level. . . . . . . . . . . . . . . . . . . . . . . . . . . . . . . . . . . . . . . . . . 41
Communicating with Mirage 304K through Art-Net. . . . . . . . . . . . . . . . . . . . . . . . . . . . . . 42
Art-Net channel listing. . . . . . . . . . . . . . . . . . . . . . . . . . . . . . . . . . . . . . . . . . . . . 42
Index list for the input channel. . . . . . . . . . . . . . . . . . . . . . . . . . . . . . . . . . . . . . . . 44
Working with macros. . . . . . . . . . . . . . . . . . . . . . . . . . . . . . . . . . . . . . . . . . . . . . . . 46
Adding a Scheduled Event macro. . . . . . . . . . . . . . . . . . . . . . . . . . . . . . . . . . . . . . . 46
Adding a GPIO Event macro. . . . . . . . . . . . . . . . . . . . . . . . . . . . . . . . . . . . . . . . . . 47
Copying a macro. . . . . . . . . . . . . . . . . . . . . . . . . . . . . . . . . . . . . . . . . . . . . . . . . 47
Editing a macro. . . . . . . . . . . . . . . . . . . . . . . . . . . . . . . . . . . . . . . . . . . . . . . . . .48
Deleting a macro. . . . . . . . . . . . . . . . . . . . . . . . . . . . . . . . . . . . . . . . . . . . . . . . . 48
Configuring the GPIO. . . . . . . . . . . . . . . . . . . . . . . . . . . . . . . . . . . . . . . . . . . . . . . . 48
GPIO connector. . . . . . . . . . . . . . . . . . . . . . . . . . . . . . . . . . . . . . . . . . . . . . . . . .49
Setting up projector profiles. . . . . . . . . . . . . . . . . . . . . . . . . . . . . . . . . . . . . . . . . 50
Creating a new projector profile. . . . . . . . . . . . . . . . . . . . . . . . . . . . . . . . . . . . . . . . . 50
Importing a projector profile. . . . . . . . . . . . . . . . . . . . . . . . . . . . . . . . . . . . . . . . . . . .50
Restoring settings from a profile. . . . . . . . . . . . . . . . . . . . . . . . . . . . . . . . . . . . . . . . . 50
Renaming a projector profile. . . . . . . . . . . . . . . . . . . . . . . . . . . . . . . . . . . . . . . . . . . .51
Exporting a projector profile to an external device. . . . . . . . . . . . . . . . . . . . . . . . . . . . . . 51
Deleting a projector profile. . . . . . . . . . . . . . . . . . . . . . . . . . . . . . . . . . . . . . . . . . . . .51
Backing up, restoring, and upgrading projector files. . . . . . . . . . . . . . . . . . . . . . 52
Upgrading the Mirage 304K software. . . . . . . . . . . . . . . . . . . . . . . . . . . . . . . . . . . . . . 52
Adding a software license to a projector. . . . . . . . . . . . . . . . . . . . . . . . . . . . . . . . . . . . 52
Exporting backup settings to an external device. . . . . . . . . . . . . . . . . . . . . . . . . . . . . . . 53
Importing a file from an external device to restore settings. . . . . . . . . . . . . . . . . . . . . . . . 53
Restoring projector default settings. . . . . . . . . . . . . . . . . . . . . . . . . . . . . . . . . . . . . . . 54
Diagnostic tools . . . . . . . . . . . . . . . . . . . . . . . . . . . . . . . . . . . . . . . . . . . . . . . . . . 55
Viewing Mirage 304K information. . . . . . . . . . . . . . . . . . . . . . . . . . . . . . . . . . . . . . . . .55
Viewing lamp information. . . . . . . . . . . . . . . . . . . . . . . . . . . . . . . . . . . . . . . . . . . . . 55
Mirage 304K (Bm.1) User Guide 5
020-101778-14 Rev. 1 (03-2021)
Copyright © 2021 Christie Digital Systems USA, Inc. All rights reserved.Content
Adding lamp end-of-life indicator. . . . . . . . . . . . . . . . . . . . . . . . . . . . . . . . . . . . . . . . . 55
Freezing an image. . . . . . . . . . . . . . . . . . . . . . . . . . . . . . . . . . . . . . . . . . . . . . . . . . 55
Test patterns. . . . . . . . . . . . . . . . . . . . . . . . . . . . . . . . . . . . . . . . . . . . . . . . . . . . . 56
Selecting a test pattern. . . . . . . . . . . . . . . . . . . . . . . . . . . . . . . . . . . . . . . . . . . . . 56
Modifying grey level test pattern characteristics. . . . . . . . . . . . . . . . . . . . . . . . . . . . . .56
Modifying ramp test pattern characteristics. . . . . . . . . . . . . . . . . . . . . . . . . . . . . . . . 56
Modifying grid test pattern characteristics. . . . . . . . . . . . . . . . . . . . . . . . . . . . . . . . . 57
Enabling a specific test pattern color. . . . . . . . . . . . . . . . . . . . . . . . . . . . . . . . . . . . .57
Selecting an engine test pattern. . . . . . . . . . . . . . . . . . . . . . . . . . . . . . . . . . . . . . . 57
Viewing Mirage 304K status. . . . . . . . . . . . . . . . . . . . . . . . . . . . . . . . . . . . . . . . . . . . 57
Monitoring projector and lamps with Christie TAP. . . . . . . . . . . . . . . . . . . . . . . . . . . . . . . 58
Running the Mirage 304K interrogator. . . . . . . . . . . . . . . . . . . . . . . . . . . . . . . . . . . . . .58
Identifying where alarm and trap messages are sent. . . . . . . . . . . . . . . . . . . . . . . . . . . . 58
Setting the SNMP read community string. . . . . . . . . . . . . . . . . . . . . . . . . . . . . . . . . . 59
Configuring traps. . . . . . . . . . . . . . . . . . . . . . . . . . . . . . . . . . . . . . . . . . . . . . . . .59
Defining a trap IP address. . . . . . . . . . . . . . . . . . . . . . . . . . . . . . . . . . . . . . . . . . . 59
Downloading the SNMP MIB files. . . . . . . . . . . . . . . . . . . . . . . . . . . . . . . . . . . . . . . 59
Restoring factory default settings. . . . . . . . . . . . . . . . . . . . . . . . . . . . . . . . . . . . . . . . .60
Mirage 304K Specifications. . . . . . . . . . . . . . . . . . . . . . . . . . . . . . . . . . . . . . . . . .61
Display. . . . . . . . . . . . . . . . . . . . . . . . . . . . . . . . . . . . . . . . . . . . . . . . . . . . . . . . . 61
Control signal compatibility. . . . . . . . . . . . . . . . . . . . . . . . . . . . . . . . . . . . . . . . . . . . 61
Shipped input cards. . . . . . . . . . . . . . . . . . . . . . . . . . . . . . . . . . . . . . . . . . . . . . . . . 62
Optional input cards. . . . . . . . . . . . . . . . . . . . . . . . . . . . . . . . . . . . . . . . . . . . . . . . . 63
Temperature sensor thresholds. . . . . . . . . . . . . . . . . . . . . . . . . . . . . . . . . . . . . . . . . . 63
Warning thresholds for fans . . . . . . . . . . . . . . . . . . . . . . . . . . . . . . . . . . . . . . . . . . . .64
Warning threshold for liquid cooling module. . . . . . . . . . . . . . . . . . . . . . . . . . . . . . . . . . 65
Power requirements. . . . . . . . . . . . . . . . . . . . . . . . . . . . . . . . . . . . . . . . . . . . . . . . . 65
Physical specifications. . . . . . . . . . . . . . . . . . . . . . . . . . . . . . . . . . . . . . . . . . . . . . . .66
Accessories. . . . . . . . . . . . . . . . . . . . . . . . . . . . . . . . . . . . . . . . . . . . . . . . . . . . . . 66
Regulatory. . . . . . . . . . . . . . . . . . . . . . . . . . . . . . . . . . . . . . . . . . . . . . . . . . . . . . . 67
Safety. . . . . . . . . . . . . . . . . . . . . . . . . . . . . . . . . . . . . . . . . . . . . . . . . . . . . . . 67
Near field communication reader. . . . . . . . . . . . . . . . . . . . . . . . . . . . . . . . . . . . . . . 68
Electro-magnetic compatibility. . . . . . . . . . . . . . . . . . . . . . . . . . . . . . . . . . . . . . . . 68
Environmental. . . . . . . . . . . . . . . . . . . . . . . . . . . . . . . . . . . . . . . . . . . . . . . . . . 68
Environment. . . . . . . . . . . . . . . . . . . . . . . . . . . . . . . . . . . . . . . . . . . . . . . . . . . . . 69
Signal connectivity specifications. . . . . . . . . . . . . . . . . . . . . . . . . . . . . . . . . . . . 70
HBMIC video formats for Mirage projectors. . . . . . . . . . . . . . . . . . . . . . . . . . . . . . . . . . .70
Mirage 304K (Bm.1) User Guide 6
020-101778-14 Rev. 1 (03-2021)
Copyright © 2021 Christie Digital Systems USA, Inc. All rights reserved.Content
QDPIC video formats. . . . . . . . . . . . . . . . . . . . . . . . . . . . . . . . . . . . . . . . . . . . . . . . 72
TDPIC video formats for Mirage projectors. . . . . . . . . . . . . . . . . . . . . . . . . . . . . . . . . . . 72
DDIC video formats for Mirage projectors. . . . . . . . . . . . . . . . . . . . . . . . . . . . . . . . . . . 73
THIC video formats for Mirage projectors. . . . . . . . . . . . . . . . . . . . . . . . . . . . . . . . . . . . 73
HDBase-T video formats for Mirage projectors. . . . . . . . . . . . . . . . . . . . . . . . . . . . . . . . . 74
3GIC video formats for Mirage projectors. . . . . . . . . . . . . . . . . . . . . . . . . . . . . . . . . . . . 74
Dual-input 3D for Mirage projectors. . . . . . . . . . . . . . . . . . . . . . . . . . . . . . . . . . . . . . . 75
Mirage 304K (Bm.1) User Guide 7
020-101778-14 Rev. 1 (03-2021)
Copyright © 2021 Christie Digital Systems USA, Inc. All rights reserved.Introduction
This manual is intended for Christie qualified installers and trained operators of Christie Mirage 304K
projection systems.
For complete Mirage 304K product documentation and technical support, go to
www.christiedigital.com.
Safety and warning guidelines
Read all safety and warning guidelines before installing or operating the projector.
This projector is intended for use in a non-cinema environment.
This projector must be operated in an environment that meets the operating range specification. Use
only the attachments and/or accessories recommended by Christie. Use of others may result in the
risk of fire, shock, or personal injury.
Warning! If not avoided, the following could result in death or serious injury.
• This product must be operated in an environment that meets the operating range as specified in
this document.
• Do not look directly into the lens when the light source is on. The extremely high brightness can
cause permanent eye damage.
• EXTREME BRIGHTNESS! When accessing a restricted access location for product service or
maintenance, avoid exposure to the product beam path by turning the product power off and
disconnecting the product from AC power, or by shuttering the light source to avoid emissions
from the front aperture.
• ELECTRICAL and BURN HAZARD! Use caution when accessing internal components.
• FIRE HAZARD! Keep hands, clothes, and all combustible material away from the concentrated
light beam of the projector.
• Keep fingers and other body parts away from the moving parts in the product. Tie back long
hair, and remove jewelry and loose clothing before manually adjusting the product.
• FIRE AND SHOCK HAZARD! Use only the attachments, accessories, tools, and replacement parts
specified by Christie.
• SHOCK HAZARD! Power supply uses double pole/neutral fusing. Disconnect all power sources
before opening the product.
• FIRE HAZARD! Do not exceed 30 A for the breaker to power Input 1 on the projector.
• Install the product near an easily accessible AC receptacle.
• FIRE AND SHOCK HAZARD! Use only the attachments, accessories, tools, and replacement parts
specified by Christie.
Mirage 304K (Bm.1) User Guide 8
020-101778-14 Rev. 1 (03-2021)
Copyright © 2021 Christie Digital Systems USA, Inc. All rights reserved.Introduction
Caution! If not avoided, the following could result in minor or moderate injury.
• TRIP OR FIRE HAZARD! Position all cables where they cannot contact hot surfaces, be pulled, be
tripped over, or damaged by persons walking on or objects rolling over the cables.
• The American Conference of Governmental Industrial Hygienists (ACGIH) recommends
occupational UV exposure for an 8-hour day to be less than 0.1 microwatts per square
centimeters of effective UV radiation. A workplace evaluation is advised to assure employees are
not exposed to cumulative radiation levels exceeding the government guidelines for your area.
Be aware that some medications are known to increase sensitivity to UV radiation.
Light intensity hazard distance
This projector has been classified as Risk Group 3 as per the IEC62471 standard due to possible
hazardous optical and thermal radiation being emitted.
Warning! If not avoided, the following could result in serious injury.
• PERMANENT/TEMPORARY BLINDNESS HAZARD! No direct exposure to the beam must be
permitted.
• PERMANENT/TEMPORARY BLINDNESS HAZARD! Operators must control access to the beam
within the hazard distance or install the product at the height that prevents exposure of
spectators' eyes within the hazard distance. The hazard zone must be no lower than 3.0 meters
above the floor and the horizontal clearance to the hazard zone must be a minimum 2.5 meters.
• EXTREME BRIGHTNESS! Do not place reflective objects in the product light path.
The following show the zones for ocular and skin hazard distances.
• A—Hazard zone. The region of space where the projection light from the projector is above
emission limits for Risk Group 2. The light intensity may cause eye damage after a momentary
or brief exposure (before a person can avert his or her eyes away from the light source). The
light may cause skin burns to occur.
• B—Hazard distance. Operators must control access to the beam within the hazard distance or
install the product preventing potential exposure of the spectators' eyes from being in the
hazard distance.
Mirage 304K (Bm.1) User Guide 9
020-101778-14 Rev. 1 (03-2021)
Copyright © 2021 Christie Digital Systems USA, Inc. All rights reserved.Introduction
• C—No access zone. Horizontal clearance of the no access zone must be a minimum of 2.5
meters.
• D—Vertical distance to hazard zone. The hazard zone must be no lower than 3.0 meters above
the floor.
• E—Represents the top view of the projector.
• F—Represents the side view of the projector.
Projection lens Part number Hazard distance
(m)
0.38:1 144-136101-XX 0.6
0.72:1 HB fixed lens 144-110103-XX 0.6
0.9:1 fixed lens 144-111014-XX 0.7
1.13-1.31:1 HB zoom lens 144-103105-XX 1.1
1.31-1.63:1 HB zoom lens 144-104106-XX 1.3
1.63-2.17:1 HB zoom lens 144-105107-XX 1.7
1.99-2.71:1 HB zoom lens 144-106108-XX 2.2
2.71-3.89:1 HB zoom lens 144-107109-XX 3.1
3.89-5.43:1 HB zoom lens 144-108100-XX 4.2
4.96-7.69:1 HB zoom lens 144-109101-XX 6.0
Product labels
Learn about the labels that may be used on the product. Labels on your product may be yellow or
black and white.
General hazards
Hazard warnings also apply to accessories once they are installed in a Christie product that is
connected to power.
Fire and Shock Hazard
To prevent fire or shock hazards, do not expose this product to rain or moisture.
Do not alter the power plug, overload the power outlet, or use it with extension cords.
Do not remove the product enclosure.
Only Christie qualified technicians are authorized to service the product.
Electrical Hazard
Risk of electric shock.
Do not remove the product enclosure.
Only Christie qualified technicians are authorized to service the product.
Mirage 304K (Bm.1) User Guide 10
020-101778-14 Rev. 1 (03-2021)
Copyright © 2021 Christie Digital Systems USA, Inc. All rights reserved.Introduction
Warning! If not avoided, the following could result in death or serious injury.
Electric shock hazard. To avoid personal injury, disconnect all power sources before
performing maintenance or service.
Electrocution hazard. To avoid personal injury, always disconnect all power sources
before performing maintenance or service procedures.
Explosive material hazard. To avoid personal injury, disconnect all power sources
before performing maintenance or service, and wear Christie-approved protective
clothing.
Bright light hazard. To avoid personal injury, never look directly at the light source.
Caution! If not avoided, the following could result in minor or moderate injury.
Hot surface hazard. To avoid personal injury, allow the product to cool for the
recommended cool down time before touching or handling for maintenance or
service.
Burn hazard. To avoid personal injury, allow the product to cool for the recommended
cool down time before handling for maintenance or service.
Pinch hazard. To avoid personal injury, keep hands clear and loose clothing tied back.
Moving fan blade. To avoid personal injury, keep hands clear and loose clothing tied
back. Always disconnect all power sources before performing maintenance or service
procedures.
Notice. If not avoided, the following could result in property damage.
General hazard.
Not for household use.
Mandatory action
Disconnect all power sources before performing maintenance or service procedures.
Consult the service manual.
Mirage 304K (Bm.1) User Guide 11
020-101778-14 Rev. 1 (03-2021)
Copyright © 2021 Christie Digital Systems USA, Inc. All rights reserved.Introduction
Electrical labels
Indicates the presence of a protective earth ground.
Indicates the presence of an earth ground.
Additional hazard labels
Risk Group 3 warning: Indicates a potential optical radiation hazard emitted from
this product. Thermal radiation emitted from this product may cause burns.
Projector overview
Learn about the Mirage 304K projector.
The Mirage 304K is a professional quality, easy-to-use projector using Digital Light Processing (DLPTM)
technology from Texas Instruments. Integrating smoothly into traditional projection environments, the
Mirage 304K interfaces with local networks throughout the world, for multimedia presentations from a
variety of formats, to offer stunning wide screen, high resolution 4K images at 60 frames per second.
Contact your dealer
Record the information about your projector and keep this information with your records to assist with
the servicing of your projector. If you encounter a problem with your Christie projector, contact your
dealer.
Purchase record
Dealer:
Dealer or Christie Sales/Service contact phone number:
Projector serial number:
The serial number can be found on the license label located on the display panel
Purchase date:
Installation date:
Ethernet settings
Default gateway
Projector IP address
Mirage 304K (Bm.1) User Guide 12
020-101778-14 Rev. 1 (03-2021)
Copyright © 2021 Christie Digital Systems USA, Inc. All rights reserved.Introduction
Ethernet settings
Subnet mask
Key features
Understand the important features of the projector.
• Built in warp and blend of projected images
• Near field communication
• Multi-lamp module with no lamp alignment required
• Improved lens mount with bayonet style insertion
• Single phase 200-240 V
• Side access to optical adjustments
• 4K resolution for flexibility and future proofing
• Omnidirectional operation
• TruLife electronics
• LCD display to provide information at-a-glance
How the projector works
The Mirage 304K accepts a variety of input signals for projection on front or rear projection screens,
typical in commercial or other large screen applications.
High-brightness light is generated by mercury vapor lamps, then modulated by three Digital
Micromirror Device (DMD) panels responding to incoming data streams of digitized red, green and blue
color information. As these digital streams flow from the source, light from the responding on pixels of
each panel is reflected, converged and then projected to the screen through one or more projection
lenses, where all pixel reflections are superimposed in sharp full-color images.
List of components
Verify all components were received with the projector.
• Power cord for full brightness, six lamp operation
• Power cord for limited power, single lamp operation
• IR remote keypad
Mirage 304K (Bm.1) User Guide 13
020-101778-14 Rev. 1 (03-2021)
Copyright © 2021 Christie Digital Systems USA, Inc. All rights reserved.Introduction
Product documentation
For installation, setup, and user information, see the product documentation available on the Christie
Digital Systems USA Inc. website. Read all instructions before using or servicing this product.
Mirage 304K
1. Access the documentation from the Christie website:
• Go to http://bit.ly/2Fx47O4 or
https://www.christiedigital.com/en-us/business/products/projectors/3-chip-dlp/3d-
projectors
• Scan the QR code using a QR code reader app on a smartphone or tablet.
2. On the product page, select the model and switch to the Downloads tab.
Related documentation
Additional information on the projector is available in the following documents.
• Mirage 304K Installation and Setup Guide (P/N: 020-102013-XX)
• Boxer Product Safety Guide (P/N: 020-101780-XX)
• Boxer 4K Service Guide (P/N: 020-101699-XX)
• Mirage 304K Serial Commands Guide (P/N: 020-101776-XX)
• Mirage 304K Status System Guide (P/N: 020-101783-XX)
Site requirements
To safely install and operate the projector, the installation location must have restricted access for
authorized personnel only and meet these minimum requirements.
Physical operating environment
Provides specifications for the operating environment.
• Ambient temperature (operating) 5 to 40°C (41 to 104°F) up to 457.2 m (1500 ft)
• Humidity (non-condensing) 10 to 80%
• Operating altitude: 3,000 m (10,000 ft) maximum at 5 to 25°C (41 to 77°F) ambient
Mirage 304K (Bm.1) User Guide 14
020-101778-14 Rev. 1 (03-2021)
Copyright © 2021 Christie Digital Systems USA, Inc. All rights reserved.Introduction
Power connection
The projector uses an innovative dual AC inlet power system that offers two power modes.
To operate at full brightness (six lamps), power the projector using AC Input 1 if the appropriate high
power source is available. To operate in limited power mode (single lamp), power the projector using
standard lower power sources using AC Input 2. A different power cord is provided for each power
source. A 30A rated wall breaker is required at the installation when using Input 1. A 15A rated wall
breaker is required at the installation when using Input 2.
Projector components
Identify the main components of the projector.
A B C D E F G H I J
L M N O P Q R
S
T
U
V
K
ID Component Description
A Communication and input Connects media sources to either the ports on the option cards or the
panel IMXB.
B Mounting and rigging holes M12 x 1.75 holes for projector feet installation and offer mounting and
rigging points.
C User interface air filter door Provides to the user interface air filter.
D Display panel Displays the projector menus and status.
E Keypad interface Controls the projector.
Mirage 304K (Bm.1) User Guide 15
020-101778-14 Rev. 1 (03-2021)
Copyright © 2021 Christie Digital Systems USA, Inc. All rights reserved.Introduction
ID Component Description
F Christie TAP Enables Android devices to communicate with the projector using near field
communication.
G Electronics-side filter door Provides access to the electronics-side air filter.
H Front IR Receives transmissions from the IR remote.
I Lamp-side filter door Provides access to the lamp-side air filter.
J Projection lens A variety of lenses can be used with the projector. Available lenses are
listed in accessories.
K Adjustable feet Raise or lower these feet when positioning the projector to make sure it
is level on all sides so the displayed image appears rectangular without
any keystone.
L Service compartment Access to fold mirror, optical zoom/focus, and DMD convergence
adjustments.
M Tool box Provides tools for Christie qualified technicians.
N Rear IR Receives transmissions from the IR remote.
O LED status indicator Indicates lamp and power status.
P Shutter LED status indicator Indicates shutter status.
Q Lamp door Access to lamp compartment.
R AC lock Locks Input 1 power cord.
S AC Input 2: limited power Use this IEC 320-C14 inlet to connect to an appropriately rated power
cord (component R) provided for your region. For use in limited power
mode.
T AC Input 1: full power Use this IEC 309 inlet to connect to an appropriately rated power cord
(component S) provided for your region. For use in full power mode.
U Power cord: limited power Connects the provided power cord appropriately rated for your region to
AC Input 2 for limited power mode.
V Power cord: full power Connects the provided power cord appropriately rated for your region to
AC Input 1 for full power mode.
IR remote keypad
The IR remote keypad controls the projector by way of wireless communications from a battery-
powered infrared (IR) transmitter.
To use the IR remote, direct the keypad toward the projector’s front or rear IR sensor and press a
function key. One of the two IR sensors on the projector detect the signal and relay the commands for
internal processing. The remote also offers a connector for wired connections to the projector.
Mirage 304K (Bm.1) User Guide 16
020-101778-14 Rev. 1 (03-2021)
Copyright © 2021 Christie Digital Systems USA, Inc. All rights reserved.Introduction Button Description A Powers on the projector light source. B Opens the aspect ratio dialog. C Turns off the light source and puts the projector in standby. D Selects an active or inactive input on any slot. E Not supported. Mirage 304K (Bm.1) User Guide 17 020-101778-14 Rev. 1 (03-2021) Copyright © 2021 Christie Digital Systems USA, Inc. All rights reserved.
Introduction

 Button           Description
 F                Enter a number, such as menu, item index or value.

 G                Use the arrows to navigate within a menu or to adjust settings.

 H                Selects a highlighted menu item and changes or accepts a value.

 I                Toggles the menus on/off.

 J                Not supported.

 K                Opens the keystone dialog.

 L                Adjusts the lens focus.

 M                Not supported.

 N                Displays a test pattern.

 O                Not supported.

 P                Optimizes the image automatically.

 Q                Opens or closes the shutter.

 R                Not supported.

 S                Initiates a custom action when a number is selected.

 T                Selects a projector in multi-projector installations.

 U                Returns to the previous menu level or exits menus if at the top level.

 V                Displays context-sensitive help.

 W                Arrows adjust the lens offset.

 X                Adjust the lens zoom.

 Y                Opens the on-screen display position menu.

 Z                Shows or hides the on-screen display menus.

 AA               Turns the remote backlight on.

 AB               Male 3-pin XLR connector for wired option.

 AC               Lock/unlock the keypad.

 AD               Battery door.

Mirage 304K (Bm.1) User Guide                                                                        18
020-101778-14 Rev. 1 (03-2021)
Copyright © 2021 Christie Digital Systems USA, Inc. All rights reserved.
Introduction

Display panel components
Identify the main components of the display panel (also known as the home page).

 ID              Component                                      Description
 A               Status                                         Contains information about the health of the projector including
                                                                the number of warnings and errors.
                                                                Provides access to the status system.

 B               IP Settings                                    Displays the IP address and subnet values.
                                                                Provides access to changing the IP settings.

 C               Test Pattern                                   Displays the currently selected test pattern. If no test pattern is
                                                                selected, Off is displayed.
                                                                Provides access to the list of test patterns.

 D               Input                                          Displays the signal for the currently selected input.
                                                                Provides access to the list of input signals.

 E               Power and Temperature                          Indicates the incoming voltage, measured in Volts, and intake
                                                                temperature, measured in Celsius.

 F               Lamp Hours                                     Displays the state of the lamps and the number of hours used.

 G               Projector and Component                        Indicates the states of the projector and its components.
                 Controls

 H               Projector Information                          Provides information about the projector such as the projector
                                                                name, serial number, software version, and projector ID.

Mirage 304K (Bm.1) User Guide                                                                                                         19
020-101778-14 Rev. 1 (03-2021)
Copyright © 2021 Christie Digital Systems USA, Inc. All rights reserved.
Introduction
Turning on the projector
When the projector AC power supply is plugged in, the power is on.
Warning! If not avoided, the following could result in death or serious injury.
• SHOCK HAZARD! Do not attempt operation if the AC supply is not within the specified voltage
and current, as specified on the license label.
1. Plug the projector into AC power.
When plugged in, the projector automatically powers on to standby mode within 60 seconds.
The display panel functionality becomes available.
2. To turn the light source on using the projector keypad, press and hold the Power button
until you hear a beep.
To turn on the light source using the remote, press and hold the ON button until you hear a
beep.
Projector LED status indicators
Identify the LED state colors and meaning.
LED State Description
Blue Solid Standby Light source is off. Video electronics are off.
Projector status is OK.
Flashing Cool down Projector is moving to one of the two standby
states:
• Light source is off and video electronics are
booting up.
• Light source is off. Video electronics and light
source is cooling down.
Green Solid Light source on Light source is on. Projector status is OK.
Flashing Startup Projector is moving to light source on state. Light
source is warming up. Video electronics are
initializing.
Yellow Solid Warning in Projector is in standby state. A problem exists with
standby the projector that does not prevent it from
operating.
Flashing yellow/green Warning during Projector is in a startup state. A problem exists
startup with the projector that does not prevent it from
operating.
Flashing Warning with Light source is on. A problem exists with the
light source on projector that will not cause it to shut down.
Flashing yellow/blue Warning during Projector is in a cool down state. Light source is off.
cool down Video electronics and light source are cooling
down. A problem exists with the projector that
does not prevent it from operating.
Red Solid Error in Projector is in standby. An error exists that
standby prevents the projector from starting up.
Mirage 304K (Bm.1) User Guide 20
020-101778-14 Rev. 1 (03-2021)
Copyright © 2021 Christie Digital Systems USA, Inc. All rights reserved.Introduction
LED State Description
Flashing Error An error with the projector exists during startup,
cool down, or when the light source is off. Projector
will proceed to shut down.
Off AC off The AC power is off.
Projector LED shutter indicators
Identify the shutter LED state colors and meaning.
LED State Description
Solid magenta Shutter closed The shutter is closed.
In standby, the shutter is always automatically closed and
the magenta light is muted.
Off Shutter open The shutter is open.
Turning off the projector
When powering off in preparation for inspection or maintenance, always disconnect from AC.
1. To turn the light source off using the projector keypad, press and hold the button until you
hear a beep.
To turn off the light source using the remote, press and hold the OFF button until you hear a
beep.
When powering off the projector, allow the projector to complete its cool down cycle. Do not
immediately unplug the projector if this can be avoided.
2. To turn off power to the projector, disconnect from AC power.
Mirage 304K (Bm.1) User Guide 21
020-101778-14 Rev. 1 (03-2021)
Copyright © 2021 Christie Digital Systems USA, Inc. All rights reserved.Adjusting the image
Adjust the projector image. Christie recommends warming the lens before completing these
procedures as focus may change as the lens warms.
Selecting screen image orientation
Specify the orientation to use for the image. The projector supports front projection, rear projection,
front projection inverted, or rear projection inverted.
1. Select MENU > Image Settings > Image Orientation.
2. Select the required orientation from the list.
3. To confirm your selection, press Enter.
Setting the image resize preset
Set the image resize preset to determine if an image will display in its native resolution or will resize
by maximizing the height, width, both height and width, or to the maximum size while keeping the
original aspect ratio.
1. Select MENU > Image Settings > Size & Position > Resize Presets.
2. Select the appropriate resize preset:
• Auto—Maximize for current source.
• No Resizing—Display in native resolution.
• Full Size—Fill the screen, regardless of source.
• Full Width—Fill display width and keep aspect ratio.
• Full Height—Fill display height and keep aspect ratio.
3. Select Enter.
Adjusting lens settings
Adjust various lens settings including the offset, zoom, focus, and locking the lens motor.
Adjusting offset
Adjust the offset to align the image on the screen. Always adjust offset before adjusting boresight.
For the best optical performance and minimal keystone, use offsets instead of aiming at the center of
the image, in off-axis installations. Avoid extreme tilts or offsets. Corner vignettes on a white test
pattern indicate extreme offset that should be avoided using mechanical alignment.
1. Project an image with the primary lens.
Mirage 304K (Bm.1) User Guide 22
020-101778-14 Rev. 1 (03-2021)
Copyright © 2021 Christie Digital Systems USA, Inc. All rights reserved.Adjusting the image
2. Select a framing test pattern.
3. Select LENS OFFSET.
You can also select MENU > Configuration > Lens Settings > Lens Offset.
4. Use the arrows to adjust the offset to display a square image on the screen, with minimal
projector aiming error.
5. To exit to the home page, select Back.
Resetting the lens to home position
Set the lens offset back to the home position.
1. Select LENS OFFSET.
You can also select MENU > Configuration > Lens Settings > Lens Offset.
2. To reset the lens to the default home position, select Reset.
3. To confirm the reset, select Reset Lens Position.
Aligning the image with lens zoom and focus
Ensure that the image reflected from the digital micromirror device (DMD) is parallel and centered
with the lens and screen.
1. Display an image or test pattern that can be used to analyze image focus and geometry.
2. Select Lens Zoom.
You can also select the zoom function from MENU > Configuration > Lens Settings >
Zoom.
3. Use the up and down arrows to zoom in or out of the image.
4. To exit, select Back.
5. Select FOCUS.
You can also select the focus function from MENU > Configuration > Lens Settings >
Focus.
6. Use the up and down arrows to adjust the focus of the image.
7. To exit on the display panel, select Back.
8. To refine your adjusts, repeat steps 2 to 7.
Locking the lens motor
Prevents all lens motors from moving. It disables the zoom, focus, and offset settings, locking out any
changes and overriding all other lens features. This feature prevents accidental lens position changes
in multi-projector installations.
1. Select MENU > Configuration > Lens Settings > Lock all Lens Motors.
2. To enable locking of all lens motors, select Enter.
Calibrating the zoom motor
Calibrate the zoom motor to ensure all zoom controls for the lens are enabled.
1. Select MENU > Configuration > Lens Settings > Zoom Lens Calibration.
Mirage 304K (Bm.1) User Guide 23
020-101778-14 Rev. 1 (03-2021)
Copyright © 2021 Christie Digital Systems USA, Inc. All rights reserved.Adjusting the image
Issuing the (LCB+ZOOM 1) serial command also manually calibrates the lens.
2. To start the calibration, select Calibrate Zoom Lens.
3. At the confirmation prompt, select Calibrate Zoom Lens.
The Zoom menu item is greyed out until the calibration is complete, which can take up to a
minute.
Determining what lens warnings are displayed
Controls the level of lens warnings displayed.
1. Select MENU > Configuration > Lens Settings > Lens Warnings.
2. Select the appropriate lens warning level:
• Show All Warnings—Shows all lens warnings.
• Hide Zoom Motor Warnings—Hides zoom motor warnings. Christie recommends
selecting this option when using a fixed lens as all zoom operations are disabled.
• Hide Detection Warnings—Hides lens detection warnings. Christie recommends
selecting this option when using a third-party lens.
3. Select Enter.
Mirage 304K (Bm.1) User Guide 24
020-101778-14 Rev. 1 (03-2021)
Copyright © 2021 Christie Digital Systems USA, Inc. All rights reserved.Adjusting the image Lens control limitations The projector has keep-out areas for the lens position, illustrated below. When adjusting the lens offset, these regions are unavailable to prevent interference and potentially damage of internal components. Mirage 304K (Bm.1) User Guide 25 020-101778-14 Rev. 1 (03-2021) Copyright © 2021 Christie Digital Systems USA, Inc. All rights reserved.
Adjusting the image

Ultra short throw lens control limitations
The projector has keep-out areas for the ultra short throw lens position, illustrated below. When
adjusting the lens offset, these regions are unavailable to prevent interference and potentially damage
of internal components.

Enabling the ultra short throw lens keep-out area
Not switching to the ultra short throw lens keep-out area risks damaging the projector when an ultra
short throw lens is installed.
     1.    Select MENU > Configuration > Lens Settings.
     2.    Select Enable UST Lens 0.38:1.
     3.    To enable the ultra short throw lens keep-out area, select Enter.
           The reduced keep-out area is implemented and the lens offset is set to zero.
     4.    To use a non-ultra short throw lens, clear the checkbox to disable this option.

Mirage 304K (Bm.1) User Guide                                                                          26
020-101778-14 Rev. 1 (03-2021)
Copyright © 2021 Christie Digital Systems USA, Inc. All rights reserved.
Adjusting the image
Adjusting primary colors
Calibrate the accuracy of primary colors, which can change because of lighting and environmental
factors.
All primary colors in the projector are precisely set to pre-established values to ensure overall color
performance is optimized and is as accurate as possible. Lighting and other environmental factors may
slightly change how these colors appear on your screen. While the change is negligible in most cases,
you may prefer to recover the originally intended color performance before trying to match colors from
several projectors.
To achieve consistency use a color meter to measure the native primary colors—red, green, blue, and
white—as they appear on the screen. On the basis of these new values, which are stored in memory,
each projector automatically calculates any necessary corrections to reproduce the original factory
colors under the current environmental conditions. This essentially calibrates a projector to its
surroundings, compensating for factors such as screen type, light source and/or ambient lighting, and
improves color accuracy and consistency in a group of projectors. It ensures a good starting point for
further customizing and matching; however, is not critical for all installations.
1. From the display panel, select MENU > Configuration.
2. Select Color Primary Settings.
3. To edit the primary colors settings, select Edit.
4. Adjust the slider or enter the measured color values of the primary color component you
selected.
5. To confirm your selection, select Enter.
6. Repeat steps 4 and 5 for each primary color component.
7. To view a specific color while adjusting, select Show Color Pattern.
8. Select the appropriate color and select Enter.
9. To reset the primary colors to their defaults, select Reset Color Primaries.
10. At the confirmation prompt, select Reset.
DMD color correction
Adjust the DMD color values as required.
Adjusting color by precise chromaticity values
Change the values of the primary color components.
1. Select MENU > Configuration > Color Correction by x,y.
2. To edit the custom color correction settings, select Edit.
3. Adjust the slider or enter the measured color values of the primary color component you
selected.
4. To confirm your selection, select Enter.
5. Repeat steps 3 and 4 for each primary color component.
6. To view a specific color while adjusting, select Show Color Pattern.
7. Select the appropriate color and select Enter.
Mirage 304K (Bm.1) User Guide 27
020-101778-14 Rev. 1 (03-2021)
Copyright © 2021 Christie Digital Systems USA, Inc. All rights reserved.Adjusting the image
Adjusting color by saturation
Change the strength of the primary color in relation to the other primary colors.
1. Select MENU > Configuration > Color Saturation.
2. To edit the custom color correction settings, select Edit.
3. Adjust the value of the primary color you selected by using more or less of it in relation to the
other primary colors.
4. To confirm your selection, select Enter.
5. Repeat steps 3 and 4 for each primary color.
6. To view a specific color while adjusting, select Show Color Pattern.
7. Select the appropriate color and select Enter.
Signal color correction
Adjust the video signal color as required.
For best results, Christie recommends setting all color and gamma settings to Auto Detect.
Adjusting the color space
Determine how the color components are decoded for accurate color in the display.
1. Select MENU > Image Settings > Color & Gamma > Color Space.
2. Select the adjustment most suited to the input signal:
• Auto Detect
• RGB (Full Range)
• RGB (Limited Range)
• YCbCr HDTV (Expanded Range)
• YCbCr JPEG (Full Range)
• YCbCr UHDTV (ITU-R BT.2020) (Full Range)
3. Select Enter.
Adjusting color by temperature
Adjust the color temperature as expressed in degrees Kelvin.
1. Select MENU > Image Settings > Color & Gamma.
2. Select Color Temperature.
3. Adjust the slider to change the light to warmer or cooler and select Enter.
Mirage 304K (Bm.1) User Guide 28
020-101778-14 Rev. 1 (03-2021)
Copyright © 2021 Christie Digital Systems USA, Inc. All rights reserved.Adjusting the image
Adjusting color values based on gamma function
The gamma function options adjust the color values of the inputted signal to give you a more detailed
picture.
1. Select MENU > Image Settings > Color & Gamma > Gamma Function.
2. Select the appropriate option:
• Auto Detect
• sRGB
• ITU-R BT-1886
• Power Law Function
• Classic
3. Select Enter.
Selecting the color correction mode
Select the color correction mode most suited to the input signal.
1. Select MENU > Image Settings > Color & Gamma > Color Correction Mode.
2. Select the adjustment most suited to the input signal:
• Auto Detect—Automatically detect the appropriate color correction mode, where possible.
• Max Drives—All color adjustments are turned off, allowing the projector to run at
maximum brightness.
• Color Temperature—Specify a color temperature between 3200 and 9300, expressed in
degrees Kelvin.
• HD Video—Set the output color to a specific standard value. Adjusts the colors red,
green, blue, and white.
• DCI P3—Set the DCI P3 (cinema) colorimetry with DCI white point.
• DCI P3 (D65)—Set the DCI P3 colorimetry with D65 white point.
• Custom—Select a user defined set of color adjustments.
3. Select Enter.
Correcting for ambient light
Ambient light is the natural light that occurs in the environment where the projector is located.
1. Select MENU > Image Settings > Color & Gamma > Ambient Light Correction.
2. Select Enter.
3. Use the right and left arrows to adjust how the image displays in conditions with ambient light.
4. To confirm your selection, select Enter.
Mirage 304K (Bm.1) User Guide 29
020-101778-14 Rev. 1 (03-2021)
Copyright © 2021 Christie Digital Systems USA, Inc. All rights reserved.Adjusting the image
Setting the frame delay
Delay the output signal timing relative to the input signal timing by a fraction of a frame, and up to
several frames.
The minimum latency can vary based on the amount of scaling applied to the image. When using
keystone or warping, an additional latency is required, depending on the amount of warp.
1. Select MENU > Image Settings > Advanced Image Settings > Frame Delay.
You can also set the frame delay from the 3D Settings menu.
2. To set the total video frame delay, select Set Delay.
3. Adjust the value and to confirm your selection, select Enter.
The Actual Delay field reports what the system has delivered for the frame delay. The value is reported
in frames and milliseconds.
Enabling film mode detect
Enables or disables the detection of film motion.
1. Select MENU > Image Settings > Advanced Image Settings > Film Mode Detect.
2. To enable the detection of film motion, select Auto Detect.
3. To disable the detection of film motion, select Disabled.
4. Select Enter.
Adjusting the image sharpness
Change the sharpness of the image.
Lower settings can improve a noisy signal. Setting the sharpness above the halfway point can
introduce noise in the image.
1. Select MENU > Image Settings > Advanced Image Settings > Sharpness.
2. Select Enter.
3. Use the right and left arrows to adjust the sharpness of the image.
4. To confirm your selection, select Enter.
Creating a seamless image with edge blending
Combine several projected images into one single, seamless image with edge blending.
Adding edge blends to the projector
Use or to create edge blends and upload them to Mirage 304K.
1. Create an edge blend file using the or application.
To connect Mirage 304K with or , use port 3003.
Mirage 304K (Bm.1) User Guide 30
020-101778-14 Rev. 1 (03-2021)
Copyright © 2021 Christie Digital Systems USA, Inc. All rights reserved.Adjusting the image
Christie Twist Premium, Twist Pro, and offer advanced warping options. Refer to the Christie
website (www.christiedigital.com) for product information and documentation.
2. Upload the edge blend file to the projector.
3. On one projector, select MENU > Configuration > Edge Blending.
4. Select the appropriate edge blend setting and select Enter.
5. Repeat steps 2 to 4 for the remaining projectors.
6. To turn off edge blending, from MENU > Configuration > Edge Blending, select Off.
Enabling basic edge blending
Create basic edge blends directly on Mirage 304K.
1. Start with two projectors and display the full white field test pattern from both.
2. On one projector, select MENU > Configuration > Edge Blending.
3. To enable basic edge blending, select Basic.
4. To edit blending adjustments, select Edge Blend Widths.
5. From the Basic Blending dialog, select a side to blend.
6. To make the blending adjustments, use the arrow keys to change either the vertical and
horizontal values as appropriate.
7. To accept the selection, select Enter.
8. Repeat steps 4 to 6 to blend the remaining sides.
9. When all adjustments are made, use the arrow keys to highlight Apply and select Enter.
10. Repeat steps 2 to 9 for the remaining projectors.
11. To turn off basic edge blending, from MENU > Configuration > Edge Blending, select Off.
Resetting edge blending
Reset the edge blending to revert any edge blends.
1. Select MENU > Configuration > Edge Blending.
2. Select Reset Edge Blends.
3. At the confirmation prompt, select Reset.
Geometry correction
Modify the geometry for all sources.
Enabling warping
Use warping to project images on any surface shape.
1. Create a warp file using the or application.
To connect Mirage 304K with or , use port 3003.
Christie Twist Premium, Twist Pro, and offer advanced warping options. Refer to the Christie
website (www.christiedigital.com) for product information and documentation.
Mirage 304K (Bm.1) User Guide 31
020-101778-14 Rev. 1 (03-2021)
Copyright © 2021 Christie Digital Systems USA, Inc. All rights reserved.Adjusting the image
2. Upload the warp file to the projector.
3. Select MENU > Configuration > Geometry Correction > Geometry Correction Mode.
4. Select the appropriate warp setting and select Enter.
5. To turn off warping, from MENU > Configuration > Geometry Correction > Geometry
Correction Mode, select Off.
Pressing Func+Help on the IR remote keypad disables all geometry corrections (warping,
keystone, and black level blending) without changing the settings associated with them.
Correcting the shape of a keystoned image
Keystone effect occurs when you project an image onto the screen at an angle and the projector is not
centered on the screen. The image appears distorted and resembles a trapezoid.
To correct the shape of a keystoned image, use the keystone options available in the geometry
correction menu. Perform coarse keystone adjustments by using the horizontal or vertical settings. It
may not be possible to match the screen dimensions with the horizontal and vertical keystone controls
but you can refine these settings by adjusting the 2D keystone settings.
Enabling keystone adjustments
Enable keystone corrections to correct the shape of a keystoned image.
1. Select MENU > Configuration > Geometry Correction > Geometry Correction Mode.
2. Select Keystone.
Any keystone adjustments previously set are enabled.
To disable keystone adjustments, select MENU > Configuration > Geometry Correction >
Geometry Correction Mode > Off.
Adjusting the image with 2D keystone
2D keystone distorts the projected image both vertically and horizontally simultaneously and
resembles a trapezoid.
Adjusting horizontal or vertical keystone correction after 2D keystone erases the 2D keystone settings;
however, performing 2D keystone after horizontal or vertical correction retains the previous keystone
setting.
1. Select MENU > Configuration > Geometry Correction > Geometry correction Mode.
2. Select 2D Keystone Correction.
3. From the correction dialog, select the corner to adjust.
4. To make the keystone adjustments, use the arrow keys to change both the vertical and
horizontal values.
5. Select Apply Changes.
Mirage 304K (Bm.1) User Guide 32
020-101778-14 Rev. 1 (03-2021)
Copyright © 2021 Christie Digital Systems USA, Inc. All rights reserved.You can also read