Oracle Fusion Middleware - Administering Oracle Enterprise Data Quality - 12c (12.2.1.4.0)
←
→
Page content transcription
If your browser does not render page correctly, please read the page content below
Oracle® Fusion Middleware
Administering Oracle Enterprise Data Quality

    12c (12.2.1.4.0)
    E95654-03
    March 2021
Oracle Fusion Middleware Administering Oracle Enterprise Data Quality, 12c (12.2.1.4.0)

E95654-03

Copyright © 2018, 2021, Oracle and/or its affiliates.

This software and related documentation are provided under a license agreement containing restrictions on
use and disclosure and are protected by intellectual property laws. Except as expressly permitted in your
license agreement or allowed by law, you may not use, copy, reproduce, translate, broadcast, modify, license,
transmit, distribute, exhibit, perform, publish, or display any part, in any form, or by any means. Reverse
engineering, disassembly, or decompilation of this software, unless required by law for interoperability, is
prohibited.

The information contained herein is subject to change without notice and is not warranted to be error-free. If
you find any errors, please report them to us in writing.

If this is software or related documentation that is delivered to the U.S. Government or anyone licensing it on
behalf of the U.S. Government, then the following notice is applicable:

U.S. GOVERNMENT END USERS: Oracle programs (including any operating system, integrated software,
any programs embedded, installed or activated on delivered hardware, and modifications of such programs)
and Oracle computer documentation or other Oracle data delivered to or accessed by U.S. Government
end users are "commercial computer software" or "commercial computer software documentation" pursuant
to the applicable Federal Acquisition Regulation and agency-specific supplemental regulations. As such,
the use, reproduction, duplication, release, display, disclosure, modification, preparation of derivative works,
and/or adaptation of i) Oracle programs (including any operating system, integrated software, any programs
embedded, installed or activated on delivered hardware, and modifications of such programs), ii) Oracle
computer documentation and/or iii) other Oracle data, is subject to the rights and limitations specified in the
license contained in the applicable contract. The terms governing the U.S. Government’s use of Oracle cloud
services are defined by the applicable contract for such services. No other rights are granted to the U.S.
Government.

This software or hardware is developed for general use in a variety of information management applications.
It is not developed or intended for use in any inherently dangerous applications, including applications that
may create a risk of personal injury. If you use this software or hardware in dangerous applications, then you
shall be responsible to take all appropriate fail-safe, backup, redundancy, and other measures to ensure its
safe use. Oracle Corporation and its affiliates disclaim any liability for any damages caused by use of this
software or hardware in dangerous applications.

Oracle and Java are registered trademarks of Oracle and/or its affiliates. Other names may be trademarks of
their respective owners.

Intel and Intel Inside are trademarks or registered trademarks of Intel Corporation. All SPARC trademarks are
used under license and are trademarks or registered trademarks of SPARC International, Inc. AMD, Epyc,
and the AMD logo are trademarks or registered trademarks of Advanced Micro Devices. UNIX is a registered
trademark of The Open Group.

This software or hardware and documentation may provide access to or information about content, products,
and services from third parties. Oracle Corporation and its affiliates are not responsible for and expressly
disclaim all warranties of any kind with respect to third-party content, products, and services unless otherwise
set forth in an applicable agreement between you and Oracle. Oracle Corporation and its affiliates will not
be responsible for any loss, costs, or damages incurred due to your access to or use of third-party content,
products, or services, except as set forth in an applicable agreement between you and Oracle.

Contents
    Preface
    Audience                                                                 vii
    Documentation Accessibility                                              vii
    Related Documents                                                        vii
    Conventions                                                             viii

1   Using Autorun to Execute Startup Tasks
    1.1     Understanding Autorun                                           1-1
    1.2     Using the Autorun Chores                                        1-1
    1.3     Using the Autorun Scripts                                       1-2
          1.3.1   Examples                                                  1-2
    1.4     Understanding the Chore and Rules Schemas                       1-4
          1.4.1   Understanding the Chores Schema                           1-4
          1.4.2   Understanding the Rules Schema                            1-9

2   Configuring EDQ Email Notifications
    2.1     Using SMTP to Send Email Notifications                          2-1
    2.2     Configuring Email Sessions in WebLogic Administration Console   2-1
    2.3     Ensuring that Email is Configured                               2-2

3   Configuring EDQ Case Management
    3.1     Understanding and Adding Extended Attributes                    3-1
          3.1.1   Default Extended Attributes                               3-1
          3.1.2   Adding New Extended Attributes                            3-2
    3.2     Configuring Data Entry Validation                               3-2
          3.2.1   Checking Predefined List Restrictions                     3-3
          3.2.2   Checking Regular Expression Restriction                   3-4
    3.3     Understanding Case Management Configuration Properties          3-5

                                                                             iii
4   Tuning EDQ Performance
    4.1     Understanding the Properties File                                               4-1
    4.2     Tuning for Batch Processing                                                     4-2
    4.3     Tuning for Real-Time Processing                                                 4-2
          4.3.1    Tuning Batch Processing On Real-Time Systems                             4-2
          4.3.2    Tuning Real-Time Thread Numbers                                          4-3
          4.3.3    Tuning I/O Heavy Real-Time Processes                                     4-3
          4.3.4    Example of Tuning Real-Time Processes                                    4-3
    4.4     Tuning JVM Parameters                                                           4-4
          4.4.1    Setting the Maximum Heap Memory                                          4-4
    4.5     Tuning Database Parameters                                                      4-4
    4.6     Adjusting the Client Heap Size                                                  4-4
    4.7     Designing Fast Jobs: General Performance Options                                4-5
          4.7.1    Streaming Data and Disabling Staging                                     4-6
          4.7.2    Minimized Results Writing                                                4-9
          4.7.3    Disabling Sorting and Filtering                                         4-10
          4.7.4    Resource-Intensive Processors                                           4-12
    4.8     Performance Tuning for Parsing and Matching                                    4-13
          4.8.1    Place Parse and Match processors in their own Processes                 4-13
          4.8.2    Parsing performance options                                             4-13
          4.8.3    Matching performance options                                            4-14
              4.8.3.1    Optimized Clustering                                              4-14
              4.8.3.2    Disabling Sort/Filter options in Match processors                 4-15
              4.8.3.3    Minimizing Output                                                 4-16
              4.8.3.4    Streaming Inputs                                                  4-17
    4.9     Performance Tuning for Address Verification                                    4-17
    4.10     What Makes Processes Slow? Common Pitfalls                                    4-18
          4.10.1    Poor Matching Processor Configuration                                  4-18
          4.10.2    Unnecessary Merge Data Streams Processors                              4-18
          4.10.3    Doing Too Much in a Single Process                                     4-18
          4.10.4    Using the Script Processor when You Could Use a Core Processor         4-18
          4.10.5    Using Matching Processors Unnecessarily                                4-19
    4.11     Tuning EDQ's Platform                                                         4-19
          4.11.1    The Application Server and the Database Repository                     4-19
              4.11.1.1    Relative Importance of the Application Server and the Database
                          Repository                                                       4-19
              4.11.1.2    Database Tuning                                                  4-20
          4.11.2    Processor Cores and Process Threads                                    4-20
              4.11.2.1    Process Threads                                                  4-21

                                                                                             iv
5    Using JMX Extensions to Monitor EDQ
     5.1     Understanding JMX Binding                                         5-1
     5.2     Understanding JMX Bean Naming                                     5-2
           5.2.1   Reviewing the Example                                       5-2
     5.3     Monitoring Real-Time Processes                                    5-3
           5.3.1   Monitoring the Real-Time Web Service MBeans                 5-3
           5.3.2   Monitoring the Real-Time MBeans                             5-3

6    Using Triggers
     6.1     Overview of the Triggers Functionality                            6-1
           6.1.1   About Predefined Triggers                                   6-1
           6.1.2   About Custom Triggers                                       6-1
     6.2     Required Skills to Use Triggers                                   6-2
     6.3     Storing Triggers                                                  6-2
     6.4     Configuring Triggers Using the Script Trigger API                 6-2
     6.5     Extending the Configuration of Triggers Using Properties Files    6-3
     6.6     Understanding EDQ Trigger Points                                  6-4
     6.7     Understanding TriggerInfo Methods                                 6-9
     6.8     Setting Trigger Levels                                           6-10
     6.9     Using JMS in Triggers                                            6-10
     6.10     Exposing Triggers in a Job Configuration                        6-11
     6.11     Trigger Examples                                                6-12

7    Accessing EDQ Files Remotely
     7.1     Using FTP and SFTP Server to Access EDQ Files                     7-1

8    Defining Housekeeping Rules
     8.1     For the Event Log Table                                           8-1
     8.2     For the Task Status Table                                         8-2

9    Third-Party License Attributions

10   Limits in EDQ

                                                                                v
11   Backing Up and Restoring EDQ Server

                                           vi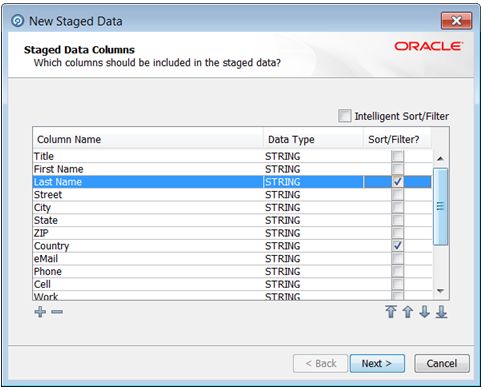
Preface
           This document describes how to administer and configure Oracle Enterprise Data
           Quality. You can perform a variety of administration tasks to extend the default EDQ
           configuration.

Audience
           This document is intended for system administrators or application developers who
           are installing the Oracle Enterprise Data Quality. It is assumed that you have a basic
           understanding of core EDQ concepts, application server and web technology and have
           a general understanding of Linux, UNIX, and Windows platforms.

Documentation Accessibility
           For information about Oracle's commitment to accessibility, visit the Oracle
           Accessibility Program website at http://www.oracle.com/pls/topic/lookup?
           ctx=acc&id=docacc.

           Access to Oracle Support
           Oracle customers that have purchased support have access to electronic support
           through My Oracle Support. For information, visit http://www.oracle.com/pls/
           topic/lookup?ctx=acc&id=info or visit http://www.oracle.com/pls/topic/lookup?
           ctx=acc&id=trs if you are hearing impaired.

Related Documents
           For more information about EDQ, see the Oracle Enterprise Data Quality
           documentation set.

           EDQ Documentation Library
           Find the latest version of the EDQ guides and all of the Oracle product documentation
           at
           https://docs.oracle.com

           Online Help
           Online help is provided for all EDQ user applications. It is accessed in each application
           by pressing the F1 key or by clicking the Help icons. The main nodes in the Director
           project browser have integrated links to help pages. To access them, either select a
           node and then press F1, or right-click on an object in the Project Browser and then
           select Help. The EDQ processors in the Director Tool Palette have integrated help
           topics, as well. To access them, right-click on a processor on the canvas and then

                                                                                                  vii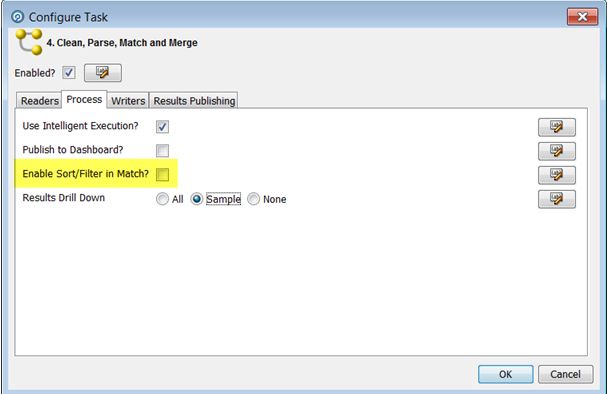
Preface

        select Processor Help, or left-click on a processor on the canvas or tool palette and
        then press F1.

Conventions
        The following text conventions are used in this document:

         Convention          Meaning
         boldface            Boldface type indicates graphical user interface elements associated
                             with an action, or terms defined in text or the glossary.
         italic              Italic type indicates book titles, emphasis, or placeholder variables for
                             which you supply particular values.
         monospace           Monospace type indicates commands within a paragraph, URLs, code
                             in examples, text that appears on the screen, or text that you enter.

                                                                                                     viii
1
Using Autorun to Execute Startup Tasks
This chapter provides an introduction to the EDQ autorun functionality, which allows
EDQ to load projects and run jobs when the application server starts up. It explains
how the autorun functionality is configured, introduces the chore types that can be
performed by using the autorun facility and provides examples of autorun scripts.
This chapter includes the following sections:
• Understanding Autorun
• Using the Autorun Chores
• Using the Autorun Scripts
• Understanding the Chore and Rules Schemas
1.1 Understanding Autorun
EDQ can be configured to do the following automatically at startup:
• Perform a range of tasks when the application server starts up. Each task, which is
composed of chores, can be configured to be performed every time the application
server is started, or just once the next time the application server is started.
• Load and apply purge rules that override the purge settings that are stored in the
EDQ server.
To use autorun processing, you place autorun scripts, written in XML, that specify
tasks in one of two specific directories in the EDQ installation:
• startup directory: Scripts in the startup directory are processed every time the
EDQ application server starts up.
• onceonly directory: Scripts in the onceonly directory are processed when the
EDQ application server next starts up, and are then moved to the complete
subdirectory within onceonly. Scripts in the complete directory are not processed
on subsequent start ups.
When the application server starts up, EDQ checks the onceonly and startup
directories for autorun scripts and processes any that are present.
The startup and onceonly directories are located in the EDQ autorun directory in the
local configuration directory of the application server, oedq.local.home.
1.2 Using the Autorun Chores
Various kinds of autorun chores are available in EDQ, each with a set of XML
attributes specific to its function. The chore types and their available attributes are
defined by the autorun file XML schema, see Understanding the Chore and Rules
Schemas. The chores available are listed in the following table:
1-1Chapter 1
Using the Autorun Scripts
Chore Type What the Chore Does
httpget Downloads files from a web server.
package Loads a project from a .dxi file into the server, or saves a project on the
server into a .dxi file. If no nodes are specified then the contents of the whole
file, including system level components, are loaded into the server.
load Loads a file, for example a purge rules configuration file. This chore
is valid only in the startup directory. See Example 3, #unique_19/
unique_19_Connect_42_BABCGHFA for how to use the load chore with the
Rules schema to load purge rules.
runjob Runs an existing job from Director. Any run labels in a run profile specified in
this chore are ignored. (Use runopsjob to run a job based on a run label.)
runopsjob Runs an existing job from the EDQ Server Console and requires a run label to
be set, either in the run profile or with the runlabel attribute.
dbscript Runs a database script against the Director database. This kind of chore must
only be used with extreme care, as inappropriately applied scripts may corrupt
the underlying database.
sleep Waits for a specified interval before proceeding.
1.3 Using the Autorun Scripts
Autorun scripts are files that contain XML code. The main part of an autorun script
consists of a list of chores, each bounded by tags. Each chore is of one
of the autorun chore types listed in Using the Autorun Chores and includes a set of
attributes that specify the chore to be performed. The attributes available depend on
the chore type selected.
The XML schema that is used to structure autorun scripts is shown in full in
Understanding the Chore and Rules Schemas.
1.3.1 Examples
This section shows some examples of autorun scripts.
Example 1
The following XML code shows a sample autorun script that instructs EDQ to:
• Download the 23People.dxi file, overwriting any existing file with the same name.
• Import the 23People project from the 23People.dxi file, overwriting any existing
project with the same name.
• Run the 23People Excel.23People job with the rp1 run profile. Any run label
specified in the profile will be ignored, because this is not a runopsjob chore.
http://svn/repos/dev/trunk/benchmark/ benchmark/dxis/23People.dxi
1-2Chapter 1
Using the Autorun Scripts
Example 2
The following XML code shows a sample autorun script that shows four different ways
to use a runjob or runopsjob chore to run a job.
Example 3
The following XML code shows how to use a load chore to load purge rules.
The following are the purge rules in the purgerules.xml file that is loaded in the chore
specification:
-
-
aa
12345
-
aa
ABCD
-
1-3Chapter 1
Understanding the Chore and Rules Schemas
-
-
-
-
1.4 Understanding the Chore and Rules Schemas
This section shows the Chores and Rules XML schemas.
1.4.1 Understanding the Chores Schema
This schema explains the chores listed in Using the Autorun Chores.
1-4Chapter 1
Understanding the Chore and Rules SchemasChapter 1
Understanding the Chore and Rules Schemas
Directory that the dxi is in.
- relative path is relative to the config dir
- absolute path is used as is
- no path indicates the config dir
-->
1-6Chapter 1
Understanding the Chore and Rules Schemas
1-7Chapter 1
Understanding the Chore and Rules Schemas
1-8Chapter 1
Understanding the Chore and Rules Schemas
1.4.2 Understanding the Rules Schema
This section describes the Rules schema, which provides the basis for structuring an
XML script that specifies EDQ server purge rules. Use the load chore to load the script
at EDQ startup.
1-9Chapter 1
Understanding the Chore and Rules Schemas
1-102
Configuring EDQ Email Notifications
This chapter describes how to configure to produce email notifications in a number of
situations.
• Using SMTP to Send Email Notifications
• Configuring Email Sessions in WebLogic Administration Console
• Ensuring that Email is Configured
Emails can be sent to EDQ users when relevant issues are created or changed, when
relevant cases or alerts in Case Management are added or modified, or when relevant
jobs are finished running.
2.1 Using SMTP to Send Email Notifications
To send email notifications, the Simple Mail Transfer Protocol (SMTP) information
for your EDQ installation must be entered in the mail.properties file. Email
authentication from EDQ works with an SMTP server requiring authentication is now
supported via WebLogic credentials store. Set the SMTP user name and password as
the session user name and password to the property list. This mail.properties file is
stored in /oedq_home/notification/smtp.
1. Copy the mail.properties file from its installed location of edq_home/
notification/smtp to the notification/smtp sub-directory of the local
configuration directory (oedq_local_home by default).
/oedq_local_home/notification/smtp
This file is in the standard Java mail.properties file format, as documented at
the JavaMail API documentation website found at https://javamail.java.net/
nonav/docs/api/.
2. Edit the mail.properties file as follows, supplying the name of your SMTP host at
the site.
enabled = true
mail.transport.protocol = smtp
mail.host = smtp.fully qualified domain name of mail host
auth.username = username
auth.password = password
from.address = edqserver@example.com
2.2 Configuring Email Sessions in WebLogic Administration
Console
You can also send email notifications by creating the configuration for
an email session in the WebLogic console. You can then refer to
this by the JNDI name in the mail.properties file. To configure a JNDI-
2-1Chapter 2
Ensuring that Email is Configured
accessible session, see http://docs.oracle.com/middleware/1221/wls/WLACH/taskhelp/
mail/CreateMailSessions.html.
session = JNDI name of session
from.address = edqserver@example.com
enabled = true
Note:
For email notifications to work correctly, you must ensure that the
from.address property is set to a valid email format for your site. You must
also ensure that each of your users who will be receiving email notifications
has an email address configured in their profile.
2.3 Ensuring that Email is Configured
To check that email notifications are working correctly, create a test issue in Director
and assign it to a user with a configured email address. The user should receive an
email with a link to the issue.
2-23
Configuring EDQ Case Management
This chapter describes how to configure to use Case Management.
This chapter includes the following sections:
• Understanding and Adding Extended Attributes
• Configuring Data Entry Validation
• Understanding Case Management Configuration Properties
Case Management supports the manual investigation of results from data quality
processes. Using Case Management, privileged users can manage and review
matching results using highly configurable workflows.
The complete set of Case Management extended attributes that are used on an server
are configured in the flags.xml file in the oedq_local_home/casemanagement directory.
This file must be modified to add new extended attributes, and to define rules for how
these attributes are populated.
An additional property file named flags.properties accompanies the base flags.xml
file and specifies the labels for the extended attributes as they will appear in the
graphical user interface (GUI). The settings in this file may be overridden for a
specific client language by the creation of additional property files with an ISO 639-1
language code, such as flags_en.properties (for English) or flags_de.properties
(for German). This language code is described at the ISO website found at http://
www.iso.org/iso/home/standards/language_codes.htm.
If Oracle Watchlist Screening is installed, these files may already exist.
To ensure that Case Management publication works correctly, the flags.xml file
is overwritten whenever a Case Source is imported using the Case Management
Administration application. This is because Case Sources have a dependency on the
format of the flags.xml file and requires the flags to be indexed and specified in the
same way as on the server where the Case Source was defined. Oracle recommends
that you back up the file before importing a Case Source in case there are any existing
extended attributes in the flags.xml file on the server that need to be re-added once
the import is complete.
3.1 Understanding and Adding Extended Attributes
This section describes the different types of extended attributes and how to add them
for use in Case Management.
3.1.1 Default Extended Attributes
In an initial installation, the flags.xml file contains the following two extended attribute
(flag) example definitions:
3-1Chapter 3
Configuring Data Entry Validation
Note:
The order in which these properties appear in each line may not match
this example. The order of properties is immaterial. Also, if Oracle Watchlist
Screening is installed, the contents of the flags.xml file is different.
3.1.2 Adding New Extended Attributes
To add a new extended attribute, add a line immediately after the existing attribute
definitions in the flags.xml file, following the same syntax as the existing lines and
using the following notes for each property:
Property Allowed Values Notes
index Integer Must be unique for each entry in the file
label Any The% character is used to indicate that the label for the
UI should be retrieved from the flags.properties file
for the client locale. If the% character is not used, the
label will always be exactly as stated (in all languages).
type number, boolean, or Controls the data type of the column.
string
readonly true or false Controls whether or not privileged users can edit the
value of the extended attribute when editing a Case or
Alert
notnull true or false Controls whether or not Null values are allowed in the
extended attribute. If this is undefined, Null values are
allowed (the same as the 'false' setting).
default Any permissible Sets the default value of the extended attribute if not set
value to a specific value.
There is a character limit of 80 characters for extended attributes with a type of 'string'.
Values longer than this cannot be inserted as values.
3.2 Configuring Data Entry Validation
You can restrict the format of user-specified data for an extended attribute. The
restriction is checked when users edit extended attributes in the Case Management
GUI, and when defining possible values to set for an extended attribute in the
Workflow editor in Case Management Administration.
The restriction is not checked when cases and alerts are written to Case Management
from a process, so it is possible to write invalid values into an extended attribute. The
invalid values will appear in error, with an appropriate error message. This designed
behavior protects the system against unnecessary job failure.
Restrictions are defined as part of the flags.xml file. There are two types of possible
restrictions:
3-2Chapter 3
Configuring Data Entry Validation
• Predefined list means that the data to be written is checked against a predefined
list of allowed values.
• Regular expression means that the data to be written is checked against a
regular expression.
3.2.1 Checking Predefined List Restrictions
To check that the data being entered into the extended attribute matches a predefined
list of possible values, add XML elements in the following format after the definition of
the extended attribute (flag):
first value
second value
third value
For example, the following XML fragment defines a custom 'Status' extended attribute
that allows only the values 'active' and 'inactive':
active
inactive
The extended attribute appears with a list of the valid values in the Case Management
Edit Case (or Edit Alert) dialog:
Tip:
In this case, the user can specify a Null value for the Status field (as a
'notnull' condition was not set).
3-3Chapter 3
Configuring Data Entry Validation
3.2.2 Checking Regular Expression Restriction
To check that data being entered into the extended attribute matches a regular
expression, add XML elements in the following format after the definition of the
extended attribute (flag):
Where: the value property defines the regular expression, and the ignorecase and
matchby properties defines how it is matched. The possible values for the matchby
condition are as follows:
Value Description
w WHOLE - The whole value must match the Regular Expression.
s STARTS - The beginning of the value must match the Regular Expression.
e ENDS - The end of the value must match the Regular Expression.
c CONTAINS - The value must contain a string that matches the Regular Expression.
For example, the following XML fragment defines a custom 'National ID' extended
attribute that allows only values in the format NN-NN-NNN (2 digits, hyphen, 2 digits,
hyphen, 3 digits):
\d{2}-\d{2}-\d{3}
The following shows the error message displayed when a user attempts to add a value
that does not match the regular expression:
It is also possible to customize this error message with the errormessage attribute.
Either enter a simple text string to be displayed as the error message, or begin
the string with a percent (%) symbol to direct the application to look in the
flags.properties file for a localized value.
3-4Chapter 3
Understanding Case Management Configuration Properties
For example, the following XML fragment causes the e1.message error message to be
retrieved from the flags.properties file when an error occurs:
\d{3}-\d{2}-\d{4}
3.3 Understanding Case Management Configuration
Properties
This section lists the main parameters in director.properties that are used to
configure Case Management.
Parameter Description0
case.management.fa This property controls the Case Management behavior when flag
il.on.long.flags values that are longer than 80 characters are generated. If this
property is set to true, the process will generate an error and will
stop. If it is set to false, long flag values will be truncated and a
warning will be written to the log file. This property is set to false by
default.
cm.index.queue.lim This property controls the maximum size of the index queue limit.
it
index.directory This property allows an absolute path for the Lucene index directories
to be configured. By default, the index directories are always created
within the localhome directory. In some circumstances, these
directories can become very large, and storing them in a separate
location may facilitate better management of disk space.
3-54
Tuning EDQ Performance
This chapter describes the server properties that can be used to optimize the
performance of the system and how these properties should be configured in various
circumstances.
This chapter includes the following topics:
• Understanding the Properties File
• Tuning for Batch Processing
• Tuning for Real-Time Processing
• Tuning JVM Parameters
• Tuning Database Parameters
• Adjusting the Client Heap Size
• Designing Fast Jobs: General Performance Options
• Performance Tuning for Parsing and Matching
• Performance Tuning for Address Verification
• What Makes Processes Slow? Common Pitfalls
• Tuning EDQ's Platform
has a large number of properties that are used to configure various aspects of the
system. A relatively small number of these are used to control the performance
characteristics of the system.
Performance tuning in is often discussed in terms of CPU cores. In this chapter, this
refers to the number of CPUs reported by the Java Virtual Machine as returned by a
call to the Runtime.availableProcessors()method.
4.1 Understanding the Properties File
The tuning controls are exposed as properties in the director.properties file. This
file is found in the oedq_local_home configuration directory.
The available tuning properties are as follows:
Properties Description
runtime.threads This property determines the number of threads that will be used for
each batch job which is invoked. The default value of this property is
zero, meaning that the system should start one thread for each CPU
core that is available. You can specify an explicit number of threads by
supplying a positive, non-zero integer as the value of this property. For
example, if you know that you want to start a total of four threads for
each batch process, set runtime.threads to four.
4-1Chapter 4
Tuning for Batch Processing
Properties Description
runtime.intervalt This property determines the number of threads that will be used by
hreads each process when running in interval mode. This will also define the
number of requests that can be processed simultaneously. The default
behavior is to run a single thread for each process running in interval
mode.
Properties Description
workunitexecutor. This property determines the number of threads that will be used to
outputThreads write data to the results database. These threads service the queue
of results and output data for the whole system, and so are shared
by all the processes which are running on the system. The default
value of this property is zero, meaning that the system should use
one output thread for each CPU core that is available. You can specify
an explicit number of output threads by supplying a positive, non-zero
integer as the value of this property. For example, if you know that
you want to use a total of four threads for each batch process, set
workunitexecutor.outputThreads to 4.
4.2 Tuning for Batch Processing
The default tuning settings provided with are appropriate for most systems that are
primarily used for batch processing. Enough threads are started when running a
job to use all available cores. If multiple jobs are started, the operating system can
schedule the work for efficient sharing between the cores. It is best practice to allow
the operating system to perform the scheduling of these kinds of workloads.
4.3 Tuning for Real-Time Processing
When a production system is being used for a significant amount of real time
processing, it should not be used for simultaneous batch and real time processing
unless the real time response is not critical. Run batch processing only to process data
that is required by the real time processes.
4.3.1 Tuning Batch Processing On Real-Time Systems
If batch processing must be run on a system that is being used for real time
processing, it is best practice to run the batch work when the real time processes are
stopped, such as during a scheduled maintenance window. In this case, the default
setting of runtime.threads is appropriate.
If it is necessary to run batch processing while real time services are running, set
runtime.threads to a value that is less than the total number of cores. By reducing
the number of threads started for the batch processes, you prevent those processes
from placing a load on all of the available cores when they run. Real time service
requests that arrive when the batch is running will not be competing with it for CPU
time.
4-2Chapter 4
Tuning for Real-Time Processing
4.3.2 Tuning Real-Time Thread Numbers
For most production systems the default value of one for runtime.intervalthreads
is not appropriate. The default setting implies that, for any given real-time service
handled by a process running in interval mode, all requests will be processed
sequentially. If four requests for the same service arrive simultaneously, and the
average time to process a request is 100 ms, then the first message will be processed
after 100 ms, the second after 200 ms, and so on. In addition, all the work will be
performed by a single core, meaning that on a four-core machine three of the cores
are idle. It is best practice to set runtime.intervalthreads to the same as the number
of available cores. This configuration allows incoming requests to be processed
simultaneously, resulting in a more efficient use of resources and a much faster
turnaround speed. The default setting for runtime.intervalthreads is adequate for
development environments.
4.3.3 Tuning I/O Heavy Real-Time Processes
If a process performs significant I/O, you can try increasing the value of
runtime.intervalthreads above the number of available cores. When a process
performs intensive I/O, there will be times when all the threads are waiting for disk
activity to complete, leaving one or more cores idle. By using more active threads than
there are cores, you ensure that when one thread stalls for I/O, another thread can
utilize the core that the thread was using.
4.3.4 Example of Tuning Real-Time Processes
In this example of how to tune real-time processes, a four-core Intel server is being
used to support four different web services. The web services are CPU-intensive
and perform minimal amounts of I/O. Some data used by the web services must be
updated on a daily basis, which includes running a data preparation process in a batch
mode. The web services receive intermittent sets of simultaneous requests. Overnight,
the web services are stopped for maintenance and data preparation.
In this scenario, it is appropriate to leave the runtime.threads property set to its
default value of one thread per CPU core: in this case, four threads. With the goal of
performing data preparation in the quickest possible time, and assuming the process
is not likely to become I/O bound, you can set the runtime.intervalthreads property
to four. Using the same number of threads as processes ensures that the maximum
number of requests are processed at the same time.
Note:
Increasing the value of runtime.intervalthreads means that there will be
a significant increase in the memory requirement, particularly at interval
turnover.
4-3Chapter 4
Tuning JVM Parameters
4.4 Tuning JVM Parameters
JVM parameters should be configured during the installation of EDQ. For more
information, see Setting Server Parameters to Support Enterprise Data Quality
section present in Installing and Configuring Oracle Enterprise Data Quality guide.
If it becomes necessary to tune these parameters post-installation to improve
performance, follow the instructions in this section.
Note:
All of the recommendations in this section are based on EDQ installations
using the Java HotSpot Virtual Machine. Depending on the nature of the
implementations, these recommendations may also apply to other JVMs.
4.4.1 Setting the Maximum Heap Memory
If an OutOfMemory error message is generated in the log file, it may be necessary to
increase the maximum heap space parameter, -Xmx. For most use cases, a setting of
8GB is sufficient. However, large installations may require a higher max heap size, and
therefore setting the -Xmx parameter to a value half that of the server memory is the
normal recommendation.
4.5 Tuning Database Parameters
The most significant database tuning parameter with respect to performance tuning
within is workunitexecutor.outputThreads. This parameter determines the number
of threads, and hence the number of database connections, that will be used to
write results and staged data to the database. All processes that are running on the
application server share this pool of threads, so there is a risk of processing becoming
I/O bound in some circumstances. If there are processes that are particularly I/O
intensive relative to their CPU usage, and the database machine is more powerful than
the machine hosting the application server, it may be worth increasing the value of
workunitexecutor.outputThreads. The additional database threads would use more
connections to the database and put more load on the database.
4.6 Adjusting the Client Heap Size
Under certain conditions, client heap size issues can occur; for example, when:
• attempting to export a large amount of data to a client-side Excel file, or
• opening up Match Review when there are many groups.
allows the client heap size to be adjusted using a property in the
blueprints.properties file.
To double the default maximum client heap space for all Java Web Start client
applications, create (or edit if it exists) the file blueprints.properties in the local
configuration directory of the server. For more information about the EDQ configuration
4-4Chapter 4
Designing Fast Jobs: General Performance Options
directories, see "EDQ Directory Requirements" in Installing Oracle Enterprise Data
Quality.
Add the line:
*.jvm.memory = 512m
Note:
Increasing this value will cause all connecting clients to change their
heap sizes to 512MB. This could have a corresponding impact on client
performance if other applications are in use.
To adjust the heap size for a specific application, replace the asterisk, *, with the
blueprint name of the client application from the following list:
• director - (Director)
• matchreviewoverview - (Match Review)
• casemanager - (Case Management)
• casemanageradmin - (Case Management Administration)
• opsui - (Server Console)
• diff - (Configuration Analysis)
• issues - (Issue Manager)
Note:
Dashboard is not a Java Web Start application, and therefore cannot be
controlled using this property.
For example, to double the maximum client heap space for Director, add the following
line:
director.jvm.memory = 512m
When doubling the client heap space for more than one application, simply repeat the
property; for example, for Director and Match Review:
director.jvm.memory = 512m
matchreviewoverview.jvm.memory = 512m
4.7 Designing Fast Jobs: General Performance Options
You can use four general techniques to maximize the performance.
See below for more information.
4-5Chapter 4
Designing Fast Jobs: General Performance Options
4.7.1 Streaming Data and Disabling Staging
You can develop jobs that stream imported data directly into processes instead of, or
as well as, staging the imported data in the EDQ repository database. Where only
a small number of threads are available to a job, streaming data into that job may
enable it to process the data more quickly. This is because bypassing the staging
of imported data reduces a job's I/O load. Depending on your job's technical and
business requirements, and the resources available to it, you may be able to stream
data into it, or stage the data and stream it in, to improve performance. Note, however,
that where a large number of threads are available to a job, it may run more quickly if
you snapshot the data, so that it is all available from the outset. For the avoidance of
doubt: you can stream data into a job with or without staging it. However, you cannot
disable the staging of imported data unless you are streaming data. A job that streams
imported data directly into and out of a process or chain of processes without staging it
acts as a pipe, reading records directly from a data store and writing records to a data
target.
Configuration
To stream data into a process:
• Create a job.
• Add both the snapshot and the process as tasks within the same phase of the job,
ensuring that the snapshot is directly connected to the process.
To additionally disable the staging of imported data in the EDQ repository:
• Right-click the snapshot within the job and select Configure Task… or Configure
Connector...
• Within the Configure Task dialog box, de-select the Stage data? check box.
4-6Chapter 4
Designing Fast Jobs: General Performance Options
Note:
Any record selection criteria (snapshot filtering or sampling options) will still
apply when streaming data.
To stream an export:
• Create a Process that finishes with a Writer that writes to a Data Interface.
• Create an Export that reads from the same Data Interface.
• Within a Job, add the Process and the Export as tasks in the same phase of the
Job.
• Ensure that the Process that writes to your Data Interface is directly connected to
the Export.
If you have configured EDQ as outlined above, then, by default, data will not be staged
in the repository. This is because you have not selected a Data Interface Output
Mapping that points at a set of staged data.
If you want to enable staging of the data that is to be exported:
• Create a Data Interface Mapping that points to a set of staged data.
• Right-click the Process within your Job and select Configure Task… or Configure
Connector...
• In the Configure Task dialog, navigate to the Writers tab.
• Ensure that the Enabled? Check-box beside the writer is ticked (it should be ticked
by default).
• Select the Data Interface Mapping that points to a set of staged data.
4-7Chapter 4
Designing Fast Jobs: General Performance Options
When to Stage Data, and When to Disable Staging
Whilst designing a process, you will often run it against data that has been staged in
the EDQ repository via a snapshot. Streaming data into a job without staging it may be
appropriate when:
• You are dealing with a production environment.
• You have a large number of records to process.
• You always want to use the latest records from the source system.
However, streaming a snapshot without staging it is not always the quickest or best
option. If you need to run several processes on the same set of data, or if you need
to lookup on staged data, it may be more efficient to stage the data via a snapshot
as the first task of a job, and then run the dependent processes. If your job has a
large number of threads available to it, it may run more quickly if all of the data is
staged at the outset. Additionally, if the source system for the snapshot is live, it may
be best to run the snapshot in a phase on its own so that the impact on the source
system is minimized. In this case, the data will not be streamed into a process, since
the snapshot and process need to be directly connected to each other within the same
job phase for streaming to occur.
For the avoidance of doubt: if you connect a process directly to a snapshot, then the
data will always be streamed into that process, regardless of whether it is also staged
in the repository (which is determined by the Stage data? check box). Streaming the
data into EDQ and also staging it may, in some cases, be an efficient approach - for
example, if the data is used again later in the job.
Streaming an Export
When an export of a set of staged data is configured to run in the same job after the
process that writes the staged data, the export will always write records as they are
processed, regardless of whether records are also staged in the repository. However, it
4-8Chapter 4
Designing Fast Jobs: General Performance Options
is possible to realize a small performance gain by disabling staging so that data is only
streamed to its target.
You may choose to disable staging of output data:
• For deployed data cleansing jobs.
• If you are writing to an external staging database that is shared between
applications. (For example when running a data quality job as part of a larger
ETL process, and using an external staging database to pass the data between
EDQ and the ETL tool.)
4.7.2 Minimized Results Writing
Minimizing results writing reduces the amount of Results Drilldown data that EDQ
writes to the repository from processes, and so saves on I/O.
Each process in EDQ runs in one of three Results Drilldown modes:
• All (all records in the process are written in the drilldowns)
• Sample (a sample of records are written at each level of drilldown)
• None (metrics only are written - no drilldowns will be available)
All mode should be used only on small volumes of data, to ensure that all records
can be fully tracked in the process at every processing point. This mode is useful
when processing small data sets, or when debugging a complex process using a
small number of records.
Sample mode is suitable for high volumes of data, ensuring that a limited number
of records are written for each drilldown. The System Administrator can set the
number of records to write per drilldown; by default this is 1000 records. Sample
mode is the default when running processes interactively from the Director User
Interface.
None mode should be used to maximize the performance of tested processes that
are running in production, and where users will not need to interact with results.
None is the default when processes are run within jobs.
To change the Results Drilldown mode when executing a process, use the Run
Preferences screen, or create a Job and double click the process task to configure
it.
For example, the following process is configured so that it does not write drilldown
results when it is deployed in production via a job (this is the default when a
process is run within a job):
4-9Chapter 4
Designing Fast Jobs: General Performance Options
The Effect of Run Labels
Note that jobs that are run with run labels from either the Server Console user
interface or the command line do not generate results drill-downs.
4.7.3 Disabling Sorting and Filtering
When working with large data volumes, it can take a long time to index snapshots and
staged data in order to enable users to sort and filter the data in the Results Browser.
In many cases, this sorting and filtering capability will not be needed, or will only be
needed when working with smaller samples of the data.
The system applies intelligent sorting and filtering, where it will enable sorting and
filtering when working with smaller data sets, but will disable sorting and filtering for
large data sets. However, you can choose to override these settings - for example to
achieve maximum throughput when working with a number of small data sets.
Snapshot Sort/Filter options
When a snapshot is created, the default setting is to 'Use intelligent Sort/Filtering
options', so that the system will decide whether or not to enable sorting and filtering
based on the size of the snapshot.
However, if you know that no users will need to sort or filter results that are based on
a snapshot in the Results Browser, or if you only want to enable sorting or filtering at
the point when the user needs to do it, you can disable sorting and filtering on the
snapshot when adding or editing it.
To do this, edit the snapshot, and on the third screen (Column Selection), uncheck
the option to Use intelligent Sort/Filtering, and leave all columns unchecked in the
Sort/Filter column:
4-10Chapter 4
Designing Fast Jobs: General Performance Options
Alternatively, if you know that sorting and filtering will only be needed on a sub-
selection of the available columns, use the tick boxes to select the relevant columns.
Note that any columns that are used as lookup columns by a Lookup and Return
processor should be indexed to boost performance.Disabling sorting and filtering
means that the total processing time of the snapshot will be less as the additional
task to enable sorting and filtering will be skipped.Note that if a user attempts to sort or
filter results based on a column that has not been enabled, the user will be presented
with an option to enable it at that point.
Staged Data Sort/Filter options
When staged data is written by a process, the server does not enable sorting
or filtering of the data by default. The default setting is therefore maximized for
performance.
If you need to enable sorting or filtering on written staged data - for example, because
the written staged data is being read by another process which requires interactive
data drilldowns - you can enable this by editing the staged data definition, either to
apply intelligent sort/filtering options (varying whether or not to enable sorting and
filtering based on the size of the staged data table), or to enable it on selected
columns (as below):
4-11Chapter 4
Designing Fast Jobs: General Performance Options
Match Processor Sort/Filter options
It is possible to set sort/filter enablement options for the outputs of matching.
Note:
This should only be enabled if you wish to review the results of match
processing using the Match Review UI.
4.7.4 Resource-Intensive Processors
The following processors are highly resource intensive because they need to write all
of the data they process to the EDQ repository before they work on it:
• Quickstats Profiler
• Record Duplication Profiler
• Duplicate Check
• All match processors
• Group and Merge
• Phrase Profiler
• Merge Data Streams
4-12Chapter 4
Performance Tuning for Parsing and Matching
Note:
This processor should only be used to merge records from separate readers;
it is NOT necessary to use it to connect up multiple paths from the same
reader.
The following processors work on a record-by-record basis, but are also highly
resource intensive:
• Parse
Note:
This Parse processor's performance is highly dependent upon its
configuration, it can be fast or slow.
• Address Verification
Clearly, there are situations in which you will need to use one or more of these
resource-intensive processors. For example, a de-duplication process requires a
match processor. However, when optimal performance is required, you should avoid
their use where possible. See below for specific guidance on how to tune the
matching, Parse and Address Verification processors.
4.8 Performance Tuning for Parsing and Matching
In the case of Parsing and Matching, a large amount of work is performed by an
individual processor, as each processor has many stages of processing. In these
cases, options are available to optimize performance at the processor level.
See below for more information on how to maximize performance when parsing or
matching data:
4.8.1 Place Parse and Match processors in their own Processes
Both parsing and matching are inherently resource-intensive, and can take time to run.
For this reason, it is advisable to place parse and match processors in processes on
their own (or with only a small number of other processors). This will enable you to
isolate and therefore accurately measure their performance, which should in turn make
it easier to tune them.
4.8.2 Parsing performance options
By default, the Parse processor works in Parse and Profile mode. This is useful during
configuration, as the parser will output the Token Checks and Unclassified Tokens
results views. These will help you to define parsing rules. In production, however,
when maximum performance is required from a Parse processor, it should be run in
Parse mode, rather than Parse and Profile mode. To change the Parser's run mode,
click its Advanced Options link, and then set the run mode in the Options dialog box.
4-13Chapter 4
Performance Tuning for Parsing and Matching
For even better performance where only metrics and data output are required from a
Parse processor, the process that includes the parser may be run with no drilldowns -
see Minimized results writing above.
When designing a Parse configuration iteratively, where fast drilldowns are required,
it is generally best to work with small volumes of data. If a parse processor has
configuration that drives it to generate a number of different patterns for a given input
record, for example it has many classification and reclassification rules, it may be
possible to improve performance by reducing the number of patterns produced using
the Patterns limit option (for example to 8) without altering results. If changing this
option, parsing results should be tested for changes before and after making the
change.
4.8.3 Matching performance options
The following techniques may be used to maximize matching performance:
4.8.3.1 Optimized Clustering
Matching performance may vary greatly depending on the configuration of the match
processor, which in turn depends on the characteristics of the data involved in the
matching process. The most important aspect of configuration to get right is the
configuration of clustering in a match processor.
In general, there is a balance to be struck between ensuring that as many potential
matches as possible are found and ensuring that redundant comparisons (between
records that are not likely to match) are not performed. Finding the right balance
may involve some trial and error - for example, assessment of the difference in
match statistics when clusters are widened (perhaps by using fewer characters of
an identifier in the cluster key) or narrowed (perhaps by using more characters of an
identifier in a cluster key), or when a cluster is added or removed.
The following two general guidelines may be useful:
4-14Chapter 4
Performance Tuning for Parsing and Matching
• If you are working with data with a large number of well-populated identifiers, such
as customer data with address and other contact details such as e-mail addresses
and phone numbers, you should aim for clusters with a maximum size of 20 for
every million records, and counter sparseness in some identifiers by using multiple
clusters rather than widening a single cluster.
• If you are working with data with a small number of identifiers, for example,
where you can only match individuals or entities based on name and approximate
location, wider clusters may be inevitable. In this case, you should aim to
standardize, enhance and correct the input data in the identifiers you do have
as much as possible so that your clusters can be tight using the data available.
In this case, you should still aim for clusters with a maximum size of around 500
records if possible (bearing in mind that every record in the cluster will need to
be compared with every other record in the cluster - so for a single cluster of 500
records, there will be 500 x 499 = 249500 comparisons performed).
4.8.3.2 Disabling Sort/Filter options in Match processors
By default, sorting, filtering and searching are enabled on all match results to
ensure that they are available for user review. However, with large data sets, the
indexing process required to enable sorting, filtering and searching may be very time-
consuming, and in some cases, may not be required.
If you do not require the ability to review the results of matching using the Match
Review Application, and you do not need to be able to sort or filter the outputs of
matching in the Results Browser, you should disable sorting and filtering to improve
performance. For example, the results of matching may be written and reviewed
externally, or matching may be fully automated when deployed in production.
The setting to enable or disable sorting and filtering is available both on the individual
match processor level, available from the Advanced Options of the processor (see
Sort/Filter options for match processors for details), and as a process or job level
override.
To override the individual settings on all match processors in a process, and disable
the sorting, filtering and review of match results, deselect the option to Enable Sort/
Filter in Match processors in a job configuration, or process execution preferences:
4-15Chapter 4
Performance Tuning for Parsing and Matching
Note:
Sort / Filter in Match is disabled by default when processes are included in
jobs.
4.8.3.3 Minimizing Output
Match processors may write out up to three types of output:
• Match (or Alert) Groups (records organized into sets of matching records, as
determined by the match processor. If the match processor uses Match Review,
it will produce Match Groups, whereas if uses Case Management, it will produce
Alert Groups.)
• Relationships (links between matching records)
• Merged Output (a merged master record from each set of matching records)
By default, all available output types are written. (Merged Output cannot be written
from a Link processor.)
However, not all the available outputs may be needed in your process. For example
you should disable Merged Output if you only want to identify sets of matching
records.
Note that disabling any of the outputs will not affect the ability of users to review the
results of a match processor.
To disable Match (or Alert) Groups output:
• Open the match processor on the canvas and open the Match sub-processor.
• Select the Match (or Alert) Groups tab at the top.
4-16Chapter 4
Performance Tuning for Address Verification
• Un-check the option to Generate Match Groups report, or to Generate Alert
Groups report.
Or, if you know you only want to output the groups of related or unrelated records,
use the other tick boxes on the same part of the screen.
To disable Relationships output:
• Open the match processor on the canvas and open the Match sub-processor.
• Select the Relationships tab at the top.
• Un-check the option to Generate Relationships report.
Or, if you know you only want to output some of the relationships (such as only
Review relationships, or only relationships generated by certain rules), use the
other tick boxes on the same part of the screen.
To disable Merged Output:
• Open the match processor on the canvas and open the Merge sub-processor.
• Un-check the option to Generate Merged Output.
Or, if you know you only want to output the merged output records from related
records, or only the unrelated records, use the other tick boxes on the same part
of the screen.
4.8.3.4 Streaming Inputs
Batch matching processes require a copy of the data in the EDQ repository in order to
compare records efficiently.
As data may be transformed between the Reader and the match processor in a
process, and in order to preserve the capability to review match results if a snapshot
used in a matching process is refreshed, match processors always generate their own
snapshots of data (except from real time inputs) to work from. For large data sets, this
can take some time.
Where you want to use the latest source data in a matching process, therefore, it may
be advisable to stream the snapshot rather than running it first and then feeding the
data into a match processor, which will generate its own internal snapshot (effectively
copying the data twice). See Streaming a Snapshot above.
4.9 Performance Tuning for Address Verification
EDQ's Address Verification processor is a conduit to the Enterprise Data Quality
Address Verification Server (EDQ AV). EDQ AV attempts to match each input record
against all of the addresses that exist for that country in its Global Knowledge
Repository. This operation is inherently resource-intensive, and it does take time
to run. For this reason, it is advisable to place the Address Verification processor
in a process on its own, or with only a small number of other processors. This
will enable you to isolate and therefore accurately measure its performance, which
should in turn make it easier to tune. The EDQ Address Verification server requires
a substantial amount of memory outside of the EDQ Application Server's Java Heap.
Address Verification's performance may suffer if insufficient memory is available. See
Application Server Tuning for more information about tuning the EDQ Application
Server's Java Heap. You can adjust Address Verification performance by tuning its
caching options. You can control these parameters using the Address Verification
4-17You can also read