POWERVIEW ECLIPSE SHUTTERS PRODUCT MANUAL - MYNZWS
←
→
Page content transcription
If your browser does not render page correctly, please read the page content below
PowerView Eclipse Shutters
    Product Manual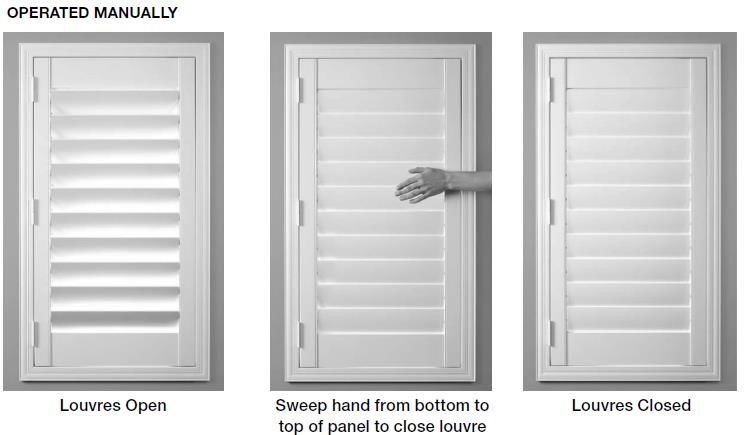
POWERVIEW MECHANISM

                                                                    Smartview Gear

                                                                    Rail 101.60mm

                                                                    PowerView Rack Gear

                                                                    Battery Wand Cover

                                                                    Battery Wand
                                                                    Preloaded
                 PowerView
Motorized Jamb    Shutter
Reinforcement      Motor

    POWERVIEW MECHNISM - COUPLING SYSTEM

                                                   Smartview Gear

                                                                           Battery Wand
                                                                           Preloaded

                                                                           Battery Wand
                                                                           Cover

Clutch for the      Coupler   Coupler    PowerView
Non-Motorized        Cover    System    Shutter Motor
    Panel

        2|Page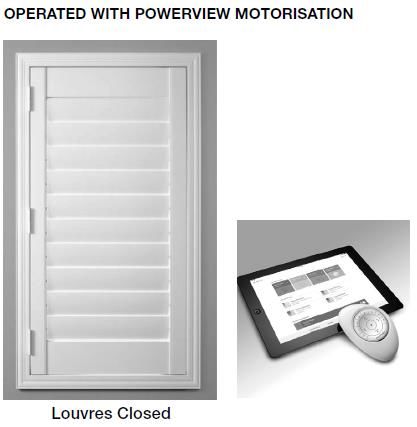
POWERVIEW MOTORISED SHUTTERS
     The PowerView system is a self-contained, battery powered, louvre rotation system.
     PowerView for shutters allows for manual louvres operation. PowerView offers users
     the option to hand tilt or remotely tilt the louvres without affecting the system or
     warranty. Simply move the louvres by hand to any position or use the remote. Our
     second key feature is the coupler system resulting in smooth operation of coupled
     sections with the push of a button. This unique feature joins the louvre section of one
     panel to the louvre section of the adjacent panel. This allows the use of one motor to
     power one or two louvre sections. Even though the louvre sections in two panels are
     joined, the panels can be opened and closed individually.

      Features and benefits
          • Louvres operate remotely with the push of a button
          • Manually operate the louvres at any time (no need to disengage the motors)
          • Available with standard hinged shutters and bi-fold hinged shutters.
          • Available with all louvre sizes
          • Must be ordered as a four-sided frame (excluding mounting strip)
          • Available with none, one or two divider rails.
          • Available with SmartView operating system (Gear System).This will allow
             manual operation without damage or affect the motorisation system
          • Pre-loaded 12V battery wand (with 8 AA alkaline batteries)
          • 6 Channel PowerView remote control
          • 108mm Beaded Rail Only
          • Panel Lock Only (No magnets)
          • Control two louvre sections with single motor (cannot couple through a T Post)
          • Shutters with divider rails will have two motors and allow flexibility in
             programming and operation
      PowerView Shutter size limitations per Panel
      (Note: Limitation includes frames)
                                                       (mm)
Type
                       Min Width            Max Width        Min Height           Max Height
STD Hinged shutter Panel
64mm Louvres               466                 750              457                   2500
89mm Louvres               466                 900              457                   2500
114mm Louvres              466                 900              584                   2500
STD Hinged Bi-Folding Panels
64mm Louvres               466                 610              457                   2500
89mm Louvres               466                 610              457                   2500
114mm Louvres              466                 610              584                   2500
Sliding By-Pass for Single Panels only
64mm Louvres               466                 750              610                   2500
89mm Louvres               466                 900              660                   2500
114mm Louvres 466                       900               710                2500
     TABLE 1
     Notes
     *Specifications for PowerView shutters are not flexible and will not be waived.
     *PowerView is available for standard Hinged, standard hinges Bi-fold and By-
     Pass/Open By-Pass track system only.
     *Coupling system is not available for By-Pass configurations.
    3|Page
OTHER SPECIFICATIONS
• All motorised shutters require 101.6mm top and bottom rails
• Shutters with two divider rails can be motorised. The middle section will be
linked to either the bottom section or the top section. Make sure to note this
on the order form.
• Shutters with more than 2 panels, with or without T Posts, can be motorised, but
only 2 panels can be operated with a single motor.
• Panels separated by a T Post cannot be coupled together.
• Do not install PowerView shutters where there is direct contact with moisture
(i.e.: inside a shower)
• The program button is located on the back side of the panel, so it is critical to
be able to access the rear of the panel(s) to complete the remote setup.
• Battery access is also located on the back side of the panel(s). When the
batteries need to be changed, it will be necessary to open the panel and
remove the battery cover to change the batteries.
• Eight AA alkaline batteries required for the battery wand in the panel.
MOTOR LOCATIONS
The default motor location is in the bottom rail. If there are one or two divider rails,
then there is a motor in both the bottom and top rails.
Type of Motor Location No. of No. of No. of
Panel Divider Motors Coupling
Rails Systems
Single Bottom Rail 0 1 0
Single Top & Bottom Rails 1 2 0
Single Top & Bottom Rails 2 2 0
Double Bottom Tail - Left Panel 0 1 1
Double Top & Bottom Rails - Left 1 2 2
Panel
Double Top & Bottom Rails - Left 2 2 2
Panel
TABLE 2
4|PageMEASURING
Measuring for shutters with PowerView is the same process as other shutters. It is,
however, more critical to review the opening for potential obstructions and out of
square. Please refer to the appropriate section of the product manual for additional
details based on the type of shutter ordering; measuring for standard shutters
DEPTH CLEARANCES
Depth clearances are critical for shutters with PowerView. Even slight interference
with the window, window frame, cranks, etc. can interfere with the operation of the
PowerView system. Please refer to the appropriate section of the manual for depth
clearance charts; operating and depth clearances for Standard shutters
ORDERING ECLIPSE SHUTTERS WITH POWERVIEW
When ordering shutters with PowerView, use the appropriate order form that includes
the PowerView option. This includes the PowerView option as well as the PowerView
accessories page.
Standard available options:
• Available with all louvre sizes
• Available with all frame types (four-sided frame only)
• Available with none, one or two divider rails
• 101.6 mm Large Rail only
• Panel Lock Only (No magnets)
• Standard closure for LR panels is Left over Right (Right over Left must be noted
in special instruction – closure for motorised shutters cannot be changed in the
field)
PowerView orders require the following information:
1. Shutters with two divider rails will only include two motors, not three. The centre
section must be connected to either the top or bottom section. This should be
specified in the order form.
2. Select the number of remotes. One remote per room is recommended.
5|PageLOUVRE CLOSURE
• Eclipse Shutters with PowerView Motorisation offer an exclusive override feature
that allows manual operation without causing any damage to the motor.
• To operate manually, simply hand sweep the louvres up or down, depending on
the direction the louvres are closed. (Images above)
• For most effective light block, it’s recommended to close the louvres upward.
• On shutters with PowerView motorisation, because of the override feature, given
by the presence of the SmartView gears, louvres may not close fully with manual
operation. Use the motorised function for optimal louvre closure.
• Both manual and Motorised systems
feature up/down louvre closure. Eclipse
Shutters with PowerView will come by
default with the “louvres closed” position
upwards, when operated with the remote
control or through the PowerView app.
• Shutters operated with PowerView
motorisation have the most optimal closure,
due to the tension that the motor provides
when tilting the louvres.
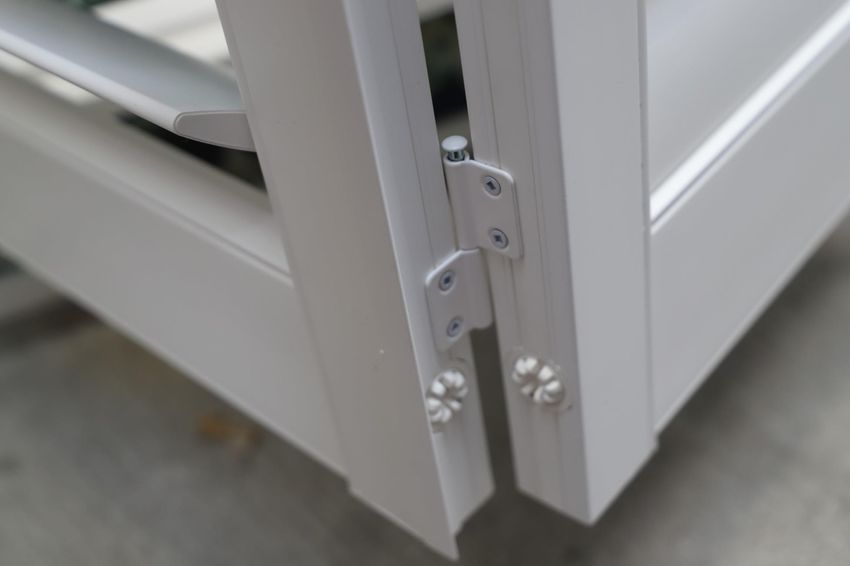
6|PageTROUBLESHOOTING PROGRAMMING 1. Check batteries in remote and make sure they are oriented correctly. 2. Check that batteries are installed into wand correctly. 3. Verify battery wand is plugged into motor correctly. TROUBLESHOOTING POWERVIEW SHUTTERS If you are experiencing issues with your PowerView Shutters, listed below are some suggestions to look at: 1. Frame Installation - You must keep the corners tight to avoid any problems with functionality. Use L-Brackets on Trim, Bullnose Z, Deluxe Trim, to prevent separation. Luxaflex recommends for L Frames and Z Frames to have corners glued during assembly to prevent corner separation. 2. Louvres Do Not Rotate Fully - Make sure there are no obstructions in the louvre section. Rotate louvres manually to determine if obstructions are preventing movement. Verify the louvres are not too tight. There should be some side to side movement of the louvres between the jambs. 3. Coupled Panels - The couplers must line up evenly and connect to one another. Excessive gaps between panels cannot exist. Verify the frames are square by measuring diagonally. Check the squareness of the shutters by measuring the width on the top and bottom inside of frame. If they are not the same adjust the installation of frames. Also, make sure the installation screws of the side frames have not been overtightened causing excessive gaps between panels. 4. Louvre rotation speed or rotation alignment – There may be some variation in the speed at which the louvres rotate from section to section or panel to panel. Likewise, there may be some slight mis-alignment of the louvres in different panels or sections as they rotate to a desired position. 7|Page
You can also read