QUICKBOOKS ONLINE MANUAL - UPDATED: NOVEMBER 10, 2017 - SQUARESPACE
←
→
Page content transcription
If your browser does not render page correctly, please read the page content below
QuickBooks Online Manual
     Updated: November 10, 2017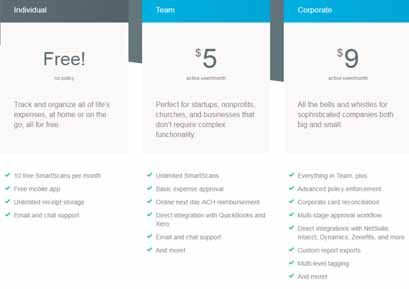
2

                                                             Table of Contents

Contents
QuickBooks Online Subscription Comparison ............................................................................................. 3
   Payroll Prices ............................................................................................................................................ 4
To Add a Client to QBOA .............................................................................................................................. 5
Accountant Only Features............................................................................................................................ 5
QuickBooks Payments .................................................................................................................................. 6
Converting from Desktop ............................................................................................................................. 7
Payroll Set Up ............................................................................................................................................... 9
Payroll Taxes ............................................................................................................................................... 10
Bank Feeds .................................................................................................................................................. 11
   Bank Rules .............................................................................................................................................. 12
   Default Accounts .................................................................................................................................... 13
   Bank Feed Recognized ............................................................................................................................ 14
   Set Up Conditions for New Rule ............................................................................................................ 15
Reconciling Bank Accounts ........................................................................................................................ 16
Reports........................................................................................................................................................ 17
   Payroll Tax Reports ................................................................................................................................ 18
Export to Desktop....................................................................................................................................... 18
Apps ............................................................................................................................................................ 19
QuickBooks Online Support ....................................................................................................................... 24

                                               Click on title or page number to go to page
3

                     QuickBooks Online Subscription Comparison
The difference in subscriptions for most clients is the ability to track classes, budgets, and expenses by
customer. We can always upgrade to Plus, but we can’t go backwards to Essentials.

                                                            Essentials                    Plus

 Price                                                         $20                        $30
 Track income and expenses                                      X                          X
 Send and track invoices                                        X                           X
 Download and automatically organize bank                       X                           X
 and credit card transactions
 Print checks and record transactions                           X                           X
 Import data from Excel or QuickBooks Desktop                   X                           X
 Back up your data online automatically                         X                           X
 Strong security measures so only you access                    X                           X
 your info
 Access your data from a tablet or smartphone                   X                           X
 Snap photos of receipts so you’re ready for tax                X                           X
 time
 Invite up to two accountants to access your                    X                           X
 data
 Integrate with available applications                          X                           X
 Set up invoices to automatically bill on a                     X                           X
 recurring schedule
 Manage and pay bills from vendors                              X                           X
 Enter bills and schedule payments for later                    X                           X
 Compare your sales and profitability with                      X                           X
 industry trends
 Control what your users can access                             X                           X
 Handle multiple currencies                                     X                           X
 Create and send purchase orders                                                            X
 Track inventory                                                                            X
 Prepare and print 1099s                                                                    X
 Give employees and subcontractors limited                                                  X
 access to enter time worked
 Track billable hours by customer                                                           X
 Create budgets to estimate future income and                                               X
 expenses
 Categorize your income and expenses using                                                  X
 class tracking
 Track sales and profitability for each of your                                             X
 locations
4

 Number of people who can access QuickBooks                     3                        5
 Online
 Number of built‐in business reports                          40+                      65+
Note: For Payroll Options we use Enhanced Payroll instead of Full Service where QuickBooks prepares
payroll and payroll taxes.

Payroll Prices
                                                   Essentials                                   Plus

                                       Track income and expenses                 Track income and expenses

                                       Create estimates and invoices             Create estimates and invoices
                                       Sync bank accounts and apps               Sync bank accounts and apps
                                       Manage and pay bills                      Manage and pay bills
                                       Instant sales and profit reports          Instant sales and profit reports
                                                                                 Report printing for Classes
                                                                                 Track inventory
                                                                                 Prepare and print 1099s
 Wholesale Pricing:
 QBO, w/ no payroll       Total/Mth                                  20.00                                     30.00

 Add: Online Payroll                                              20.00                                     20.00
 Payroll Add‐on                 2.00                 $2/employee/month                         $2/employee/month
  # employees     5       Total/Mth                               55.00                                     60.00
  # employees    10       Total/Mth                               65.00                                     75.00
  # employees    20       Total/Mth                               85.00                                     95.00
  # employees    30       Total/Mth                              110.00                                    115.00
5
To Add a Client to QBOA
Instruct the client to perform the following:
1. Click the Gear Icon
2. Manage Users
3. Invite Accountant
4. Instruct client to use qbo@bcscpa.com for the email in the next step
Accountant Only Features
Accountant Toolbox
Accountant tools give you the power you need to help your client with anything. Common accounting
tasks are grouped into one menu so you can reclassify transactions, write‐off invoices, and more‐
without searching through menus.
To access the Accountant Toolbox in a QBO company, click on the briefcase icon in the top‐left of the
Accountant Tool‐belt. The Accountant Tools will display in a drop‐down menu.6
QuickBooks Payments
QuickBooks Payments is a way to accept online payments. This allows your customers to pay directly
from invoices emailed from QuickBooks. Customers can pay immediately with ACH bank transfer or
credit cards. QuickBooks auto‐updates your books and auto deposits money into your bank. Also, can
receive a credit card reader to accept payments anywhere with mobile credit card processing.
This is an option to merchant services.
To set up:
1. Go to Account and Settings
2. Select Payments
3. Click Learn More
4. Click Finish Setup
Prices:7
Converting from Desktop
1) Save client file to the Q: Drive then restore to your desktop instead of the Q: Drive to prevent
errors
2) Update QuickBooks before converting
a. Help Update QuickBooks Update now Get Updates
3) Your QuickBooks file must be under 350,000 targets (file size does not matter). If you are over
this limit, you will only be given the option to import your lists and/or balances.
a. Open Product Information in QuickBooks Desktop by pressing F2
b. If too large, file can be condensed
4) Before Converting to QBO:
a. The legacy file needs to be in as ‘clean’ a state as possible prior to converting to QBO.
i. Quotes: Close or finalize
ii. Purchase orders: Close or finalize
iii. Unbilled Activity: Delete or finalize
iv. Delete any account never used in the Chart of Accounts. These may be inactive,
but should be deleted.
v. Run a Payroll Report for dates of current compliance (month to date) if
converting mid reporting period
vi. Print off full Employee info details and current leave balances
vii. Print off YTD Payroll Summary by Employee
viii. Archive reports run on Accruals Basis, all Dates
1. Trial Balance
2. Balance Sheet
3. Profit & Loss Report
4. Accounts Receivable Aging (& Detail)
5. Accounts Payable Aging (& Detail)
6. General Ledger (Optional but recommended)
b. You can only import QuickBooks Desktop data within the first 60 days of your
QuickBooks Online company start date. Your QuickBooks Desktop file will also replace
your entire QuickBooks Online file and overwrite any existing information.8
c. You must be an Administrator user in both your existing QuickBooks Desktop file AND in
your QuickBooks Online account.
5) Open QBO company and change URL
a. Replace ‘homepage’ with “purgecompany”
b. Purge the file
6) Import from QuickBooks Desktop Pro/Premier
a. Open QuickBooks Desktop
b. Click Company > Export Company File to QuickBooks Online
c. Enter your QuickBooks Online login credentials (User ID is usually the user's email
address)
i. Whoever is Master Admin needs to upload the file
d. Select the QuickBooks Online company you want to import your data into
e. Will receive an email when the conversion is complete
7) After Import:
a. Sign into QBO
b. Compare the Profit & Loss and Balance Sheet standard reports in QBO and in Desktop to
ensure that your data was transferred correctly
8) Import Limitations
a. Not converted over
i. Accounts
1. Bank account numbers and notes
ii. Audit Trail
iii. Closing Date
1. Your QuickBooks Desktop closing date is converted. The password is
not.
iv. Credit card Charges
1. Converted over as Expenses
v. Discounts
1. When converting your QuickBooks Desktop data, discounts already
given to customers for early payment of invoices are converted as credit
memos, applied to the customer's outstanding balance.
2. Discounts taken from suppliers for early payment of bills are converted
as supplier credits, applied to the supplier's outstanding balance.
vi. Documents
1. Any Documents listed under the Company menu will not transfer over
2. Save elsewhere before converting
vii. Inventory
1. QBO tracks using FIFO method in accrual only
viii. Journal Entry’s billable status
ix. Memorized Reports
x. Merchant Account Service
xi. Other Names
1. Will be converted as Suppliers
xii. Pending Sales9
xiii. Price Levels
xiv. Print Mailing Labels
xv. Progress Invoices
xvi. Purchase orders
1. Will not be linked to their corresponding Bill
xvii. Receive Items are converted as Bills
xviii. Reconciliations and Reconciliation Reports
1. Your past reconciliation reports are not converted to QuickBooks
Online; however, all reconciled transactions in the register will have an
“R” in the cleared column.
xix. Reimbursable Expenses converted as Billable Expenses
xx. Reminders
xxi. Type: Customer, Supplier, Job
xxii. To Do List
xxiii. Users & Permissions
1. Will not need to be re‐invited
9) If the Client has Payroll:
a. Set up the employees
b. Verify that the amounts have been converted correctly
c. Adjust payroll taxes
Note: Many software may be able to convert information to QuickBooks Desktop. Examples of software
that convert to Desktop are Peachtree, CSA, Quicken, Mas 90, and Sage Products. Once converted into
Desktop the file can be converted into QBO.
See Bank Feeds for ways to import files through Bank Feeds.
Payroll Set Up
Information Needed:
Employer Information:
o Bank Account Info
o Employee Compensation
o Employee Benefits
o Other Additions/Deductions
Employee Info:
o Form W‐4
o Pay Rate
o Paycheck Deductions
o Pay Schedule10
o Sick/Vacation hours policy and balance
Tip: If you are converting in the middle of a calendar year, be sure to enter the
total sick/vacation hours an employee had from the old software.
o Hire Date
o Birth Date
o Direct Deposit Authorization Form
Set Up Payroll:
1. Click on Employees tab located on the left menu bar.
2. Proceed to Payroll Set Up
3. Answer the questions regarding prior payrolls
4. Add Employees
5. Complete Employee Info
o Employee Withholding Info
o Pay Schedule
o Employee Pay
o Deductions/Contribution
o Payment Method
o Enter Year‐to‐Date Payroll Info
Tip: It is extremely important that you ensure the year‐to‐date totals are
accurate.
Note: Once you click Finished Set up, you cannot enter prior period information.
Payroll Taxes
If you're paying taxes outside of QuickBooks Online, then you can record them by using Paid Tax
Feature. This will tell the system that the liabilities have been paid, but won't create an additional record
in your registers. If payment used is a check, use Prior Tax Payment.
Enter Prior Tax History
1. Go to Taxes on the left panel, and then click Payroll Tax.
2. Under Taxes, click Enter Prior Tax History.
3. Select the year, then click the Add Payment button.
4. Select tax type and liability period (the period that the taxes were accrued).
5. Click OK.
6. You will then be back to the Prior Tax Payments screen.11
Archive Forms
After recording the tax payments, you need to archive the forms to remove the Reminders in the home
page.
1. Click on the Taxes tab.
2. Select Payroll taxes.
3. On the right side of the page, click Quarterly Forms or Annual Forms, as appropriate.
4. Click on the desired form.
5. Select the liability period.
6. Click Archive.
Note: Most important for SUTA reports.
Bank Feeds
Bank Feeds allow bank transactions to be automatically downloaded into QuickBooks Online. It links
your online banking accounts and feeds the transactions directly into the Banking Center. When the
transactions are pulled in, they are non‐posting until you match them to previously recorded
transactions or use them to add new transactions to your registers.
When you use Bank Feeds to enter your transactions, your accounts become “self‐reconciling”, meaning
that because each transaction is matched to the bank as they are entered, they are already marked
cleared in the reconciliation screen. A transaction that has been matched or was created from a Bank
Feed has the letter ‘C’ next to it in the register. A transaction that has been marked cleared in the
reconciliation screen will have the letter ‘R’ next to it.
To set up the account:
1. Select “Banking” tab.
2. Click the blue “Add account” in the upper right.
3. Enter the name of your financial institution to select your bank (or choose from the popular
banks listed logos) and follow the onscreen instructions.
4. Log into your bank account the same way with your same bank user ID and Password.12
Note: If direct Deposit is split between different Bank Accounts, exclude from Bank Feeds and find the
transaction while reconciling.
To manually import a bank file:
Note: An Excel file can be imported with transactions.
1. Download transactions from your bank’s website
a. Choose one of the supported file type
i. QuickBooks Online (QBO) – Works best
ii. Comma‐Separated Values (CSV)
iii. Quicken (QFX)
iv. Microsoft Money (OFX)
2. On the Banking page, scroll down to the bottom and click Upload Transactions Manually
3. Click Browse to find and select the file to upload, and then click Open.
4. Click Next.
5. Select the QuickBooks account you want to upload the bank data to, and click Next. If you don't
have an account set up yet, click Add New in the drop‐down list and add an account.
6. If you're uploading a CSV file, you're prompted to select columns from the CSV file that match
QuickBooks banking fields. Click Next when you're done.
7. Click Let's go! to return to the Banking page and begin reviewing your bank transactions so that
you can accept them into QuickBooks.
Tip: QuickBooks only supports files sizes up to 350 KB (kilobytes). If you're downloading a lot of
transactions, you may need to download smaller date ranges.
Bank Rules
Rules go beyond the automatic processing to give you a finer level of control. They scan downloaded
bank items for certain criteria you specify, and then assign particular payees, categories, classes,
locations, and more to them. Rules can even help automatically split items between categories and
more.
To Create a Rule:
1. Select Banking from the menu.
2. Select Bank Rules at the top.
3. Select New Rule at the top.
4. Fill in all the fields.
5. Select Save.
Note: Rules apply to unaccepted transactions only (New Transactions tab on the banking downloads
screen).13
To reduce the need for multiple rules, you can create rules with "or" so that transactions are edited
when they meet any of the outlined conditions. In order for the "or" function to be available, you must
change the drop‐down so that it shows "when a transaction meets ANY of these conditions"
Import Bank Transaction Rules from another QuickBooks Online Company
In the Company that has the bank rules set up:
1. Select Banking from the left menu.
2. Select Bank Rules at the top.
3. Select the New Rule drop‐down arrow and select Export Rules (there must be rules set up to see
the option).
4. Save the file in Excel.
5. Log out.
Next, Switch to the Company you want to import the rules to:
1. Select Banking from the left menu.
2. Select Bank Rules at the top.
3. Select the New Rule drop‐down arrow and select Import Rules.
4. Select Browse to upload the Excel file.
5. Select the rules and details you want to import.
Default Accounts
Default Accounts are used when it is unclear how a transaction should be categorized. The purpose of
Banking Rules is to accurately categorize transactions; and since these accounts do not accurately depict
the category they are ignored by Banking Rules. The following default accounts should not be used in
creating a Banking Rule.
‐ Uncategorized Income
‐ Uncategorized Expense
‐ Uncategorized Asset
Note: Bank Rules will also ignore these accounts if they have been renamed.14
Bank Feed Recognized
You are now be able to see when transactions in the banking menu have been recognized by the
system. Green indicators will show that QuickBooks Online has recognized the transactions because of
rules, matching, or auto recall. You can add transactions from the recognized page or click on the line of
the transaction to edit before adding it.
Automatically add to my books
You can now create targeted rules to have transactions automatically accepted into your books from
bank feeds.
To use click the check box at the bottom of the Rules edit screen and then click save.
However, please be sure to start slow with this feature using easy reliable transactions first. For,
example Gas Expenses under $100.
This feature is for expert users who have experience using Rules.
How it works:
After creating the auto‐add rule, any affected transactions in the “For Review” section are
automatically added.
Auto‐add Rules are run:
o When user logs in
o When manual update is run
o When a file upload is done
o After a new auto‐add rule is created/modified
Note: If need to edit a rule that is auto add, uncheck auto add before editing. If it is not unchecked
before editing the bank rule it will continue to add automatically.
Time Saver Tip: When dealing with Transfers between two balance sheet accounts, you must select the
transfer option or the transaction will become duplicated.15
Batch Actions
Batch actions give you a way to perform a single action on multiple transactions. For example, you can
quickly assign a single category to several transactions at once. Or you can "batch accept" transactions
to add them to your books.
Excluded Transactions
Excluded transactions are used when you have an item that has been downloaded from your
bank that shouldn't be in QuickBooks Online
Examples:
o Duplicated transactions
o Transactions that were for personal expenses
Set Up Conditions for New Rule
1. Rule name – give each rule a name
2. For – Select whether the rule applies to Money in (deposits) or Money out (withdrawals)
3. In – From the drop down, you can select which bank accounts this rule applies to. The default is
All bank accounts.
4. Conditions – You have the option to set the conditions that the transaction must meet for this
to apply:
a. From the drop down, select all or any
b. From the drop down, you can select bank text, description, or amount
c. From the drop down, you can select contains, is exactly, or doesn’t contain
d. In this field, you can enter the bank text, description, or amount.
5. Transaction type – Select whether the transaction is an expense, transfer, or check16
6. Payee – Select the payee (if applicable)
7. Category – Select the account the transaction should be categorized to.
Reconciling Bank Accounts
Bank Feeds
When a transaction has been matched or added via Bank Feeds page the transaction will be
automatically checked on the reconciliation page
If the transaction clears in the next month and is matched before the reconciliation is complete,
the transaction will be checked during current month reconciliation regardless of the date it
actually cleared
o Never change ‘C’ or ‘R’ in the Register.
Time Saver Tip: Only Match and Add transactions in the month for the month that is being reconciled at
the time.
How to Undo a Reconciliation
Reconcile Reconciliation History Drop down arrow Undo
This is an Accountant Only Feature
Time Saver Tip: Print the Reconciliation Report before Undoing the Bank Rec. This will show the
uncleared transactions, which will allow you to check all and uncheck the uncleared from the report.17
Reports
Report Groups
QuickBooks Online makes it easy for you to group customized reports. Custom report groups in
QuickBooks Online are helpful when you have many custom reports and want to keep them in groups
for ease of use.
How to Group Custom Reports:
1. Go to Reports.
2. Open a report that you want to add in a group.
3. Customize the report.
4. Click the Customize button.
5. Below the Add this report to a group field, click Add new group.
6. Enter the group name, and click Add.
7. Click Save.
Reports by Classes:
For All Classes:
1. Go to Reports
2. Open report that you want
3. Go to the drop down menu called Display Columns By
4. Select Classes
5. Run Report
For Selected Classes:
1. Go to Reports
2. Open report that you want
3. Click the Customize button
4. Filter
5. Choose the classes for the report
6. Run Report
Time Saver Tip: Once custom reports have been created, the reports can be batched printed. It will put
all of the reports into one PDF document.18
Payroll Tax Reports
Under Taxes Payroll Tax Quarterly Tax Forms TN LB‐0456/0851 Worksheets
Under Reports All Reports Manage Payroll Payroll Details (Filter Employee – Summary
By Employee)
Under Reports All Reports Manage Payroll Payroll Tax and Wage Summary
o On the report if you click on the FUTA or SUTA link, it will give you breakdown by
Employee
Under Reports All Reports Manage Payroll Total Pay Report
Under Reports All Reports Manage Payroll Payroll Tax Payments
o This report is needed is Tax Payments are paid within QBO
A sample of these reports can be found in iChannel under Crop Hair Studio.
Export to Desktop
Reasons Why to Export to Desktop:
Change of Structural Organization
Before a client ends their QBO subscription
Client changing firms so we have back up records
Must be using Internet Explorer to export to Desktop.
1. Go to Desktop
2. Click Help Ask Intuit
3. Log into QBO from the Internet Explorer Browser that pops up
4. From the company's Home page, click the ⚙ (Gear) icon, and select Export Data from the menu.
1. Answer the Pop‐up Question “Why are you exporting your company info today?”
5. Click Get Started.
6. Click Continue.
7. Select the data to export, and click Continue.
8. In the Exporting from QuickBooks Online page, click Continue to Download.
9. Verify that the version of QuickBooks desktop, to which you are exporting, is open and is sitting
at the No Company Open screen.19
IMPORTANT: If a company file is currently open, you need to close that file prior to proceeding.
7. Click Download.
8. In the Save your company file to pop‐up window that appears, select a location in which to save
the export_company file.
Note: We suggest you NOT change the file name and save the file to your Q Drive.
9. Once the file has finished downloading, click Convert Now.
10. In the Create new QuickBooks file pop‐up window that appears, give the file a name and save
the file to a local directory.
IMPORTANT: We strongly recommend saving to your local directory. Attempting to save the file
to a network directory or external media may result in the conversion failing.
Note: This will display a pop‐up dialogue window containing a status bar. If the status bar does
not appear to be progressing, check QuickBooks desktop for an Application Certificate.
11. Once the export has completed, click the Finished button, located within the QuickBooks Online
screen.
Apps
Time Tracking
TSheets
TSheets is a flexible, easy‐to‐use time tracker filled with innovative tools to help you maximize
your most valuable resource: time. Whether your employees sit in an office, work in a
warehouse, travel between job sites, or spend the day on the road, there's a simple time
tracking solution just for you:
TSheets mobile time tracking apps for iPhone and Android include GPS
location tracking and allow employees to easily log time from any location
The TSheets Crew app empowers managers to clock in an entire team at
once
TSheets Kiosk operates like a traditional punch time clock but functions on
any tablet or laptop with a simple PIN. Works great as a construction time
clock.
TSheets online web dashboard turns any desktop or laptop into a time
tracker
Dial In, Text Messaging, and Twitter options (no smartphone required!).20
Accounts Payable
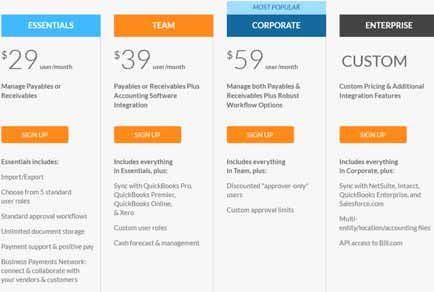
Bill.com
Bill.com is a business payments system that digitizes your accounts payable and receivable
process. Pay and get paid via ACH with full remittance information, store documents, and route
bills for approval. Payments automatically sync with QuickBooks. New bills are received through
your digital inbox. All contracts, invoices, and any supporting documentation will be saved in the
cloud so you can access them anytime, anywhere.
Note: Only suggest this app to clients with good cash flow.21
Expense Tracking
Expensify
Receipt and mileage tracking, expense reporting, and company card reconciliation – all
seamlessly integrated with QuickBooks. Loved by small businesses, accountants, and employees
alike, Expensify is the only AICPA recommended expense solution.
Receipt Bank
Use Receipt Bank to manage all your business expenses. Eliminate data entry ‐ Receipt Bank
extracts the info from your receipts and invoices quickly and accurately. Your data is then
seamlessly synced with QuickBooks Online. No matter how you receive your invoices and
receipts ‐ Receipt Bank can handle them. Submit via mobile app, Dropbox, email, drag & drop
and many more, the software then extracts all the key information for you.
Single User Rates:22
CRM
NeonCRM
NeonCRM is the most robust cloud CRM built specifically for nonprofits. It provides nonprofits
the necessary tools to increase donations, memberships, outreach and attendance while
automating common processes to streamline staff's day‐to‐day tasks. NeonCRM maps, sends,
and syncs transactional information (donation, membership, event registration, store
purchases) to QuickBooks so that your organization does not need to enter data twice.
NeonCRM allows sync'd transactions to be locked as well for accounting integrity purposes as
well.
Inventory
SOS Inventory
A more in‐depth inventory app than QuickBooks itself. SOS Inventory has full support for
multiple locations. See instantly how much inventory is in each of your facilities. Purchase and
receive materials at each location. Ship orders from one or more locations. Transfer items
between locations. You’ll enjoy a key benefit of a high‐priced inventory system at a reasonable
cost. SOS Inventory allows you to track specific items, including serial numbers for each.23
24

                                 QuickBooks Online Support

In the top right corner, click on the question mark to search for common issues, chat with support or
call.

Tip: Many times when QBO is down you cannot get the direct number for QBO Support and will have to
call Intuit. When this occurs use the number above for direct QBO Support.
You can also read