High Availability (HA) - Feature Description UPDATED: 19 March 2021 - KEMP Technologies
←
→
Page content transcription
If your browser does not render page correctly, please read the page content below
High Availability (HA)
Feature Description

UPDATED: 19 March 2021
High Availability (HA)

     Copyright Notices

     Copyright © 2002-2021 Kemp Technologies, Inc. All rights reserved. Kemp Technologies and the
     Kemp Technologies logo are registered trademarks of Kemp Technologies, Inc.

     Kemp Technologies, Inc. reserves all ownership rights for the LoadMaster and Kemp 360 product line
     including software and documentation.

     Used, under license, U.S. Patent Nos. 6,473,802, 6,374,300, 8,392,563, 8,103,770, 7,831,712, 7,606,912,
     7,346,695, 7,287,084 and 6,970,933

     kemp.ax                                2                Copyright 2002-2021, Kemp Technologies, All Rights Reserved
High Availability (HA)
Table of Contents
1 Introduction 5
1.1 Document Purpose 6
1.2 Intended Audience 6
1.3 Related Firmware Version 7
2 Advantages of High Availability (HA) 8
3 Prerequisites 9
4 HA Components 11
5 Set Up HA 12
5.1 Set up the First Unit 12
5.2 Set up the Second Unit 16
5.3 Enable the 'Use for HA Checks' Option 20
5.4 Test Failover 20
6 Performing a Firmware Update on HA Pairs 22
7 HA WUI Options 23
7.1 HA and Clustering 23
7.1.1 Interfaces 24
7.1.1.1 Use for HA checks 24
7.1.2 HA Parameters 25
8 Troubleshooting 35
8.1 General Troubleshooting Tips 35
8.2 Confirm Settings 36
kemp.ax 3 Copyright 2002-2021, Kemp Technologies, All Rights ReservedHigh Availability (HA)
8.2.1 Further Details about IGMP Snooping and PortFast 38
8.3 No HA Status Squares are Visible in the WUI 38
8.4 Green/Red HA Status Squares 39
8.5 Blue HA Status Square 41
8.6 Both Units are Active and the WUI is Unresponsive – Blue or Red Status Square 41
8.7 Gray HA Status Square 41
8.8 Virtual Services Temporarily Unavailable After Failover 41
8.9 No Access to WUI on HA1/2 or Shared 42
8.10 Nothing Works 42
8.11 Issue with Hyper-V and HA on a Pair of VLMs 42
8.12 HA Issues on VMware 43
8.12.1 Both Units Attempt to be the Master Unit 43
8.12.2 Two Virtual LoadMasters on Different Hosts 43
8.13 Synchronization Issue After Unbonding/Bonding an Interface 44
8.14 Log Messages Explanations 44
9 Replacing HA Units 47
References 57
Last Updated Date 58
kemp.ax 4 Copyright 2002-2021, Kemp Technologies, All Rights ReservedHigh Availability (HA)
1 Introduction
1 Introduction
The High Availability (HA) feature of the LoadMaster guarantees the availability of your server farm.
HA is achieved by a hot-standby, failover mechanism. Two identical LoadMaster units are integrated
into the network as a cluster. One machine serves as the active LoadMaster and the second one
remains in a standby, idle state - always prepared to take over the activities from the active server.
This cluster appears as a single logical unit to the internet side and to the server farm side
connections.
kemp.ax 5 Copyright 2002-2021, Kemp Technologies, All Rights ReservedHigh Availability (HA)
1 Introduction
With a HA cluster, each network interface has an individual IP address and one shared IP address
which is shared with the partner unit. The shared IP address is identical for both LoadMaster
appliances, though it is associated with only the active LoadMaster at any given time.
HA in the LoadMaster for cloud products works differently to
that of a regular LoadMaster. For more information and
instructions on how to configure HA on the LoadMaster for
cloud products, refer to the relevant document on the Kemp
Documentation Page.
You must have three IP addresses available for HA configuration purposes. These are required for
the:
l Active unit
l Standby unit
l Shared interface
For a one-armed configuration, only one interface is configured. Two individual Virtual IP (VIP)
addresses are set on each LoadMaster unit as their physical IP address; one address for HA-1 and the
other for HA-2. The third IP address is set for the shared IP address which is for the Web User
Interface (WUI) management page and routing. Additional addresses are needed if there is a need to
set up the HA pair as a two-arm configuration and configure more interfaces. Each additional
interface configured requires three free IP addresses per interface.
1.1 Document Purpose
This document describes the HA feature in the Kemp LoadMaster and provides step-by-step
instructions on how to configure HA (active/standby).
If you want to have multiple units in an active/active
configuration, review the LoadMaster Clustering Feature
Description on the Kemp Documentation Page.
1.2 Intended Audience
Anyone who is interested in learning about the HA feature in the Kemp LoadMaster.
kemp.ax 6 Copyright 2002-2021, Kemp Technologies, All Rights ReservedHigh Availability (HA)
1 Introduction
1.3 Related Firmware Version
Published with LMOS version 7.2.48.4 LTS. This document has not required substantial changes
since 7.2.48.4 LTS. However, the content is in sync with the latest LoadMaster LTS firmware.
kemp.ax 7 Copyright 2002-2021, Kemp Technologies, All Rights ReservedHigh Availability (HA)
2 Advantages of High Availability (HA)
2 Advantages of High
Availability (HA)
The goal of redundant LoadMasters is to provide reliable traffic management, even if one
LoadMaster becomes unavailable. The advantages of HA are as follows:
l Eliminates a single point of failure.
l The second (standby) unit monitors the active unit to detect if a failure has occurred.
l Persistence can be kept using the HA parameters:
l Inter HA L4 TCP Connection Updates
l Inter HA L7 Persistency Updates
kemp.ax 8 Copyright 2002-2021, Kemp Technologies, All Rights ReservedHigh Availability (HA)
3 Prerequisites
3 Prerequisites
There are some prerequisites to be aware of before setting up HA:
l If using physical LoadMasters, it is recommended that the two LoadMasters are:
l Deployed.
l Located on the same subnet.
l In the same physical location.
l Not located further than 100 meters from each other.
l Using the same default gateway.
l A layer 2 connection (Ethernet/VLAN) is required.
l Ensure that you have more than one interconnection between the two LoadMasters to avoid
data loss or lack of availability.
l Use Network Time Protocol (NTP) to keep times on the LoadMasters up-to-date. This ensures
that the times are correct on any logs and that Common Address Redundancy Protocol (CARP)
kemp.ax 9 Copyright 2002-2021, Kemp Technologies, All Rights ReservedHigh Availability (HA)
3 Prerequisites
message timestamps are in sync.
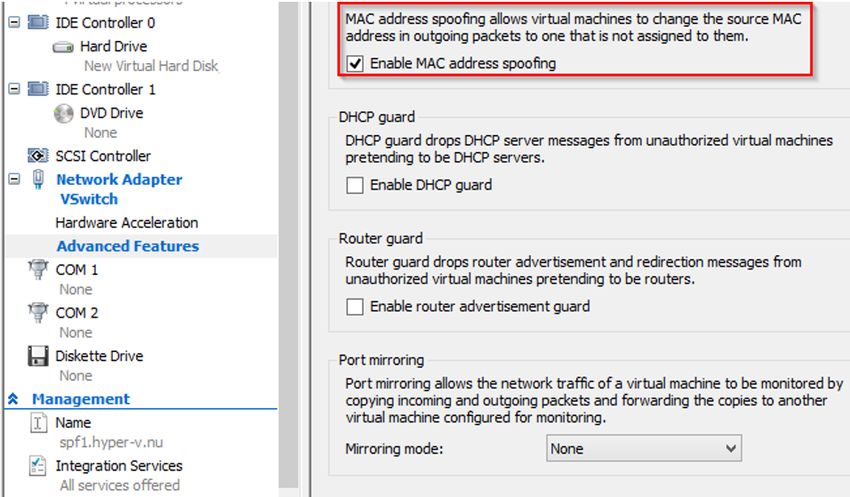
l Ensure that any switches do not prevent MAC spoofing. For example, on Hyper-V, go to the
network adapter settings in the Virtual Machine settings and select the Enable MAC address
spoofing check box.
l Latency on the link between the two LoadMasters must be below 100 milliseconds.
l By default, multicast traffic flow is required in both directions between the devices. This
includes disabling Internet Group Management Protocol (IGMP) snooping on the various
switches between the LoadMasters. Alternatively, you can instead enable HA communication
between the HA LoadMasters using broadcast traffic. Refer to the HA Components section for
further details.
l Three IP addresses are required for each subnet in which the LoadMaster is configured.
l The same LoadMaster models running the same release of LMOS must be used when
configuring High Availability (HA) pairs.
kemp.ax 10 Copyright 2002-2021, Kemp Technologies, All Rights ReservedHigh Availability (HA)
4 HA Components
4 HA Components
LoadMasters in a HA configuration use two protocols, CARP and Sync, to perform health checks and
to synchronize the configuration between LoadMasters.
CARP:
l CARP is the HA protocol that the LoadMaster uses.
l Each HA unit provides health status updates to the other partner.
l The health status updates are used by the standby LoadMaster to decide when it is
appropriate to assume the active role.
l On each interface, the Use for HA Checks option enables CARP requests to be sent over that
interface. It can be enabled on multiple interfaces.
l By default, the LoadMaster uses multicast IP addresses (224.0.0.18) when sending CARP
packets. Alternatively, when the Use Broadcast IP address option is enabled in the HA
Parameters screen, the LoadMaster uses the broadcast address (255.255.255.255) to send
CARP packets.
l CARP works in a similar way to Cisco's Virtual Router Redundancy Protocol (VRRP). For CARP
to work between a pair of LoadMasters, both LoadMasters must be on the same broadcast
domain.
When CARP is used, packet analysis tools (such as Wireshark),
incorrectly display the protocol used as Virtual Router
Redundancy Protocol (VRRP). Any IP addresses displayed by the
packet analysis tools are fictitious and are not part of the CARP
protocol.
Sync:
l Sync maintains a 'single image view' of the LoadMaster settings. It keeps the LoadMaster up-
to-date with changes made to Virtual Services and all other configurations.
l Notable exceptions that are not synchronized are time and the password for the bal user.
l Keeps the standby LoadMaster updated on persistence updates.
kemp.ax 11 Copyright 2002-2021, Kemp Technologies, All Rights ReservedHigh Availability (HA)
5 Set Up HA
5 Set Up HA
5.1 Set up the First Unit
To build a HA LoadMaster environment there are several settings that you must carefully specify.
Follow the steps below to set up HA:
1. Log in to the LoadMaster that you want to be the active (master) unit.
2. In the main menu, select System Configuration and click HA Parameters.
kemp.ax 12 Copyright 2002-2021, Kemp Technologies, All Rights ReservedHigh Availability (HA)
5 Set Up HA
3. A screen appears asking if you want to set up HA Mode or Clustering. To set up HA,
select HA Mode and click Confirm.
For instructions on configuring clustering, refer to the
LoadMaster Clustering Feature Description on the
Kemp documentation page.
4. Select HA (First) Mode in the HA Mode drop-down.
kemp.ax 13 Copyright 2002-2021, Kemp Technologies, All Rights ReservedHigh Availability (HA)
5 Set Up HA
5. Click OK.
Do not reboot at this time.
6. Click OK on the resulting message reminding not to forget to set the shared IP address.
Selecting the Prevent this page from creating additional
dialogs check box stops any warning messages, such as this
one, from appearing.
kemp.ax 14 Copyright 2002-2021, Kemp Technologies, All Rights ReservedHigh Availability (HA)
5 Set Up HA
7. Specify the desired shared IP address in the HA Shared IP address field and click Set
Shared address.
8. A confirmation message may appear. Click OK.
Do not reboot or reconnect at this time.
9. Enter the IP address of the standby unit in the HA Partner IP address field and click Set
Partner address.
10. A confirmation message appears. Click OK.
11. As of the 7.2.36 firmware, the LoadMaster selects a HA Virtual ID based on the shared IP
address of the first configured interface (the last eight bits). You can change the value to
whatever you want (in the range 10 – 255) or you can keep it at its existing value.
Ensure the Virtual ID is unique for each HA pair on the network.
When using multiple HA LoadMaster clusters (or other devices
using CARP-like protocols) on the same network, this value
uniquely identifies each cluster so that there are no potential
unwanted interactions.
12. Configure any other settings as needed.
13. Click Reboot Now.
14. Click Continue.
15. Refresh the page after the LoadMaster has rebooted (this may take a few minutes).
kemp.ax 15 Copyright 2002-2021, Kemp Technologies, All Rights ReservedHigh Availability (HA)
5 Set Up HA
A log in screen appears. After logging in, a different menu
appears than before. This is the Local Administration menu
displayed for HA units - this menu has fewer options. Only
configuration settings pertaining to that specific unit are
accessible using the Local Administration option. All
management of the HA units should be done using the shared
IP address. To see the full menu and configure the units,
access the WUI of the shared IP address, which you configured
previously.
16. Log in to the shared IP Web User Interface (WUI) by entering the shared IP address in the
address bar of the browser and pressing Enter.
In the top-right of the screen there are two indicator squares.
These squares indicate the status of the HA pair. The
left square always represents HA1 and the right represents
HA2. The A represents which unit is active. The first or second
HA unit can be opened by clicking the relevant status icon.
Green and green status colors indicate a properly paired
configuration. Currently, the icons are green and red because
the HA2 unit has not yet joined the pair. For an explanation of
all icon colors and statuses, refer to the HA Parameters
section.
17. Go to HA Parameters in the main menu.
18. Enter a different number (different from the IDs of other HA devices) in the HA Virtual ID
text box and click Set Virtual ID. Using the same ID as other HA devices may cause
problems.
All HA pairs on the network must be assigned unique HA
Virtual ID numbers.
5.2 Set up the Second Unit
Now that HA has been configured on the first unit, the second unit must be set up. Follow the steps
below to do this:
kemp.ax 16 Copyright 2002-2021, Kemp Technologies, All Rights ReservedHigh Availability (HA)
5 Set Up HA
1. Enter the IP address of the second unit in the address bar of the browser and press Enter.
Ensure to enter https:// before the IP address.
2. In the main menu, select System Configuration and click the HA option.
3. A screen appears asking if you want to set up HA Mode or Clustering. To set up HA,
select HA Mode and click Confirm.
4. Select HA (Second) Mode as the HA Mode.
kemp.ax 17 Copyright 2002-2021, Kemp Technologies, All Rights ReservedHigh Availability (HA)
5 Set Up HA
5. Click OK.
6. Click OK.
To prevent any warning messages such as this one from
appearing, select the Prevent this page from creating
additional dialogs check box.
7. Enter the HA Shared IP address and click Set Shared address.
kemp.ax 18 Copyright 2002-2021, Kemp Technologies, All Rights ReservedHigh Availability (HA)
5 Set Up HA
The HA Shared IP address must be the same as the HA Shared
IP address, which was set when configuring the first unit in the
Set up the First Unit section.
8. Click OK.
9. Click OK on the message asking to reconnect to the shared IP address.
10. Enter the IP address of the first (master) unit in the HA pair in the HA Partner IP
address field and click Set Partner address.
11. Click OK.
12. Ensure the HA Virtual ID is the same as it is on the other unit.
If they are not the same, the pairing fails.
13. Change any other settings as needed.
14. Click Reboot Now.
15. Click Continue.
Passwords for the bal account are not synchronized across HA
pairs, so ensure to use the same password on both units.
Problems may occur if different passwords are used.
After rebooting, the HA pair establishes a TCP connection (using port 6973) between the two
addresses. The synchronization process is started for the configuration.
The indicator squares should now be green and green. The A indicates the active unit of the
pair. If the first synchronization attempt fails (that is, the icons are not green and green) a second
attempt might be needed.
kemp.ax 19 Copyright 2002-2021, Kemp Technologies, All Rights ReservedHigh Availability (HA)
5 Set Up HA
On the home screen, the IP address field has changed. In addition to specifying the shared IP
address of the pair, it also specifies the IP address of the unit. The left IP address is the shared
address. The IP address in parentheses is the address of the current unit.
5.3 Enable the 'Use for HA Checks' Option
Some guidelines relating to the Use for HA checks option are below:
l If you have a physical LoadMaster, you can connect a direct cable on eth1 between both
boxes. Leave the IP configuration blank. Select the Use for HA checks check box.
l In a hardware configuration, if the following three conditions are true, this causes problems
because the LoadMaster thinks it is a production link and if one of the LoadMasters reboots,
the other fails too:
l A direct cable is deployed between both units over eth1
l An IP address is on eth1
l Use for HA checks is enabled on that interface
l If the Use for HA checks check box is grayed out it means that this is the only interface
configured to be used for HA checks and it cannot be deselected.
To enable the Use for HA checks option, follow the steps below:
1. Go to the WUI of the shared IP address.
2. In the main menu, select System Configuration.
3. Select the relevant interface.
4. Select the Use for HA checks check box.
These steps can be repeated if you need to enable the Use for HA checks option on more than one
interface.
5.4 Test Failover
Now that the HA units have been set up, failover can be tested if needed. The easiest way to do this
is to reboot the active unit. To reboot the unit, follow the steps below:
1. Log in to the IP address of the active unit.
2. In the main menu, click Local Administration.
3. Select System Reboot.
kemp.ax 20 Copyright 2002-2021, Kemp Technologies, All Rights ReservedHigh Availability (HA)
5 Set Up HA
4. Click Reboot.
5. A confirmation message may appear. Click OK.
6. Click Continue.
When HA1 is back online, both HA status icons should be green. The A should have moved into the
right green square. This means that the secondary unit is now the active unit.
When using local certificates in HA mode – the shared IP
inherits the local certificate from the master unit. So, if a
standby unit has a different local certificate to the master and
failover occurs, the shared IP inherits the local certificate of the
standby (now master) unit.
kemp.ax 21 Copyright 2002-2021, Kemp Technologies, All Rights ReservedHigh Availability (HA)
6 Performing a Firmware Update on HA Pairs
6 Performing a Firmware
Update on HA Pairs
Kemp recommends performing firmware updates outside of working hours. This ensures there is no
interruption to client connectivity. If it has to be done during working hours, Kemp recommend
scheduling a maintenance window.
Before updating the firmware, ensure the Switch to Preferred
Server drop-down list is set to No Preferred Host in System
Configuration > HA Parameters.
Kemp recommends updating the passive unit first and then updating the active unit. This causes
only a single failover and minimal downtime, and is the preferred option for most customers. While
this procedure does leave the currently passive LoadMaster as the active LoadMaster going forward,
this usually has no consequences in most customer environments. However, it is also possible to
update the currently active unit, failover to the passive unit, update the passive unit and then
failover to the originally active unit.
To update the firmware on a HA pair using the recommended method; perform the following steps
using the shared IP address:
1. Update the passive LoadMaster first (we will refer to this LoadMaster as B).
2. When the update is complete, reboot B.
3. When unit B is back up, update the active unit (we will refer to this unit as A).
4. When the update is complete, reboot A. Now B becomes active.
5. Ensure B is handling traffic.
kemp.ax 22 Copyright 2002-2021, Kemp Technologies, All Rights ReservedHigh Availability (HA)
7 HA WUI Options
7 HA WUI Options
See below for descriptions of the various HA-related fields in the LoadMaster WUI.
7.1 HA and Clustering
The HA section in the WUI is called HA and Clustering.
kemp.ax 23 Copyright 2002-2021, Kemp Technologies, All Rights ReservedHigh Availability (HA)
7 HA WUI Options
This screen describes both HA Mode and Clustering. Select the relevant option and click Confirm
to continue.
If clustering is configured, the HA mode options become
unavailable.
7.1.1 Interfaces
If the unit is part of a HA configuration, the following screen displays when you click one of the
interfaces.
This screen tells the user:
l The IP address of this LoadMaster (10.35.47.10 in this example).
l The HA shared IP address (10.35.47.30 in this example). This is the IP address used to
configure the pair.
l The IP address of the paired machine (10.35.47.12 in this example).
l Whether or not this interface is enabled for HA health-checking.
l The speed of the link (automatically detected). If the link is down, it is indicated here.
l Any alternate addresses on this interface.
7.1.1.1 Use for HA checks
Some key points to note about this option are below:
l The Use for HA checks check box must be selected on at least one interface that has
connectivity from HA1 to HA2.
kemp.ax 24 Copyright 2002-2021, Kemp Technologies, All Rights ReservedHigh Availability (HA)
7 HA WUI Options
l If the Use for HA checks check box is grayed out it means that this is the only interface
configured to be used for HA checks and cannot be deselected.
l This option should include at least one production interface, because if HA checks are only
selected on non-production interfaces, the backup unit does not notice if a production
interface goes down and does not take over for the incapacitated unit.
l In a hardware configuration, care should be taken when enabling Use for HA checks on an
interface that is directly cabled between the two units. If a direct cable is deployed between
two HA units over any interface and IP addresses have been set on that interface, then
enabling Use for HA checks on that interface will cause HA issues. The LoadMaster will,
because of the presence of IP addresses on the interface, behave as if the link is a production
link: if one of the LoadMasters reboots, the other will also fail.
7.1.2 HA Parameters
You can change the role of the LoadMaster by setting the HA Mode. If the HA Mode is set to HA
(First) Mode or HA (Second) Mode, a prompt appears reminding you to add a shared IP. Changing
the HA Mode requires a reboot. After the details are set, click Reboot. Once the LoadMaster has
rebooted, the HA Parameters menu option is available in the System Configuration section
provided the role is not Non HA Mode. Configuring both units in the same HA Mode, for example,
HA (First Mode) and HA (First) Mode, results in severe operational problems because; not only will
both units be master, both units try to use the same IP address.
When logging in to the HA cluster, use the shared IP address to view and set the full functionality of
the pair, apart from passwords and licensing. Logging in to the direct IP address of either one of the
devices displays different menu options (see menus below). Logging into one of the LoadMasters
directly is usually reserved for maintenance.
After upgrading from firmware version 7.1-24b or below, if using the FIPS cavium card 1610 FW 2.2
and the LoadMaster is in HA mode, regenerate the web server SSL key to access the WUIs of the
individual LoadMasters.
kemp.ax 25 Copyright 2002-2021, Kemp Technologies, All Rights ReservedHigh Availability (HA)
7 HA WUI Options
When a LoadMaster is in HA mode, the following screen appears when the HA Parameters menu
option is selected:
kemp.ax 26 Copyright 2002-2021, Kemp Technologies, All Rights ReservedHigh Availability (HA)
7 HA WUI Options
After initial configuration, the HA parameters should not be
modified unless both units in the HA pair are available and
operating properly (if they are both showing green icons at the
top of the WUI, with one LoadMaster in active mode and the
other in standby).
HA Status
At the top of the screen, next to the time, icons denote the real-time status of the LoadMaster units
in the cluster. There is an icon for each unit in the cluster. This status is maintained using an
automatic ping between the units.
Clicking these icons opens the management interface of the relevant HA partner.
The possible icons are:
The unit is online and operational and the HA units are correctly paired.
Green (with
‘A’) The A in the middle of the square indicates that this is the master (active)
unit.
The unit is online and operational and the HA units are correctly paired.
Green
(without ‘A’) The absence of an ‘A’ in the middle of the square indicates that this is not
the master unit (standby).
The partner unit is unreachable or turned off. It may be offline or
Red/Yellow misconfigured. The unit is not ready to take over. It may be offline or
incorrectly paired.
When the unit reboots more than three times in 5 minutes it enters a
pacified state. In this state the machine is only accessible using the direct
machine WUI (not the shared WUI) and it is not participating in any HA
activity. Therefore, no changes from the master are received and it does not
Blue take over if the master fails. To remove the unit from the pacified state, fix
the root cause of the health check failures, log in to the pacified LoadMaster
through SSH or the console and reboot.
If a unit continuously reverts to a pacified state, check the network to see if
CARP is being blocked.
kemp.ax 27 Copyright 2002-2021, Kemp Technologies, All Rights ReservedHigh Availability (HA)
7 HA WUI Options
The machine is in an indeterminate state and may require a reboot to
return to operation. A gray box often means the unit has not been set up in
HA mode correctly. A gray box also appears for a few seconds during the
Gray initial HA configuration.
In some cases, it may mean both machines are active, that is, both are set
to master, and something has gone seriously wrong.
Question
The HA status is updating.
marks
Both green
(left box Both units are up, unit 1 is master (A) and unit 2 is standby.
with 'A')
Both green
(right box Both units are up, unit 1 is standby and unit 2 is master (A).
with 'A')
Left box
green, right Unit 1 is up and currently master (A). Unit 1 cannot reach unit 2, or unit 2 is
box turned off.
red/yellow
Left box
red/yellow, Unit 2 is up and currently master (A). Unit 2 cannot reach unit 1, or unit 1 is
right box turned off.
green
Left box
gray, right
HA setup is not complete on unit 1.
box
red/yellow
Left box
red/yellow,
HA setup is not complete on unit 2.
right box
gray
If the HA status squares are not appearing in the WUI, it probably means
No HA icons that HA is not enabled. Go to System Administration and select the HA
option. Ensure the HA Mode is set to either First or Second.
kemp.ax 28 Copyright 2002-2021, Kemp Technologies, All Rights ReservedHigh Availability (HA)
7 HA WUI Options
In HA mode, each LoadMaster has its own IP address that is used only for diagnostic purposes
directly on the unit. The HA pair have a shared IP address over which the WUI is used to configure
and manage the pair as a single entity.
There are a number of prerequisites that must be in place for
HA to function correctly. Refer to the Prerequisites section for
a list of these prerequisites.
HA Mode
If using a single LoadMaster, select NonHA Mode. When setting up HA mode, one LoadMaster must
be set to HA (First) Mode and the other HA (Second) Mode. HA does not operate if both units have
the same HA Mode.
HA Timeout
CARP requests are sent every second from the master. The value selected in the HA Timeout drop-
down list is the time that the master machine must be unavailable before a switchover occurs. With
this option, the time it takes a HA cluster to detect a failure can be adjusted from 3 seconds to 15
seconds in 3-second increments. The default value is 9 seconds. A lower value detects failures
sooner, whereas a higher value prevents HA from failing over too soon if there is a delay when
receiving CARP.
To set this option, follow the steps below:
1. Select System Configuration > HA Parameters.
2. Select the preferred value in the HA Timeout drop-down list.
HA Initial Wait Time
The HA Initial Wait Time is the length of time after the initial boot of a LoadMaster, before the
machine decides that it should become active. If the partner machine is running, this value is
ignored. You can change this value to mitigate the time taken for some intelligent switches to
detect that the LoadMaster has started and to bring up the link.
HA Virtual ID
When using multiple HA LoadMaster clusters (or other devices using CARP-like protocols) on the
same network, this value uniquely identifies each cluster so that there are no potential unwanted
interactions.
Kemp highly recommends using a higher value than 10 because any other HA pair using the same ID
could interfere with HA operations.
kemp.ax 29 Copyright 2002-2021, Kemp Technologies, All Rights ReservedHigh Availability (HA)
7 HA WUI Options
As of the 7.2.36 release, the LoadMaster selects a virtual ID based on the shared IP address of the
first configured interface (the last eight bits). It is selected and displayed once both the shared
address and the partner address are set. You can change the value to whatever you want (in the
range 1 – 255) or you can keep it at the value it already selected. Ensure the virtual ID is unique on
each LoadMaster on the network.
You can find the HA Virtual ID in the LoadMaster WUI by going to System Configuration > HA
Parameters.
Use Broadcast IP address
By default, the LoadMaster uses an IP multicast address (224.0.0.18) when sending CARP packets.
Enabling this option forces the use of the IP broadcast address (255.255.255.255) instead.
Switch to Preferred Server
By default, neither partner in a HA cluster has priority. When a machine restarts after a failover, the
machine becomes the standby and stays in that state until it is forced to master. Specifying a
preferred host means that when this machine restarts, it always tries to become master and the
partner reverts to standby mode.
When set to Prefer First HA, if the LoadMaster fails over, the master reverts to HA1 when HA1
comes back online.
When set to Prefer Second HA, if the LoadMaster fails over, the master reverts to HA2 when HA2
comes back online.
When No Preferred Host is selected, if there is a failover on the LoadMaster, the unit that becomes
master remains as master (failback does not happen).
To change this option, follow the steps below in the LoadMaster WUI:
1. In the main menu, select Local Administration > HA Parameters.
2. Select the relevant option from the Switch to Preferred Server drop-down list.
Some connections may be dropped during the switchover if a
preferred host is specified.
For normal operating conditions, Kemp recommends selecting No Preferred Host.
HA Update Interface
The interface used to synchronize the entire HA configuration within the HA cluster.
Synchronization occurs every two minutes. The information is synchronized over SSH port 6973.
kemp.ax 30 Copyright 2002-2021, Kemp Technologies, All Rights ReservedHigh Availability (HA)
7 HA WUI Options
Hard Reboot on link Failure
In LoadMaster firmware version 7.2.53, a new option was introduced that allows you to specify that
a LoadMaster configured in HA reboots if any configured interface loses connectivity with the
network (that is, experiences a link failure). For further details, refer to the following article: HA
Interface Reboot Feature.
Force Partner Update
Immediately forces the configuration from the active to standby unit without waiting for a normal
update. This option is only available if both units can see each other in an active/standby scenario.
Inter HA L4 TCP Connection Updates
When using L4 services, enabling this option allows L4 connection information to be shared
between the HA partners. If a failover occurs, the connection information will be available on the
unit that assumes the master role. This option does not apply to L7 services.
If you do not allow multicast on the specific interface, inter-HA
updates will not work. If you must have inter-HA updates,
ensure to have a dedicated multicast-enabled interface for this
purpose.
Inter HA L7 Persistency Updates
When using L7 services, enabling this option allows L7 persistence information to be shared
between the HA partners. If a failover occurs, the persistence information will be available on the
unit that assumes the master role. This option does not apply to L4 services.
Enabling this option can have a significant performance impact.
If you do not allow multicast on the specific interface, inter-HA
updates will not work. If you must have inter-HA updates,
ensure to have a dedicated multicast-enabled interface for this
purpose.
HA Multicast Interface
The network interface used for multicast traffic, which is used to synchronize Layer 4 and Layer 7
traffic when Inter HA Updates are enabled.
You can select the interface to send and receive inter-HA traffic from within the WUI of the shared
IP address:
kemp.ax 31 Copyright 2002-2021, Kemp Technologies, All Rights ReservedHigh Availability (HA)
7 HA WUI Options
1. In the main menu, select System Configuration > HA Parameters.
2. The HA Update Interface setting is used for sending HA configuration updates using
TCP/6973 between units. Modify it if needed.
If you have enabled L7 persistency updates or L4 TCP connection updates, an additional
HA Multicast Interface option also becomes available.
Use Virtual MAC Addresses
Selecting this option creates a shared MAC address for both units. When failover occurs, the
LoadMaster handles the MAC address handover too. This allows the switches to keep the same MAC
address and not worry about ARP caches or stale records. This is useful when gratuitous ARPs (used
in communicating changes in HA IP addresses to switches) are not allowed.
Virtual MAC (VMAC) is a way of doing HA at Layer 2, rather than Layer 3. In addition to a shared IP
address, there is a shared MAC address that is owned by whichever unit is active. By implementing
this, all Virtual Service traffic communicates to this shared MAC address, allowing the standby
device to pick up the traffic seamlessly. In the event of a failover, upstream devices do not need to
change the Address Redundancy Protocol (ARP) record associated with the services. The only
change that must occur is that the switch must begin sending frames out a different port.
VMAC is the best way to accomplish HA. The only reason it is not defaulted is because some
environments prohibit migrating MAC addresses across ports. Settings such as Cisco's Port Security
can prevent VMAC from working properly.
A quick way to test whether your environment can use this is the 'laptop test'. To do the 'laptop
test', follow the steps below:
1. Get a laptop and plug it into a port on the switch.
2. Get connectivity.
3. Move the connection to a different port on the same switch.
If connectivity returns without incident, then you should also be able to use VMAC.
If your HA pair is connected to two different switches, the laptop test should be done on the switch
that those switches converge at (rather than the switches the LoadMaster connects to) because that
is where the MAC bookkeeping has to change quickly.
After confirming that VMAC will work in your environment, you can change to Virtual MAC during a
maintenance window because it requires a reboot. Also, ARP must be flushed on relevant devices.
To turn it on, select the Use Virtual MAC addresses check box in the LoadMaster WUI by going to
Local Administration > HA Parameters on both devices. Following that, you must reboot both
kemp.ax 32 Copyright 2002-2021, Kemp Technologies, All Rights ReservedHigh Availability (HA)
7 HA WUI Options
devices. You also must flush the ARP on all upstream devices. It is recommended, but may not be
necessary, to also flush ARP on the Real Servers.
This option is not available in Virtual or Cloud LoadMasters
because they are not physically connected.
This is the expected behavior when Virtual MAC (VMAC) is enabled and a fail-over occurs:
IP address MAC address Type Unit
10.35.47.12 00-10-f3-19-31-26 dynamic Standby unit
10.35.47.10 00-00-5e-00-01-48 dynamic Master unit
10.35.47.30 00-00-5e-00-01-48 dynamic Shared IP
Following a fail-over:
IP address MAC address Type Unit
10.35.47.12
00-00-5e-00-01-48 dynamic New master
10.35.47.10 00-10-f3-19-31-26 dynamic New standby
10.35.47.30 00-00-5e-00-01-48 dynamic Shared IP
Here is the expected behavior without VMAC enabled:
IP address MAC address Type Unit
00-10-f3-19-31-
192.168.11.242
26 dynamic Standby unit
00-10-f3-18-d4-
192.168.11.243 dynamic Master unit
82
00-10-f3-18-d4-
192.168.11.245 dynamic Shared IP
82
Following a fail-over:
kemp.ax 33 Copyright 2002-2021, Kemp Technologies, All Rights ReservedHigh Availability (HA)
7 HA WUI Options
IP address MAC address Type Unit
192.168.11.242 00-10-f3-19-31-26
dynamic New master
192.168.11.243 00-10-f3-18-d4-82 dynamic New standby
192.168.11.245 00-10-f3-19-31-26 dynamic Shared IP
Switches may not update their ARP table to reflect the change in fail-over.
The switch sends traffic to 192.168.11.245 (00-10-f3-18-d4-82 (Standby unit)).
kemp.ax 34 Copyright 2002-2021, Kemp Technologies, All Rights ReservedHigh Availability (HA)
8 Troubleshooting
8 Troubleshooting
This section outlines troubleshooting steps for some common HA-related problems. If further help is
needed, contact Kemp Support.
8.1 General Troubleshooting Tips
General HA troubleshooting steps are below:
l Check that the IP settings for the Interface, Partner, and Shared IP address are correct.
These settings can be found in System Configuration > Interfaces.
l Log in to each of the single HA interface addresses and ensure the HA parameters are correct
(Local Administration > HA Parameters):
l Ensure that the HA pair has one unit in HA (First) Mode and another unit in HA
(Second) Mode.
l Ensure that both units are on the same protocol and HA ID.
l Ensure that all of the IP addresses are available and are not in use by another device. IP
conflict causes numerous problems.
l Shut down one or both LoadMasters and try to ping the IP address of each unit. If there is an
answer, another device is using that IP address. Try the ‘arp -a’ or ‘netstat’ commands to find
out more information on what device that is.
l Set the HA Virtual ID (in Local Administration > HA Parameters) to something other than 1.
The further up the range the better – avoid numbers from 1 to 10 because other HA pairs may
have those IDs and use Virtual Router Redundancy Protocol (VRRP).
The Virtual ID can conflict with any device on the network
which is using VRRP. If there are multiple HA clusters on the
same network, they must also have different Virtual IDs.
l Check that the time of both units are in sync and if they are not, ensure that NTP is
configured and running on both units.
kemp.ax 35 Copyright 2002-2021, Kemp Technologies, All Rights ReservedHigh Availability (HA)
8 Troubleshooting
l Ensure there are no Virtual Services using TCP and port 6973 on the interface where
synchronization is configured.
l Ensure there are no Virtual Services on either of the HA individual addresses.
l Ensure there are no Virtual Services using TCP and port 22 on a LoadMaster interface port.
8.2 Confirm Settings
If you are experiencing problems with HA, confirm that:
l The two LoadMasters are on the same subnet.
l For each Network Interface Card (NIC) that has Use for HA checks enabled, the link status
shows as connected.
l The two units can ping each other and their default gateway. (The ping options are available
in System Configuration > Logging Options > System Log Files > Debug Options.)
l Both units have the same time. Set both units to use the same NTP server and correct time
zone. (The date and time options are available in System Configuration > System
kemp.ax 36 Copyright 2002-2021, Kemp Technologies, All Rights ReservedHigh Availability (HA)
8 Troubleshooting
Administration > Date/Time).
l Unit 1 is set to HA (First) Mode.
Unit 2 is set to HA (Second) Mode.
The HA Virtual ID is the same on both units.
In terms of the network switch settings:
l Confirm that Promiscuous mode and PortFast are enabled.
l If HA is configured for multicast traffic (that is, if Use Broadcast IP address is disabled on the
LoadMaster HA Parameters screen), then:
l Confirm that the switch allows multicast traffic
l Confirm that settings that block multicast traffic, such as 'IGMP snooping', are disabled
on the switch.
Sometimes there are logs relating to HA, such as:
ucarp[2193]: Bad digest - md2=[xxxxx...] md=
[xxxxx...]
- Check vhid, password and virtual IP address
For example:
Jul 13 17:47:10 Kemp_1 ucarp[2193]: Bad digest - md2=[31084da3...] md=
[20dcd914...] - Check vhid, password and virtual IP address
The most common reasons for this error are as follows:
l There is another device on the network with the same HA Virtual ID. The LoadMasters in a HA
pair should have the same HA Virtual ID. It is possible that a third device could be interfering
with these units. As of LoadMaster firmware version 7.2.36, the LoadMaster selects a HA
Virtual ID based on the shared IP address of the first configured interface (the last 8 bits). You
can change the value to whatever number you want (in the range 1 - 255), or you can keep it
kemp.ax 37 Copyright 2002-2021, Kemp Technologies, All Rights ReservedHigh Availability (HA)
8 Troubleshooting
at the value already selected.
l An interface used for HA checks is receiving a packet from a different interface/appliance. If
the LoadMaster has two interfaces connecting to the same switch, with Use for HA checks
enabled, this can also cause these error messages. Disable the Use for HA checks option on
one of the interfaces to confirm the issue. If confirmed, either leave the option disabled, or
move the interface to a separate switch.
8.2.1 Further Details about IGMP Snooping and PortFast
IGMP Snooping
If Internet Group Management Protocol (IGMP) snooping is enabled, this can cause issues when HA
is configured to use multicast packets (the default). With IGMP enabled, the switch intelligently
detects which hosts belong to a multicast to restrict the number of hosts that receive the multicast.
Typically it does not detect LoadMaster multicasts correctly. This can lead to one of two situations -
either CARP packets flow one way or they do not flow at all. This is why Kemp recommends
disabling IGMP snooping when using HA with multicast CARP packets. (IGMP has no effect when
using HA with broadcast CARP packets.).
PortFast
If you do not have PortFast enabled, the following issues may occur:
l The LoadMaster shows as Master/Master after one unit is rebooted
l The LoadMaster (LB1) allows a failover to the passive LoadMaster (LB2). When the port comes
back up, LB1 takes over as master even when no preferred master is set.
When you enable PortFast on the switch, the spanning tree places ports in the forwarding state
immediately, instead of going through the listening, learning, and forwarding states. By default, the
spanning tree sends Bridge Protocol Data Units (BPDUs) from all ports regardless of whether
PostFast is enabled.
Having PostFast enabled on a switch that the LoadMaster is directly connected to is advisable. If a
port goes down, the LoadMaster is aware right away otherwise it performs the three states.
After the changes on the vSwitch, if there is still a Master-Master state, it means the LoadMasters are
on separate hosts and switch setup must be performed on the hardware switch.
8.3 No HA Status Squares are Visible in the WUI
kemp.ax 38 Copyright 2002-2021, Kemp Technologies, All Rights ReservedHigh Availability (HA)
8 Troubleshooting
If the HA status squares are not appearing in the WUI, it may mean that HA is not enabled. Go to
System Administration > HA Parameters and ensure the HA Mode is set to either First or Second.
8.4 Green/Red HA Status Squares
If one of the HA status squares is red, check if one of the machines has crashed. If it has not
crashed, try the following steps:
l If HA is configured for multicast traffic (that is, if Use Broadcast IP address is disabled on the
LoadMaster HA Parameters screen), then:
l Confirm that the switch allows multicast traffic.
l Confirm that settings that block multicast traffic, such as 'IGMP snooping', are disabled
on the switch.
l Ensure that promiscuous mode and portfast is enabled on the switch(es) connecting both
units.
l For Virtual LoadMasters (VLMs);
l Ensure that MAC spoofing is allowed.
l Move both units to the same host to confirm the issue is related to hardware
devices/switches.
l In VMware - ensure Notify Switches is set to No.
l In VMware, there are security policies that can be applied to the virtual switches that
can prevent a Virtual LoadMaster from properly controlling the MAC addresses for HA.
You can find out more about these policies by referring to the VMware documentation.
l Hyper-V has a per-vNIC setting to Allow MAC Spoofing in the Virtual Machine NIC
settings - this must be enabled. This can be enabled in the Hyper-V Manager Graphical
User Interface (GUI) or using PowerShell. Refer to the Microsoft documentation for
further information.
l Reboot both of the units using a single IP.
l Ping between the units.
l Confirm the IP address settings.
l Check the HA settings on both machines.
l Select more than one interface for HA checks.
kemp.ax 39 Copyright 2002-2021, Kemp Technologies, All Rights ReservedHigh Availability (HA)
8 Troubleshooting
l For hardware LoadMasters;
l Connect eth1 with a direct cable, leave the interface unconfigured and select Use for
HA checks.
l Check that No Preferred Host is selected in the Switch to Preferred Server field. If
HA works on eth1, the network could be the issue.
l Connecting eth1 and only using this interface for HA checks could lead to problems if
the production interface goes down because HA failover might not occur.
l Run a TCP dump on unit 2. The source IP address should be the IP address of the
interface. The destination IP address should be either a multicast address (224.0.0.18)
or the broadcast address (255.255.255.255) if Use Broadcast IP address is enabled.
kemp.ax 40 Copyright 2002-2021, Kemp Technologies, All Rights ReservedHigh Availability (HA)
8 Troubleshooting
Check that the Virtual Host ID is correct (51). If no VRRP packets are seen and multicast
CARP is enabled, multicast may be blocked on the switch or IGMP snooping may be
enabled.
l Change the HA Virtual ID to something other than 1 (preferably higher than 10).
l Increase the value of the HA timeouts.
8.5 Blue HA Status Square
If there is a blue HA status square, follow the steps below:
1. Let the affected unit run for 10 minutes.
While waiting you can check the HA parameters to ensure they
are configured correctly.
2. After that, shut down the blue unit for 5 minutes and restart using SSH or the console.
3. Confirm the network and HA settings.
8.6 Both Units are Active and the WUI is Unresponsive – Blue or
Red Status Square
This usually means that both units are set to the same HA Mode, for example HA (First) Mode. This
causes both units to be master and to try to take the same IP address. This causes serious problems
with all functions of the LoadMaster.
8.7 Gray HA Status Square
A gray HA status square usually indicates that the unit has not been set up in HA mode correctly. A
gray square is expected for a few seconds during initial HA setup.
8.8 Virtual Services Temporarily Unavailable After Failover
If Virtual Services are temporarily unavailable after a failover, try flushing the Address Resolution
Protocol (ARP) cache on the next-hop Layer 3 device which the LoadMaster is connected to.
If that does not work, activate Virtual MAC and flush the ARP cache. Activating the Virtual MAC
requires a reboot on both units.
kemp.ax 41 Copyright 2002-2021, Kemp Technologies, All Rights ReservedHigh Availability (HA)
8 Troubleshooting
The Virtual MAC option is not available in Virtual or Cloud
LoadMasters due to the inability to physically influence the
units.
To activate Virtual MAC, follow the steps below:
1. In the shared IP address WUI, go to System Configuration > HA Parameters.
2. Enable the Use Virtual MAC Addresses option.
Selecting this option creates a shared MAC address for both units. When failover occurs, the
LoadMaster handles the MAC address handover too. This allows the switches to keep the same MAC
address and not worry about ARP caches or stale records. This is useful when gratuitous ARPs (used
in communicating changes in HA IP addresses to switches) are not allowed.
8.9 No Access to WUI on HA1/2 or Shared
If the WUI is inaccessible using any of the three IP addresses, try the steps below:
l Wait 5 minutes and try again. Sometimes WUI access has not yet been activated, even though
the LoadMaster is responding to pings.
l Try a different web browser.
l Clear the web browser cache.
l Try from a different computer.
l Log in to the console (of the IP address where the problem is occurring) using SSH, go to
option 3 Local Administration, 4 Web Address and s Immediately Stop Web Server Access,
which will then turn into s Immediately Start Web Server Access. This should restart
hanging WUI access.
8.10 Nothing Works
If everything in this troubleshooting section fails, try to shut down one of the LoadMasters. The
remaining LoadMaster should take over. This can remain in HA mode or be set to single – whichever
works. This provides a working solution until a more permanent fix can be found.
8.11 Issue with Hyper-V and HA on a Pair of VLMs
If you are having problems with Hyper-V and HA on a pair of VLMs, you may need to configure MAC
address spoofing. The following Microsoft TechNet article may help you to fix the problem:
kemp.ax 42 Copyright 2002-2021, Kemp Technologies, All Rights ReservedHigh Availability (HA)
8 Troubleshooting
http://technet.microsoft.com/en-us/magazine/ff458341.aspx
8.12 HA Issues on VMware
Refer to the sections below for some details about HA issues that may occur in a VMware
environment.
8.12.1 Both Units Attempt to be the Master Unit
In some situations, when using HA in a VMware environment, both units might attempt to be the
master unit and it may show the other unit as pacified (represented by a blue HA status square).
This issue could be caused by the VMware Switch configuration. To resolve this issue, select the
options as outlined below on the virtual switch.
Ensure that MAC Address Changes and Forged Transmits are both selected. When they have been
selected, reboot one of the LoadMasters.
The units should now be able to communicate properly. The correct state should now appear in the
HA status icons.
8.12.2 Two Virtual LoadMasters on Different Hosts
Having two Virtual LoadMasters on different hosts can also pose problems on VMware.
kemp.ax 43 Copyright 2002-2021, Kemp Technologies, All Rights ReservedHigh Availability (HA)
8 Troubleshooting
To resolve these issues, select the Notify Switches check box in the NIC Teaming tab of the virtual
switch and select No in the drop-down list.
8.13 Synchronization Issue After Unbonding/Bonding an Interface
Occasionally, after unbonding a bonded interface or bonding an unbonded interface – the
master/standby units cannot communicate. To fix this issue, restart the master unit.
8.14 Log Messages Explanations
Some common HA log messages and their explanations are as follows:
Log
ucarp[]: Bad digest -md2=[...] md=[...] - Check vhid,
password and virtual IP address
Explanation
An interface used for HA checks is receiving a packet from a different interface/appliance.
How to solve
Check that the LoadMaster pair is using a unique HA-ID.
kemp.ax 44 Copyright 2002-2021, Kemp Technologies, All Rights ReservedHigh Availability (HA)
8 Troubleshooting
Check that an interface is not receiving packets from another interface. For example, eth0 is used for
sending HA status but it is connected to the same switch as eth1. In this scenario, eth1 will see the
packets and report this error message.
Log:
ucarp[]: [WARNING] HA Config file has changed - reloading
Explanation:
A user made changes to the HA parameters.
Log:
ucarp[]: [CRITICAL] Detected MASTER - MASTER re-arping
Explanation:
This message occurs when both LoadMasters become "Master". The LoadMaster that is set to "HA
Mode First" (KEMP-1) receives a CARP packet from "KEMP-2". It detects another Master on the
network, informs KEMP-2 that the Master is up and healthy, and re-ARPs to update the
routers/firewalls.
Log:
ucarp []: [WARNING] Bad TTL
Explanation:
This means the machine sending the CARP message (this might not be a LoadMaster) is not on the
same network. It is at least one hop away.
Log:
ucarp []: [WARNING] Switching to state: MASTER
Explanation:
The connection to the partner unit has been lost or the unit is not responding correctly to CARP
messages.
How to solve:
kemp.ax 45 Copyright 2002-2021, Kemp Technologies, All Rights ReservedHigh Availability (HA)
8 Troubleshooting
Verify that the partner unit is up and running. Follow the tips in the General Troubleshooting
Tipssection and confirm all switch settings per the guidelines in the Confirm Settings section.
kemp.ax 46 Copyright 2002-2021, Kemp Technologies, All Rights ReservedHigh Availability (HA)
9 Replacing HA Units
9 Replacing HA Units
When replacing HA units, it is important to follow the correct steps in sequence to ensure that there
is little or no downtime for end users. The below example has two old units which are to be
replaced with two new units.
The steps below are written assuming that the new units are powered on and available to be
provisioned and that all cabling is in place.
Old unit 1 (A) (Master) Old unit 2 (B) (Standby)
No preferred master set
Replacement units:
New unit 1 (C) New unit 2 (D)
Update the firmware on the old units if possible. For further information on how to upgrade the
firmware of a HA pair, refer to the Performing a Firmware Update on HA Pairs section and the
Updating the LoadMaster Software Feature Description on the Kemp Documentation Page.
1. On the WUI of the individual unit being replaced, in the main menu, go to Local
Administration > Backup/Restore.
2. Click Create Backup File.
3. Save the backup file.
kemp.ax 47 Copyright 2002-2021, Kemp Technologies, All Rights ReservedHigh Availability (HA)
9 Replacing HA Units
4. In the main menu, go to Certificates & Security > Backup/Restore Certs.
5. Enter the same passphrase in the Passphrase and Retype Passphrase text boxes.
Retain this passphrase because you need it to restore the
certificates.
6. Click Create Backup File.
7. In the WUI of unit 1 (A), in the main menu, go to System Configuration > HA
Parameters.
8. Select Prefer First HA in the Switch to Preferred Server drop-down list.
Specifying a preferred host means that when the machine
restarts, the preferred unit always becomes master and the
kemp.ax 48 Copyright 2002-2021, Kemp Technologies, All Rights ReservedHigh Availability (HA)
9 Replacing HA Units
partner reverts to standby mode. This may cause connection
loss.
9. Remove old unit 2 (B) from production.
As old unit 1 (A) is master, this should not affect production.
10. In the WUI of new unit 2 (D), in the main menu, go to System Configuration > System
Administration > Backup/Restore.
You cannot restore the LoadMaster Base Configuration of a
standalone unit to a HA pair.
11. Click Choose File.
12. Browse to and select the backup file.
13. Select the configuration(s) to be restored.
This is the backup from old unit 2 (B).
14. Click Restore Configuration.
It is not possible to restore a single machine configuration onto
a HA machine, or restore a HA configuration onto a single
machine. A unit must be put into HA mode before a backup
from a HA machine can be used to restore the LoadMaster
Base Configuration.
kemp.ax 49 Copyright 2002-2021, Kemp Technologies, All Rights ReservedHigh Availability (HA)
9 Replacing HA Units
It is not possible to restore a configuration containing ESP-
enabled Virtual Services onto a machine which is not enabled
for ESP.
15. Click Reboot Now.
16. Click Continue.
17. In the main menu, go to Certificates & Security > Backup/Restore Certs.
18. Click Choose File.
19. Browse to and select the certificate backup file.
20. Select All VS and Intermediate Certs..
21. Enter the Passphrase which was entered when taking the certificate backup.
22. Click Restore Certificates.
23. In the main menu, go to Local Administration > Interfaces.
24. Select the relevant interface.
25. Check that the Interface Address (address[/prefix]), the HA Shared IP address and HA
Partner IP address are correct before adding it to the production unit.
kemp.ax 50 Copyright 2002-2021, Kemp Technologies, All Rights ReservedHigh Availability (HA)
9 Replacing HA Units
26. In the main menu, go to Local Administration > HA Parameters.
27. Ensure that the HA Virtual ID is correct and unique.
28. When the new unit 2 (D) is connected, open the WUI of the shared IP address and in the
main menu, go to System Configuration > HA Parameters.
29. Click Force Update.
kemp.ax 51 Copyright 2002-2021, Kemp Technologies, All Rights ReservedHigh Availability (HA)
9 Replacing HA Units
This copies the configuration from the old unit 1 (A) (Master) to
the new unit 2 (D) (standby). This takes approximately 15
seconds.
30. When the update has completed, in the main menu, go to System Configuration > HA
Parameters.
31. Select Prefer Second HA in the Switch to Preferred Server drop-down list.
This drops all connections while the second unit takes over as
master.
Old unit 1 (A) (Standby) New unit 2 (D) (Master)
Preferred master: unit 2
kemp.ax 52 Copyright 2002-2021, Kemp Technologies, All Rights ReservedYou can also read