Rugged Notebook N15b User Manual - Acturion
←
→
Page content transcription
If your browser does not render page correctly, please read the page content below
Rugged Notebook N15b
User Manual
Table of Contents
BEFORE YOU START ...................................................................................................................................................................................................................
PACKAGE CONTENTS .................................................................................................................................................................................................................
PRODUCT OVERVIEW ................................................................................................................................................................................................................
STATUS INDICATORS ..................................................................................................................................................................................................................

GETTING STARTED
INSTALLING THE BATTERY ......................................................................................................................................................................................................
USING THE OPTICAL DISC DRIVE (ODD) ...........................................................................................................................................................................
USING THE STORAGE DRIVE .................................................................................................................................................................................................
CONNECTING THE POWER ......................................................................................................................................................................................................
STARTING YOUR NOTEBOOK ..................................................................................................................................................................................................
USING THE KEYBOARD ............................................................................................................................................................................................................
USING THE TOUCH PAD ............................................................................................................................................................................................................

OPERATING YOUR NOTEBOOK
USING THE CAMERA .................................................................................................................................................................................................................

MAKING CONNECTIONS
INSTALLING THE MEMORY CARD .........................................................................................................................................................................................
REMOVING THE MEMORY CARD ..........................................................................................................................................................................................
USING THE SIM CARD ...............................................................................................................................................................................................................
USING THE SMART CARD ........................................................................................................................................................................................................
CONNECTING THE MICROPHONE/HEADSET ...................................................................................................................................................................
CONNECTING USB DEVICES ...................................................................................................................................................................................................
CONNECTING TO EXTERNAL DISPLAYS ..............................................................................................................................................................................
CONNECTING TO A LOCAL AREA NETWORK (LAN) .......................................................................................................................................................
CONNECTING TO WIRELESS CONNECTIONS.....................................................................................................................................................................

USING THE BIOS SETUP UTILITY
BIOS SETUP MENU .....................................................................................................................................................................................................................
MAIN MENU...................................................................................................................................................................................................................................
ADVANCED MENU ......................................................................................................................................................................................................................
BOOT MENU .................................................................................................................................................................................................................................
SECURITY MENU .........................................................................................................................................................................................................................
SAVE & EXIT MENU ....................................................................................................................................................................................................................

MAINTAINING AND CARING FOR YOUR NOTEBOOK
PROTECTING YOUR NOTEBOOK ............................................................................................................................................................................................
STORING AND HANDLING YOUNOTEBOOK ......................................................................................................................................................................
CLEANING YOUR NOTEBOOK .................................................................................................................................................................................................
TRAVELRAVELING WITH YOUR NOTEBOOK ......................................................................................................................................................................

TROUBLESHOOTING
PRELIMINARY CHECKLIST .......................................................................................................................................................................................................
SOLVING COMMON PROBLEMS ..........................................................................................................................................................................................
DISPLAY PROBLEMS ..................................................................................................................................................................................................................
HARD DISK PRROBLEMS ..........................................................................................................................................................................................................
OTHER PROBLEMS .....................................................................................................................................................................................................................

APPENDIX
COPYRIGHT ...................................................................................................................................................................................................................................
SPECIFICATIONS ..........................................................................................................................................................................................................................
REGULATORY STATATEMENT....................................................................................................................................................................................................
SAFETY INSTRUCTIONS ............................................................................................................................................................................................................

                                                                                                                                                                                                                                                2
ENGLISH

Before You Start
Congratulations on your purchase of this notebook .

This semi-rugged notebook is portable and provides users with maximum mobile computing experience in a wide range of
working environments. Before you begin using your notebook , read this chapter to familiarize yourself with the main
components installed in the system.

Package Contents
If any of the following items is damaged, please contact your retailer.

                           Notebook                                                         Power cord

                     Lithium Battery Pack                                            DC 19V 65 W power adapter

                                                              NOTE
                             • These pictures are for reference only Actual items may slightly differ.

3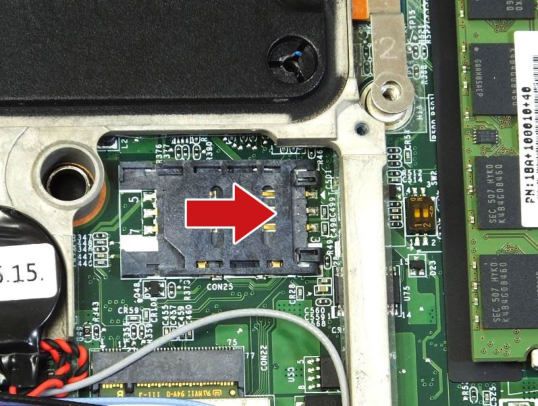
Product Overview
Front View

     1   Microphones                           Record the surrounding sound.
     2   Web camera                            Use for video conference.
     3   Display screen                        Provide visual output.
     4   Power button                          Press to turn your notebook on or off.
     5   Keyboard                              Press the keys to input information.
     6   Touch Pad                             Use to point, select, drag, or scroll objects on the screen.
     7   Touch pad button                      Press to select objects or display a shortcut menu.
         Device Indicators (Power, Wireless,
     8   HDD, Caps Lock, Num lock, Battery)
                                               Indicate the corresponding function status.

                                                                                                              4
ENGLISH

Back View

     1    Battery latch         Slide to the unlock position to release the battery.
     2    Battery compartment   Install the battery.
     3    Speakers              Emit sound.
     4    CTO door              Remove the door to access the SIM card slot.

5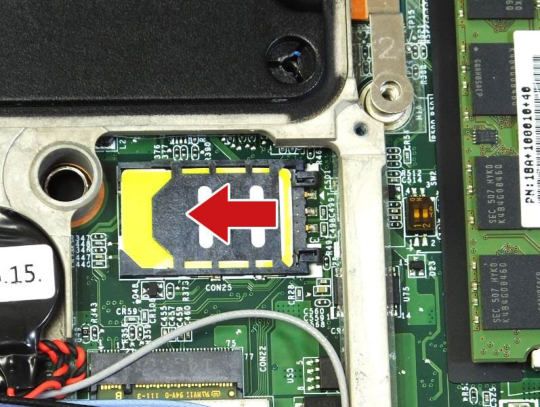
Right View

                                             Use to insert memory cards to transfer pictures, music, and data
     1   Card reader                         between your notebookand flash compatible devices. Thecard reader
                                             supports SD (Secure Digital), SDXC, Mini-SD (with adapter).
     2   Earphone jack                       Connect headphones or external speakers.

     3   USB 3.1 (type A) ports(x2)          Connect USB 3.1 (Gen.1) peripheral devices.

     4   DC-in jack                          Connect the power adapter.

Left View

     1   Kensington lock slot         Connect to a Kensington-compatible notebook security lock.

                                      Varies depending on SKU:
     2   Media bay                      • Optical disk drive
                                        • Secondary storage

     3   Smart card reader            Use to insert smart cards.
                                      Slide it to the left to enable all wireless network (WLAN) and Bluetooth
     4   RF switch
                                      communications.

                                                                                                                 6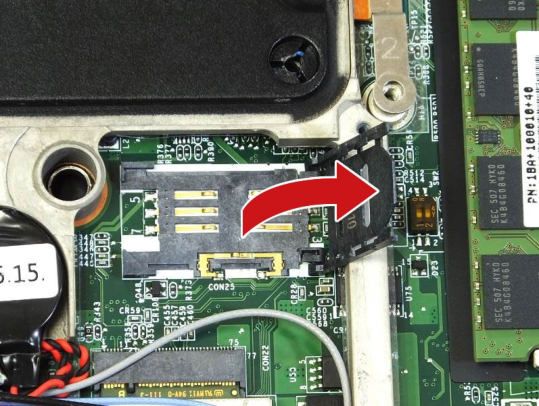
ENGLISH

Rear View

            1    USB 3.1 (type A) port               Connect USB 3.1 (Gen2) peripheral devices.
            2    USB 3.1 (type C) port               Connect USB 3.1 (Gen2) peripheral devices.
            3    RJ 45 port                          Connect to a local area network (LAN) using an Ethernet cable.
            4    HDMI output port                    Connect an HDMI device such as an external HDMI LCD TV.
            5    VGA port                            Connect to a display device such as an external monitor or a projector.
            6    RS 232 port                         Connect a serial peripheral device.

Status Indicators
The status indicators light up when a particular function of the notebook is active. Each indicator is marked with a symbol .

                                         The LED always lights on (blue) when the system is running. When the system is in stand-
                 Power
                                         by mode, the LED blinks. When the system is off or in hibernate mode, the light is off.

                                         Indicate the status of RF (WLAN, Bluetooth, or WWAN/GPS) communication. The LED
                 RF
                                         always lights on (blue) when the function is enabled.

                 HDD                     A blinking HDD LED indicates HDD activity (data is being read or written).

                 Num Lock                Lights on when Num Lock is activated.

                 Caps Lock               Lights on when Caps Lock is activated.

                                         Indicate the battery status:
                                           • Green light means the battery is fully charged or the battery capacity higher than
                                              95%.
                                           • Orange light means the battery is being charged.
                 Battery
                                           • Blinking orange light means the battery cannot be fully charged over 8 hours of
                                              charging.
                                           • Blinking red light means the battery power is low (less than 7%).
                                           • When the light is off it means the battery is discharging.
7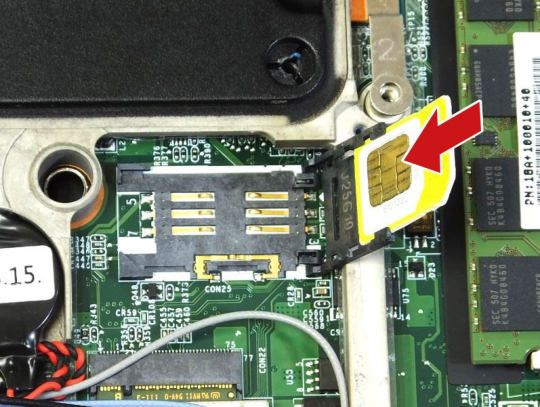
Getting Started
This chapter will help you get started using the device.

CAUTION!
Before any internal installation procedures are carried out on the system, make sure the system is turned off and cooled down
for 5 minutes. Failing to turn off the system before opening it can cause permanent damage to the system and serious or fatal
inju ry to the user.

Installing the Battery
To install the battery, follow the steps below:
  1. Align and insert the battery into the battery compartment.

                                                                                                                                8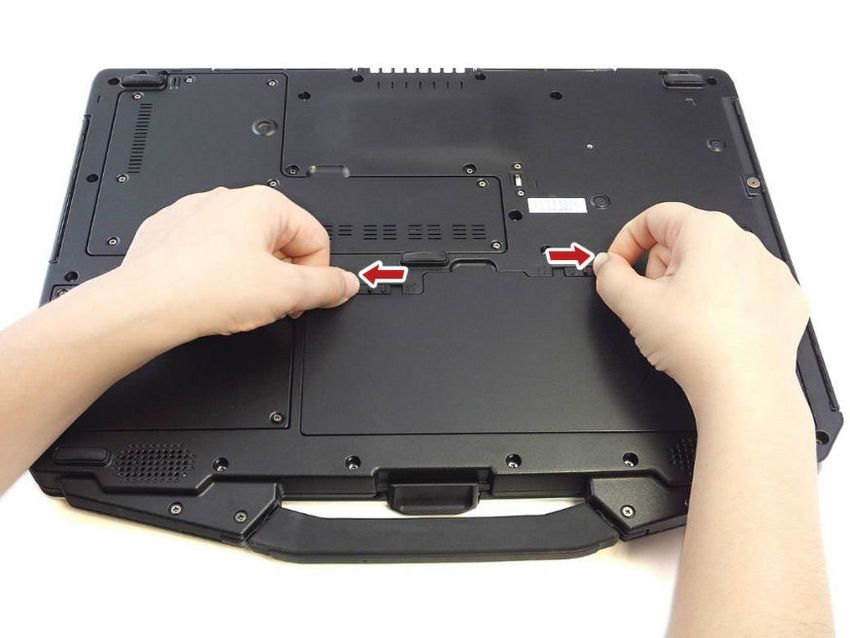
ENGLISH

    2. Push completely until the battery locks into place.
    3. Slide the latch to the lock position ( ) to secure the battery.

Charging the Battery
The Lithium-ion battery is not fully-charged upon purchase.months of usage.

To charge the battery, follow the steps below:
  1. Install the battery to your notebook. See procedures above.
  2. Connect the AC adapter to the DC-in jack of your notebook.
  3. Connect the AC adapter to the power cord.
  4. Plug the power cord to an electrical outlet.

Charging Time
It takes approximately 3.5 hours to fully charge the battery.

NOTE
 • The charging time may be longer if you are using your notebook while charging the battery.

CAUTION!
 • DO NOT charge the battery if the temperature is below 0ºC or higher than 45ºC.
 • Use only the supplied AC adapter. Using other AC adapters may damage the battery or your notebook.

ATTENTION!
  • NE PAS charger la batterie si la température est inférieure à 0° C ou supérieures à 45º C.
  • Utilisez uniquement l'adaptateur secteur fourni. L'utilisation d'autres adaptateurs secteur peut endommager la batterie ou
    de votre tablette PC.

9
Checking the Battery Level
It is important that you monitor the battery status regularly to ensure you do not run out of power at a critical moment.

To check the remaining battery power, click the battery icon () on the system tray.

The battery screen appears, as shown on the right:

When to replace the Battery Pack
The battery performance gradually decreases over time and usage. We recommend you replace your battery pack 18 to 24
months after purchase.

Removing the Battery
To remove the battery, follow the steps below:

  1. Slide the battery latch to the unlock position ( ).

                                                                                                                            10
ENGLISH 2. Remove the battery out of the battery compartment. 11
Using the Optical Disc Drive (ODD)
You can use the optical disk drive (ODD) to play or record DVD or CD disc.

Placing a Disk
To place a disk, follow the steps below:
  1. Open the ODD cover.

  2. Press the Eject button to eject the tray.

  3. Place the disc on the tray.
  4. Close the disc tray.

Manual Ejection
If the Eject button fails to work properly, insert a paper clip into the Pin Hole Eject to open the tray.

NOTE
 • Be sure that the notebook is turned off before performing the manual ejection.

                                                                                                            12
ENGLISH Using the Storage Drive Replacing the Storage Drive To replace the storage drive, follow the steps below: 1. Remove the screws securing the HDD compartment door to the device. 2. Remove the HDD compartment door. 13
3. Use the pull tab to release the HDD module from the HDD compartment. DO NOT remove the HDD module yet!

4. Disconnect the HDD module from the mainboard connector.

5. Connect the HDD module to the mainboard connector (visible inside the HDD compartment).

                                                                                                            14
ENGLISH 6. Lower the HDD module into its compartment. 7. Replace the HDD compartment cover. 8. Secure the HDD compartment cover to the device with the screws. 15
Connecting to Power
Your notebook can be powered up using the AC adapter or the Lithium-ion battery.

Connecting the AC Adapter
The AC adapter powers up your notebook and charges the battery.

     1. Connect the AC adapter to the DC-in jack on your notebook.
     2. Connect the AC adapter to the power cord.
     3. Plug the power cord into an electrical outlet.

Using Battery Power
1.     Install the charged battery in the battery compartment.
2.     Remove the AC adapter (if plugged in). Your notebook will automatically use the battery power.

NOTE
 • If you are using the notebook with the battery power for the first time, be sure that the battery is fully charged before you
    operate the notebook.

                                                                                                                              16
ENGLISH Configuring the Power Settings 1. Right-click the battery icon ( ) on the system tray. Then select Power Options. 2. Select Change plan settings to customize a power plan. 3. Change the desired sleep and display settings. Then select Save changes. 17
Starting Your Notebook
Turning On Your Device
  1. To open the display panel, lift the cover lid up to upright position.

  2. Press the   button until the Power LED lights up.

Turning Off Your Device
It is important to properly shut down your notebook to avoid the loss of unsaved data. To shut down your notebook, do the
following:

Click > > Shut down.
Wait for your notebook to power off
completely before removing the power
source (if necessary).

                                                                                                                            18
ENGLISH
Using the Keyboard
NO. Keys Description
These function keys are used to perform designated tasks. The tasks for each
1 Function keys
key may vary from one application to another.
[Fn] Press the [Fn] key in combination with other keys to execute a command.
[Fn] + F1 Enables/Disables the Bluetooth function.
[Fn] + F2 Enables/Disables the 3G/GPS function.
[Fn] + F3 Enables/Disables the WLAN function.
[Fn] + F4 Switches to suspend mode (Suspend to RAM/HDD).
[Fn] + F5 Toggles between LCD, External display, or both.
2 [Fn] + F6 Decreases the brightness level.
[Fn] + F7 Increases the brightness level.
[Fn] + F8 Decreases the volume by one level.
[Fn] + F9 Increases the volume by one level.
[Fn] + F10 Turns on or mutes the volume.
[Fn] + F11 Toggles the touch pad to on/off.
[Fn] + F12 Toggles the keyboard backlight to on/off (only for backlit keyboard).
Press to display the Start menu. This action is the same as clicking the Start
3 Windows key
icon.
Press the Num Lk key to activate the numeric keypad. Press the keys on the
4 Numeric keypad
numeric keypad to enter numbers or operands as you would on a calculator.
Press to display an application shortcut menu. This action is the same as right
5 Application key
clicking a mouse button.
19Using the Keyboard
The touch pad is a cursor-pointing device that provides all the features of a two-button mouse. Its primary function is to move
the cursor around the screen. You can also point, select, or drag items or objects on the screen.
Main touchpad
Left button Right button
Point
Slide your finger on the touch pad to point the cursor to an item or object on the screen.
Click
To left click, move the cursor to the item or object on the screen, then lightly tap the touch pad or press the left button.
To right click, move the cursor to the item or object on the screen, then press the right button.
Double-click
To double click, move the cursor to the item or object on the screen, then tap the touch pad twice or press the left button twice.
Drag
To drag an item or object, press and hold the left button then slide your finger on the touch pad to move the item or object.
Scroll
To scroll through a page, press and hold the left button, then slide your finger on the touch pad to scroll.
20ENGLISH
Operating Your Notebook
This chapter will guide you through how to use your notebook.
Using the Camera
Using the Camera application, you can use this notebook to take photos or videos.
Opening Camera App
To access the Camera application, do one of the following:
a. Click > Camera.
b. In the Cortana search box, enter
‘camera’. Then click Camera.
21Taking Photos
Click to capture a photo.
Recording Videos
1. Click to switch to Video mode.
NOTE
• You can also toggle / and press Enter to switch to Video mode.
22ENGLISH
2. Click to start recording a video, as shown on the previous page. The recording time appears on the bottom of the
screen.
3. During the video recording, you can do the following:
• Click to pause the recording. Then click to resume.
• Click to stop recording the video.
Adjusting Brightness
1. Click to display the brightness control slider
NOTE
• If the icon does not appear on the top panel, click .
2. Do the following:
• Click and drag the slider upwards to brighten your photo or video.
• Click and drag the slider downwards to darken your photo or video.
23Setting Photo Timer
Click to toggle the desired time delay.
• : Self-timer is off
• : 2-second self-timer
• : 5-second self-timer
• : 10-second self-timer
Configuring Camera Settings
1. Click to enter the Settings menu.
24ENGLISH
2. Select the desired menu option and setting.
Menu Option Description
When I press and
hold the camera Select an action when you press and hold the camera button.
button
Photos
Quality Set the photo resolution.
Framing grid Show or hide the framing grid lines.
When the setting is set to On, the system will keep taking photos
Time lapse
until the Camera button is pressed a second time.
Videos
Quality Set the video quality.
Select 50 Hz or 60 Hz to reduce the flickering that may occur when
Flicker reduction
recording video under fluorescent light.
When the setting is set to On, then the system reduces high-
Digital video stabi-
frequency frame-to-frame jitter that is produced by video camera
lization
shake.
Select the related settings that can only be configured in the
Related settings
Settings app.
Viewing Photos/Videos
After taking a photo or recording a video, click the thumbnail (in the bottom right corner) to view the most recent photo or
video taken.
Swipe right to see other photos or videos in your collection.
25Making Connections
This chapter will guide you through installing peripheral devices to maximize the use of your notebook.
Installing the Memory Card
Your notebook supports different types of memory cards to provide faster data transfer.
Supported types: SD card, SDXC card, and Mini-SD card (with adapter).
1. Open the I/O port cover.
2. With the label side up, push the memory card into the memory card slot until it clicks into place.
3. Push the memory card into the memory card slot until it clicks into place.
4. Close the I/O device cover.
Removing the Memory Card
It is important to remove the memory card properly. Improper removal may cause the data in the memory card to be corrupted
and your notebook to malfunction.
To properly remove the memory card, follow the steps below:
1. Click the removable disk icon on the system tray.
2. Click Eject EMV Smartcard Reader.
The system confirms that the device can be safely removed.
3. Open the I/O port cover.
4. Push the memory card to eject it.
5. Pull the card out from the slot.
6. Close the I/O device cover.
26ENGLISH Using the SIM Card You can use a SIM card for wireless internet access. NOTE • Check the availability of service and data plan rates with your network service provider. • Make sure to turn off the notebook before inserting the SIM card. 1. Remove the screws securing the CTO door. 1. Remove the CTO door. 27
3. Push the SIM card slot forward to release it from the latch.

4. Lift the SIM card slot upward.

5. Slide a SIM card into the SIM card slot.

                                                                  28
ENGLISH 6. Gently place down the SIM card slot. 7. Push the SIM card slot backward until it locks into place. 8. Replace the CTO door. Then secure the CTO door using the screws. 29
Using the Smart Card
Your notebook is equipped with a built-in smart card reader that allows you to make secure purchases, store security informa-
tion, and provide identification and information using a smart card.
   1. Open the I/O port cover.
   2. Insert a smart card into the smart card slot.

  3. Close the I/O port cover.

Connecting the Microphone/Headset
Your notebook is equipped with an audio combo jack that enables you to use a headset or microphone.
  1. Open the I/O port cover.
  2. Plug the stereo headphones cable into the audio combo jack of your device.

NOTE
 • A headset and microphone are not included in the package for this device. They are sold separately.

                                                                                                                            30
ENGLISH Connecting USB Devices You can connect your notebook to other USB devices, such as a mouse, keyboard, digital camera, printer, or an external storage drive. 1. Open the I/O port cover. 2. Connect one end of the USB cable to the USB port of your device or connect the device directly to the USB port. 3. Connect the other end of the cable to the USB device (if necessary). NOTE • USB cable is not included in the package. It is sold separately or it may come with your USB device. 31
Connecting to External Displays
You can connect an additional display to your notebook by using the HDMI or VGA cable.
  1. Open the I/O port cover.
  2. Connect one end of the HDMI or VGA cable to its corresponding port on your device.

 3. Connect the other end of the cable to the external display.
NOTE
 • An HDMI cable or VGA cable is not included in the package for this device. They are sold separately.

Connecting to a Local Area Network (LAN)
You can connect your notebook to a local area network (LAN) using the Ethernet cable.
  1. Open the I/O port cover.
  2. Connect one end of the Ethernet cable to the RJ 45 port on your notebook.

 3. Connect the other end of the Ethernet cable to the router.
NOTE
 • An Ethernet cable is not included in the package. It is sold separately.

                                                                                                          32
ENGLISH
Connecting to Wireless Connections
You can connect your notebook to a Bluetooth device, wireless local area network (WLAN), or WWAN.
1. Open the I/O port cover.
2. Connect one end of the HDMI or VGA cable to its corresponding port on your device.
NOTE
• Make sure to slide the RF Signal switch to enable the RF functions.
1. Open the I/O cover.
2. Slide the RF switch to the left to enable the wireless function.
Connecting to a Bluetooth Device
Your notebook can connect and communicate with other Bluetooth-enabled devices. By default, the Bluetooth function is
disabled.
To add a device, follow the steps below:
1. Press both Fn and F1 keys to turn on the Bluetooth function.
2. Click the Bluetooth icon ( ) on the system tray.
3. Click Add a Bluetooth Device.
The system starts scanning for Bluetooth
devices and displays the available devices.
NOTE
If the device that you want to add does not appear on the screen,
please check if the device is turned on and discoverable.
334. The Bluetooth and other devices screen appears. Click Add Bluetooth or other device.
5. The Add a device screen appears. Click Bluetooth.
34ENGLISH
6. Select the desired device to pair and then click Connect to confirm the pairing code (PIN). Confirm the pairing code also in
the other Bluetooth device to establish the connection.
7. After pairing is complete, click Done.
NOTE
• The pairing method varies depending the type of device you are pairing with. You may be prompted to enter the
pairing code, confirm the pairing code, or the device will pair automatically.
8. When the pairing process is complete, the connection status will show “Connected”.
NOTE
• Most Bluetooth enabled devices need to be paired with your notebook. The PIN you enter on the notebook must be the
same PIN to be entered on the other Bluetooth device.
• Once a partnership has been created, connecting to that device again will no longer require entering the PIN.
• To disconnect from the Bluetooth enabled device, select the device in the Bluetooth menu and click Remove device.
35Connecting to a Wireless Local Area Network
Your notebook comes with a WLAN module. A wireless network can be added either when the network is detected or by manu-
ally entering the settings information.
To connect, follow the steps below:
1. Press both Fn and F3 keys to turn on the wireless network function.
2. Click the wireless network icon ( ) on the system tray.
3. Available wireless network connections
are displayed. Select the desired
wireless network.
4. Click Connect.
Some networks require a network
security key or a password.
NOTE
• Check Connect automatically box to automatically con-
nect to this network when it is available.
5. Enter the network security key and click Next.
6. A connection confirmation message appears on the screen. Click Yes or No.
7. After the connection is established, you can see the wireless icon ( ) on the system tray.
NOTE
• Wi Fi access requires service from a wireless service provider. Contact your service provider for more information.
• Actual wireless connectivity will depend on system configuration. Please contact your dealer for more information.
• To disconnect from the wireless network, select the network in the wireless network list and click Disconnect.
36ENGLISH
Connecting to a Wireless Wide Area Network (WWAN)
The WWAN function allows your notebook to connect to the Internet using mobile or cellular data networks.
To connect, follow the steps below:
1. Insert a valid SIM card into the SIM card slot (refer to page 35).
2. Click the cellular network icon ( ) on the system tray. Then, click Cellular to enable the Internet connection via mobile data
network.
NOTE
If you do not see the cellular network icon, click on the system tray, and click
Cellular to enable the function.
37Using the BIOS Setup Utility
Your notebook has a BIOS setup utility, which allows you to configure important system settings, including settings for various
optional functions on the notebook. This chapter explains how to use the BIOS setup utility.
BIOS Setup Menu
The BIOS Setup Utility allows you to configure your notebook’s basic settings. When you turn on your notebook, the system
reads this information to initialize the hardware so that it can operate correctly. Use the BIOS setup utility to change your note-
book start-up configuration. For example, you can change the system’s security and power management routines.
Starting the BIOS Setup Utility
You can only enter the BIOS setup utility as the notebook is booting, i.e., between the time you turn on the notebook and before
the Windows interface appears.
If your notebook is already on, shut down your notebook completely (power off), restart it, and then press the Delete button on
the keyboard to enter the setup utility.
Selecting the Boot Device
Restart your notebook and press the F12 button on the keyboard when the Pokini Rugged logo appears. Then select the boot
device.
Navigating and Entering Information in BIOS
Use the following keys to move between fields and to enter information:
Keyboard Description
Select screen
Select item
Enter Select
+/- Change Opt.
F1 General Help
F2 Previous Values
F3 Optimized Defaults
F4 Save & Exit
ESC Exit
Users are allowed to enter new values to replace the default settings in certain fields, and the rest of the fields are specified
by system default parameters and cannot be modified by users. Reverse the attribute of the main options and press the Enter
button to enter into the submenu. Press the Esc button to return to the previous configuration page. To display the Help screen
at any time, simply press the F1 button.
38ENGLISH
Main Menu
The Main Menu displays the device’s system overview information, including the system date and time.
Item Description
BIOS Information Display the BIOS version detected during boot up.
Display the CPU type and speed, total memory, mainboard version,
System Information UEFI Firmware version, processor type, ME FW version, ME Firm-
ware SKU, serial number, and UUID.
SATA Information Display the SATA hard drive information.
System Date Set the system date.
System Time Set the system time.
39Advanced Menu
The Advanced Menu allows you to configure specific system settings.
Item Description
Configure the CPU parameters. For details, refer to CPU Configura-
CPU Configurations
tions on page 51.
Configure the device settings including USB ports (1 - 4), LAN, SD
Device Configura- card reader, TPM device, HD audio, smart card, front camera, wire-
tions less LAN, Bluetooth, GPS, and WWAN. For details, refer to Device
Configurations on page 51.
Configure the power management settings including keyboard
Power backlight timer, resume on AC power, wake on LAN from S3/S4,
Configurations wake on wireless LAN from S3/S4, and USB3.0 power share. For
details, refer to Power Configurations on page 53.
TPM Configurations Configure Trusted Computing settings.
FAN Calibrations Perform the fan calibration.
Battery
Perform the battery calibration.
Calibrations
UART port 1 Mode Set the UART port mode between RS232, RS422, RS485, or disable
selection the port.
40ENGLISH
CPU Configurations
Select this option to configure the CPU parameters.
Item State Description
Intel (VMX) Enabled Turn on the function. The default value is [Enabled].
Virtualization
Tech. Disabled Turn off the function.
Enabled Turn on the function. The default value is [Enabled].
VT-d
Disabled Turn off the function.
Intel Trusted Enabled Turn on the function.
Execution
Technology Disabled Turn off the function. The default value is [Disabled].
Device Configurations
Select this option to configure the device settings.
Item State Description
Enabled Turn on the function.
USB Port 1
Disabled Turn off the function.
Enabled Turn on the function.
USB Port 2
Disabled Turn off the function.
Enabled Turn on the function.
USB Port 3
Disabled Turn off the function.
Enabled Turn off the function.
USB Port 4
Disabled Turn off the function.
Enabled Turn off the function.
LAN
Disabled Turn off the function.
SD Card Enabled Turn off the function.
Reader Disabled Turn off the function.
Enabled Turn off the function.
TPM Device
Disabled Turn off the function.
41Item State Description
Enabled Turn on the function.
HD Audio
Disabled Turn off the function.
Smart Card Enabled Turn on the function.
Reader Disabled Turn off the function.
Enabled Turn on the function.
Front Camera
Disabled Turn off the function.
Enabled Turn off the function.
Wireless LAN
Disabled Turn off the function.
Enabled Turn off the function.
Bluetooth
Disabled Turn off the function.
Enabled Turn off the function.
GPS
Disabled Turn off the function.
Enabled Turn off the function.
WWAN
Disabled Turn off the function.
NOTE
By default, all settings are set to [Enabled].
Power Configurations
Select this option to configure the power management settings.
Item State Description
Keyboard Backlight Off,
Keyboard
5/10/15/20/30/
Backlight Configure the length of time the keyboard
40/50/60/80/
Timer backlight would remain on.
100/120/240
Settings
Minutes
Resume on AC Enabled Turn on the function.
power Disabled Turn off the function.
Wake On LAN Enabled Turn on the function.
from S3/S4 Disabled Turn off the function.
Wake On Enabled Turn off the function.
Wireless LAN
from S3/S4 Disabled Turn off the function.
USB 3.1 Power Enabled Turn off the function.
Share Disabled Turn off the function.
NOTE
By default, all settings are set to [Disabled].
42ENGLISH
Boot Menu
The Boot Menu allows you to configure the boot settings and boot sequence.
Item Description
Bootup NumLock
Select the keyboard NumLock state.
State
Launch CSM Enable/Disable CSM support.
Launch Network
Select the LAN PXE boot mode.
PXE OpRom
Option ROM
Set the display mode for Option ROM messages.
Messages
Boot Option
Set the system boot order.
Priorities
43Security Menu
The Security Menu allows you to set the Administrator password and configure the Secure Boot settings.
Item Description
Administrator
Set the administrator password.
Password
Secure Boot Customize the Secure Boot settings.
44ENGLISH
Save & Exit Menu
The Save & Exit Menu allows you to save/discard the changes and restore the default values for all setup options before leaving
the BIOS Setup Menu.
Item Description
Save Changes and
Reset the system after saving any changes.
Reset
Discard Changes
Reset the system setup without saving any changes.
and Reset
Restore Defaults Restore the default values for all the Setup options.
Window – Push
Boot to Windows Push Button Reset page.
Button Reset
45Maintaining and Caring for Your Note-
book
Taking care of your notebook will reduce the risk of damage to your device and ensure that it operates properly.
To help you maintain the quality and function of your notebook, this chapter provides guidelines on how to protect, store, clean,
and travel with your device.
Protecting Your Notebook
To safeguard the integrity of the data stored on your notebook as well as the device, please follow the precautions described
below:
• Install an anti virus program to monitor potential viruses that could damage your files.
• Use a Kensington cable lock to protect your notebook against theft. Cable locks are available for purchase from online
retailers and in most stores that sell computers.
• To use the lock, loop the lock cable around a stationary object such as a table. Then, insert the lock into the Kensington lock
hole and turn the key to secure the lock. Store the key in a safe place.
Storing and Handling Your Notebook
General Storage and Handling Guidelines
• Use your notebook at the recommended temperature between 0°C (32°F) and 55°C (131° to ensure optimal performance
(Actual operating temperature depends on product specifications.)
• Avoid placing your notebook in a location subject to high humidity, extreme temperatures, mechanical vibrations, direct
sunlight, or heavy dust. Using your device in extreme environments for long periods of time can result in product
deterioration and a shortened product life.
• Do not place heavy objects on top of the notebook as this may damage the display.
• Do not operate in an environment with metallic dust.
• Store and use your notebook on a flat and steady surface. Do not stand the notebook on its side or store it in an upside
down position. The impact from dropping or an object hitting the device may cause damage.
• Do not cover or block any ventilation openings on the notebook. For example, do not place the notebook on a bed, sofa,
rug, or other similar surface. Overheating may occur, which could result in damage to your notebook.
• Keep your notebook away from that are vulnerable to damage from heat, as the device can become very hot during
operation.
• Keep your notebook at least 13 cm (5 inches) away from electrical appliances that can generate a strong magnetic field
such as a TV, refrigerator, motor, or a large audio speaker.
• Avoid moving your notebook abruptly from a cold to a warm place. A temperature difference of more than 10°C (50°F) may
cause condensation inside the unit, which may damage storage media.
Display Guidelines
• Turn off the notebook power when cleaning the display. Cleaning the display with the power on may cause improper
operation.
• Do not use excessive force on the display. Avoid placing objects on top of the display as this may cause the glass to break,
thereby damaging the device.
• LCD image sticking occurs when a fixed pattern is displayed on the screen for a prolonged period of time. You can avoid
the problem by limiting the amount of static content on the display. It is recommended that you either use a screen saver
or turn off the display when it is not in use.
• To maximize the life of the backlight display, allow the backlight to automatically turn off as a result of power manage-
ment.
46ENGLISH Battery Pack Guidelines • Do not expose the battery to temperatures below 0°C (32°F) or above 46°C (115°F). This may adversely affect the battery pack. • While the battery may not provide 100% capacity at temperature extremes, its capacity is restored when the battery tem- perature return to a normal range, around 20°C (68°F). • Your battery will last longer during the day if it is used, charged and stored between 50°F and 86°F (10°C and 30°C). • Charge the battery nightly where the temperature will remain around 68°F (20°C). Your battery may not last as long through the day if you charge it at higher or lower temperatures. • Allow unrestricted airflow while the device is connected to external power. Make sure that the fan inlet and outlet are unobstructed. • Avoid exposure to extreme temperatures for long periods as this can shorten battery charge life or damage the battery. • If your battery is charged in a cold (less than 5°C/41°F) or very warm (greater than 50°C/122°F) environment, it is possible that the battery LED will indicate that the charge has stopped; However, this does not necessarily mean that your battery is fully charged. • Read and follow all battery precautions in the Safety section. • Use only batteries of the same kind as replacements. • Turn the power off before removing or replacing batteries. • Do not tamper with the batteries. • Keep batteries away from children. • Before storing your battery, read and follow the recommendations in the Battery Tips section. • Dispose of used batteries according to local regulations. • Recycle if at all possible. Cleaning Your Notebook Cleaning the Outside Case • Disconnect external power and turn off the device. • Remove the battery. • Add a small amount of water to a soft cloth and clean the device case. Do not use paper products because they can scratch the surface. • Wipe off any excess liquid with a soft cloth. • Reinstall the battery. ATTENTION! Aerosols, solvents, or strong detergents are not recommended cleaning solutions and may void your warranty. For system decontamination recommendations please contact your support representative. Cleaning the Display Use a soft, dry cloth. In some cases, you can use a small amount of water to remove streaks or smears. For difficult display cleaning tasks, use a 50/50 mixture of isopropyl alcohol and water. Do not use paper products because they can scratch the screen. Cleaning the External Power Connector The external power connector may sometimes be exposed to moisture and/or contamination causing an unreliable connection to the external power source. Clean the connector with a cotton swab dipped in electronics grade isopropyl alcohol. Cleaning the RJ 45 / USB Connectors If the connector pins get dirty, clean the connector with a cotton swab dipped in electronics grade isopropyl alcohol. 47
Traveling With Your Notebook
Before traveling with your notebook, make sure you prepare and follow the precautions described below:
 • Back up the data on your hard drive to a flash drive or other storage device. As an added precaution, bring an extra copy of
    your important data.
 • Make sure that the battery pack is fully charged.
 • Ensure that your notebook is turned off.
 • Confirm that all the connector covers are closed completely to ensure the device’s waterproof integrity.
 • Disconnect the AC adapter from your notebook and take it with you. Use the AC adapter to power the device and charge
    the battery.
 • Hand carry your notebook onto an airplane, train, or bus. Do not check it in as luggage.
 • If you need to leave your notebook in a car, store it in the trunk to avoid exposing it to excessive heat.
 • When going through airport security, do not carry your notebook through the magnetic detector (the device you walk
    through) or expose it to a magnetic wand (the handheld device used by security personnel). It is recommended that you
    send the notebook and any flash drives through the X ray machine (the device where you set your bags).
 • If you plan to travel abroad with your notebook, consult your dealer for the appropriate AC power cord for use in your coun-
    try of destination.

                                                                                                                            48
ENGLISH
Troubleshooting
This chapter advises you on what actions to take when solving common computer problems that may be caused by issues with
hardware or software.
Preliminary Checklist
Here are the initial steps you should follow before taking further action when encountering any problem:
1. Try to identify and isolate which part of the notebook is causing the problem.
2. Make sure that you turn on all peripheral devices before turning on the notebook.
3. If you are having trouble with an external device, make sure that the cable connections are correct and secure.
4. Make sure that the configuration information is properly set in the BIOS Setup program.
5. Ensure that all the device drivers are correctly installed.
6. Make note of your observations. Are there any messages on the screen? Do any indicators light up? Do you hear any beeps?
Detailed descriptions are useful to the service personnel when you need to consult someone for assistance.
7. If any problem persists after you follow the instructions in this chapter, contact an authorized dealer for help.
Preliminary Checklist
Battery Problems
The battery does not charge
• To prevent possible damage to the battery, the device does not allow the battery to charge if the internal temperature of
the battery gets too low (< 5°C or < 41°F) or too high (> 50°C or > 122°F). If possible, charge the battery in a location with a
moderate temperature of around 20°C (68°F).
• If possible, turn off the device while the battery is charging.
• If the battery is new or has been stored for a week or more, follow this procedure:
1. Make sure the device is turned off.
2. Remove the battery.
3. Connect the AC adapter to the device and an AC wall outlet, and then
turn on the device by pressing the button.
4. Let the device complete the boot process. Then reinstall the battery.
• Allow the system to remain idle for one hour with the AC adapter connected to the device.
• The Battery Power LED lights when the battery starts charging.
• If the battery still fails to start charging after an hour, remove the battery, wait several seconds, and then install it again.
• If the battery does not begin charging within several minutes, return the unit for service.
The battery takes longer than seven hours to charge.
• Under moderate temperatures, about 20°C (68°F), the device’s battery takes approximately 4 to 5 hours to completely
charge.
• As the battery temperature approaches the ends of its temperature range (5°C/41°F to 50°C/122°F), it may take longer to
charge the battery.
The battery doesn’t hold charge for very long.
• Calibrate the battery. If your battery is new or has not been used for several weeks, calibrating the battery accurately sets
the gas gauge.
• As your battery ages, its maximum capacity naturally decreases and even the best maintained batteries eventually need to
be retired. Consider replacing the battery if you are not getting the usage you need from it.
• To meet ENERGY STAR® requirements, Wake on LAN is enabled by default. If running on battery power this may decrease
battery run time. To change Wake on LAN settings, open the Device Manager, Network Adapters and select the LAN device.
Open the device Properties and select Power Management. Disable the Wake on LAN setting by unchecking. Allow this
device to wake the computer.
The gas gauge isn’t full after charging the battery.
• This may indicate that the charging process terminated prematurely.
49The gas gauge reads “full,” but the charging LED is still lit.
• If you charge your battery daily, rely on the gas gauge reading to determine battery capacity. The charging process may
continue even if the gas gauge reads full. External power can be removed because the battery is virtually full.
My battery seems to have less and less capacity.
• If your battery is new, or if you are using it for the first time, you will need to calibrate it (see Battery Calibration) prior to
using it.
• As your battery ages, the maximum capacity that it can hold naturally decreases and even the best maintained batteries
eventually need to be retired. Consider replacing the battery if you are not getting the usage you need from it.
Bluetooth Wireless Transmission Problems
I cannot connect to another device with BT wireless technology.
• Ensure that you have activated BT feature on both devices.
• Make sure that the distance between the two devices is within the acceptable limit and that there are no walls or other
obstructions between the devices.
• Confirm that the other device is not in “Hidden” mode.
• Verify that both devices are compatible.
Display Problems
The display performance is slow.
• The temperature may be too cold. Move the device to a warmer operating environment.
The underlined, inverse, and hypertext characters are difficult to read on the screen.
• Right click on the Windows Desktop, select Personalize, then Colors to change the color and style of your Windows.
I changed my display resolution, but I see no difference on the screen.
• Select Start > Power > Restart.
Hard Disk Problems
The hard disk will not spin up, so the device can’t boot up.
• This occurs if the unit is exposed to extreme low temperatures. This is not a hardware failure associated with the hard disk.
The integrated hard disk drive heater will warm the drive to a safe operating temperature.
The device does not startup properly.
• Make sure you remove any USB drives from the unit before you start it.
• Connect the AC adapter to charge the battery if it is not charged.
• If the battery does not begin charging, perform the following:
1. Remove the battery.
2. Connect the AC adapter.
3. Turn on the device by pressing the button.
4. Reinstall the battery. The battery LED is a steady orange while the battery is charging.
Hard disk recovery process on Win10
1. Select Start > Settings .
50ENGLISH
2. On the SETTINGS page, click Update & security > Recovery.
3. Click Get started to start the recovering process.
4. Choose one of the following options:
• Keep my files: Remove the apps and settings, but it keeps your personal files. The process will take approximately
3~4 hours.
• Remove everything: Remove all your personal files, apps, and settings. The process will take approximately 5~6
hours.
5. A notification message will appear on the screen. Click Next to continue.
516. Click Reset to reset your notebook.
NOTE
• If below message appears, you need a recovery media and then follow the steps 1 to 6.
• To create a recovery media, open Control Panel (View by: Large icons or Small icons) > Recovery > Create a recovery drive.
If prompted, click Yes to “Do you want to allow this app to make changes to your device?” message. Check Back up system
files to the recovery drive. option and then click Next. Follow the on screen instructions to back up system files.
52ENGLISH
Other Problems
The device won’t turn on.
• Make sure a fully charged battery is properly installed.
• Connect external power to charge the battery if it is not charged.
• If you are using the AC adapter check the electrical outlet you are using to make sure it is working properly.
• If the device does not turn on, reset the device by holding down the button for at least ten seconds, release it, and then
press the button again.
The device won’t turn off.
1. Select Start > Power > Restart.
2. If that does not work, press Ctrl + Alt + Del and then select Task Manager.
3. If any programs are open, use your arrow keys to highlight each one and select End task. Repeat this until all programs are
closed.
4. If that still does not work, press and hold the button for approximately ten seconds and then release it.
The device doesn’t make any sounds, even during boot up.
• You may have enabled Stealth Mode. Disable Stealth mode.
53Appendix
Copyright
Copyright© 2019. All rights reserved.
No part of this user manual may be transmitted, stored in a retrieval system, or translated into any language or computer
language, in any form or by any means, without the prior written permission of the manufacturer. Information is subject to
change without prior notice.
Specifications
Model Name N15b
– MIL STD 810G certified (Drop, Shock, Vibration, Dust, Altitude,
High/Low Temperature, Humidity)
– 3' drop 26 faces
DURABILITY – IP5X certified
– Aluminum magnesium alloy chassis
– Port covers
– Removable quick release battery
OPERATING
Windows® 10 Pro 64 bit
SYSTEM
– Intel® Core™ i7 8565U (8th Gen) 1.8GHz processor with Turbo
Boost Technology up to 4.6GHz, 8MB cache
PROCESSORS
– Intel® Core™ i5 8265U (8th Gen) 1.6GHz processor with Turbo
Boost Technology up to 3.9GHz, 6MB cache
GRAPHICS Intel® UHD Graphics 620
MEMORY 2 slots 8GB up to 32GB (2400MHz DDR4)
256GB SSD
STORAGE
– Optional 512GB/1TB SSD
DISPLAY 15.6” FHD (1920 x1080)
– Integrated microphone
– Intel® High Definition Audio Compliant
AUDIO
– Integrated speaker x 2
– Keyboard volume and mute controls
CAMERA Integrated 2.0 MP web cam
Standard membrane keyboard with optional LED backlight mem-
KEYBOARD
brane keyboard
54ENGLISH
– Integrated 10/100/1000 Ethernet
– Intel® Dual Band Wireless AC 9260
COMMUNICATONS – (802.11a/b/g/n/ac)
– Bluetooth® V5.0
– Optional GPS and 4G LTE multi carrier mobile broadband
– TPM 2.0
– NIST BIOS compliant
SECURITY – Smart card reader default
– Kensington lock
– Optional RFID
– USB 3.1 Gen1 Type A x 2
– USB 3.1 Gen2 Type A x 1 (speed up to 10Gbps)
– USB 3.1 Type C x 1
– Audio in/out (combo jack) x 1
– SD card (SDXC) x 1
– 10/100/1000 Ethernet (RJ 45) x 1
I/O INTERFACES – VGA port (D sub,15 pin) x 1
– HDMI port (type A) x 1
– Serial port (RS 232 : D sub,9 pin) x 1
– SIM card x 1
– Smart card reader x 1 (RFID and Smart card reader are
mutually exclusive.)
– DC In jack x 1
– DVD super multi
MEDIA BAY
– 2nd SSD
(One Option Only)
– 2nd & 3rd SSD (Factory Option Only)
AC adapter : 100 240V, 50Hz 60Hz, 65W
POWER
– Main battery Li Ion, 7.4V, 7600mAh, 13.5 hours
– Temperature
Operating : 20°C ~ 60°C
ENVIRONMENT
Storage : 51°C ~ 71°C / 60°F ~ 160°F
– Humidity : 5% ~ 95%
DIMENSION & – 375 mm (L) x 273 mm (W) x 29.5 mm (H)
WEIGHT – 2.6 kg
WARRANTY 3 year limited warranty standard
NOTE
• Specifications are subject to change without any prior notice.
55Regulatory Statement
Federal Communications Commission
Statement
This equipment has been tested and found to comply with the limits for a Class B digital device, pursuant to Part 15 of the FCC
Rules. These limits are designed to provide reasonable protection against harmful interference in a residential installation. This
equipment generates, uses, and can radiate radio frequency energy and, if not installed and used in accordance with the in-
structions, may cause harmful interference to radio communications. However, there is no guarantee that interference will not
occur in a particular installation. If this equipment does cause harmful interference to radio or television reception, which can
be determined by turning the equipment off and on, the user is encouraged to try to correct the interference by one or more of
the following measures:
• Reorient or relocate the receiving antenna.
• Increase the separation between the equipment and the receiver.
• Connect the equipment into an outlet on a circuit different from that to which the receiver is connected.
• Consult the dealer or an experienced radio/TV technician for help.
Shielded interconnect cables and shielded AC power cable must be employed with this equipment to insure compliance with
the pertinent RF emission limits governing this device. Changes or modifications not expressly approved by the system's manu-
facturer could void the user's authority to operate the equipment.
RF exposure warning
Any changes or modifications not expressly approved by the party responsible for compliance could void the authority to
operate equipment. This device and its antenna must not be co located or operating in conjunction with any other antenna or
transmitter.
The SAR limit set by the FCC is 1.6W/kg.
This device is operation in 5.15 5.25GHz frequency range, then restricted in indoor use only. Outdoor operations in the
5150~5250MHz is prohibited.
This device is slave equipment, the device is not radar detection and not ad hoc operation in the DFS band.
Note: Do not disassemble the bumper. Otherwise, the antenna may be damaged, resulting in poor reception.
Battery Disposal
THIS PRODUCT CONTAINS A LITHIUM ION OR NICKEL METAL HYDRIDE BATTERY. IT MUST BE DISPOSED OF
PROPERLY. CONTACT LOCAL ENVIRONMENTAL AGENCIES FOR INFORMATION ON RECYCLING AND DISPOS-
AL PLANS IN YOUR AREA.
Battery Disposal
This product follows the provisions of the European Directive 2014/30/EU
This product follows the provisions of the European Directive 2014/35/EU
This product follows the provisions of the European Directive 2014/53/EU
This product follows the provisions of the European Directive 2009/125/EC
This product follows the provisions of the European Directive 2012/19/EU
This product follows the provisions of the European Directive 2015/863/EU
56You can also read