SEMIAUTOMATIC SHOTGUN OWNER'S MANUAL - www.legacysports.com - Legacy ...
←
→
Page content transcription
If your browser does not render page correctly, please read the page content below

SEMIAUTOMATIC SHOTGUN
    OWNER'S MANUAL

                        www.legacysports.com
TECHNICAL DATA
Caliber: 12 gauge / 20 gauge

Operation: Semi-Automatic, Gas Operated System

Barrel Length: 26" 28"

Magazine Capacity: 5+1, 2+1 with Plug

Stock & Forearm Group: Black Synthetic / Wood

Recoil Pads: Ventilated Rubber (Thick) Pad.

Accessories: 4 Choke Set (F, IM, IC, C)
             Choke Tube Wrench
             Green Fiber Optic Sight

Average Weight:             12 Gauge          ~6.61 Lbs
                            20 Gauge          ~5.95 Lbs

                                                                1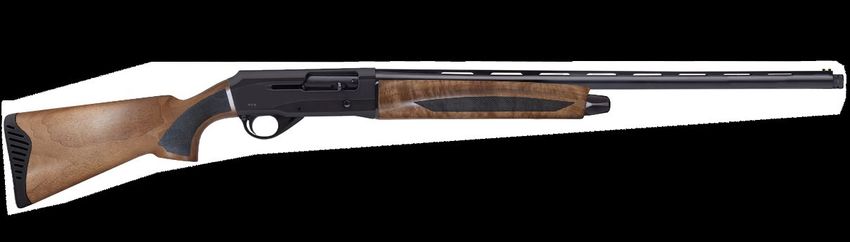
MODELS
         Pointer Semiautomatic FT3

         Pointer Semiautomatic FT4

         Pointer Semiautomatic FT5

         Pointer Semiautomatic STS8

  2
OWNER'S MANUAL
                                                                  12 - 20
                                                            AUTOLOADING SHOTGUN
                                                        IMPORTANT "SAFETY WARNINGS"
Be certain this owner's manual is available for reference and is kept with this firearm if transferred to another party. If the manual is lost or misplaced,
contact your "Product Service Center" for a free replacement copy.
After performing any work on your firearm such as cleaning, adjustments, disassembly, or installation of any accessory, the firearm should be re-
checked for proper functioning before firing live ammunition.
Firearms are complicated mechanisms. Any modification, alteration, or improper fitting of parts may result in a dangerous malfunction, damage to the
firearm and injury to the shooter and others. The firearm's owner must accept full responsibility for the correct reassembly and functioning of the
firearm after any disassembly or replacement of parts.
If you do not understand any of the material in this manual or have any questions, contact your dealer or a qualified gunsmith.
Do not attempt to load or use any firearm until you have read and understood the information contained in its owner's manual. Before handling your
firearm, you should learn how it operates and how to maintain it. This includes knowing its basic parts, how the manual safety and other safety
features operate, how to safely open and close the action, and how to safely load and unload ammunition from the firearm. Improper use and handling
is dangerous and could cause serious injury or death to you or those around you. All users of the firearm must become thoroughly familiar with the
instructions in this manual.
As the owner of a firearm, you must undertake the full-time responsibility of safe firearms handling for your own safety and the safety of those around
you:

                                                                            3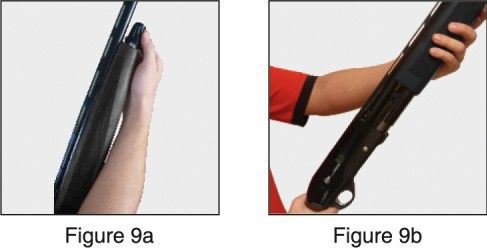
IMPORTANT "SAFETY WARNINGS"
-Keep all firearms and ammunition out of the reach of children.
-Store your firearms and ammunition separately.
-Never store a loaded firearm.
-Never leave a loaded firearm unattended.
-Never transport a loaded firearm in a vehicle.
-Unload your firearm when you have stopped shooting and when you have to climb a tree, fence, cross a slippery surface or have to
transport it in a vehicle.
- Do not load your firearm before you are in a place where it is safe to shoot, and keep your finger off the trigger until you are on target and
have decided to fire.
- Never shoot at water, rocks or any hard surfaces. Shots may glance off such surfaces and cause injuries.
- Do not use alcohol or drugs before or while handling firearms.
- Do not touch the trigger while the safety button is being engaged or disengaged.

Always point the muzzle of your firearm in a safe direction, regardless of whether the firearm is loaded or unloaded. Always treat every
firearm as if it were loaded. Give your firearm to someone with the action open (bolt fully rearward) and safety in the "ON" (SAFE) position,
after you verify the firearm is unloaded. Insist on the same procedure when receiving a firearm from someone else. Learn the location of all
the safety features of your firearm and how they operate. Wear eye and ear protection when shooting.

                                                                       4
IMPORTANT "SAFETY WARNINGS"

 Shooting without proper ear protection can cause hearing damage. The use of eye protection during any type of shooting is important to
protect your eyesight. Due to the heavy recoil of a shotgun, maintain an adequate distance between the rear of the scope (if equipped) and
your face at all times. Be certain the scope installation does not interfere with access to, or the proper functioning of the safety.
WE SPECIFICALLY DISCLAIM ANY RESPONSIBILITY FOR DAMAGE OR INJURY WHATSOEVER OCCURRING IN CONNECTION
WITH, OR AS A RESULT OF, THE USE OF FAULTY, OR "REMANUFACTURED," OR HAND-LOADED (RELOADED) AMMUNITION.
ADDITIONALLY, WE DISCLAIM ANY RESPONSIBILITY FOR DAMAGE OR INJURY WHICH RESULTS FROM ANY MODIFICATIONS
OR CHANGES THAT ARE NOT A PART OF THE FIREARM AS DELIVERED FROM THE FACTORY.
Learn to clean your firearm thoroughly and make certain no oil, grease, or other materials are blocking the barrel. Obstructions of any kind
can cause damage to the firearm, and may result in serious personal injury to the shooter and/or others nearby. Practice proper firearm
maintenance and safety. Make sure all exposed metal surfaces are coated with a thin film of oil, especially after exposure to damp weather.
(See proper section of this manual for cleaning instructions). Do not plug barrel or store in a fabric-lined case which will absorb lubricants
from the firearm. Before using after storage, follow complete instructions stated in this manual for refamiliarization with the firearm. A
thorough inspection should be performed before going into the field. Have your firearm periodically checked by a qualified gunsmith.

                                                                     5
MECHANICAL SAFETY

The safety button is located at the rear of the trigger guard (See Figure 1a and 1b) and must be manually moved to the desired position by the
shooter.
To put the safety in the "ON" (SAFE) position, the safety button must be pushed from the left side (side opposite the ejection port) so that it
moves all the way to the right. The button must always be pushed fully to the right until it moves no further to be in the "ON" (SAFE) position.
(See Figure 1a).
The safety button is designed to function only as described above and should not be reversed. Do not attempt to remove or reverse the safety
button. Doing so will result in an unsafe condition which can cause serious injury or death.
Remember, a firearm's manual safety is a mechanical device which can never replace safe firearm handling practices.
Never rely on any mechanical mechanism or safety device to prevent the dangers of careless handling or pointing a firearm in an unsafe
direction.

                                                                       6
USE ONLY SUITABLE AMMUNITION !!!
12 gauge and 20 gauge shotguns are chambered for 3" shells.

With 12 Gauge Shotguns, use shot shells between 2 ¾” 1oz (28gr) and 3” 1 7/8oz (52gr)
With 20 Gauge Shotguns, use shot shells between 2 ¾” 7/8oz (25gr) and 3” 1 1/4oz (36gr)

Use of re-loaded ammunition voids the one year factory warranty. Never shoot slugs with a full choke. Use only the most open (improved
cylinder) choke. Never use shotshells with a case longer than the chamber, as this can cause damage to the firearm and may result in serious
personal injury to theshooter and/or others nearby.
Never shoot steel shot with a full choke. Use only a modified, improved cylinder or skeet choke tubes.

                                                                     7
UNPACKING AND ASSEMBLING SHOTGUN
When shipped from the factory, the barrel is removed and packed separately in the shipping carton. Before installing the barrel, visually and
physically inspect the barrel and receiver to ensure they are free of any excess oil, grease, or any obstructions. Obstructions of any kind can
cause damage to the firearm and may result in serious personal injury to the shooter and/or others nearby.
MOUNTING THE BARREL TO THE RECEIVER
Remove the forearm by unscrewing the magazine cap (counter clockwise). Slide the forearm off the magazine tube. Check that the gas
piston is correctly assembled in the gas cylinder portion of the barrel before mounting the barrel to the receiver. Note the orientation of the gas
piston (See Figure 2b). Mount the barrel to the receiver by sliding the barrel into the receiver, with the gas cylinder portion of the barrel on the
magazine tube (See Figure 2a). Pull the operating handle half way back to fully seat the barrel in the receiver (See Figure 2c).
8Figure 2b Figure 2c
MOUNTING THE FOREARM
Pull back the operating handle. The action should stay open. Mount the forearm by carefully sliding it over the magazine tube, and
seating it into the receiver. (See Figure 3). Screw the magazine cap onto the front of the magazine tube, finger-tight.
Figure 3
9MAGAZINE CAPACITY
Five (5) 2 ¾" shot shells, Four (4) 3" shot shells (plus one in chamber). (5+1)
MAGAZINE PLUG
You are responsible for complying with all laws regarding magazine capacity. Your Autoloading Shotgun is supplied with a plastic plug
inserted in the magazine tube. It reduces the capacity of the magazine tube to two (2) shells. (2+1)
REMOVING THE MAGAZINE PLUG
Move the safety button so it is fully protruding out of the right side of the trigger guard and cannot be moved any further indicating the "ON"
(SAFE) position. Pull back the operating handle. The action should stay opened. Visually and physically check the chamber, elevator and
magazine tube to be certain the shotgun is unloaded before removing the magazine cap.
Unscrew and remove the magazine cap. Push the magazine plug blocker down with your finger and pull up the slanted end in a diagonal
motion (See Figure 4). Remove the magazine plug from the end of the magazine tube (See Figure 5). Replace the magazine cap finger
tight only.
10INSTALLING THE MAGAZINE PLUG
Move the safety button so it is fully protruding out of the right side of the trigger guard and cannot be moved any further indicating the "ON"
(SAFE) position. Pull back the operating handle. The action should stay opened. Visually and physically check the chamber, elevator, and
magazine tube to be certain the shotgun is unloaded before installing the magazine plug.
Unscrew and remove the magazine cap. Insert the plastic magazine plug into the end of the magazine tube. Insert the magazine plug
blocker by pushing down on the slanted end diagonally onto the end of the plastic magazine plug. After the magazine blocker is in the
magazine tube make sure it is sitting flat on the plastic magazine plug to capture it in the magazine tube. Release pressure from the
magazine plug blocker. Replace the magazine cap finger tight only.
LOADING
Before loading, move the safety button fully to the right so it is protruding from the right side of the trigger guard indicating the "ON" (SAFE)
position.
During loading, never allow fingers or any objects to contact the trigger. Keep the muzzle pointed in a safe direction at all times.
Open the action by pulling the operating handle completely rearward until it locks in the open position (See Figure 6).
Inspect the chamber and bore of the barrel for any obstruction, excessive oil or grease. (The chamber is the rear portion of the barrel where
cartridge will be inserted.) Obstructions of any kind may result in damage to the firearm and/or serious personal injury to you or those
around you.
Do not load the shotgun until ready for use! Unload shotgun when shooting has been completed! The safety
11button should always be protruding fully from the right side of the trigger guard indicating the "ON" (SAFE) position whether the firearm is
loaded or not.
Check to be certain that the ammunition selected is the same type of cartridge as designated on the right side of the barrel.
12 gauge shotguns are designated to fire 12ga 2 ¾" and 3" shells, 20 gauge shotguns are designated to fire 20 ga 2 ¾" and 3" shells.
If you wish to load the firearm with the maximum number of shells or fire single shots, load the first shell through the ejection port located on
the right side of the receiver (See Figure 6). The shell can be inserted directly into the chamber or placed on top of the elevator. Close the
action by pressing the bolt release (See Figure 7a). Be sure to keep fingers and other objects out of the ejection port.
12The shotgun is now loaded! The safety button (See Figure 1a) should be fully protruding from the right side of the trigger guard indicating
the "ON" (SAFE) position until you are on target and have actually decided to fire. Keep the muzzle pointed in a safe direction at all times
and your finger and any other objects away from the trigger area.
TO LOAD MAGAZINE — With the safety button fully protruding from the right side of the trigger guard indicating the "ON" (SAFE) position
and the bolt in the forward (closed) position, hold the shotgun with the bottom of the receiver facing upward.
Push the shotshell into the loading port depressing the elevator as shown in Figure 7a. This will expose the magazine tube opening within
the receiver.
Figure 7a
13FIRING
Discharging firearms in poorly ventilated areas, cleaning firearms, and/or handling ammunition may result in exposure to lead and other
substances known to cause birth defects, reproductive harm, and/or other serious physical injury. Have adequate ventilation at all times.
Wash hands thoroughly after exposure.
During firing, the operating handle (See Figure 6) travels rearward with considerable force and speed. Do not place hands or other objects
in its path.
TO FIRE
With the shotgun pointed in a safe direction and held in the proper firing position, move the safety button fully to the left of the trigger guard
to the "OFF" (FIRE) position. Pulling trigger through its full travel to the rear will fire the shotgun. Ensure muzzle is pointed in a safe direction
before placing finger on trigger.
After firing, the empty cartridge will be automatically ejected through the ejection port. Be sure all observers are clear of the path of
ejection, as the empty cartridges are thrown out with considerable force and could cause injury.
Figure 7b
14This shotgun automatically feeds the next live round from the magazine tube into the chamber each time the shotgun is fired, until
all rounds in the magazine tube are fired. You should be aware that no mechanical force on the part of the user is needed in this
process and you should be alert to the fact that the chamber is loaded for you and the shotgun is capable of firing again if the
trigger is pulled.
This shotgun is designed so that when all shells have been fired, the bolt will automatically lock rearward in the open position. You
should never use this feature as a guide for determining if the shotgun is empty! Always visually and physically inspect the
chamber, elevator, and magazine tube for the presence of ammunition.
Should any shell fail to fire, keep the shotgun pointed in a safe direction and move the safety button fully to the right of the trigger guard to the
"ON" (SAFE) position. Wait a few moments and then remove the misfired shell and keep separate from other ammunition. Do not attempt to
refire a misfired shell.
If at any time during firing, the sound of any shell is noticeably louder or softer than the previous shells fired, STOP! Do not load or fire
additional shells until you have put the safety in the "ON" (SAFE) position and safely unloaded your shotgun. Inspect the shotgun for
possible damage or obstructions in the chamber or bore. (The bore is the inside surface of the barrel.) Firing the shotgun with a bore
obstruction can cause damage to the firearm and could result in serious personal injury to the shooter and/or others nearby.
TO UNLOAD
Position the safety button so it is fully protruding out the right side of the trigger guard indicating the "ON" (SAFE) position and keep the
muzzle pointed in a safe direction at all times. At no time during unloading should you allow your fingers or any other object to touch the
trigger.
15First, remove the round from the chamber by grasping the operating handle and pulling the bolt slowly rearward until the face of the bolt is
even with the rear of the ejection port. Remove the round by hand.
DO NOT pull the bolt fully rearward to its locked position since this may release a round from the magazine tube. Allow the bolt to move
forward slowly and close on an EMPTY chamber.
To remove shells from the magazine tube, turn the shotgun so that the trigger guard is facing upward. Push the elevator down and hold it.
While holding the elevator down, depress the front of the shell stop located on the opposite side of the receiver from the ejection port. This
will release one shell from the magazine tube under spring pressure. To release any remaining shells, repeat this procedure until the
magazine is completely empty (See Figure 8).
After unloading the magazine, pull the operating handle rearward until the bolt locks in the open position.
Visually and physically check the chamber, elevator and magazine tube to be certain the shotgun is unloaded.
16DISASSEMBLY
Position the safety button so it is protruding fully out the right side of the trigger guard indicating the "ON" (SAFE) position, and visually and
physically check the chamber, elevator and magazine tube to be certain the shotgun is unloaded before disassembling the firearm. Wear
eye protection during disassembly and cleaning.
REMOVING THE FOREARM
Visually and physically check the chamber and magazine to make sure the shotgun is unloaded. Pull the bolt operating handle back as far
as it will go; it should stay locked. Unscrew the magazine cap (counter clockwise) and remove it. (See Figure 9a). Slide the forearm toward
the muzzle, and remove it. (See Figure 9b).
17REMOVING THE BARREL
After removing the forearm, hold the bolt operating handle and press the bolt release button. Allow the bolt to slowly travel fully forward. With
the bolt fully forward, pull the barrel out of the receiver with the gas piston assembled in the gas cylinder portion of the barrel (See Figure 10).
Note: If the gas piston remains on the magazine tube after the barrel is removed slide the gas piston forward to remove it.
REMOVING THE BOLT
Slowly push the action (bolt action slide and bolt assembly) back until the notch in the bolt lines up with the raised protrusion on the operating
handle (See Figures 11a and 11b). Pull the operating handle straight out. Slowly allow the action, (bolt action slide and bolt assembly) to
travel fully forward. Remove the bolt action slide and bolt assembly from the receiver through the barrel hole. Lift the bolt assembly from the
bolt action slide.
18REMOVING THE TRIGGER HOUSING ASSEMBLY
1. Push out trigger housing retaining pin using a blunt object no larger than
1/8" diameter (See Figure 12). The pin can be pushed out from either directon.
2. Remove the trigger housing assembly by pushing the bolt release button and sliding the trigger housing assembly forward and down.
19The trigger housing assembly is a complex assembly and must not be disassembled. Disassembly should only be performed at an
authorized Product Service Center or by a qualified gunsmith.
Do not pull the trigger and allow the hammer to fall when the trigger housing assembly is removed from the receiver. To do so may result in
personal injury or damage to the assembly.
Field disassembly is now complete. The shotgun should not be disassembled any further for routine cleaning or maintenance. Further
disassembly should only be performed at an authorized Product Service Center or by a qualified gunsmith.
ASSEMBLY
REINSTALLING THE BOLT
Assemble the bolt assembly onto the bolt action slide. Assemble the bolt action slide onto the magazine tube. Slowly push the bolt action
slide into the receiver (see Figure 11a). Looking through the ejection port, align the notch in the slide with the notch in the bolt (see Figure 13).
Align the operating handle raised protrusion with the notch in the bolt. Push the operating handle into the bolt assembly (see Figure 11b).
20BARREL RE-ASSEMBLY
Assemble the barrel to the receiver as described in "UNPACKING AND ASSEMBLING SHOTGUN" under the section "MOUNTING THE
BARREL TO THE RECEIVER".
TRIGGER HOUSING ASSEMBLY RE-ASSEMBLY
1 Insert the trigger housing assembly by pressing the bolt release button while pushing the trigger housing assembly up and rearward
(Figure 14).
2 Push in the trigger housing pin until it is flush with the sides of the receiver.
FOREARM RE-ASSEMBLY
Assemble the forearm to the receiver as described in "UNPACKING AND ASSEMBLING SHOTGUN" under the section "MOUNTING THE
FOREARM."
21CHOKE TUBES
BEFORE REMOVING OR INSTALLING ANY CHOKE TUBE:
Move the safety button so it is protruding fully out the right side of the trigger guard indicating the "ON" (SAFE) position and keep muzzle
pointed in a safe direction.
Open the action, visually and physically check chamber, elevator, and magazine tube to be certain firearm is unloaded.
Do not use bent or deformed choke tubes as these may result in tube or barrel damage upon firing which may cause serious personal injury to
you or those around you. Inspect choke tubes periodically to insure they are properly installed and in good condition. Pay special attention to
the threaded end of the choke tube to be certain it is not deformed or dented.
22Never fire the shotgun without a choke tube properly installed. Failure to do so will damage the precision threads on the inside of the barrel.
Firing the shotgun with loose choke tubes may lead to damage to the choke tube and barrel, as well as serious personal injury to you or
those around you.
CARE AND CLEANING: The precision threads on your choke tube should be kept clean and lightly oiled at all times.
During cleaning of the barrel, be certain a choke tube is properly installed. This will avoid residue build-up on threads.
TO REMOVE CHOKE TUBE: Loosen with choke wrench provided, turning it counterclockwise (See Figure 15). When the choke tube is
loosened, remove it completely with your fingers. Place choke tube on a clean, dry surface.
TO INSTALL CHOKE TUBE: Screw the tube clockwise into the barrel by hand and then tighten the tube until snug with the choke wrench
(see Figure 16). These tubes fit completely inside the barrel when properly installed. Do not use excessive force when installing.
Lead, steel, and other non-toxic shot patterns will vary substantially depending on shell length, shot size, brand of ammunition, and the individual
barrel. The shooter is urged to conduct pattern tests before field use.
23CHOKE VALUES AND AREAS USED
FOR SEMI - AUTOMATIC SHOTGUN
NUMBER
CHOKE VALUE AREAS USED SYMBOL of
NOTCHES
* 1
FULL
** 2
IMPROVED MODIFIED
*** 3
MODIFIELD
****
4
IMPROVED CYLINDER
*****
5
CYLINDER
Do not use choke values FULL, IMPROVED MODIFIED, and MODIFIED with slugs, single bullets or single
projectiles. Do not use choke value FULL or IMPROVED MODIFIED with steel shot.
24CLEANING AND LUBRICATION
With proper maintenance and care, your shotgun will provide you with years of dependable service. Your firearm should be inspected and
cleaned periodically to ensure that it remains in good condition. Clean your firearm as soon as possible after use. This is especially
important if your firearm has been exposed to moisture. For maximum performance and continued satisfaction with your shotgun, periodic
cleaning and lubrication are essential.
Follow the instructions and equipment provided with a quality shotgun cleaning kit.
Always be sure that the safety button is fully to the right in the "ON" (SAFE) position (See Figure 1a) and that the shotgun is unloaded by
visually and physically checking the chamber, elevator, and magazine tube before cleaning your shotgun. Wear eye protection during
cleaning. Normal use requires only that the mechanisms be free of excessive shooting residue. Very little lubrication other than a light oiling
of internal and external surfaces to prevent rust is needed.
To ensure optimum performance we recommend thorough cleaning of your firearm after every 200 rounds. However, unusually dusty, dirty,
or harsh weather conditions, or use of ammunition which leaves significant powder residue may require more frequent cleaning.
If the firearm is to be stored for a long period of time, it should be thoroughly cleaned and oiled. Do not plug the barrel or store in a fabric-lined
case that will absorb lubricant from the firearm, as this may result in corrosion to the unprotected metal surfaces.
Over-lubrication should be avoided during below freezing conditions. Many lubricants thicken in low temperatures which could affect the
operation of the firearm. Exposure to unfavorable weather or moisture from condensation requires additional care to prevent corrosion to
the firearm.
25BARREL CLEANING
Remove the gas piston from the gas cylinder portion of the barrel. Scrub the bore of the barrel, chamber and gas cylinder bore with solvent
and follow with cleaning patches until barrel and gas cylinder bore are clean. Place a few drops of light oil in the gas cylinder bore (See
Figure 17). A final pass with a lightly oiled patch in the bore of the barrel, and chamber will provide a protective coating. A stiff brass bristle
brush is useful for removing stubborn deposits.
Be sure not to leave cleaning patches or excessive oil or grease in the bore of the barrel as this can create dangerous obstructions, resulting
in damage to the firearm and/or serious personal injury to you or those around you.
ACTION CLEANING
Clean all components of the action including the bolt assembly and bolt action slide to remove accumulated residue. An evaporating
solvent should be used. Action parts will remain cleaner longer if lubrication is used sparingly.
26CLEANING AND LUBRICATION
RECEIVER CLEANING
Clean the inside of receiver with a rag or soft brush, giving special attention to the tracks which guide the bolt and slide. Place a few
drops of light oil in these tracks when clean. Care should be taken when cleaning the exterior surfaces of the receiver to prevent
cosmetic damage. Never use a brush with metal bristles, as this could remove the protective coating on the receiver.
TRIGGER HOUSING CLEANING
Brush loose residue from trigger housing with a soft bristle brush. Never use a brush with metal bristles, as this could remove the
protective coating on the trigger housing.
Never pull the trigger while the trigger housing is removed from the receiver, as damage to the
trigger housing or personal injury may result.
GAS SYSTEM CLEANING
The gas system includes the magazine tube, gas piston, piston ring, seal, and the gas action return spring (See exploded view). These
parts should be thoroughly cleaned using solvent. A stiff brass bristle brush is useful for removing stubborn deposits.
Apply a light coat of gun oil to all metal parts and then wipe thoroughly with a dry cloth. Excess oil will accelerate the build up of carbon residue
in the gas system and may have a negative effect on the shotguns performance.
27STOCK SPACER SYSTEM
Included with this shotgun is a matching set of stock spacers. These spacers allow you to raise or lower the vertical position of the stock.
Each spacer is marked with the amount of drop or rise they will provide.
Stock Spacer Installation (Figure 18)
Move the safety button so it is fully protruding out of the right side of the trigger guard and cannot be moved any further indicating the "ON"
(SAFE) position. Pull back the operating handle. The action should stay opened. Visually and physically check the chamber, elevator, and
magazine tube to be certain the shotgun is unloaded. Wear eye protection during disassembly.
1- Remove recoil pad (screws will remain in recoil pad).
2- Remove stock bolt using 1/2" socket wrench (Rotate counterclockwise).
3- Remove stock.
4- Place selected stock spacer on back of receiver, text side facing out.
(Note clocking slot).
5- Reinstall stock.
6- Install stock bolt. Do not over-tighten.
7- Replace recoil pad. Do not over-tighten screw.
28After performing any work on your firearm such as cleaning, disassembly, or installation of any accessory, check your firearm for
proper functioning before firing any live ammunition.
2912-20-28 GA GENERAL PART ASSEMBLY
3112-20 GA GENERAL PARTS LIST
Part No Description Part No Description Part No Description
1 Receiver 12 Barrel
2 Choke Tube 13 Front Sight
3 Magazine Cap 14 Bolt Release 23 Stock Bolt Screw
4 Magazine Spring Cap 15 Button Pin 24 Stock
5 Magazine Spring 16 Carrier Latch 25 Recoil Pad
6 Magazine Short Spring Cap 17 Carrier Latch Spring 26 Recoil Pad Screws
7 Magazine Tube 18 Carrier Latch Pivot Pin 27 Recoil Pad Screw Washer
8 Action Spring 19 Carrier Latch Button Spring 28 Forearm
9 Magazine Plug 20 Stock Bolt 29 Magazine Cap Lock Spring
10 Gas Piston 21 Stock Bolt Washer 30 Magazine Cap Lock Pin
11 O-ring 22 Stock Bolt Lock Washer 31 Magazine Cap Lock Screws
32BOLT GROUP ASSEMBLY
Part No , - Desc rip_ t_ i o _n _ _
-
1 Bolt
2 Firing Pin
3 Firing Pin Spring
4 Firing Retaining Pin
5 Extractor I
6 Extractor Spring I
-
7 Extractor Spring Pin
8 Extractor Pin
9 Bolt Handle
10 Action Arm Sleeve
11 Locking Bar
12 Action Arm
33TRIGGER GROUP ASSEMBLY
3412-20 GA TRIGGER GROUP PART LIST
Part No Description Part No Description
1 Trigger Guard 15 Hammer Spring
2 Manual Safety 16 Hammer Spring Cap
3 Safety Plunger Spring 17 Hammer Latch
4 Safety Plunger Spring Pin 18 Hammer Tube Pin
5 Safety Spring Retaining Pin 19 Hammer Tube Piston Ring
6 Trigger 20 Sear
7 Trigger Spring 21 Sear Spring
8 Trigger Pin 22 Sear Spring Cap
9 Trigger Fixing Pin 23 Sear Pin
10 Disconnector 24 Sear Spring Pin
11 Disconnector Spring 25 Elevator
12 Disconnector Pin 26 Elevator Pin
13 Disconnector Pin 27 Receiver Pin
14 Hammer
35You can also read