SUPPLIER PORTAL - Using the Supplier Portal - Intermountain Healthcare
←
→
Page content transcription
If your browser does not render page correctly, please read the page content below

SUPPLIER PORTAL – Using the Supplier Portal
Once you successfully register as a user and sign in, you will have access to the tiles below:
Link to training for each tile:
• Initiate Supplier Change • PO Acknowledgement
• Purchase Orders • Announcements
• Receipts • FAQs | Contact Us
• Events Calendar • Manage Profile
• Bidding Opportunities • Reports
Initiate Supplier Change
o Click the Initiate Supplier Change tile to modify your Supplier Profile for the
following reasons:
Update or add an address or phone number
Update or add preferred contacts such as sales or accounts receivable
Update preferred method for receiving purchase orders (EDI, email, fax)
Update payment method
Update supplier name (requires copy of W9)
o From the main landing page, click Next to review your information in the Company Profile train stop.
Updated 7/27/2021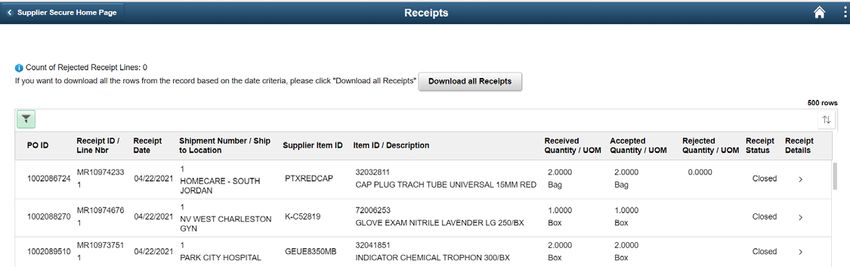
o   Company Profile
              • Click on the triangle next to Profile Questions to see all boxes. Enter any information for
                   the changes you need to make and attach any relevant documents (such as a W9). Upon
                   completion, click Next to move to the Addresses train stop.
                       o Please note, any question marked with an asterisk (*) must be completed
                          before clicking Next.

               •

                                                                                                  Updated 7/27/2021
o Addresses
Click the pencil icon under the Edit column to update address(es) and phone number(s).
Alternatively, if you need to add a new address, you can click Add New Address.
Complete the fields with the pertinent information and click OK to return to the Addresses train
stop. Click Next to move to the Contacts train stop.
• Please note, if a required field is left blank, a pop-up will alert you to complete the field.
Updated 7/27/2021
o Contacts
Click the pencil icon under the Edit column to update contact information for specific users such
as sales or accounts receivable. Alternatively, if you need to add a new contact, you can click
Add New Contact.
• Please note, if a required field is left blank, a pop-up will alert you to complete the field.
Complete the fields with the pertinent information and click OK to return to the Contacts train
stop. Click Next to move to the Submit train stop.
Updated 7/27/2021
o Submit
Select appropriate audit reason code from dropdown box to reflect change(s) to supplier profile.
Add any comments about change or additional information you would like to provide regarding
the change request.
Click box next to Confirm Changes.
If needed, you can click Review to review the changes you have selected.
Click Submit to submit changes.
o Once you click Submit, a confirmation page appears confirming submission of your changes.
Updated 7/27/2021• You will also receive an email that the requested changes have been accepted and are pending approval.
• Once the requested changes are approved, you will receive a confirmation email.
Updated 7/27/2021 Purchase Orders
o Use the Purchase Orders tile to open the Purchase Orders page and view
the details of all Purchase Orders that have been issued for your company.
o You can filter the results on the PO by clicking the filter icon. Once you
enter the criteria, click Done to narrow your search.
Updated 7/27/2021o To download a spreadsheet of the filtered POs, click Download all PO’s.
Updated 7/27/2021o Click the > arrow under PO Details to see the details of the PO.
o Click the green down arrow to view the options for the PO.
Click View POA to acknowledge the PO if has not yet been acknowledged or view the Purchase
Order Acknowledgement (POA).
Updated 7/27/2021 Click View PO Dispatch Document to view a PDF copy of the PO. When the window opens, click
View PDF.
If you receive the following notification, click OK and remain on View PO Dispatch
Document screen. Click View PDF again to generate the PDF for viewing.
Updated 7/27/2021 Receipts
o Use the Receipts tile to open the Receipts page and view the details of the
rejected and accepted receipt lines. The Receipts tile displays a count of
the Rejected Receipt Lines that may need you to work with the facility to
create a Return Material Authorization (RMA).
PO Acknowledgement
o When a purchase order is issued by Intermountain Healthcare, it is important for the Purchasing buyer
to know that you have received and processed the PO. The PO acknowledgement tile allows for you to
review any unacknowledged POs and acknowledge receipt of the PO.
Please note, please do not acknowledge POs that have been acknowledged by EDI as manual
acknowledgement will create a duplicate acknowledgement.
o The tile shows a count of the number of unacknowledged purchase orders.
o Click on the tile to see all unacknowledged purchase orders
Updated 7/27/2021o Click on the green down arrow to see available actions.
o Click Acknowledge PO to review the PO details for each line on the PO.
You can click on the Comments or PO Line comments for additional details, or to view a quote or
comments from the buyer.
If all details are correct, click Acknowledge.
If you find that any of the information is not correct, such as price, estimated delivery date, ship
method, or the item is on backorder, you can communicate those changes by editing the
information in the appropriate fields. In the example below, the quantity and delivery date have
been updated. Once updated, click Acknowledge.
If item on the line cannot be ordered, click Reject Item. A pop-up will ask for confirmation of the
rejected line. Click OK to proceed. From the main screen, click Acknowledge.
Updated 7/27/2021 After you click Acknowledge, a pop-up will ask you to confirm acknowledgement of the PO. Click
OK.
o Once the PO has been acknowledged, you can review the acknowledgement by clicking the green down
arrow.
Click View POA to review the information that was sent to the buyer in the acknowledgement.
Updated 7/27/2021 Click Acknowledgement History to review the date and time the purchase order was
acknowledged.
Click View PO Dispatch Document to view a PDF copy of the PO. When the window opens, click
View PDF.
If you receive the following notification, click OK and remain on View PO Dispatch Document
screen. Click View PDF again to generate the PDF for viewing.
Updated 7/27/2021 Announcements
o Announcements related to downtime, updates, or other important
system messages
FAQs | Contact Us
o Contains answers to Frequently Asked Questions including how to
submit an invoice and contact information for Accounts Payable
Events Calendar
o Calendar for supplier events or bidding events
Bidding Opportunities
o Use the Bidding Opportunities tile to open a new page and view a list
of bidding events. The Bidding Opportunities tile displays a count of
the events available for bidding, which includes public events as well as
invitation-based events. You use your Bidder ID or Supplier ID to
participate in a Public Bidding Event.
Updated 7/27/2021 Manage Profile
o Bidder Profile
View your bidder settings
o Change My Password
To change your password, type in the current password, new
password, and then the new password again.
Click Change Password.
Please note: Upon initial registration, a password was emailed to you. When you update your
password, no email will be sent. Please keep your new password safe for future.
Reports
o Intermountain Roster
Query of all Intermountain locations including address, GLN, type
of facility, and Intermountain location code
o Bill Only Purchase Orders
Bill Only purchase orders are used exclusively for Surgical Services products.
Query of bill only purchase orders that can be narrowed by date range, facility, and patient
name. Query only reflects purchase orders for supplier associated with your user id.
Updated 7/27/2021You can also read