Using PSYCKES from Home - We will begin shortly - NY.gov
←
→
Page content transcription
If your browser does not render page correctly, please read the page content below
Using PSYCKES from Home
We will begin shortly
To hear the webinar, click “Call Me” in the Audio Connection box and enter
your phone number - the WebEx system will call your phone

If you do not see the Audio Connection box, go to the top of your WebEx
screen, click “Communicate” > “Audio Connection” > “Join Teleconference”

                                                Michelle Hand, MSW
                                    PSYCKES Medical Informatics Team
                                                         April 7, 2021
Q&A via WebEx

▪ All phone lines are muted
▪ Access “Q&A” box in WebEx menu at the right of
  your screen; if you expanded the view of the
  webinar to full screen, hover cursor over bar at top
  of screen to see menu
▪ Type questions using the “Q&A” feature
   – Submit to “all panelists” (default)
   – Please do not use Chat function for Q&A
▪ Slides will be emailed to attendees after the webinar
Agenda
▪ How to access PSYCKES from home
   – Token setup
   – Login instructions
   – Troubleshooting login error messages
▪ Where to find the PSYCKES consent form
   – Verbal consent during state emergency
   – How to look up a client in PSYCKES and enter consent

▪ COVID-19 related functions in PSYCKES

▪ PSYCKES mobile app for iPhones & iPads

▪ Additional PSYCKES training

▪ Technical support
Token Setup
Login Requires User ID and RSA Security Token
 ▪ A user ID and RSA token issued by the organization for which you
   work is required to login to PSYCKES
     – Note: If you work for an OMH organization, this user ID and token is
       the same you might use for MHARS, CAIRS, NIMRS, PCS or MHPD
 ▪ Your organization’s security manager grants you access to
   “PSYCKES-Medicaid” using the Security Management System (SMS)
 ▪ If you use a hard token and don’t have it with you, request a soft token
    Hard token              Soft token on computer         Soft token on phone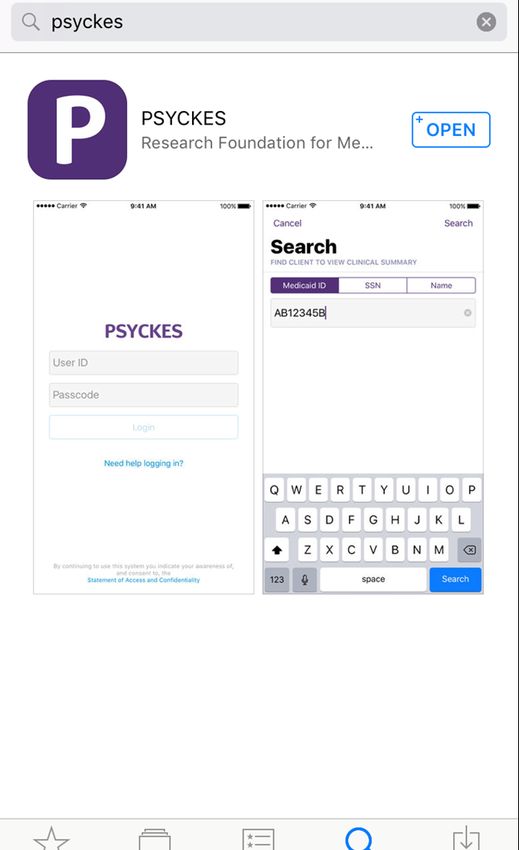
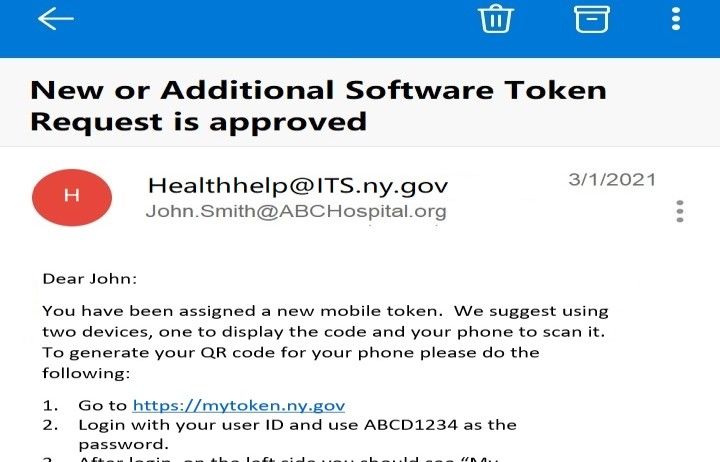
Locating Your Desktop-Compatible Soft Token

▪ Search email Inbox/Junk/Spam folders for soft token
  email sent from either:
   its.sm.bhp.bs.omh.sao@its.ny.gov
   OR
   Information_security_office@omh.ny.gov

▪ Your soft token email will contain the RSA token
  attachment, and the password to import the token
  (password to import token is sent within the same
  email or a separate email)
Can’t Locate Your Soft Token Email?
▪ If you can’t locate your soft token email, contact the
  OMH/ITS Helpdesk:
   – OMH Helpdesk - External Providers (Non-State Employees):
     healthhelp@its.ny.gov
   – ITS Helpdesk - State Employees: fixit@its.ny.gov
▪ Request that your soft token email be resent to you, and
  include your PSYCKES user ID
▪ New soft tokens are now automatically set to go on a
  computer only. If you’d like your token on your mobile
  device instead of your computer, please specify this in your
  email to the OMH/ITS Helpdesk (“I would like to replace my
  desktop token with a mobile token”)
   – Include your name, email address, OMH user ID, and type of
     mobile device (e.g., iOS/Apple, Android, etc.)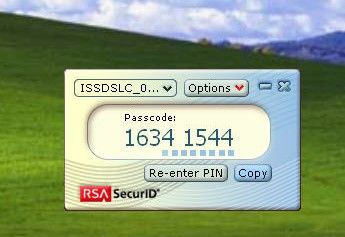
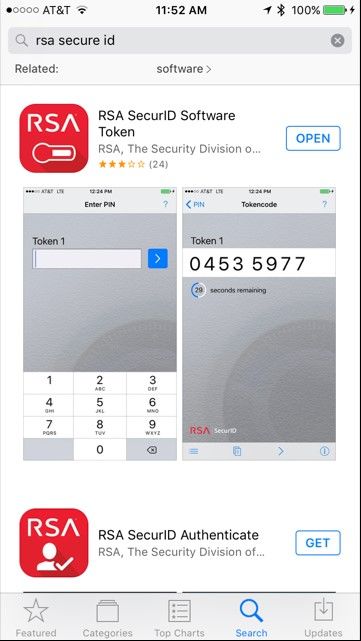
Install RSA SecurID App on Mobile Device
 To install the RSA SecurID token
 app onto your mobile device:
 1. Go to the App Store icon on
     iOS device or Google Play on
     Android device
 2. Search for “RSA SecurID”
 3. Install the RSA SecurID app
   •   Device account password
       may be required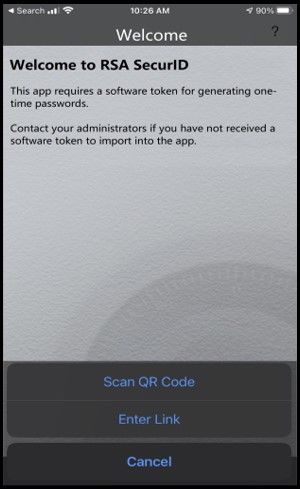
Import Your Token Into RSA App on Mobile Device

▪ Locate mobile token
  confirmation email
  – This email will contain login
    credentials for the Self-Service
    Console page and mobile
    token import instructions
▪ Login to the RSA Token
  Self-Service Console
  page on desktop
  computer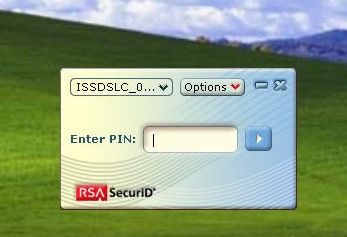
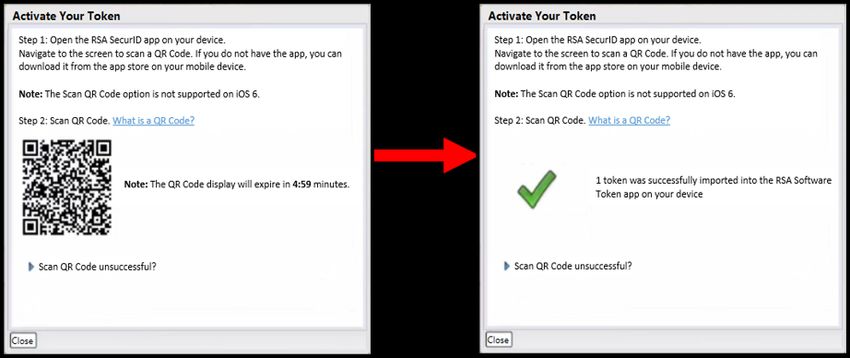
Import Your Token Into RSA App on Mobile Device
1. Under “My
   Authenticators” in
   the Self-Service
   Console page click
   on “Activate your
   token”

2. A QR Code will
   pop up on the
   desktop screen.
   *This code will only be
   available for 5 minutes*
Import Your Token Into RSA App on Mobile Device
 3. Open the RSA App on
    your mobile device and
    tap the “Scan QR Code”
    option on the welcome
    screen.

 4. Use your mobile device
    to scan the QR code
    on the desktop
    screen until the QR
    code changes to a
    green checkmark
    to confirm a
    successful scan!
Install RSA Token Software on Computer
First check to see if RSA
token software already
exists on your computer
– Open the Windows
search/ Start menu
(bottom left of screen)
– Type “RSA” into the
search field
– If you see “RSA
SecurID Token” under
programs, then the
software has already
been installedInstall RSA Token Software on Computer
▪ If the RSA token software has not been installed on your
computer, you can install it using the following site RSA
SecurID website:
RSA SecurID Token Download
▪ To find out if you have a 64-bit system or a 32-bit system
on your home computer, go to “System Information” via
your Windows search/Start menu in bottom left corner of
screen or through control panel
– “System Type” x64-based PC, use the 64-bit link to install RSA
– “System Type” x86-based PC, use the 32-bit link to install RSAInstall RSA Token Software on Computer Extract/Un-Zip token file from download – Select “Show in folder” – Select “Compressed Folder Tools” > “Extract all” 1. Click “Next” at the Welcome screen 2. At the “License Agreement” screen, if you agree, select “I accept the terms in the license agreement” and click “Next” 3. On “Setup Type” screen, leave the default “Typical” checked and click “Next” 4. On “Ready to Install the Program” screen, click “Install” 5. When the installation is complete, click “Finish” 6. Note: You do not need to restart your system
1   2

3   4
5
Import Your Token Into RSA Software on Computer
 When you have RSA Token Software on your computer:
 ▪ Locate your desktop-compatible soft token email
 ▪ Double-click on the token attachment (.sdtid)
 ▪ Click to open
 ▪ Enter password provided in the token email
    – The password was either in the same email as your
      token attachment or in an email sent separately
    – This password is case sensitive
 ▪ Success message appears, click “OK” or…
 ▪ Optional: change the “name” of your token to your
   user ID for future convenience
Enter password provided in token email and click “OK”
Requesting a Soft Token
▪ If you use a hard token to login to PSYCKES but don’t
  have it with you and would like to request a desktop-
  compatible soft token, contact the OMH/ITS Helpdesk:
   – OMH Helpdesk - External Providers (Non-State Employees):
     healthhelp@its.ny.gov
   – ITS Helpdesk - State Employees: fixit@its.ny.gov
▪ Include your PSYCKES user ID
▪ Can obtain either a desktop token or mobile token (not
  both)
▪ If you’d like a mobile only token, you will need to specify
  this when contacting the OMH Helpdesk and include your
  email address, OMH user ID, and type of mobile device
  (e.g., iOS/Apple, Android, etc.)
Login Instructions
Login to PSYCKES
▪ Go to PSYCKES Home Page: www.psyckes.org
▪ Click “Login to PSYCKES”
Enter PSYCKES User ID

Soft token: Copy/paste or enter passcode
Hard token: Enter PIN and numbers from token
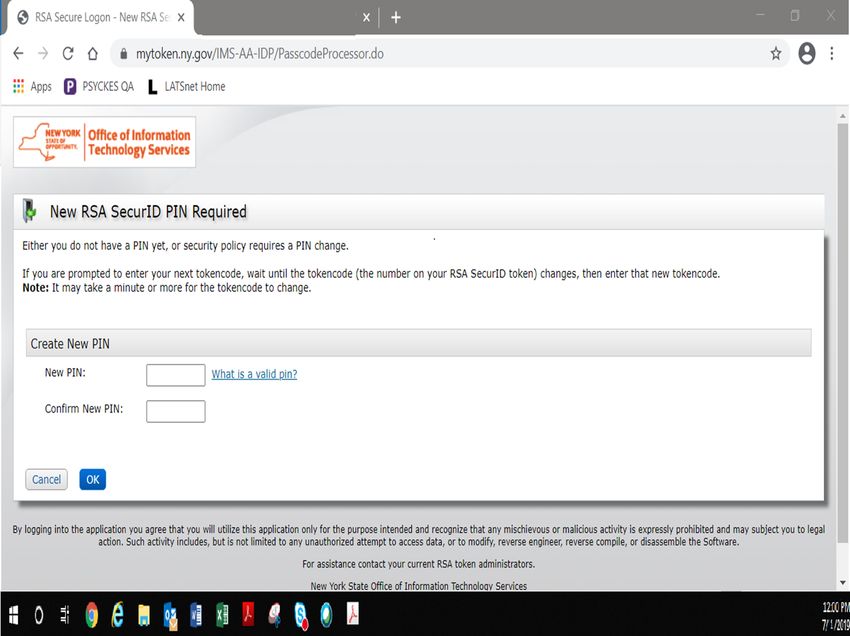
Login to PSYCKES: First time using this
token at this organization
Using a Desktop-Compatible Soft Token
▪ Enter user ID in PSYCKES login screen
▪ Open RSA SecurID token
▪ Leave “Enter PIN” box empty and click
  on the arrow button to generate a
  passcode
▪ Copy/paste passcode in login screen
▪ Click “Continue”
▪ You will then be prompted to create PIN
▪ Note: Your PIN cannot begin with zero
  or be a PIN you’ve used before
Login to PSYCKES: First time using this
token at this organization
Using a Desktop-Compatible Soft Token
▪ After you create a PIN, go back to your
  RSA SecurID token
▪ Select “Re-enter PIN”
▪ Type your PIN into the “Enter PIN” box
▪ Click the arrow button to generate a
  passcode
▪ Wait for passcode numbers to change
▪ Copy/paste passcode into login screen
▪ Click “Continue” to login to the
  application
Login to PSYCKES: First time using this
token at this organization
Using a Mobile Token

▪ Login to the Self-     ▪ Under the “My
  Service Console page     Authenticators” section,
                           click on “Create PIN”
Login to PSYCKES: First time using this token at this organization Using a Mobile Token Please note: Your PIN cannot begin with zero!
Login to PSYCKES: First time using this
token at this organization
Using a Hard Token

▪ Enter user ID in PSYCKES login screen
▪ When using a hard token for the first time at this
  organization, enter only the numbers on the token
  screen into the passcode box
▪ Follow instructions to create a PIN
▪ Wait for passcode numbers to change
▪ Enter your PIN and the 6 numbers on the token directly
  into the passcode box of PSYCKES login screen
▪ Proceed to login to the application
Login to PSYCKES: Subsequent logins when
you have PIN for this token at this organization
 Using a Soft Token (Mobile or Desktop)
▪ Enter your PIN into the RSA SecurID Token “Enter
  PIN” box
▪ Click or tap the arrow button to generate a passcode
▪ Copy/paste the passcode into the passcode box of
  PSYCKES desktop login screen/PSYCKES mobile app

Using a Hard Token
▪ Enter your PIN and the 6 numbers on the token all
  directly into the passcode box of PSYCKES login
  screen
Troubleshooting Login
Errors
Authentication Error
▪ Troubleshooting steps:

  1. Confirm you are
     logging in correctly
     with correct User ID
     and passcode
  2. Clear your browser’s
     history/cache
  3. Contact the OMH/ITS
     Helpdesk and request
     a PIN reset
Authentication Error
▪ Confirm you are logging in correctly
1. Navigate to the PSYCKES login screen
NOTE: Do not bookmark the PSYCKES login
screen itself, instead bookmark the PSYCKES
homepage www.psyckes.org
2. Confirm you are using the correct user ID
3. Make sure that the passcode is not about to change
when pasting/entering the passcode into the
PSYCKES login screenTroubleshoot Login Error: Clear Cache
▪ How to clear your browser’s history/cache in
Internet Explorer:
1. Navigate to the icon in the upper righthand
corner if Internet Explorer screen
2. Hover over “Safety”
3. Select “Delete browsing history…”
4. Confirm first four boxes are checked off
5. Click “Delete”Troubleshoot Login Error: Clear Cache Steps 1 – 3 in Internet Explorer
Troubleshoot Login Error: Clear Cache
Steps 4 – 5 in Internet Explorer
Troubleshoot Login Error: Clear Cache
▪ How to clear your browser’s history/cache in
  Google Chrome

   1. Navigate to the icon in the upper righthand corner
      of the Google Chrome screen
   2. Hover over “History”
   3. Select “History”
   4. Select “Clear browsing data”
   5. Change time range to “All time”
   6. Confirm first four boxes are checked off
   7. Click “Clear data”
Troubleshoot Login Error: Clear Cache Steps 1 – 3 in Google Chrome
Troubleshoot Login Error: Clear Cache
Steps 4 – 7 in Google Chrome
Authentication Error: Reset PIN
▪ If you still cannot login after completing the
  troubleshooting steps, contact the OMH/ITS Helpdesk
  and request a PIN reset:

  – OMH Helpdesk - External Providers (Non-State Employees):
    healthhelp@its.ny.gov
  – ITS Helpdesk - State Employees: fixit@its.ny.gov

▪ NOTE: Your new PIN cannot begin with zero or be
  a PIN you’ve used before.
PSYCKES Consent Form
Where Do I Find PSYCKES Consent Form?
PSYCKES Application
 ▪ Registrar Menu within PSYCKES application
    – Navigate to the “Registrar Menu” in PSYCKES
    – Select “Manage PHI Access”
    – Where it states “Print PSYCKES Consent Form,”
      select the PDF links “English” or “Spanish”
 ▪ To pre-populate contact information in the
   PSYCKES consent form prior to printing:
    – Navigate to the “Registrar Menu” in PSYCKES
    – Select “Manage PHI Access”
    – Select “Add/Edit” details located under “Provider
      Details for Consent Form”
Where Do I Find PSYCKES Consent Form? PSYCKES Application
Where Do I Find PSYCKES Consent Form?
PSYCKES Public Website
 ▪ Go to www.psyckes.org
 ▪ Click “Implementing PSYCKES” from left navigation
   menu
 ▪ Open PSYCKES Consent Form PDF in desired
   language
 ▪ Insert your organization’s information in appropriate
   blank lines throughout pages 1 and 2
Verbal Consent to Access PSYCKES
During the COVID-19 public health emergency, it is
acceptable to obtain verbal consent for PSYCKES so
long as:
  – The consent is informed (i.e., explain to the client
    what PSYCKES is, their right to deny consent, and
    their right to withdraw consent at any time)
  – Staff obtaining verbal consent complete PSYCKES
    consent form (described in next slide)
  – A copy of the completed PSYCKES consent form with
    the date of verbal consent is provided to the patient
    via mail, email, or after the emergency is over, in
    person
Complete a Consent Form with Verbal Consent ▪ Check the “I give consent” check box ▪ Enter the patient’s name in “Name of Patient” line ▪ Enter “Verbal consent with (staff name)” in “Signature of Patient” line ▪ Enter date verbal consent was obtained in “Date” line ▪ Save the form in patient’s file
Entering Consent in PSYCKES

▪ There is not a separate consent checkbox in the
  PSYCKES application to indicate verbal consent
  was obtained compared to signed consent

▪ Follow the normal process for entering consent in
  PSYCKES if it was obtained verbally, by checking
  “Client signed PSYCKES Consent form” check box
Lookup a Client and
Enter Consent
Lookup a Client and Enter Consent
▪ Navigate to Recipient Search

               Go to Recipient
               Search
Lookup a Client and Enter Consent
▪ Enter recipient identifier (Medicaid ID or SSN or
name and DOB)
▪ Click “Search”
Then click “Search”
Enter a Recipient ID
such as Medicaid IDLookup a Client and Enter Consent
▪ Review and confirm client is correct match
▪ Check “Current PHI Access” column
▪ Select “Update Access” or “Enable Access”
Confirm you found the Review current level of access
correct client to this client’s data and select
Update Access or Enable Access
to enter consentLookup a Client and Enter Consent ▪ Select “Client signed a PSYCKES Consent” ▪ Click “Next” Select why you can view client’s data, such as “client signed a PSYCKES consent”
Lookup a Client and Enter Consent
 ▪ Confirm how client’s identity was verified
    – “Provider attests to the client’s identity” or “Client
      provided 1 form of photo ID or 2 forms of non-photo ID”

     Select how
     client’s identity
     was verified
Lookup a Client and Enter Consent
▪ Select “Enable” or “Enable and View Clinical Summary”
Select “Enable” or
“Enable and View
Clinical Summary”COVID-19 Related Functions in PSYCKES
Recipient Search: COVID-19 related reports
▪ Run reports to identify:
   – Clients with COVID-19 diagnosis
   – Clients with high utilization of Emergency Room
     services (i.e., to target interventions to help divert
     from the ER during the state emergency)
   – Clients who have been actively placed on COVID-19
     Registry
      • State PCs use a registry tool for their inpatient and
        residential units
      • If you happen to be serving a client that was on one of
        the PC registries, and you have PSYCKES consent,
        you will see their registry status within their clinical
        summary
Recipient Search: COVID-19 Dx Report
Recipient Search: COVID-19 Dx Report
Recipient Search: High ER Use Report
Recipient Search: COVID-19 Registry
Clinical Summary: COVID-19 Medical Diagnosis
 ▪ Diagnostic billing code for COVID-19 was added to
   the International Classification of Diseases (ICD)

 ▪ Clinical Summary will display this diagnosis when:
    – A provider uses this billing code
    – The bill is processed
    – Note: there is a billing lag from time diagnosis was
      given to time it shows up in PSYCKES

 ▪ Clinical Summary is updated weekly
Clinical Summary: COVID-19 Medical Diagnosis “Medical Diagnosis” section will display “COVID-19” in the “Certain Infectious and Parasitic Diseases” category if applicable to that client
Clinical Summary: COVID-19 Registry
“Active COVID-19 Registry” information will appear in
the Current Care Coordination section. Current and
Historical Registry information will appear in the
PSYCKES Registry section.
PSYCKES Mobile App
PSYCKES Mobile App Overview
▪ PSYCKES users can rapidly access a client’s clinical
  summary from the field using an iPhone or iPad
▪ User-friendly streamlined design
▪ Review overview of critical information and drill into
  more detail as needed
▪ Enable consent or emergency access as needed
▪ Access recently viewed clients easily without having
  to re-enter search criteria
▪ Update User Role Profile
▪ Free in the App Store
Install the PSYCKES Mobile App
Install the Mobile App from
the App Store:
1. Tap the App Store icon on
   iOS device
2. Search for “PSYCKES”
3. Install the free PSYCKES
   Mobile App
   – App Store account
     password may be required
Lookup a Client in the Mobile App Search for Client with: ▪ Medicaid ID ▪ Social Security Number (SSN) ▪ First Name ▪ Last Name ▪ Date of Birth (DOB)
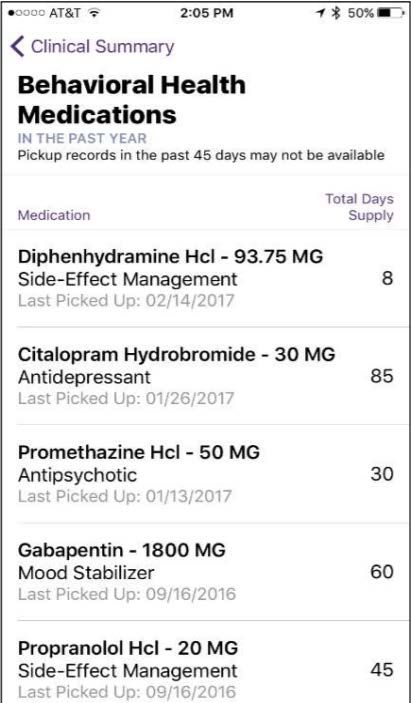
General
Diagnoses
Medications
Services
Additional Training &
Technical Support
PSYCKES Training
▪ PSYCKES website: www.psyckes.org
▪ Webinars
   - Live webinars: Register on PSYCKES “Live Webinars” section
   - Recorded webinars: Posted on PSYCKES “Recorded Webinars”
     section
       - Using PSYCKES Quality Indicator Reports
       - Navigating PSYCKES Recipient Search for Population Health
       - Using the PSYCKES Clinical Summary
       - Consent, Emergency, Quality Flag: PSYCKES Levels of Access
       - PSYCKES Mobile App for iPhones & iPads
       - Introduction to PSYCKES
       - Where to Start: Getting Access to PSYCKES

▪ PSYCKES User’s Guides
   - www.psyckes.org > PSYCKES Training Materials
   - Each User Guide explains an individual section of the PSYCKES
     application
Technical Support
▪ PSYCKES Help (PSYCKES support)
– 9:00AM – 5:00PM, Monday – Friday
– PSYCKES-help@omh.ny.gov
▪ OMH/ITS Helpdesk (Token, Login & SMS support)
– Provider Partner OMH Helpdesk:
– healthhelp@its.ny.gov; 518-474-5554
– State Employee ITS Helpdesk:
– fixit@its.ny.gov;1-844-891-1786You can also read