A10 Software Quick Start Guide - EN
←
→
Page content transcription
If your browser does not render page correctly, please read the page content below

EN

A10 Software Quick Start Guide

Understanding ATRIUM Areas

               cdvigroup.com   Creator of electronic access solutions since 1985

                                                                        Group Products
Objective:

    •       Understand areas and how ATRIUM uses them to control access
    •       Provide a real-world example depicting the relationship between areas and doors
    •       Demonstrate the process in creating access levels
    •       Associate an access level to a User/Card

            In this document we will:

            1.      Create areas
            2.      Define doors
            3.      Create schedules and multi-day holidays
            4.      Create access levels
            5.      Create users and cards
            6.      Associate cards to users
            7.      Associate access levels to users

    Understanding Areas
    The ATRIUM Access Control system uses a different concept in managing access rights for card holders. ATRIUM
    determines user access rights based on areas delimited by doors.

    For example, the reception area at the entrance of a building is considered an area. A room or department such as a
    conference room or shipping department are other areas.

    Users (card holders) are granted or denied access to these area during specific time periods using schedules.

    Another example to help understand areas are countries. Countries are separated by international borders such as the
    border between Canada and the USA and the border between the USA and Mexico.

    Each country is an area. These countries are equivalent to areas in a building. In ATRIUM, doors are considered
    borders between areas.

    When entering a country, a border guard will permit or deny access to the country according to strict criteria.

    With ATRIUM, an access reader will act in the same manner as a border guard. It will grant or deny access to the area
    according to strict access rights.

    In addition, all countries have several entry points such as airports, sea ports and terrestrial border crossings. This is
    also true for some areas in a building where several doors give access to the same area.

    ATRIUM’s door menu permits us to define which areas are located on both sides of the door. As shown in the floor
    plan on the next page, two doors lead to the shipping area. One door (door 7) is from the exterior of the building to
    the shipping department and another (door 6) is from the hallway to the shipping department. Both doors lead to the
    same area.

2       cdvigroup.com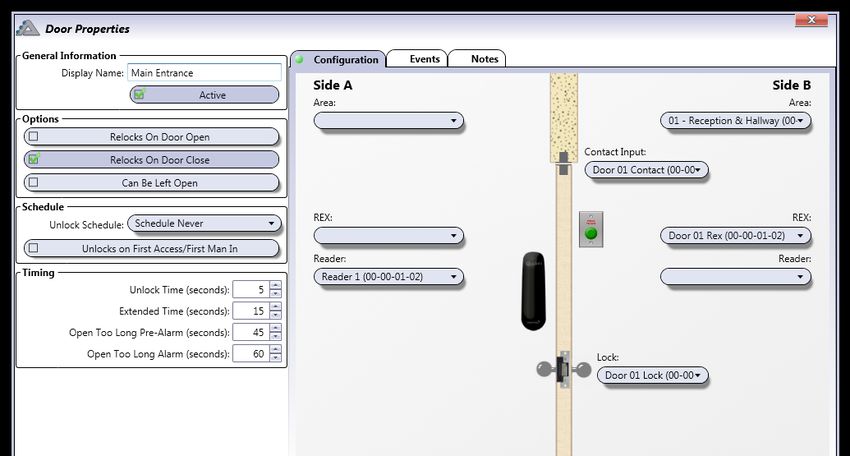
A10 Software
Quick Start Guide

                    cdvigroup.com   3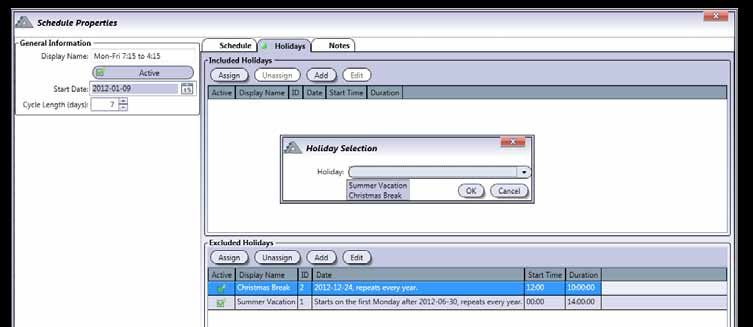
1. Creating Areas

    * Note that the words «Areas» and «Partitions» are synonyms. They mean the same thing.

    Click the Areas icon and add areas (click the Add button) as depicted below.

    •    Refer to the floor plan on the previous page to name the other areas.
    •    Although the floor plan includes a cafeteria, it is not a restricted area. This is a public access area. A reader or
         request-to-exit device are not installed for this area. Therefore, it is not necessary to add the Cafeteria area to
         the system.

4       cdvigroup.com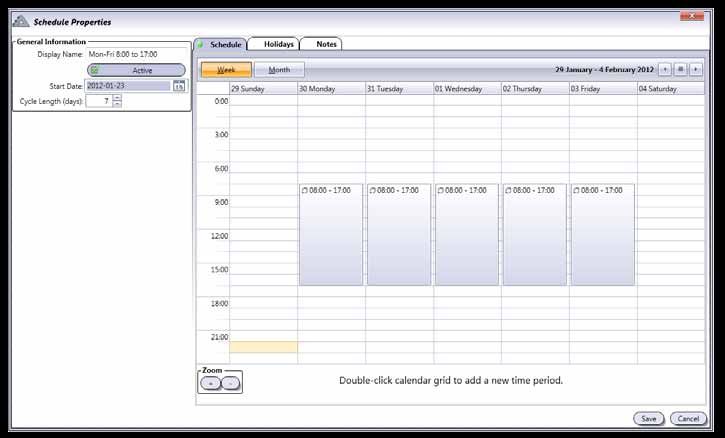
A10 Software
                                     Quick Start Guide

2. Define Doors

Use the list on the following page to define the doors. Click the Edit button to access the Door Properties menu.

Name each door (Display Name field) as shown in the list and indicate Side A and Side B areas using the floor plan
provided. Note that Side A is the area located before the door (reader side) and Side B (rex side) is the area located
on the other side of the door. Repeat for each door.

Door Properties Menu

                                            An empty area represents
                                            the exterior of building

                                                                                                    cdvigroup.com        5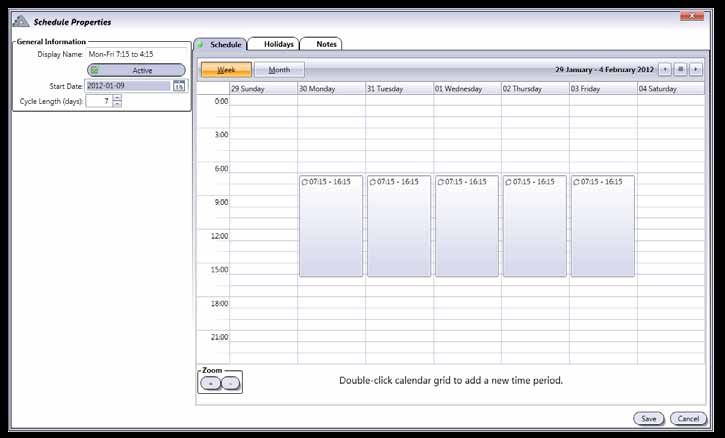
Side A = Reader location - Side B = Request-to-Exit (REX) location
                    _______________________________________________________

              Door 1 - Main Entrance
                       • Side A - Empty (Leave Blank)
                       • Side B - Area 01 - Reception & Hallway

              Door 2 - President’s Office
                       • Side A - Area 01 - Reception & Hallway
                       • Side B - Area 02 - President’s Office

              Door 3 - Employee Entrance
                       • Side A - Empty (Leave Blank)
                       • Side B - Area 01 - Reception & Hallway

              Door 4 - Conference Room
                       • Side A - Area 01 - Reception & Hallway
                       • Side B - Area 03 - Conference Room

              Door 5 - Production Door
                       • Side A - Area 01 - Reception & Hallway
                       • Side B - Area 04 - Production

              Door 6 - Shipping Hallway Door
                       • Side A - Area 01 - Reception & Hallway
                       • Side B - Area 05 - Shipping

              Door 7 - Loading Dock Service Door
                       • Side A - Empty (Leave Blank)
                       • Side B - Area 05 - Shipping

              Door 8 - Server Room
                       • Side A - Area 01 - Reception & Hallway
                       • Side B - Area 06 - Server Room

              Door 9 - Accounting
                       • Side A - Area 01 - Reception & Hallway
                       • Side B - Area 07 - Accounting

6   cdvigroup.com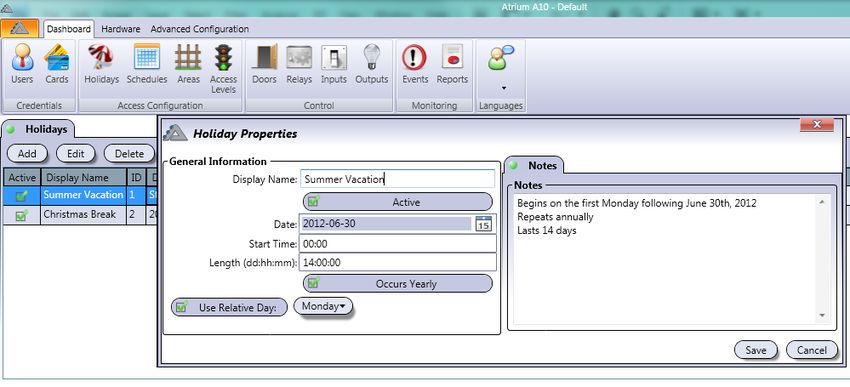
A10 Software
                                   Quick Start Guide

3. Create Schedules
The highlighted schedules in the list below show the Mon - Fri 7:15 to 4:15 and Mon - Fri 8:00 to 5:00 schedules.
Click the ADD button to create these schedules.

The schedule below will be valid Monday to Friday from 7:15 AM to 4:15 PM. This schedule will be used to permit
access to the Reception & Hallway, Production and Shipping areas. Double-click the calendar to add time periods
for each day.

                                    Monday to Friday - 7:15 AM to 4:15 PM

                                                                                                cdvigroup.com       7
The schedule below will be valid Monday to Friday from 8:00 AM to 5:00 PM. This schedule will be used to permit
    access to the Reception & Hallway, Accounting, Conference Room and Marketing areas. Double-click the
    calendar area to add time periods.

                                         Monday to Friday - 8:00 AM to 5:00 PM

8     cdvigroup.com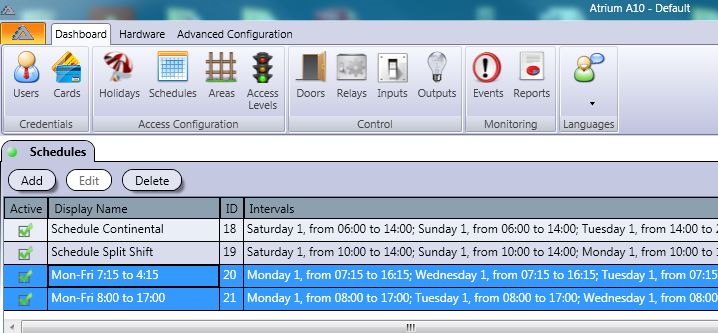
A10 Software
                                     Quick Start Guide

Holidays

Holidays can impact a schedule. For example, if Christmas falls on a weekday, the holiday will override the normal
execution of the schedule. In most instances, an employee will be permitted access weekdays but will be denied
access if Christmas day occurs on a weekday.

We manage this by excluding a holiday from a schedule. Click the Holidays tab in the schedule menu to exclude a
holiday. Inversely, including a holiday in a schedule will permit the schedule to remain active (or valid) even if the
day is a holiday.

Note that one holiday can span several days (multi-day holidays).  For example, summer holidays (2 weeks in July) or
during the holiday season (Dec. 24th to Jan. 2nd). We can exclude these holiday periods from a schedule which will
result in the schedule being invalid during these holidays. The holidays will override the schedule.

We will create two holidays, Summer Vacation and Christmas Break and exclude them from the schedules created
previously.

Click the Holidays icon and click the Add button to enter the Holiday Properties menu.

In the example below, the Summer Vacation holiday will:

        •       begin at midnight on the first Monday following June 30, 2012
        •       repeat every year (occurs yearly)
        •       last 14 days

                                                  Summer Vacation

                                                                                                      cdvigroup.com      9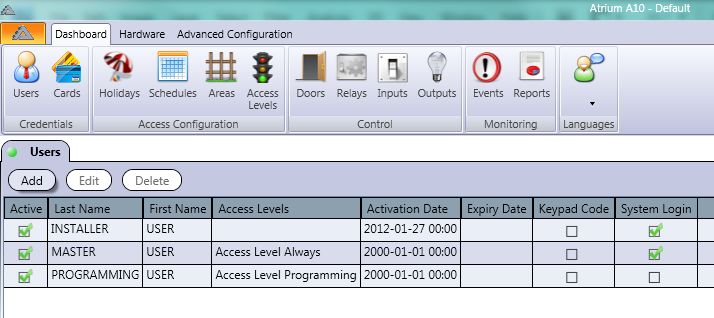
In the example below, the Christmas Break holiday will:

            •       begin at noon December 24, 2012
            •       repeat every year
            •       last 10 days

                                                      Christmas Break

     Exclude holidays from schedules

     The next step consists of excluding these holidays from the schedules as shown in the screen capture below. In the
     Schedule Properties menu, select the Holidays tab, click the Assign button in the Excluded Holidays section.
     Select the holidays in the drop-down list of the Holiday Selection pop-up window. Save the modification. Repeat for
     both schedules.

10     cdvigroup.com
A10 Software
Quick Start Guide
4. Create Access Levels
The highlighted access levels below show the Accounting and Shipping access levels.
Click the ADD button to create these access levels as shown on pages 12 and 13 in Table 1 and Table 2.
Access levels permit us to configure which schedule (if any) will allow a user (card holder) to access an area.
! This is an essential step in controlling who will have access, and at what times, to different areas of a building.
cdvigroup.com 11Accounting Access Level
Table 1: Association between areas and schedules for the Accounting Access Level
Area Schedule
01 - Reception & Hallway Mon - Fri 8:00 AM to 5:00 PM
02 - President’s Office Never
03 - Conference Room Mon - Fri 8:00 AM to 5:00 PM
04 - Production Never
05 - Shipping Never
06 - Server Room Never
07 - Accounting Mon - Fri 8:00 AM to 5:00 PM
• Access will be granted to the 01-Reception & Hallway, 03-Conference Room and 07-Accounting
areas when the Mon - Friday from 8:00 AM to 5:00 PM schedule is valid.
• Access will be denied to the 01-Reception & Hallway, 03-Conference Room and 07-Accounting
areas when the Mon - Fri 8:00 AM to 5:00 PM schedule is not valid.
• Access will always be denied to the President’s Office, Production, Shipping and
Server Room areas at all times.
12 cdvigroup.comA10 Software
Quick Start Guide
Shipping Access Level
Table 2: Association between areas and schedules for the Shipping Access Level
Area Schedule
01 - Reception & Hallway Mon - Fri 7:15 AM to 4:15 PM
02 - President’s Office Never
03 - Conference Room Never
04 - Production Mon - Fri 7:15 AM to 4:15 PM
05 - Shipping Mon - Fri 7:15 AM to 4:15 PM
06 - Server Room Never
07 - Accounting Never
• Access will be granted to the 01-Reception & Hallway, 04-Production and 05-Shipping areas when
the schedule Monday to Friday 7:15 AM to 4:15 PM is valid.
• Access will be denied to the 01-Reception & Hallway, 04-Production and 05-Shipping areas when
the schedule Mon - to Fri 7:15 AM to 4:15 PM is not valid.
• Access will always be denied to the 02-President’s Office, 03-Conference Room, 06-Server
Room and 07-Accounting areas.
cdvigroup.com 135. Create Users and Cards
Create two Users and assign a card to the each User. Each User will be given an access level according to the areas
he/she will be allowed access and according to the times (schedule) he/she will be permitted to access these areas.
We will use the Accounting and Shipping access levels created in step 4 to accomplish this.
The accounting employee (Jane Doe) will be permitted access to the 01- Hallway & Reception, 03- Conference
Room and 07 - Accounting areas:
• Monday to Friday from 8:00 AM to 5:00 PM
• She will be denied access to these areas any other day or time
• She will be denied access at all times to all other areas
The shipping employee (John Doe) will be permitted access to the 01- Hallway & Reception, 04- Production and
05 - Shipping areas:
• Monday to Friday from 7:15 AM to 4:15 PM
• He will be denied access to these areas any other day or time
• He will be denied access at all times to all other areas
Note: The scope of this document will not explore the Installer, Master or Programming users included by default
in ATRIUM. In most instances these users are typically reserved for building owners/managers, ATRIUM service
technicians and system administrators. Refer to the ATRIUM manuals for detailed information about these users.
Click on the Users icon and click Add to create a new User.
14 cdvigroup.comA10 Software
Quick Start Guide
User Jane Doe
Enter the user’s first and last name then click the Add button in the Credentials tab to create and assign a card to
this user. This will automatically display the Card Properties menu.
User Properties menu
cdvigroup.com 15Card Properties menu
Enter a Display Name, Format and Card Number.
• In many instances the user name is entered in the Display Name field.
• 26-bit is the format used by CDVI proximity readers. Your ATRIUM service technician will be able to advise
you which format to select if other proximity readers are installed in your system.
• Refer to the label on the box the cards were delivered in. The Family Number indicated on the label will
be entered in the first section of the “Number” field. In the example below, this value is 123. The Family
Number can be 1 to 5 digits in length.
• The card number is printed on the card and is 5 digits in length. Enter the card number in the second
section of the “Number” field. In the example below this value is 45678 .
• Click Save. You will automatically be returned to the User Properties menu
Family Number Card Number
The card is now assigned to the user and displayed in the Credentials list
16 cdvigroup.comA10 Software
Quick Start Guide
Associate an access level to the user
In the User Properties menu, click the Access Levels tab and click Assign
Select the Accounting Access Level from the drop-down list in the Access Level Selection pop-up window as
shown below. Click OK to return to the User Properties menu and click Save.
1. Click the “Access Levels” tab then
click “Assign”
2. Select an access level and click “OK”
3. The selected access level has been assigned to
the user and is displayed in the list.
Repeat these steps for John Doe and select Shipping Access Level.
cdvigroup.com 17CONGRATULATIONS!
You have successfully:
✓ Created areas (partitions)
✓ Defined doors
✓ Created schedules and multi-day holidays
✓ Created access levels
✓ Created users and cards
✓ Associated cards to users
✓ Associated access levels to users
Refer to the ATRIUM User Guide for more information. It is available on the ATRIUM installation CD or in the Download
section of our web page at: www.cdvi.ca
18 cdvigroup.comA10 Software
Quick Start Guide
Company name:_ _________________________ Contact 2:_ ______________________________
Address:_ _______________________________ Tel:_____________________________________
City:____________________________________
State:___________________________________
Zip Code:________________________________ Dealer:_________________________________
Contact 1:_ ______________________________
Tel:____________________________________
Tel:_____________________________________
AC22
Door Request Door
Main Controller Door Name Reader Maglock
Contact to Exit Strike
1: _______________________________
q Entry
q q q q
q Exit
Area: _____________________________
2: _______________________________
q Entry
q q q q
q Exit
Area: _____________________________
3: _______________________________
q Entry
q q q q
q Exit
AX22 (1)
Area: _____________________________
4: _______________________________
q Entry
q q q q
q Exit
Area: _____________________________
5: _______________________________
q Entry
q q q q
q Exit
AX22 (2)
Area: _____________________________
2-Door Expander
6: _______________________________
q Entry
q q q q
q Exit
Area: _____________________________
7: _______________________________
q Entry
q q q q
q Exit
AX22 (3)
Area: _____________________________
8: _______________________________
q Entry
q q q q
q Exit
Area: _____________________________
9: _______________________________
q Entry
q q q q
AX22 (4)
q Exit
Area: _____________________________
10: _______________________________
q Entry
q q q q
q Exit
Area: _____________________________
cdvigroup.com 19Manufacturing Access Control since 1985
All the instructions on this document (photos, drawings and specifications) are subject to change without notice.
Printed in Canada - January 2012 - EXE-CDVI_IM ATRIUM SOFT GUIDE CMYK LETTER EN 01
CDVI FRANCE
31, avenue du Général Leclerc
93500 PANTIN
Tél. : +33 (0)1 48 91 01 02
Fax : +33 (0)1 48 91 21 21
CDVI CDVI CDVI CDVI UK
FRANCE + EXPORT SUISSE ITALIA [UNITED KINGDOM - IRELAND]
Phone: +33 (0)1 48 91 01 02 Phone: +41 (0)21 882 18 41 Phone: +39-0321-90573 Phone: +44 (0)1628 531300
Fax: +33 (0)1 48 91 21 21 Fax: +41 (0)21 882 18 42 Fax: +39-0321-908018 Fax: +44 (0)1628 531003
CDVI AMERICAS CDVI CHINA CDVI
[CANADA - USA - Latin America]
CHINA MAROC
Phone: +1 (450) 682-7945 Phone: +86 (0)10 87664065 Phone: +212 (0)5 22 48 09 40
Fax: +1 (450) 682-9590 Fax: +86 (0)10 87664165 Fax: +212 (0)5 22 48 34 69
CDVI BENELUX CDVI IBÉRICA CDVI SWEDEN
[BELGIUM - THE NETHERLANDS - LUXEMBOURG]
[SPAIN - PORTUGAL]
[SWEDEN - DENMARK - NORWAY - FINLAND]
Phone: +32 (0) 56 73 93 00 Phone: +34 (0)935 39 09 66
Fax: +32 (0) 56 73 93 05 Phone: +46 (0)31 760 19 30
Fax: +34 (0)935 39 09 70 Fax: +46 (0)31 748 09 30
CDVI Group
FRANCE (Headquarter/Siège social)
Phone: +33 (0)1 48 91 01 02
Fax: +33 (0)1 48 91 21 21
cdvigroup.comYou can also read