Developing a social platform based on MERN stack - Hau Tran - Theseus
←
→
Page content transcription
If your browser does not render page correctly, please read the page content below

Hau Tran

Developing a social platform based
on MERN stack

Metropolia University of Applied Sciences
Bachelor of Engineering
Information Technology
Bachelor’s Thesis
1 March 2021

Abstract

Author:                   Hau Tran
Title:                    Developing a social platform based on MERN stack
Number of Pages:          41 pages + 2 appendices
Date:                     1 March 2021

Degree:                   Bachelor of Engineering
Degree Programme:         Information Technology
Professional Major:       Software Engineering
Instructors:              Janne Salonen (Head of Degree Program)

In the past, web development was mostly based on the LAMP stack (Linux, Apache,
MySQL, PHP or Perl) and Java-based applications (Java EE, Spring). However,
those stacks comprise of various programming languages which can be a burden for
a single developer to comprehend. With the advances in web technologies during the
last few years, a developer can participate in both front-end and back-end processes
of a web application.

The main goal of this bachelor’s thesis was to study the basic components of the
highly popular MERN stack and build a social platform application based on it. The
MERN stack, short for MongoDB, Express.js, React.js and Node.js eases the
developers with the idea of unifying web development under a single programming
language: JavaScript.

After months of doing research, the application was successfully built and fully
functional. The application has sufficient features and can either be used as a
platform to connect people or a service to manage employees for a real company.

Keywords:                 MongoDB, Express, Node, React, JavaScript.

Contents

List of Abbreviations

1   Introduction                                        1

2   Introduction to JavaScript                          2

    2.1 History of JavaScript                           2
    2.2 What is JavaScript used for?                    3
    2.3 Modern JavaScript                               3
         2.3.1 Creating variables using let             4
         2.3.2 Creating variables using const           4
         2.3.3 Arrow function                           5

3   Explore the MERN stack                              5

    3.1 Node.js                                         6
         3.1.1 Background of Node.js                    6
         3.1.2 Non-Blocking programming in Node.js.     8
         3.1.3 Node package manager (NPM)               10
         3.1.4 Applications of Node.js                  11
    3.2 Express.js                                      11
         3.2.1 Introduction to Express.js               11
         3.2.2 Structure of an Express.js application   12
         3.2.3 Understanding middleware                 13
    3.3 MongoDB                                         14
         3.3.1 Introduction to MongoDB                  14
         3.3.2 Pros and Cons of MongoDB                 14
    3.4 React.js                                        15
         3.4.1 Introduction to React.js                 15
         3.4.2 Some concepts of React.js                17

4   Implementation of the project                       19

    4.1 Back-end creation                               20
         4.1.1 Server creation                          20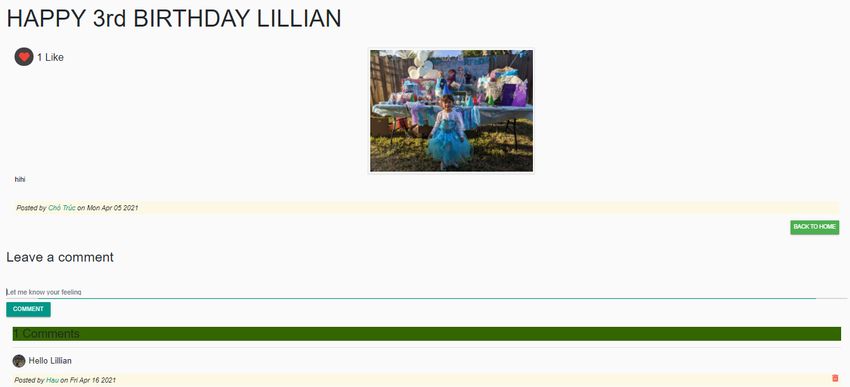
4.1.2 Database creation                                       21
         4.1.3 Authentication and Authorization process                25
         4.1.4 Controllers and Routes                                  28
    4.2 Front-end creation                                             28
         4.2.1 Setting up a React.js application                       28
         4.2.2 Setting up route in React.js app                        31
         4.2.3 Connection between the front-end and back-end           33
         4.2.4 Fetching data in React.js                               33
    4.3 Testing the application                                        35

5   Conclusion                                                         38

References                                                             39

Appendices
Appendix 1: Creation of a Profile component                Appendix 1 1(4)
Appendix 2: Creation of a Post component                   Appendix 2 1(5)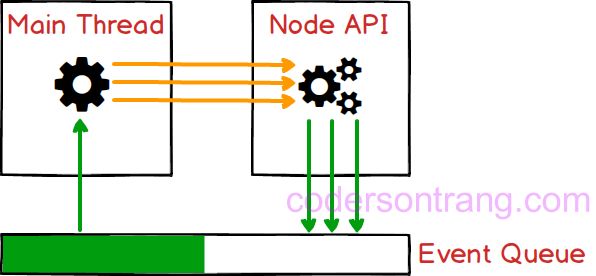
List of Abbreviations

API      Application Programming Interface

NPM      Node Package Module

MVC      Model-View-Controller

HTTP     Hypertext Transfer Protocol

NoSQL    Non- Structured Query Language

JSON     JavaScript Object Notation

BSON     Binary JSON

RDBMS    Relational Database Management System

HTML     Hypertext Markup Language

MVVM     Model-View-ViewModel

JSX      JavaScript XML

SPA      Single Page Application

URL      Uniform Resource Locator

UI       User Interface
1 Introduction

Nowadays, the demand for full-stack developers has rapidly increased than ever
before. According to a survey taken by Indeed, the highest demand also comes
with an impressive average salary of $110,770 in the US. [1] The term full-stack
developer refers to a person who can technically work on both front-end and
back-end development of a dynamic website or web-based applications.

In the past, web development was mainly based on the LAMP stack (Linux,
Apache, MySQL, PHP or Perl) and Java (Java EE, Spring), which consists of
various programming languages. With the capabilities to work on both the client-
side and server-side, JavaScript eases web development with the MERN stack's
emergence. The stack comprises four primary technologies: MongoDB,
Express.js, React.js, and Node.js. In this bachelor's thesis, the main goal was to
study each component's nature in the stack and create a social platform that can
connect people.

The thesis will primarily split into two main parts. The theoretical part focuses on
giving a deep understanding of each component in the stack and related
technologies to carry out the final project. Later it will dive into practical
implementation of the social platform.

The outcome is a platform that has sufficient features to demonstrate the
connections of each of the components in the MERN stack. Users can sign up,
sign in and sign out. After signing in, users can create a post with upload photo
functionality. Moreover, users can also like and comment on other user's posts
and reset the password. Due to the limited scope of this thesis, a notification
system was not implemented. The knowledge acquired from this thesis can be
applied to build various kinds of applications.

                                                                                  1
2 Introduction to JavaScript
2.1 History of JavaScript
Brandan Eich, an employee of Netscape created JavaScript in September 1995.
In 1996, JavaScript was officially named ECMAScript, which is a standard set by
European Computer Manufacturer associations (ECMA). ECMAScript 2 was
released in 1998, and ECMAScript 3 continued in 1999. [2] Since then, JavaScript
has been steadily evolving, with a record of 95% of websites using JavaScript as
of March 2021. [3]
Figure 1. Usage of client-side programming languages for websites, 28 Mar
2021, W3Techs.com. [3]
22.2 What is JavaScript used for?
JavaScript is a lightweight, interpreted, cross-platform scripting language. Back
in the day, JavaScript was only used in websites and run by the browsers to add
effects or interactions to a website's front end. However, as with the existence of
Node.js running by V8 engine since 2009, JavaScript can also be used to run on
the server.
• Client-side JavaScript: An extension of core JavaScript language to
control the browser and the DOM. It can also validate input, manipulate
UI elements or perform some calculations without refreshing the page
frequently.
• Server-side JavaScript: An extension of core JavaScript language to
run on a server that can be seen as normal C#, C, Python, or any other
server-side programming language code. For example, it can connect
and modify the database or file system with back-end access. Moreover,
with server-side code, a developer can handle JavaScript requests from
the client-side. [4]
2.3 Modern JavaScript
ECMAScript 6, also known either as ES6 or ECMAScript 2015, released in 2016,
was the second major revision to JavaScript. [5] Understanding ES6 is essential
when adopting the React.js framework in any of the MERN-based projects. In
React.js, developers will be writing plain-old JavaScript along with features added
by ES6.
32.3.1 Creating variables using let
Using the let keyword allows developers to declare a variable with block scope.
[5]
var x = 5;
// now x = 5
{
var x = 20;
// now x = 20
}
// finally x = 20
Listing 1. Declaring variable using var
Using let to re-declare a variable can solve the above problem.
var x = 5;
// right now x = 5
{
let x = 20;
//x = 20
}
// x is still 5
Listing 2. Declaring variable using let
2.3.2 Creating variables using const
The const keyword is used to declare a variable with a constant value. [5] A
variable need to be assigned a value as soon as it is declared.
var x = 5;
// now x= 5
{
const x = 20; // x = 20
}
// x is 5
4Listing 3. Declaring variable using const
2.3.3 Arrow function
Arrow functions make it possible to write a function in a concise way. Developers
can get rid of writing function and return keywords as well as the curly brackets.
[5]
// ES5
var minus = function(y, z) {
return y - z;
}
// ES6
const minus = (y, z) => y - z;
Listing 4. Difference between normal function and arrow function
3 Explore the MERN stack
MERN stands for MongoDB, Express.js, React.js and Node.js. With MongoDB as
Database, Express.js is a web server framework (integrated with Node.js),
React.js is a web client library, and Node.js is a server-side platform. It helps
developers to develop Web apps based solely on full-stack JavaScript.
MERN combines four cutting-edge technologies today, from the front-end to the
back-end development, which Facebook strongly supports, so developers do not
need to learn any other technology such as .NET, PHP, or Java. It saves
developers time and effort to learn different technologies for application
development. Due to the same JavaScript platform, the stack is supported by a
vast number of open-source packages and a dedicated community for
programmers to increase scalability and maintain software products.
5Figure 2. A 3-tier MERN architecture [6].
As depicted in Figure 2, the MERN stack starts with the core Node.js, a server-
side technology with very high performance and fast response to all tasks,
including large and complex data.
MERN does not need to use TypeScript, just the flexible foundation of React -
the most popular and influential front-end technology today.
3.1 Node.js
3.1.1 Background of Node.js
None of us are unfamiliar with the Google Chrome web browser, and there is
nothing new that this browser can open web pages and run JavaScript on the
websites. The JavaScript code's execution is thanks to a JavaScript engine
located inside a Chrome browser called V8. V8 has proven to be a powerful
engine, written in C ++; V8 can interpret and execute JavaScript very quickly. [7]
Faced with the apparent fact about the power of V8, the idea popped into the
founders' minds to separate this V8 from Chrome and form an application capable
of executing the JavaScript code on the server-side. In 2009, Ryan Dahl created
Node.js to achieve that goal. [7]
6It should be easy to understand when Node has the same role as JVM (Java
Virtual Machine). Like the JVM, Node.js is considered a platform, an environment
for the applications to run on. If JVM executes the byte code, Node.js executes
the JavaScript code. Programmers always use high-level languages such as
Java, Scala, Groovy, or Kotlin to write the source code on the application
programming side when working on the JVM. This source code will be compiled
into byte code. Nevertheless, Node.js itself can understand and execute
JavaScript on the Node.js platform, so the language written on the application
side can be JavaScript, or languages capable of compiling into JavaScript like
Typescript.
The birth of Node.js brought a breath of fresh air into the programming world. It
has gained popularity among developers' top server-side platform choices and is
used in major systems such as Netflix, LinkedIn, and Uber. The following is a
ranking of the most popular libraries/platforms according to a StackOverflow
survey in 2020.
7Figure 3. Node usage in 2020 [8]
3.1.2 Non-Blocking programming in Node.js.
The Node.js platform is versatile, perhaps not because of the V8 engine or the
ability to support the JavaScript language, but in the Non-Blocking style of
programming. Operations related to Non-Blocking in Node.js are mostly related
to IO, such as reading and writing data to disk or calling Web APIs, for example.
Furthermore, the use of Non-Blocking operations makes applications written on
a Node.js platform capable of using computational resources (CPU) most
efficiently.
In the creation of the Non-Blocking mechanism, Node.js applications operate
according to the Event Loop design pattern. The illustration below explains this
design in more detail:
8Figure 4. The Event Loop mechanism. [9]
• Event Queue: Considering as a repository to store Events (events). Event
here can be understood as a particular process in the program. Each event
contains information to classify what that event is and the accompanying
data. Because it is a queue structure, the Event Queue will operate on the
principle of First In First Out (FIFO). This ensures that the order in which
the Events are retrieved for processing is the same as the order they are
put into the Event Queue.
• Main Thread: Saying this is the Main Thread because it will be the source
and the end of the program. This main Thread is responsible for
processing computation when receiving Events from the Event Queue.
This is also the only Thread of the Node application that the programmer
has control over. That is also the reason why it is still said that a Node
application is single-threaded. Because of that, programmers will not have
a headache about concurrency problems between threads like in some
other platforms like Java.
• Node API: The unit responsible for handling IO operations. IO operations
will be handled here by the multi-threaded mechanism. Moreover, each IO
operation after completion will return the result as an event, and this event
will be put in the Event Queue.
9With the above three components, the way a Node application behaves like
this:
• The Main Thread will run the computation processing statements
declared in the source code. Wherever IO manipulation is involved, the
Main Thread will make a Non-Blocking call to the Node API and then
continue to execute other commands without waiting for the other IO
operation to complete.
• When receiving a request from Main Thread, Node API will directly
handle IO manipulation by different Threads. Once the IO operation is
completed, the Node API will wrap the result as an Event and place it
into the Event Queue.
• Events in the Event Queue will be processed by the Main Thread one
after another. In the Main Thread, the code used to handle Events is
usually declared as callback.
The above process is repetitive, creating a cycle of events in the
application. The programming will be imposed in a way that is geared
towards event handling instead of the traditional sequential way of
thinking. [9]
3.1.3 Node package manager (NPM)
NPM (short for Node Package Manager) is used and comes together to support
each development of Node.js. [10] Most libraries are available on NPM, so it is
relatively easy to include them just by running npm install
command line to download them.
NPM is being maximized and operating based on two prominent roles as follows:
• NPM is a Software Registry and is being used very extensively to publish
open-source Node.js projects. One can understand that: it is an online
platform that allows all users to publish and share several other tools
10written in JavaScript. It has crossed over 1.3 million code packages as of
April 2020. [11]
• NPM is one of the command-line tools that can help interact with other
online platforms such as servers or web browsers. It is also a utility that
can assist with package installation, package uninstallation, version
management, and server-driven management. Also, NPM is used to
manage the dependencies needed to run the projects.
3.1.4 Applications of Node.js
• Websocket servers: Websocket is a protocol formed to support two-way
communication between the client and the server to connect and
exchange data with each other quickly and accurately. The protocol is
implemented over TCP, and they are used for web applications.
• Ad Server: Running ads and controlling views will take time. Therefore,
Node.js will be a platform that brings many benefits to customers. It is
easier for ad servers to capture information.
• Cloud Services: Cloud services on electronic devices such as phones,
iPad, etc.
• RESTful APIs.
• Real-time applications.
• Microservices: The idea of microservices is to split an extensive
application into small services and connect them.
3.2 Express.js
3.2.1 Introduction to Express.js
Express.js is released under an open-source license, has a large community of
support, and used for commercial applications. Hence, developers can
11completely rest assured to use this framework for their projects, from small
projects to large projects.
Express.js has a ton of support packages and provides additional features for
developers to a better program. Nevertheless, it does not slow down the speed
of Node.js. The famous Node.js platform today is using Express.js as a core
function.
According to the GitHub repository, Express.js was founded by TJ Holowaychuk
and was first released on May 22, 2010, with version 0.12. In June 2014, project
management rights were acquired by StrongLoop. IBM acquired StrongLoop in
September 2015. In January 2016, Express.js was managed by the Nodejs
Foundation. [12]
3.2.2 Structure of an Express.js application
Figure 5. Structure of an Express.js app.
As illustrated in Figure 5, the project directory structure using Express.js is divided
into three parts: Routes, Views, and Public. Express.js build web applications
following the MVC (Model, View, Controller) design pattern.
• Root.
12• app.js: contains all the logic setup for the applications to run.
• package.json: contains all the installed packages.
• routes: contains all the routing-related logic present in the application.
• views: contains the views/templates for the application.
• Public: contains static files such as images, JS codes and CSS settings
for the application.
3.2.3 Understanding middleware
Middleware is computer software that connects software components or
applications together. [13] Software of this type consists of services that allow
interaction between processes running on one or more different machines.
Middleware technology has been developed to provide interoperability, catering
to commonly used distributed architectures to support and simplify complex
distributed applications.
When working with Express.js, developers use various middleware functions with
different functionalities:
• Functions receive the request, response of 1 cycle of HTTP
request/response.
• Functions can correct requests and responses before sending them to the
next() middleware function.
• Functions can update or terminate the request/response cycle. [14]
The middleware function in Express.js often takes three parameters: the request
(req) object, the response (res) object, and the next() function. Figure 6
below illustrate a custom middleware used in the project.
13Figure 6. A custom middleware.
3.3 MongoDB
3.3.1 Introduction to MongoDB
MongoDB was first born by MongoDB Inc. in October 2007. It was part of the
PaaS (Platform as a Service) product like Windows Azure and Google App
Engine. It was later made open source in 2009. [15]
MongoDB is a document-oriented database and a NoSQL database. Therefore,
MongoDB will often avoid the relational database's table-based structure to adapt
to all documents such as JSON, available in a very flexible schema called BSON.
[16]
3.3.2 Pros and Cons of MongoDB
The outstanding advantages of MongoDB convincing the choice of current users
are:
• Since MongoDB uses data in the JSON form, each collection has different
sizes and documents. Nevertheless, they are very flexible when it comes
to archiving.
14• MongoDB data is usually not bound to each other; it does not support
join query like in RDBMS, so when users insert, delete or update, it will
not spend too much time to check if it satisfies the constraints like in
RDBMS or not.
• MongoDB is easy to scale. In MongoDB, the concept “cluster” refers to
clusters of nodes containing data to communicate with each other. Adding
a new node to the cluster helps users expand the system quickly.
• The unique identifier _id will always be indexed automatically, so the
speed of querying information will consistently achieve the highest
performance.
• Data query will be cached to RAM with little access to the hard drive so
the read and write speed is faster.
In addition to many outstanding advantages as above, MongoDB still does have
its drawbacks:
• It is not applicable to any transaction models that require a high degree of
accuracy due to its non-binding nature.
• There is no transaction mechanism to banking service applications.
• Data takes RAM as the centre of the action, so it requires a large amount
of RAM when operating.
• Any change to the default data is not written to the hard drive immediately,
so the chance of losing data from the cause of an unexpected power failure
is very high.
3.4 React.js
3.4.1 Introduction to React.js
React.js is a JavaScript library built by Facebook engineers, being used by many
famous companies to develop their products such as Yahoo, Airbnb, Facebook,
15Instagram. It is better suited for large, scalable projects rather than small projects.
[17]
• Features of React.js
The React.js mindset is to build reusable components that make it easy to break
down problems and test. It helps us quickly manage and extend the system; if it
is Angular, it requires optimal structure and coding style.
React.js always keeps components stateless (as much as possible), making it
easy to manage because it is like a static HTML page. It takes inputs from the
outside and only displays it against those inputs, explaining why it is reuse and
easy for testing.
• The strengths of React.js
React.js is a performance-minded view rendering framework. Many of the
heavyweights on the MVVM (Model-View-ViewModel) framework take a long
time to display large amounts of data, such as lists. However, with React.js, that
is no longer an issue, as it just shows what changes.
One of React.js more strengths is the virtual DOM (Document Object Model) -
which is hidden inside every view and is the reason why React.js achieves good
performance. When a view requests a call, everything is included in a virtual copy
of the DOM. React.js compares the virtual DOM and the real DOM after the call
completes and makes the changes indicated in the above comparison. [18]
For example, if we are looking at a list of 20 products displayed by React.js and
change the 2nd product, only that product is re-displayed, and the remaining 19
products remain the same (no need to display reload or reload the page). React.js
used the so-called virtual DOM to increase performance by outputting a virtual
view, then checking the difference between the virtual rendering and what is in
the DOM and creating a patch.
163.4.2 Some concepts of React.js
• Component
React.js is built around components, not using templates like other frameworks.
The user can create a component by extending the component as follows. [19]
Figure 7. A component in React.js.
The most crucial method is render, which is triggered when the component is
ready to be rendered on the page.
In that function, the user will return a description of what the user wants React.js
to render on the page. As in the example above, the user renders an h1 tag
containing the greeting and the name.
The render function is a specific description of the UI at any given time. If the data
is changed, React.js will update the UI with the corresponding data. One can
understand that React.js will automatically call the render function to update the
UI when the data changes. [19]
• Prop
17Props here are properties of a component; users can change the props of the
component by passing data from the outside. Props can be an object, function,
string, number, etc. [19]
Figure 8. Prop in React.js.
When a prop is passed to the component, it is immutable. That is, its data is not
changed like a "pure" function. [19]
Examples of “pure” and “not pure” function. We consider the function as below:
Figure 9. Pure function.
The function is called "pure" because it does not change its input value and
always returns the same result for the same inputs. [19]
We consider the second function as shown below:
18Figure 10. Not pure function.
Here the above function changed its input sum value, and this makes it not a
"pure" function.
All React.js components must act as "pure" function. [19]
• State
A React.js component has two ways to get props and state information. Unlike
props, the state of a component is not passed from the outside. A component
determines its own state. To create a state for the component, we will have to
declare it in the constructor function. [20]
Figure 11. State in React.js.
4 Implementation of the project
The Social Platform implementation will be carried out into three separate steps:
back-end creation, front-end creation, and finally testing of the applicaion. Due to
the limited scope of the thesis, it is not recommended to describe all the project's
aspects in detail. However, it can be able to demonstrate all the necessary steps
to implement the MERN application successfully.
194.1 Back-end creation
In creating the back-end of the application, the Express.js library on top of Node.js
is used to build the server. After that, to store the data in JSON format, Mongoose
library is installed to connect to the MongoDB database. Finally, the routing-
related logic is introduced as they include the endpoints to interact with the front-
end.
4.1.1 Server creation
First and foremost, a server is needed to compile the JavaScript code on the
back-end.
npm init
Listing 5. Command to initialize a project.
The code above is used to initialize a new Node.js project. After answering
fundamental questions regarding the project's description and user's information,
a package.json file is automatically created. After the project's initialization,
instead of using the core Node.js HTTP core modules to build the server, the
Express.js framework is used to take advantage of existing npm packages:
npm install express
Listing 6. Command to create an Express.js server.
Afterward, an entry file called app.js is created. This file contains all the
middlewares and node packages.
20Figure 12. app.js file.
The objectives of some middlewares and packages included in Figure 11 can be
explained as follow:
• mongoose helps establish a connection between MongoDB database and
the Express app.
• morgan shows the request details in the console.
• bodyParser parses the incoming request bodies under the req.body
property.
• dotenv helps loading environment variable from a .env file into
process.env.
4.1.2 Database creation
To connect the MongoDB database to the Express.js app, a node package called
Mongoose is installed. Mongoose is an Object Data Modelling tool to assist
MongoDB in creating a schema. Based on that Schema interface, models are
defined. The Schema allows users to define the fields stored in each document
and their validation methods and default values. Essentially, the schema is a
21blueprint for constructing the database. [21] There are two schemas in the
application: user and post.
User schema
Figure 13. A user schema.
In the Social Platform app, the user schema will store all the information related
to the users. This schema has many different fields within it, each with its type
and properties, as shown in Figure 13 above. The three required fields that need
introduction include name, email, and hashed_password.
22• name: This field stores the user's name who is using the app and will be
of String data type.
• email: This field stores the registered user's email and will also be of
String data type.
• hashed_password: This field is designed to store the user's password in
a hashed version.
The author does not store the password in plain text format but as a hashed
version. As security concerns, the plain text version will be easily stolen if hackers
perform breaching the database. Taking that into account, virtual fields and
Crypto - a Node.js module are used to encrypt the password. Virtual fields are
additional fields for a given model. Their properties can be set manually or
automatically with defined functionality. Virtual properties do not persist in the
database as they only exist logically and are not written to the document's
collection. [22] A whole process of encrypting a password is illustrated in Figure
14 below.
As shown in Figure 14, a plain password, along with a generated timestamp, has
been encrypted by the encryptPassword method and saved in the
hashed_password variable between the setter and getter methods in the virtual
fields. The actual process of encrypting a plain password occurs in lines 73-76
where the encryptPassword method takes the plain password as an argument
and does the encryption.
In the authenticate method, the function receives the plain password, hashes it
and check if it is the same as the encrypted version saved in the database to
verify the user.
23Figure 14. Virtual fields and methods in user schema.
Post schema
Figure 15 below displays the structure of the post schema in detail. The schema
has various fields related to the post, including title, body, photo, likes, comments,
etc. One exceptional point is the appearance of a type of ObjectId and ref of
"User" in the likes, postedBy and comments field. It illustrates the
relationship between Post and User models in the database. For instance, when
a user likes a post, his/her userId will be store in the post model to reflect the
change.
24Figure 15. A post schema.
4.1.3 Authentication and Authorization process
Authentication is the process of identifying an account entering the system as
that person and not anyone else. It is the initial step of any system with a user
element.
After determining the account's identity, the system can only answer, "Who is
that?". The next equally important step, that is, to answer the question, "What can
that person do in the system"? Hence, Authorization comes into play to define
the permissions of the current account that has just been authenticated.
25Figure 16. Authentication and Authorization with JWT.
JSON Web Token (JWT) is a JSON standard representation of the claim(s)
transmitted between client and server. The token issuer digitally signs claims,
and the recipient of this token can then use this digital signature to prove
ownership of the claim. [23] Figure 16 above illustrates the flow of using JWT in
authentication and authorization of a service:
1) A user performs login by sending id/password or using social network
accounts on the Authentication Server.
2) The Authentication Server receives the data sent by the user for user
authentication. In case of success, the Authentication Server will create a JWT
and return it to the user via a response.
3) The user receives the JWT returned by the Authentication Server as the "key"
to execute subsequent commands against the Application Server.
4) The Application Server before executing the request called from the user will
verify JWT sent. If OK, continue to execute the called request.
26Figure 17. Using JWT to sign in user.
The implementation of JWT in the signin controller method is depicted in Figure
17. When there is a POST request to the route ’/sigin’, the method
’signin’ is executed. First of all, email and password values are deconstructed
from the request body. Then the database searches for the user using the email
id. If the user does not exist, an error message indicates that the user does not
exist will appear. When the user is found, the database will check the password
if it is the same as the hashed version. Subsequently, a signed JWT token is
generated along with the user id, the user's role, and a JWT secret (created in
the .env variable). The token is sent back to the user in the Local Storage as a
response with user details but without the password.
274.1.4 Controllers and Routes
For the sake of clearness, the back-end folder will be split into three sub-folders:
controllers, models, and routes. Folder models contains the mongoose
schemas to define the models in the database. Folder routes include all the
routing-related API endpoints. The controllers folder consists of the
middleware functions to be executed when the front-end requests match the
corresponding routes.
router.get("/users", allUsers);
Listing 7. An example of post-related API.
As can be seen from Listing 5, whenever a GET request from the front-end is
sent to the back-end to the corresponding "/users" endpoint, the custom
middleware function allUsers will be executed to retrieve all the users in the
database and display them to the front-end.
4.2 Front-end creation
4.2.1 Setting up a React.js application
In the past, configuration and environment settings for new projects using React
were sophisticated. The process included setting up Babel to convert JSX into
browser-ready code and configuring Webpack to bundle all the application
assets. Realizing this is a time-consuming and tedious process, Facebook has
developed an app Node.js module named "create-react-app" to scaffold a
React.js template quickly.
28Figure 18 below shows the first step of creating a React.js application by running
the command "npx create-react-app" with the application's name, in this
case, "react-final" in the same folder that an Express.js was created.
Figure 18. Creation of a React.js app.
After successfully creating a React.js app, a command "npm start" was run to
display the application in the user's default browser. The figure below shows how
a React.js looks like in the browser.
Figure 19. Initial look of a React.js app.
29In the src folder, the index.js file is the entry point of the whole application.
The figure below displays the flow of how a React.js app functions. Firstly, the
index.js file imports all the necessary libraries, then it renders the root
component App.js on the interface with the ReactDom.render() method.
Figure 20. Flow of a React.js app.
304.2.2 Setting up route in React.js app
SPA (Single Page Application) is now considered a trend to build web apps
because of many outstanding features. When an app is created in the SPA
philosophy, the UIs will be generated on a single page, depending on the case in
which the component will be rendered.
Alternatively, users can use the URL as a condition considering which
components will be rendered. In React.js, React Router is the library built to do
this.
React Router is a library for standard URL navigation in React.js; it allows
synchronizing UI with URL. It is designed with a simple API, which in turn allows
solving problems of URLs quickly. Listing x above shows how to install React
Router library in the project.
npm install react-router-dom
Listing 8. Install React Router library
Figure 21. A look of App component.
Figure 21 above shows a look of the App component. As discussed in section
4.2.1, App is the parent component of the application. For React Router to work,
31minor adjustments need to be made on the App component. Firstly, a component
named MainRouter was created. Then BrowserRouter will wrap and render
everything that is inside MainRouter.
Figure 22. A look of MainRouter component.
The MainRouter component, as shown in Figure 22, contains all the
components with their corresponding paths that will be rendered inside
BrowserRouter. There are three primary types of components in React Router:
• Routers, such as and .
• Route matchers, such as and .
• Redirects, such as , , and . [24]
It can also be seen from Figure 22 that there are two kinds of the route in the
application: public and protected. For instance, users go to the path "/" on the
browser to access the home page but cannot go to the route “/user/:userId”
to see a particular user's profile page, as it is a protected route.
324.2.3 Connection between the front-end and back-end
The CORS (Cross-origin resource sharing) error is a browser policy that prevents
unauthorized access to resources from other domains. Besides, it also helps to
protect users from malicious websites from unauthorized access to additional
resources. [25]
If a request is called from the front-end to back-end API, an error will occur, as
shown in figure 23 below. It is because both the front-end and part-end parts of
the application are hosted on different domains.
Figure 23. An example of CORS error
To fix the error, a command “npm install cors” was run in the back-end
directory. cors is a very convenient package, providing middleware that allows
users to enable CORS with many options to customize and concise for MERN-
based application.
4.2.4 Fetching data in React.js
Fetching data in React.js is an essential task as a MERN-based application is all
about dynamic rendering. By using fetch() API, a built-in tool in most modern
browsers on the window object (window.fetch), users can get resources from
a server or an API endpoint.
33Figure 24. Fetch API.
As shown in figure 24, a list of users from the database is retrieved by calling the
fetch() API inside the list() method. The fetch() API takes in the path to
the endpoint author wants to fetch, along with the method of "GET”. When the
request is fulfilled, it returns a promise that contains a response object. The
response is just a typical HTTP response and not the actual JSON. Finally, the
json() method is used to get the JSON body content from the response.
Figure 25. Component Lifecycle.
34The best place to fetch data in React.js is at the componentDidMount()
lifecycle method as shown in figure 25. Using componentDidMount() will
prevent data from being uploaded until the first render is complete. It reminds
users to correctly state the data without getting an error. When the Users
component has mounted, a list of users in the app will be displayed in the browser
as shown in figure 26 below.
Figure 26. Showing all the users of the app on Users component.
4.3 Testing the application
After successfully creating the back-end, front-end, and connection between
them, it is time to test the result application. As expected, the application behaves
as a fully functional social platform.
Figure 27 below displays the app's home page, which contains all the posts by
the users. It is the only page that unregistered users can access the app excluded
the sign-up and sign-in features. Conventionally, all the app pages will have a
navigation bar at the top of the page, which helps users direct to different parts
of the app.
35Figure 27. Initial look of homepage
To access all the app features, a visitor needs to register to the service by clicking
the tab SIGN UP, filling all the required fields as figure 28 displays.
Figure 28. Sign Up form
Subsequently, user can sign in with the provided email and password as shown
in figure 29 below.
36Figure 29. Sign In form
After successfully login, a user can have full access to the app, including creating
post with photo upload functionality, editing his/her profile. The most interesting
feature is that user can like or comment on other user’s post as shown in figure
30.
Figure 30. A single post in detail
375 Conclusion
In this bachelor's thesis, MERN stack and its characteristics are studied and
applied to build an end-to-end social media web application. The paper has
outlined comprehensively the history of JavaScript, which is the core of MERN
stack, as well as the background theories, concepts, and important techniques of
each technology in the stack itself. The author has demonstrated the advantages
of those technologies and how they strongly unify to form an application with
connected backend and frontend, aided by a NoSQL database engine.
Thereupon, detailed steps to implement the social media application have been
described and thus have proven the feasibility of applying aformentioned theories
into a real-world problem. All things considered, all objectives have been
accomplished and the outcome of the project can be considered successful. The
application built during the project has fulfilled all minimum requirements of a
social platform, given the time frame of the project. The users can share their own
stories and interact with those from others through a graphical web user interface,
while benefitting from a secure authentication and authorization model. This can
become a strong foundation for a more sophisticated and refined product that is
able of connecting people or even a more professional workplace communication
system.
38References
1. David, A.Arnott. Everyone wants full stack developers — and
these other 24 in-demand jobs [online]. National News Desk
Editor. Mar 22, 2017. Retrieved from
https://www.bizjournals.com/bizjournals/news/2017/03/22/every
one-wants-full-stack-developers-and-these.html. Accessed on
17 April 2021.
2. MDN Web Docs. A re-introduction to JavaScript. Retrieved from
https://developer.mozilla.org/en-US/docs/Web/JavaScript/A_re-
introduction_to_JavaScript. Accessed on 17 April 2021.
3. Web Technology Surveys. Historical trends in the usage statistics
of client-side programming languages for websites. Retrieved
from
https://w3techs.com/technologies/history_overview/client_side_l
anguage/all. Accessed on 17 April 2021.
4. MDN Web Docs. JavaScript Guide – Introduction. Retrieved from
https://developer.mozilla.org/en-
US/docs/Web/JavaScript/Guide/Introduction. Accessed on 17
April 2021.
5. w3schools.com. ECMAScript 2015 - ES6. Retrieved from
https://www.w3schools.com/js/js_es6.asp. Accessed on 17 April
2021.
6. MongoDB. MERN Stack. Retrieved from
https://www.mongodb.com/mern-
stack?fbclid=IwAR19AW5xLR45sMUccHB1mjbZLbAq8u8ePnm
EI6aAYlM1H2vEtQtpAwrSYSU. Accessed on 17 April 2021.
7. Node.js. About Node.js. Retrieved from
https://www.mongodb.com/mern-
stack?fbclid=IwAR19AW5xLR45sMUccHB1mjbZLbAq8u8ePnm
EI6aAYlM1H2vEtQtpAwrSYSU. Accessed on 17 April 2021.
398. 2020 Developer Survey. Technology. Retrieved from
https://insights.stackoverflow.com/survey/2020#technology.
Accessed on 17 April 2021.
9. Coder Son Trang. Node.js. Retrieved from
https://codersontrang.wordpress.com/2017/10/09/gioi-thieu-ve-
nodejs/. Accessed on 17 April 2021.
10. w3schools.com. What is npm? Retrieved from
https://www.w3schools.com/whatis/whatis_npm.asp. Accessed
on 17 April 2021.
11. Npm Blog (Archive). Retrieved from
https://blog.npmjs.org/post/615388323067854848/so-long-and-
thanks-for-all-the-
packages.html#:~:text=In%20June%202019%2C%20the%20np
m,number%20has%20crossed%201.3%20million. Accessed on
17 April 2021.
12. Wikipedia. Express.js. Retrieved from
https://en.wikipedia.org/wiki/Express.js#:~:text=js%2C%20or%2
0simply%20Express%2C%20is,software%20under%20the%20
MIT%20License.&text=js.,many%20features%20available%20a
s%20plugins. Accessed on 17 April 2021.
13. Wikipedia. Middleware analyst. Retrieved from
https://en.wikipedia.org/wiki/Middleware_analyst. Accessed on
17 April 2021.
14. Express. Using middleware. Retrieved from
https://expressjs.com/en/guide/using-middleware.html.
Accessed on 17 April 2021.
15. Wikipedia. MongoDB. Retrieved from
https://en.wikipedia.org/wiki/MongoDB. Accessed on 17 April
2021.
16. MongoDB Manual. Introduction to MongoDB. Retrieved from
https://docs.mongodb.com/manual/introduction/. Accessed on 17
April 2021.
4017. React. Getting Started. Retrieved from
https://reactjs.org/docs/getting-started.html. Accessed on 17
April 2021.
18. React. Virtual DOM and Internals. Retrieved from
https://reactjs.org/docs/faq-internals.html. Accessed on 17 April
2021.
19. React. Components and Props. Retrieved from
https://reactjs.org/docs/components-and-props.html. Accessed
on 17 April 2021.
20. React. State and Lifecycle. Retrieved from
https://reactjs.org/docs/state-and-lifecycle.html. Accessed on 17
April 2021.
21. Mongoose. Schemas. Retrieved from
https://mongoosejs.com/docs/guide.html. Accessed on 17 April
2021.
22. Mongoose. Virtuals. Retrieved from
https://mongoosejs.com/docs/guide.html#virtuals. Accessed on
17 April 2021.
23. SoftwareSecure. Security issues in JWT authentication.
Retrieved from https://www.softwaresecured.com/security-
issues-jwt-authentication/. Accessed on 17 April 2021.
24. React training/ React Router. Retrieved from
https://reactrouter.com/web/guides/primary-components.
Accessed on 17 April 2021.
25. MDN Web Docs. Cross-Origin Resource Sharing (CORS).
Retrieved from https://developer.mozilla.org/en-
US/docs/Web/HTTP/CORS. Accessed on 17 April 2021.
41Creation of a Profile component. Appendix 1
1 (4)
import React, { Component } from "react";
import { Redirect, Link } from "react-router-dom";
import { isAuthenticated } from "../auth";
import { read } from "./userApi";
import DefaulAvatar from "../images/avatar.jpg";
import DeleteUser from "./DeleteUser";
import FollowProfile from "./FollowProfile";
import FollowList from "./FollowList";
import { postByUser } from "../post/postApi";
class Profile extends Component {
constructor() {
super();
this.state = {
user: { following: [], followers: [] },
redirectToSignin: false,
following: false,
error: "",
posts: [],
};
}
//check follow
checkFollow = (user) => {
const jwt = isAuthenticated();
const match = user.followers.find((follower) => {
//one id has many other ids (followers) and vice versa
return follower._id === jwt.user._id;
});
return match;
};
clickFollowBtn = (apiCall) => {
const userId = isAuthenticated().user._id;
const token = isAuthenticated().token;
apiCall(userId, token, this.state.user._id).then((data) => {
if (data.error) {
this.setState({ error: data.error });
} else {
this.setState({ user: data, following: !this.state.following });
}
});
};
init = (userId) => {
const token = isAuthenticated().token;
read(userId, token).then((data) => {Creation of a Profile component. Appendix 1
2 (4)
if (data.error) {
this.setState({ redirectToSignin: true });
} else {
let following = this.checkFollow(data);
this.setState({ user: data, following });
this.loadPosts(data._id);
}
});
};
loadPosts = (userId) => {
const token = isAuthenticated().token;
postByUser(userId, token).then((data) => {
if (data.error) {
console.log(data.error);
} else {
this.setState({ posts: data });
}
});
};
componentDidMount() {
const userId = this.props.match.params.userId;
this.init(userId);
}
UNSAFE_componentWillReceiveProps(props) {
const userId = props.match.params.userId;
this.init(userId);
}
render() {
const { redirectToSignin, user, posts } = this.state;
if (redirectToSignin) return ;
const photoUrl = user._id
? `${process.env.REACT_APP_API_URL}/user/photo/${
user._id
}?${new Date().getTime()}`
: DefaulAvatar;
return (
ProfileCreation of a Profile component. Appendix 1
3 (4)
style={{ height: "300px", width: "auto" }}
className="img-thumbnail img-fluid mx-auto d-block"
src={photoUrl}
onError={(i) => (i.target.src = `${DefaulAvatar}`)}
alt={user.name}
/>
{user.name}
{user.email}
{`Joined ${new Date(user.created).toDateString()}`}
{(isAuthenticated().user &&
isAuthenticated().user._id === user._id) ||
isAuthenticated().user.role === "admin" ? (
Create a post
Edit profile
) : (
)}
{isAuthenticated().user &&
isAuthenticated().user.role === "admin" && (
Admin
Edit/Delete as an AdminCreation of a Profile component. Appendix 1
4 (4)
Edit Profile
)}
{user.about}
);
}
}
export default Profile;
.Creation of a Post component Appendix 2
1 (5)
import React, { Component } from "react";
import { singlePost, remove, like, unlike } from "./postApi";
import DefaulPost from "../images/saigon.jpg";
import { Link, Redirect } from "react-router-dom";
import { isAuthenticated } from "../auth";
import Comment from "./Comment";
class SinglePost extends Component {
constructor() {
super();
this.state = {
post: "",
redirectToHome: false,
like: false,
likes: 0,
comments: [],
};
}
componentDidMount = () => {
const postId = this.props.match.params.postId;
singlePost(postId).then((data) => {
if (data.error) {
console.log(data.error);
} else {
this.setState({
post: data,
likes: data.likes.length,
like: this.checkLike(data.likes),
comments: data.comments,
});
}
});
};
updatedComments = (comments) => {
this.setState({ comments });
};
checkLike = (likes) => {
const userId = isAuthenticated().user._id;
let match = likes.indexOf(userId) !== -1;
return match;
};
likeToggle = () => {
let callApi = this.state.like ? unlike : like;
const userId = isAuthenticated().user._id;Creation of a Post component Appendix 2
2 (5)
const postId = this.state.post._id;
const token = isAuthenticated().token;
callApi(userId, token, postId).then((data) => {
if (data.error) {
console.log(data.error);
} else {
this.setState({
like: !this.state.like,
likes: data.likes.length,
});
}
});
};
deletePost = () => {
const postId = this.props.match.params.postId;
const token = isAuthenticated().token;
remove(postId, token).then((data) => {
if (data.error) {
console.log(data.error);
} else {
this.setState({ redirectToHome: true });
}
});
};
deleteConfirmation = () => {
let answer = window.confirm("Are you sure to delete this post?");
if (answer) {
this.deletePost();
}
};
renderPost = (post) => {
const posterId = post.postedBy ? `/user/${post.postedBy._id}` : "";
const posterName = post.postedBy ? post.postedBy.name : "Unknown";
const { like, likes } = this.state;
return (
{like ? (Creation of a Post component Appendix 2
3 (5)
borderRadius: "50%",
}}
>
{likes} Like
) : (
{likes} Like
)}
(i.target.src = `${DefaulPost}`)}
style={{ height: "300px", width: "auto" }}
className="img-thumbnail img-fluid mx-auto d-block"
/>
{post.body}
Posted by {posterName}
on {new Date(post.created).toDateString()}
Back to Home
{isAuthenticated().user &&
isAuthenticated().user._id === post.postedBy._id && (
Update PostCreation of a Post component Appendix 2
4 (5)
Delete Post
)}
{isAuthenticated().user && isAuthenticated().user.role === "adm
in" && (
Admin
Edit/Delete as an Admin
Update Post
Delete Post
)}
);
};
render() {
if (this.state.redirectToHome) {
return ;
}
const { post, comments } = this.state;
return (
{post.title}
{!post ? (Creation of a Post component Appendix 2
5 (5)
Loading...
) : (
this.renderPost(post)
)}
);
}
}
export default SinglePost;You can also read