Fall/Winter 2021/22 Inspirational Projects - Created by Swarovski North America Ltd. In-House design - John Bead Blog
←
→
Page content transcription
If your browser does not render page correctly, please read the page content below
Fall/Winter 2021/22
         Inspirational Projects
Created by Swarovski North America Ltd. In-House design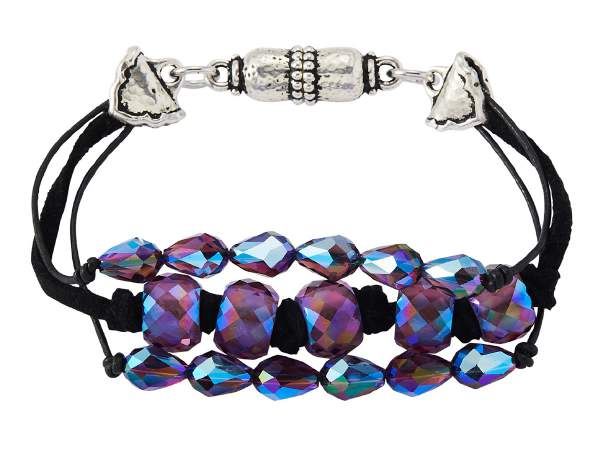
Baroque Beauty
Swarovski crystals

Product Group      Article No.    Amount      Size       Color             Color Code
Crystal Pearls     5841           44 pcs      12mm       White             001 650

SUPPLIES:
1 – Artisan Toggle set - TierraCast® 94-6214-25
3 – large 30mm Gold Fashion Beads
30” – Beading wire
2 – 2mm crimp beads
2 – 3mm crimp covers

INSTRUCTIONS:
Step 1: Using beading wire, slip on one crimp bead and one end of the Artisan Toggle and
        crimp to close. Add crimp cover.
Step 2: Slide on 31 Round Baroque 12mm pearls, one large gold bead, one Round Baroque
        12mm pearl, one large gold bead, one Round Baroque 12mm pearl, one large gold
        bead, and 11 Round Baroque 12mm pearls. Slip on one crimp bead and the other
        end of the Artisan Toggle and crimp to close. Add crimp cover.

                                                                           www.create-your-style.com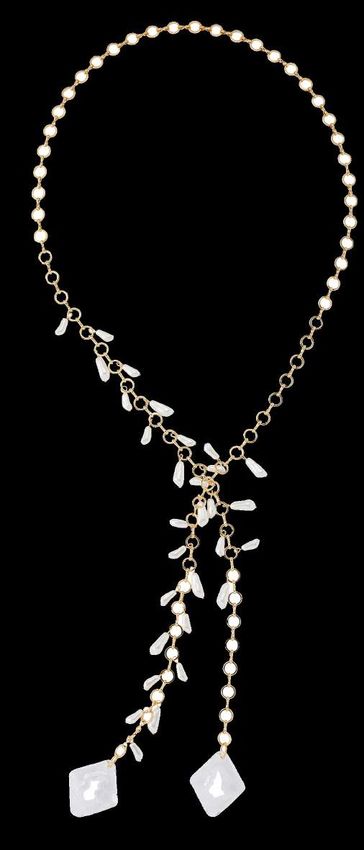
Pearl Wrap Around
Swarovski crystals

Product Group       Article No.    Amount      Size       Color               Color Code
Pendants            6926           2 pcs       36mm       Crystal             001
Crystal Pearls      5844           20 pcs      10mm       White               001 650
Crystal Pearls      5844           10 pcs      14mm       White               001 650

SUPPLIES:
40” – large circle gold chain
30 – 1” Headpins
2 – 8mm jump rings

INSTRUCTIONS:
Step 1: Using one head pin slide on one 5844 10mm Elongated Baroque pearl make a simple loop and set
        aside. Repeat 19 more times and set aside.
Step 2: Using one head pin slide on one 5844 14mm Elongated Baroque pearl make a simple loop and set
        aside. Repeat 9 more times and set aside.
Step 3: Using the gold chain, take one side of the chain and begin 3” up on the chain and begin to attach
        10 pearls from step 1 and 5 pearls from step 2 randomly up the chain (one on each ring).
Step 4: Continue to use the gold chain, take the other side of the chain and begin at the bottom ½” up on
        the chain and begin to attach 10 pearls from step 1 and 5 pearls from step 2 randomly up the chain
        (one on each ring).
Step 5: Using a large jump ring attach one Growing Crystals Rhombus pendant at the bottom of one side of
        the chain. Repeat for the other side.

                                                                             www.create-your-style.com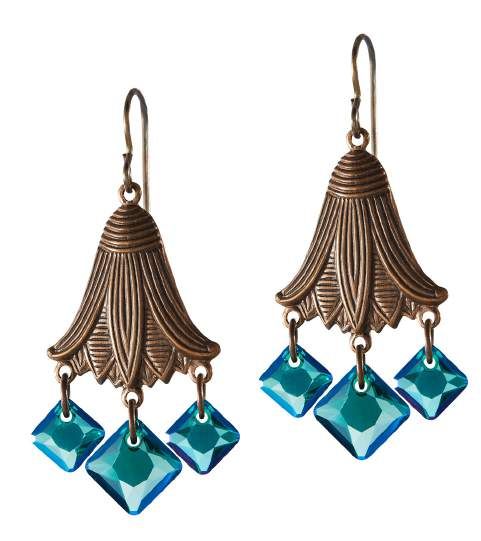
Trio of Opulent Earrings
Swarovski crystals

Product Group     Article No.   Amount     Size       Color                 Color Code
Beads             5040          12 pcs     4mm        Crystal Shimmer 2X    001 SHIM2
Crystal Pearls    5841          2 pcs      12mm       White                 001 650
Crystal Pearls    5842          2 pcs      10mm       White                 001 650
Crystal Pearls    5844          2 pcs      14mm       White                 001 650

SUPPLIES:
                                                          4 – Ear wires
2 – Opulence post earrings - TierraCast® 94-1083-12
                                                          4 – 2” Ballpins
2 – Opulence Charm - TierraCast® 94-2544-12
                                                          2 – 2” eyepins
2 – Opulence Teardrop Bead - TierraCast® 94-5834-12
2 – Dragon Bead - TierraCast® 94-5832-12

INSTRUCTIONS:

Earring #1
Step 1: Using one eye pin, attach one Opulence Charm on the bottom. Slide on one 4mm 5040 Crystal Shimmer 2X bead, one 5841 Round Baroque 12mm pearl, and one 4mm 5040
        Crystal Shimmer 2X bead. Make a simple loop. Attach this to one Opulence post earring. Repeat for second earring.
Earring #2
Step 1: Using one ball pin, slide on one Opulent teardrop bead, one 4mm 5040 Crystal Shimmer 2X bead, one 5842 Coin Baroque 10mm pearl, and one 4mm 5040 Crystal Shimmer 2X
        bead. Make a simple loop. Attach this to one ear wire. Repeat for second earring.
Earring #3
Step 1: Using one ball pin, slide on one 14mm Elongated Baroque Pearl, one 4mm 5040 Crystal Shimmer 2X bead, one Dragon Bead, and one 4mm 5040 Crystal Shimmer 2X bead.
        Make a simple loop. Attach this to one ear wire. Repeat for second earring.

                                                                       www.create-your-style.com
Tahitian Treat Necklace and/or Bracelet
Swarovski crystals

Product Group       Article No.    Amount       Size      Color                       Color Code
Crystal Pearls      5842           36 pcs       10mm      Iridescent Tahitian Look    001 2004
Crystal Pearls      5844           24 pcs       14mm      Iridescent Tahitian Look    001 2004
Beads               5000           7 pcs        8mm       Black Diamond Shimmer       215 SHIM

SUPPLIES:
1 – Flora Toggle set – TierraCast® 94-6223-40
2 – 2mm crimp beads
2 – 3mm crimp covers
36” – Beading wire

INSTRUCTIONS:
Step 1: Using one crimp bead slide onto one end of beading wire and slide on one end of the Flora toggle and crimp to close.
        Add crimp cover.
Step 2: Slide on six 14mm 5844 Elongated Baroque pearls and one 8mm 5000 Black Diamond Shimmer bead. Repeat this
        pattern 3 more times.
Step 3: Slide on nine 10mm 5842 Coin Baroque pearls and one 8mm 5000 Black Diamond Shimmer bead. Repeat this pattern
        3 more times.
Step 4: Slide on one crimp bead and other end of the Flora toggle and crimp to close. Add crimp cover.
Note: This can either be worn as a necklace or wrapped 4 times around for a bracelet.

                                                                             www.create-your-style.com
Baroque Butterfly Earrings
Swarovski crystals

Product Group      Article No.    Amount      Size      Color                       Color Code
Crystal Pearls     5841           2 pcs       8mm       Iridescent Tahitian Look    001 2004
Crystal Pearls     5843           2 pcs       16mm      Iridescent Tahitian Look    001 2004

SUPPLIES:
1 – Butterfly Link – TierraCast® 94-3224-12
2 – 1” ball pins
2 – 1” eye pins
2 – ear wires

INSTRUCTIONS:
Step 1: Using one ball pin slide on one 16mm Baroque Drop pearl and make a simple loop. Attach to the bottom of
        the Butterfly link.
Step 2: Using one eye pin slide on one 8mm Baroque Round pearl and make a simple loop. Attach to the top of the
        Butterfly link. Attach top of round pearl to ear wire. Repeat Steps 1-2 to make a second earring.
Step 3: Repeat Steps 1-2 to make a second earring.

                                                                           www.create-your-style.com
Emerald Eye Necklace
Swarovski crystals

Product Group       Article No.    Amount       Size         Color                       Color Code
Pendants            6435           2 pcs        9mm          Crystal Vitrail Light P     001 VL
Pendants            6435           2 pcs        11.5mm       Crystal Vitrail Light P     001 VL
Pendants            6435            1 pc        16mm         Crystal Vitrail Light P     001 VL

SUPPLIES:
1 – 39x28 Mandala Eye Blank – Vintaj® P023
1 – 21x9 Swirl Clasp – Vintaj® CL60
8 – 8mm jump rings
4” – 24 gauge Brass Artistic Wire®
2’ – black suede lace
1 – hole punch

INSTRUCTIONS:
Step 1: Using hole punch make 6 holes in the Mandala Eye blank---5 on the bottom and one on the top. Using the jump rings attach in order
        of the 5 holes left to right, one 9mm Emerald Pendant, one 11.5mm Emerald Pendant, one 16mm Emerald Pendant, one 11.5mm
        Emerald Pendant, and one 9mm Emerald Pendant. Attach another jump ring to the center hole on the top and close.
Step 2: Cut the wire into two 2” pieces and set aside
Step 3: Slide the suede lace through the open top jump ring from Step 1. Taking one jump ring and one end of the suede lace, fold over 1”
        of the lace onto the jump ring. Taking one 2” piece of wire, wire close by wrapping the wire around the suede lace. Repeat for the
        second side.
Step 4: Attach the Swirl Clasp to the end of the necklace.

                                                                                  www.create-your-style.com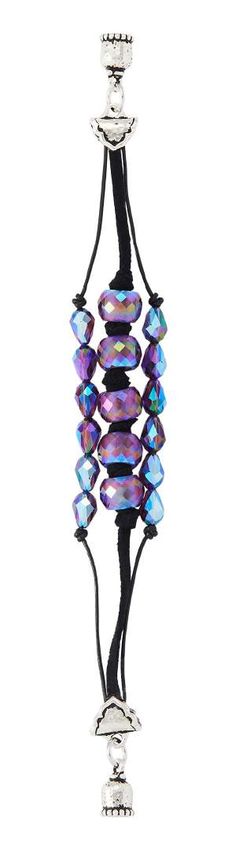
Emerald Domed Earrings
Swarovski crystals

Product Group       Article No.    Amount      Size       Color                       Color Code
Pendants            6435           2 pcs       11.5mm     Crystal Vitrail Light P     001 VL

SUPPLIES:
1 – 20 mm Endless Passage drop – Vintaj® DP175
2 – ear wires
2 – 6mm jump rings
1 – hole punch

INSTRUCTIONS:
Step 1: Using hole punch make 1 hole in the Endless Passage drop exactly opposite the original hole.
Step 2: Using one jump ring attach one Emerald Pendant to one hole in the Endless Passage drop.
        Attach ear wire to opposite hole.
Step 3: Repeat Steps 1-2 to make second earring.

                                                                               www.create-your-style.com
Triple the Fun Bracelet
Swarovski crystals

Product Group       Article No.    Amount       Size       Color                        Color Code
Bead                5043           5 pcs        11mm       Amethyst Shimmer 2X          204 SHIM2
Bead                5500           12 pcs       9x6mm      Amethyst Shimmer 2X          204 SHIM2

SUPPLIES:
1 – Rope Magnetic Clasp – TierraCast® 94-6240-12
2 – Palace Crimp End – TierraCast® 94-3227-12
2 – 6mm jump rings
20” – Black suede lace
20” – 0.5mm black leather
Alcohol wipes
Swarovski CG500 two-part epoxy glue

INSTRUCTIONS:
Step 1: Using alcohol wipes clean both Palace Crimp Ends on the inside.
Step 2: Using the black suede lace, make a double overhand knot in the center. Pull down on the knot to make sure it is snug. Slip on (1) 5043 11mm Amethyst Shimmer 2x large hole bead
        and create another double overhand knot on the open side of the bead. Add one more bead on each side. Ending with a knot on each end to close off the beads. Set aside.
Step 3: Cut the 0.5mm black leather into two equal pieces. Using one piece, slip on (6) 5500 9x6mm Amethyst Shimmer 2x beads. Center the beads and mark the leather on each end.
        While holding the beads in place, create a double overhand knot on each side of the set of 6 beads. Keep the leather snug as you pull down on the end. Repeat for second side.
Step 4: Line up the three strands of leather with the large hole beads in the center and one each of the tear drop beads on the outsides. Cut the 0.5mm to desired length plus one inch on
        each end; repeat for second strand. Cut the suede lace to desired length plus 3/8” inch on each end. NOTE: to calculate desired length, make sure to include the length of the
        clasp and two jump rings into your calculations or it will be too big.

                                                                              www.create-your-style.com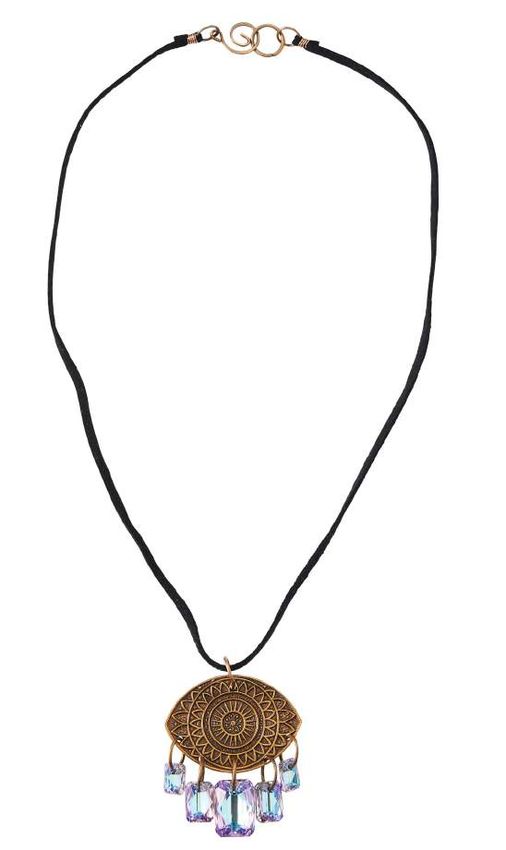
Triple the Fun Bracelet
Swarovski crystals

Step 5: On each end of each piece of 0.5mm leather strand make an overhand knot at each end. Repeat for
        the second piece.
Step 6: Line up the three strands of leather with the large hole beads in the center and one each of the tear drop
        beads on the outsides. Each of the three strands should be of similar length
Step 7: Using the two-part epoxy glue, place one large dab in the center of the Palace Crimp End. Using a tooth
        pick spread the glue on the inside. Slip the end of the suede lace into the center of the crimp, followed
        by (1) 0.5mm leather knotted end to the left of the suede and the second piece to the right of the suede.
        Repeat for second side. Let sit until the glue sets.
Step 8: Once the glue sets, squeeze the Palace Crimp End until the crimp holds the leather in place. Repeat for
        the second side.
Step 9: Attach one 6mm jump ring to the loop of the Palace Crimp End and repeat for the second side.
Step 10: Attach the two jump rings from step 9 to each end of the Rope Magnetic Clasp.

                                                                               www.create-your-style.com
A Touch of Tabac
Swarovski crystals
Product Group Article No. Amount Size Color Color Code
Flatback 2196/4 1 pc 30x22.7mm Crystal Satin Tabac 001 SATTA
BeCharmed Beads 5948 2 pcs 14mm Crystal Golden Shadow 001 GSHA
SUPPLIES:
2 – 36x26mm Scrolled Border Oval Blank - Vintaj® PT139-270
36” – 1mm black leather
6” – 24 gauge Brass Artistic Wire®
Alcohol wipes
Swarovski CG500 Two Part Epoxy Glue
INSTRUCTIONS:
Step 1: Using alcohol wipes clean off the Scrolled Border Oval blank and set aside to dry.
Step 2: Using two-part epoxy, glue the one 2196/4 Oval Cabochon Flatback to the blank side of the Scrolled Border Oval blank and set
aside for 24 hours to dry.
Step 3: Split the 1mm leather into two pieces. String one piece through the hole of the oval blank. Pull tails to match. Repeat for second side.
Step 4: Split the 24g wire into two even pieces. Approximately 3/8” from the hole of the blank, perform a wire wrap, keeping the wire snug,
wrap 4-5 times. Repeat for the second side using the remaining piece of wire.
Step 5: Slip on (1) 14mm 5948 BeCharmed Bead in Crystal Golden Shadow through the pair of leather strands on one side of the
cabochon, keeping the bead on the cabochon end. Make a double overhand knot and slide the bead down on top of the knot.
Repeat for the other side.
www.create-your-style.comCool, Crisp, and Minty
Swarovski crystals
Product Group Article No. Amount Size Color Color Code
Beads 5328 25 pcs 4mm Pacific Opal Shimmer 2X 390 SHIM2
Flatbacks 2196/4 1 pc 30x22.7mm Crystal Mint Green 001 L115S
Flatbacks 2088 18 pcs SS16 Crystal Mint Green 001 L115S
SUPPLIES:
2 – 36x26mm Organic Arrow Oval Blank - Vintaj® PT120
3 – 9mm Ribbed Cable jump ring - Vintaj® JR106-040
1 – 32mm medium wire hoop - TierraCast® 01-0401-11
1 – medium lobster clasp
24” – 2mm silver leather
32” – 0.5mm gray leather
36” – 26 gauge silver Artistic Wire®
8” – 24 gauge silver Artistic Wire®
Alcohol wipes
Swarovski CG500 Two Part Epoxy Glue
INSTRUCTIONS:
Step 1: Using alcohol wipes clean off the Organic Arrow Oval blanks and set aside to dry.
Step 2: Using two-part epoxy, glue the one 2196/4 Oval Cabochon Flatback to one Organic Arrow Oval blank and set aside
for 24 hours to dry.
Step 3: Using two-part epoxy, glue all of the ss16 Mint Green flatbacks around the edge of the Organic Arrow Oval blank and
set aside for 24 hours to dry.
www.create-your-style.comCool, Crisp, and Minty
Swarovski crystals
Step 4: Cut the 0.5mm into two pieces one 18” and the remaining piece is 14”.
Step 5: Fold the 18” piece of leather and using the loop side, thread through the hole on the blank from front to back and pull
snuggly. Adjust the leather to even out the tails; if you are unable to do this, clip the tails so that they are even in length.
Repeat step using the cabochon oval side and the 14” piece of leather.
Step 6: Knot the tail ends of each component made in step 5 to the Medium Wire hoop making sure the knots are secure.
Step 7: Using the 26g wire, wire wrap all 25 pieces of 5328 4mm Pacific Opal Shimmer 2x crystals to the Medium Wire
hoop placing two wraps between each crystal. Keep the wire snug on the hoop so that the crystals don’t move.
Note: for separation of the two leather drops, make sure to wire wrap one crystal between the two sets of leather
knots continue around until completed.
Step 8: Attach one jump ring to the top loop of the wire hoop. Close.
Step 9: Thread the 2mm leather thru the jump ring from step #8. If necessary, cut leather to adjust for desired length.
Step 10: Fold over one tail about ¾”. Using 4” of 24g wire wire wrap 4-5 times to secure the leather. Wrap from the tail
towards the loop. Repeat for the second side of the necklace.
Step 11: Attach one 6mm jump ring to each loop made in step #10. Before closing one of the jump rings attach the lobster
clasp then close.
www.create-your-style.comMystical Cornucopia Earrings
Swarovski crystals
Product Group Article No. Amount Size Color Color Code
Fancy Stones 4160 2 pcs 18x13mm Crystal Paradise Shine F 001 PARSH
Beads 5328 2 pcs 6mm Crystal Paradise Shine 001 PARSH
SUPPLIES:
2 – 25mm Filigree Cones – Kabela Designs
2 – Add a Bead Ear Wires - TierraCast® 90-1150-00
Alcohol wipes
Swarovski CG500 Two Part Epoxy Glue
INSTRUCTIONS:
Step 1: Using alcohol wipes clean off the Filigree Cones and set aside to dry.
Step 2: Using two-part epoxy, glue one 4160 Oval Mystic Fancy into the bottom end of the Filigree Cone and set aside for 24
hours to dry. Repeat one more time.
Step 3: Using one Add a Bead Ear Wire slide on one 6mm 5328 Paradise Shine bead and make a simple loop. Attach to the
top of the Filigree cone. Repeat to make the second earring.
www.create-your-style.comPretty in Pink
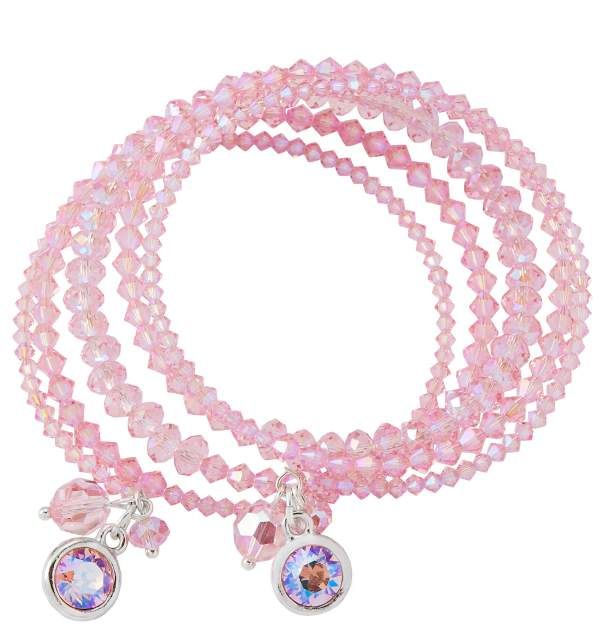
Swarovski crystals
Product Group Article No. Amount Size Color Color Code
Beads 5328 150 pcs 3mm Light Rose Shimmer 2X 223 SHIM2
Beads 5328 100 pcs 4mm Light Rose Shimmer 2X 223 SHIM2
Beads 5040 50 pcs 6mm Light Rose Shimmer 2X 223 SHIM2
Beads 5000 2 pcs 8mm Light Rose Shimmer 223 SHIM
Chatons 1088 2 pcs SS39 Light Rose Shimmer F 223 SHIM
SUPPLIES:
2 – Plain Chaton Bezel Setting – TierraCast® 94-2545-61
4 – 1” Ball pins
2 – oval jump rings
5 ½ - Memory wire rings
INSTRUCTIONS:
Step 1: Using alcohol wipes clean off the chaton bezel settings and set aside to dry.
Step 2: Using two-part epoxy, glue in one Light Rose Shimmer Chaton into the Chaton Bezel setting and set aside for 24 hours to dry.
Repeat one more time.
Step 3: Using a round nose plier bend back to make a loop the end of the memory wire.
Step 4: Slide on 75 3mm 5328 Light Rose Shimmer 2X beads, 50 4mm 5328 Light Rose Shimmer 2X beads, 48 6mm 5040 Light Rose
Shimmer 2X beads, 50 4mm 5328 Light Rose Shimmer 2X beads, and 75 3mm 5328 Light Rose Shimmer 2X beads. Using round
nose plier bend back to make a loop.
www.create-your-style.comPretty in Pink
Swarovski crystals
Step 5: Using one ball pin slide on one 8mm 5000 Light Rose Shimmer bead and make a simple loop.
Repeat once and set aside.
Step 6: Using one ball pin slide on one 6mm 5040 Light Rose Shimmer 2X bead and make a simple loop.
Repeat once and set aside.
Step 7: Using one component made in Steps 1, 5, & 6 attach these to one loop end on the memory wire
bracelet. Repeat this for the other side of the bracelet.
www.create-your-style.comFrosty Pink Surprise
Swarovski crystals
Product Group Article No. Amount Size Color Color Code
Beads 5328 4 pcs 6mm Light Rose Shimmer 223 SHIM
Beads 5328 4 pcs 4mm Light Rose Shimmer 2X 223 SHIM2
Beads 5000 2 pcs 8mm Light Rose Shimmer 223 SHIM
Beads 5043 2 pcs 11mm Crystal Shimmer 2X 001 SHIM2
SUPPLIES:
4 – 24x6mm paddle - Vintaj® PT196-330
2 – 2” Eye pins
2 – 1” Ball pins
2 – Ear Wires
INSTRUCTIONS:
Step 1: Using one eye pin, slide on one 4mm 5328 Light Rose Shimmer 2X bead, one 6mm 5328 Light Rose Shimmer bead, one
11mm 5043 Crystal Shimmer 2X XXL bead, one 6mm 5328 Light Rose Shimmer bead, and one 4mm 5328 Light Rose
Shimmer 2X bead and make a simple loop. Repeat once and set aside.
Step 2: Using one ball pin slide on one 8mm 5000 Light Rose Shimmer and make a simple loop. Repeat once and set aside.
Step 3: Attach one bead component made in step one with beaded component made in Step 1. Attach the ear wire to top loop.
Step 4: Repeat Step 3 to make second earring.
www.create-your-style.comShimmering Bangle
Swarovski crystals
Product Group Article No. Amount Size Color Color Code
Chatons 1088 15 pcs SS39 Light Rose Shimmer F 223 SHIM
SUPPLIES:
1 – Fifteen Setting Cuff Bracelet – Las Vegas Rhinestones EB113
1 – Interchangeable Prong Pushing Hand Tool – Las Vegas Rhinestones
INSTRUCTIONS:
Step 1: Using the hand tool place one SS39 Chaton stone into the cup and press down prongs.
Repeat 14 more times to finish the bracelet.
www.create-your-style.comSliver Harvest Moon Earrings
Swarovski crystals
Product Group Article No. Amount Size Color Color Code
Pendants 6430 6 pcs 8mm Light Colorado Topaz Shimmer 246 SHIM
Pendants 6430 2 pcs 10mm Light Colorado Topaz Shimmer 246 SHIM
SUPPLIES:
2 – 32mm Wandering Pathway drop - Vintaj® DP 057
8 – 6mm Ribbed cable jump ring - Vintaj® JR112
2 – Ear Wires
Hole Punch
INSTRUCTIONS:
Step 1: Using hole punch make three holes on the bottom rung of the Wandering Pathway drop. Repeat once and set aside
Step 2: Using the jump rings attach in order of the 3 holes on the bottom left to right, one 8mm Classic Pendant, one 10mm
Classic Pendant, and one 8mm Classic Pendant. Attach another jump ring with one 8mm Classic Pendant to the center
hole on the top. Attach Ear wire. Repeat to make second earring.
www.create-your-style.comLotus Blossom Princess Droplets
Swarovski crystals
Product Group Article No. Amount Size Color Color Code
Pendants 6431 4 pcs 9mm Emerald Shimmer 205 SHIM
Pendants 6431 2 pcs 11.5mm Emerald Shimmer 205 SHIM
SUPPLIES:
2 – 27x23mm Lotus Blossom Connector - Vintaj® C4H0001
6 – 4mm jump ring
2 – Ear Wires
INSTRUCTIONS:
Step 1: Using the jump rings attach in order of the 3 holes on the bottom left to right, one 9mm Princess Pendant,
one 11.5mm Princess Pendant, and one 9mm Princess Pendant. Attach Ear wire to top hole. Repeat to make
second earring.
www.create-your-style.comYou can also read