National College of Ireland - Cloud-based Research Honeypots Technical Report - BSc (Honours) in Computing
←
→
Page content transcription
If your browser does not render page correctly, please read the page content below
National College of Ireland
     BSc (Honours) in Computing
           Cyber Security
            2020/2021
           Umar Rafique
            x18142061
     x18142061@student.ncirl.ie

Cloud-based Research Honeypots
       Technical Report
Contents
1.      Executive Summary ......................................................................................................................... 2
2.      Introduction .................................................................................................................................... 3
     Background ......................................................................................................................................... 4
     Aim: ..................................................................................................................................................... 5
     Technology: ......................................................................................................................................... 5
     Structure ........................................................................................................................................... 12
3.      System ........................................................................................................................................... 12
     Requirements .................................................................................................................................... 12
     Functional Requirements .................................................................................................................. 12
     Use Case Diagram: ............................................................................................................................ 13
     Requirement 1  ......................................................................................... 13
     Description & Priority........................................................................................................................ 13
     Use Case ............................................................................................................................................ 13
     Requirement 2  ........................................................................................ 15
     Description & Priority........................................................................................................................ 15
     Use Case ............................................................................................................................................ 15
     Requirement 3  ....................................................................................... 17
     Description & Priority........................................................................................................................ 17
     Use Case ............................................................................................................................................ 18
     Requirement 4  ................................................................................................... 19
     Description & Priority........................................................................................................................ 19
     Use Case ............................................................................................................................................ 19
     Requirement 5 < View Details > ........................................................................................................ 21
     Description & Priority........................................................................................................................ 21
     Use Case ............................................................................................................................................ 21
     Data Requirements ........................................................................................................................... 23
     User Requirements ........................................................................................................................... 23
     Implementation ................................................................................................................................ 23
     Graphical User Interface (GUI) .......................................................................................................... 38
4.      MHN Analysis Using Splunk .......................................................................................................... 44
        Cowrie: .......................................................................................................................................... 48
        Dionaea: ........................................................................................................................................ 54
        Combined Analysis: ....................................................................................................................... 60

                                                                                                                                                               1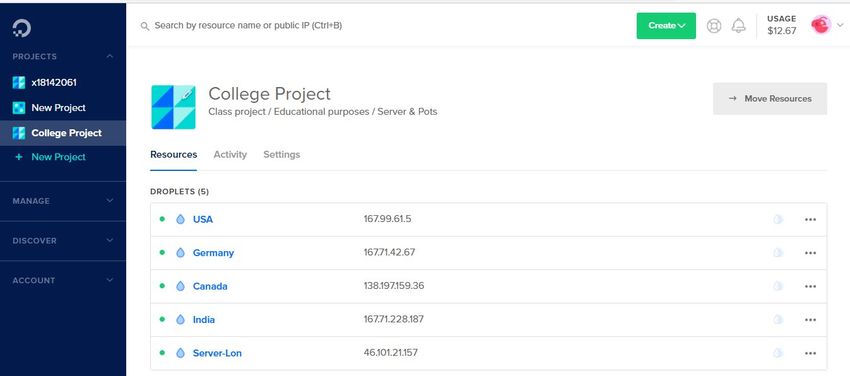
5.      Testing ........................................................................................................................................... 63
6.      Conclusions ................................................................................................................................... 66
7.      Further Development or Research ............................................................................................... 66
8.      References .................................................................................................................................... 66
9.      Appendices .................................................................................................................................... 68
     Project Plan ....................................................................................................................................... 68
     Ethics Approval Application (only if required) .................................................................................. 72
     Reflective Journals ............................................................................................................................ 72
     Survey................................................................................................................................................ 79
     Splunk Overview ............................................................................................................................... 83
     Digital Ocean Invoices ....................................................................................................................... 83

       1. Executive Summary
"Cybercriminals are developing and boosting their attacks at an alarming pace, exploiting the
fear and uncertainty caused by the unstable social and economic situation created by COVID-
19" (Stock, 2020) INTERPOL Secretary-General.
In today’s world, everything is connected to the Internet, which increases the exploitation of
devices and systems.
As we live in the middle of the pandemic, Company employees work remotely, making them
even more vulnerable. The intrusions also increase on the same scale as the Internet
multiplies. In the past few months, cyber-attacks are at their peak.
The National College of Ireland and Technology University Dublin was attacked by malware.
Then we have probably the most significant cyberattack on USA oil pipeline due to which oil
prices surge and about two days ago the most significant cyber-attack in the history of the
Republic of Ireland attacking HSE. The systems were forced to shut down for avoiding future
damage.
Minister of State for Public Procurement and eGovernment Ossian Smyth said, “This is a
very significant attack, possibly the most significant cyberattack on the Irish State”. (Gráinne
Ní Aodha, 2021)

Throughout the year, the project I have worked on is to research how these attacks took
place in the first place, which are commonly attacked ports and gathering the information of
the attacker, such as IP address and if it is a brute-force. The most common passwords used
to get into the systems.
I decided to work on this project because the main reason was the study of attackers'
behaviour. During the Christmas break each year, we have seen a new cyber-attack. This

                                                                                                                                                            2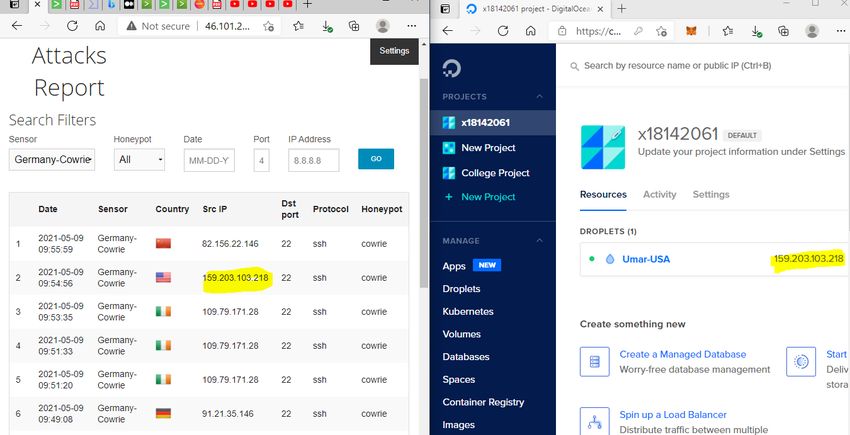
gives me the idea that cyber attackers will be more active during the pandemic, and we can
see the results.
The project's complexity is a bit high because I used third-party services. The reason to do
this was to mitigate the risk on my machine. If I run server and pots on my machine, I knew I
would be gathering the attacks. Simple attacks could disrupt while working on the project.
The project is built on Linux (Ubuntu) using the Digital Ocean cloud platform, running an
MHN server and attaching the sensors/droplets (Honeypots) to the MHN.

   2. Introduction
This report will describe the use of Honeypots, what honeypots are used for—a guide to set
up your own Modern Honey Network (MHN). We can deploy the MHN server for a limited
time. The Ubuntu has been upgraded & a few MHN features are not compatible anymore
with the new versions of Ubuntu whilst the developers of MHN are constantly working to
improve their project.
Companies of significant scale to small scale have implemented strong firewalls policies and
antivirus software to prevent such intrusions. However, attackers usually break the firewall
rules by using different ports or by opening the back door for devices. In this scenario, the
implementation of honeypots could capture the attacker’s activities and alert the security
members to block those ports for future damage. The companies demand countermeasures
for specific periods of times, e.g., which ports been attacked and what payloads have been
used, to prevent such attacks in the future.
This work uses honeypot scenarios of Modern Honeypot Network to detect future attacks. I
will deploy honeypot, gather logs in real-time in the above network scenarios and take
decisions based on machine learning techniques. Currently, work carried out in this
semester is divided into three parts (1) Selection of MHN (2) Deploying Honeypots
(3) Debugging of MHN server.
   (1) Selection of MHN, In the early stages of the project. I had to research and decide to
       either run honeypots on an actual system or virtually. I decided to run honeypots
       virtually because it is more secure than deploying on the existing system rather than
       putting my system at risk.
   (2) Deploying Honeypots when it comes to deploying honeypots, there is a wide variety
       of honeypots to deploy for the project. I have decided to run Dionaea and Cowrie as
       the main honeypots for the final report.
   (3) Debugging of MHN sever, Whilst the deployment of droplets/sensors. I ran into few
       errors explained in detail under the Technology section. I had to debug those error
       to gather the logs from attackers.
The work status is that honeypot is successfully deployed in the digital ocean, and real-time
logs are already collected to make real-time decisions on attacks. The subsequent
immediate work is to apply machine learning techniques to classify attacks.

                                                                                                3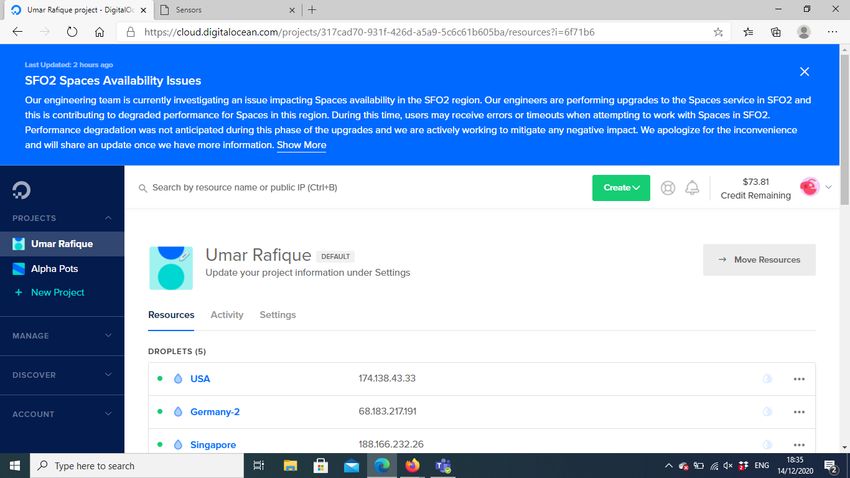
Using MHN enables the person who has deployed the MHN server to study the different
attacks by attackers by trapping them in the honeypot and logging their attacks to the
server. This will be explained in greater detail, and there are three types of interactions low,
medium, and high. This report will focus on low interaction, medium interaction, and high
interaction. The report will also outline my own Modern Honey Network analysis, the
troubleshooting whilst developing the network, and the results of my analysis on different
droplets/sensors attached to the server. The analysis will focus on the multiple results from
attackers’ locations, IP addresses, most used passwords to get in the system.
This report will also explain the requirements needed to deploy the project, the design, the
architecture of the project, how I implemented and troubleshoot whilst implementing the
server and the sensors/droplets for MHN, and the implementation of the Splunk tool for
analysis. To illustrate how exactly this project operates.

Background
As my specialisation stream is cybersecurity and for my final year project. I wanted to
something related to my stream when we are studying a module called Security Principles.
That was the first time I heard about honeypots and how they work. It took my attention,
and I started researching and working on honeypots.
Honeypots are decoy systems used in real networks to divert attacker from systems to
another to study their behaviour, tools and techniques used by hackers. The level of
interaction allowed by systems helps us categorise the honeypots into three categories.
Usually, honeypots are designed to detect and report attacks against network and network
systems such as Dos/DDOS DNS, DHCP etc.
Honeypots came with an idea and approach of catching the attackers understanding their
tools to be ready for countermeasures to protect the existing organisation network. The
honeypots are defined as a security resource. As we know, the number of cyber attackers is
increasing rapidly and leaving the organisation vulnerable and sometimes bankrupt with the
new GDPR. We must be extra cautious when handling users' data on Networks. The typical
methodologies used to prevent attacks were IDS/IPS systems or penetration testing to find
vulnerabilities within the network and systems. The downfall for Penetration testing could
be unexpected results while a member is trying to find vulnerabilities which put the system
in a very insecure mode to do countermeasures. As we know, the attackers are finding
alternative ways to exploit the system, so we should also find an alternative way of learning
their behaviour without risking our existing system. I will do so by deploying the MHN server
on the cloud and attaching the sensors/droplets. This will attract the attackers to exploit. In
the meantime, we would understand their behaviour what ports they are attacking the
cloud platform is Digital Ocean for time interaction and analysis.
Mainly Honeypots are broken into two categories: production-based honeypots and
research-based honeypots. For this project, I will deploy research-based honeypots whose
primary purpose is to attract and lure attackers worldwide to gather the data for analysis.
The sole purpose of researched-based honeypots is to gather the data from different
locations worldwide whilst deploying the sensors worldwide, which helps us understand

                                                                                               4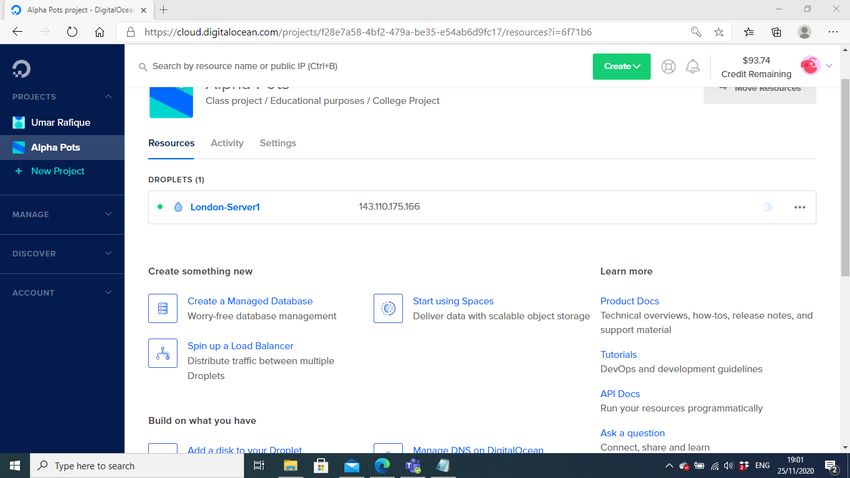
where the attackers are most attracted to attacks and what countries the attackers are
usually attracted to that part of the world. For the trial, I had deployed Honeypots Cowrie
and Dionaea in the USA & India to understand where the most common IP addresses and
the ratio of attacks hit the sensors.

Aim:
Many honeypots can be deployed, but the aim to deploy and analyse for my BSc (honours)
project is mainly based on Cowrie, Dionaea. In the later stages of my master’s degree, I
would love to work on snort and Passive OS Fingerprinting (P0f).
As mentioned earlier, since the servers update, the MHN project was fully compatible with
earlier versions of Ubuntu. While deploying the cowrie, I ran into unexpected errors that
were resolved using troubleshoot guide for MHN. The ticket is open for snort and P0f. The
developers of MHN are working on it to resolve the issue, including the script changes. Once
the ticket is resolved, I would successfully deploy other Honeypots. In the meantime, the
core focus is on Cowrie and Dionaea. As these two are mainly target networks

   Dionaea Honeypot:
   Dionaea honeypot is to trap malware exploiting vulnerabilities. The goal is a gathering
   the data copy of the malware. Since the pandemic people are working remotely for
   meeting VOIP, Dionaea is a low interaction honeypot that works around the server-side
   that supports such protocols SMB, HTTP, FTP, TFTP, MSSQL, MySQL, SIP for Voice Over IP
   (VOIP).

   Cowrie Honeypot:
   Cowrie honeypots are designed to work as a proxy to capture Secure Shell interaction
   (SSH) and Telnet connections to log brute force attacks. Since people are working
   remotely and these are the most used ports. The cowrie records the session information
   and often connected to the Internet to monitor the tools, scripts and host use by
   password guessing attacks such as Brute Force Attacks. Cowrie is a medium Interaction
   Honeypot.
   I will be working on P0f, a high-level interaction for fingerprints and Snort, an intrusion
   detection system, if the issue from the server-side of MHN gets resolved by tickets to
   the developers. Snort help us to monitor TCP/IP networks. Which usually are used by
   attackers for Denial of Service and Distributed Denial of Service.

Technology:
What Theology will you use to achieve what you have set out to do and how will you use it?
For the technologies to achieve the goal, I researched to start the deployment process for
honeypots. There were two options either I do physical or virtual. The physical deployment

                                                                                                 5
of honeypots on the laptop was that I would have required an extra laptop as the attackers
could deploy the payload into my actual laptop or hack my logs. I realise the second option,
which is running virtually, is more secure and cost-effective.
Following are the technology I am using for the project to achieve its primary goal:
       1. Digital Ocean
       2. Modern Honey Network
       3. Splunk
The first step to achieving this project's goal was to find a compatible cloud network. Where
I could deploy my MHN server and sensors/droplets. After few suggestions, I came across
Digital Ocean Network, allowing students to use 60 days free trial of 100 US dollars.
After creating an account with Digital Ocean, the next step was to deploy the Modern Honey
Network and sensors to gather the data from attackers. I ran into few unexpected errors
whilst deploying the MHN server. The screenshots are following, which would give an
overview of errors and how I manage to troubleshoot those errors:

                                            Figure: 1
   Figure 1 shows us that the mhn-celery worker was FATAL. It is vital to log the attacks as I
   will not be able to work on the project without resolving it. The issue directly impacted
   the MHN server dashboard. After the first attack, the rest of the logs were not stored
   and logged into the server.

                                                                                               6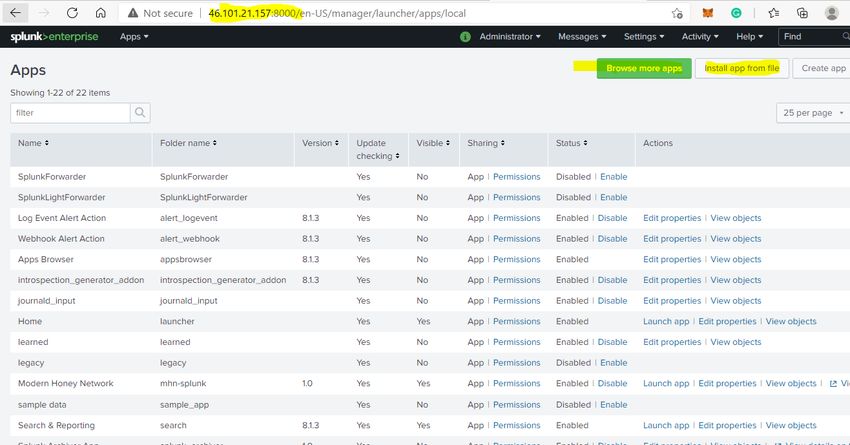
Figure: 2

Figure 2. shows us exactly what I was getting on my dashboard.
After researching the issue and how to troubleshoot the issue. The following
screenshots will illustrate the Linux commands I ran to resolve the error.

                                        Figure 3.
After researching the effects of error, I also researched how to resolve the causing
issues. The resolving of the error was based on the commands on the link for the
troubleshooting guide for MHN.

                                                                                       7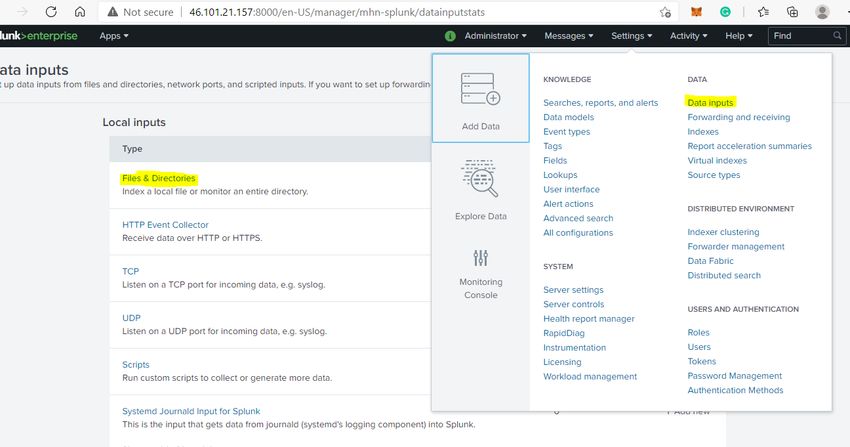
I also ran into an error from the digital ocean platform where their data was lost for
virtual machines due to that issue from the platform provider. I could not do much, so I
had to create a new MHN server and droplets/sensors to restart gathering the data.
Figure 4 screenshot will provide you with an overview of the issue.

                                         Figure: 4
As you can see, the virtual machines for the USA, Germany-2, Singapore were running,
but due to the error in the SF02 region where my MHN server was running, I lost all the
gathered data from all the virtual machines. After opening a ticket with Digital Ocean, I
realised as the server was not on backup because I had to pay extra for backup. So, I
could have lost all the data. Rather than waiting for them to resolve the issue, I created a
new server and droplets/sensors.
Figure 5 and 6 screenshots will explain the nature of error on the Digital Ocean.

                                                                                           8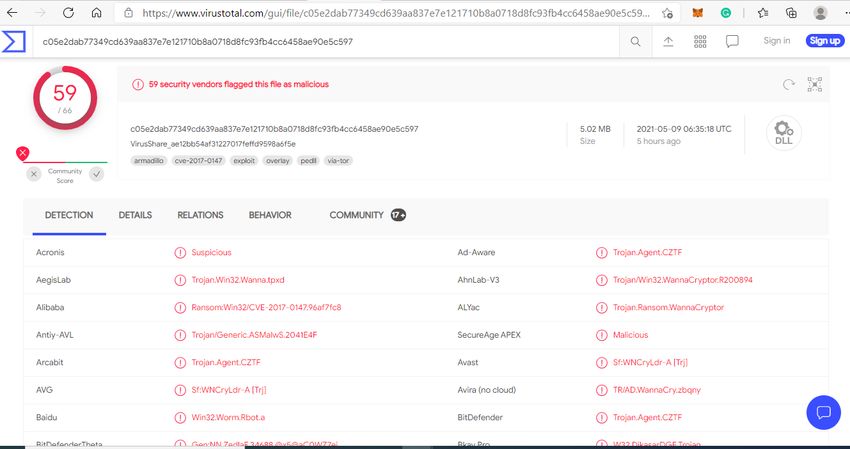
Figure 5

Figure 6

           9
Figure 7
Figure 7 shows the new New MHN server, which is now running on 143.110.175.166
instead of 139.59.47.212.
Figure 8
Figure 8 screenshots show that when I was running into errors and the day, I resolved
the error from the MHN server and ran into an error from Digital Ocean.
10Figure 9
Figure 9 shows that I successfully resolved the issues I was encountering. The next step
was to integrate Splunk into the MHN server. So, I would be able to get the logs when I
integrate Splunk to analyse data. Figure 10 screenshot shows where I successfully
integrated Splunk with the MHN server.
Figure 10
11So far, I have successfully achieved the first main steps for the project, and now I will
start adding sensors to gather and learn the behaviour of attackers. The final step will be
creating an account with Splunk using their free trial for a month to analyse the
gathered data.
Structure
Section 1 was an executive summary, and section 2 is based on the project introduction. I
have categorised the introduction into different heading, including the brief introduction,
background, aims, technology, and structure.
The honeypots are explained in detail, why they are vital, and the types of honeypots. I have
also explained the project's aim, what honeypots sensors/droplets I am currently running,
and will be running in the future if the developers of MHN resolve the issue. I have
explained the technologies I am using to host the MHN server in the technology section. I
ran into it while deploying the server with screenshots and resolving those issues with
screenshots. In the technologies section, I have explained the next step of the project and
how I will achieve the project results.
Section 3 of the system will grow through the system requirement, functional requirements
(Use Case), Data requirement, User requirement, Implementation and Graphic User
Interface (GUI) of the Project.
Section 4 is based on an analysis of attacks gathered using MHN and Splunk's machine
learning tool. Section 4 demonstrate the testing while working on the project. Section 5 is
the conclusion. Section 6 is briefly written about further development or research. Section 7
is about references. The last section is about Appendices. I have attached the submitted
Project Plan, Reflective Journals, a survey I conducted, Splunk Overview by exporting the pdf
file from Splunk and Digital Ocean invoices.
3. System
Requirements
The Requirement section contains all the functional requirements of the project. It explains
the description of the project and features how a user is going to interacts with the system
features.
Functional Requirements
This section lists the functional requirements in ranked order. Functional requirements
describe the possible effects of a software system, in other words, what the system must
accomplish. Other kinds of requirements (such as interface requirements, performance
requirements, or reliability requirements) describe how the system accomplishes its
functional requirements.
12A short, imperative sentence stating highest ranked functional requirement.
Use Case Diagram:
Requirement 1
Description & Priority
A description of the requirement and its priority. Describes how essential this requirement is to the
overall system.
This is essential as only authorised users can log in and access all the features of the system/project.
All the user have to create an account before they log in to the system. The user's information will
be saved on a cloud-based server database which could be SQL or NoSql, depending on the platform
used by the providers.
Use Case
UR 1
Scope
The scope of this use case is to explain how exactly the users access the system and how the
system interacts with the users.
Description
Create Account/Login
13Use Case Diagram
The user is brought to the login screen whilst the system is in initialisation mode.
Activation
This use case starts when a presses the register button /sign up and then brought
up to the register page of the system.
Main flow
1.The user presses the register button. The system triggers the sign-up.
2.The user fills out the necessary details on the sign-up page.
3.The user clicks the register button.
4.The system sends an authentications email to the user account to validate
the user.
5. The user clicked on the email link and brought it up to the login page.
6. The user entered the credentials, and the system bought them to the
homepage of the cloud-based platform (Digital Ocean).
Alternate flow
A1 :
1. The system compares the passwords entered.
2. The system notifies the user that the password is incorrect and did not
match.
3. The use case continues at position 2 of the main flow.
A2 :
1. The system checks email entered is not already registered.
2. If the typed-in email is already registered, the user must choose another
email or use the recovery option for their account.
3. The use case continues at position 2 of the main flow.
A3 :
141. The system checks that all the mandatory fields are filled.
2. The system informs the user if they forgot to fill any mandatory field.
3. The use case continues at position 2 of the main flow.
A4 :
1. The use case continues at position 2 of the main flow.
Termination
The system presents the next to the login page. Therefore the sign-up page will be
terminated.
Post condition
Successful:
• The user has created an account.
• The user can log in.
• The user credentials and personal data is stored in the server database.
Failure:
• The user cannot create an account.
• The user cannot log in to the account.
• The user credentials and personal data is not stored in the server database.
Requirement 2
Description & Priority
When the user has successfully created an account and logged in to the system, the user is then
brought to the homepage. On the home page, the user can do several things, and one of the vital
things to is deploying a Sensor / Droplet -Honeypot.
Use Case
UD 1
Scope
The scope of this use case is to explain how the user interacts with the system and how the
droplets/sensors (honeypots) interacts with the MHN server.
Description
This use case describes the deployment of the droplets/sensors or honeypot. It also shows
us how the honeypot communicates with the MHN server.
Use Case Diagram
Deploy Honeypots
15Flow Description
Precondition
The user can do several things once the user logs in to the system. One of the vital things is
creating droplets/ sensors (Honeypot).
Activation
This use case starts when a presses the ‘create new droplet’ on Digital Ocean.
Main flow
1.0 The user clicks on ‘create a new droplet’.
2.0 The system brings the user to the ‘create new droplet page’.
3.0 The user selects the Operating System & version of the operating system
wants to deploy.
4.0 The user then selects the size and location where in the world, wants to
deploy the virtual machine.
5.0 The user type in the password for the virtual machine.
6.0 The user gives a password to the virtual machine to access it later.
7.0 The user clicks the deploy button.
8.0 The system brings the user back to the main page, where the user can access
the droplet/sensors (Honeypot).
9.0 The user accesses the sensor by clicking on the droplet and selecting the
console.
1610.0 The user accesses the droplet, and login credentials typed earlier
whilst creating a droplet.
11.0 The system responds with several commands.
12.0 The user adds sensors to the droplet (Honeypot) to detect attacks
using the Linux script.
13.0 The MHN server starts storing the attack logs.
Alternate flow
A1 :
1.0 The system checks that all the mandatory fields have been filled correctly.
2.0 The system notifies the user of mandatory fields.
3.0 The use case continues at position 3.0.
A2 :
1.0 The system checks the entered password with the saved password.
2.0 The system notifies the user invalid password or username.
3.0 The use case continues at position 10.0.
A3 :
1.0 The system run the Linux commands by the user.
2.0 The system notifies the user that the script copied by the MHN server no
longer support due to the upgrade.
3.0 The use case continues at position 11.0.
Termination
The system presents added droplet on the MHN server dashboard. The sensor starts picking
up attacks once it deployed and shown on the MHN server dashboard under the sensors.
Post condition
Successful:
• The droplet/sensor (Honeypot) deployed successfully.
• The logs are stored in the MHN server.
Failure:
• The droplet/sensor (Honeypot) fails to deploy successfully.
• The logs are not stored in the MHN server.
Requirement 3
Description & Priority
This use case describes how a user destroy the exciting sensor/droplets (Honeypot). This is done for
several reasons: the storage is filled, or the droplet is not attracting any attackers as it is supposed to
do.
17Use Case
UD 2
Scope
The scope of this use case is to explain how the user can destroy an exciting honeypot.
Description
This use case describes how a user destroy their droplets/sensors (Honeypot)
Use Case Diagram
Destroy Honeypot
Flow Description
Precondition
The user can do several things once the user logs in to the system. One of the vital things is
to destroy the honeypot from the main screen.
Activation
This use case starts when a presses the ‘destroy droplet’ on the Digital Ocean.
Main flow
1. The user clicks on ‘destroy droplet’.
2. The system prompts the user to another page for confirmation.
3. The user clicks on the ‘destroy’ button.
4. The system destroys the droplet/sensor (Honeypot.)
Alternate flow
18A1 :
1. The system prompts the user to destroy the droplet page.
2. The user changes their mind and exits the page without clicking destroy
button.
3. The use case continues at position 1.
Termination
The system destroys the droplet/sensor (Honeypot) and brings the user back to the main
page.
Post condition
Successful:
• The droplet/sensor (Honeypot) destroyed successfully.
• The droplet /sensor (Honeypot) is removed from the homepage.
Failure:
• The droplet/sensor (Honeypot) fails to destroy successfully.
• The droplet /sensor (Honeypot) is still running on the homepage.
Requirement 4
Description & Priority
This use case describes how a user monitors the threat activity on created honeypots and gets the
idea of which honeypots are attacks mostly and where the attacks are coming.
Use Case
MA 1
Scope
The scope of this use case is to explain how the user can monitor the threat activity in real-
time.
Description
This use case describes how a user views the threat activity on the MHN server.
19Use Case Diagram
Monitor Activity
Flow Description
Precondition
The user must have successfully deployed droplets/sensors (Honeypots) on the MHN server.
The user is logged into the MHN server, and the homepage user clicks the Map button. Then
the system shows all the attacks in real-time coming from worldwide.
Activation
This use case starts when a presses the ‘Map’ button on the MHN server.
Main flow
1.0 The user clicks on the ‘Map’ button.
2.0 The system prompts the user to the Map page, where the user can
monitor the attacks.
3.0 The user views the attacks coming from different locations and targeting
the droplets.
4.0 The user monitors the attacks and finishes the task.
Alternate flow
A1 : < No Attacks >
1.0 The system displays the Map page.
2.0 The user sees there are no current attacks.
3.0 The use case continues at position 4 of the main flow.
20Termination
The system successfully displays the “Map” page to monitor the attacks.
Post condition
Successful:
• The map page is displayed.
• Attacks are displayed.
• User monitors attacks.
Failure:
• The map page is displayed.
• No attacks are displayed.
• User cannot monitor attacks.
Requirement 5 < View Details >
Description & Priority
This use case describes how a user views the activity log. The user would view the log to make the
attacks readable. Therefore, do research and analysis on the logs.
Use Case
VD 1
Scope
The scope of this use case is to explain how the user views the attack logs.
Description
This use case describes how a user views the logged logs.
21Use Case Diagram
Monitor Activity
Flow Description
Precondition
The user must have successfully deployed droplets/sensors (Honeypots) on the MHN server.
The user has deployed droplets and has already stored the logs. The user has integrated the
Splunk with the MHN server then the user clicks the “View log files” button on the Splunk
application. The system shows all log files with every attack since the deployment of
droplets/sensors (Honeypots).
Activation
This use case starts when a presses the ‘View log files’ button.
Main flow
1.0 The system identifies that the “View log files” button is clicked.
2.0 The system prompts the user to a page where the user can view the
stored log files.
3.0 The user extracts the log files using Splunk.
224.0 The user downloads the files for research & analysis to make the final
report.
Termination
The system successfully extracts and downloads all the stored log.
Post condition
Successful:
• Log files are extracted.
• Logfile are downloaded.
• Research and analysis are conducted for the final report.
Failure:
• Log files are not extracted.
• A log file is not downloaded.
• Research and analysis are not conducted for the final report.
Data Requirements
The Data requirements are essential in this project, as we are storing the logs, which is raw
data. I decided to go for an 80 GB SSD disk for the server as all the logs will be stored in the
server, and for sensor/droplets (Honeypots), it is 25GB per sensor.
User Requirements
As we know, the server and droplets/sensors are hosted online and run virtually on a cloud-
based platform. A fast, reliable internet connection is required to access, monitor and
analysis the data.
Implementation
This section will implement the technologies used for this project and some issues that I had
to debug to run this project successfully.
The first step to implement the MHN server is by creating an account with the cloud
provider and use their facilities to deploy the MHN server. I have mentioned that for the
project, I used Digital Ocean. The cloud provider came with the facilities of security and
recovery. Once I created the account. I was promoted to the main dashboard to create the
project. In the project, I can add the MHN server.
23Figure:3.1
Figure 3.1 shows how to create the project.
Figure 3.2
24Figure 3.2 shows us the project created in the main dashboard. As you can see, I am
using a project name “College Project”, in which I am currently running my MHN
server and few honeypots.
Figure: 3.3
The next step is creating a sensor, creating a virtual machine. In figure 3.3, it shows
us the button of creating. Once we clicked the button, it prompts us to create the
virtual machine. We need to click the first option, which is droplets. Once I clicked
the create droplets. The page takes us to another page shown in figure 3.4 and 3.5.
25Figure 3.4
26Figure 3.5
Figure 3.4 & 3.5 shows the option how to create a sensor. The first option is to get
the list of the operating systems, and if we click on them, we can use them. The next
option is regarding the cloud facilities; either we want to share them or the machine
or the rack of others. Then we have an option of different CPU and SSD option. After
selecting the plan, the next option is for the datacentre region, which means we can
locate our VM on their data centre and by default, we will get the IP of that region.
After that, the last option is for authentication. We can use SSH Keys or password.
27Figure:3.6
Figure 3.6 shows us the technology I am using to run my server. I am running my
MHN server at the datacentre of London, which is on 8GB RAM and 160 GB SSD. The
Operating system I am using is Ubuntu 18.04.
The following screenshots show the implementation of the MHN server on Digital
Ocean.
Figure:3.7
28Figure:3.8
29Figure:3.9
30Figure:3.10
Figure 3.8 – 3.10 shows us the screenshots of updating the system and cloning the
git repository at cd/opt. The cloned git is GitHub - pwnlandia/mhn: Modern Honey
Network.
Figure:3.11
Figure 3.11 shows us the error I received after running a supervisorctl status to check
if the MHN server is functioning as it supposes to be. Unfortunately, the error I got
was complicated as the mhn-celery worker was not working. I could not check the
attacker's location after the first attack, and the rest of the attacks were not getting
stored on var/log.
31Figure:3.12
Figure 3.12 shows that I was able to debug the error, and mhn-celery-worker is
running the commands I ran was sudo chown www-data mhn.log and then restart
the server by sudo supervisor start mhn-celery-worker.
Figure:3.13
Figure: 3.13 shows us the integration of Splunk. Hpfeeds-logger-Splunk is running,
enabling Splunk to collect the data from var/log/mhn when Splunk is integrated.
32Figure:3.14
Figure:3.15
Figure 3.14 & 3.15 shows the honeypots' successful installation, but I ran into an
error when I tried to install cowrie as a honeypot. The cowrie was one of the vital
honeypots I planned to use for my project because it logs the data from brute force.
33Figure:3.16
34Figure:3.17
Figure:3.18
Figure 3.16 - 3.18 shows the debugging of the cowrie, in which I changed the port
and cowrie was added successfully.
35Figure:3.20
Figure 3.20 shows us the MHN main dashboard of the MHN server. I am currently
running the Ip address of my server is 46.101.21.157, which the following screenshot
can confirm.
Figure:3.21
As the first two-step was successfully installed/configured and debugged, the final
and vital part of the project was the installation of Splunk.
As mentioned earlier, the Splunk hpfeed logger was installed in the early stages of
the project by the following commands:
cd /opt/mhn/scripts/
sudo ./install_hpfeeds-logger-splunk.
The next step was to install Splunk on the MHN server to do; I required to sign up
with Splunk. Once I created the Splunk account, I was given two options to run an
enterprise trial or cloud trial. I picked cloud. On the page, the option where given
which operating system I am using. After selecting the operating system, which was
36Linux ubuntu, I was given a wget command, which I pasted in the server to get the
Splunk.
Figure: 3.22
Figure 3.22 shows us the page after the sign-up. The .tgz file was downloaded into
the MHN server and then extracted.
Figure: 3.23
In figure 3.23 the Splunk was successfully installed. The following screenshot will
confirm it.
37Figure: 3.24
Figure 3.21 and Figure: 3.24, the Ip address is the same. So, it shows that the MHN
server I am working on the Splunk, is integrated successfully to the server.
Graphical User Interface (GUI)
I will be going through the GUI of MHN Server, Digital Ocean and Splunk GUI in the GUI
section.
Figure 3.1.1
Figure 3.1.1 shows us the main dashboard of the MHN server, where we can see the stats of
the past 24 hours, top 5 attackers, top 5 attacked ports, top 5 honey pots, top 5 sensors to
attract the attackers.
38Figure 3.1.2
Figure 3.1.2 once the attacker successfully launches the attack, it logs it on var/log/mhn and
then shows us the date, the name of the honeypot, the country from where the attack was
launched, the IP address of the attacker, the attacked port and protocol.
Figure 3.1.3
Figure 3.1.3 shows us the sensor or the honeypots attached to our system with the number
of attacks to the virtual machine.
39Figure 3.1.4
Figure 3.1.4 shows us the payload report of attacks, as I worked with cowrie and dionaea.
The dionaea is known for attracting malware attacks. So the payload report is very beneficial
for analysis to check which type of payloads are commonly used nowadays.
Figure 3.1.5
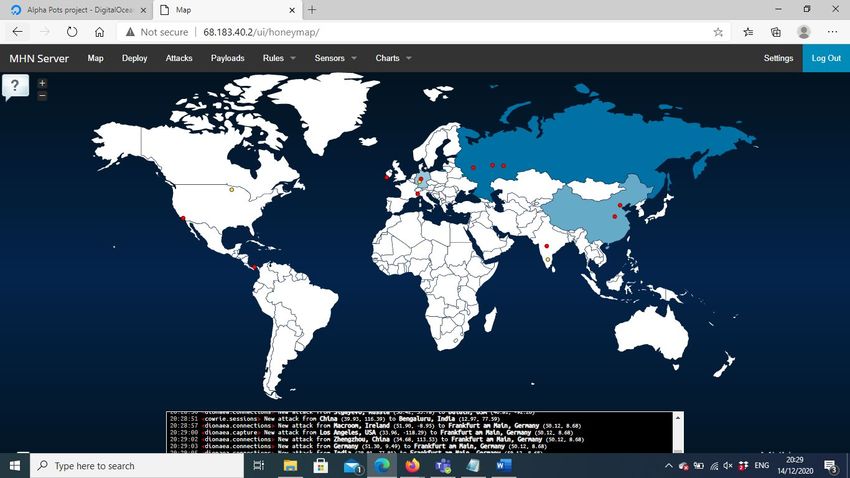
Figure 3.1.5 shows us the map. The map's purpose is to see live attacks from where the
attackers are attacking and on which honeypot. When I took the screenshot, no honeypot
was added to my MHN server. That is why it shows no attack but fetching the old data of
attacks. I was able to show the attacks on Splunk on the following screenshot:
40Figure 3.1.6
Figure 3.1.7
Figure 3.1.7 shows us the main dashboard of the Digital Ocean. Where we can create a
different project to centralised things. As you can see, I am running my server on a College
project.
Figure 3.1.8
In figure 3.1.8, I created a cowrie honeypot under my student id project and added it to the
MHN server.
41Figure 3.1.9
The create option for honeypots.
Figure 3.1.10
The delete option. Once we decided to delete the honeypot, we need to click on the three
dots available on the right-hand side option. After clicking, a dropdown menu will give us
the option to destroy. Once we click the destroy, we will be promoted to the following page:
42Figure 3.1.11
Then we need to click on the “Destroy this droplet”. Once we hit the button, we will be
promoted by the following option:
Figure 3.1.12
To delete, we need to click on confirm. Once it has been clicked, the
droplet/sensor/honeypot is deleted and unable to retrieve our decision.
43Figure 3.1.13
Shows us the activity within the project: the added and deleted sensors.
Figure 3.1.14
The overview of the Splunk page. The highlighted part shows the IP address associated with
the MHN server.
4. MHN Analysis Using Splunk
The project was 75% done, but something was missing. I successfully learned how to deploy
the MHN server, debug it and add honeypots. The outcome of the project I wanted was to
get the geolocation of the attackers and most commonly attacked ports. I must gather the
raw data and turn it into useful information to do the task. I used Splunk, which is a machine
learning tool. I could perform the analysis on the MHN server, but it will be minimal as it
44shows only the past 24 hours. In Splunk, I had the facility upload all the log files I stored in
var/log/mhn to perform the analysis.
While researching, I came across an article, “Splunking The Modern Honey Network: Getting
the Value From Your Honeypots Data (Part 1)” The article is a step by step guide to the
integration of the MHN with Splunk. The advantage I got from this article was a premade
MHN Splunk App that can be downloaded using this link. The MHN Splunk App can be
integrated into Splunk once it successfully downloaded.
Figure 4.1
In figure 4.1 it shows that the MHN Splunk App was added successfully. To install the app,
we need to go to the setting, and once we are on the setting, this page will be shown with
the given option. We can browse and Install the app from the file because I downloaded the
file I clicked on “Install the app from file”.
Figure 4.2
45After clicking the install app from the file, we will be promoted to this page to choose a file
location and upload.
The next step after installing the app is to point to the application form where we will fetch
the data.
Figure 4.3
With the help of figure 4.3, I will illustrate how data can be fetched. On settings, we require
to click on data inputs. I stored the data into var/log/mhn, so I had to point to the
application where the data is located. To do so, I required to click on the Files & Directories.
Figure 4.4
46Figure 4.4 shows the existing files and directories in my Splunk App. We require to click on
New Local File and Directory to add new.
Figure 4.5
Once we are on the page, we can select the directory by clicking on it. For the project,
everything is working as requires.
Figure 4.6
Figure 4.6 shows us the added app into the Splunk dashboard.
47Figure 4.7
The overview of Splunk's dashboard also shows the time I was running my honeypots. As
you can view, I ran few honeypots in March to gather the data and at last while writing the
report. To show everything is functional.
The next step was analysing the Honeypots, as my project evolves around the Cowrie and
Dionaea.
Cowrie:
Cowries are medium-level interaction honeypots. They operate on the SSH. Their primary
purpose is to detect the attackers' attempts to connect to the SSH server through brute-
forcing attacks. In my case, the default password was ‘password’.
I deployed many cowries during the project, and even in penetration class, the deployed
cowries IP address was given to classmates to perform attacks. So, I could gather the data.
Before analysing the whole gather data, I decided to run few attacks from my VM and
through two cloud-based machines.
Figure 4.1.0
To perform the attacks, I deployed a Cowrie in Germany datacentre. The Ip address I got
was 138.68.105.180.
Once I have the Ip address, I logged in through my Kali Linux and other virtual machines to
perform some attacks.
48Figure 4.1.1
Figure 4.1.1 shows that the Ip address I am attacking from is 192.168.226.128. To confirm if
my attacks being logged, I went back to the dashboard of MHN.
Figure 4.1.2
Figure 4.1.2 shows the attacks were logged, the Ip address and the country where the
attacks were deployed.
So, I decided to go one step future, in which I will deploy a VM on the cloud platform and
run and attack from there.
49Figure 4.1.3
Figure 4.1.3 shows us the attacker IP and the country. In this case, it was the VM I deployed
in Canada. After few successful attempts, I decided to deploy another VM in the USA and
run few more attacks.
Figure 4.1.4
Figure 4.1.4 shows us the attack I ran from a virtual machine-based in the USA. I successfully
logged into the cowrie and ran few unfamiliar commands, which was my name and student
Id shown in Figure 4.1.5.
50Figure 4.1.5
The next step will perform analysis on Splunk if it has been logged or not.
Figure 4.1.6
Figure 4.1.6 shows the username and password of the attacker used to get the access. The
username is shown as umar because I created virtual machines under my first name.
It illustrates the recent attack and logs, but now, I wanted to investigate what password has
been used frequently to access the honeypot.
51Figure 4.1.7
Figure 4.1.7 shows the Top password. On top of the list was 123456, which was attempted
646 times, then nproc with the second-highest attempts of 629 so on and so forth.
Figure 4.1.8
52Then I wanted to investigate the combination with includes the username and password. In
this case, the nproc username and nproc password were used 629, the second-highest
username and password used were user, user, and so forth.
At the start of the project, my investigation was limited, but I realised a lot could be done
when I went through the project. As mentioned in my proposal and technical report, I
wanted to get geolocation, so the following chart gives us the attackers countries.
Figure 4.1.9
After receiving the Countries, I wanted to investigate to top cities of the attacker.
Figure 4.1.10
Figure 4.1.10 shows us the top cities of the attackers.
53Figure 4.1.11
Figure 4.1.11 show us how Splunk was able to determine the raw data and converted it into
a helpful graph. We were able to retrieve the top counties and cities of the attackers based
on the above data. For manual computation, it would have taken month or years to come
up with figures with the probability of fifty per cent of wrong information because the
attackers were attacking in real-time.
Dionaea:
Dionaea was the second and the most crucial honeypot. It comes under the low interaction
category of honeypots. It matches vulnerabilities inside the network servers. Dionaea
supports HTTP, SIP, SMB, FTP protocol. Dionaea runs on a restricted mode with no
administrative privileges to keep the impact of attacks at a minimum. If an attacker exploits
any of the port mentioned above, it creates an alert while making a copy. Dionaea gathers
malware attacks, which are nowadays on the peak. When dionaea is attacked, it logs the
payload into URLDownloadToFile, Command Exec, Multi-Stage Payloads, and shells, Once
the payload from the attacker has been received. Dionaea analysis the payload using
‘Libemu’, then the extracted information is sent to and stored in the SQLite database.
54Figure 4.2.1
Figure 4.2.1 shows us the attacks I was receiving on the Dionaea honeypot. The minimum
per day I have received was 204, and the maximum goes to 2772. It shows the trend of
malware attacks.
Figure 4.2.2
Figure 4.2.2 shows us the top ports being hit, SMB was on top of the list with the count of
28459, and then we have HTTP with 8056, so on and so forth.
55Figure 4.2.3
Figure 4.2.3 shows that the port 21 FTP was exploited 14 times.
Figure 4.2.4
Figure 4.2.4 shows us the top Dionaea attackers IP address with the country's name and
total count of how many attacks have been launched on the honeypot.
56Figure 4.2.5
Figure 4.2.5 shows us the top attacker and the IP address of the honeypot he/she was trying
to exploit. Only within two days, April 13 and April 14, 2021, a total number of 24034
attacks were logged from the IP address of 45.125.65.74.
Figure 4.2.6
Figure 4.2.6 shows us the hashes of files. To run a further analysis and check what is inside
the files, I copied the hash to virustotal.
57Figure 4.2.7
Figure 4.2.8
58Figure 4.2.9
Figure 4.2.10
The above figures show I copied the top two and the last hash of the file. After investigating
on VirusTotal, it gives us the conclusion that the files were associate with malware.
59Combined Analysis:
The global map of attackers.
Figure 4.3.1
Top countries and cities of attackers.
Figure 4.3.2
Top ports being attacked.
Figure 4.3.3
60Top attackers and the honeypots that attracted the attackers.
Figure 4.3.4
Figure 4.3.5 shows total Dionaea attacks running on different datacentres. The graph below
shows the New York datacentre was the hit most and the Frankfurt was the second highest.
Figure 4.3.5
61Data visualisation of numbers.
Figure 4.3.6
In the below graph for Cowrie, Canada datacentre was the one hit mostly, Singapore took
the second position than Germany and was the USA.
Figure 4.3.7
62Figure 4.3.8
5. Testing
The testing plays a vital role in this project. I used waterfall methodology while installing
each of the honeypots. This means I tested every single server and droplet (Honeypot) when
installed. If the server and honeypots are not deployed properly, I will not have achieved the
results of this project.
Following screenshots are the demonstration of testing that when the celery worker was
not installed properly, I could not log the attacks after the first attack.
Figure 5.1
63Figure 5.2
Figure 5.1 show us that mhn-celery-worker was Fatal. I received a couple of attacks
worldwide, but the server logged only one of the attacks, shown in Figure 5.3.
Figure 5.3
64Figure 5.4
After researching, I restored the celery-worker via few Linux commands. Figure 5.4 show us
that the mhn-celery-worker is generally functioning because the issue was resolved in figure
5.5. The screenshot shows the other attackers are also getting logged into the server.
Figure 5.5
65As you can see, the issue was resolved in figure 5.5. I also tested for the MHN server and
Splunk if they worked properly. The results could be confusing if the MHN server does not
log the attacks coming from the same IP address, location, and destination port.
The testing for the MHN server by running few attacks were done under the heading of
MHN Analysis using Splunk can be seen from figure 4.1.0 to 4.1.7.
I also ran Nmap commands to see the open ports.
6. Conclusions
This project has enhanced my knowledge in the cybersecurity field, especially how the
attackers launched the attacks on different systems. Where to find the system's
vulnerabilities using different tools and operating system.
Overall, it was a successful project for me. With much learning, including different tools and
operating systems, I successfully achieved my project aim, which was mentioned under the
sub-heading of the introduction. I successfully deployed the honeypots, gathered the data
and analysed the data.
I was also able to check the hashes using total virus if the files include any malware, which
has broadened my skills, especially when dealing with unfamiliar email addresses.
The only limitation of the project it works virtually, which could cause us few issues from the
cloud provider side. In that scenario, we could lose all the gathered information.
7. Further Development or Research
With additional time and resources, this project could lead us to a company where we
provide organisation knowledge about cybersecurity and prevent it. I would require few
members who are expert in Cyber Security and tools.
The other alternative is to work as a freelance Penetration tester by creating a phishing
email or checking which unsecured ports are open. The attackers could deploy the payload.
The most accessible demonstration would be creating a simple malware and deploying it
into the organisation. The password to unlock the malware will be given to the organisation
before deploying the attack, not to affect the organisation's work.
Also, if we research correctly in this project, we might find many new ways the
hackers/attackers are using to exploit the system and learn how to defend the new
techniques the attackers/hackers are using.
8. References
Stock, J., 2020. INTERPOL report shows alarming rate of cyberattacks during COVID-19. [Online]
Available at: https://www.interpol.int/en/News-and-Events/News/2020/INTERPOL-report-shows-
alarming-rate-of-cyberattacks-during-COVID-19
[Accessed April 17 2021].
66Arora, M., 2021. What Are Honeypots? Various Types Of HoneyPots. [Online]
Available at: https://catchupdates.com/honeypots/
[Accessed March 5 2021].
David Millward, 2021. Biden to step up cybersecurity after hackers hit vital oil pipeline. [Online]
Available at: https://www.independent.ie/world-news/north-america/biden-to-step-up-
cybersecurity-after-hackers-hit-vital-oil-pipeline-40406446.html
[Accessed May 14 2021].
Fortinet, 2020. What Are Honeypots (Computing)?. [Online]
Available at: https://www.fortinet.com/resources/cyberglossary/what-is-honeypot
[Accessed September 19 2020].
Gatlan, S., 2021. Ransomware hits TU Dublin and National College of Ireland. [Online]
Available at: https://www.bleepingcomputer.com/news/security/ransomware-hits-tu-dublin-and-
national-college-of-ireland/
[Accessed May 13 2021].
Gráinne Ní Aodha, 2021. HSE confirms ransom has been sought over cyber attack but says it will not
be paid. [Online]
Available at: https://www.thejournal.ie/hse-cyber-attack-5436981-May2021/
[Accessed May 15 2021].
Mukherjee, L., 2020. What Is a Honeypot in Network Security? Definition, Types & Uses. [Online]
Available at: https://sectigostore.com/blog/what-is-a-honeypot-in-network-security-definition-
types-uses/
[Accessed March 17 2021].
National College of Ireland, 2021. IT Systems Outage. [Online]
Available at: https://www.ncirl.ie/News/ArtMID/748/ArticleID/587/IT-Systems-Outage
[Accessed May 13 2021].
Oxf0x.com, 2019. Setting up dionaea & cowrie with mhn. [Online]
Available at: https://neil-fox.github.io/Setting-up-Dionaea-&-Cowrie-with-MHN/
[Accessed October 10 2020].
Pwnlandia, 2014. Repositories. [Online]
Available at: https://github.com/pwnlandia
[Accessed September 14 2020].
pwnlandia, 2017. MHN Troubleshotting Guide. [Online]
Available at: https://github.com/pwnlandia/mhn/wiki/MHN-Troubleshooting-Guide
[Accessed November 10 2020].
Symanovich, S., 2020. What is a honeypot? how it can lure cyberattackers. [Online]
Available at: https://us.norton.com/internetsecurity-iot-what-is-a-honeypot.html
[Accessed September 20 2020].
wikipedia, 2014. Honeypot (computing). [Online]
Available at: https://en.wikipedia.org/wiki/Honeypot_(computing)
[Accessed September 20 2020].
679. Appendices
This section should contain information that is supplementary to the main body of the
report.
Project Plan
National College of Ireland
Project Proposal
Cloud-Based Research Honeypot
08-11-2020
BSc (Hons) in Computing
Cyber Security
Academic Year 2020/2021
Umar Rafique
18142061
x18142061@student.ncirl.ie
Contents
1.0 Objectives 2
2.0 Background 2
3.0 Technical Approach 3
4.0 Special Resources Required 3
5.0 Project Plan 4
68You can also read