Oracle Cloud Using the Salesforce Adapter with Oracle Integration Generation 2
←
→
Page content transcription
If your browser does not render page correctly, please read the page content below
Oracle® Cloud
Using the Salesforce Adapter with Oracle
Integration Generation 2

    E85419-47
    December 2022
Oracle Cloud Using the Salesforce Adapter with Oracle Integration Generation 2,

E85419-47

Copyright © 2017, 2022, Oracle and/or its affiliates.

Primary Author: Oracle Corporation

This software and related documentation are provided under a license agreement containing restrictions on
use and disclosure and are protected by intellectual property laws. Except as expressly permitted in your
license agreement or allowed by law, you may not use, copy, reproduce, translate, broadcast, modify, license,
transmit, distribute, exhibit, perform, publish, or display any part, in any form, or by any means. Reverse
engineering, disassembly, or decompilation of this software, unless required by law for interoperability, is
prohibited.

The information contained herein is subject to change without notice and is not warranted to be error-free. If
you find any errors, please report them to us in writing.

If this is software, software documentation, data (as defined in the Federal Acquisition Regulation), or related
documentation that is delivered to the U.S. Government or anyone licensing it on behalf of the U.S.
Government, then the following notice is applicable:

U.S. GOVERNMENT END USERS: Oracle programs (including any operating system, integrated software,
any programs embedded, installed, or activated on delivered hardware, and modifications of such programs)
and Oracle computer documentation or other Oracle data delivered to or accessed by U.S. Government end
users are "commercial computer software," "commercial computer software documentation," or "limited rights
data" pursuant to the applicable Federal Acquisition Regulation and agency-specific supplemental
regulations. As such, the use, reproduction, duplication, release, display, disclosure, modification, preparation
of derivative works, and/or adaptation of i) Oracle programs (including any operating system, integrated
software, any programs embedded, installed, or activated on delivered hardware, and modifications of such
programs), ii) Oracle computer documentation and/or iii) other Oracle data, is subject to the rights and
limitations specified in the license contained in the applicable contract. The terms governing the U.S.
Government's use of Oracle cloud services are defined by the applicable contract for such services. No other
rights are granted to the U.S. Government.

This software or hardware is developed for general use in a variety of information management applications.
It is not developed or intended for use in any inherently dangerous applications, including applications that
may create a risk of personal injury. If you use this software or hardware in dangerous applications, then you
shall be responsible to take all appropriate fail-safe, backup, redundancy, and other measures to ensure its
safe use. Oracle Corporation and its affiliates disclaim any liability for any damages caused by use of this
software or hardware in dangerous applications.

Oracle®, Java, and MySQL are registered trademarks of Oracle and/or its affiliates. Other names may be
trademarks of their respective owners.

Intel and Intel Inside are trademarks or registered trademarks of Intel Corporation. All SPARC trademarks are
used under license and are trademarks or registered trademarks of SPARC International, Inc. AMD, Epyc,
and the AMD logo are trademarks or registered trademarks of Advanced Micro Devices. UNIX is a registered
trademark of The Open Group.

This software or hardware and documentation may provide access to or information about content, products,
and services from third parties. Oracle Corporation and its affiliates are not responsible for and expressly
disclaim all warranties of any kind with respect to third-party content, products, and services unless otherwise
set forth in an applicable agreement between you and Oracle. Oracle Corporation and its affiliates will not be
responsible for any loss, costs, or damages incurred due to your access to or use of third-party content,
products, or services, except as set forth in an applicable agreement between you and Oracle.
Contents
    Preface
    Audience                                                                                    vi
    Documentation Accessibility                                                                 vi
    Diversity and Inclusion                                                                     vi
    Related Resources                                                                           vii
    Conventions                                                                                 vii

1   Understand the Salesforce Adapter
    Salesforce Adapter Capabilities                                                            1-1
    Salesforce Adapter Restrictions                                                            1-2
    What Application Version Is Supported?                                                     1-3
    Salesforce Adapter Use Cases                                                               1-3
    Workflow to Create and Add a Salesforce Adapter Connection to an Integration               1-3

2   Create a Salesforce Adapter Connection
    Prerequisites for Creating a Connection                                                    2-1
        Prerequisites for Oracle Integration Release 20.2.2.0.0 (200524.0200.35760) or Later   2-1
            Identify the Instance Type of Your Salesforce Organization                         2-2
            Obtain the Custom Domain Name                                                      2-2
            Find Your Current Salesforce API Version                                           2-2
        Prerequisite for Oracle Integration Releases Earlier Than 20.2.2.0.0                   2-3
            Generate the Salesforce Enterprise WSDL                                            2-3
        Prerequisites to Use the Salesforce Username Password Security Policy                  2-4
        Prerequisites to Use the Salesforce OAuth Three-Legged (Authorization Code
        Credentials) or Resource Owner Password Credentials Security Policy                    2-5
        Prerequisites to Use Platform Events                                                   2-6
            Define Your Platform Event                                                         2-6
            Publish Platform Events                                                            2-7
        Prerequisite to Use Change Data Capture (CDC) Events                                   2-7
            Select an Entity (Business Object)                                                 2-7
        Prerequisite to Use Outbound Messaging                                                 2-8

                                                                                                iii
Use Outbound Messaging with a Flow                                                 2-8
           Use Outbound Messaging with a Workflow                                            2-12
       Prerequisite to Use Apex Web Services                                                 2-14
           Generate the Salesforce Adapter Custom WSDL                                       2-14
    Create a Connection                                                                      2-14
       Configure Connection Properties                                                       2-15
       Configure Connection Security                                                         2-17
       Test the Connection                                                                   2-19
    Upload an SSL Certificate                                                                2-19
    Refresh Integration Metadata                                                             2-21

3   Add the Salesforce Adapter Connection to an Integration
    Basic Info Page                                                                           3-1
    Trigger Action Page                                                                       3-2
    Trigger Outbound Messaging Page                                                           3-2
    Trigger Streaming API Page                                                                3-3
    Trigger Response Page                                                                     3-5
    Trigger Callback Response Page                                                            3-5
    Invoke Action Page                                                                        3-6
    Invoke Operations Page                                                                    3-7
    Invoke Headers Page                                                                      3-12
    Invoke Apex Operations Page                                                              3-15
       Query and Template Parameters Page                                                    3-17
       Invoke Sample Request Payload Page                                                    3-18
       Invoke Sample Response Payload Page                                                   3-19
    Summary Page                                                                             3-20
    Perform Salesforce Adapter Postconfiguration Tasks                                       3-20

4   Implement Common Patterns Using the Salesforce Adapter
    Process Large Data Sets Asynchronously with Different Bulk Operations                     4-1
    Use Bulk Response Operations in an Integration                                            4-5
    Retrieve the Name and IDs from Account Records with the queryMore Operation              4-17
    Send Multiple Records in a Single Message                                                4-21
    Allow and Prevent Duplicate Headers with the Duplicate Rule Header Property              4-23
       Allow Duplicate Records with the Duplicate Rule Header Property                       4-24
       Prevent Duplicate Records with the Duplicate Rule Header Property                     4-26
    Synchronize Salesforce Platform Event Notifications (or Messages) With ServiceNow
    Incidents                                                                                4-27

                                                                                        iv
5   Troubleshoot the Salesforce Adapter
    Error When a Connected Application Attempts to Access Your Salesforce Data                 5-1
    Errors When the Salesforce Endpoint is Configured as a Trigger                             5-1
    Invoke Oracle Integration When a Payload is Not Expected                                   5-2
    Id Field Identified with an Asterisk in the Request Mapper of an Upsert Operation is Not
    Mandatory                                                                                  5-2
    Custom and Inbound WSDLs Unavailable after Migration                                       5-2
    Troubleshoot the Platform Event Service in the Salesforce Adapter                          5-3

                                                                                                v
Preface

Preface
           This guide describes how to configure this adapter as a connection in an integration in
           Oracle Integration.

                  Note:
                  The use of this adapter may differ depending on the features you have, or
                  whether your instance was provisioned using Standard or Enterprise edition.
                  These differences are noted throughout this guide.

           Topics:
           •   Audience
           •   Documentation Accessibility
           •   Diversity and Inclusion
           •   Related Resources
           •   Conventions

Audience
           This guide is intended for developers who want to use this adapter in integrations in
           Oracle Integration.

Documentation Accessibility
           For information about Oracle's commitment to accessibility, visit the Oracle
           Accessibility Program website at http://www.oracle.com/pls/topic/lookup?
           ctx=acc&id=docacc.

           Access to Oracle Support
           Oracle customers that have purchased support have access to electronic support
           through My Oracle Support. For information, visit http://www.oracle.com/pls/topic/
           lookup?ctx=acc&id=info or visit http://www.oracle.com/pls/topic/lookup?
           ctx=acc&id=trs if you are hearing impaired.

Diversity and Inclusion
           Oracle is fully committed to diversity and inclusion. Oracle respects and values having
           a diverse workforce that increases thought leadership and innovation. As part of our

                                                                                                   vi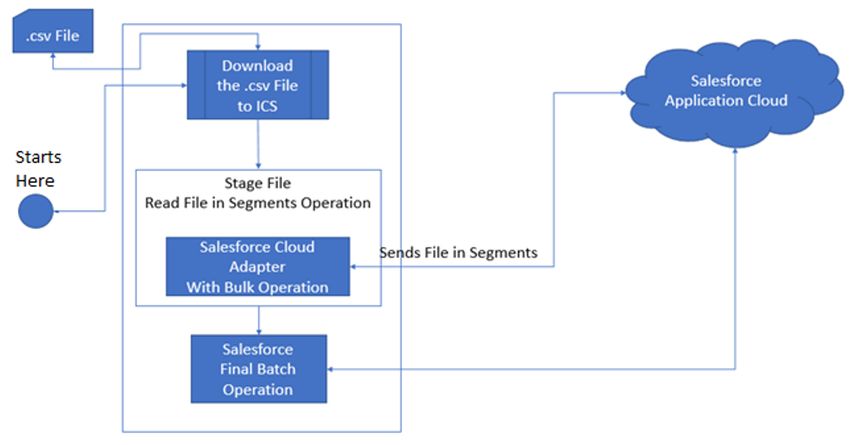
Preface

         initiative to build a more inclusive culture that positively impacts our employees, customers,
         and partners, we are working to remove insensitive terms from our products and
         documentation. We are also mindful of the necessity to maintain compatibility with our
         customers' existing technologies and the need to ensure continuity of service as Oracle's
         offerings and industry standards evolve. Because of these technical constraints, our effort to
         remove insensitive terms is ongoing and will take time and external cooperation.

Related Resources
         See these Oracle resources:
         •    Oracle Cloud
              http://cloud.oracle.com
         •    Using Integrations in Oracle Integration Generation 2
         •    Using the Oracle Mapper with Oracle Integration Generation 2

Conventions
         The following text conventions are used in this document:

         Convention              Meaning
         boldface                Boldface type indicates graphical user interface elements associated with an
                                 action, or terms defined in text or the glossary.
         italic                  Italic type indicates book titles, emphasis, or placeholder variables for which
                                 you supply particular values.
         monospace               Monospace type indicates commands within a paragraph, URLs, code in
                                 examples, text that appears on the screen, or text that you enter.

                                                                                                               vii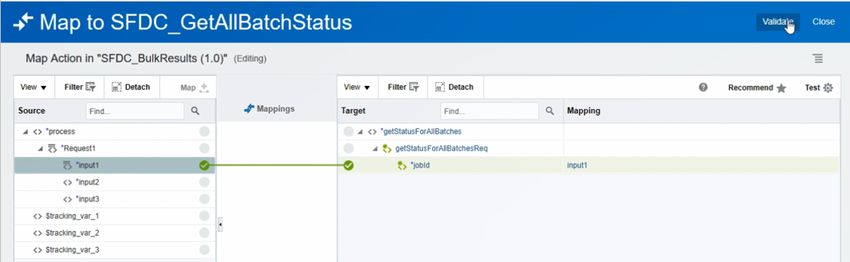
1
Understand the Salesforce Adapter
          Review the following conceptual topics to learn about the Salesforce Adapter and how to use
          it as a connection in integrations in Oracle Integration. A typical workflow of adapter and
          integration tasks is also provided.

          Topics:
          •   Salesforce Adapter Capabilities
          •   Salesforce Adapter Restrictions
          •   What Application Version Is Supported?
          •   Salesforce Adapter Use Cases
          •   Workflow to Create and Add a Salesforce Adapter Connection to an Integration

                  Note:
                  There are overall service limits with Oracle Integration. A service limit is the quota
                  or allowance set on a resource. See Service Limits.

Salesforce Adapter Capabilities
          The Salesforce Adapter enables you to create an integration with Salesforce CRM
          applications.
          The Salesforce Adapter provides the following benefits:
          •   Enables simplified bidirectional integration with Salesforce.com.
          •   Discovers business objects and operations and provides easy mapping to and from
              Salesforce.com business objects.
          •   Provides ease of use in the mapper by recommending the most frequently-used business
              objects and renders human readable names for the elements found in Salesforce
              business objects for easy mapping.
          •   Provides support for performing the following type of operations against business objects
              fetched from the Salesforce application:
              –     Bulk Create, Update, Upsert, Delete, and so on operations on all of the business
                    objects supported by Salesforce
              –     Core (Convertlead, GetDeleted, GetUpdated, Process, Merge, Undelete, and Upsert)
              –     CRUD (create, delete, retrieve, and update) operations
              –     Declaratively defining and executing SOQL and SOSL queries
              –     Salesforce Object Search Language (SOSL) search operation
              –     Utility (GetUserInfo, GetServerTimestamp, and SendEmail) operations

                                                                                                           1-1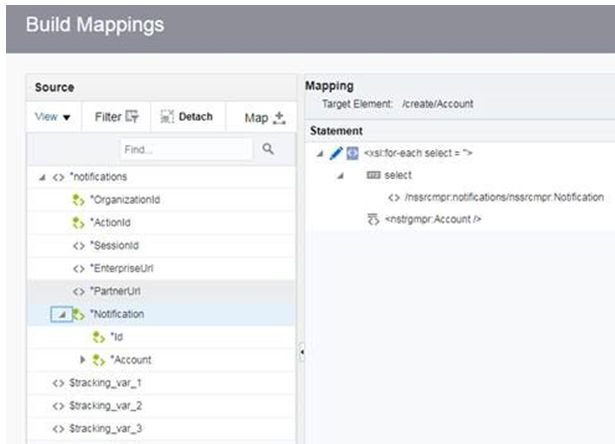
Chapter 1
                                                                           Salesforce Adapter Restrictions

              See Process Large Data Sets Asynchronously with Different Bulk Operations and
              Use Bulk Response Operations in an Integration.
          •   Supports all custom objects defined by the user and custom fields created at
              Salesforce.com along with the standard objects and fields.
          •   Supports consuming custom Apex classes developed and exposed as SOAP
              services in force.com.
          •   Supports receiving notifications (events) sent with outbound messaging and the
              Streaming API (that is, platform events and change data capture events) from
              Salesforce.com.
          •   Supports trigger (source) callbacks.
          •   Supports Salesforce APIs protected using OAuth two-legged and three-legged
              token-based authentication and user name token-based authentication.

              Video

              Video

              Video

Salesforce Adapter Restrictions
          You must be aware of the following constraints before configuring the Salesforce
          Adapter.
          •   The Salesforce Adapter uses the SalesForceDotCom (SFDC) API for all activities.
              Therefore, it is subject to any Salesforce API limitations.
          •   The Salesforce Adapter supports only Bulk API version 1.0.
          •   Client applications must adhere to Salesforce’s SOAP API support policy and
              backward compatibility terms.
          •   Not all the push topic queries are supported by Salesforce.
          •   The platform events feature has the following restriction:
              –   The maximum number of delivered event notifications within a 24-hour period,
                  shared by all CometD clients:
                  *   50,000 for Performance and Unlimited Editions
                  *   25,000 for Enterprise Edition
                  *   10,000 for Developer Edition
                  See Platform Event Allocations.
          •   SOQL queries do not support the FIELDS() function to fetch data from
              Salesforce.com. Instead, explicitly specify all the fields needed in the SOQL query
              to get the data from accounts.
          •   You cannot use the Salesforce Adapter to publish events to Salesforce. However,
              you can use the REST Adapter to satisfy this requirement.
          •   The Salesforce Adapter does not support the PushTopic and Generic Events.

                                                                                                     1-2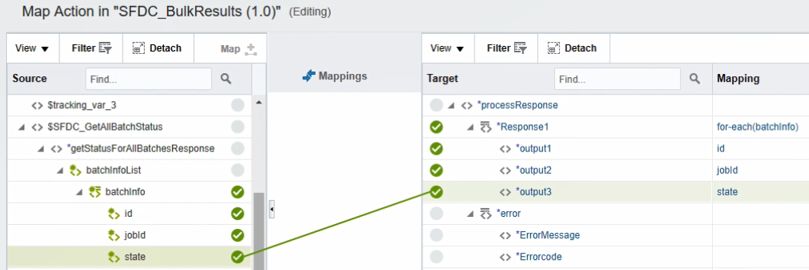
Chapter 1
                                                                             What Application Version Is Supported?

What Application Version Is Supported?
         For information about which application version is supported by this adapter, see the
         Connectivity Certification Matrix.
         See Connectivity Certification Matrix.

Salesforce Adapter Use Cases
         The Salesforce Adapter can integrate with Salesforce.com. Use the Salesforce Adapter to
         send data to Salesforce.com and also receive events from Salesforce.com.
         The following are some common use cases:
         •    Account and contact synchronization between Salesforce and ERP (such as Oracle E-
              Business Suite and Netsuite).
         •    Opportunity to order synchronization between Salesforce and ERP systems.
         •    Employee on-boarding from HCM systems to Salesforce.com.

Workflow to Create and Add a Salesforce Adapter Connection to
an Integration
         You follow a very simple workflow to create a connection with an adapter and include the
         connection in an integration in Oracle Integration.
         This table lists the workflow steps for both adapter tasks and overall integration tasks, and
         provides links to instructions for each step.

          Step     Description                          More Information
          1        Create the adapter connections for Create a Salesforce Adapter Connection
                   the applications you want to
                   integrate. The connections can be
                   reused in multiple integrations and
                   are typically created by the
                   administrator.
          2        Create the integration. When you Create Integrations and Add the Salesforce Adapter
                   do this, you add trigger and invoke Connection to an Integration
                   connections to the integration.
          3        Map data between the trigger         Map Data of Using Integrations in Oracle Integration
                   connection data structure and the    Generation 2
                   invoke connection data structure.
          4        (Optional) Create lookups that       Manage Lookups of Using Integrations in Oracle
                   map the different values used by     Integration Generation 2
                   those applications to identify the
                   same type of object (such as
                   gender codes or country codes).
          5        Activate the integration.            Manage Integrations of Using Integrations in Oracle
                                                        Integration Generation 2
          6        Monitor the integration on the       Monitor Integrations of Using Integrations in Oracle
                   dashboard.                           Integration Generation 2

                                                                                                               1-3
Chapter 1
Workflow to Create and Add a Salesforce Adapter Connection to an Integration
Step Description More Information
7 Track payload fields in messages Assign Business Identifiers for Tracking Fields in
during runtime. Messages and Manage Business Identifiers for Tracking
Fields in Messages of Using Integrations in Oracle
Integration Generation 2
8 Manage errors at the integration Manage Errors of Using Integrations in Oracle
level, connection level, or specific Integration Generation 2
integration instance level.
1-42
Create a Salesforce Adapter Connection
A connection is based on an adapter. You define connections to the specific cloud
applications that you want to integrate.
Topics:
• Prerequisites for Creating a Connection
• Create a Connection
• Upload an SSL Certificate
• Refresh Integration Metadata
Prerequisites for Creating a Connection
You must satisfy the following prerequisites to create a connection with the Salesforce
Adapter.
• Prerequisites for Oracle Integration Release 20.2.2.0.0 (200524.0200.35760) or Later
• Prerequisite for Oracle Integration Releases Earlier Than 20.2.2.0.0
• Prerequisites to Use the Salesforce Username Password Security Policy
• Prerequisites to Use the Salesforce OAuth Three-Legged (Authorization Code
Credentials) or Resource Owner Password Credentials Security Policy
• Prerequisites to Use Platform Events
• Prerequisite to Use Change Data Capture (CDC) Events
• Prerequisite to Use Outbound Messaging
• Prerequisite to Use Apex Web Services
Prerequisites for Oracle Integration Release 20.2.2.0.0
(200524.0200.35760) or Later
When you create or edit your Salesforce Adapter connection on release 20.2.2.0.0
(200524.0200.35760) or later of Oracle Integration, you must specify the following details on
the Connections page. Therefore, you must obtain the following details before creating or
editing a connection.
Topics:
• Instance type. See Identify the Instance Type of Your Salesforce Organization.
• Custom domain name (optional). If you are using Salesforce Government Cloud or a
custom domain to log in to your Salesforce account, a custom domain name is required
for creating a connection on the Connections page. See Obtain the Custom Domain
Name.
2-1Chapter 2
Prerequisites for Creating a Connection
• API version. See Find Your Current Salesforce API Version.
Identify the Instance Type of Your Salesforce Organization
Follow these methods to identify your instance type:
• If you use the URL https://login.salesforce.com to log in to your Salesforce
account, your instance type is Production.
• If you use the URL https://test.salesforce.com to log in to your Salesforce account,
your instance type is Sandbox.
Obtain the Custom Domain Name
When you create your Salesforce Adapter connection on the Connections page, you
must specify your custom domain name.
Note:
The steps provided here apply to the Salesforce Classic UI. If you are using
the Lightning Experience UI on your Salesforce instance, switch to the
Salesforce Classic UI. See Toggle or switch between Lightning Experience
and Salesforce Classic.
To obtain the custom domain name:
1. Log in to the Salesforce sandbox or production instance.
2. Click Setup in the header or click your username, then select Setup. See Explore
the Salesforce Setup Menu.
3. Search for My Domain in the Quick Find box, then select My Domain.
4. Under My Domain Settings, your custom domain name appears in the Your
domain name is field.
See Configure Connection Properties.
Find Your Current Salesforce API Version
You can find your current Salesforce API version in the enterprise WSDL.
Note:
The steps provided here apply to the Salesforce Classic UI. If you're using
the Lightning Experience UI on your Salesforce instance, switch to the
Salesforce Classic UI. See Toggle or switch between Lightning Experience
and Salesforce Classic.
To find your current Salesforce API version.
1. Log in to the Salesforce sandbox or production instance.
2-2Chapter 2
Prerequisites for Creating a Connection
2. Click Setup in the header or click your username, then select Setup. See Explore the
Salesforce Setup Menu.
3. Search for API in the Quick Find box, then select API under Develop.
4. Click Generate Enterprise WSDL.
5. On the Generate Enterprise WSDL page, click Generate.
The WSDL opens in a new browser tab and your current API version appears in the
Commented-out section. For example:
Salesforce.com Enterprise Web Services API Version 35.0
Prerequisite for Oracle Integration Releases Earlier Than 20.2.2.0.0
Perform the following prerequisite for Oracle Integration releases earlier Than 20.2.2.0.0.
Generate the Salesforce Enterprise WSDL
If you edit an existing connection created prior to release 20.2.2.0.0 (200524.0200.35760) of
Oracle Integration, you must upload an enterprise WSDL to use in an integration.
You must generate the Salesforce enterprise WSDL, then upload this WSDL on the
Connections page when creating a Salesforce Adapter connection.
Note:
The steps provided here apply to the Salesforce Classic UI. If you're using the
Lightning Experience UI on your Salesforce instance, switch to the Salesforce
Classic UI. See Toggle or switch between Lightning Experience and Salesforce
Classic.
To generate the Salesforce Adapter enterprise WSDL:
1. Log in to your Enterprise, Unlimited, or Developer Edition Salesforce.com account.
2. Click Setup in the header or click your username, then select Setup. See Explore the
Salesforce Setup Menu.
3. Search for API in the Quick Find box, then select API under Develop.
4. If the organization has managed packages installed in the organization, click Generate
Enterprise WSDL. Salesforce prompts you to select the version of each installed
package to include in the generated WSDL or right-click Generate Enterprise WSDL
and save it to a local directory.
In the right-click menu, Microsoft Edge/Google Chrome users can select Save link as,
while Mozilla Firefox users can select Save Link As to save it to the local directory.
The Save dialog is displayed.
5. Provide a name for the WSDL file and a location to save the file on your file system, and
click Save. For information about uploading this WSDL when creating a connection, see
Configure Connection Properties.
2-3Chapter 2
Prerequisites for Creating a Connection
Prerequisites to Use the Salesforce Username Password Security
Policy
To use the Salesforce Username Password security policy, you must create a user
account in Salesforce.com.
1. Create an API-enabled profile. You assign this profile to the user account you
subsequently create for Oracle Integration. See Create a Secure Salesforce API
User.
2. Create a user account in Salesforce for Oracle Integration. See Add a Single User.
Once the user account is created, a verification email is sent to the email address
you provided for the account.
3. Log in to the corresponding email account and click Verify Account in the email
message from Salesforce.
You are redirected to the Salesforce instance to set a password for the new user
account.
Note:
You use the credentials of this user account when configuring the
Salesforce connection in Oracle Integration.
4. Set a password and copy this value.
You're subsequently signed in to the Salesforce instance with the new account.
You'll need to enter these values on the Connections page when you configure the
Salesforce Username Password security policy for your Salesforce Adapter
connection in Oracle Integration. See Configure Connection Security.
5. Generate a security token.
Generate a security token for the new user account. You'll need this security token
along with the password to access Salesforce using Oracle Integration.
Stay signed in as the new user, and click the user name at the top of the page to
open a menu.
Note:
The steps provided here apply to the Salesforce Classic UI. If you're
using the Lightning Experience UI on your Salesforce instance, switch to
the Salesforce Classic UI. See Toggle or switch between Lightning
Experience and Salesforce Classic.
a. Click My Settings in the menu or click the username, then select My
Settings.
b. On the My Settings page, in the Quick Links section, click Edit my personal
information.
2-4Chapter 2
Prerequisites for Creating a Connection
c. On the resulting page, click Reset My Security Token in the left navigation pane.
d. Click Reset Security Token.
A new security token is sent to the email address associated with the account.
e. Copy the security token.
Prerequisites to Use the Salesforce OAuth Three-Legged (Authorization
Code Credentials) or Resource Owner Password Credentials Security
Policy
To use the Salesforce OAuth Three-Legged or Resource Owner Password Credentials
security policy, you must create a connected application in Salesforce.com.
Note:
The steps provided here apply to the Salesforce Classic UI. If you are using the
Lightning Experience UI on your Salesforce instance, switch to the Salesforce
Classic UI. See Toggle or switch between Lightning Experience and Salesforce
Classic.
1. Log in to your Enterprise, Unlimited, or Developer Edition Salesforce.com account.
2. Click Setup in the header or click your username, then select Setup. See Explore the
Salesforce Setup Menu.
3. Search for Apps in the Quick Find box, then select Apps under Create.
4. In the Connected Apps section, click New. The New Connected App page appears.
5. In the Basic Information section, enter your basic information details, and select the
Enable OAuth Settings checkbox in the API section.
6. In the Callback URL field, enter the fully qualified domain name of your server using the
HTTPS protocol, and add the following text to the URL: agent/oauth/callback.
For example:
https://www.your_server.com/agent/oauth/callback
7. From the Available OAuth Scopes list, add the following scopes toSelected OAuth
Scopes:
• Access and manage your data (api)
• Access your basic information (id)
• Perform requests on your behalf at any time (refresh_token)
2-5Chapter 2
Prerequisites for Creating a Connection
Note:
These are the minimum scopes required to configure the Salesforce
OAuth Three-Legged security policy for your Salesforce Adapter
connection. For the Resource Owner Password Credentials security
policy, api and id are the minimum scopes required.
8. Click Save, and then click Continue. Once the application is saved, Salesforce
populates the API section with the following IDs:
• Consumer key (Client ID)
• Consumer secret (Client secret)
Note:
• Use the client ID and client secret later when configuring security for
your Salesforce Adapter connection. See Configure Connection
Security.
• Every connected application permits five distinctive approvals per
user. Once a sixth approval is created, the oldest approval is
revoked. See Error When a Connected Application Attempts to
Access Your Salesforce Data.
Prerequisites to Use Platform Events
Perform the following prerequisites to use platform events.
Topics:
• Define Your Platform Event
• Publish Platform Events
Define Your Platform Event
To receive notifications using platform events, you must define the platform event. The
list of platform events you defined in Salesforce.com is displayed for use on the
Streaming API page of the Adapter Endpoint Configuration Wizard when configuring
the Salesforce Adapter as a trigger connection.
Note:
The steps provided here apply to the Salesforce Classic UI. If you are using
the Lightning Experience UI on your Salesforce instance, switch to the
Salesforce Classic UI. See Toggle or switch between Lightning Experience
and Salesforce Classic.
1. Log in to your Enterprise, Unlimited, or Developer Edition Salesforce.com account.
2-6Chapter 2
Prerequisites for Creating a Connection
2. Click Setup in the header or click your username, then select Setup. See Explore the
Salesforce Setup Menu.
3. Search for Platform Events in the Quick Find box, then select Platform Events.
4. Click New Platform Event.
5. Enter the required details, and click Save.
6. To add a field, click New in the Custom Fields & Relationships section.
7. Select the field type, and click Next.
8. Enter the required details, and click Save. A new custom field is added.
Additional information about platform events is provided. See Define and Manage
Platform Events.
Publish Platform Events
After a platform event is defined, you must publish event messages from a Salesforce
application.
Note:
See Publishing Platform Events.
Prerequisite to Use Change Data Capture (CDC) Events
Perform the following prerequisite to use change data capture (CDC) events.
Select an Entity (Business Object)
To receive notifications using change data capture (CDC) events, you must select the entity/
entities. Once selected, these objects are displayed for use on the Operations page of the
Adapter Endpoint Configuration Wizard when configuring the Salesforce Adapter as a trigger
connection.
Note:
The steps provided here apply to the Salesforce Classic UI. If you are using the
Lightning Experience UI on your Salesforce instance, switch to the Salesforce
Classic UI. See Toggle or switch between Lightning Experience and Salesforce
Classic.
1. Log in to your Enterprise, Unlimited, or Developer Edition Salesforce.com account.
2. Click Setup in the header or click your username, then select Setup. See Explore the
Salesforce Setup Menu.
3. Search for Change Data Capture in the Quick Find box, then select Change Data
Capture.
4. Select the required entities (business objects) for which you want to receive change
event notifications.
2-7Chapter 2
Prerequisites for Creating a Connection
5. Click Save.
Prerequisite to Use Outbound Messaging
To use outbound messaging, perform the following prerequisites.
Note:
New workflow rules are blocked in the Salesforce application as of the Winter
2023 release. New workflow rules cannot be created in Salesforce. However,
you can activate, deactivate, and edit existing workflow rules.
• Use Outbound Messaging with a Flow
• Use Outbound Messaging with a Workflow
Use Outbound Messaging with a Flow
To use outbound messaging with a flow, follow these instructions.
• Create the Salesforce Outbound Message
• Develop a Flow in Salesforce
Note:
• You must first create an outbound message and then develop a flow.
• These steps apply to the Salesforce Classic UI. If you are using the
Lightning Experience UI on your Salesforce instance, switch to the
Salesforce Classic UI. See Toggle or switch between Lightning
Experience and Salesforce Classic.
Create the Salesforce Outbound Message
1. Log in to your Salesforce account.
2. Click Setup in the header or click your user name, then select Setup. See Explore
the Salesforce Setup Menu.
3. Search for Outbound Messages in the Quick Find box.
4. Click Outbound Messages under Workflow & Approvals in the Build section.
5. Select an object.
6. Enter the required details.
7. Click Save.
Develop a Flow in Salesforce
1. Log in to your Salesforce account.
2-8Chapter 2
Prerequisites for Creating a Connection
2. Click Setup in the header or click your user name, then select Setup. See Explore the
Salesforce Setup Menu.
3. Search for Flows in the Quick Find box.
4. Select Flows under Workflow & Approvals in the Build section.
5. Click New Flow.
6. Select Record-Triggered Flow.
7. Click Create. The Configure Start page appears.
8. Select an object.
9. Set the trigger criteria.
10. Select the condition requirement in the Condition Requirements field. You click add
condition to add an element.
2-9Chapter 2
Prerequisites for Creating a Connection
11. Select Actions and Related Records.
12. Click Done.
13. Click the + icon.
14. Select Action from Add Element.
2-10Chapter 2
Prerequisites for Creating a Connection
15. Click Outbound message.
16. Select the outbound message that you created.
2-11Chapter 2
Prerequisites for Creating a Connection
17. Enter a label name of the outbound message.
18. Click Done and click Save.
19. Enter a flow name and click Save.
20. Click Save and click Activate.
Use Outbound Messaging with a Workflow
Perform the following prerequisite to use outbound messaging.
Generate the Salesforce Adapter Outbound Messaging WSDL
You can generate an outbound messaging WSDL for the Salesforce Adapter to
receive outbound message notifications from the Salesforce application. You then
select this WSDL when configuring the Salesforce Adapter as a trigger on the
Outbound Messaging page of the Adapter Endpoint Configuration Wizard.
This process consists of several steps. You must first create a workflow rule and
generate an outbound messaging WSDL. The outbound message consists of a
workflow, approval, or milestone action that sends your specified information to your
specified endpoint. You configure outbound messaging in the Salesforce setup menu.
Afterward, you configure the endpoint.
Note:
The steps provided here apply to the Salesforce Classic UI. If you are using
the Lightning Experience UI on your Salesforce instance, switch to the
Salesforce Classic UI. See Toggle or switch between Lightning Experience
and Salesforce Classic.
To create a workflow rule:
1. Log in to your Salesforce account.
2. Click Setup in the header or click your username, then select Setup. See Explore
the Salesforce Setup Menu.
2-12Chapter 2
Prerequisites for Creating a Connection
3. Search Workflow in the Quick Find box.
4. Click Workflow Rules under Workflow & Approvals in the Build section.
5. Click New Rule.
6. Select an object and click Next.
7. Enter a rule name, select an evaluation and rule criteria, and click Save & Next.
8. Click Add Workflow Action and select New Outbound Message or Select Existing
Action (if you already have the outbound message).
9. Provide the required information in the wizards and click Save.
a. Enter a name, description for this outbound message, and endpoint URL, and select
the fields you want included in the outbound message.
Note:
You can enter a dummy URL in the Endpoint URL field. For example:
https://test.com
b. Click Add.
Outbound messaging WSDLs associated with approval processes or entitlement processes
are also supported and consumed by the Salesforce Adapter.
1. Generate the Salesforce outbound messaging WSDL at www.salesforce.com. You then
select this WSDL to receive outbound message notifications from the Salesforce
application on the Outbound Messaging page in the Adapter Endpoint Configuration
Wizard. See Trigger Outbound Messaging Page.
Note:
The steps provided here apply to the Salesforce Classic UI. If you are using the
Lightning Experience UI on your Salesforce instance, switch to the Salesforce
Classic UI. See Toggle or switch between Lightning Experience and Salesforce
Classic.
To generate the Salesforce outbound messaging WSDL:
1. Log in to your Salesforce account.
2. Click Setup in the header or click your username, then select Setup. See Explore the
Salesforce Setup Menu.
3. Search Outbound Messages in the Quick Find box.
4. Click Outbound Messages under Workflow & Approvals in the Build section.
5. Select the required outbound message.
6. Click Click for WSDL to download the outbound messaging WSDL.
7. Drag the Salesforce Adapter to the trigger (inbound) section of the integration canvas.
This invokes the Adapter Endpoint Configuration Wizard.
2-13Chapter 2
Create a Connection
8. Browse for the generated WSDL on the Outbound Messaging page.
9. Activate the integration and copy the endpoint URL from the integration
information icon.
10. Select the required outbound message.
11. Click Edit.
12. Replace the dummy URL with the activated integration endpoint URL in the
Endpoint URL field. You entered the dummy URL when configuring your
outbound message.
Prerequisite to Use Apex Web Services
Perform the following prerequisite to use Apex web services.
Generate the Salesforce Adapter Custom WSDL
You can generate a custom WSDL that includes custom Apex classes written on
force.com and exposed as SOAP web services. This enables external applications to
access your code and application.
You select the custom WSDL for the Invoke Apex Web Services option when
configuring the Salesforce Adapter in the invoke direction. See Invoke Apex
Operations Page.
For more information about custom WSDLs, see Exposing Apex Methods as SOAP
Web Services.
Create a Connection
Before you can build an integration, you have to create the connections to the
applications with which you want to share data.
To create a connection in Oracle Integration:
1. In the left navigation pane, click Home > Integrations > Connections.
2. Click Create.
Note:
You can also create a connection in the integration canvas of:
• An orchestrated integration (See Define Inbound Triggers and
Outbound Invokes.)
• A basic routing integration (See Add a Trigger (Source) Connection.)
3. In the Create Connection — Select Adapter dialog, select the adapter to use for
this connection. To find the adapter, scroll through the list, or enter a partial or full
name in the Search field and click
Search.
2-14Chapter 2
Create a Connection
4. In the Create Connection dialog, enter the information that describes this connection.
a. Enter a meaningful name to help others find your connection when they begin to
create their own integrations. The name you enter is automatically added in capital
letters to the Identifier field. If you modify the identifier name, don't include blank
spaces (for example, SALES OPPORTUNITY).
b. Enter optional keywords (tags). You can search on the connection keywords on the
Connections page.
c. Select the role (direction) in which to use this connection (trigger, invoke, or both).
Only the roles supported by the adapter are displayed for selection. When you select
a role, only the connection properties and security policies appropriate to that role are
displayed on the Connections page. If you select an adapter that supports both
invoke and trigger, but select only one of those roles, you'll get an error when you try
to drag the adapter into the section you didn't select. For example, let's say you
configure a connection for the Oracle Service Cloud (RightNow) Adapter as only an
invoke. Dragging the adapter to a trigger section in the integration produces an
error.
d. Enter an optional description of the connection.
5. Click Create.
Your connection is created. You're now ready to configure the connection details, such as
connection properties, security policies, connection login credentials, and (for certain
connections) agent group.
Configure Connection Properties
Enter connection information so your application can process requests.
1. Go to the Connection Properties section.
The fields that are displayed are based on your instance version.
2. Specify details based on your instance version.
Note:
If you create or edit your Salesforce Adapter connection on Oracle Integration
release 21.2.1.0.0 (211110.1100.42360) or later, you must specify API version
47 or later in the API Version field or upload an enterprise WSDL of API
version 47 or later.
2-15Chapter 2
Create a Connection
To Edit Existing or Create New Description
Connections on...
Release 20.2.2.0.0 (200524.0200.35760) or a. From the Select Salesforce.com
later of Oracle Integration
Instance Type list, select the instance
type:
• Production
• Sandbox
• Government: Select if you want to
connect to Salesforce Government
Cloud.
Note: For more information about
instance type, see Identify Instance
Type of Your Salesforce Organization.
b. In the Custom domain field, enter your
custom domain name. For example, if
your custom domain name is
sfcustomdomain.my.salesforce.co
m, then enter sfcustomdomain. See
Obtain the Custom Domain Name.
Note:
• The Government instance type
option and Custom domain field
are displayed for connections
created in release 20.3.3 or later of
Oracle Integration.
• The Custom domain field is
optional. However, if you are using
Salesforce Government Cloud or a
custom domain to log in to your
Salesforce account, the custom
domain name is required.
• The Salesforce Adapter
recommends that you not use your
Salesforce instance value as your
custom domain name (for example,
with the URL https://
ap1.salesforce.com, the value
before salesforce.com is your
Salesforce instance value).
• Don’t use common words like test,
login, sfcustomdomain.my, and
sfcustomdomain.my.salesforce.com
as the custom domain name.
c. In the API Version field, enter the API
version to use. See Find Your Current
Salesforce API Version.
Note: If you edit an existing connection
created on release 20.2.2.0.0
(200524.0200.35760) or later of Oracle
Integration, the instance type and API
version fields are displayed.
2-16Chapter 2
Create a Connection
To Edit Existing or Create New Description
Connections on...
A release prior to Oracle Integration a. Select the Upload File checkbox, then
20.2.2.0.0 (200524.0200.35760)
click Upload to select the enterprise
WSDL to use in this integration. The
enterprise WSDL is mandatory and
must be specified regardless of whether
you are also using a custom WSDL or
an outbound messaging WSDL. See
Generate the Salesforce Enterprise
WSDL.
Note: If you edit an existing connection
created prior to release 20.2.2.0.0
(200524.0200.35760) of Oracle Integration,
the field to upload an enterprise WSDL is
displayed.
Configure Connection Security
Configure security for your Salesforce Adapter connection by selecting the security policy.
1. Go to the Security section.
2. From the Security Policy list, select the security policy.
• Salesforce Username Password Policy
• Authorization Code Credentials (Salesforce OAuth 3-legged)
• Resource Owner Password Credentials
3. If you select Salesforce Username Password Policy.
a. In the Username field, enter the username.
b. In the Password field, enter the password (combination of the password and security
token).
The security token must be appended to the end of the password. Salesforce.com
APIs generate the security token at the time of password reset. For example, if the
security token generated by Salesforce.com is SSSSSSSSSSS and the password is
password, you must enter passwordSSSSSSSSSSS to log in. Obtain the security token
by changing the password or resetting the security token through the Salesforce.com
user interface. You receive the security token through the email address registered
with Salesforce.com. This token is valid until you reset the security token for the
respective account or change the password.
c. In the Confirm Password field, re-enter the password a second time for
confirmation.
4. If you select Authorization Code Credentials.
a. In the Client Id field, enter the consumer key/client ID that you obtained when
creating a connected application. See Prerequisites to Use the Salesforce OAuth
Three-Legged (Authorization Code Credentials) or Resource Owner Password
Credentials Security Policy.
b. In the Client Secret field, enter the client secret key that you obtained when creating
a connection application. See Prerequisites to Use the Salesforce OAuth Three-
Legged (Authorization Code Credentials) or Resource Owner Password Credentials
Security Policy.
2-17Chapter 2
Create a Connection
c. In the Confirm Client Secret field, re-enter the client secret a second time for
confirmation.
d. In the Scope field, enter id api refresh_token. These are the minimum
scopes required to configure a connection. Ensure that your connected
application has these scopes configured. See Prerequisites to Use the
Salesforce OAuth Three-Legged (Authorization Code Credentials) or
Resource Owner Password Credentials Security Policy.
Note:
The Scope field is not marked with an asterisk (*). This incorrectly
implies that this field is not mandatory. This field is mandatory.
e. Click Provide Consent. You are redirected to the Salesforce login page.
f. Log in to the Salesforce account with your credentials. Once you successfully
log in, the following message appears:
Access Allowed! Please switch back to connection page to proceed
with
testing and saving connection configuration.
5. If you select Resource Owner Password Credentials.
a. In the Client Id field, enter the consumer key/client ID that you obtained when
creating a connected application. See Prerequisites to Use the Salesforce
OAuth Three-Legged (Authorization Code Credentials) or Resource Owner
Password Credentials Security Policy.
b. In the Client Secret field, enter the client secret key that you obtained when
creating a connection application. See Prerequisites to Use the Salesforce
OAuth Three-Legged (Authorization Code Credentials) or Resource Owner
Password Credentials Security Policy.
c. In the Confirm Client Secret field, re-enter the client secret a second time for
confirmation.
d. In the Username field, enter the username.
e. In the Password field, enter the password (combination of the password and
security token).
The security token must be appended to the end of the password.
Salesforce.com APIs generate the security token at the time of password
reset. For example, if the security token generated by Salesforce.com is
SSSSSSSSSSS and the password is password, you must enter
passwordSSSSSSSSSSS to log in. Obtain the security token by changing the
password or resetting the security token through the Salesforce.com user
interface. You receive the security token through the email address registered
with Salesforce.com. This token is valid until you reset the security token for
the respective account or change the password.
f. In the Confirm Password field, re-enter the password a second time for
confirmation.
2-18Chapter 2
Upload an SSL Certificate
Note:
When switching the connection from one Salesforce environment to another or
switching the security policy, you must reactivate the integration to point to the
correct environment.
Test the Connection
Test your connection to ensure that it's configured successfully.
1. In the page title bar, click Test. What happens next depends on whether your connection
uses a Web Services Description Language (WSDL) file.
If Your Connection... Then...
Doesn't use a WSDL The test starts automatically and validates the inputs you provided for the
connection.
Uses a WSDL A dialog prompts you to select the type of connection testing to perform:
• Validate and Test: Performs a full validation of the WSDL, including
processing of the imported schemas and WSDLs. Complete
validation can take several minutes depending on the number of
imported schemas and WSDLs. No requests are sent to the
operations exposed in the WSDL.
• Test: Connects to the WSDL URL and performs a syntax check on
the WSDL. No requests are sent to the operations exposed in the
WSDL.
2. Wait for a message about the results of the connection test.
• If the test was successful, then the connection is configured properly.
• If the test failed, then edit the configuration details you entered. Check for typos,
verify URLs and credentials, and download the diagnostic logs for additional details.
Continue to test until the connection is successful.
3. When complete, click Save.
Upload an SSL Certificate
Certificates are used to validate outbound SSL connections. If you make an SSL connection
in which the root certificate does not exist in Oracle Integration, an exception is thrown. In
that case, you must upload the appropriate certificate. A certificate enables Oracle Integration
to connect with external services. If the external endpoint requires a specific certificate,
request the certificate and then upload it into Oracle Integration.
To upload an SSL certificate:
1. In the left navigation pane, click Home > Settings > Certificates.
All certificates currently uploaded to the trust store are displayed in the Certificates
dialog. The
link enables you to filter by name, certificate expiration date, status, type, category, and
installation method (user-installed or system-installed). Certificates installed by the
system cannot be deleted.
2-19Chapter 2
Upload an SSL Certificate
2. Click Upload at the top of the page.
The Upload Certificate dialog box is displayed.
3. Enter an alias name and optional description.
4. In the Type field, select the certificate type. Each certificate type enables Oracle
Integration to connect with external services.
• X.509 (SSL transport)
• SAML (Authentication & Authorization)
• PGP (Encryption & Decryption)
X.509 (SSL transport)
1. Select a certificate category.
a. Trust: Use this option to upload a trust certificate.
i. Click Browse, then select the trust file (for example, .cer or .crt) to
upload.
b. Identity: Use this option to upload a certificate for two-way SSL
communication.
i. Click Browse, then select the keystore file (.jks) to upload.
ii. Enter the comma-separated list of passwords corresponding to key
aliases.
Note:
When an identity certificate file (JKS) contains more than one
private key, all the private keys must have the same password. If
the private keys are protected with different passwords, the
private keys cannot be extracted from the keystore.
iii. Enter the password of the keystore being imported.
c. Click Upload.
SAML (Authentication & Authorization)
1. Note that Message Protection is automatically selected as the only available
certificate category and cannot be deselected. Use this option to upload a keystore
2-20Chapter 2
Refresh Integration Metadata
certificate with SAML token support. Create, read, update, and delete (CRUD) operations
are supported with this type of certificate.
2. Click Browse, then select the certificate file (.cer or .crt) to upload.
3. Click Upload.
PGP (Encryption & Decryption)
1. Select a certificate category. Pretty Good Privacy (PGP) provides cryptographic privacy
and authentication for communication. PGP is used for signing, encrypting, and
decrypting files. You can select the private key to use for encryption or decryption when
configuring the stage file action.
a. Private: Uses a private key of the target location to decrypt the file.
i. Click Browse, then select the PGP file to upload.
ii. Enter the PGP private key password.
b. Public: Uses a public key of the target location to encrypt the file.
i. Click Browse, then select the PGP file to upload.
ii. In the ASCII-Armor Encryption Format field, select Yes or No. Yes shows the
format of the encrypted message in ASCII armor. ASCII armor is a binary-to-
textual encoding converter. ASCII armor formats encrypted messaging in ASCII.
This enables messages to be sent in a standard messaging format. This
selection impacts the visibility of message content. No causes the message to be
sent in binary format.
iii. From the Cipher Algorithm list, select the algorithm to use. Symmetric-key
algorithms for cryptography use the same cryptographic keys for both encryption
of plain text and decryption of cipher text.
c. Click Upload.
Refresh Integration Metadata
You can manually refresh the currently-cached metadata available to adapters that have
implemented metadata caching. Metadata changes typically relate to customizations of
integrations, such as adding custom objects and attributes to integrations. There may also be
cases in which integrations have been patched, which results in additional custom objects
and attributes being added. This option is similar to clearing the cache in your browser.
Without a manual refresh, a staleness check is only performed when you drag a connection
into an integration. This is typically sufficient, but in some cases you may know that a refresh
is required. For these cases, the Refresh Metadata menu option is provided.
To refresh integration metadata:
Note:
The Refresh Metadata menu option is only available with adapters that have
implemented metadata caching.
1. In the left navigation pane, click Home > Integrations > Connections.
2. Go to the row of the connection to refresh.
2-21Chapter 2
Refresh Integration Metadata
3. Select Refresh Metadata from the menu.
A message is displayed indicating that the refresh was successful.
Metadata refresh for connection "connection_type" has been
initiated successfully.
2-223
Add the Salesforce Adapter Connection to an
Integration
When you drag the Salesforce Adapter into the trigger or invoke area of an integration, the
Adapter Endpoint Configuration Wizard appears. This wizard guides you through the
configuration of the Salesforce Adapter endpoint properties.
These topics describe the wizard pages that guide you through configuration of the
Salesforce Adapter as a trigger or invoke in an integration.
Topics:
• Basic Info Page
• Trigger Action Page
• Trigger Outbound Messaging Page
• Trigger Streaming API Page
• Trigger Response Page
• Trigger Callback Response Page
• Invoke Action Page
• Invoke Operations Page
• Invoke Headers Page
• Invoke Apex Operations Page
• Summary Page
• Perform Salesforce Adapter Postconfiguration Tasks
Basic Info Page
You can enter a name and description on the Basic Info page of each adapter in your
integration. The Salesforce Cloud Basic Info page is the initial wizard page that is displayed
whenever you drag an adapter to the trigger or invoke area.
Element Description
What do you want to call your Provide a meaningful name so that others can understand the
endpoint? connection. For example, if you are creating an invoke Salesforce
Cloud connection, you may want to name it
SalesforceOutboundDirection. You can include English
alphabetic characters, numbers, underscores, and dashes in the
name. You cannot include the following:
• Blank spaces (for example, My Salesforce Connection)
• Special characters (for example, #;83& or righ(t)now4)
• Multibyte characters
3-1Chapter 3
Trigger Action Page
Element Description
What does this endpoint do? Enter an optional description of the connection’s responsibilities. For
example: This connection receives an outbound request
to synchronize account information with the
Salesforce Cloud Application.
Trigger Action Page
Select the following to receive notifications from the Salesforce application.
Element Description
How would you like to receive messages • Outbound Messaging: Select to receive
from Salesforce.com outbound message notifications from the
Salesforce application.
• Streaming API: Select to receive event
notifications from the Salesforce
application using platform events and
change data capture events. You receive
event notifications for the platform events
you defined in Salesforce.com and receive
change event notifications for the entities
you selected in Salesforce.com.
Trigger Outbound Messaging Page
Select the trigger outbound messaging WSDL to use with the Salesforce Adapter.
You must have already created this WSDL. This process consists of several steps.
See Generate the Salesforce Adapter Outbound Messaging WSDL.
If you selected Outbound Messaging on the Action Page, the following option is
displayed.
3-2Chapter 3
Trigger Streaming API Page
Element Description
Select the Outbound Select the invoke Salesforce outbound messaging WSDL to receive
Messaging WSDL outbound message notifications from the Salesforce application.
Note: You must first create a workflow rule and generate an
outbound messaging WSDL. Outbound messaging WSDLs
associated with approval processes or entitlement processes are
also supported and consumed by the adapter.
1. Browse for and select the invoke Salesforce outbound
messaging WSDL (.wsdl file).
The Select New Outbound Messaging WSDL field is displayed.
This is an optional field.
2. If you want to optionally upload a new or modified Salesforce
outbound messaging WSDL to replace the already-uploaded
outbound messaging WSDL, then select that WSDL (.wsdl
file).
3. Activate the integration and copy the endpoint URL from the
integration information icon.
4. Go to the Outbound Messaging section at
www.salesforce.com and replace the dummy URL you
previously entered with the real endpoint URL.
Trigger Streaming API Page
Select the platform events and change data capture events to use with the Salesforce
Adapter.
If you selected Streaming API on the Action Page, the following options are displayed.
Select the option appropriate to your integration requirements in the Select a streaming
event type field.
• Subscribe to platform events published on Salesforce.com
Select to receive event notifications from the Salesforce application based on the events
you defined in Salesforce.com.
You must have already defined the platform events in Salesforce.com. See Define Your
Platform Event .
• Subscribe to change data capture events published on Salesforce.com
Select to receive change event notifications, whenever a data change in Salesforce
occurs, for the entities (business objects) you selected in Salesforce.com
You must have already selected the change data capture events in Salesforce.com. See
Select an Entity (Business Object).
Note:
The Salesforce Adapter does not support the Overflow event.
3-3You can also read