Outdoor Cooktops USE AND CARE GUIDE - Kalamazoo Outdoor Gourmet
←
→
Page content transcription
If your browser does not render page correctly, please read the page content below
Outdoor Cooktops
                  U S E   A N D   C A R E   G U I D E

+1.800.868.1699                                         1
2 KalamazooGourmet.com
Important Safety Warnings
This appliance is FOR OUTDOOR USE ONLY. It is not to be used inside a garage, other building or
any type of enclosed area.

WARNING: Failure to follow the information in this Use and Care Guide exactly may result in fire
or explosion, causing property damage, personal injury or death. Read and follow all warnings and
instructions before assembling and using the appliance.

WARNING: This appliance is not intended to be installed in or on a boat or recreational vehicle.

    		 DANGER: IF YOU SMELL GAS:
    1. Shut-off gas to the appliance.

    2. Extinguish any open flame.

    3. Open Lid.

    4. If odor continues, keep away from the appliance and immediately call your gas
       supplier or fire department.

    Failure to follow these instructions could result in fire or explosion which could cause
    property damage, personal injury or death.

    		 WARNING: FOR YOUR SAFETY:
    1. Do not store or use gasoline or other flammable liquids or vapors in the vicinity of
       this or any other appliance.

    2. An LP cylinder not connected for use shall not be stored in the vicinity of this or any
       other appliance.

    3. Improper installation, adjustment, alteration, service or maintenance can cause
       property damage, injury or death. Read the installation, operating and maintenance
       instructions thoroughly before installing or servicing this equipment.

    IMPORTANT: Damage caused by a failure to heed the warnings or follow the
    safety instructions and practices described in this Use and Care Guide is not
    covered by the warranty.

+1.800.868.1699                                                                                     1
This Use and Care Guide contains     Thank you for choosing Kalamazoo Outdoor
    important information necessary      Gourmet cooking equipment.
    for the proper assembly and safe
                                         We recommend familiarizing yourself with
    use of the Cooktop Unit.
                                         this book before using your cooktop for
    Read and follow all warnings and     the first time. Your Use and Care Guide
    instructions before assembling and   contains important safety information as
    using the Cooktop Unit.              well as helpful guidance for successful
                                         cooking experiences and care. Following the
    Follow all warnings and              guidance of this book will help ensure many
    instructions when using the          years of outdoor cooking enjoyment.
    Cooktop Unit.

    Keep the Use and Care Guide for      Should you ever have any questions about cooking
    future reference.                    with or caring for your cooktop, we are here to help.
                                         Contact Kalamazoo Outdoor Gourmet Customer
                                         Service at:

                                         +1.800.868.1699
                                         or
                                         customerservice@KalamazooGourmet.com

                                         Please have your model number and serial number
                                         ready or include it in your email.

                                         Model Number
                                              F CKTPDB-NG
                                              F CKTPDB-LPBLK
                                              F CKTPWP-NG
                                              F CKTPWP-LPBLK

                                         Serial Number

                                         California Proposition 65 Warning:
                                         The burning of gas cooking fuel generates some by-products
                                         that are on the list of substances which are known by the State
                                         of California to cause cancer or reproductive harm. California law
                                         requires businesses to warn customers of potential exposure to
                                         such substances. To minimize exposure to these substances, always
                                         operate this gas appliance according to this Use and Care Guide
                                         and ensure you provide good ventilation when cooking.

    Version 1.30.2019

2                                                                                  KalamazooGourmet.com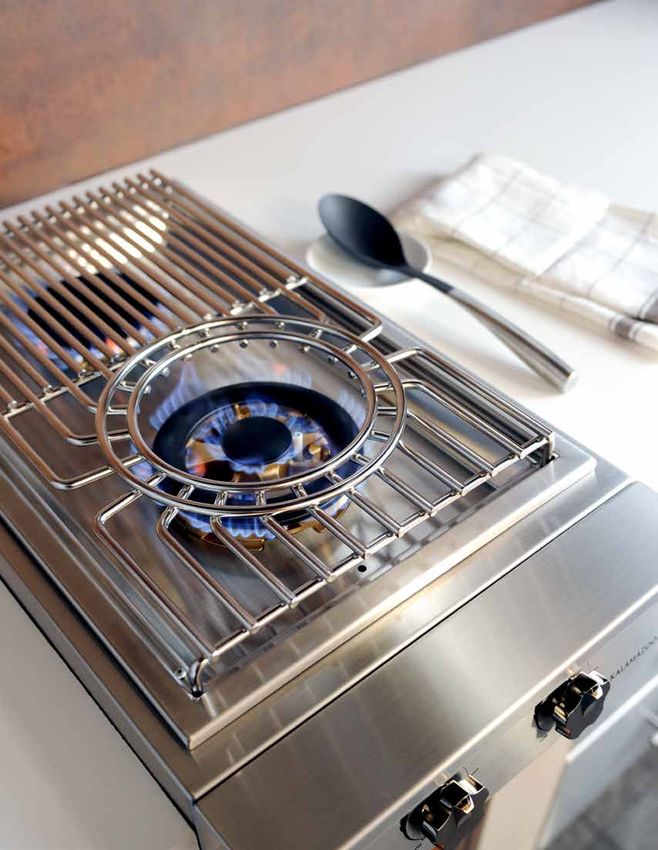
Table of Contents
                  Safe Operation                 6

                  LP Tank Safety                 7

                  Gas Requirements               9

                  Leak Testing                  12

                  Cooktop Location              16

                  Cooktop Unit Specifications   19

                  Initial Assembly              21

                  Cooktop Controls              24

                  Before you Cook               24

                  Lighting your cooktop         25

                  Ignition System               26

                  Flame Characteristics         27

                  Caring for you Cooktop        28

                  Troubleshooting               29

+1.800.868.1699                                  3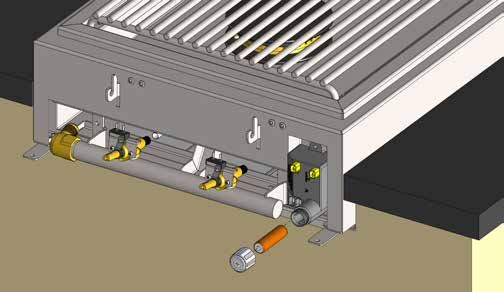
4 KalamazooGourmet.com

Safety Information

+1.800.868.1699                        5
Safe Operation
WARNING: When in use, portions of your cooktop get hot enough to cause severe burns.
Children and pets should never be left alone or unattended in the area where the grill is
being used. Never allow children to sit, stand or play on or around the grill.
IMPORTANT: Improper use or installation is dangerous. Extreme care must be taken.
Carefully follow all instructions, including the following:
To reduce the risk of fire, burns or other injury, read this Use and Care Guide thoroughly. Begin by ensuring
proper installation and servicing. Do not repair or replace any part of the cooktop yourself unless it is specifically
recommended in this Use and Care Guide. All other service must be carried out by a qualified gas technician.
Never allow children to operate the cooktop unattended.
Do not heat unopened food containers on the cooktop burners. The build-up of pressure resulting from the heat
may cause the container to burst.
When lighting the cooktop burners, always pay close attention to what you are doing. Make sure you are aware of
which burner you are lighting and can see whether or not it is lit. Make sure you are pushing in the burner valve to
activate the ignition when you attempt to light the burner.
Be sure all control knobs are in the OFF position and the cooktop unit is cool before using any aerosol cleaner on
it or near it. The chemical used for aerosol propellant could ignite in the presence of heat.
Always use dry pot holders or gloves on hot surfaces or cooking tools: moist or damp pot holders or gloves may
cause steam burns. Never use a towel or bulky cloth in place of pot holders. Do not let pot holders touch hot
portions of the grill or allow them to get near the open flame.
Do not cover grate with griddle or cookie sheet that will cover more than 70% of the surface area of the grate. Air
flow is necessary for complete combustion of the burner flames.
Use minimum 8” (20 cm) wok pan for Power Wok Burner
Keep all gas hoses away from the hot surfaces of the cooktop unit.
Ensure proper installation and servicing by following all instructions in this Use and Care Guide and any other
instructions or markings provided with this product. Have your cooktop unit installed by a qualified technician.
Have the installer show you were the gas supply shut-off valve is located and instruct you in its operation so that
you can shut-off the gas to the cooktop unit.
If you smell gas, there is likely a problem with the installation. If the connections are not perfectly sealed, you can
have a small leak resulting in the faint smell of gas — even if the cooktop appears to be working properly. Close
the gas supply shut-off valve and call a qualified technician to locate and resolve the leak.
SPIDER ALERT: Spiders and other insects are prone to nesting inside burners
in outdoor cooking equipment. This can block the normal flow of gas, and can
result in a fire behind the control panel, causing serious damage to the unit.
Frequent inspections are recommended. See the care section beginning on
page 28.
6 KalamazooGourmet.com
Important LP Tank Safety Information
A liquid propane cylinder should never be overfilled beyond the cylinder filling capacity.
Overfilling may create a dangerous condition.
Overfilled tanks can build up excess pressure. The standard safety device on tanks is the
safety relief valve. This valve vents propane gas vapors to relieve excess pressure. These
vapors are combustible and can be ignited. To reduce this danger, you should take the
following safety precautions:
To avoid risk of fire or explosion, take the following safety precautions:
Never replace the liquid propane regulator or hose with a different type than the model supplied.
NEVER USE A DENTED OR RUSTY LP TANK.
NEVER USE A CYLINDER WITH A DAMAGED VALVE.
ALWAYS CHECK FOR LEAKS AFTER CONNECTING AN LP TANK.
Never connect the cooktop unit to anything other than the fuel source indicated on the serial plate. Factory
conversion kits are available for switching fuel sources. Contact Kalamazoo Outdoor Gourmet or an authorized
dealer for details. Conversion kit installation must be done by a qualified technician.
The LP-gas cylinder must include a collar to protect the cylinder valve from damage.
Always ensure proper ventilation of the cylinder. See page 8 for proper ventilation required in an enclosure to
safely dissipate gas vapors if there is a leak in your enclosure. The cylinder supply system must be arranged for
vapor withdrawal. Cylinder must always be oriented in an upright position (Fig.1).
The LP-gas supply cylinder to be used must be constructed and marked in accordance with the specifications for
LP-gas cylinders, U.S. Department of Transportation (DOT) or the standard for Cylinders Spheres and Tubes for the
Transportation of Dangerous Goods, CAN/CSA-B339.
When the cooktop burners are not in use, the gas must be turned off at the supply cylinder.
The cooktop unit may be stored indoors, but only if the cylinder is disconnected and removed. An LP cylinder
MUST NEVER BE STORED INDOORS. Cylinders must be stored outdoors out of the reach of children and must
not be stored in a building, garage or any other enclosed area.
Do not route the gas supply hose or locate a propane cylinder in a way that may create a tripping hazard. Tripping
over, or getting caught on, a gas supply hose may tip the cylinder over or damage the hose, creating serious risk
of injury and fire.
The pressure regulator and hose assembly supplied with the cooktop unit must be used. Replacement pressure
regulators and hose assemblies must be the type specified by Kalamazoo Outdoor Gourmet. For replacement
parts, contact Kalamazoo Outdoor Gourmet customer service at +1.800.868.1699.
DANGER:
A. Do not store a spare LP-gas cylinder under or near this appliance;
B. Never fill the cylinder beyond 80 percent full; and
C. If instructions A and B are not followed exactly, a fire causing death or
serious injury may occur.
+1.800.868.1699 7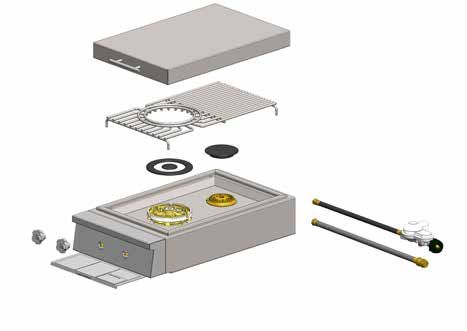
LP Tank Safety Information CONTINUED
Required ventilation for built-in LP-gas cylinder structures:
An enclosure for an LP-gas cylinder shall be ventilated by openings at both the upper and lower levels of the
enclosure. The effectiveness of the opening(s) for purposes of ventilation shall be determined with the LP-gas
supply cylinder in place. This shall be accompanied by one of the following:
A. One side of the enclosure shall be completely open; or
B. For an enclosure having four sides, a top and a bottom:
    1. At least two ventilation openings shall be provided in the side walls of the enclosure, located within
       5 in (217 mm) of the top of the enclosure, equally sized, spaced at a minimum of 90 degrees (1.57 rad),
       and unobstructed. The opening(s) shall have a total free area of not less than 1 in2/lb (14.2 cm2/kg) of
       stored fuel capacity.
    2. Ventilation opening(s) shall be provided at floor level of the enclosure and shall have a total free area
       of not less than 1/2 in2/lb (7.1 cm2/kg) of stored fuel capacity. If ventilation openings at floor level are
       in a side wall, there shall be at least two openings. The bottom of the openings shall be 1 in (25.4 mm)
       or less from the floor level and the upper edge no more than 5 in (127 mm) above the floor level. The
       openings shall be equally sized, spaced at a minimum of 90 degrees and unobstructed.
    3. Every opening shall be a minimum of a 1/8 in (3.2 mm) diameter.
    4. Ventilation openings in side walls shall not communicate directly with other enclosures of the outdoor
       cooking gas appliance.
    5. A door on the enclosure to gain access to the cylinder is acceptable, provided it is non locking and can
       be opened without the use of tools.
C. Some means of retention (chain, bracketry, cut-out) must be used to hold cylinder in place inside enclosure.
D. There shall be a minimum clearance of 2 in (50.8 mm) between the floor of the LP-gas cylinder enclosure
  and the ground.


                                                                     Kalamazoo Outdoor Gourmet offers
                                                                     an LP tank mounting bracket to meet
                                                                         the cylinder install requirements.

8                                                                                              KalamazooGourmet.com
Liquid Propane Gas Requirements
(For use with 20-Pound (9 kg) Cylinder only)
Verify the type of gas your cooktop unit has been configured for by the factory by checking the
first page of this Use and Care Guide. Gas appliances configured for liquid propane (LP) gas are
orificed differently than those configured for natural gas (NG). Cooktop units configured for use with
a standard 20-pound LP cylinder, equipped with a UL listed, Type 1, QCC-1 valve, are shipped with a
dual-stage LP regulator hose assembly.
Connection: LP regulator hose assembly (included) connects to the cooktop unit via a 3/8" male flare
fitting.
Input Pressure: 11.0" W.C. (27.4 mbar)
Cylinder Requirements: For use with 20-pound (9kg) Type 1 LP cylinder with a UL listed Type 1,
QCC-1 valve. Never use a dented or rusty LP tank. Never use a cylinder with a damaged valve. Always
check for leaks after connecting an LP tank.
To connect the LP regulator hose assembly to the LP tank, first make sure the main valve on the tank is
completely closed. Make sure also that all control valves on the front of the cooktop unit are OFF.
Thread the regulator inlet over the tank valve. Use care to ensure proper alignment of the threaded
coupler and avoid cross-threading or damaging the coupler. Turn the coupler clockwise until
tightened up, but do not over-tighten.
IMPORTANT: Always close the main valve on the tank before disconnecting or transporting the tank.
IMPORTANT: After connecting a fresh LP tank, you may need to purge air from the system. Before
lighting, open the main valve on the tank. Turn the control valves on the grill to the HIGH position for
about 15 seconds to purge air from the system.
Turn the control valves on the grill OFF FIGURE 1
and wait 5 minutes for any gas to clear.
Finally, continue with the normal lighting
procedure. The installation must conform
A
to local codes. In the absence of local
codes, the installation must conform
to the National Fuel Gas Code, ANSI
Z223.1/NFPA 54; Storage and
Handling of Liquefied Petroleum
A. Main Tank Valve
Gases, ANSI/NFPA 58; Natural
Gas and Propane Installation Code, B. LP Hose and
CSA B149.1; or Propane Storage Regulator Assembly
and Handling, CSA B149.2. (Included)
B
+1.800.868.1699 9Natural Gas Requirements
Verify the type of gas your grill has been configured for by the factory by checking the first
page of this Use and Care Guide. Gas appliances configured for natural gas (NG) are orificed
differently than those configured for liquid propane (LP) gas. Cooktop units configured for
use with natural gas are shipped with a gray hose with a quick-connect fitting.
Connection: 3/8" NPT male. Quick-connect hose assembly (included) connects to the
cooktop unit via a 3/8” male flare fitting.
Input Pressure: 7.0" W.C. (17.4 mbar)
IMPORTANT: Always close gas supply shut-off valve before disconnecting the cooktop unit
gas supply hose.
IMPORTANT: An installer-supplied safety shut-off valve MUST be installed on the natural
gas supply line for the cooktop unit. The valve should be easily accessed and located
between 3 and 20 feet (.9 m to 6.1 m) away from the unit. All gas connections should be
made by a qualified technician. The installation and all installer-supplied parts must conform
to local codes. In the absence of local codes, the installation and all parts should conform to
the National Fuel Gas Code, ANSI Z223.1/ NFPA 54 or Natural Gas and Propane Installation
Code, CSA B149.1. Cooktops to be connected to a fixed fuel piping system must use rigid
pipe, semi-rigid tubing, and/or a connector that complies with the Standard for Connectors
for Outdoor Gas Appliances and Manufactured Homes, ANSI Z21.75/CSA 6.27.
All pipe sealants must be an approved type.
IMPORTANT: Diameter and length of the gas supply pipe may limit the pressure and BTU
delivery of gas to the cooktop unit. The installer must ensure proper delivery to the cooktop
unit or it will not operate properly.
The appliance and its individual shut-off valve must be disconnected from the gas supply
piping system during any pressure testing of that system at pressures in excess of 1/2 psi
(3.5 kPa). During any pressure testing of the gas supply piping system at test pressures equal
to or less than 1/2 psi (3.5 kPa), the appliance must be isolated from the system by closing
its individual manual shut-off valve.
Installer-supplied shutoff
valve must be easily
accessible
FIGURE 2
Gas Hose Assembly with
Quick-Disconnect and Gas
Regulator (Included)
10 KalamazooGourmet.comBulk Supply Liquid Propane Gas Requirements
Verify the type of gas your grill has been configured for by the factory by checking the
first page of this Use and Care Guide. Gas appliances configured for natural gas (NG)
are orificed differently than those configured for liquid propane (LP) gas. Cooktop
units configured for use with a bulk LP supply are shipped with a gray hose with a
quick-connect fitting.
Connection: 3/8" NPT male. Quick-connect hose assembly (included) connects to the
cooktop unit via a 3/8” male flare fitting.
Input Pressure: 11.0" W.C. (27.4 mbar)
IMPORTANT: Always close gas supply shut-off valve before disconnecting the cooktop gas
supply hose.
IMPORTANT: An installer-supplied safety shut-off valve MUST be installed on the gas
supply line for the cooktop. The valve should be easily accessed and located between 3
and 20 feet (.9 m to 6.1 m) away from the cooktop unit. All gas connections should be made
by a qualified technician. The installation and all installer-supplied parts must conform to
local codes. In the absence of local codes, the installation and all parts should conform to
the National Fuel Gas Code, ANSI Z223.1/NFPA 54; Storage and Handling of Liquefied
Petroleum Gases, ANSI/NFPA 58; Natural Gas and Propane Installation Code, CSA B149.1;
or Propane Storage and Handling, CSA B149.2. Cooktops to be connected to a fixed fuel
piping system must use rigid pipe, semi-rigid tubing, and/or a connector that complies with
the Standard for Connectors for Outdoor Gas Appliances and Manufactured Homes, ANSI
Z21.75/CSA 6.27.
All pipe sealants must be an approved type and safe for use with LP gas.
FIGURE 3
Installer-supplied shutoff
valve must be easily
accessible
Gas Hose Assembly with
Quick-Disconnect and Gas
Regulator (Included)
+1.800.868.1699 11Leak Testing
Although gas connections on the cooktop are leak tested at the factory prior to shipment,
a complete test must be performed after installation due to possible mishandling during
shipping or installation.
Periodic checks are also recommended. Immediately check for leaks if you smell gas.
Never use an open flame to look for leaks.
Before Testing: Extinguish all open flames. Do not smoke.
You will need a spray bottle, a brush or a rag. For LP units using a 20-pound (9 kg) cylinder,
a full cylinder should be used.
IMPORTANT: Homeowners should only check for leaks on the gas connections that are
external to the cooktop unit. If the valves or other internal connections need to be checked,
please call a qualified technician or Kalamazoo Outdoor Gourmet customer service at
+1.800.868.1699.
To Conduct the Test: Make a soap solution of one part liquid dish soap and one part water.
Make sure all control valves are in the OFF position. Turn the gas supply ON. Use a spray
bottle, brush or rag to apply the mild soap solution to all connections from the supply line
or LP cylinder to the connection on the cooktop unit. Check all connections. Soap bubbles
will appear at any connections with a leak. Turn OFF the gas supply and tighten any leaky
connections. Recheck, applying more mild soap solution.
IMPORTANT: Do not use the cooktop unit until all connections have been
checked and do not leak.
12 KalamazooGourmet.com+1.800.868.1699 13
14 KalamazooGourmet.com
Location and Installation

+1.800.868.1699                         15
Cooktop Location
The cooktop is designed for easy placement into an outdoor countertop.
Choosing a Location: Important consideration for cooktop placement include exposure to
wind, proximity to foot traffic and areas where people congregate, and access to the gas
supply.
A minimum of 9 inches (22.86 cm) from the sides of the unit must be maintained above the countertop to
adjacent vertical combustible construction.
Cooktop is only for installation in a built-in enclosure constructed of non-combustible materials.
Do not locate under overhead unprotected combustible construction.
The unit must be recessed a minimum of 2 inches (5.08 cm) beneath the countertop for gas input clearance. A
minimum of 2 inches (5.08 cm) is required behind the unit, underneath the counter, for gas input clearance. See
Figure 4.
Do not place the cooktop in a location where the burners are likely to be exposed to strong wind.
Do not place the cooktop where it is likely to be bumped into or inadvertently touched by passersby.
Never place the cooktop where the gas hose creates a safety hazard. Tripping over an exposed gas hose may
create a gas leak, or create other serious safety hazards. Keep gas hose as short as possible.
Never locate the cooktop in a building, breezeway, shed or other such enclosed areas.
The cooktop is not intended to be installed in or on a boat or recreational vehicle.
FIGURE 4
DANGER:
Do not route the gas supply hose or
locate a propane cylinder in a way that
may create a tripping hazard. Tripping
over, or getting caught on, a gas supply
hose may tip the grill over or damage
the hose, creating serious risk of injury
and fire.
16 KalamazooGourmet.comFIGURE 6
FIGURE 5
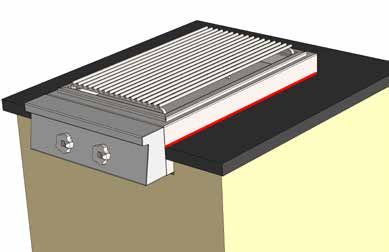
Installation:
Caulking around the cooktop unit
body is recommended to seal it
against the countertop. Do not
caulk control panel portion of the
unit. It must be removed in order to
service the unit and to change the
batteries. See recommended caulk
line indicated in red on Figure 7.
FIGURE 7
Gas inlet is located at the back of
the cooktop unit. Figure 4.
+1.800.868.1699 17Installing with the Cooktop Cabinet
(Bulk gas connections only)
Set the cooktop on top of the cooktop cabinet, aligning
the two locating posts on the top of the cabinet with
corresponding holes underneath the cooktop unit (Figure
8). The posts will align the control panel seam on the
cooktop 1 inch (2.54 cm) forward of the cabinet door.
This offset is to align the seam with the front face of the
countertop when set to a 1 inch (2.54 cm) overhang.
The cooktop does not fasten to the cabinet. It just sits on
top. Use silicone caulk to seal the cooktop unit body to the
countertop (See Figure 7).
FIGURE 9
Locating Posts
FIGURE 8
The gas hose is channeled through the outside wall of the cabinet keeping the cabinet
clear for storage. Feed the gas line through the rubber gasket lined hole on either side
of the cabinet (depending on what side you want the gas line to come out.)The gas line
will drop down another rubber gasket lined hole at the base of the cabinet.
Please note: The Cooktop Cabinet is not approved for holding LP tanks. See LP tank
storage information on page 8.
IMPORTANT: An installer-supplied safety shut-off valve MUST be installed on the gas
supply line for the cooktop. The valve should be easily accessed and located between
3 and 20 feet (.9 m to 6.1 m) away from the cooktop unit
18 KalamazooGourmet.comDouble-Burner Cooktop
Our standard outdoor cooktop features double-burner design with 19,000 BTU burners and
a continuous grate for professional cooking. Diffusion caps enhance simmering on low.
FIGURE 10
PRODUCT MODEL # K-CKTPDB-BI
WIDTH 16.00 in (40.6 cm)
DEPTH 28.00 in (71.1 cm)
HEIGHT 5.31 in (13.5 cm)
APPROX. PRODUCT WEIGHT 40 lb (18.1 kg)
GAS REQUIREMENTS Natural Gas: 3/8” male NPT connection. Quick disconnect provided. Gas service
line to deliver 7 i.w.c. (17.4 mbar) at side burner location. See BTU information be-
low for pipe sizing.
Bulk LP/Propane: 3/8” male NPT connection. Quick disconnect provided. Gas
service line to deliver 11 i.w.c. (27.4 mbar) at side burner location. See BTU informa-
tion below for pipe sizing.
LP/Propane Portable Tank: Equipped with high-capacity hose/dual-regulator
assembly for connection to 20 lb. propane tank (not included).
ELECTRICAL REQUIREMENTS AA battery for electronic ignition.
STANDARD BURNER RATING 19,000 BTU LP/18,000 BTU NG
STANDARD BURNER QUANTITY 2
TOTAL BTU 38,000 BTU LP/33,000 BTU NG
+1.800.868.1699 19Double Cooktop with Power Wok Burner
Our double outdoor cooktop with a 25,000 BTU Wok burner and a 19,000 BTU standard
burner. The Wok power burner features three concentric rings of fire. The one piece grate
incorporates our standard burner grid with a wok ring grid for convenience.
FIGURE 11
PRODUCT MODEL # K-CKTPWP-BI
WIDTH 16.00 in (40.6 cm)
DEPTH 28.00 in (71.1 cm)
HEIGHT 5.31 in (13.5 cm)
APPROX. PRODUCT WEIGHT 42 lb (19.1 kg)
GAS REQUIREMENTS Natural Gas: 3/8” male NPT connection. Quick disconnect provided. Gas service
line to deliver 7 i.w.c. (17.4 mbar) at side burner location. See BTU information be-
low for pipe sizing.
Bulk LP/Propane: 3/8” male NPT connection. Quick disconnect provided. Gas
service line to deliver 11 i.w.c. (27.4 mbar) at side burner location. See BTU informa-
tion below for pipe sizing.
LP/Propane Portable Tank: Equipped with high-capacity hose/dual-regulator as-
sembly for connection to 20-30 lb. propane tank (not included).
ELECTRICAL REQUIREMENTS AA battery for electronic ignition.
STANDARD BURNER RATING 19,000 BTU LP/18,000 BTU NG
STANDARD BURNER QUANTITY 1
WOK BURNER RATING 25,000 BTU LP/20,000 BTU NG
WOK BURNER QUANTITY 1
TOTAL BTU 44,000 BTU LP/35,000 BTU NG
20 KalamazooGourmet.comInitial Assembly
You will need a ¾” wrench and a ½” wrench for initial assembly.
A. Set BASE UNIT A onto a level FIGURE 12
surface.
Double-Burner Cooktop
B. Natural Gas and Bulk LP units
include a 10 ft (3 m) gray bulk gas
hose with a quick-disconnect B.
Using the two wrenches tighten gas F
hose to 3/8” male flare fitting at rear
of BASE UNIT A. E
C. LP units, for use with 20# (9 kg)
gas tank, include a 6 ft (1.8 m) D
black lp gas hose with a dual-stage
LP regulator C. Using the two C
wrenches tighten gas hose to 3/8”
male flare fitting at rear of BASE F
UNIT A.
D. After the unit has been installed, set
the black DIFFUSER CAPS D down
onto each side burner. Set the black
G A
WOK BURNER DIFFUSER CAPS D2 B
H
down onto the wok side burner.
E. Set the SIDE BURNER GRATE E/E2
down, so that it is nested in burner
well. For Wok Burner units, make sure FIGURE 13
that the grate circles are oriented to Double Cooktop with Power Wok Burner
the front, over the wok burner.
F. Place SIDE BURNER COVER F over
assembled Side Burner Unit.
WARNING: Never operate the
F
side burners with the cover in place.
G. Mount CONTROL KNOBS G onto
E2
the valve posts. Be sure that the
flat side of the opening in the knob
casting is aligned with the flat side D
of the valve stem. The metal tab
welded into the knob opening is D2
C
placed against the round side of the
valve stem.
H. LIGHTING INSTRUCTIONS must be
pushed back underneath cooktop
when not in use. DO NOT OPERATE
BURNERS WITH INSTRUCTION A
G B
PLATE PULLED FORWARD. Push H
closed until opening under control
panel is completely unobstructed.
+1.800.868.1699 2122 KalamazooGourmet.com
Operation

+1.800.868.1699               23
Cooktop Controls
A. Rear Burner Control: Controls the flame on the rear cooktop burner. The electronic ignition for the rear
   burner is activated by pressing in the control knob.
B. Front Burner Control: Controls the flame on the front cooktop burner. The electronic ignition for the front
   burner by pressing in the control knob.

                        FIGURE 14

                                         A                B       C

Before You Cook
A quick safety check should be performed before each time you use the cooktop.

1.   Clean and inspect the gas hose. If there is evidence of abrasion, wear, cuts or leaks, do
     not use the grill. The hose must be replaced prior to using the grill. Replace the hose
     assembly with the exact type specified by Kalamazoo Outdoor Gourmet.

2.   Ensure the gas hose is clear of the cooktop. Keep the fuel supply hose away from all
     surfaces of the cooktop.

3.   Check that the area near the cooktop is clear of combustible materials and vapors,
     including alcohol, gasoline, aerosol containers and dry goods. Keep electrical cords from
     coming into contact with any surfaces of the unit.

4.   Do not use the cooktop with overly loose-fitting clothing, especially loose sleeves that
     may come in contact with the hot surfaces.

While you are cooking
1. Never move the cooktop while it is in use or when it is hot.

2. The use of alcohol, prescription or non-prescription drugs may impair your ability to properly assemble or
   safely operate the unit.

3. Do not touch the cooktop grate when it is hot

24                                                                                         KalamazooGourmet.com
4. Be very careful transporting hot food. Sauces, juices and oils can cause serious burns to yourself or those
around you.
5. Do not cover grate with griddle or cookie sheet that will cover more than 70% of the surface area of the
grate. Air flow is necessary for complete combustion of the burner flames.
Lighting your Cooktop Burners
Before lighting your cooktop, be sure you have followed the instructions in this Use and
Care manual regarding proper setup, placement, gas connections leak testing, and safe
operation, all of which precede this page.
Lighting instructions are located on the pull out Instruction Plate underneath the unit
(Figure 14:C). Push Instruction Plate all the way closed when Cooktop is in use.
IMPORTANT: Do not use the grill if the odor of gas is present at any time.
Follow leak testing procedures before using cooktop.
Standard Lighting Procedure:
1. Remove the stainless steel cover from the cooktop burners (see Figure 12).
2. Make sure all control knobs are in the OFF position.
3. Turn the main gas supply on.
4. Keeping your face well away from the unit, press in the COOKTOP BURNER control knob
(see Figure 14). You should hear a rapid clicking noise from the electronic ignition. While
continuing to press in the control knob, turn it to the HIGH position. Ignition should
take place within 4 to 5 seconds. If the burner does not light within 4 to 5 seconds,
turn the knob to the OFF position and wait 5 minutes for the gas to dissipate before
trying again. If you do not hear clicking from the electronic ignition system, refer to the
troubleshooting section of this Use and Care Guide.
NEVER PLACE THE COOKTOP BURNER COVER OVER THE COOKTOP BURNERS WHILE THE BURNERS ARE
IN OPERATION.
Manual Lighting Procedure:
1. Remove the cover from the cooktop burners.
2. Make sure all control knobs are in the OFF position.
3. Turn the main gas supply on.
4. Keeping your face well away from the unit, hold a match or lighter wand at the side of the COOKTOP
BURNER. Press in the COOKTOP BURNER control knob (see Figure 14), and turn it to the HIGH position.
Ignition should take place within 4 to 5 seconds. If the burner does not light within 4 to 5 seconds, turn
the knob to the OFF position and wait 5 minutes for the gas to dissipate before trying again.
+1.800.868.1699 25Ignition System
The ignition system for the cooktop burners utilizes a AA battery to power an electronic
spark ignition system. Screw off the ignition module cap to replace the AA battery.
(Figure 17:A)
The ignition module is accessed by removing the cooktop control panel.
1. Remove the knobs from the control valves.
2. Remove the two screws underneath the control panel. (Figure 15)
3. Lift the control panel up and forward off of unit. (Figure 16)
FIGURE 15 FIGURE 16
Remove two screws
FIGURE 17
B
A
26 KalamazooGourmet.comFlame Characteristics
Every burner is tested and adjusted at the factory for proper performance. If a burner is
not operating properly, it may be due to variations in the local gas supply or because of
an obstructed orifice. Flames should be stable without lifting from the burner. The flames
should burn cleanly without creating any sooty residue.
Cooktop Burner Flame Characteristics:
FIGURE 18
The flame should be blue and stable with only a small
amount of orange, if any, at the tips. There should be little
noise and no lifting. B
A
On HIGH, the inner cone (see Figure 18:A) should be
approximately ½ inch (12.7 mm) long.
On HIGH, the outer cone (see Figure 18:B) should be
approximately 1 inch (25.4 mm) long.
Wok Burner Flame Characteristics: FIGURE 19
The flame should be blue and stable with only a small
amount of orange, if any, at the tips. There should be little
noise and no lifting.
On HIGH, the inner cone (see Figure 19:A) should be B
approximately 3/4 inch (19 mm) long. A
On HIGH, the outer cone (see Figure 19:B) should be
approximately 1 ¼ inches (31.75 mm) high.
To Adjust Burner LOW Settings (All Burners):
The low setting on the main burners can be adjusted
WITHOUT removing the control panel. A long and thin FIGURE 20
flat-blade screw driver is needed to make the adjustments.
Light the burner and set it to LOW.
Remove the control knob and insert the screw driver into
the opening in the center of the valve stem (Figure 17:B).
Turn the adjustment screw (see Figure 20:A) until the
flame on the burner is the minimum stable flame height.
The flame should be steady at all ports around the burner. A
The flame should not be easily blown out without quickly
reestablishing itself.
+1.800.868.1699 27Caring for Your Cooktop Unit Your Kalamazoo Outdoor Gourmet cooktop is made from high-quality 304 stainless steel and engineered for durability. Simple care and cleaning will provide a lifetime of service… Wire Grates Stainless steel wire grates are dishwasher safe. ALWAYS use a stainless steel or brass bristle brush for cleaning your grates. Do not use brushes or scrapers of other metals. NEVER use steel wool on your grates. It will leave small amounts of mild steel behind, embedded into the grain of the stainless steel, and it will cause rust. Exterior Cleaning The most difficult part of cleaning your stainless steel cooktop unit is removing burnt-on food and grease. Start by using a citrus-based or organic degreaser to remove everything that isn't burnt on. Next, we recommend using powdered Bar Keepers Friend with a jersey knit rag or micro fiber cloth. Be careful to follow the grain direction of the stainless steel to avoid scratches. With a little elbow grease, Bar Keepers Friend will remove most stains and discoloration. For real problem areas, a Scratch-B-Gone kit can be used to restore the factory finish. After these steps, rinse off all cleaners, wait for the cooktop to dry, and then apply stainless steel polish. Saltwater Environments Oceanfront environments with salt air and sea spray will require regular maintenance and cleaning to prevent rust. Clean stainless steel surfaces at least two times a month to keep the chemical reaction from the salt from gaining a foothold on your equipment. With regular cleaning, your equipment will look like new for a lifetime. To achieve maximum corrosion and stain resistance, the surface of the stainless steel must be kept clean. Should some rust spots occur, they can be easily removed with Bar Keepers Friend. Burner Care To access the burners, first make sure the cooktop is completely cooled. Ensure the control valves are in the OFF position and turn off the main gas supply. Remove the Diffuser Caps (see Figure 12:D/D2). Visually inspect each burner to confirm it is structurally sound and that none of the ports are clogged. Carefully clean the burner using a brass brush. Clogged burner ports may be opened up with a straightened paper clip. Do not use a toothpick or anything else that could break off inside the burner ports. 28 KalamazooGourmet.com
Troubleshooting
The troubleshooting tips here are for general information only. The information may save you
the trouble of a service call. If your side burner requires service, contact Kalamazoo Outdoor
Gourmet customer service at +1.800.868.1699.

Burners won’t light:

The cooktop burners are lit by a battery-powered electronic spark ignition. If you do hear
rapid clicking when you press in the control knobs, but the burners won’t light, try manually
lighting the burners (follow the instructions on page 25). If the burners do not light manually,
there is probably a gas problem and not an ignition problem. Call Kalamazoo Outdoor
Gourmet customer service.

Cooktop burners have low flames on high:

On HIGH, the flames on the cooktop burners should be at least 1 inch long. If they are not,
check the following:
 LP cylinder has enough gas to deliver proper pressure. Refill the tank if necessary. In some situations in
  cold ambient temperatures, an LP cylinder will ice up, creating a drop in pressure. If this happens, turn off
  the tank and let it warm up before trying again. A full tank is less likely to ice up than a tank that is less than
  half full.

 Main gas supply is fully on and not just partially opened.

 Orifices are clear and not clogged. A clogged orifice creates a dangerous situation. Do not use the
  cooktop until the issue has been resolved (see instructions on page 29).

 If the fuel has been switched from liquid propane gas to natural gas, part of the process to convert the
  burners includes larger orifices. It is not safe to burn natural gas with liquid propane orifices (neither is it
  safe to burn the other way around). If you suspect a conversion was done improperly, do not use the grill
  and contact Kalamazoo Outdoor Gourmet customer service at +1.800.868.1699.

You smell gas:
 Turn off the cooktop burners immediately. Follow the leak check procedures on page 12.
  Contact Kalamazoo Outdoor Gourmet customer service at +1.800.868.1699 for assistance.

+1.800.868.1699                                                                                                      29
All specifications and other information contained in this Use and Care Guide are based on
the latest product information available at the time of printing. Because Kalamazoo Outdoor
Gourmet is always focused on product improvement, we reserve the right to make changes
at any time. This includes all specifications of the product.
© 2015 Kalamazoo Outdoor Gourmet, LLC. Not to be reproduced wholly or in part without specific written
permission from Kalamazoo Outdoor Gourmet, LLC.

Kalamazoo Outdoor Gourmet
Chicago Headquarters
810 West Washington Blvd
Chicago, IL 60607
Kalamazoo Plant
8566 Krum Avenue
Galesburg, MI 49053
+1.800.868.1699
KalamazooGourmet.com

30                                                                                    KalamazooGourmet.com
+1.800.868.1699 31
32 KalamazooGourmet.com
You can also read


