Sniper The Sniper User Manual
←
→
Page content transcription
If your browser does not render page correctly, please read the page content below
The Sniper User Manual

Trevor E. Carlson     Wim Heirman

         November 13, 2013

      sniper
Contents
1 Introduction                                                                                                                   2
  1.1 What is Sniper? . . . . . . . . . . . . . . . . . . . . . . . . .                                                          2
  1.2 Features . . . . . . . . . . . . . . . . . . . . . . . . . . . . . .                                                       2

2 Getting Started                                                                                                               3
  2.1 Downloading Sniper . . . . . . . . . . . . . . . . . . . . . . .                                                          3
  2.2 Compiling Sniper . . . . . . . . . . . . . . . . . . . . . . . . .                                                        4
  2.3 Running a Test Application . . . . . . . . . . . . . . . . . . .                                                          4

3 Running Sniper                                                                                                                4
  3.1 Simulation Output . . . . . . . . . . . . . . .                                       .   .   .   .   .   .   .   .   .   4
  3.2 Using the Integrated Benchmarks . . . . . . .                                         .   .   .   .   .   .   .   .   .   5
  3.3 Simulation modes . . . . . . . . . . . . . . . .                                      .   .   .   .   .   .   .   .   .   5
  3.4 Region of interest (ROI) . . . . . . . . . . . .                                      .   .   .   .   .   .   .   .   .   6
  3.5 Using Your Own Benchmarks . . . . . . . . .                                           .   .   .   .   .   .   .   .   .   7
  3.6 Manually Running Multi-program Workloads                                              .   .   .   .   .   .   .   .   .   7
  3.7 Running MPI applications . . . . . . . . . . .                                        .   .   .   .   .   .   .   .   .   8

4 Scripted simulator control with Python                                                                                         9
  4.1 Runtime Configuration Support with the SimAPI . . . . . . .                                                               11

5 Configuring Sniper                                                                                                            11
  5.1 Configuration Files . . . . . .                   .   .   .   .   .   .   .   .   .   .   .   .   .   .   .   .   .   .   12
  5.2 Command Line Configuration                        .   .   .   .   .   .   .   .   .   .   .   .   .   .   .   .   .   .   12
  5.3 Heterogeneous Configuration                       .   .   .   .   .   .   .   .   .   .   .   .   .   .   .   .   .   .   12
  5.4 Heterogeneous Options . . . .                     .   .   .   .   .   .   .   .   .   .   .   .   .   .   .   .   .   .   13

6 Configuration Parameters                                                13
  6.1 Basic architectural options . . . . . . . . . . . . . . . . . . . . 13
  6.2 Reschedule Cost . . . . . . . . . . . . . . . . . . . . . . . . . 14
  6.3 DVFS Support . . . . . . . . . . . . . . . . . . . . . . . . . . 14

7 Understanding your        Software with Sniper                                                                                16
  7.1 CPI Stacks . . .      . . . . . . . . . . . . . . .                               .   .   .   .   .   .   .   .   .   .   16
  7.2 Power Stacks . .      . . . . . . . . . . . . . . .                               .   .   .   .   .   .   .   .   .   .   16
  7.3 Loop Tracer . . .     . . . . . . . . . . . . . . .                               .   .   .   .   .   .   .   .   .   .   17
  7.4 Visualization . .     . . . . . . . . . . . . . . .                               .   .   .   .   .   .   .   .   .   .   17

8 Command Listing                                                                                                               20
  8.1 Main Commands         .   .   .   .   .   .   .   .   .   .   .   .   .   .   .   .   .   .   .   .   .   .   .   .   .   20
  8.2 Sniper Utilities .    .   .   .   .   .   .   .   .   .   .   .   .   .   .   .   .   .   .   .   .   .   .   .   .   .   22
  8.3 SIFT Utilities . .    .   .   .   .   .   .   .   .   .   .   .   .   .   .   .   .   .   .   .   .   .   .   .   .   .   23
  8.4 Visualization . .     .   .   .   .   .   .   .   .   .   .   .   .   .   .   .   .   .   .   .   .   .   .   .   .   .   24

                                                    1
9 Comprehensive Option List 26
9.1 Base Sniper Options . . . . . . . . . . . . . . . . . . . . . . . 26
9.2 Options used to configure the Nehalem core . . . . . . . . . . 33
9.3 Options used to configure the Gainestown processor . . . . . 35
9.4 Sniper Prefetcher Options . . . . . . . . . . . . . . . . . . . . 37
9.5 DRAM Cache Options . . . . . . . . . . . . . . . . . . . . . . 37
9.6 SimAPI Commands . . . . . . . . . . . . . . . . . . . . . . . 37
1 Introduction
1.1 What is Sniper?
Sniper is a next generation parallel, high-speed and accurate x86 simula-
tor. This multi-core simulator is based on the interval core model and the
Graphite simulation infrastructure, allowing for fast and accurate simulation
and for trading off simulation speed for accuracy to allow a range of flexible
simulation options when exploring different homogeneous and heterogeneous
multi-core architectures.
The Sniper simulator allows one to perform timing simulations for both
multi-programmed workloads and multi-threaded, shared-memory applica-
tions running on 10s to 100+ cores, at a high speed when compared to
existing simulators. The main feature of the simulator is its core model
which is based on interval simulation, a fast mechanistic core model. In-
terval simulation raises the level of abstraction in architectural simulation
which allows for faster simulator development and evaluation times; it does
so by ’jumping’ between miss events, called intervals. Sniper has been val-
idated against multi-socket Intel Core2 and Nehalem systems and provides
average performance prediction errors within 25% at a simulation speed of
up to several MIPS.
This simulator, and the interval core model, is useful for uncore and
system-level studies that require more detail than the typical one-IPC mod-
els, but for which cycle-accurate simulators are too slow to allow workloads
of meaningful sizes to be simulated. As an added benefit, the interval core
model allows the generation of CPI stacks, which show the number of cycles
lost due to different characteristics of the system, like the cache hierarchy or
branch predictor, and lead to a better understanding of each component’s
effect on total system performance. This extends the use for Sniper to
application characterization and hardware/software co-design. The Sniper
simulator is available for download at http://snipersim.org and can be used
freely for academic research.
1.2 Features
• Interval core model
2• CPI Stack generation
• Parallel, multi-threaded simulator
• Multi-threaded application support
• Multi-program workload support with the SIFT trace format
• Validated against the Core2 microarchitecture
• Shared and private caches
• Heterogeneous core configuration
• Modern, Pentium-M style branch predictor
• Supports a number of pthread-based parallel application APIs, like
OpenMP, TBB and OpenCL
• SimAPI and Python interfaces for monitoring and controlling the sim-
ulator’s behavior at runtime
• ROI (region of interest) support
• Multiple instrumentation modes - Faster cache-only pre-ROI simula-
tion
• Single-option debugging of simulator or application itself
• Stackable configurations
• x86-64 support and initial 32-bit support
• Modern Linux-OS support
• Integrated statistics collection support
2 Getting Started
2.1 Downloading Sniper
Download Sniper at http://www.snipersim.org/w/Download.
32.2 Compiling Sniper
One can compile Sniper with the following command: cd sniper && make.
If you have multiple processors, you can take advantage of a parallel make
build starting with Sniper version 3.0. In that case, you can run make -j
N, where N is the number of make processes to start.
The SNIPER TARGET ARCH environment variable can be use to set
the architecture type for compilation. If you are running on a 64-bit host
(intel64), then setting the SNIPER TARGET ARCH variable to ia32 will
compile Sniper and the applications in the sniper/test in 32-bit mode.
2.3 Running a Test Application
After compiling Sniper, you can run the included test application to verify
that the simulator has been compiled properly.
Listing 1: Running an included application
$ cd sniper / test / fft
$ make run
...
[ SNIPER ] Start
3 Running Sniper
To run Sniper, use the run-sniper command. For more details on all of the
options that run-sniper accepts, see Section 8.1.1.
Here is the most basic example of how to run the Sniper simulator. After
execution, there will be a number of files created that provide an overview
of the current simulation run.
Listing 2: Integrated Benchmarks Quickstart
$ cd sniper
$ ./ run - sniper -- / bin / ls
3.1 Simulation Output
After running Sniper, output will be created in the current directory (or a
directory specified by the -d option to run-sniper). With the files created
there, one can see the results of the timing simulation done by Sniper.
The main file generated is the sim.out file. It is generated automat-
ically by the sniper/tools/gen simout.py command, and contains basic
information about the simulation, such as runtime, instruction count, and
simulated cycles. (Note that cycle count is only correct when there has only
been a single core frequency during the entire run.)
4In addition to viewing the sim.out file, we encourage the use of the
sniper/tools/sniper lib.py:get results() function to parse and pro-
cess results. The sim.stats files store the raw counter information that
has been recorded by the different components of Sniper. Since Sniper
4.0, the new SQLite3 statisitics database format (sim.stats.sqlite3) sup-
ports multiple statistics snapshots over time. No matter which sim.stats
data format is in the back end, the get results() python subroutine will
be able to present a consistent view of the statistics. Additionally, the
sniper/tools/dumpstats.py utility will continue to produce human-readable
output of all of the counters no matter what the back end will be.
3.2 Using the Integrated Benchmarks
Download Sniper as described in Section 2.1, and then follow the example
in Listing 3.
Listing 3: Integrated Benchmarks Quickstart
$ wget http :// snipersim . org / packages / sniper - benchmarks . tbz
$ tar xjf sniper - benchmarks . tbz
$ cd benchmarks
$ export SNIPER_ROOT =/ path / to / sniper
$ export BENCHMARKS_ROOT = $ ( pwd )
$ make -j 2 # make -j supported in Sniper 3.0
$ ./ run - sniper -p splash2 - fft -i small -n 4 -c gainestown
3.2.1 Automatically Running Multiple Multi-threaded Workloads
Starting with Sniper version 3.04, and using the integrated benchmarks as
described in Section 3.2, it is now possible to run multiple multi-threaded
workloads in parallel (or easily run multiple multi-program workloads in
parallel). To do this, one needs to simply use the --benchmarks option
to $BENCHMARKS ROOT/run-sniper. Note that currently, ROI support is
disabled and the entire application will run in the simulator (not just the
region of interest).
Listing 4: Running Multiple Multi-threaded Benchmarks
$ cd $BENCHMARKS_ROOT
$ ./ run - sniper -c gainestown -- benchmarks = splash2 - fft - small -2 ,
splash2 - fft - small -2
3.3 Simulation modes
When running a single (potentially multi-threaded) application, Sniper uses
the Pin front-end which supports multiple simulation modes, these can be
switched at runtime. These modes are:
5• Detailed — Fully detailed models of cores, caches and interconnection
network
• Cache-only — No core model (simulated time does not advance!),
only simulate cache hit rates (useful for cache and branch predictor
warmup)
• Fast-forward — No core and no cache models, useful for quickly skip-
ping to a region of interest
As a (rough) guideline, simulation speed is in the order of 1 MIPS (de-
tailed) / 10 MIPS (cache-only) / 1000 MIPS (fast-forward) when using the
different instrumentation modes.
3.4 Region of interest (ROI)
When simulating parallel applications, one usually does not care about the
(sequential) initialization and cleanup phases of the benchmarks. When
applications are marked with SimRoiBegin() and SimRoiEnd() markers,
Sniper can enable performance models only during ROI. By default, Sniper
assumes the application has no such markers and simulates the entire ap-
plication in detailed mode. The --roi option to run-sniper changes this
behavior, and starts in cache-only mode (the initialization phase is used to
warm up caches, the --no-cache-warming option can be used to select fast-
forward mode instead) until the application executes SimRoiBegin(), and
switches to fast-forward mode on SimRoiEnd(). The integrated benchmarks
suite already has ROI markers included, in fact, when using the run-sniper
script inside benchmarks, --roi is implied (use benchmarks/run-sniper
--no-roi to simulate these applications completely).
More fine-grained control over execution modes can be obtained by us-
ing the --roi-script parameter. This starts the simulation in fast-forward
mode, and ignores any SimRoiBegin()/SimRoiEnd() markers in the ap-
plication. Instead, a Python script can — triggered by callbacks on for
instance HOOK ROI BEGIN/END or HOOK MAGIC MARKER — decide when to en-
able performance models. For an example, see the fft-marker test applica-
tion which uses a combination of SimMarker()s in the application and the
iter2.py script to use the first iteration of the FFT algorithm to warm up
caches, execute only the second iteration in detail, and fast-forward through
the remainder of the application.
Note that all magic instructions, including ROI markers, are currently
only supported in single-application mode, not when using trace files or
multiple multi-threaded applications.
63.5 Using Your Own Benchmarks
Sniper can run most applications out of the box. Both static and dynamic
binaries are supported, and no special recompilation of your binary is nec-
essary. Nevertheless, we find that most people will want to define a region
of interest (ROI) in their application to focus on the parallel sections of the
program in question. By default, Sniper uses the beginning and end of an
application to delimit the ROI. If you add the --roi option to run-sniper,
it will look for special instructions, we call them magic instructions, as they
are derived from Simics’ use of them to communicate with the simulator.
See Section 4.1 for more details on the SimAPI, and how to use them in
your application. Specifically, one would want to add the SimRoiStart()
and SimRoiEnd() calls into your application before and after the ROI to
turn detailed modes on and off respectively.
3.6 Manually Running Multi-program Workloads
In Sniper 2.0, multi-program workload support was added. This is an alter-
native method to run programs in Sniper. The normal execution mode, runs
Pin as the instruction-trace feeder, and Sniper runs as a Pintool to produce
timing results on your application run. In an alternative mode, Sniper can
me run with multiple single-threaded applications, mapping each to its own
core.
The steps involved for running multi-threaded workloads are first to gen-
erate SIFT traces, and then to run Sniper passing the SIFT filenames into
the simulator. In an alternative mode, it is also possible to run an appli-
cation live, and feed a trace, via a named pipe, directly into the simulator.
Although this method will save HDD space, it will require that your system
runs copies of each program for each Sniper invocation. Additionally, there
is no guarantee that each run will be identical when using this method.
3.6.1 Collecting Traces
It is possible to collect both full and partial traces of an application’s exe-
cution.
Listing 5: Collecting Traces
$ cd sniper
$ make -C test / fft
$ ./ record - trace -o fft -- test / fft / fft - p1
In addition, it is also possible to collect traces and their corresponding
BBVs suitable for SimPoint processing.
Listing 6: SimPoint Trace Collection
$ cd sniper
7$ ./ record - trace -o fft -b 1000000 -- test / fft / fft - p1 - m20
This command will generate a number of SIFT files with names in the
format of .N.sift, where if defined by the -o option, and N
is the block number. BBVs will be stored in .N.bbv.
3.6.2 Viewing Traces
After generating a trace, as shown in Listing 5, you can view the data
captured in the trace with this command.
Listing 7: Viewing Traces
$ cd sniper
$ ./ sift / siftdump fft . sift | less
3.6.3 Collecting and Playing Back Traces Simultaneously
Listing 8: Simultaneous Recording/Playback of Traces
$ # Make a pipe for each application
$ cd sniper
$ mknod fft1_pipe . sift p
$ mknod fft2_pipe . sift p
$ # Start recording traces for each application
$ ./ record - trace -o fft1_pipe -- ./ test / fft / fft - p1 &
$ ./ record - trace -o fft2_pipe -- ./ test / fft / fft - p1 &
$ # Run Sniper , pointing to the instruction trace pipe files
$ ./ run - sniper -c gainestown -n 2 -- traces = fft1_pipe . sift ,
fft2_pipe . sift
3.7 Running MPI applications
Starting with version 4.0, Sniper has (limited) support for running MPI
applications. All MPI ranks run on the same machine, and will use a shared-
memory back-end. Ranks can be internally parallelized, e.g. using a hybrid
MPI+OpenMP programming model. This mode is not meant for running
simulations that span multiple machines; instead, the goal is to simulate
the running of legacy applications, parallelized using only MPI, on (single-
machine) multi-core hardware.
Running A typical command line for running an MPI application in
Sniper looks like this:
Listing 9: Running MPI applications in Sniper
run - sniper -c gainestown -n 4 -- mpi -- my_mpi my_args
8run-sniper generates an mpiexec command line using mpiexec and the
number of MPI ranks (-np). By default, one MPI rank is run per core. This
can be overriden using the --mpi-ranks=N option. The mpiexec command
can be overriden with the --mpi-exec= option. For example, this command
will use mpirun to start two MPI ranks on a 4-core system, and set an extra
environment variable NAME=VALUE:
Listing 10: Extended MPI options
run - sniper -c gainestown -n 4 -- mpi -- mpi - ranks =2
-- mpi - exec = " mpirun - genv NAME VALUE " -- my_mpi my_args
Only instructions between MPI Init and MPI Finalize are simulated, all
in detailed mode.1 This requires that MPI applications are modified by
appending SimRoiBegin() and SimRoiEnd() markers. The --roi can also
be added to restrict simulation to the code executed in the ROI region of
the MPI application.
Logical versus physical addresses MPI ranks belonging to a single
application, running on a single host machine, will all run in their private
address space — except for a shared memory region that is managed by the
MPI back-end and used for inter-process communication. To make sure that
cache coherency is simulated correctly, Sniper uses physical addresses when
simulating MPI applications. This ensures that no cache line sharing, and
its associated timing effects, is simulated for private address ranges even if
their logical address ranges overlap.
Limitations Currently, only MPICH2 and Intel MPI are supported. MPI
applications must not start new processes or call clone(). All MPI ranks
must run on the local machine (do not pass -host or -hostfile options to
mpiexec).
4 Scripted simulator control with Python
Python interfaces are available for runtime analysis and manipulation of
the state of the simulator. By using the -s parameter to run-sniper, one
or more Python scripts can be specified that are run at the start of the
simulation. These scripts can register callback functions which are executed
during simulation whenever certain events occurs.
The most common event is the synchronization event which periodi-
cally synchronizes the system to make sure that each of the cores are not
1
Although an explicit warmup phase is not supported when running MPI applications,
one can write out a statistics snapshot by calling sim.stats.write from a Python script
and use the --partial flag to ignore results before the snapshot.
9advancing too quickly in respect to the others. When using barrier synchro-
nization via the clock skew minimization/scheme=barrier configuration
option, the clock skew minimization/barrier/quantum=100 variable sets
how often the periodic callback, or sim hooks.HOOK PERIODIC Python hook,
in nanoseconds is called. In the following example, using the above config-
uration settings, the script registers the foo() subroutine to get called on
each periodic callback, or every 100ns given the above configuration options.
Listing 11: DVFS Periodic Callback Example
import sim_hooks
def foo ( t ) :
print ’ The time is now ’ , t
sim_hooks . register ( sim_hooks . HOOK_PERIODIC , foo )
Below is higher-level example that works the same way as Listing 11.
Listing 12: High Level DVFS Periodic Callback Example
import sim
class Class :
def hook_periodic ( self , t ) :
print ’ The time is now ’ , t
sim . util . register ( Class () )
In this case, the Class automatically registers functions named hook *.
In this case, hook periodic(self, t) is the same as registering the sim hooks.HOOK PERIODIC
call.
More example scripts are available in the scripts subdirectory of the
Sniper distribution. Below is a complete listing of the currently available
hooks.
Listing 13: Available Hooks
// available hooks
HOOK_PERIODIC
HOOK_PERIODIC_INS
HOOK_SIM_START
HOOK_SIM_END
HOOK_ROI_BEGIN
HOOK_ROI_END
H OOK_CPUFREQ_CHANGE
HOOK_MAGIC_MARKER
HOOK_MAGIC_USER
HOOK_INSTR_COUNT
HOOK_THREAD_CREATE
HOOK_THREAD_START
HOOK_THREAD_EXIT
HOOK_THREAD_STALL
HOOK_THREAD_RESUME
H OOK_THREAD_MIGRATE
H OOK_INSTRUMENT_MODE
H OOK_PRE_STAT_WRITE
10HOOK_SYSCALL_ENTER
HOOK_SYSCALL_EXIT
H O OK _A PP LIC AT IO N_S TA RT
H OO K_AP PLICA TION _EXIT
HOOK_APPLICATION_ROI_BEGIN
H O OK _ A P PL I C A TI O N _ RO I _ E ND
4.1 Runtime Configuration Support with the SimAPI
The SimAPI allows an application to directly interact with Sniper. We
use the same methodology that is used in Simics, where an xchg %bx,%bx
instruction tells the simulator to interpret this instruction differently. The
benefit of using this instruction is the ability of applications that use the
SimAPI to be run on native hardware without modification. This can be
done by using the SimInSimulator() function which returns 1 when one is
running in the simulator, and 0 when you are not. Using this information,
one can control the simulator, interact with DVFS, and also interact with
user-written python scripts to monitor or control different aspects of the
simulation. See Section 9.6 for a complete list of currently available SimAPI
calls available.
5 Configuring Sniper
There are two ways to configure Sniper. One is directly on the command
line, and the other is via configuration files. Configuration options are stack-
able, which means that options that occur later will overwrite older options.
This is helpful if you would like to define a common shared configuration,
but would like to overwrite specific items in the configuration for different
experiments.
All configuration options are hierarchical in nature. The most basic form
below indicated how to set a key to value in a section.
Listing 14: Key Value and Section
section / key = value
Listing 15: Key Value and Section for Config Files
[ section ]
key = value
Sections can be hierarchical, delimited with a /. For example, the fol-
lowing two configurations are identical:
Listing 16: Hierarchical Section Configuration
perf_model / core / interval_timer / window_size =96
11Listing 17: Hierarchical Section Config File
[ perf_model / core / interval_timer ]
window_size =96
5.1 Configuration Files
The method we most often use is to pass an entire configuration file to
Sniper from the command line. In the example below, we pass the option
-c gainestown to run-sniper. By default, the run-sniper command is
smart enough to look for configuration files both in the local directory as
well as in the sniper/config subdirectory. The gainestown configuration
is one that is provided on the config directory. Note that the .cfg suffix
is optional for Sniper version 3.01 and higher.
Listing 18: Passing Options via the Command Line
$ ./ run - sniper -c gainestown -- / bin / ls
Here is an example configuration file.
Listing 19: Example configuration file
#include nehalem
[ perf_model / core ]
frequency = 2.66 # Frequency in GHz
[ perf_model / branch_predictor ]
type = " pentium_m "
5.2 Command Line Configuration
Sniper supports passing configuration options directly on the command line
with the -g option, followed by the configuration item itself, and the value
of the configuration item.
For example, to set the window size of your processor when using the
interval core model, you can run Sniper this way:
Listing 20: Passing Options via the Command Line
$ ./ run - sniper -g -- perf_model / core / interval_timer / window_size
=96 -- / bin / ls
5.3 Heterogeneous Configuration
To allow for heterogeneous configurations, we introduced, in Sniper 3.0, the
ability to configure different parameters based on a new array notation. In
Sniper version 3.02, we updated the way to specify heterogeneous options
by adding the required empty array suffix ([]).
12Listing 21: Example configuration file
[ perf_model / core ]
frequency = 2.66 # Set the default value
frequency [] = 1.0 , , ,1.0 # Core 1 ,2 uses the default above , 2.66
In the example above, we first set a default frequency of 2.66 for all cores in
the simulation. We then specify frequencies for cores 0 and 3, leaving the
frequency for core 1 and 2 at the default value.
5.4 Heterogeneous Options
Below is a short listing of some of the more popular heterogeneous configura-
tion options. All heterogeneous options can be found by looking for function
calls in this format: get*Array("config/path", index). Currently, most
options are indexed by core id, but this is not guaranteed to be the case for
all options.
Not listed here are the private cache configuration options which also are
heterogeneous with the Sniper 3.01 release. See Section 6.1.2 for a listing of
those options.
Listing 22: A Selection of Heterogeneous Options
[ perf_model / core ]
frequency [] = 2.66 ,3.00
[ perf_model / branch_predictor ]
mispredict_penalty [] = 8 ,10
[ perf_model / core / interval_timer ]
dispatch_width [] = 2 ,4
window_size [] = 64 ,128
6 Configuration Parameters
6.1 Basic architectural options
Here are some of the most used configuration options in Sniper.
6.1.1 Processor core
Description Example Option
Core model type perf model/core/type=interval
Core dispatch width perf model/core/interval timer/dispatch width=4
Core ROB size perf model/core/interval timer/window size=128
136.1.2 Caches
Description Example Option
Number of cache levels perf model/cache/levels=3
L1-I options perf model/l1 icache/*
L1-D options perf model/l1 dcache/*
L2 options perf model/l2 cache/*
L* options perf model/l* cache/*
Total cache size (kB) perf model/l* cache/cache size=256
Cache associativity perf model/l* cache/associativity=8
Replacement policy perf model/l* cache/replacement policy=lru
Data access time perf model/l* cache/data access time=8
Tag access time perf model/l* cache/tags access time=3
Replacement policy perf model/l* cache/writeback time=50
Writethrough perf model/l* cache/writethrough=false
Shared with N cores perf model/l* cache/shared cores=1
6.2 Reschedule Cost
Allows one to add an additional latency to pthread mutex calls when high
single-mutex contention causes the kernel to wait for long periods before
returning that would otherwise not exist with uncontended or low-contention
mutexes.
6.3 DVFS Support
We added support for DVFS throughout the entire simulator when we moved
to keeping track of progress from cycles to femtoseconds (SubsecondTime
class/uint64 t internally). DVFS support in Sniper allows one to change
the frequency of a running core during execution. Below we will review how
to configure DVFS for your system, and how to update the frequencies while
running.
6.3.1 Configuring the DVFS Architecture
There are two types of domains in the current DVFS manager implementa-
tion, a global domain, and a voltage-island domain that can be configured
on a per-core clustering basis. This was done to be able to model the Core 2
microarchitecture, where the shared L3 cache was on a fixed global domain,
and each socket is shared on a single voltage domain. To configure the sim-
ulator for this configuration, the DVFS domain of the cache needs to be set,
and also the voltage island cache grouping also need to be defined. For the
example, the following configuration items need to be configured.
Listing 23: DVFS Cache Configuration for Core2
14# Setup the core DVFS transition latency
[ dvfs ]
transition_latency = 10000 # In ns
# Configure 4 - core DVFS granularity
[ dvfs / simple ]
cores_per_socket =4
# Place the L2 ( and L1 ’s , not shown ) on the core domains
[ perf_model / l2_cache ]
shared_cores =1
dvfs_domain = core
# Place the L3 cache on the global domain
[ perf_model / l3_cache ]
shared_cores =4
dvfs_domain = global
6.3.2 Configuring DVFS at Startup
There are a ways to control DVFS. The first, is to set the values at startup,
using a heterogeneous configuration (See Section 5.3 for more details). For
example, one can configure the startup frequency for each core using the
perf model/core/frequency configuration variable. See Listing 21 for a
configuration file example involving heterogeneous frequency settings.
6.3.3 Controlling DVFS at Runtime
Using the scripting interface, it is possible to configure the core frequencies at
runtime. There are two different ways to do this. The first is to communicate
with the simulator from the application itself. The application, through
the SimAPI, can change it’s own frequency, or that of another core. The
SimSetOwnFreqMHz(MHz) function sets the frequency of the current core
to the value passed in. For a listing of all of the SimAPI interfaces, see
Section 9.6.
A second way of controlling the frequency of the host cores is via the
Python interface. Below is a complete example that is included in the Sniper
distribution that allows one, from the command line and without a simulator
recompile, to change the frequencies of any core during the simulation.
Listing 24: Included DVFS Python Script
"""
dvfs . py
Change core frequencies according to a predifined list
Argument is a list of time , core , frequency values . Time is in
nanoseconds , frequency in MHz
Example :
- sdvfs : 10 0 0 : 1: 3 0 0 0: 2 5 00 : 1 : 26 6 0
Change core 1 to 3 GHz after 1 us , change core 1 to 2.66 GHz
after 2.5 us
15"""
import sys , os , sim
class Dvfs :
def setup ( self , args ) :
self . events = []
args = args . split ( ’: ’)
for i in range (0 , len ( args ) , 3) :
self . events . append (( long ( args [ i ]) * sim . util . Time . NS , int (
args [ i +1]) , int ( args [ i +2]) ) )
self . events . sort ()
sim . util . Every (100* sim . util . Time . NS , self . periodic ,
roi_only = True )
def periodic ( self , time , time_delta ) :
while self . events and time >= self . events [0][0]:
t , cpu , freq = self . events [0]
self . events = self . events [1:]
sim . dvfs . set_frequency ( cpu , freq )
sim . util . register ( Dvfs () )
7 Understanding your Software with Sniper
7.1 CPI Stacks
To generate CPI Stacks, run the SPLASH-2 - FFT
sniper/tools/cpistack.py file in 100% sync-barrier
sync-crit_sect
mem-dram
mem-off_socket
the directory where your Sniper out- 80%
mem-l3
mem-l2_neighbor
mem-l2
put files are. With that data, a mem-l1_neighbor
mem-l1d
ifetch
Percent of time
60% branch
file, cpi-stack.png will be generated depend-fp
depend-int
dispatchwidth
along with output text that represents 40%
the CPI Stack of your application. 20%
Each component represents the time
0%
lost because of that specific compo- 0 1 2 3 4
Thread number
5 6 7
nent.
7.2 Power Stacks
As of version 3.02, Sniper integrates with the McPAT power and area mod-
eling framework to estimate a program’s power consumption. To generate
Power Stacks, run the sniper/tools/mcpat.py file in the directory where
your Sniper output files are. With that data, a file, power.png will be
generated along with output text that represents the power use of your ap-
plication, broken down by component. One can choose to plot dynamic,
static or total power, or chip area per component.
167.3 Loop Tracer
The loop tracer allows one to determine the steady-state performance of
an application loop. To use it, configure Sniper with the parameters from
Listing 25. The output should will look similar to Listing 26.
Listing 25: Loop Tracer Setup
[ general ]
syntax = att # Optional
[ loop_tracer ]
enabled = true
base_address =4090 be # Loop start address
iter_start =9000 # Wait before starting
iter_count =20 # Number to view
Listing 26: Loop Tracer Output
0 10 20
0 1 2 3 4 5 6 7 8 9 0 1 2 3 4 5 6 7 8 9 0 1 2 3 4 5 6 7
[ 4090 be] add % rbp, % rbx (0) 0 1 2 3 4 5 6 7 8 9 a b c d e f g h i j
[ 4090 c1] add $0x1, % rax (0) 0 1 2 3 4 5 6 7 8 9 a b c d e f g h i j
[ 4090 c5] cmp % rdi, % rax (0) 0 1 2 3 4 5 6 7 8 9 a b c d e f g h i j
[ 4090 c8] jle 0 x4090be (0) 0 1 2 3 4 5 6 7 8 9 a b c d e f g h i
7.4 Visualization
Sniper visualization options can help the user to understand the behavior of
the software running in the simulator. As there is no single visualization that
fits the needs of all researchers and developers, a number of visualization op-
tions are provided. Currently, there are three main groups of visualizations
available:
• Cycle stacks plotted over time
• McPAT visualizations plotted over time
• 3D Time-Cores-IPC visualization
The visualizations can be generated by passing the --viz option to the
run-sniper command. The --viz option periodically stores statistics into
the sim.stats file. The default setting saves statistics every 1000ns, storing
a maximum of 2000 snapshots (by automatically consolidating extra entries
for long-running applications).
7.4.1 Cycle stacks plotted over time
The traditional CPI-stack (sniper/tools/cpistack.py) aggregates infor-
mation from an entire run into a single stack. This visualization (as seen
in Figure 1) is an interactive graph of cycle stacks plotted over time. Two
main options are provided. The user can switch between a simple and a
17Figure 1: CPI stack over time for Splash-2 FFT with 2 threads in the
detailed, normalized view. The application was run in Sniper with the
gainestown configuration in Sniper using the --viz and --power options.
detailed view. In the simple view, the used cycles are grouped in four main
components: compute, branch, communicate and synchronize. The detailed
view subdivides these main components in more detailed components while
keeping the colors of the main components the same. Components that be-
long to the same main component have the same color with a different tint
or shade. The second option provided is the option to view a normalized or
non-normalized cycle stack. This visualization can be created by using the
--viz option to the run-sniper command.
7.4.2 McPAT visualizations plotted over time
This visualization is similar to the cycle stacks plotted over time, instead
showing the output of McPAT over time. One can view the power and energy
used during the different periods of execution of the application. The user
can switch between the visualization of power (W), energy (J) and energy
(%). By default, the McPAT visualization is not generated because it can
take quite a long time (many hours for long benchmarks). We have recently
updated McPAT to support CACTI caching both between and inside of runs.
This has resulted in significant performance improvements when running
McPAT. Sniper versions after 4.1 have been enabled to automatically use
the CACTI caching version of McPAT on 64-bit hosts. To generate the
McPAT visualization in addition to the normal visualizations over time, use
the --power option in combination with the --viz option to run-sniper.
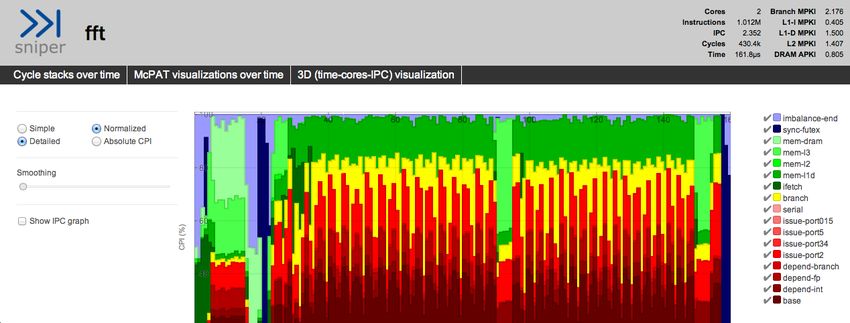
7.4.3 3D Time-Cores-IPC visualization
As progress made on cores can be different, a higher-level overview of the IPC
(instructions-per-cycle) for each core over time was added (Figure 2). The
result is a surface plot that indicates per-core IPC. A low IPC can mean that
18Figure 2: CPI stack over time for Splash-2 FFT with 2 cores running with
the gainestown configuration in Sniper.
an application is not making significant progress because of architectural or
micro-architectural limitations.
7.4.4 Topology
Starting with Sniper version 4.2, the --viz option to run-sniper automati-
cally generates the system topology as an additional section on the generated
web page. In addition to the topology information, with includes cache sizes
and sharing configuration, the image is annotated with performance data.
Pop-ups display information about the different components: cores display
their IPCs over time, caches display MPKI, and the DRAM controllers show
APKI.
7.4.5 Visualization notes
• The visualizations have been tested on Google Chrome version 23,
Mozilla Firefox version 16 and Sarfari 6.02. Enable WebGL support
in Safari to view the WebGL-optimized version of the 3D IPC plot.
• When the visualizations are not on a web server, Chrome will not
render the visualizations correctly, although Firefox will.
• If the visualizations are slow, try to generate them with fewer, larger
intervals.
• Generating the output for McPAT can take a lot of time if you are
not using the CACTI-caching version. Note that the 32-bit versions
compiled by us do not support caching.
19Figure 3: Topology of the gainestown microarchitecture with a sparkline
showing the misses per 1000 instructions (MPKI) of the first L1 data cache.
The sparkline shows the MPKI of the Splash-2 FFT application running on
two cores.
8 Command Listing
8.1 Main Commands
8.1.1 run-sniper
run-sniper [-n ] [-d ] [-c ]
[-c [objname:],,...] [-g ]
[-s ] [--roi] [--roi-script] [--viz] [--perf] [--gdb] [--gdb-wait]
[--gdb-quit] [--appdebug] [--appdebug-manual] [--appdebug-enable]
[--power] [--cache-only] [--fast-forward] [--no-cache-warming] [--save-patch]
[--pin-stats] [--mpi [--mpi-ranks=] ] {--traces=,,...
[--response-traces=,,...] | -- }
There are a number of ways to simulate applications inside of Sniper.
The traditional mode accepts a command line argument of the application to
run. Starting with Sniper 2.0, multiple single-threaded workloads to be run
on in Sniper via the SIFT feeder (--traces). Multiple multi-threaded appli-
cations can be run in Sniper as well via SIFT and the --response-traces
option starting with version 3.04. This is automatically configured via the
--benchmarks parameter to run-sniper in the integrated benchmarks suite.
In Sniper 4.0, single-node shared-memory MPI applications can now be run
in Sniper.
-n — Number of simulated cores (overrides the general/ncores con-
figuration option)
-d — Output directory for all generated files
20-c — Configuration file(s), see Section 5.1
-c [objname:],,... — Setup a het-
erogeneous configuration for n items (cores by default) while setting
the tag objnames to name, name2, etc.
-g — Individual configuration setting(s), see
Section 5.2
-s — Run script during the simulation, see Section 4
--roi — Enable/disable detailed mode on SimRoiBegin()/SimRoiEnd()
(default: whole program executed in detailed mode)
--roi-script — Allow ROI to be completely determined by script
(start in fast-forward mode, ignore SimRoiBegin()/SimRoiEnd())
--viz — Generate visualizations, combine with --power to enable
McPAT runs. (default: output to viz/, Requires version 4.1+)
--perf — Run Sniper inside of the Linux ’perf stat’ tool.
--gdb — Enable Pin tool debugging. Start executing the Pin tool
right away
--gdb-wait — Enable Pin tool debugging. Halt when first attaching
to the debugger
--gdb-quit — Enable Pin tool debugging. Automatically quit if no
errors were detected
--appdebug — Enable Pin application debugging. Halt when first
attaching to the debugger
--appdebug-manual — Enable Pin application debugging. Do not
start gdb automatically, but allow the user to connect manually
--appdebug-enable — Enable Pin application debugging. Start exe-
cuting the application right away
--power — Enable McPAT power runs. When used in combination
with --viz, also generate the McPAT output.
--cache-only — Only simulate caches during ROI
--fast-forward — Use fast-forwarding during the entire run
--no-cache-warming — Use fast-forward simulation before ROI (de-
fault is to use cache-only)
21--save-patch — Save a patch (to sim.patch) with the current Sniper
code differences
--pin-stats — Enable basic pin statists. Normally saves to pin.log
--mpi — Enable single-node (shared-memory) MPI simulation sup-
port. Works with MPICH2 and Intel MPI (Requires version 4.0+)
--mpi-ranks — Specify the number of ranks (if different from -n)
(Requires version 4.0+)
--traces — Low-level SIFT interface. Specify a comma-separated
list of SIFT input trace files. Normally, users will want to use the
integrated benchmarks suite instead of using this interface directly
(Requires version 2.0+).
--response-traces — Low-level SIFT interface. Specify a list of
SIFT response trace pipes. Normally, users will want to use the inte-
grated benchmarks suite instead of using this interface directly. (Re-
quires version 3.04+)
– Application and options to simulate in Sniper
8.2 Sniper Utilities
8.2.1 tools/attachgdb.sh
tools/attachgdb.py [-h|--help] [--all-threads] [--action={bt}] [--abt]
--all-threads — Perform the action on all threads
--action= — Perform an action (default = bt, backtrace) on all
threads
--abt — Shorthand for attachgdb.py --all-threads --action=bt
8.2.2 tools/cpistack.py
tools/cpistack.py [-h (help)] [-d ] [--partial
:] [-o ] [--without-roi]
[--simplified] [--no-collapse] [--no-simple-mem] [--time|--cpi|--abstime
(default: time)] [--aggregate]
-d — Look into to find the necessary files to compute a
CPI-stack
--partial — Compute CPI stack over time span between specific
statistics markers (default: roi-begin:roi-end)
22-o — Save gnuplot plotted data to ¡file¿.png
--simplified — Create a CPI stack merging all items into the fol-
lowing categories: compute, communicate, synchronize
--no-collapse — Show all items, even if they are zero or below the
threshold for merging them into the category other.
--time — Display CPI-stacks with execution time penalties instead
of using CPI
--cpi — Display stacks with CPI data
--abstime — Normalize each thread’s time to 1.0
--aggregate — Merge all CPI-stacks from multiple threads into a
single CPI-stack
8.2.3 tools/mcpat.py
tools/mcpat.py [-h (help)] [-d ] [--partial
:] [-t ]
[-v ] [-o
-d — Look into to find the necessary files to compute a
power stack
--partial — Compute power over time span between specific statis-
tics markers (default: roi-begin:roi-end)
-o — Save gnuplot plotted data to ¡file¿.png
-t — Output type of McPAT to plot: dynamic (dynamic
power), rundynamic (runtime dynamic), static, total (dynamic + static),
area
-v — Override the process’ default Vdd (V)
8.3 SIFT Utilities
8.3.1 record-trace
Record a SIFT instruction trace.
./record-trace -o [-f-f — Number of instructions to fast forward before starting to
create the trace
-d — Number of instructions to record in the trace
-b — Block size. By setting this value, multiple trace files will
be created. Filenames are names ..sift where is
set above (via -o ) and n is the block number.
— The command (and options) to run for trace collection
8.3.2 sift/siftdump
Review the contents of a SIFT trace.
./siftdump [ ...]
— One or more SIFT trace files to view
8.4 Visualization
8.4.1 tools/viz.py
Generate the visualizations.
tools/viz.py [-h|--help (help)] [-d ]
[-t ] [-n ] [-i
] [-o ] [--mcpat]
[-v|--verbose]
-d — Look into to find the necessary
files to generate the visualizations
-t — Name of the application, will be used as title of the
visualization
-n — The visualization will be generated for
intervals
-i — The used interval size will be
-o — Save the result to
--mcpat — Generate visualizations for McPAT
-v|--verbose — Verbose output
248.4.2 tools/viz/level2.py
Generate the visualization of the cycle stacks over time.
tools/viz/level2.py [-h|--help (help)] [-d ] [-t ] [-n ]
[-i ] [-o ] [--mcpat]
[-v|--verbose]
-d — Look into to find the necessary
files to generate the visualizations
-t — Name of the application, will be used as title of the
visualization
-n — The visualization will be generated for
intervals
-i — The used interval size will be
-o — Save the result to
--mcpat — Generate visualizations for McPAT
-v|--verbose — Verbose output
8.4.3 tools/viz/level3.py
Generate the 3D Time-Cores-IPC visualization.
tools/viz/level3.py [-h|--help (help)] [-d ] [-t ] [-n ]
[-i ] [-o ] [-v|--verbose]
-d — Look into to find the necessary
files to generate the visualizations
-t — Name of the application, will be used as title of the
visualization
-n — The visualization will be generated for
intervals
-i — The used interval size will be
-o — Save the result to
-v|--verbose — Verbose output
259 Comprehensive Option List
9.1 Base Sniper Options
Listing 27: Base options (base.cfg)
# Configuration file for the Sniper simulator
# This file is organized into sections defined in [] brackets
as in [ section ].
# Sections may be hierarchical withsub - sections split by the
’/ ’ character as
# in [ section / sub_section ].
#
# values can be " strings " , numbers , or true / false , existing
values
# should indicate the type
# This section controls various high - level simulation
parameters .
[ general ]
magic = false # Enable performance simulation straight away (
false ) , or wait for Roi { Begin , End } magic instruction ( true )
roi_script = false # Allow ROI to be set by a script , and
ignore Roi { Begin , End } magic instructions
inst_mode_init = cache_only
inst_mode_roi = detailed
inst_mode_end = fast_forward
inst_mode_output = true
syntax = intel # Disassembly syntax ( intel , att or xed )
enable_signals = false
enable_smc_support = false # Support self - modifying code
enable_pinplay = false # Run with a pinball instead of an
application ( requires a Pin kit with PinPlay support )
suppress_stdout = false # Suppress the application ’ s output to
stdout
suppress_stderr = false # Suppress the application ’ s output to
stderr
# Total number of cores in the simulation
total_cores = 64
e n ab le _i cac he _m ode li ng = false
# This section is used to fine - tune the logging information .
The logging may
# be disabled for performance runs or enabled for debugging .
[ log ]
enabled = false
stack_trace = false
disabled_modules = " "
enabled_modules = " "
mutex_trace = false
26p in_codecache_trace = false
[ progress_trace ]
enabled = false
interval = 5000
filename = " "
[ c lo c k_ sk e w_ m in im i za t io n ]
scheme = barrier
report = false
[ c lo c k_ sk e w_ m in im i za t io n / barrier ]
quantum = 100 # Synchronize after every
quantum ( ns )
# This section describes parameters for the core model
[ perf_model / core ]
frequency = 1 # In GHz
type = simple # Valid models are magic , simple , iocoom
logical_cpus = 1 # Number of SMT threads per core
[ perf_model / core / iocoom ]
n u m_ s t o re _ b u ff e r _ en t r i es = 20
n um _out stand ing_ loads = 32
[ perf_model / core / interval_timer ]
# dispatch_width = 4
# window_size = 96
issue_contention = true
num_outstanding_loadstores = 8
m e m o r y _ d e p e n d e n c y _ g r a n u l a r i t y = 8 # In bytes
l l l _ d e p e n d e n c y _ g r a n u l a r i t y = 64 # In bytes . Model the MSHR for
overlapping misses by adding additional dependencies on
long - latency loads using cache - line granularity
lll_cutoff = 30
i s su e _ m em o p s _a t _ d is p a t ch = false # Issue memory operations to
the cache hierarchy at dispatch ( true ) or at fetch ( false )
# This section describes the number of cycles for
# various arithmetic instructions .
[ perf_model / core / s t a ti c _ i ns t r u ct i o n _c o s t s ]
add =1
sub =1
mul =3
div =18
fadd =3
fsub =3
fmul =5
fdiv =6
generic =1
jmp =1
string =1
branch =1
dynamic_misc =1
27recv =1
sync =0
spawn =0
tlb_miss =0
mem_access =0
delay =0
[ perf_model / branch_predictor ]
type = one_bit
mispredict_penalty =14 # A guess based on Penryn pipeline depth
size =1024
[ perf_model / tlb ]
# Penalty of a page walk ( in cycles )
penalty = 0
# Page walk is done by separate hardware in parallel to other
core activity ( true ) ,
# or by the core itself using a serializing instruction ( false ,
e . g . microcode or OS )
penalty_parallel = true
[ perf_model / itlb ]
size = 0 # Number of I - TLB entries
associativity = 1 # I - TLB associativity
[ perf_model / dtlb ]
size = 0 # Number of D - TLB entries
associativity = 1 # D - TLB associativity
[ perf_model / stlb ]
size = 0 # Number of second - level TLB entries
associativity = 1 # S - TLB associativity
[ perf_model / l1_icache ]
perfect = false
coherent = true
cache_block_size = 64
cache_size = 32 # in KB
associativity = 4
address_hash = mask
replacement_policy = lru
data_access_time = 3
tags_access_time = 1
perf_model_type = parallel
writeback_time = 0 # Extra time required to write back data
to a higher cache level
dvfs_domain = core # Clock domain : core or global
shared_cores = 1 # Number of cores sharing this cache
n e x t _ l e v e l _ r ea d _ b a n d w i d t h = 0 # Read bandwidth to next - level
cache , in bits / cycle , 0 = infinite
prefetcher = none
[ perf_model / l1_dcache ]
perfect = false
28cache_block_size = 64
cache_size = 32 # in KB
associativity = 4
address_hash = mask
replacement_policy = lru
data_access_time = 3
tags_access_time = 1
perf_model_type = parallel
writeback_time = 0 # Extra time required to write back data
to a higher cache level
dvfs_domain = core # Clock domain : core or global
shared_cores = 1 # Number of cores sharing this cache
outstanding_misses = 0
n e x t _ l e v e l _ r ea d _ b a n d w i d t h = 0 # Read bandwidth to next - level
cache , in bits / cycle , 0 = infinite
prefetcher = none
[ perf_model / l2_cache ]
perfect = false
cache_block_size = 64 # in bytes
cache_size = 512 # in KB
associativity = 8
address_hash = mask
replacement_policy = lru
data_access_time = 9
tags_access_time = 3 # This is just a guess for Penryn
perf_model_type = parallel
writeback_time = 0 # Extra time required to write back data
to a higher cache level
dvfs_domain = core # Clock domain : core or global
shared_cores = 1 # Number of cores sharing this cache
prefetcher = none # Prefetcher type
n e x t _ l e v e l _ r ea d _ b a n d w i d t h = 0 # Read bandwidth to next - level
cache , in bits / cycle , 0 = infinite
[ perf_model / llc ]
evict_buffers = 8
[ perf_model / fast_forward ]
model = none # Performance model during fast - forward (
none , oneipc )
[ perf_model / fast_forward / oneipc ]
interval = 100000 # Barrier quantum in fast - forward , in ns
i n cl ud e_ mem or y_ lat en cy = false # Increment time by memory
latency
i n c l u d e _ b r a n c h _ m i s p r e d i c t i o n = false # Increment time on branch
misprediction
[ core ]
s pin_loop_detection = false
[ core / light_cache ]
num = 0
29[ core / hook_periodic_ins ]
ins_per_core = 10000 # After how many instructions should each
core increment the global HPI counter
ins_global = 1000000 # Aggregate number of instructions
between HOOK_PERIODIC_INS callbacks
[ caching_protocol ]
type = p a r a m e t r i c _ d r a m _ d i r e c t o r y _ m s i
variant = mesi # msi , mesi or mesif
[ perf_model / dram_directory ]
total_entries = 16384
associativity = 16
max_hw_sharers = 64 # number of sharers
supported in hardware ( ignored if directory_type = full_map
)
directory_type = full_map # Supported ( full_map
, limited_no_broadcast , limitless )
home_lookup_param = 6 # Granularity at
which the directory is stripped across different cores
d i r e c t o r y _ c a c h e _ a c c e s s _ t i m e = 10 # Tag directory
lookup time ( in cycles )
locations = dram # dram : at each DRAM
controller , llc : at master cache locations , interleaved :
every N cores ( see below )
interleaving = 1 # N when locations =
interleaved
[ perf_model / dram_directory / limitless ]
s of twar e_tra p_pe nalty = 200 # number of cycles
added to clock when trapping into software ( pulled number
from Chaiken papers , which explores 25 -150 cycle penalties )
[ perf_model / dram ]
type = constant # DRAM performance
model type : " constant " or a " normal " distribution
latency = 100 # In nanoseconds
p e r_ c o n tr o l l er _ b a nd w i d th = 5 # In GB / s
num_controllers = -1 # Total Bandwidth =
p e r_ c o n tr o l l er _ b a nd w i d th * num_controllers
c o nt r o l le r s _ in t e r le a v i ng = 0 # If num_controllers
== -1 , place a DRAM controller every N cores
c ontroller_positions = " "
direct_access = false # Access DRAM
controller directly from last - level cache ( only when there
is a single LLC )
[ perf_model / dram / normal ]
standard_deviation = 0 # The standard
deviation , in nanoseconds , of the normal distribution
[ perf_model / dram / cache ]
enabled = false
30[ perf_model / dram / queue_model ]
enabled = true
type = history_list
[ perf_model / nuca ]
enabled = false
[ perf_model / sync ]
reschedule_cost = 0
# This describes the various models used for the different
networks on the core
[ network ]
# Valid Networks :
# 1) magic
# 2) emesh_hop_counter , emesh_hop_by_hop
# 3) bus
memory_model_1 = emesh_hop_counter
system_model = magic
c o ll ec t_ tra ff ic _ma tr ix = false
[ network / emesh_hop_counter ]
link_bandwidth = 64 # In bits / cycles
hop_latency = 2
[ network / emesh_hop_by_hop ]
link_bandwidth = 64 # In bits / cycle
hop_latency = 2 # In cycles
concentration = 1 # Number of cores per network stop
dimensions = 2 # Dimensions (1 for line / ring , 2 for 2 - D
mesh / torus )
wrap_around = false # Use wrap - around links ( false for line /
mesh , true for ring / torus )
size = " " # ":" - separated list of size for each
dimension , default = auto
[ network / emesh_hop_by_hop / queue_model ]
enabled = true
type = history_list
[ network / emesh_hop_by_hop / broadcast_tree ]
enabled = false
[ network / bus ]
i gnore_local_traffic = true # Do not count traffic between core
and directory on the same tile
[ network / bus / queue_model ]
type = contention
[ queue_model / basic ]
moving_avg_enabled = true
m o vi ng _a vg_ wi nd ow_ si ze = 1024
moving_avg_type = arithmetic_mean
31[ queue_model / history_list ]
# Uses the analytical model ( if enabled ) to calculate delay if
cannot be calculated using the history list
max_list_size = 100
a n al y t i ca l _ m od e l _ en a b l ed = true
[ queue_model / windowed_mg1 ]
window_size = 1000 # In ns . A few times the barrier
quantum should be a good choice
[ dvfs ]
type = simple
transition_latency = 0 # In nanoseconds
[ dvfs / simple ]
cores_per_socket = 1
[ bbv ]
sampling = 0 # Defines N to skip X samples with X uniformely
distributed between 0..2* N , so on average 1/ N samples
[ loop_tracer ]
enabled = false
# base_address = 0 # Start address in hex ( without 0 x )
iter_start = 0
iter_count = 36
[ osemu ]
pthread_replace = false # Emulate pthread_ { mutex | cond | barrier
} functions ( false : user - space code is simulated , SYS_futex
is emulated )
nprocs = 0 # Overwrite emulated get_nprocs ()
call ( default : return simulated number of cores )
clock_replace = true # Whether to replace gettimeofday ()
and friends to return simulated time rather than host wall
time
time_start = 1337000000 # Simulator startup time (" time zero
") for emulated gettimeofday ()
[ traceinput ]
enabled = false
a dd ress _rand omiz ation = false # Randomize upper address bits on
a per - application basis to avoid cache set contention when
running multiple copies of the same trace
s top_with_first_app = true # Simulation ends when first
application ends ( else : when last application ends )
restart_apps = false # When stop_with_first_app = false ,
whether to restart applications until the longest - running
app completes for the first time
mirror_output = false
trace_prefix = " " # Disable trace file prefixes (
for trace and response fifos ) by default
32[ scheduler ]
type = pinned
[ scheduler / pinned ]
quantum = 1000000 # Scheduler quantum ( round - robin for
active threads on each core ) , in nanoseconds
core_mask = 1 # Mask of cores on which threads can
be scheduled ( default : 1 , all cores )
interleaving = 1 # Interleaving of round - robin initial
assignment ( e . g . 2 = > 0 ,2 ,4 ,6 ,1 ,3 ,5 ,7)
[ scheduler / roaming ]
quantum = 1000000 # Scheduler quantum ( round - robin for
active threads on each core ) , in nanoseconds
core_mask = 1 # Mask of cores on which threads can
be scheduled ( default : 1 , all cores )
[ scheduler / static ]
core_mask = 1 # Mask of cores on which threads can
be scheduled ( default : 1 , all cores )
[ scheduler / big_small ]
quantum = 1000000 # Scheduler quantum , in nanoseconds
debug = false
[ hooks ]
numscripts = 0
[ fault_injection ]
type = none
injector = none
[ routine_tracer ]
type = none
[ instruction_tracer ]
type = none
[ sampling ]
enabled = false
9.2 Options used to configure the Nehalem core
Listing 28: Nehalem options (nehalem.cfg)
# Common config file for Nehalem core
[ general ]
e n ab le _i cac he _m ode li ng = true
[ perf_model / core ]
logical_cpus = 1 # number of SMT threads per core
type = interval
core_model = nehalem
33[ perf_model / core / interval_timer ]
dispatch_width = 4
window_size = 128
n u m _ o u t s t a n d i n g _ l o a d s t o r e s = 10
[ perf_model / sync ]
reschedule_cost = 1000
[ caching_protocol ]
type = p a r a m e t r i c _ d r a m _ d i r e c t o r y _ m s i
[ perf_model / branch_predictor ]
type = pentium_m
mispredict_penalty =8 # Reflects just the front - end portion (
approx ) of the penalty for Interval Simulation
[ perf_model / tlb ]
penalty = 30 # Page walk penalty in cycles
[ perf_model / itlb ]
size = 128 # Number of I - TLB entries
associativity = 4 # I - TLB associativity
[ perf_model / dtlb ]
size = 64 # Number of D - TLB entries
associativity = 4 # D - TLB associativity
[ perf_model / stlb ]
size = 512 # Number of second - level TLB entries
associativity = 4 # S - TLB associativity
[ perf_model / cache ]
levels = 3
[ perf_model / l1_icache ]
perfect = false
cache_size = 32
associativity = 4
address_hash = mask
replacement_policy = lru
data_access_time = 4
tags_access_time = 1
perf_model_type = parallel
writethrough = 0
shared_cores = 1
[ perf_model / l1_dcache ]
perfect = false
cache_size = 32
associativity = 8
address_hash = mask
replacement_policy = lru
data_access_time = 4
34tags_access_time = 1
perf_model_type = parallel
writethrough = 0
shared_cores = 1
[ perf_model / l2_cache ]
perfect = false
cache_size = 256
associativity = 8
address_hash = mask
replacement_policy = lru
data_access_time = 8 # 8. something according to membench , -1
cycle L1 tag access time
# http :// www . realworldtech . com / page . cfm ? ArticleID =
RWT040208182719 & p =7
tags_access_time = 3
# Total neighbor L1 / L2 access time is around 40/70 cycles
(60 -70 when it ’ s coming out of L1 )
writeback_time = 50 # L3 hit time will be added
perf_model_type = parallel
writethrough = 0
shared_cores = 1
[ perf_model / l3_cache ]
address_hash = mask
dvfs_domain = global # L1 and L2 run at core frequency ( default
) , L3 is system frequency
prefetcher = none
writeback_time = 0
[ c lo c k_ sk e w_ m in im i za t io n ]
scheme = barrier
[ c lo c k_ sk e w_ m in im i za t io n / barrier ]
quantum = 100
[ dvfs ]
transition_latency = 2000 # In ns , " under 2 microseconds "
according to http :// download . intel . com / design / intarch /
papers /323671. pdf ( page 8)
[ dvfs / simple ]
cores_per_socket = 1
[ power ]
vdd = 1.2 # Volts
technology_node = 45 # nm
9.3 Options used to configure the Gainestown processor
Listing 29: Gainestown options (gainestown.cfg)
# Configuration file for Xeon X5550 Gainestown
35You can also read