USER MANUAL - 2021COGNIVUE,INC. 7911RAEBLVD | VICTOR,NY14564
←
→
Page content transcription
If your browser does not render page correctly, please read the page content below
User Manual

© 2021 COGNIVUE, INC.   7911 Rae Blvd |   Victor, NY 14564   |   585.203.1969

Cognivue Clarity® User Manual
Contents
1.0    About Cognivue Clarity® ................................................................................................................... 3
2.0    Device Description ............................................................................................................................ 4
3.0    Recommendations for Use ............................................................................................................... 5
        General Testing Location ................................................................................................................. 5
        Positioning of Cognivue Clarity® and the Patient. ........................................................................... 5
        Cleaning and Disinfecting Cognivue Clarity® ................................................................................... 5
        Use of Personal Protective Equipment ............................................................................................ 6
4.0    Network Connectivity ....................................................................................................................... 6
       Basic Wi-Fi Configuration ................................................................................................................. 6
       Basic Wired Connection ................................................................................................................... 7
       Connection Details ........................................................................................................................... 8
       Advanced Configuration .................................................................................................................. 8
          Static IP Address Configuration .................................................................................................. 8
5.0    Logging on to Cognivue Clarity® ..................................................................................................... 11
6.0    Managing User Accounts ................................................................................................................ 12
       Creating User Accounts.................................................................................................................. 13
       Modifying User Accounts ............................................................................................................... 13
       Deleting User Accounts .................................................................................................................. 14
       Password Expiration....................................................................................................................... 15
7.0    System Information......................................................................................................................... 15
8.0    System Settings ............................................................................................................................... 16
        Enable Report Emailing .................................................................................................................. 16
        Disable Report Printing .................................................................................................................. 16
           Setting a Default Printer ........................................................................................................... 16
        Enable Force Intro Video ............................................................................................................... 17
9.0    Practice Information ....................................................................................................................... 18
10.0   Running a Test................................................................................................................................. 18
11.0   Video Volume Control ..................................................................................................................... 19
12.0   Finding and Viewing Reports .......................................................................................................... 19
13.0   Printing Reports .............................................................................................................................. 22
14.0   Emailing Reports ............................................................................................................................. 22
15.0   Removing Reports ........................................................................................................................... 23
16.0   Power Management ....................................................................................................................... 24
        Screen Sleep ................................................................................................................................... 24
        Screen Wake .................................................................................................................................. 24
        Power Alert .................................................................................................................................... 24

© 2021 Cognivue, Inc.                                               UM-410-J                                                                     Page 1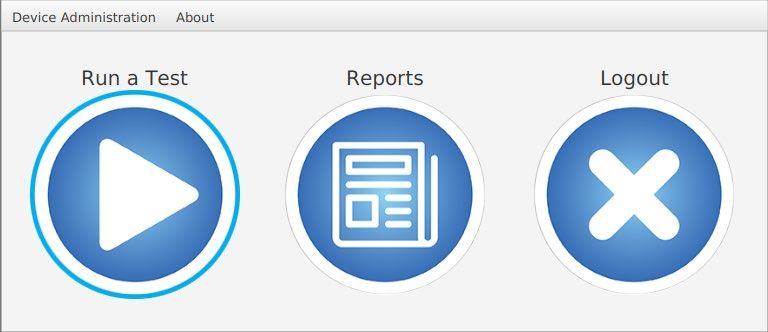
Cognivue Clarity® User Manual
17.0   Technical Specifications .................................................................................................................. 24
18.0   Safety Precautions and Compliance ............................................................................................... 25

                                                      About This Guide
This User Manual contains information that describes the installation and operation of
Cognivue Clarity®. Additional information can be found at www.cognivue.com. Cognivue
Support personnel can be reached from 9-5pm EST at 1-585-433-2992 or
support@cognivue.com.
UM-410-J Cognivue Clarity® User Manual, 02/2/2021

           © 2020 Cognivue, Inc. | 7911 Rae Blvd | Victor, NY 14564 | 585.203.1969

© 2021 Cognivue, Inc.                                            UM-410-J                                                                  Page 2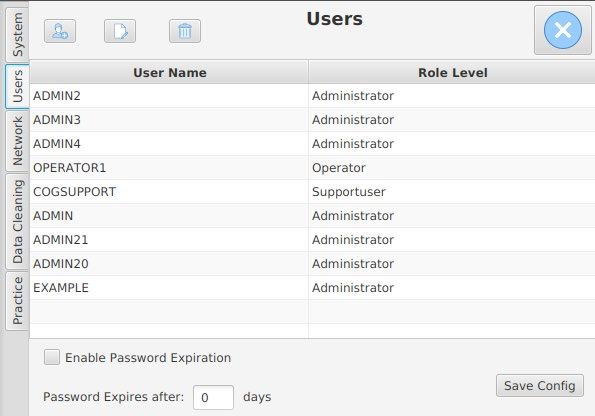
Cognivue Clarity® User Manual
1.0 About Cognivue Clarity®
Cognivue Clarity® is a computerized cognitive assessment aid that objectively, quantitatively, and
reliably evaluates cognitive function. Upon completion of a series of 10 subtests, Cognivue Clarity®
creates a one-page easy-to-interpret patient report with a single clinical score of cognitive function and
a two-page physician report that includes the overall score, breakdown into key cognitive domains and
two key speed parameters. Using these reports, physicians are able to evaluate the patient’s cognitive
profile and decide on the proper course of action to improve patient care. If the score indicates the
patient does not have cognitive impairment, their overall and breakdown cognitive scores can be used
as a baseline for future comparison.

Cognivue Clarity® is indicated for use as an adjunctive tool for evaluating cognitive function. It is not a
stand-alone diagnostic tool. The device results are to be assessed and interpreted by a licensed
physician.

Warnings
    1) Cognivue Clarity® does not identify the presence or absence of clinical diagnoses.
    2) Cognivue Clarity® cannot be used as a stand-alone diagnostic.
    3) Cognivue Clarity® is intended to be used in clinical settings.

Cognivue® scores ≤ 50 are consistent with being impaired (moderate to severe impairment), and scores
≥ 75 are consistent with being unimpaired (normal cognitive function) and scores between 51 and 74
are intermediate (low cognitive impairment). In the Cognivue® clinical validation study, 401 participants
completed ≥ 1 testing session, and 358 completed 2 sessions 1-2 weeks apart. The study showed that
SLUMS cut-off scores of < 21 (impairment) and > 26 (no impairment) corresponded to Cognivue® scores
of 54.5 (NPA = 0.92; PPA = 0.64) and 78.5 (NPA = 0.5; PPA = 0.79), respectively. Cognivue® classification
scores demonstrated good agreement with SLUMS scores (weighted κ 0.57; 95%CI: 0.50-0.63).
Reliability analyses showed similar scores across repeated testing for Cognivue® (R2 = 0.81; r = 0.90) and
SLUMS (R2 =0.67; r = 0.82).

Cognivue Clarity® has been validated with Cognivue Advanced® in a clinical trial with 31 subjects. The
correlation between Advanced and Clarity was very high positive (0.943) and Clarity’s test reliability
analysis was similar to Advanced (R2 = 0.859; r = 0.927)

Additional information is available in the following references:

    •   Cognivue Advanced De Novo Clearance, DEN130033
    •   Diego Cahn-Hidalgo, Paul W Estes, Reina Benabou, “Validity, reliability, and psychometric
        properties of a computerized cognitive assessment test (Cognivue®),” World Journal of
        Psychiatry 2020 January 19; 10(1): 1-11.

© 2021 Cognivue, Inc.                            UM-410-J                                             Page 3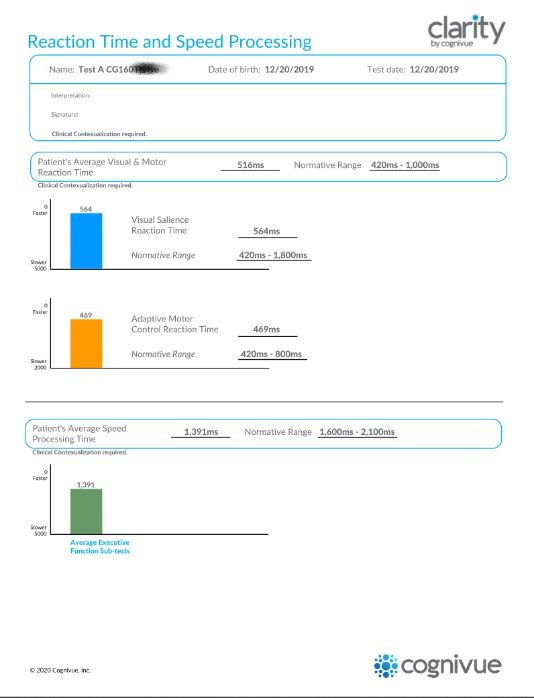
Cognivue Clarity® User Manual
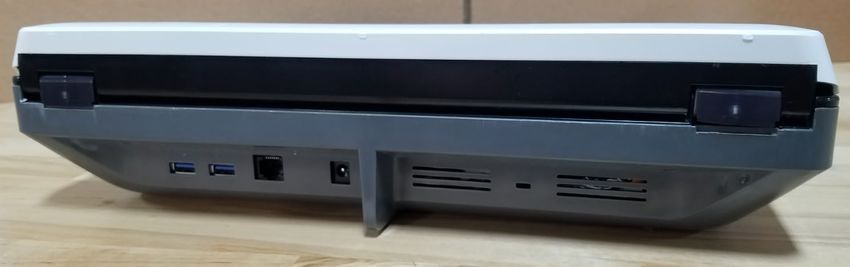
2.0 Device Description
The Cognivue Clarity® is a portable, battery powered, and laptop-like device that includes a wireless
keyboard with a touchpad, a rotary CogniWheel® and a CogniCover®. The CogniWheel® is the sole
patient input device. The CogniCover® is designed for privacy and to reduce distraction and light
reflections on the computer screen. The CogniCover® and CogniWheel® are designed to fold for
portability.
CogniWheel ® CogniCover ®
Power Button
Battery Indicator Lights &
Headphone Jack
USB (for Keyboard) Ethernet Battery Charger
© 2021 Cognivue, Inc. UM-410-J Page 4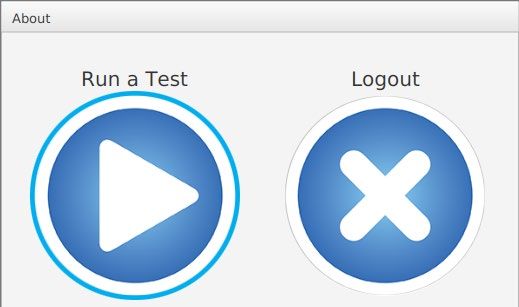
Cognivue Clarity® User Manual
3.0 Recommendations for Use
To provide the best experience for patients and to produce repeatable test results, Cognivue
recommends the following when using Cognivue Clarity®.

General Testing Location
When possible, choose a test location that reduces distractions (for example, an exam room, office or
conference room rather than a busy hallway).

Positioning of Cognivue Clarity® and the Patient.
Put the device on a flat, stable surface that is ergonomically comfortable for the patient (see below).
The patient should be able to comfortably reach and manipulate the CogniWheel® and view the
computer screen. Avoid placing the Cognivue Clarity® in a location where there may be distractions
behind the device which are visible to the patient.

                                                                      Avoid Distractions in the
                                                                      Patient Viewing Area
                                                                      Behind the Device

Do not place the device on the patient’s lap for the test. This does not provide a stable surface during
the administration of the test and may lead to the patient not being able to consistently use the
CogniWheel®.

Cleaning and Disinfecting Cognivue Clarity®
Cognivue recommends sanitizing the Cognivue Clarity® before and after administering a test using one
of the following procedures:
    • Preferred: Use sanitizing or disinfectant wipes to thoroughly wipe the CogniWheel® and the
         base of the device where the patient palm rests. Do NOT wipe the screen!
    • In the event wipes are not available, sanitizing or disinfecting spray may be used as follows:
         Spray twice onto a paper towel and thoroughly wipe the CogniWheel® and the base of the
         device where the patient palm rests. Do NOT wipe the screen and do NOT spray sanitizer or
         disinfectant directly onto the device!

© 2021 Cognivue, Inc.                           UM-410-J                                            Page 5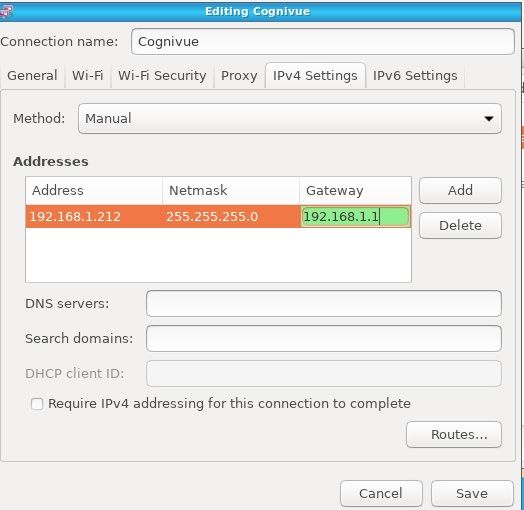
Cognivue Clarity® User Manual
Use of Personal Protective Equipment
While Cognivue recommends sanitizing the device (see Cleaning and Disinfecting Cognivue Clarity®)
before and after administering a test, Cognivue also recommends that operators and patients wear a
disposable mask while interacting with the device. In the event it is not possible to sanitize the device
between patients, Cognivue recommends that operators and patients also use disposable gloves.

4.0 Network Connectivity
Network connectivity is essential to utilize the full capability of the Cognivue Clarity® device. Connecting
to a network will allow your facility to access reports from other computers within the same network. In
addition, Cognivue remotely provides regular software updates that enable new features, fix issues, and
ensure that the system configuration remains secure. These automatic software updates require
Cognivue Clarity® to be connected periodically through your network to Cognivue back-end services.
While it does not need to be connected to run a test, it should be regularly re-connected to a network,
ideally on a daily basis. Cognivue recommends that Clarity devices be connected to a network when
they are plugged into a power source for charging.

Basic Wi-Fi Configuration
To establish a basic network connection, click on the   Network icon in the status bar at the upper left
corner of the screen. From the drop-down menu, select the available Wi-Fi network to which you wish
to connect. In this example, the network is “Cognivue”, but you will connect to your network with a
different name. If there is a large number of networks available, you may see a More networks option
which you can check if you do not see your network listed.

                                                Network icon

© 2021 Cognivue, Inc.                            UM-410-J                                            Page 6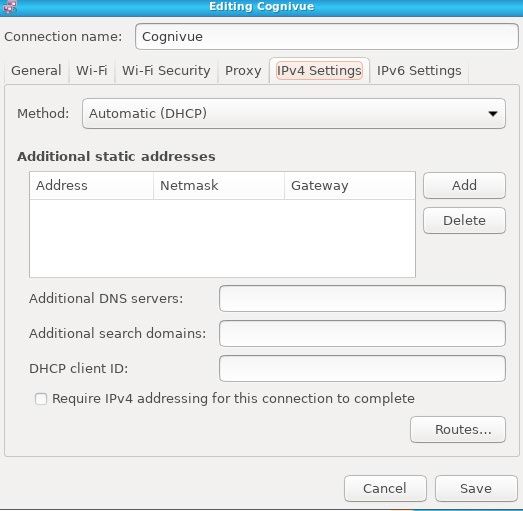
Cognivue Clarity® User Manual
Upon selecting a network, you will be prompted to enter the Wi-Fi password for the selected network.

                                           Wifi Authentication dialog

Upon entering a correct password and clicking the Connect button, the Cognivue Clarity® device will be
connected. Note that the icon in the top left has now changed to the    Wi-Fi connection strength icon
indicating network connectivity.

                                         Wi-Fi Connection Strength icon

The first time the device is connected to any network, it will be necessary to follow this procedure to
select the network and enter the credentials for that network. Once connected to a network, the device
will remember the credentials so that when moving from one previously-connected network to another,
it will be necessary to simply click the Network icon and select the desired network.

Basic Wired Connection
To establish a wired connection to a network, connect one end of a standard network cable to an active
network jack at your location and the other end into the RJ-45 network port on the back of the Cognivue
Clarity® device. Follow the same instructions as above, but this time select Wired Connection 1. The
icon in the top, left corner will now be the    Network icon.

© 2021 Cognivue, Inc.                             UM-410-J                                      Page 7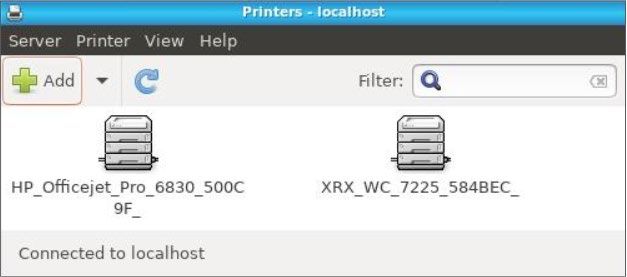
Cognivue Clarity® User Manual
Connection Details
When logged on to a Cognivue Clarity® device, administrators can view and test the current network
configuration information on the Network Configuration window.

                                         Network Configuration window

To open the Network Configuration window, on the Primary window (see 5.0 Logging on to Cognivue
Clarity®) select Device Administration >> Settings and then click the Network tab. The Network
Configuration window contains network configuration properties and their values, as well as
instructions for setting up a basic connection as described above. To ensure the displayed connection
property values are current, click the Refresh button. If all the property values are blank, the device is
not connected and you will need to follow the instructions to establish a connection. Once there are
property values displayed, you can use the Test Connection button to confirm that the device has
network connectivity and is able to connect to the Cognivue back-end systems.

Advanced Configuration
When more advanced network configuration is required, an administrator can log on to the Cognivue
Clarity® device and open the Network Configuration window as described above. Generally, this more
advanced configuration will be done during a consultation with a network administrator and/or
Cognivue Support staff; however, one of the more common advanced configurations is described in the
following subsection.

Static IP Address Configuration
Click the Advanced Configuration button on the Network Configuration window.

© 2021 Cognivue, Inc.                            UM-410-J                                             Page 8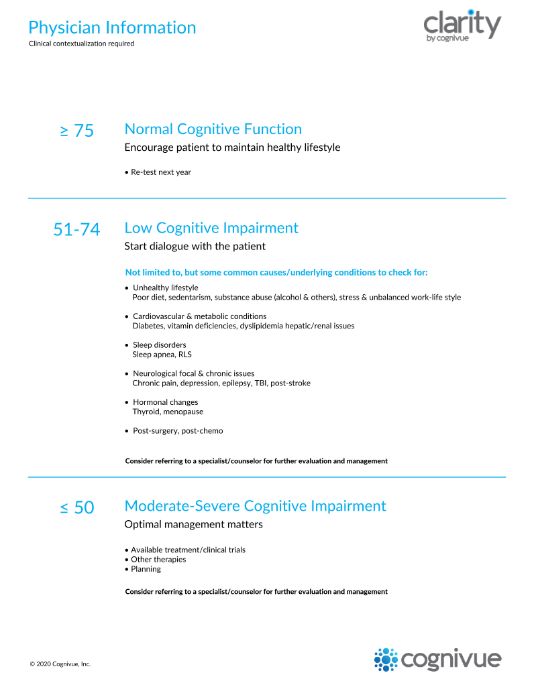
Cognivue Clarity® User Manual
A Network Connections configuration wizard window will appear. Click on the connection named for
your SSID and then click the Gear icon.

                                        Gear icon

                                       Network Connections wizard

On the pop-up window that appears, click on the IPV4 Settings tab.

                                       Network Configuration Editor

© 2021 Cognivue, Inc.                          UM-410-J                                      Page 9
Cognivue Clarity® User Manual
Click the Method drop-down menu button and select Manual.
Network Configuration Editor
Now perform the following steps:
1. Click the Add button.
2. In the Address field enter your static or reserved IP (obtained from your network team).
3. In the Netmask field enter the Subnet mask (obtained from your network team).
4. In the Gateway field enter the default gateway address (obtained from your network team).
5. Click the Save button.
6. Close the Network Connections window and return to the Network Configuration window by
clicking the title bar menu icon and selecting Close from the drop-down menu.
Title bar menu icon
Network Configuration Editor
© 2021 Cognivue, Inc. UM-410-J Page 10Cognivue Clarity® User Manual
On the Network Configuration window, click the Refresh button to display the new settings. Then
click the Test Connection button to confirm connectivity to the Cognivue back-end systems.
5.0 Logging on to Cognivue Clarity®
The user Login window is displayed when Cognivue Clarity® is powered on, after an operator completes
administration of a test, after a user clicks the Exit button on the Primary window, or after 30 minutes of
inactivity.
Login window
Any defined Administrator or Operator user (see 6.0 Managing User Accounts) on the specific device can
enter their username and password and click the Login button to log on to the device and see the
Primary window.
Primary window for Administrator users
Primary window for Operator users
The Shutdown button on the Login window can be used by anyone, whether or not a defined user, to
power down the device. Clicking the Shutdown button will display a Confirmation dialog. Clicking the
Cancel button returns the user to the Login window and clicking the OK button shuts down the device.
© 2021 Cognivue, Inc. UM-410-J Page 11Cognivue Clarity® User Manual
Note: This is the preferred way to shut down the device. The physical power button should be used only
if absolutely necessary.
6.0 Managing User Accounts
Each Cognivue Clarity® user should have their own user account. User accounts can be assigned one of
two roles: Administrator or Operator. Administrators are responsible for setting up and managing
accounts, Operators can set up and run tests with patients. The table below summarizes the capabilities
associated with each type of user account.
Administrator Operator
Setting up new accounts X
Disabling accounts X
Changing accounts X
Configure network connection X X
Entering patient data & running a test X X
Running a test with an intro video X X
Viewing a test report X
Role Capabilities table
User accounts must be managed directly on Cognivue Clarity®. After you log in as an Administrator, the
Primary window for Administrators (see 5.0 Logging on to Cognivue Clarity®) will be displayed. On the
menu bar, select Device Administration >> Settings. Select the Users tab to display the User
Management window. Note: the first time you log in, you will see only two accounts: The COGSUPPORT
account, which is for Cognivue support staff use, and the Administrator account defined during
Cognivue Clarity® installation and configuration.
Delete User button
Modify User button
Add User button
User Management window
© 2021 Cognivue, Inc. UM-410-J Page 12Cognivue Clarity® User Manual
The User Management window lists all the user accounts that have been set up on the system and
allows for adding, modifying, and deleting user accounts. This window also allows you the option to set
a defined amount of time before passwords expire.
Creating User Accounts
Click on the Add User button to display the Create Account window.
Create Account window
Enter a valid Username and Password, then re-type it to Confirm Password. Enter the user’s First
Name, Last Name and Email address. Confirm Email by re-typing it, select the appropriate Role
(Operator or Administrator) for this user account, and finally click the Save button. A Confirmation
dialog will be presented and when the Yes button is clicked, the user account will be added to the
device. If there are any errors on the form, appropriate error messages will be displayed and you will be
given the opportunity to make corrections.
© 2021 Cognivue, Inc. UM-410-J Page 13Cognivue Clarity® User Manual
Modifying User Accounts
To modify a user account, open the User Management window, select from the list the user account to
be modified and click the Modify User button.
Modify Account window
Make the desired changes, enter and confirm the account Password (or a new password), click the Save
button and click the Yes button on the Confirmation dialog to complete the changes.
Deleting User Accounts
From the User Management window, you can also delete user accounts by selecting from the list the
user account to delete and then clicking on the Delete User button. You will be presented with a
Confirmation dialog and when you click the Yes button, the account will be deleted and cannot be
recovered.
Note: Only accounts that have not been used to administer a test can be fully deleted. Those that have
been used to administer one or more tests will appear to be deleted, but will, in fact, only be disabled in
order to maintain traceability for all tests administered from that account. Once disabled, an account
cannot be re-enabled, nor can a new account be created with the same username.
© 2021 Cognivue, Inc. UM-410-J Page 14Cognivue Clarity® User Manual
Delete User Confirmation dialog
Password Expiration
This feature is off by default. To enable/disable password expiration for all accounts, click the Enable
Password Expiration checkbox. When this feature is enabled, a password lifetime must be specified.
The default setting is 0 days which will require users to reset their password each time they log on to the
system. To specify a longer period, change the value in the Password Expires after box to the number
of days before a user must reset their password. Each time a user logs on the device within three days
of their password expiration date (determined based on the last time their password was reset) they will
be presented a warning message. Then, the first time they log onto the device on or after the password
has expired they will be forced to reset their password. Note: Operator user accounts can only reset
their own password once it has expired.
7.0 System Information
Basic system information about Cognivue Clarity® is available to any user on the About window
(accessed by clicking About >> About on the Primary window). The information displayed here will be
useful when contacting support.
About window
© 2021 Cognivue, Inc. UM-410-J Page 15Cognivue Clarity® User Manual
8.0 System Settings
The Clarity device includes several configurable options. The ability to make these configuration
changes is available only to Administrator users on the System Settings window which is accessed from
the Primary window by clicking Device Administration >> Settings and selecting the System tab.
System Settings window
Enable Report Emailing
Sending a test report from Cognivue Clarity® to a patient via encrypted email following completion of a
test (see 14.0 Emailing Reports) is not enabled by default. An Administrator can enable this functionality
by clicking the Enable Report Emailing checkbox. When enabled, the option for the patient to receive a
copy of the test report via encrypted email will be provided on the Patient Information window (see
10.0 Running a Test). Note: This setting applies to all users of the device.
Disable Report Printing
Printing test reports from Cognivue Clarity® (see 13.0 Printing Reports) is enabled by default. An
Administrator can disable this functionality by clicking the Enable Report Printing checkbox. When
enabled, a Print button will be displayed on the top navigation bar of the Report Viewer. Note: This
setting applies to all users of the device.
Setting a Default Printer
To set the default printer used to print reports, click the Printer icon next to the Network icon at the top
left of the screen to open the Printer Configuration window.
© 2021 Cognivue, Inc. UM-410-J Page 16Cognivue Clarity® User Manual
Printer Configuration window
Press the Refresh button to discover network printers (please work with your IT team to connect your
printer to your network). Right click on the desired printer to open a drop-down menu and select the
Set as Default option. Select the Properties option from this same menu to adjust other printer settings
as desired. To close the Printer Configuration window, click the title bar menu icon and select Close
from the drop-down menu. Note: Any user of the device can set the default printer, whether or not
Report Printing is enabled; however, they can only print a report if the option is enabled.
Enable Force Intro Video
By default, the Cognivue Clarity® device is configured to provide the operator the option to run the test
with or without the introductory video. By enabling this feature, an Administrator can remove the
option to run the test without playing the video. This will remove the Run Test w/ Intro Video button
from the Patient Information window and change the functionality of the Run Test button to play the
introductory video before the test begins. To force Operators to always play the introductory video
before a test begins, an Administrator can check the Force Introduction Video checkbox.
© 2021 Cognivue, Inc. UM-410-J Page 17Cognivue Clarity® User Manual
9.0 Practice Information
The contact information of the practice administering a Cognivue Clarity® test may be included on test
reports (see 12.0 Finding and Viewing Reports). The ability to configure this information is only available
to Administrator users on the Practice Information window. This window is accessible from the Primary
window by clicking Device Administration >> Settings and selecting the Practice tab. To enter practice
contact information to be displayed on reports, fill in all desired fields and press the Save button. All of
the fields displayed on this window are optional and may be omitted. To enable/disable this feature,
select the Include on report checkbox and press the Save button.
Practice Information window
10.0 Running a Test
To administer a test on Cognivue Clarity®, log on to the device using an Operator account. When the
Primary window (see 5.0 Logging on to Cognivue Clarity®) appears, click the Run a Test button. A
patient information window is displayed that allows the Operator to enter patient data and run a test.
Note: The test can be administered in two different languages: English or Spanish.
Patient Information window
© 2021 Cognivue, Inc. UM-410-J Page 18Cognivue Clarity® User Manual
If enabled by an Administrator (see 8.0 System Settings), there is an option for emailing the report to the
patient. If that option is selected the Operator will be prompted to enter the patient’s email address
and then verify it by entering it a second time. Note: By checking this box, a patient is opting in to
receive email from Cognivue. For more detail on emailing patient reports see 14.0 Emailing Reports.
Patient Information window w/ Email Option
Once the required information is completed, the operator will have two options to initiate the Clarity
test: Run Test or Run Test w/ Intro Video. If the operator clicks the Run Test w/ Intro Video, the
patient will be prompted to turn the wheel to begin playing a short, four-minute video. This video will
play on the device in the language selected. The goal of this video is to prepare the patient for what to
expect during the test. At the completion of the video, or immediately after the operator clicks the Run
Test button, the patient will be prompted to turn the wheel to start the test.
When the test has completed, a new window will appear asking whether to display the test result
report. Only the Operator can respond to the prompt, as keyboard input is required. If the Report
Printing option is enabled and a default printer is configured (see 8.0 System Settings), the Operator will
be able to click a Print button on the report viewer header bar to print the report.
When finished viewing/printing the report, the Operator can click the Close Report button on the
header bar of the report viewer to close the report viewer and return to the Primary window.
11.0 Video Volume Control
In order to control the volume of video playback, the volume control keys on the keyboard can be used.
Volume Control keys
Note: The Mute button sets the volume to its lowest setting. To unmute, it is necessary to use the
volume-up key to increase the volume to the desired level.
12.0 Finding and Viewing Reports
When the test has completed, the Operator will have the option to review the test report. To review a
test report at a later time, log on to Cognivue Clarity® with an Administrator account, and select the
© 2021 Cognivue, Inc. UM-410-J Page 19Cognivue Clarity® User Manual
Reports button from the Primary window. A list of available reports will be presented. After selecting
the desired report from the list, click the View Report button to display the report. If the Report
Printing option is enabled and a default printer is configured (see 8.0 System Settings), the
Administrator will be able to click a Print button on the report viewer header bar to print the report.
Report List window
The test report consists of four pages. Please note that appropriate clinical contextualization is required.
1. Patient Report: This report is intended for the patient. It will contain an overall average score.
Clinical contextualization is required.
Patient Report
© 2021 Cognivue, Inc. UM-410-J Page 20Cognivue Clarity® User Manual
2. Physician Report: This report is intended for the physician. It displays the average test score
and the scores in various areas of cognitive function and health. Clinical contextualization is
required.
Physician Report
3. Reaction Time and Speed Processing: This page is intended for the physician. It provides scores
for reaction time and speed processing of the test taker. Clinical contextualization is required.
Reaction Time and Speed Processing
© 2021 Cognivue, Inc. UM-410-J Page 21Cognivue Clarity® User Manual
4. Physician Information: This page is intended for the physician. It provides general information
about the score ranges. Clinical contextualization is required.
Physician Information
13.0 Printing Reports
Test reports may be printed from the Clarity device whenever a report is opened in the report viewer
(see 10.0 Running a Test and 12.0 Finding and Viewing Reports), provided the Report Printing option has
been enabled by an Administrator (see 8.0 System Settings). There is no other way to print a test report
from the Clarity device.
14.0 Emailing Reports
When Report Emailing is enabled on the device, if the checkbox for the option to send email is selected
on the Patient Information window (see 10.0 Running a Test), then following the completion of the test
an alert will display indicating whether the test report was successfully sent via encrypted email. This
alert will appear before the display of the prompt to view the report on-screen. If the email was not
sent successfully (e.g. if the device is not connected to a network), an Administrator will have the option,
at a later time, to send all unsent emails once network connectivity has been re-established.
To send unsent emails, an Administrator can select Email >> Email Reports from the menu bar on the
Primary window (see 5.0 Logging on to Cognivue Clarity®). This will display a dialog box indicating the
number of unsent reports, which can then be sent by clicking the Yes button to confirm.
© 2021 Cognivue, Inc. UM-410-J Page 22Cognivue Clarity® User Manual
Send Unsent Emails dialog
Once the emails have been sent, a dialog box will display indicating how many were successfully sent.
15.0 Removing Reports
To clean up old reports and test data on an automatic cycle, log in as an Administrator and select Device
Administration >> Settings on the Primary window and click the Data Cleaning tab to open the Data
Cleaning Configuration window.
Data Cleaning Configuration window
Click the Enable Automatic Data Removal checkbox to enable data removal. Enter a whole number of
days (no decimals) into the Delete reports and data after _____ day(s) text box. The number of days
entered represents the length of time test reports and data remain on the system before being
automatically removed. Upon clicking the Save button, a window appears to notify you that the change
was saved to the device. Click the OK button to continue.
If you wish to disable the Automatic Data Removal feature, simply click the Enable Automatic Data
Removal checkbox to clear it and click the Save button.
© 2021 Cognivue, Inc. UM-410-J Page 23Cognivue Clarity® User Manual
16.0 Power Management
The Cognivue Clarity® is designed to be battery powered during regular use, but can also be used when
the provided charging adapter is plugged in. The battery will last for up to 4 hours of continuous usage
or up to 8 hours of intermittent usage, and takes approximately 4 hours to fully charge. There are four
possible battery states--with the battery indicator lights facing you: when both battery status indicator
lights are blank, the device is fully discharged; when the left light is orange and the right is blank, the
battery is discharging; when the left light is green and the right light is orange, the device is plugged-in
and charging; when both lights are green, the battery is plugged-in and fully charged. It may take up to
4 hours to fully charge the battery from a fully discharged state.
Screen Sleep
When the Cognivue device is not in use for a period of 10 minutes, the screen will go into sleep mode.
Screen Wake
When the screen is asleep, it can be awakened in any one of several ways:
• Pressing a key on the keyboard
• Clicking one of the buttons on the trackpad
• Swiping across the track pad
Power Alert
When the device is low on battery charge and not plugged in, if an attempt is made to start a testing
session, i.e., upon clicking the Run a Test button on the main screen, it will display an alert and not allow
the testing session to begin. Plugging in the device will allow tests to be administered. In order to avoid
running out of power during a test, please charge the device for at least one hour before again
administering tests on battery power.
17.0 Technical Specifications
Operating Environment 10 to 30 degrees C (50 to 86 degrees F)
Power Input 19V DC, 3.5 A Nominal
Weight 4.2 kg (9lbs 2oz)
Intel Dual Band Wireless-AC 3168
Wireless Communications 20 dBm max output power for 2.4 GHz 802.11b/g/n
23 dBm max output power for 5.0 GHz 802.11a/n/ac
© 2021 Cognivue, Inc. UM-410-J Page 24Cognivue Clarity® User Manual 18.0 Safety Precautions and Compliance Observe the following precautions to ensure safety and prevent damage to the Cognivue Clarity®: • Do not place on uneven or unstable surfaces. • Do not make any modifications or alterations to the device. • Do not open the device cover or modify the device. There are no customer serviceable parts. • Do not apply weight onto the device. • Do not connect a multiple socket outlet or extension cords to the Cognivue Clarity®. • Do not install the unit such that the power cord is a tripping hazard. • Do not expose to liquids, rain, or moisture except in routine cleaning of surfaces. • Do not dispose of this product in a landfill. WARNING: Use of this equipment adjacent to or stacked with other equipment should be avoided because it could result in improper operation. If such use is necessary, this equipment and the other equipment should be observed to verify that they are operating normally. WARNING: Use of accessories, transducers, and cables other than those specified or provided by the manufacturer of this equipment could result in increased electromagnetic emissions or decreased electromagnetic immunity of this equipment and result in improper operation. WARNING: Portable RF communications equipment should be used no closer than 30 cm (12 inches) to any part of Cognivue® Clarity. Otherwise, degradation of the performance of this equipment could result. © 2021 Cognivue, Inc. UM-410-J Page 25
You can also read