USER MANUAL smaXtec Cow Monitoring - Version 5.0
←
→
Page content transcription
If your browser does not render page correctly, please read the page content below
USER MANUAL
smaXtec® Cow Monitoring

Version 5.0

                          www.smaXtec.com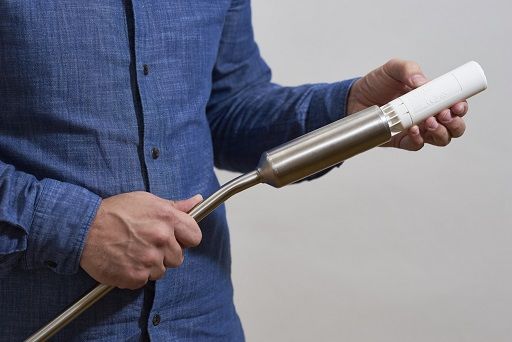
© 2020 smaXtec animal care GmbH. All rights reserved.

smaXtec® is a trademark of smaXtec animal care GmbH. This trademark may not be
used without permission of smaXtec animal care GmbH.

This user manual may not be copied. Changes regarding this document will not be
announced. Before using the smaXtec products, please check if there is a new
version of this document available on the website: http://www.smaxtec.com

The smaXtec pH Plus Bolus (part of the smaXtec System) is under protection of the
following patents:

WO 2011/079338 A2 (PCT/AT2010/000490)
EP 2 519 098 (EP 10808965.7)
AT 509 255 B1 (A 2052/2009)
BR 112012016375-2
CA 2 785 925 A1
RUS 2012 132 453
UA 2012/09263
US 2012/0277550 A1 (13/520,101)
ZA 2012/04642

Design Patent:

"Messvorrichtung, insbesondere zur Messung von physiologischen Daten im Körper
eines Lebewesens"
“Measuring Instrument“

European Union: RCD 001702598-0001 - Date: 30.04.2010 (DD/MM/YYYY)
USA: US D655,633 S – Date: 19.10.2010 (DD/MM/YYYY)

DD/MM/YYYY
D = Day
M = Month
Y = Year

2/28
                                                                www.smaXtec.com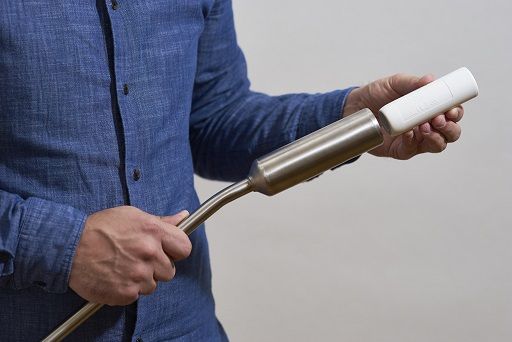
Table of contents
1.      Overview of the smaXtec System.......................................................................... 4

2.      System Requirements .......................................................................................... 7

3.      Getting started ..................................................................................................... 8

4.      smaXtec Boluses .................................................................................................. 9

     4.1. smaXtec pH Plus Bolus and smaXtec Classic Bolus ....................................... 9
       4.1.1. First Steps – smaXtec Classic Bolus......................................................... 9
        4.1.2. First steps – smaXtec pH Plus Bolus ...................................................... 11
        4.1.3. Bolus Application ................................................................................... 13
     4.2. smaXtec Climate Sensor............................................................................... 16
       4.2.1. First Steps ............................................................................................. 16
5.      smaXtec Read-Out Devices ................................................................................ 18

     5.1. smaXtec Base Station .................................................................................. 18
       5.1.1. Installation and Start Up ......................................................................... 20
     5.2. smaXtec Repeater ........................................................................................ 22
       5.2.1. Installation and Activation ....................................................................... 24
6.      smaXtec Software .............................................................................................. 26

     6.1. smaXtec Messenger ..................................................................................... 26
       6.1.1. Initial Steps ............................................................................................ 26
7.      Technical Details ................................................................................................ 27

3/28
                                                                                                     www.smaXtec.com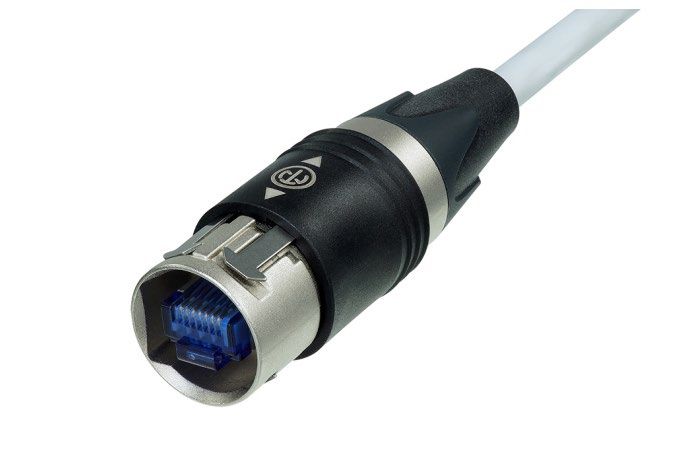
1. Overview of the smaXtec System

            WARNING: For your own safety, please read all instructions in the User
            Manual as well as the Important Safety and Product Information
            before using the smaXtec® System. Both documents are available for
            download at www.smaxtec.com.

smaXtec Messenger and further information about the smaXtec System, including
informational videos, are available at www.smaxtec.com.

The smaXtec System comprises of:

   • the Bolus for data measurement inside the cow
   • the smaXtec Messenger – the software that makes all key information is
     available 27/7
   • the Infrastructure that includes all of the relevant system components
     (wireless read-out devices and smaXtec Climate Sensors) and transmits the
     measurement data to the smaXtec server

We provide two solutions for you to choose from: smaXtec Classic (Heat & Calving
Detection and Health Monitoring) and smaXtec pH Plus (Reproduction, Health
& Feed Management).

smaXtec Classic Bolus

With smaXtec Classic you measure the rumen temperature and activity levels of your
cows and receive information on basic health and fertility. All of the cows are fitted
with a Classic Bolus enabling individual monitoring.

The Classic Bolus is designed to provide continuous measurement of the rumen
temperature as well as the activity levels of cows. The measured data is saved in the
Classic Bolus and automatically transmitted via the wireless network to the smaXtec
Base Station or to a smaXtec Repeater. Due to the dimensions, use of the Classic
Bolus is not possible for cows under the age of 18 months and/or weighing less than
450 kg.
4/28
                                                                    www.smaXtec.com
smaXtec pH Plus

With smaXtec pH Plus you can – in addition to the functions included in smaXtec
Classic – also measure rumen pH, enabling optimised feed and health management
and improving the health status of your herd. A certain percentage of the herd is
fitted with a pH Plus Bolus, providing measurement data which is representative for
the group. The remaining animals are fitted with a Classic Bolus for individual
monitoring.

The pH Plus Bolus is designed to provide continuous monitoring of rumen pH and
temperature as well as activity levels of cows. The measured data is saved in the pH
Plus Bolus and automatically transmitted via the wireless network to the smaXtec
Base Station or to a smaXtec Repeater. Due to the dimensions, use of the pH Plus
Bolus is not possible for cows under the age of 18 months and/or weighing less than
450 kg.

Infrastructure

The smaXtec Base Station automatically receives the relevant data in real-time.
The data is transmitted to the server and stored in the online database. The smaXtec
Base Station automatically receives the data from the various smaXtec sensors.
smaXtec Repeaters can be used to extend the network range.

The smaXtec Repeater is designed to extend the range of the smaXtec Base
Station and is recommended for use in certain configurations in order to cover
remote areas of the cow shed. It provides an easy-to-use and cost-efficient extension
of the smaXtec wireless network and communication with the smaXtec Sensors.

The smaXtec Climate Sensor is designed to provide continuous measurement of
environmental factors such as ambient temperature and humidity levels. This data is
automatically transmitted via the wireless network to the smaXtec Base Station or to
a smaXtec Repeater. The number of smaXtec Climate Sensors required is
dependent on the size of the barn.
5/28
                                                                    www.smaXtec.com
smaXtec Messenger

The smaXtec Messenger is an automatic alert messaging tool that keeps you
informed about changes in a cow’s state of health. Collection of data in real-time
means you are kept fully informed at all times about your herd’s state of health. The
smaXtec Messenger sends you immediate alerts if there are significant changes in
rumen pH, temperature or activity levels. The smaXtec Messenger can be accessed
via PC or Laptop (http://messenger.smaxtec.com). An App is available for tablet and
smartphone (Google Play Store, Apple App Store)

Before using the smaXtec pH Plus Bolus and smaXtec Classic Bolus for smaXtec
Cow Monitoring, these devices must first be initialised as described in the enclosed
Quickstart Guides and then activated in smaXtec Messenger.

6/28
                                                                    www.smaXtec.com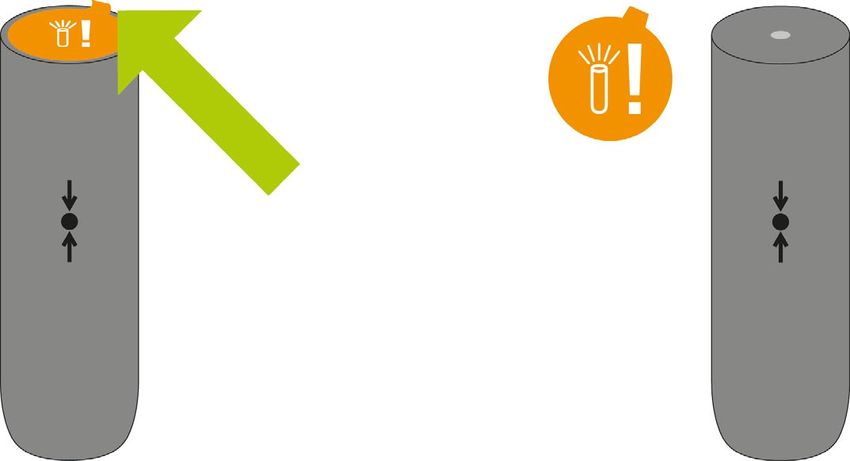
2. System Requirements

The following items are required for operation of the smaXtec System:

   • a PC/laptop with one of the following operating systems:
         o Windows 7 Home, Professional
         o Windows 8 & Windows 8.1
         o Windows 10
   • access to smaXtec Messenger via your browser (Firefox, Google Chrome,
     etc.)
   • magnet (delivered with the smaXtec Base Station)
   • applicator for the smaXtec pH Plus Bolus and smaXtec Classic Bolus (inside
     diameter 35 mm – can be ordered directly from smaXtec).

7/28
                                                                   www.smaXtec.com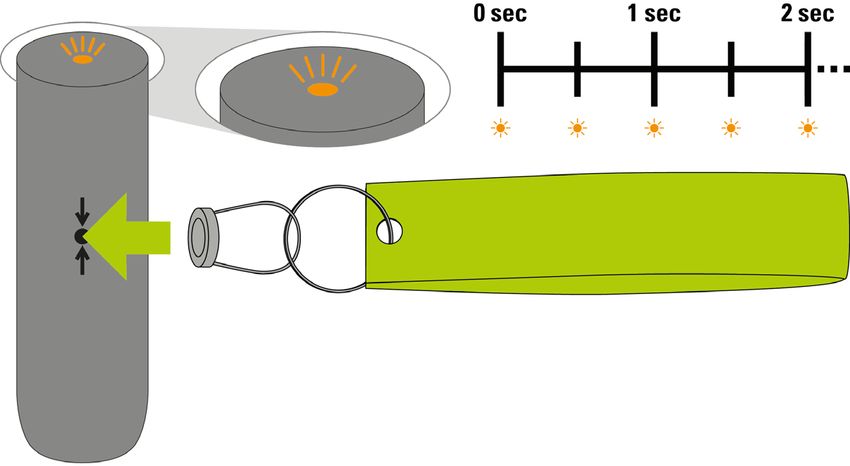
3. Getting started

1. Activation of the devices in the smaXtec wireless network (smaXtec Base
Station, smaXtec Repeater)
To start using the smaXtec System follow the steps described in the Quickstart
Guide. Start with activation of the smaXtec Base Station and/or the smaXtec
Repeater by going to https://activate.smaxtec.com or directly in smaXtec Messenger
(https://messenger.smaxtec.com). Before activation can start you will first need to
complete your online registration. Next, mount the smaXtec Base Station and/or the
smaXtec Repeater in areas where the cows tend to spend extended periods of time
(e.g. milking stations, waiting areas in front of milking stations, feeding stations, etc.).
Please see Chapter 6.1 for further information.

2. Installation of the devices in the smaXtec wireless network (smaXtec Base
Station, smaXtec Repeater)
Prior to installing the devices, please refer to the instructions in the Quickstart Guide.
Mount the smaXtec Base Station and/or one/several smaXtec Repeater(s) in areas
where the cows tend to spend extended periods of time (e.g. milking station, waiting
areas in front of milking stations, feeding stations, etc.). For further information,
please see Chapter 5.1 (smaXtec Base Station) and Chapter 5.2 (smaXtec
Repeater).

3.a. Initialisation/calibration of the smaXtec Classic Boluses/smaXtec pH Plus
Boluses
Initialise the smaXtec Classic Boluses and/or calibrate the smaXtec pH Plus Boluses
using the enclosed Quickstart Guides, which can also be downloaded at
www.smaxtec.com. Please see Chapter 4 or further information.

3.b. Installation of the smaXtec Climate Sensors
Activate the smaXtec Climate Sensor by following the steps described in the
Quickstart Guides provided. For further information, please see Chapter 4.2.

4. Read-out of measurement data
Following correct installation of the smaXtec Base Station (and a smaXtec Repeater
if required) measurement data is automatically read-out from the sensors when the
cows are in range (read-out range is 10- 30 meters/32 – 96 feet).

5. Working with smaXtec Messenger
Start your browser, go to https://messenger.smaxtec.com and log in with your email
address and password. Before using smaXtec Messenger for the first time you need
to register. Please ensure that you enter a valid email address at registration.

8/28
                                                                         www.smaXtec.com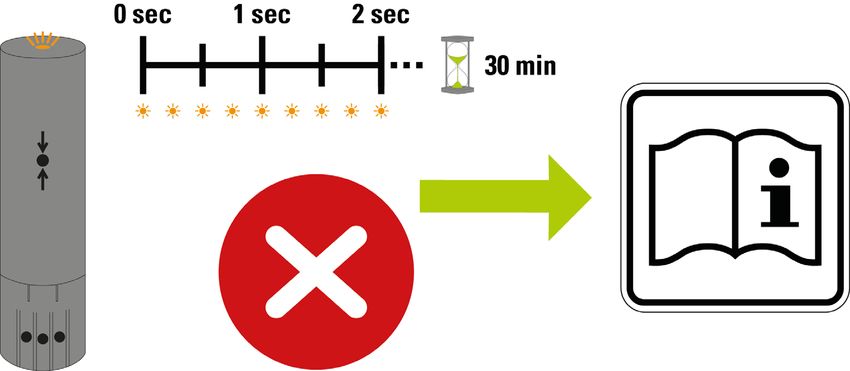
4. smaXtec Boluses

          Caution: The Quickstart Guide included with the products provides a brief
          summary of the most important information and steps regarding
          initialisation, activation and proper use of smaXtec products. Please
          ensure you follow these steps carefully in order to make proper use of the
smaXtec devices. After successful initialisation, please administer smaXtec Classic
Boluses and smaXtec pH Plus Boluses to the animal within a few hours (max. 4
hours).

   4.1.   smaXtec pH Plus Bolus and smaXtec Classic Bolus

   4.1.1. First Steps – smaXtec Classic Bolus

Follow the steps described in the accompanying Quickstart Guide and ensure they
are carried out correctly.

   1) First, please remove the label from the bottom of the smaXtec Classic Bolus.

       Next, activate the smaXtec Classic Bolus using the magnets provided (with
       the smaXtec Base Station). If the smaXtec Classic Bolus has been
       successfully activated, the LED on the bottom of the smaXtec Classic Bolus
       flashes briefly every 0.5 seconds. Please note the correct positioning of the
       magnets as indicated in the image below.

9/28
                                                                   www.smaXtec.com
2) Initialisation of the smaXtec Classic Bolus is carried out automatically. If
      initialisation has been successfully completed the LED lights up every two
      seconds for a period of 30 minutes.

   3)
        If initialisation fails, the LED flashes very rapidly (every 100 milliseconds) for a
        period of 30 minutes. If this is the case, please contact customer support.

   4) After successful initialisation, the smaXtec Classic Bolus can be inserted using
      the smaXtec Sensor Applicator. Following selection of a suitable animal, the
      animal identification details should be entered in the list provided next to the
      serial number of the smaXtec Classic Boluses.
   5) Activation in smaXtec Messenger by clicking on the + symbol on the right of
      the menu option “Animals”: activation of sensors is required to ensure the
      sensor is correctly assigned to an organisation in smaXtec Messenger.
   6) After successful installation of the read-out device the measurement data from
      the smaXtec pH Plus Bolus can be accessed in smaXtec Messenger within
      approximately 30 minutes.

Overview of the different LED displays

Flashes briefly every 0.5 seconds for 1 Bolus is activated
minute
Flashes every two seconds for 30 Bolus has been successfully initialised
minutes
Flashes very rapidly (every 100ms) for An error occurred during initialisation
30 minutes

10/28
                                                                         www.smaXtec.com
4.1.2. First steps – smaXtec pH Plus Bolus
1) First, remove the label from the bottom of the smaXtec pH Plus Bolus.
Next, activate the Sensor using the magnets provided (with the smaXtec Base
Station). If the smaXtec pH Plus Bolus has been successfully activated, the
LED on the bottom of the smaXtec pH Plus Bolus flashes briefly every 0.5
seconds. Please note the correct positioning of the magnets as indicated in
the image below.
2) Pour the buffer solution pH 7.00 into a narrow container (please note minimum
filling level) and remove the sponge from the sensor tip.
11/28
www.smaXtec.comNow place the smaXtec pH Plus Bolus into the container sensor head first and
gently shake it. Calibration of the smaXtec pH Plus Bolus takes at least 5
minutes. During this time the LED starts to repeatedly flash three times in
succession.
3) If calibration has been successful, the LED flashes every two seconds for a
period of 30 minutes.
If calibration fails, the LED flashes very rapidly (every 100 milliseconds) for a
period of 30 minutes. If this is the case, please contact customer support.
12/28
www.smaXtec.com4) After successful initialisation the smaXtec pH Plus Bolus can be inserted using
the smaXtec Sensor Applicator. Following selection of a suitable animal, the
animal identification details should be entered in the list provided next to the
serial number of the smaXtec Sensors.
5) Activation in smaXtec Messenger by clicking on the + symbol on the right of
the menu option “Animals”: activation of sensors is required to ensure the
sensor is correctly assigned to an organisation in smaXtec Messenger.
6) After successful installation of the read-out device the measurement data from
the smaXtec Sensor can be accessed in smaXtec Messenger within
approximately 30 minutes.
Overview of the different LED displays
Flashes briefly every 0.5 seconds for 1 Sensor is activated
minute
Flashes three times every two seconds Initialisation in progress
for about 5 minutes
Flashes every two seconds for 30 Sensor has been successfully initialised
minutes
Flashes very rapidly (every 100ms) for An error occurred during initialisation
30 minutes
Important information: Please note that between calibration and administration the
smaXtec pH Plus Bolus must be stored in the buffer solution pH 7.00 provided.
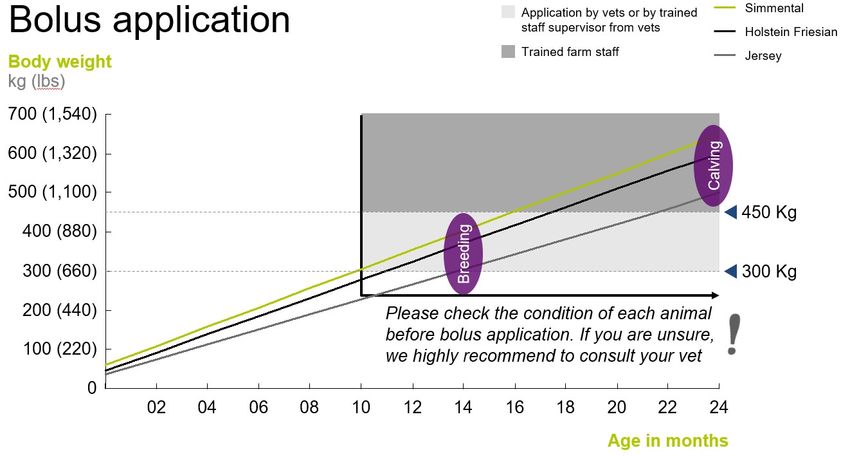
4.1.3. Bolus Application
Caution: The smaXtec pH Plus Bolus and the smaXtec Classic Bolus are
exclusively for use in cows. Under no circumstances may they be used for
other animals or for humans. The minimum body weight for both sensors
is 450 kg when administered by trained staff (approximately 18 months for
Holstein cows) and 300 kg when administered under veterinary
supervision. This graph gives more information about the age/weight of different
breeds:
13/28
www.smaXtec.com:
Cows that are to be fitted with a smaXtec pH Plus Bolus or a smaXtec Classic Bolus
must have an empty stomach when the sensor is applied. This means that the cow
must not have eaten anything for at least 2 hours prior to application.
Applicator for the smaXtec pH Plus Bolus and the smaXtec Classic Bolus:
The smaXtec pH Plus Bolus or the smaXtec Classic Bolus can be inserted into the
animal’s maw using an applicator. It is recommended that you use a smaXtec
applicator. This can be ordered from your distributor or directly from smaXtec.
14/28
www.smaXtec.comApplication Procedure:
Sensor shaft
smaXtec pH Plus Bolus
Position the smaXtec pH Plus Bolus into the applicator
with the sensor tip at the head. Insert the smaXtec pH Sensor tip
Plus Bolus into the applicator in such a way that
sensor tip comes to rest at the far end of the
applicator. Please ensure that the push rod of the
applicator is kept flat – the push rod should not press
directly on the sensor tip. This ensures that the
smaXtec pH Plus Bolus is positioned sensor tip first in
the cow’s stomach.
Picture:application procedure
smaXtec Classic Bolus
In contrast to the smaXtec Classic Bolus, the smaXtec Classic Bolus must be
positioned with the sensor shaft (the bottom end) at the head of the applicator.
Picture: application procedure
With the cow’s head and neck angled in an extended and straightened position you
can now administer the smaXtec pH Plus Bolus or the smaXtec Classic Bolus. The
front end of the applicator must extend beyond the base of the tongue before the
smaXtec pH Plus Bolus or the smaXtec Classic Bolus is released. Please ensure that
the cow does not eat anything for at least two hours prior to administration of the
15/28
www.smaXtec.comsensor. It is preferable to administer the smaXtec pH Plus Bolus or the smaXtec
Classic Bolus in the morning before the first feed.
Warning: After insertion, the smaXtec pH Plus Bolus or the smaXtec
Classic Bolus needs to settle on the floor of the reticulum as quickly as
possible. For this reason, it is important to ensure that the fibrous
material in the rumen is not too dense, i.e. the cow should not recently
have eaten anything. It is therefore of utmost importance that your animal should
have an empty stomach when the sensor is administered. Acting in accordance with
the user instructions provided by smaXtec will ensure smooth operation of the
measurement procedure.
Note: There have not been reported any adverse side effects. If you suspect adverse
reactions or side effects after the sensors are inserted, do not hesitate to consult with
veterinarians or veterinary technicians.
4.2. smaXtec Climate Sensor
The smaXtec Climate Sensor is designed to provide continuous measurement of
environmental factors such as ambient temperature and humidity levels. This data is
wirelessly transmitted to the smaXtec Base Station or a smaXtec Repeater. The
number of smaXtec Climate Sensors required depends on the size of the cow shed.
Scope of delivery
The smaXtec Climate Sensor package contains the following
components:
• 1x smaXtec Climate Sensor
• 4x screws and 4x wall plugs for mounting
• 1x Drill template
• 1x Quickstart-Guide
4.2.1. First Steps
Follow the steps described in the Quickstart Guide provided and please ensure they
are carried out correctly.
1) Activation in smaXtec Messenger – menu option “Add device”: It is necessary
to activate the device so that the device can be correctly assigned to a user
and used in smaXtec Messenger.
2) Switch on using the magnet provided (magnet is included in delivery with the
smaXtec Base Station):
a. Switch on by holding the magnet in front of the On/Off symbol ( )
16/28
www.smaXtec.comb. Power LED ( ) glows yellow for 1 second
c. Connection (takes approx. 1 second) to the smaXtec Base
Station/Repeater (wireless network)
d. Connection OK (connected to the smaXtec Base Station/Repeater) –
LED lights up green for 3 seconds
e. Connection NOT OK – LED flashes red 5 times: smaXtec Climate
Sensor then automatically switches off switch on again for new
connection attempt
Note – TO SWITCH OFF: The smaXtec Climate Sensor can be switched off using
the magnet. Simply hold the magnet in front of the On/Off symbol again – LED glows
red for 3 seconds.
17/28
www.smaXtec.com5. smaXtec Read-Out Devices
5.1. smaXtec Base Station
The smaXtec Base Station automatically receives the relevant data. The data can be
transmitted via the in-house network (Ethernet cable required) or via GSM (technical
standard for mobile communications).
Scope of delivery
The smaXtec Base Station package contains the following
components:
• 1x smaXtec Base Station
• 1x magnet with tag (required for switching the sensors
on)
• 1x mains adapter (with 3 m/10 ft cable)
• 4x screws and 4x wall plugs for mounting
• 1x Drill template
• 1x optional GSM antenna
• 1x Quickstart-Guide
Should any of these components be missing or damaged, please contact your
smaXtec distributor or smaXtec. Please retain the box and the original packaging
materials in case you need to return the product for any reason (e.g. repairs) in the
future.
The smaXtec Base Station features the following status LEDs (top left):
Power LED:
• Indicates if the smaXtec Base Station is on.
Link LED:
• Indicates the status of the connection to the server.
Data LED:
• Indicates if data from smaXtec sensors is being read out.
On the right side of the smaXtec Base Station there is a GSM antenna and on the left
you will find the socket for the network cable and the power supply. This is where the
mains adapter (included in delivery) is connected during installation. The smaXtec
Base Station must also be connected to the network via a network cable or an
optional GSM antenna used.
18/28
www.smaXtec.comsmaXtec Network Cable (not included in delivery scope)
In locations where the smaXtec Base Station will be exposed to wet conditions or
moisture, a special network cable is required for the connection between the
smaXtec Base Station and the network socket. This ensures that the network cable
remains waterproof and dustproof when plugged in. The cable must comply with
norm TIA/EIA-568-B (with regard to length, bending radius etc.).
Image: Network cable (5/10/20 m | 16/32/65 ft)
The network cable can be ordered directly from smaXtec animal care or from your
distributor in the following lengths: 5/10/20 m (16/32/65 ft).
Power Supply – included mains adapter
The smaXtec Base Station is powered via the mains adapter provided. Only use this
mains adapter for installation purposes. At the end of the cable there is a specially
designed plug to protect the smaXtec Base Station from water and dust. Connect the
mains adapter to the socket on the left-hand side of the smaXtec Base Station and
tighten the screw caps. The mains adapter itself does not conform to an IP standard
with regard to protection against water, i.e. the mains adapter must not be exposed
to rain or moisture.
Image: Mains adapter (3 m/10 ft cable)
Specifications of the adapter:
• Manufacturer: SUNNY Computer Technology Europe, s.r.o.
• Input: 100-240 V ~, 0.5 A MAX, 50-60 Hz
19/28
www.smaXtec.com• Output: 5 V --- 2.0 A
• Output power: 10 W MAX.
5.1.1. Installation and Start Up
Caution: Please observe all safety instructions concerning electrical
devices and installations.
Note:
Following correct installation of the smaXtec Base Station including the smaXtec
Repeater as required (see Quickstart Guide and in this Chapter 5.2 in this User
Manual), measurement data is automatically read out from the smaXtec Sensors
whenever the cows are in range (read-out range is 10 – 30 meters/ 32 - 96 feet).
Warning: If the smaXtec Base Station is mounted in the cow shed it is
recommended that you use a special network cable to ensure proper
functionality in conditions typically found in the cow shed (waterproofness
of the smaXtec Base Station). This cable is available from smaXtec or
from your distributor in the lengths 5/10/20 m (16/32/65 ft). It is, however, also
possible to connect the smaXtec Base Station to your network with a standard
network cable if the smaXtec Base Station is not located in the wet area/outdoor area
of the cow shed.
The most important steps for successful installation of the smaXtec Base Station are
described below:
1. Before mounting the smaXtec Base Station – Activation of the smaXtec
Base Station
Activation in smaXtec Messenger – menu item “Add devices”: device activation is
required so that the device can be correctly assigned to a user and used in smaXtec
Messenger.
2. Choose the most suitable location for the smaXtec Base Station
Before mounting the smaXtec Base Station, please select the most suitable location
as described in the Quickstart Guide. The following points must be observed and
implemented:
• Suitable position: Waiting area, milking area, feeding stations, massage
brushes (areas where the cows tend to spend more time)
• Power and Ethernet connection or mobile communications reception required
using the optional GSM.
• Power outlet may be up to a maximum of 3 m/10 ft away as the power supply
unit / adapter cable provided is 3 m/10 ft long.
• Important for the Ethernet option:
20/28
www.smaXtec.como Waterproof network cable for the connection to the smaXtec Base
Station and the network socket are available from smaXtec or from your
distributor in the lengths 5/10/20 m (16/32/65 ft).
o If using a network cable you have installed yourself, please ensure a
maximum length of 90 m/295 ft between the smaXtec Base Station and
the network socket is not exceeded.
o If using a network cable you have installed yourself, please ensure you
only use network cabling with double shielding (SSTP, SFTP)
• Mount at a minimum height of 2 m/6 ft (not within reach of cows)
• Do not mount in a closed storeroom (transmission problems)
• Close to cows (the smaXtec Base Station can read out smaXtec Sensors
within a radius of 10 – 30 meters/32 - 96 ft; otherwise a smaXtec Repeater is
required)
• Remember to consider locations for a smaXtec Repeater (if planned)
• An unobstructed view enables a greater range for planned smaXtec Repeaters
• Do not expose the smaXtec Base Station and mains adapter to direct sunlight
or rain.
3. Mounting of the smaXtec Base Station
Please follow the following steps:
• Use the screws and wall plugs provided
• Lift up plastic panel
• Drill mounting holes (use the drill template provided, see Quickstart Guide)
• Wood: screws can be used on their own (2 mm (1/12‘‘) holes can be pre-
drilled)
• Walls: use wall plugs (drill a 6 mm (1/4“) hole and insert wall plug)
4. Connecting the mains adapter and network cable/GSM antenna
When the smaXtec Base Station has been mounted in accordance with instructions,
please connect the mains adapter and the network cable/GSM antenna. Please
follow the steps described below:
• To ensure dustproof and waterproof use of the smaXtec Base Station, please
use the smaXtec network cable 5/10/20 m (16/32/65 ft).
• Connect the power supply unit provided with the smaXtec Base Station and
plug in to a wall socket. If there is no wall socket within 3 m/10 ft then it is best
to install a new one to the left of the smaXtec Base Station.
• Please note (applies to network cable and mains adapter cable):
o It is not permitted to loop cables around the smaXtec Base Station
(transmission problems).
o If possible, the cable should lead to the smaXtec Base Station from
above.
5. Verification of correct functionality with the help of status LEDs
Following successful completion of all steps, the status of the smaXtec Base Station
can be verified with the help of the LEDs. As soon as the mains adapter is plugged in
the smaXtec Base Station starts up. Following successful installation, please check
the status of the LEDs (connection can take upto 10 minutes):
21/28
www.smaXtec.com• smaXtec Base Station has started up: Power LED glows steady green
• connected to the internet: Link LED glows steady green
The LEDs in detail:
Power LED:
• Flashing yellow: Starting up
• Glowing green: Started up/OK
• Flashing red/red: Error
Link LED:
• Flashing yellow: Connecting (depending on use of Ethernet or GSM this can
take upto 10 minutes)
• Glowing green: Connected to the internet
• Flashing red/red: No connection to the server (via Ethernet/GSM)
Data LED:
• Flashing green: Data is being read out from the smaXtec Sensors
5.2. smaXtec Repeater
In certain configurations we recommend that you use a smaXtec Repeater (to ensure
coverage of various areas of the cow shed). This enables an easy and low-cost
extension of the smaXtec wireless network and communication with the smaXtec
Sensors.
Scope of Delivery
The smaXtec Repeater packaging contains the following items:
• 1x smaXtec Repeater
• 1x mains adapter (3 m/10 ft cable length)
• 4x screws and 4x wall plugs for mounting
• 1x Drill template
• 1x Quickstart Guide
Should one of these items be missing or damaged, please contact your smaXtec
distributor or contact smaXtec directly. Please retain the box and the original
packaging material in case you need to return the product for repairs at a later date.
22/28
www.smaXtec.comThe smaXtec Repeater has the following status LEDs (top left):
Power LED:
• Indicates if the smaXtec Repeater is switched on.
Link LED:
• Indicates the status of the connection in the wireless network (either to
another smaXtec Repeater or to the smaXtec Base Station).
Data LED:
• Indicates if data is being read out from smaXtec Sensors.
Power supply – mains adapter supplied
The smaXtec Repeater is powered by the mains adapter provided. For installation
purposes please only use this mains adapter. At the end of the cable there is a
specially constructed plug, which protects the smaXtec Repeater from water and
dust. Plug the connector into the socket on the left-hand side of the smaXtec
Repeater and tighten the screw cap. The mains adapter itself does not conform to an
IP standard with regard to protection against water, i.e. the mains adapter must not
be exposed to rain or moisture.
Image: Mains adapter (3 m/10 ft cable)
Specifications of the mains adapter:
• Manufacturer: SUNNY Computer Technology Europe, s.r.o.
• Input: 100-240 V ~, 0.5 A MAX, 50-60 Hz
• Output: 5 V --- 2.0 A
• Output power: 10 W MAX.
23/28
www.smaXtec.com5.2.1. Installation and Activation
Caution: Please observe all safety instructions concerning electrical
devices and installations.
Note:
Following correct installation of the smaXtec Repeater (see Quickstart Guide and
Chapter 5.1 in this User Manual), the measurement data are automatically read out
from the smaXtec Sensors whenever the cows are within range (read out range is 10
- 30 meters/32 - 96 feet).
The most important steps for successful installation of the smaXtec Repeater are
described below:
1. Before installation and activation of the smaXtec Repeater
Activation in smaXtec Messenger – menu item “Add device”: Device activation is
required to ensure the device can be correctly assigned to the user and used in
smaXtec Messenger.
2. Choose the most suitable location for the smaXtec Repeater
Before mounting the smaXtec Repeater, please select the most suitable location as
described in the Quickstart Guide. The following points must be observed and
implemented:
• Suitable position: Waiting area, milking area, feeding stations, massage
brushes (areas in which the cows spend longer periods of time)
• Power outlet must be no further than 3 m/10 ft away as the mains adapter
cable provided is 3 m/10 ft long.
• Mount at a minimum height of 2 m/6 ft (not within reach of cows)
• Do not mount in a closed storeroom (transmission problems)
• Position close to the cows (the smaXtec Repeater can read out smaXtec
Sensors within a radius of 10 - 30 meters/32 - 96 feet)
• An unobstructed view enables greater range for additional smaXtec Repeaters
and/or to the smaXtec Base Station
• Do not expose the smaXtec Repeater and the mains adapter to direct sunlight
or rain.
3. Mounting of the smaXtec Repeater
Please follow the steps below:
• Please use the screws and wall plugs provided
• Lift up plastic panel
• Drill mounting holes (please use the drill template provided, see Quickstart
Guide)
• Wood: screws are sufficient (pre-drill a 2 mm (1/12‘‘) hole)
• Walls: Use wall plugs (6 mm (1/4“) drill a hole and push in wall plug)
24/28
www.smaXtec.com4. Connection to mains adapter
Following proper mounting of the smaXtec Repeater please connect the mains
adapter. Please follow the steps below:
• Connect the power supply provided to the smaXtec Repeater and plug in. If
there is no plug socket within 3 m/10 ft then it is best to install a new one to
the left of the smaXtec Repeater.
• Please note:
o It is not permitted to loop cables around the smaXtec Repeater
(transmission problems).
o If possible, the cable should lead to the smaXtec Repeater from above
5. Verification of correct functionality with the help of status LEDs
Following successful completion of all steps, the status of the smaXtec Repeater can
be verified with the help of the LEDs. As soon as the mains adapter is connected the
smaXtec Repeater starts up. Following successful installation, please check the
status of the LEDs:
• smaXtec Repeater has started up: Power LED glows steady green
• connected to the smaXtec Base Station: Link LED glows steady green
The LEDs in detail:
Power LED:
• Glowing green: Started up/OK
• Flashing red/red: Error
Link LED:
• Flashing yellow: Connecting
• Glowing green: Connected to the smaXtec Base Station (either direct or via a
smaXtec Repeater)
• Flashing red/red: No connection to the smaXtec Base Station (either direct or
via other smaXtec Repeaters)
Data LED:
• Flashing green: Data being read out from smaXtec Sensors
25/28
www.smaXtec.com6. smaXtec Software
6.1. smaXtec Messenger
Actionable alerts with smaXtec Messenger. Monitoring of data in real-time means
that you are kept fully informed at all times about the current health status of your
animals. The smaXtec Messenger sends you immediate alerts if there are significant
changes in rumen pH, temperature or activity levels. The suggested actions
contained in the alert messages enable a rapid and targeted response – for example
by adjusting feed quantities or contacting your veterinarian.
The suggested actions and physiological data can be accessed in real-time via PC,
tablet or smartphone from the smaXtec server. Where necessary you automatically
receive an actionable alert message. You are kept easily updated with all relevant
information. This means curves no longer have to be looked at or interpreted.
Caution: For display of temperature events, measurement data must be
available from over a minimum of 4 days.
6.1.1. Initial Steps
Start your browser, go to https://messenger.smaxtec.com and log in with your user
name and password. Before using for the first time you need to register and set up
an account for your farm. Please use a valid email address.
The most important steps for successful use of smaXtec Messenger are described
below:
1. Setting up a smaXtec Messenger user account
Start your browser, go to https://messenger.smaxtec.com and register with your
email address and password. Please use a valid email address at registration.
2. Activating a sensor
Activation in smaXtec Messenger – menu item „Animals“: Sensor activation is
required to ensure the sensor can be correctly assigned to the user and used in
smaXtec Messenger.
3. Activating a device
Activation in smaXtec Messenger – menu item “Devices”: Device activation is
required to ensure the device can be correctly assigned to the user and used in
smaXtec Messenger.
4. Working with smaXtec Messenger
Following successful activation of devices (smaXtec Base Station, Repeater,
Sensors) you can manage your cows, view important events and manage alerts.
26/28
www.smaXtec.com7. Technical Details
smaXtec Classic Bolus:
• Dimensions: 105 x 35 mm (length x diameter)
• Model: US-1442A (for North & South America); TX-1442A (EU & other
countries)
• Internal antenna
• Internal Lithium Metal battery
• Measurement interval: 10 min
• Measurement range: 0 - 50°C/32 - 122°F
• Relative measurement accuracy (at 39°C/102.2°F): ± 0.05°C/± 0.09°F
• Activity index: 0 to 100
• Battery life: up to 4 years
• Internal measurement value memory: 50 days
• Ruminal fluid resistant - materials tested by the German Agricultural Society
(Deutsche Landwirtschafts-Gesellschaft DLG)
smaXtec pH Plus Bolus:
• Dimensions: 132 x 35 mm (length x diameter)
• Model: US-1042A (for North & South America), SX-1042A (EU & other
countries)
• Internal antenna
• Internal Lithium Metal Battery
• Measurement interval: 10 min
• Measurement range (pH): pH 3 - 9
• Measurement range (temperature): 0°C - 80°C/32 – 176°F
• Measurement accuracy (pH): up to day 90 pH ±0.2 up to day 150 pH ±0.4
• Relative measurement accuracy (temperature at 39°C/102.2°F): ± 0.05°C/±
0.09°F
• Measurement resolution (pH): pH 0.01
• Measurement resolution (temperature): 0.01°C/0.018°F
• Activity index: 0 to 100
• Measurement duration pH measurement: 150 days (5 months)
• Battery life (temperature and activity measurement): up to 4 years
• Shelf life from date of manufacture: 18 months
• Guarantee pH measurement: 50 days
• Internal measurement value memory: 50 days
• Ruminal fluid resistant – materials tested by the German Agricultural Society
(Deutsche Landwirtschafts-Gesellschaft DLG)
•
27/28
www.smaXtec.comsmaXtec Base Station:
• Dimensions: 200 x 110 x 60 mm (L x B x H)
• Model: US-3046 (for North & South America); BX-3046 (EU & other countries)
• Dustproof and waterproof plastic casing (IP 66)
• Antenna for communication with smaXtec Sensors (max. distance 10-30 m/32-
96 ft)
• Antenna for communication with smaXtec Repeater (max. distance between
read-out stations 100 m/328 ft)
• Device available with GSM/without GSM
• Ethernet socket: for internet connection
• Supplied mains adapter: 100-240V, 2A
• Easy to mount on a wall or wooden post etc.
smaXtec Repeater:
• Dimensions: 160 x 90 x 50 mm (L x B x H)
• Model: US-4046 (for North & South America); RX-4046 (EU & other countries)
• Dustproof and waterproof plastic casing (IP 66)
• Antenna for communication with smaXtec Sensors (max. distance 10-30 m/32-
96 ft)
• Antenna for communication with smaXtec Base Station/Repeater (max.
distance between read-out stations 100 m/328 ft)
• Supplied mains adapter: 100-240V, 2A
• Easy to mount on a wall or wooden post etc.
smaXtec Climate Sensor:
• Dimensions: 120 x 90 x 50 mm (L x B x H)
• Model: US-5046 (for North & South America); CS-5046 (EU & other countries)
• Dustproof and waterproof plastic casing (IP 66)
• Internal antenna
• Internal Lithium Metal Battery
• Measurement interval: 10 min
• Measurement range (relative humidity): 0 - 100% RH
• Measurement range (temperature): -40 - +80°C/-40 - +176°F
• Measurement accuracy (temperature; 5 – 60°C/41 – 140°F): ± 0.3 °C/± 0.54°F
• Measurement accuracy (relative humidity; 20 – 80% RH): ± 2% RH
• Battery life: up to 5 years
© 2020 smaXtec animal care GmbH. All rights reserved.
28/28
www.smaXtec.comYou can also read