2 DRIVER CONTROLS 3 VEHICLE ACCESS 4 COMFORT ADJUSTMENTS 6 DRIVING 11 TOUCH SCREEN 12 MEDIA 14 NAVIGATION 15 PHONE 16 FILLING STATION INFORMATION ...
←
→
Page content transcription
If your browser does not render page correctly, please read the page content below

RANGE ROVER EVOQUE
     QUICK START GUIDE
     2        DRIVER CONTROLS
     3        VEHICLE ACCESS
     4        COMFORT ADJUSTMENTS
     6        DRIVING
     11       TOUCH SCREEN
     12       MEDIA
     14       NAVIGATION
     15       PHONE
     16       FILLING STATION INFORMATION

     SOME FEATURES MAY NOT BE FITTED TO YOUR VEHICLE.

LRL109560161 NLI.indd 1                                 24/04/2015 11:19:51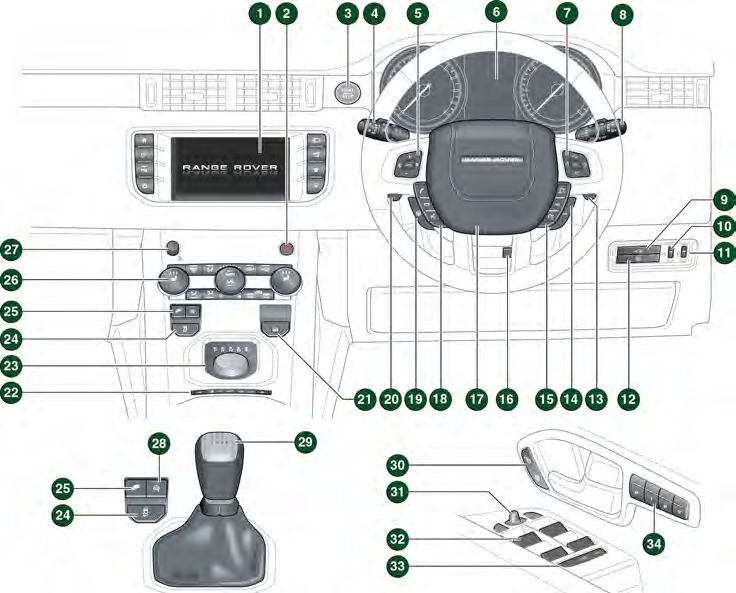
DRIVER CONTROLS                                                                                                          V
                                                                                                                                  S

                                                                                                                                Unlo

                                                                                                                                Multi
                                                                                                                                and t
                                                                                                                                unloc
                                                                                                                                To ch
                                                                                                                                unloc
                                                                                                                                simul
                                                                                                                                flash
                                                                                                                                Keyle
                                                                                                                                The S
                                                                                                                                while
                                                                                                                                expos

                                                                                                                                  Op
                                                                                                                                  Th
      1. Touch screen.                                        18. Phone and voice recognition controls.                           me
      2. Hazard warning lamps.                                19. Heated steering wheel switch.                                   scr
                                                                                                                                  ins
      3. Engine START/STOP.                                   20. Manual gear shift paddle (-) down.                              poc
                                                                                                                                  Ke
      4. Headlamps, direction indicators and Trip computer.   21. Electric Parking Brake (EPB).                                   atte
      5. Media system control.                                22. Terrain response.
      6. Instrument panel, warning lamps and Message          23. Gear selector.
         centre.
                                                              24. Dynamic Stability Control (DSC).                                P
      7. Settings menu control.
                                                              25. Hill Descent Control (HDC).                                   To op
      8. Wipers and washers.
                                                              26. Climate control.                                              1. W
      9. Tailgate release.                                                                                                         ta
                                                              27. Media on/off and volume control.                                 th
      10. Interior illumination control.                                                                                           A
                                                              28. Intelligent stop/start.
                                                                                                                                   re
      11. Headlamp levelling control.
                                                              29. Manual transmission gear lever.
                                                                                                                                To cl
      12. Lane Departure Warning (LDW) button.
                                                              30. Central locking switches.                                     2. P
      13. Manual gear shift paddle (+) up.
                                                              31. Mirror adjuster/power-fold mirror.
      14. Cruise control cancel or Adaptive Cruise Control
          (ACC) switches.                                     32. Window controls.
                                                              33. Rear windows isolation.                                         Op
      15. Cruise control or Adaptive Cruise Control
          (ACC) switches.                                                                                                         Wh
                                                              34. Driving position memory.
                                                                                                                                  it w
      16. Steering column adjuster.                                                                                               pos
      17. Horn.
  2

LRL109560161 NLI.indd 2                                                                                   24/04/2015 11:19:59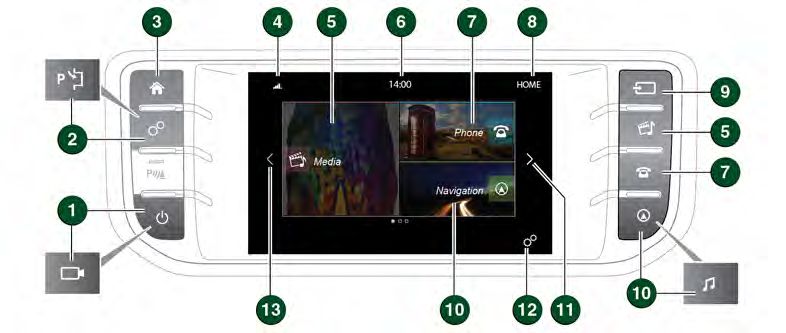
VEHICLE ACCESS
    SMART KEY
           Press once to switch the headlamps on. Press                Emergency key release
           again to switch off.                                        If the Smart key fails to open the vehicle, the emergency
                                                                       keyblade can be used. Slide the side section up, then pull
           Press to unlock and release the tailgate. A                 sideways to remove. Remove the keyblade
           powered tailgate will open to the set height.               and unfold it. Use the blade to gently lever
                                                                       off the appropriate door
                                                                       lock cover. The cover
           Press and hold for 3 seconds to activate the                has a key symbol
           panic alarm. After 5 seconds, press again for 3             embossed into it.
           seconds to cancel.
                                                                       Insert the key into
 Unlocking mode alternatives                                           the exposed lock,
           Single-point entry: Press once to disarm the                then turn and
           alarm and unlock only the driver’s door. If a               release it to
           locking fuel filler flap is fitted, it will unlock. Press   unlock.
           twice to unlock all of the doors and the tailgate.          If the security system was previously armed with the
 Multi-point entry: Press once to unlock all of the doors              Smart key, when the door is unlocked, the alarm sounds.
 and the tailgate. If a locking fuel filler flap is fitted, it will    To disarm the alarm, press the unlock button on the
 unlock.                                                               Smart key, or press the START/STOP button with the
                                                                       Smart key inside the vehicle.
 To change between entry modes, with the vehicle
 unlocked, press and hold the lock and unlock buttons                  Smart key not found
 simultaneously for 3 seconds. The hazard warning lamps
 flash to confirm the change.                                                                   If, after closing all of the doors,
                                                                                                the Smart key is not detected
 Keyless entry/exit                                                                             by the vehicle, Smart Key
 The Smart key needs only to be on the driver’s person                                          Not Recognised - Place
 while using a door handle. It does not need to be                                              As Shown And Press Start
 exposed or handled.                                                                            Button is displayed in the
                                                                                                Message centre. With the brake
                                                                                                pedal (automatic transmission),
                                                                                                or clutch pedal (manual
   Operating note                                                                               transmission), firmly pressed,
   The Smart key may not be detected if placed in a                                             press and release the START/
   metallic container, or behind a device with an LCD                                           STOP button. The Smart key
   screen such as a smartphone, laptop (including when                                          can now be removed.
   inside a laptop bag), etc. Loose coins in the same
   pocket as the Smart key can also act as a shield.
   Keep the Smart key clear of such devices when
   attempting Keyless entry or Keyless starting.

    POWERED AND MANUAL TAILGATES                                         See page 2, item 9.
 To open the tailgate
 1. With transmission P selected, press to release the
    tailgate. A powered tailgate will continue to open to
    the set height.
    Alternatively, use the Smart key or press the internal
    release switch.
 To close the powered tailgate
 2. Press and release to close the tailgate.

   Operating note
   When the tailgate closes onto the locking latch,
   it will continue to ‘soft close’ to the fully closed
   position.

                                                                                                                                      3

LRL109560161 NLI.indd 3                                                                                                24/04/2015 11:20:07
COMFORT ADJUSTMENTS                                                                                                               C
         ELECTRIC SEAT ADJUSTMENT                                  See page 2, item 34.                                                    S
      The driver’s seat can be adjusted in up to 10 directions.
      The controls are located on the outer edge of the seat.
      1. Seatback adjustment.
                                                                                                                                         While
      2. Lumbar support.                                                                                                                 each
      3. Cushion angle tilt.                                                                                                             icons
                                                                                                                                         1. G
      4. Forwards and backwards adjustment.
                                                                                                                                         2. R
      5. Height adjustment.                                                                                                                 un
                                                                                                                                            in
      Memory seats
                                                                                                                                         3. G
      Positions for the driver’s seat and exterior mirrors, can be
      stored in the vehicle’s memory for future use. Up to 3 sets
      of seat and mirror positions can be saved at any one time.
      1. When the required positions have been achieved,                                                                                   C
         press the M button on the driver’s door.
      2. Within 5 seconds, press buttons 1, 2 or 3 to store
         the current driving position to the chosen number. Any
         existing setting on that button is over-written.
      3. A stored memory position can now be recalled with                   Operating note
         a press of the appropriate button; 1, 2 or 3. The seat
                                                                             Memory seat buttons 1, 2 or 3 must be pressed
         and mirrors move to their preset positions.
                                                                             within 5 seconds of pressing the M button,
                                                                             otherwise the memory store function cancels.

         COUPÉ REAR SEAT ACCESS
                                                                                                                                         1. Te
      The front seats can tilt and power-slide forwards, enabling                                                                           te
      access to the rear seats. Control is by a lever and a two
      -way switch.                                                                                                                       Note:
      There are two types of seat. The Sport seat has the lever                                                                          4°C (
      and switch panel located on opposite sides of the seat.                                                                            2. M
      1. Lift the lever and pivot the seatback forwards.                                                                                    re
                                                                                                                                            P
      2. Press to power-slide the seat forwards.                                                                                            on
      3. To return the seat to its previous position, pivot the                                                                          3. A
         seatback until it locks into position. Press the switch                                                                            si
         to power-slide the seat backwards until it locks into
         position.                                                                                                                          •
                                                                                                                                            •
                                                                                                                                            •
                                                                                                                                         4. A
                                                                                                                                            C
                                                                                                                                            di
                                                                                                                                            an
                                                                                                                                            ad
         PASSENGER AIRBAG DEACTIVATION
      If it becomes necessary to fit a child restraint on the             Select Vehicle Set-up.                                           Op
      front passenger seat, the passenger airbag MUST be                  Select Passenger Airbag to display the current status.           AU
      deactivated.                                                                                                                         ope
                                                                          Select Passenger Airbag On or Off, as required.
      To disable/enable the front passenger airbag, use
      the right side steering wheel controls to access the                The status indicator in the overhead console will
                                                                                                                                         5. H
      Instrument panel Main menu.                                         illuminate while the ignition is on and Passenger Airbag
                                                                          Off is selected.                                               6. H

  4

LRL109560161 NLI.indd 4                                                                                            24/04/2015 11:20:14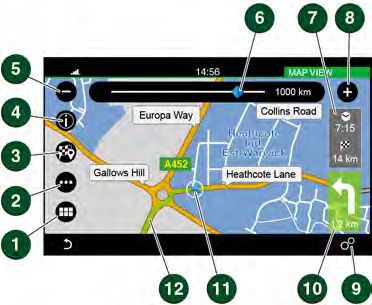
COMFORT ADJUSTMENTS
          SEAT BELT REMINDER
                     A warning indicator in the Instrument panel
                     illuminates if a front seat belt is not fastened
                     or is unfastened, while the vehicle is moving.
       While the ignition is on, the Message centre displays
       each seating position represented by one of the following
       icons:
       1. Green - seat belt in the indicated position is fastened.
       2. Red - seat belt in the indicated position has been
          unfastened while the vehicle’s ignition is on. This
          indicator will turn grey after 30 seconds.                      An audible warning will sound if a seat belt is
                                                                          unfastened while the vehicle is moving.
       3. Grey - seat belt not fastened.

          CLIMATE CONTROL                      See page 2, item 26.

       1. Temperature controls: Rotate to adjust the 		                 7. Seat heaters: Press once to switch on to high, twice
          temperature.                                                     to switch on to medium, three times to switch on to
                                                                           low and a fourth time to switch off.
       Note: The system allows temperature differential of up to
       4°C (7°F) between the left and right passenger areas.            8. Recirculation:
                                                                        With an air quality sensor: Press once to automatically
       2. Maximum defrost: Press for the fastest method of                 restrict the entry of fumes. Press twice for
          removing frost or heavy misting from the windscreen.             recirculation to operate for a set period of time.
          Press again to switch off; screen heaters will remain            Extended use of this setting causes screen misting.
          on.                                                              Press again to cancel recirculation.
       3. Air distribution: More than one setting can be selected       Without an air quality sensor: Press once to activate
          simultaneously.                                                  recirculation for a set period of time. Press and hold
                                                                           to activate continuous recirculation; screen misting
          •   Windscreen and side window vents.                            can occur. Press again to cancel recirculation.
          •   Foot level.                                               9. A/C: For cooled and dehumidified air.
          •   Face level.
                                                                        10. Blower control: Rotate to adjust airflow from the facia
       4. AUTO mode: The system will adjust the Air                         vents. LEDs indicate the current speed selection.
          Conditioning (A/C), blower speed, and airflow
          distribution to maintain the selected temperature(s)          11. Front Climate seats: Press to view the Touch screen
          and reduce misting without constant manual                        menu. The menu provides a choice of Heated
          adjustments.                                                      ventilation, Cooled ventilation, and Seat zone
                                                                            selection. Touch the display arrows to adjust to the
                                                                            required selection.
         Operating note

us.      AUTO is the recommended Climate control
         operating mode. This will help to prevent misting.
                                                                          External water deposits

       5. Heated windscreen.                                              The A/C system removes moisture from the air
bag                                                                       and deposits the excess water beneath the vehicle.
       6. Heated rear screen.                                             Puddles may form, but this is normal and no cause
                                                                          for concern.

                                                                                                                                      5

      LRL109560161 NLI.indd 5                                                                                           24/04/2015 11:20:17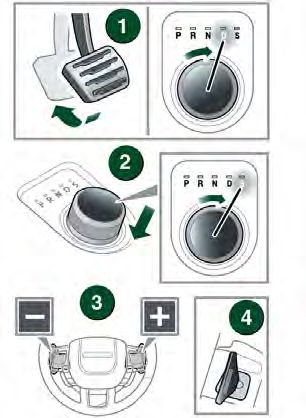
DRIVING D
IGNITION ON AND ENGINE STARTING See page 2, item 3. TR
The START/STOP button is operational only when the Diesel engine starting Gear
Smart key is inside the vehicle. In extreme low temperatures, the glow plug warning lamp with t
may illuminate with a delay of up to 12 seconds between the co
Ignition only on
the START/STOP button being pressed and the engine 1. W
1. Press once to switch the ignition on. cranking. th
2. Press again to switch off. Make sure that the appropriate foot pedal remains 2. S
pressed. DO NOT press the START/STOP button again, ho
Engine start as the cranking time will be increased. en
1. The transmission must be in either the P or N in
position.
Smart key removal from the vehicle 3. C
2. For an automatic transmission, press the brake pedal. au
If Intelligent stop/start is disabled, the engine
For a manual transmission, press the clutch pedal. an
continues to run, even if the Smart key is removed
le
3. Now press and release the START/STOP button. from the vehicle. However, if the engine is stopped,
sh
it cannot be restarted until the Smart key is returned
Press the button again to stop the engine and switch to the vehicle. 4. W
the ignition off. re
The M
WARNING AND INFORMATION LAMPS
Gear
The following lamps may illuminate in the Instrument panel during normal driving to indicate that a related system or
feature is operating. If any other warning lamp illuminates, refer to the Owner’s Handbook. DO NOT ignore warning lamps.
Notification of a critical Notification of a non-critical Airbag system fault.
warning in the Message warning in the Message
centre. centre.
Low brake fluid or a system Emissions fault. Adaptive Front lighting IN
fault. System (AFS) fault.
To ac
Flashing: Electric Parking Emergency Brake Assist Low fuel level. For a
Brake (EPB) fault. (EBA) fault or worn brake the ve
pads. For a
Low oil pressure. On continuously: Dynamic Adaptive Cruise Control the cl
Stability Control (DSC) fault. (ACC) is in Follow mode.
A seat belt is unbuckled. Anti-lock Braking System One or more tyres are
(ABS) fault. under-inflated.
INSTRUMENT PANEL MENU See page 2, items 6 and 7.
1. Steering wheel control: Use to scroll up or down
through the menu to the feature you want to disable/
enable. A
2. Vehicle Information menu: The following features
The A
can be adjusted:
ahea
• Driver Assistance.
1. P
• Trip Computer. th
• Display Settings.
2. P
• Vehicle Settings. S
• Vehicle Information.
3. P
• Head-Up Display.
4. P
in
5. P
6. P
6
LRL109560161 NLI.indd 6 24/04/2015 11:20:19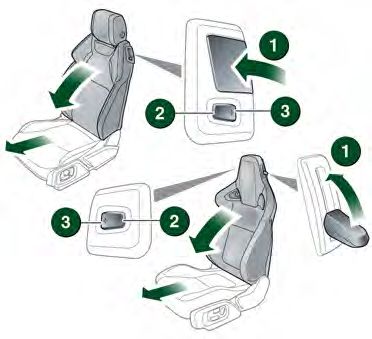
DRIVING
           TRANSMISSION
        Gear selections can be made with either the rotary selector or
lamp    with the selector paddles. The rotary gear selector elevates from
 een    the console at engine start-up.
 ne     1. With the engine running and transmission P selected, press
           the brake pedal. Rotate the selector to R or D.
        2. Sport mode: This is an automatic gear change mode,
ain,       however, change points are modified to make full use of
           engine power. Press the selector down and rotate to S. The
           indicator alongside the selector illuminates.
        3. Commandshift mode: This is an alternative to the
           automatic modes and is effective when rapid acceleration
           and engine braking are required. With S selected, use the
           left gear shift paddle (-) for downshifts and the right gear
,
           shift paddle (+) for upshifts.
ed
        4. With either paddle, pull it towards the steering wheel and
           release, to make a gear change.
        The Message centre displays the selected gear.
        Gear shift indicator
                        When manually selecting a gear, the indicator
mps.
                        illuminates briefly in the Instrument panel at the
                        recommended point for a gear change.

           INTELLIGENT STOP/START                           See page 2, item 28.

        To activate an automatic engine stop.                                                               To switch off, press the
        For an automatic transmission, apply sufficient brake pressure to make sure                         Intelligent stop/start
        the vehicle is stationary.                                                                          switch. The LED icon
        For a manual transmission, stop the vehicle, select neutral and fully release                       will extinguish while
l       the clutch.                                                                                         Intelligent stop/start is
e.                                                                                                          deactivated.
                     A green icon will illuminate in the Instrument panel.
                     The engine will restart when the brake pedal is released, a
                     drive gear is selected, or for manual transmission, the clutch
                     is pressed.

            Operating note
            When the vehicle comes to a stop, make sure that your feet do not touch the clutch or accelerator pedals.
            Inadvertent pressure will prevent the engine from stopping.

ble/
          ADAPTIVE CRUISE CONTROL (ACC)                                      See page 2, items 14 and 15.
s
        The ACC system is designed to maintain a gap to the vehicle ahead or a set road speed, if there is no slower vehicle
        ahead. A speed may be set between 20 mph (32 km/h) and 112 mph (180 km/h).

        1. Press to activate ACC and to set a speed. Press briefly to increase
           the speed in 1 mph (2 km/h) steps.
        2. Press to resume the previous set speed retained in the memory.
           Set speeds are cleared at ignition off.
        3. Pull to suspend ACC but retain the set speed in the memory.
        4. Press to decrease the set speed. Press briefly to decrease the speed
           in 1 mph (2 km/h) steps.
        5. Pull to decrease the Follow mode gap.
        6. Pull to increase the Follow mode gap.

                                                                                                                                        7

       LRL109560161 NLI.indd 7                                                                                           24/04/2015 11:20:22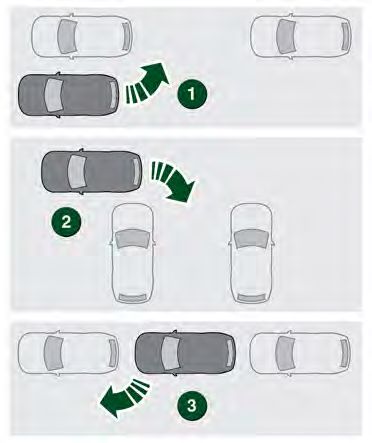
DRIVING                                                                                                                         D
          ELECTRIC PARKING BRAKE (EPB)                                See page 2, item 21.                                                 B
      Applying                                                         Releasing                                                        While
                                                                                                                                        is abo
      With the vehicle stationary, pull the EPB switch up and          With the ignition on, press the brake pedal and press
                                                                                                                                        appro
      then release it. A red lamp in the Instrument panel will         down on the EPB switch.
                                                                                                                                        scann
      illuminate continuously until the EPB is released.               With an automatic transmission and either D or R                 to the
      •   With an automatic transmission, the EPB will                 selected, pressing the accelerator will automatically
                                                                                                                                        1. A
          automatically apply when transmission P is selected.         release the EPB.
                                                                                                                                           ill
                                                                       With a manual transmission, automatic release can be
      •   With a manual transmission, the EPB will automatically
                                                                       effected in first, second, and reverse gears.                    2. A
           apply if the ignition is switched off and the vehicle’s                                                                         is
          speed is below 2 mph (3 km/h).                               To effect an automatic release, the driver’s door must be
                                                                                                                                           th
                                                                       closed or the driver’s seat belt must be buckled.

          EXTERIOR LAMPS                   See page 2, item 4.                                                                             P
                                                    1. Outer collar: First position for side lamps, second position for 		              Park
                                                       headlamps and the third position for AUTO. With AUTO selected, all               out o
                                                       exterior lamps will switch on automatically when the ambient light fades.        drivin
                                                                                                                                        (30 k
                                                    2. Inner collar: Turn it away and release for front fog lamps. Turn it towards      vehic
                                                       you and release for rear fog lamps. Turn and release again to switch off.        only o
                                                                                                                                        To se
                                                    Headlamps high beam: Push the control forwards for high beam. To flash
                                                                                                                                        turn i
                                                    the headlamps, pull back and release.
                                                                                                                                        When
                                                    Auto high beam: Active when set via Vehicle Settings in the Instrument
                                                                                                                                        proce
                                                    panel menu with the lighting control in the AUTO position and low beams in
                                                    use.
                                                    High beam then automatically activates when the sensor detects no light
                                                    or very low light source ahead. Low beam is automatically selected, when
                                                    appropriate.
                                                                                                                                        Note:
                                                                                                                                        space
          WIPERS AND WASHERS                         See page 2, item 8.                                                                imme

      1. With Automatic rain sensing, the front wipers respond to rain                                                                  1. A
         severity.                                                                                                                         P
         Without Automatic rain sensing, move up to select intermittent                                                                 2. P
         delay.
                                                                                                                                        3. P
      2. With Automatic rain sensing, rotate towards MAX to increase
         sensitivity.                                                                                                                   Follow
         Without Automatic rain sensing, rotate towards MAX to increase                                                                 Park
         the frequency of intermittent wipes.                                                                                           starti
      3. Low speed continuous wipe.                                                                                                     Furth
                                                                                                                                        instru
      4. High speed continuous wipe.                                                                                                    When
      5. Windscreen single wipe.                                                                                                        displa

      6. Windscreen wash/wipe.
      7. Rear wiper: Rotate to INT for intermittent wipe. Frequency                  To prevent inadvertent wiper activation,
         increases with the vehicle’s speed. Rotate to ON for continuous             turn the Automatic rain sensing off:
         operation.                                                                  •   Before entering an automatic car wash.
      8. Rear wash/wipe: Continue to hold for additional operation.                  •   During hot, dry and dusty periods.
      If freezing conditions are likely, the wipers can be set to a higher
      position so that they can be lifted from the screen. See Instrument
      panel menu.

  8

LRL109560161 NLI.indd 8                                                                                           24/04/2015 11:20:25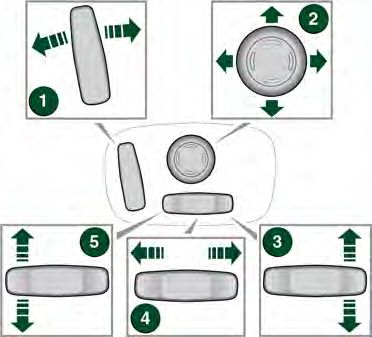
DRIVING
            BLIND SPOT MONITORING (BSM)
         While a forward gear is selected and the vehicle’s speed
         is above 6 mph (10 km/h), BSM will detect a vehicle
         approaching from behind, on either side, within its
         scanned range. The detection range is approximately 6 m
         to the rear, and 2.5 m to the sides.
         1. An amber icon, depicting an approaching vehicle,
            illuminates in the relevant door mirror.
be
         2. An amber dot illuminates when the vehicle’s speed
            is below 6 mph (10 km/h). BSM is active only when
t be
            the amber dot is extinguished.

            PARK ASSIST
         Park assist can help the driver to manoeuvre into, and
         out of, a space. With Park assist activated and while
des.     driving forwards at a vehicle speed of less than 18 mph
         (30 km/h), sensors identify a suitable space where the
ards     vehicle can be steered automatically into place. The driver
off.     only operates the accelerator and brake.
         To search for a space on the driver’s side, signal a
 sh
         turn in that direction.
         When searching for a parking space, use the following
 nt
         procedure:
ms in
                   Briefly press the Park assist button, located
 t                 alongside the Touch screen, to activate the
en                 system.

         Note: Park assist will already have recorded any available
         space passed within the last few seconds and may issue
         immediate advice to stop.
         1. A first press switches the system on and selects
            Parallel parking.
         2. Press again for Perpendicular parking.
         3. Press a third time for Parking exit.
         Follow the displayed instructions.
         Park assist instructs you to stop or to drive forward to a
         starting point and when to select Reverse gear.
         Further manoeuvring may be required. Follow
         instructions in the Message centre.
         When the manoeuvre is completed, STOP will be
         displayed.

,

ash.

                                                                                    9

        LRL109560161 NLI.indd 9                                        24/04/2015 11:20:27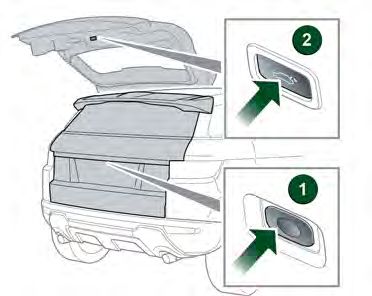
DRIVING                                                                                                                               TO
        TERRAIN RESPONSE                          See page 2, item 22.                                                                        TO
     When the vehicle is started, Terrain response normally                         General: Use for typical road surfaces.
     starts in its General program.
     Program selection is via one of two types of centre                            Grass-Gravel-Snow: Suitable for surfaces
     console switches. Depending on the vehicle’s                                   which are firm but have a slippery surface,
     specification, the control switches may include a                              e.g., grass, snow, loose gravel, pebbles, or icy
     Dynamic setting.                                                               conditions.
                                                                                    Mud-Ruts: Suitable for soft, muddy, uneven,
                                                                                    or rutted ground.
                                                                                    Sand: Suitable for soft, predominantly dry,
                                                                                    yielding sandy ground, e.g., sand dunes and
                                                                                    deserts. If the sand is damp or wet, the Mud-
                                                                                    Ruts program may be more beneficial.
                                                                                    Dynamic: Associated with driving style, rather
                                                                                    than with a type of terrain. Dynamic selection
                                                                                    allows the vehicle’s full on-road potential to be
                                                                                    explored. Handling and driving characteristics
                                                                                    are optimised for normal road surfaces.

                                                                                                                                            1. P
                                                                           Wading                                                              ca
     Use the switches to select a program. Icons illuminate, as
                                                                                                                                               E
     selected. The Message centre also displays an icon.                   When wading through water, select the program
     It is recommended that a special program be engaged                   most suitable for the surface beneath the water.                 2. P
     whenever driving conditions are difficult, and then moved             DO NOT exceed 500 mm of water depth and enter                       If
     back to the General program, once those conditions are                the water with a shallow approach angle.                            on
     no longer present.                                                    DO NOT stop the vehicle or switch the engine off
                                                                           while wading. Severe electrical damage may occur.                3. P
                                                                                                                                            4. S
                                                                                                                                               le
        PARKING AIDS
                                                                                                                                               w
                                                                                                                                               di
     Front and rear Parking aids are activated when transmission                                                                            5. To
     R is selected. When a forward gear is subsequently                                                                                        M
     selected, the Parking aids remain active until the vehicle’s
     forward speed exceeds 10mph (16 km/h).                                                                                                 6. C
                                                                                                                                               op
     If an obstruction is detected, an intermittent tone sounds.
     Moving closer to the obstruction increases the frequency of                                                                            7. To
     the tone.                                                                                                                                 P
     The Parking aid switch is located
     next to the Touch screen. Press                                                                                                        8. S
     the switch to deactivate. Press                                                                                                        9. P
     again to activate; the switch
     illuminates.
     Rear camera
     Activates when transmission R is selected. The Touch
     screen displays guidance lines to aid reversing.
     To view the user options, briefly touch the screen. Use the
     Back soft key to return to the previous screen.
     1. Broken line: Full width of the vehicle.
     2. Solid line: Projected reversing path based on the
        current steering wheel position.
     3. Parking sensors activated: Shaded area indicates		               6. Hitch guidance: To aid the process of guiding the
        which rear sensors are active.                                      vehicle to the trailer’s tow hitch. A single hitch line
     4. Tailgate access guidance lines: Do not reverse beyond               is displayed as the reversing guidance line. As the
        this point if tailgate access is required.                          vehicle closes to within 0.6 m of the tow hitch, an
                                                                            automated zoom is operated.
     5. User options: Touch one of the mini views to select
        overlay options.
10

LRL109560161 NLI.indd 10                                                                                              24/04/2015 11:20:35
TOUCH SCREEN
TOUCH SCREEN See page 2, item 1.
s
,
r icy
en,
y,
and
ud-
ather
tion
o be
stics
1. Press to switch the Touch screen on/off. If Surround 10. Touch the screen or press the button, to select
cameras are fitted, the screen can be switched off in the NAVIGATION system. The current destination
Extra features. route, or the NAV MENU screen will be displayed.
For vehicles without navigation, press to display the
2. Press to display the GENERAL SETTINGS menu. MEDIA SETTINGS menu.
r If Park assist is fitted, press to switch Park assist
on/off. 11. Touch the arrow or swipe the screen, to display the
EXTRA FEATURES screen.
r. 3. Press to select the HOME screen.
12. Touch to select the GENERAL SETTINGS menu.
4. Status icons: When a phone is connected, the battery
level and network strength is displayed. Also, 13. Touch the arrow or swipe the screen, to display the
when selected, TA (Traffic announcements) is next screen to the left.
displayed.
5. Touch the screen or press the button, to select the
Media system.
6. Clock. Time can be adjusted via the System
option, in the GENERAL SETTINGS menu.
7. Touch the screen or press the button, to select the
PHONE screen.
The Touch screen requires only light touches. Excess
8. Screen title. pressure could result in damage.
9. Press to select the media SOURCE list.
e
e
11
LRL109560161 NLI.indd 11 24/04/2015 11:20:35MEDIA M
AM/FM RADIO P
On the Touch screen HOME menu, touch the Media 4. Briefly touch for auto-seek down to the previous On th
option. Select Source, followed by FM Radio. station. option
5. The selected radio station name and frequency.
6. Briefly touch for auto-seek up to the next station.
7. Waveband image (if available).
8. Information from the selected station.
9. Preset soft keys: Can store 6 stations for each
waveband. Touch and hold a soft key to store the
current radio station.
10. Touch the arrow to scroll through the preset stations.
11. Touch to select the SETTINGS pop-up menu.
Select Media, followed by Radio, to view the RADIO
1. Source: Touch to select the media source list.
SETTINGS.
2. Status icons: Shows the connected phone’s battery 1. Tr
level, network signal strength, and TA (if selected). Note: Manual radio station seek up and down can be
achieved with the steering wheel audio controls. co
3. Touch to view and select stations. 2. B
re
co
S
3. In
pl
DAB RADIO 4. If
pl
On the Touch screen HOME menu, touch the Media 5. Seek up: Touch to auto-seek up the frequency to the
option. Select Source, followed by DAB Radio. next radio ensemble. 5. P
fo
6. Seek up: Touch to auto-seek up the frequency to the
next radio station. 6. C
co
Storing a DAB station on a preset soft key
7. S
Select a DAB radio station. Touch and hold a preset of
soft key to store the station. To subsequently listen to a th
stored station, touch the appropriate preset. Use the seek re
buttons on the steering wheel to change to the next or
previous stations. 8. P
re
9. S
be
an
1. Seek down: Touch to auto-seek down the frequency be
to the next radio station. re
2. Seek down: Touch to auto-seek down the frequency 10. S
to the next radio ensemble. M
3. The selected radio ensemble name.
4. The selected radio station name.
S
Media
can a
steer
12
LRL109560161 NLI.indd 12 24/04/2015 11:20:38MEDIA
PORTABLE MEDIA
On the Touch screen HOME menu, touch the Media Note: When connecting a Bluetooth® wireless
option. Select a portable media in the Source options. technology device, use the Touch screen to operate and
search the device. Repeat and Shuffle modes are not
available for Bluetooth wireless technology devices.
Connecting a portable media device
The connecting ports for portable media devices, are
located inside the centre console cubby box.
ons.
DIO
e 1. Track list: Touch to select the list of tracks from the
connected device.
2. Browse: Touch to select the menu screen for the
required music or audio source subject list for the
connected device: Playlists, Artists, Albums,
Songs, etc.
3. Information relating to the music or audio being
played. 1. SD card slot for Navigation and Voice only. Insert until
it clicks into place.
4. If available, the album art for the current track being
played is displayed. Note: Only use the SD card provided with the vehicle. The
the media system will not play music or display saved images
5. Progress bar: Drag the spot or touch the line to move from an SD card.
forwards or backwards through the track.
the 2. USB.
6. Continuous play: Touch to play the current track
continuously. 3. 3.5 mm AUX socket.
7. Skip/scan forwards: Touch to skip forwards to the start Note: Auxiliary devices have no Touch screen control.
of the next track, or, touch and hold to scan forwards
a through the current track being played. Playback Note: If an iPod is connected to the vehicle via its
seek resumes when the soft key is released. Bluetooth® wireless technology facility and also, via a
or USB cable, for music playback, make sure that the USB
8. Pause/play: Touch to pause playback; touch again to connection is made last.
resume playback.
If alternative connections are made, track title and time
9. Skip/scan backwards: Touch to skip back to the information is shown on the Touch screen but no audio
beginning of the current track being played, or, touch will be heard through the vehicle speakers. To address
and hold to scan backwards through the current track this issue, disconnect and reconnect the USB cable.
being played. Playback resumes when the soft key is
released.
10. Shuffle: Touch to play random tracks from the current
MP3 folder, USB folder or iPod playlist.
STEERING WHEEL AUDIO CONTROL See page 2, item 5.
Media system selections 1. Volume increase.
can also be made from the
steering wheel control. 2. Press repeatedly for media source options.
3. Seek/scan/skip up.
4. Volume decrease.
5. Seek/scan/skip down.
13
LRL109560161 NLI.indd 13 24/04/2015 11:21:09NAVIGATION P
TOUCH SCREEN NAVIGATION B
To access navigation, press either the Navigation button Map view
to the right of the Touch screen, or touch Navigation on Blu
the HOME screen.
For
to
the
Note
the ve
Use t
phon
Conn
or wit
Pairin
1. S
sc
2. S
3. Fr
1. Where To?: Touch for setting a destination. When 1. Touch to select the NAV MENU.
4. S
a destination is selected, there are 4 further 2. Touch to select the ROUTE menu. su
options: m
3. Touch to set a selected destination. yo
• Yes to start navigation.
in
• Options for the type of route. 4. Touch to show information for a Point Of Interest
(POI), or for traffic information. 5. A
• Avoid to avoid a road feature. If
• Save to save the route to your Favourites. 5. Touch to reduce the map size. sc
de
2. Map View: Touch to view the map screen. 6. Drag the indicator along the scale to enlarge or
reduce the map size, or touch the line for the position 6. O
3. Favourites: Touch to view the list of stored required. co
destinations.
7. Touch to change between estimated time to Pairin
4. Touch to select the SETTINGS pop-up menu, select destination and distance to destination. 1. S
Navigation, to view the settings. su
8. Touch to enlarge the map size. m
5. Stop Guidance: Touch to cancel the current route
guidance. 9. Touch to select the SETTINGS pop-up menu, select yo
Navigation, to view the settings. in
6. Emergency: Touch to see a list of emergency
services. 10. Next manoeuvre icon and the distance to the next 2. S
manoeuvre. Touch to hear Voice guidance for the next sc
7. Information: Touch to display the following: Traffic, manoeuvre. 3. S
Where am I, and Trip computer.
11. Indicates the vehicle’s position on the set route. 4. S
Settings 5. T
12. The route that has been set. fo
When using the Navigation system for the first time,
personal preferences should be set. These settings are If
then applied whenever the Navigation system is used. F
Settings include: 6. A
If
• Speed limit warning. sc
• Navigation guidance options.
• Map display mode.
• Map view.
• Orientation of map direction.
• Traffic incidents.
14
LRL109560161 NLI.indd 14 24/04/2015 11:21:17PHONE
BLUETOOTH® WIRELESS TECHNOLOGY DEVICES
Calls via the Touch screen
Bluetooth Connectivity With a paired and active phone, press the Phone button
to the right of the Touch screen.
For the latest compatibility information, go online
to www.landrover.com. Select OWNERSHIP and
then Bluetooth.
Note: The process of pairing and connecting a phone to
the vehicle varies depending on the type of phone used.
Use the following procedure in conjunction with your
phone manufacturer’s instructions.
Connection must be made with the ignition switched on
or with the engine running.
Pairing and connecting using a phone
1. Switch the ignition on and make sure that the Touch
screen is active.
1. Select Messages, Contacts or Call lists.
2. Select GENERAL SETTINGS, then Bluetooth.
3. From the list, select Make system discoverable. 2. Touch to search for a new device, or change to
another, paired phone or device.
4. Switch on your phone or device’s connection. Make
sure that your phone or device is in discoverable 3. Touch to display the keypad. Use the keypad to enter
mode, sometimes referred to as find me mode (see a phone number.
your phone or device’s operating instructions for more
information). 4. To make a call, touch the green connect icon. The
5. A Passkey number appears on the phone or device. icon changes to a red connected call icon. To end a
If this number matches the number on the Touch call, touch the red icon.
screen, touch Yes, or press Pair on the phone or
device.
Calls via the steering wheel controls
ition 6. Once a phone or device is paired, it appears on the
connected device’s list and on the PHONE screen. See page 2, item 18.
Pairing and connecting using the Touch screen Connect: Press and release to send or accept a
call, or to access the Last 10 dialled list. Press
1. Switch on your phone or device’s connection. Make and hold to access the Contacts.
sure that your phone or device is in discoverable
mode, sometimes referred to as find me mode (see Disconnect: Use to end or reject a call.
ect your phone or device’s operating instructions for more
information). Voice control talk button: The screen displays
2. Switch the ignition on and make sure that the Touch available options. Say Phone and follow the
t instructions.
next screen is active.
3. Select GENERAL SETTINGS, then Bluetooth. The steering wheel media controls can be used to adjust
the phone volume and to scroll through Contacts.
4. Select Search for Bluetooth Devices.
5. The system searches for a phone or device and, if
found, the phone or device displays on the screen.
If the phone or device is not found, NO DEVICES
FOUND is displayed.
6. A Passkey number appears on the phone or device.
If this number matches the number on the Touch
screen, touch Yes.
15
LRL109560161 NLI.indd 15 24/04/2015 11:21:20FILLING STATION INFORMATION
REFUELLING
Fuel information
The fuel filler flap is located on the right side of the DO NOT use E85 fuels (85% ethanol content).
vehicle. If the vehicle is locked, the filler flap cannot be Equipment necessary for the use of fuels containing
opened. more than 10% ethanol is not fitted to this vehicle. If
Push the flap at the rear edge to release, then pull to E85 fuels are used, serious engine and fuel system
open. damage will occur.
The correct fuel specification is shown on the inside of For diesel vehicles, use diesel fuel to specification
the fuel filler flap. EN 590 with a maximum Bio-diesel mix of 7%.
Jaguar Land Rover vehicles are capable of running
with up to a 7% blend of Bio-diesel.
DO NOT use a higher blend of Bio-diesel fuel.
Incorrect fuelling
No responsibility is accepted for damage caused by
using incorrect fuels.
Twist the cap counter-clockwise to release. Replace the If the vehicle is filled with the wrong type of fuel:
cap and turn it clockwise until the ratchet clicks. Close the • DO NOT start the engine!
fuel filler flap until it is latched in the closed position.
• Call for qualified assistance!
Diesel misfuelling prevention
One of two types of diesel misfuelling protection devices
may be fitted in the fuel filler neck. The device helps to
prevent the diesel fuel tank being accidentally filled with
petrol.
With the active misfuelling protection device, a metal flap
in the filler neck opens to allow fuel filling, only when the TYRE PRESSURE LABEL
correct size of fuel nozzle is fully inserted into the fuel
filler neck. Tyre pressures are displayed on a label attached to the
The passive device will activate and restrict fuel filling, if pillar behind the driver’s door.
a narrow type of fuel nozzle is fully inserted. The narrow
fuel nozzle is associated with unleaded petrol pumps.
When the device is activated, a yellow flap is visible in the
filler neck. Use the reset tool, located in the vehicle’s tool BONNET RELEASE
kit, to reset the device.
Both device types will block the passage of fuel. If fuelling
continues, it may cause fuel to be discharged from the
filler neck.
Refer to the Fuel and refuelling section in your Owner’s
Handbook for further details and for instructions on how
to reset the device after activation.
1. Pull the bonnet release lever, located in the left side
front footwell.
2. Lift the bonnet safety catch, located below the centre
point of the bonnet, then raise the bonnet.
16 Part No. LRL 10 95 60 161 © Jaguar Land Rover Limited 2015
LRL109560161 NLI.indd 16 24/04/2015 11:21:23
Z3Vlc3Q7MjAyMS0xMi0wM1QyMjozNTo0OC45OTNaOzQ2LjQuODAuMTU1Ow==You can also read