Bird handling and ringing techniques
←
→
Page content transcription
If your browser does not render page correctly, please read the page content below
51

Chapter 4
Bird handling and ringing
techniques

Disease surveillance and other studies related to the H5N1 AI virus will inevitably involve
the capture and handling of large numbers of wild birds. Depending on the objectives of
the study, birds may be subjected to a variety of research techniques, including ringing (or
banding), biometric measurements, sample collection for laboratory diagnosis (see Chapter
5), and radio-tagging or other marking techniques (see Chapters 6 and 7). All these tech-
niques require the handling and restraint of wild birds, thus instruction in safe and effective
handling techniques is essential.
    The health and well-being of captured birds should be the primary concern during
all phases of handling. Proper handing techniques will minimise stress and maximise the
chances that the bird can returns to its pre-capture state with a minimum alterations in
behaviour; a goal which ensures the welfare of the bird and high data quality. Several
simple guidelines can be taken to ensure that birds are handled safely and with minimum
disturbance:
    • Always be aware of and comply with local and national laws regarding handling and
      ringing activities. Obtain all the required permits well in advance.
    • Use approved restraint techniques and follow the handling guidelines described in
      this Manual; consult with experienced wildlife veterinarians and biologists if modifica-
      tions to the restraining and handling techniques are required.
    • Always have at least one other person on hand, one of them with bird-handling expe-
      rience, during handling and ringing procedures. Even if the bird can be restrained and
      ringed by one person, a second person for data recording and other essential tasks
      will speed the process and result in less time in captivity and therefore, less stress.
    • Maintain a calm and quiet environment at the bird handling site.
    • Conditions at the bird processing site should be appropriate for the environmental
      conditions; in cold, wet conditions, birds should be kept warm and dry, while in hot,
      sunny conditions, birds should be processed in a sheltered, shaded and cool site.
    • Processing stations should be located as near as possible to the capture site to avoid
      holding birds for transportation any longer than is absolutely necessary.
    • AI disease surveillance involves the handling of bird species known or suspected of
      being H5N1 virus carriers; thus appropriate precautions should be taken to avoid the
      mechanical transmission of pathogens between birds and sampling sites (consult FAO
      2006).
    • The use of personal protective equipment (PPE) appropriate for the level of risk is
      strongly advised even when clinical signs of disease are not evident in birds in the
      region (consult FAO 2006).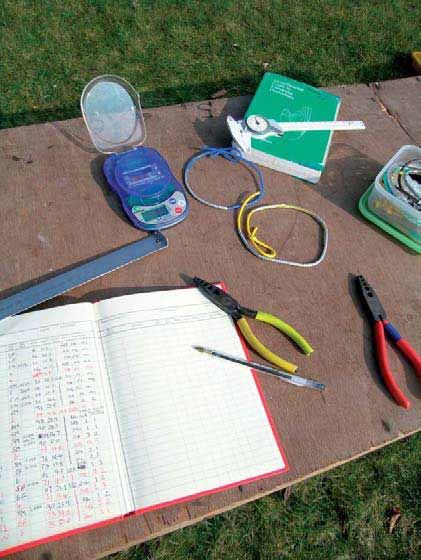
52   Wild Birds and Avian Influenza: an introduction to applied field research and disease sampling techniques

         BIRD HANDLING AND RESTRAINT
         The variety of birds likely to be captured and handled during disease surveillance and other
         AI related studies is so broad that no single handling technique is adequate for all birds.
         However, some general handling practices are applicable regardless of the species or size
         of the bird.
             • Safe handling is achieved by controlling the bird’s head, feet, legs and wings; how-
               ever, you should never move these appendages into awkward or unnatural positions
               that may injure the bird.
             • Use the proper amount of restraint; birds need to be grasped firmly enough to pre-
               vent them from struggling, but gently enough to avoid putting too much pressure on
               the bird’s body and restricting its respiration.
             • Protecting handlers from injury is also important; be sure to securely restrain the
               head and talons of those bird species (e.g. raptors or herons) that may lunge at the
               handler’s face and eyes; handlers should wear appropriate protective clothing for
               the task, including goggles or eye protection, long-sleeved shirts and leather gloves,
               where necessary.
             • Do not hesitate to request assistance if a bird struggles excessively or is otherwise
               difficult to handle; if the bird is overly agitated it is likely to overheat or undergo
               exertional muscular damage (myopathy). Consider putting it in a darkened holding
               container/crate to calm down; in extreme cases, the bird should be released.
             • Never grab or seize at a bird (especially the wings, legs or tail) if it escapes from the
               hand; if indoors, corner the bird and capture it under a net or towel before regaining
               a hold, if outdoors it is better to let the bird escape rather than risk injury.
             • Lightly wrapping the bird in a clean, dry cloth towel can be an effective form of
               restraint; alternatively, gently covering the bird’s head with a breathable cloth towel
               can eliminate stressful visual stimuli often calming the bird.
             • Consider other physical and chemical restraining aides; hoods, restraining jackets or
               even anaesthesia may be warranted, particularly when working with large or aggres-
               sive species.
             • Be on the lookout for signs of distress (gasping, laboured, or open-mouthed breath-
               ing) or physical injury to the bird.
             Proper handling and restraining techniques improve quickly as the handler gains expe-
         rience with a variety of birds. Inexperienced handlers need to be advised and supervised
         in proper handling techniques because they may tend to exert too much pressure when
         restraining the bird out of fear it might escape. Applying too much pressure can restrict
         the bird’s breathing or heart function. Gasping is an obvious sign that too much pressure is
         being used and the holder should immediately loosen the grip. Other inexperienced han-
         dlers may be afraid of harming a bird and not grasp it firmly enough, when in fact, birds
         are more likely to be injured while struggling to escape from light restraint.
             Some of the most practical handling and restraining techniques for birds of various sizes
         are described below.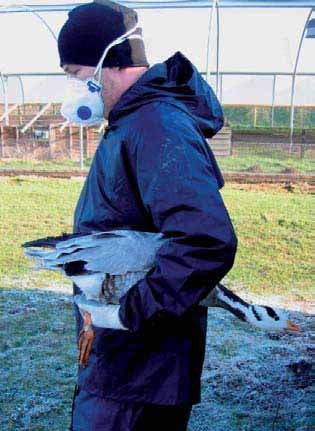
Bird handling and ringing techniques                                                                                                     53

Small birds
In general, small birds such as passerines and many shorebirds can be efficiently handled
by one person, using one hand to restrain the bird while the other hand is free to perform
relatively simple tasks such as ringing or biometric measures. However, to perform delicate
tasks such as cloacal/tracheal swabbing, blood sampling and attachment of telemetric or
data-logging devices requires two people; one to restrain the bird, the second to perform
the procedures.
    The most useful one-handed restraining technique is known as the ringer’s hold
(Figure 4.1):
    • Use the non-dominant hand to grasp the bird (e.g. if you are right-handed, hold the
       bird in your left hand), leaving the dominant hand and free for ringing, biometric
       measures and other tasks.
    • Firmly but gently grasp the bird with its back and closed wings against the palm of
       the hand.
    • Hold the head between the index and middle finger while the ring and little finger
       are closed around the body of the bird.
    • For ringing, the leg can be held between the thumb and either the index, middle or
       ring finger, whichever is most comfortable for the bird and the handler.
    • If the handling protocol involves manipulating the wing to perform blood sampling,
       moult scores or chord measurements, the wing can be held open by gripping the
       upper wing (humerus) between the thumb and tip of the index finger.

                                                      FIGURE 4.1
                                 The ringer’s hold for handling small birds
                                                                                                                   CREDIT: RUTH CROMIE

     Note: Most manipulations of the wing should be performed using the ringer’s hold, by holding the
     humerus, which is closer to the body near the shoulder joint. In this image, the ringer is holding the base
     of the primary feather to assess moult of the primary wing feathers by extending the wing.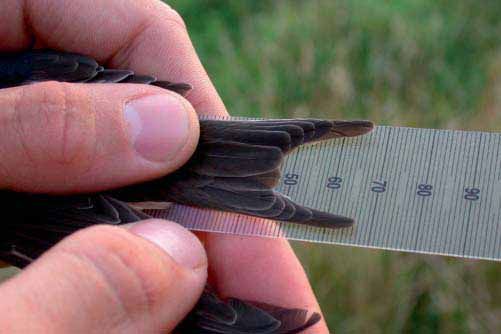
54   Wild Birds and Avian Influenza: an introduction to applied field research and disease sampling techniques

            The reverse ringer’s hold is similar to the ringer’s hold and may be a more comfort-
         able method for grasping the leg during ringing, although it is not convenient for taking
         biometric measurements:
            • Firmly but gently grasp the bird with its back and closed wings against the palm of
              the hand, but with the head facing downward toward the handler’s wrist.
            • Hold the tail between thumb and index finger.
            • Wrap the other fingers gently but firmly across the bird’s chest.
            • For ringing, the leg can be held between the thumb and the index finger.

         Medium-sized birds
         In most cases, medium-sized birds should be restrained by one handler using two hands,
         while another person conducts ringing and other procedures. Two-handed restraining tech-
         niques approved by the WWT are particularly suited to waterfowl (ducks and small geese)
         and species such as gulls, grebes, coots, cormorants and larger shorebirds.
            The two-handed grip (Figure 4.2) is the most natural two-handed restraining hold:
            • Firmly but gently grasp the bird with the hands placed either side of the bird so that
               the wings are held against the bird’s body by the handler’s palms.
            • The thumbs should be placed on the bird’s backbone at the level of the scapulae or
               shoulder and the fingers curled around the breast and abdomen, with the legs tucked
               up against the underside of the bird.
            • The bird’s body can be held horizontally (with the head facing away from the handler)
               or tilted vertically (head up) with the legs facing forward for ringing.

                                                      FIGURE 4.2
                             The two-handed grip for handling medium-sized birds
                                                                                               CREDIT: NIGEL JARRETT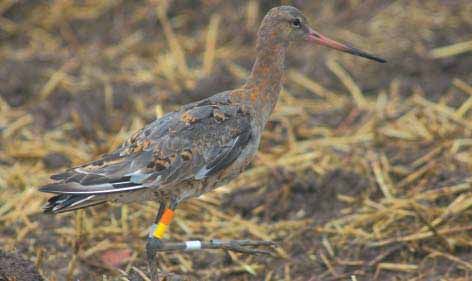
Bird handling and ringing techniques                                                                  55

                                        FIGURE 4.3
               The reverse two-handed grip for handling medium-sized birds

                                                                                CREDIT: REBECCA LEE
    The reverse two-handed grip (Figure 4.3) can be used to restrain a bird belly-up in the
handler’s lap or on a table while delicate procedures such as blood sampling and swabbing
are conducted; however, birds should not be held belly-up for long periods as this may
interfere with proper respiration:
    • With the bird belly-up, firmly but gently grasp the bird with the hands placed either
      side of the bird so that the wings are held between the bird’s body and the palms of
      the handler.
    • The thumbs should be placed on the bird’s breast near the sternum and the fingers
      curled around the back; if need be, the index and middle fingers can be used to hold
      the bird’s legs.
    • The bird can be restrained horizontally on the table or with the head tilted slightly
      upward for ringing and other procedures.
    Both of these grips can be modified if the handling protocol involves manipulating the
wing to perform blood sampling, moult scores or wing chord measurements:
    • Gently remove one wing from under the handler’s palm and extend it away the bird’s
      body.
    • Hold the wing open by gripping the upper wing (humerus near the scapula) between
      the thumb and index finger (two-handed grip) or thumb and base of the index
      finger (reverse two-handed grip).
    Very experienced handlers may be able to restrain medium-sized birds with one hand
using a waterfowl handling technique known as the one-handed ringer’s grip (Figure
4.4), although if another person is available, the other techniques are recommended:
56   Wild Birds and Avian Influenza: an introduction to applied field research and disease sampling techniques

                                                      FIGURE 4.4
                  The one-handed ringer’s grip for handling and ringing medium-sized birds

                                                                                           CREDIT: REBECCA LEE

            • Starting from the two-handed grip, the handler should use the dominant hand to
              place the bird snugly against his/her torso.
            • Switch hands so that the non-dominant hand restrains the bird against the handler’s
              body with the head of the bird facing either forward or back; one wing is pinned
              against the handler’s torso and the other against the palm of the handler with the
              fingers curled under the bird’s abdomen.
            • From this position, the fingers of the restraining hand can be used to hold the legs
              while the dominant hand is free to perform ringing and other tasks.

         Large birds
         Large birds such as geese and swans, and awkward long-legged and long-necked species
         such herons, egrets and storks can be quite difficult to handle and should only be restrained
         by experienced and handlers. When possible, these species should be restrained by at least
         two handlers; one to hold the body and wings and another to restrain the head and legs.
            The only practical technique for restraining large birds is the underarm hold (Figure
         4.5):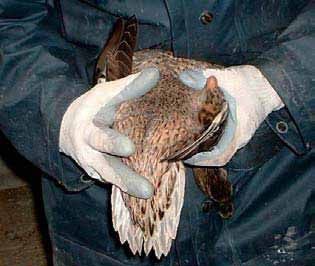
Bird handling and ringing techniques                                                                  57

                                         FIGURE 4.5
                        The underarm hold for restraining larger birds

                                                                                CREDIT: REBECCA LEE

   • The body of the bird is held under the handler’s left arm with the wings held against
     the bird’s body with pressure from the handler’s torso and left elbow and forearm.
   • In most cases, the bird’s head can be held behind the handler because this will pre-
     vent it from lunging at the handler’s face and eyes.
   • Place the left hand under the bird’s abdomen and the right hand across the bird’s
     back to help restrain the legs and wings, respectively.
   • Another handler can restrain the bird’s head and legs to prevent injuries caused while
     struggling to escape.
   • Certain species may require special handling techniques; for example, pelicans cannot
     breathe through the nares, thus the bill must be held open when restraining the head
     to allow the bird to breathe.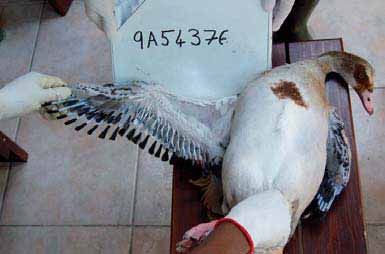
58 Wild Birds and Avian Influenza: an introduction to applied field research and disease sampling techniques
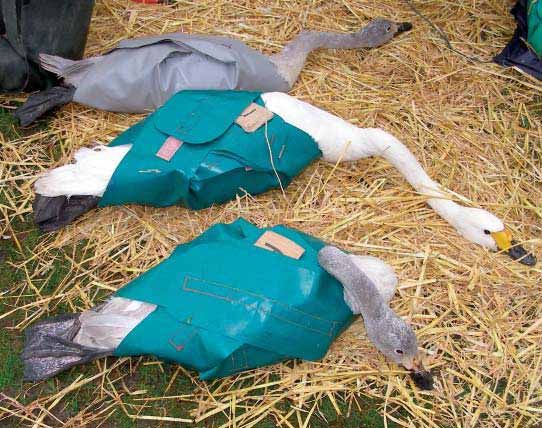
FIGURE 4.6
Velcro jacket used to restrain large birds during handling
CREDIT: TAEJ MUNDKUR
PHYSICAL AND CHEMICAL RESTRAINING AIDS
A variety of equipment can be used to physically immobilise birds. Covering the bird’s head
with a cloth towel, bag or hood to eliminate visual stimuli is a simple but often effective
means of calming a bird and preventing injuries to handlers. Hoods or some other form of
head covering are essential when handling aggressive or sharp-billed species such as her-
ons and egrets, and are advisable when handling gulls and cormorants. Lightly wrapping
birds in a cloth towel or placing them into a snug-fitting plastic or heavy paper tube can
effectively immobilise the wings of small and medium-sized birds. Velcro jackets have been
specifically designed for restraining larger geese and swans (Figure 4.6; Rees 2006).
Special care should be exercised when handling raptors, because even the smaller spe-
cies possess sharp beaks and extremely powerful talons that can injure the unwary handler.
Hoods and long thick leather gloves are required gear when handling raptors. A cloth cloak
or “aba” that permits biometric measurements and blood sampling has been specifically
designed for immobilising the body and legs of raptors and other large birds (Maechtle
1998).
Chemical restraint with anaesthesia is an option that should only be considered in two
instances: 1) to alleviate pain during invasive marking procedures; and 2) when handling
aggressive or sensitive species for which other restraining techniques are ineffective.
Anaesthesia should always be administered under controlled conditions by trained wildlife
veterinarians.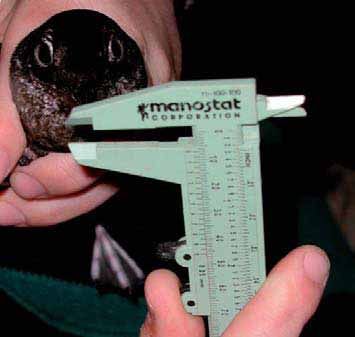
Bird handling and ringing techniques                                                            59

BIRD WELFARE
As the well-known saying goes, “prevention is the best medicine”. Careful planning and
execution of capture activities and adherence to proper handling guidelines will help
prevent most injuries or unnecessary stressors to birds. However, there is always the risk
of distress or injury when handling wild birds and handlers should always be aware of
the principles of animal welfare and be alert for signs of a bird suffering. Preferably an
appropriately trained veterinary clinician will be available to examine and treat any injured
or distressed bird, but, at the very minimum, a basic first aid kit should be included in the
equipment list of every field study involving the handling of wild birds. Some of the most
frequent maladies and treatments are described below.
    Scratches, cuts and abrasions may be unavoidable during capture and confinement.
Simple treatment by rinsing the injury with clean water or sterile saline before releasing
the bird should suffice for most minor injuries. More serious injuries such as deep cuts,
sprains and fractures should be brought to the attention of the attending veterinarian.
In no instance should a seriously injured bird be released into the wild without first being
examined and treated by a veterinarian.
    Some birds unable to cope with the stress of capture and handling may suffer a physi-
ological (shock) or neurological (inertia) reaction that leaves them in evident distress. The
signs of shock and inertia are generally similar; birds become unresponsive to external
stimuli to the point that they appear “frozen”, although shock may also be accompanied
by rapid breathing that is not evident in inertia. Birds should be allowed to recover in a
quiet, sheltered and well-ventilated area, well away from any human activity. Limiting time
in captivity, maintaining a calm and quiet captive environment, and working at a site appro-
priate for the environmental conditions will help prevent shock and inertia.
    Capturing, transporting and handling birds during extreme temperatures, rain or foul
weather may leave them vulnerable to chilling (hypothermia) or heat stress (hyperther-
mia). Hypothermia can occur in cold conditions when feathers become wet and lose their
insulating properties. Signs of hypothermia include shivering, lethargy and skin that is cold
to the touch. Birds suffering from hypothermia should be dried and placed near a heat
source such as a heating lamp or a hot water bottle (non-insulated). Hypothermia can be
prevented by avoiding capture and handling in cold/wet conditions and making sure bird
plumages are kept dry while being handled or held in captivity. Holding birds in dry airy
crates, at sufficiently low density and away from human disturbance usually allows them to
preen themselves dry. Handlers should avoid use of petroleum-based lotions (e.g. common
hand-creams and moisturisers) that may cause plumage to lose its insulating properties.
    Hyperthermia can occur in hot conditions when birds are held in direct sunlight, at high
ambient temperatures, or in overcrowded crates without adequate ventilation or water.
Hyperthermia may also occur if birds are subject to a prolonged chase during capture. Signs
of hyperthermia include panting, wings held away from the body, lethargy, seizures or pros-
tration. Birds suffering from hyperthermia should not be handled, but should be placed in a
well-ventilated box/crate, moved to a cool, shaded area and provided with abundant drink-
ing and swimming water. It may be beneficial to mist the bird with water or apply alcohol
or water to the bird’s feet to accelerate heat dissipation. Hyperthermia can be prevented by
avoiding capture and handling in hot conditions and not overcrowding holding pens/crates.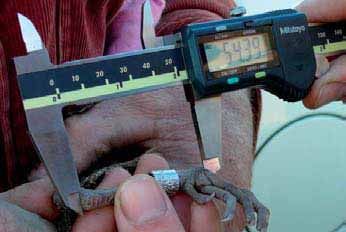
60   Wild Birds and Avian Influenza: an introduction to applied field research and disease sampling techniques

             Injuries caused by improper capture and handling techniques such as fractures, bra-
         chial (wing) paralysis and capture myopathy are common and in all cases, avoidable.
         Never carry a bird by the wings or legs alone and do not hyperextend the wings or legs
         while restraining a bird. Do not keep long-legged birds in cramped conditions that prevent
         standing. Avoid prolonged chases or forceful restraint of struggling birds that may overtax
         birds during capture and handling.

         RINGING (BANDING)
         The ringing (or banding in some countries) of wild birds for scientific purposes has provided
         a wealth of information revealing the life histories and movements of many different spe-
         cies. Metal leg rings (bands) are the oldest and most widespread ringing methods, and the
         uniquely numbered rings allow for individual identification of any marked bird. Ringing
         is advisable whenever a bird is captured and released back into the wild, and is essential
         during disease surveillance programmes to prevent repeated sampling of recaptured birds
         that would bias results. However the repeated sampling of marked birds assists in tracking
         changes in disease status.
             Several national or regional agencies have been formed to regulate and coordinate
         bird ringing activities worldwide. Organisations such as EURING4, AFRING5 and the US Bird
         Banding Laboratory6 can usually provide detailed information regarding all aspects of ring-
         ing in their region, including permitting procedures, obtaining rings, the proper size ring
         for species of interest and basic ringing equipment. Ringing agencies are also responsible
         for collecting and collating data for all the birds marked or recaptured in their jurisdiction.
         Timely submission of ringing data is vital to maintaining a complete and up-to-date history
         for each marked bird.

                          EQUIPMENT LIST FOR RINGING AND BIOMETRIC MEASURES

                   1. Leg rings sized to fit the species of interest
                   2. Ringing pliers and needle-nose pliers
                   3. Data notebook and pens/pencils
                   4. Vernier callipers
                   5. Stopped wing ruler (preferably metal)
                   6. Tail ruler (preferably metal)
                   7. Bird Guides
                   8. Weighing scale
                   9. Weighing bags
                  10. Wire or nylon fishing line

         4   http://www.euring.org/
         5   http://web.uct.ac.za/depts/stats/adu/safring-index.htm
         6   http://www.pwrc.usgs.gov/bbl/
Bird handling and ringing techniques 61
FIGURE 4.7
Basic equipment for ringing and biometric measures
1
7
2
3
6
4
5
CREDIT: MARK GRANTHAM
1) Bird guide, 2) Vernier callipers, 3) leg rings, 4) ringing pliers, 5) data notebook
and pen, 6) stopped wing ruler, 7) weighing scale62 Wild Birds and Avian Influenza: an introduction to applied field research and disease sampling techniques
Ringing a bird
Leg rings are available in a variety of different sizes (inside diameter fromBird handling and ringing techniques 63
special permits. Consult the regional ringing agency for information on acquiring rings of
the proper size and material for the species of interest.
Leg rings are almost always placed on the bird’s tarsus (the long bone immediately
above the toes) in most passerines and waterbirds (Figure 4.8), but are often placed on
the tibio-tarsus (above the “knee”) on some long-legged waders (Figure 4.9). No conven-
tion exists as to which leg should be ringed or the orientation of the ring numbers on the
standing or perched bird. Ring placement is greatly facilitated by the use of ringing pliers,
which are basically long-nosed pliers with holes of various sizes that correspond to the out-
side ring diameters. The proper ringing procedures for most situations are as follows:
• Remove the ring from the string by using a pair of needle-nose pliers to open the
ring enough that it just fits over the tarsus of the bird; the less the ring is opened to
fit over the tarsus, the easier it will be to close.
• Using whichever restraining hold is best suited to the bird, extend the bird’s leg and
slip the ring over the narrowest point of the tarsus.
• Holding the ring in place with the fingers, slip the appropriately sized hole of the
ringing pliers around the ring so that the gap in the ring is aligned with the open end
of the pliers (Figure 4.10).
• Gently squeeze the pliers so that the ring closes and it can no longer be removed from
the tarsus.
• Rotate the ring in the pliers so that the butt ends are now within the same closed half
of the pliers’ hole (Figure 4.11), then again apply pressure to fully close the ring; this
step may need to be repeated several times before the ring is properly closed.
• Record the ring number and other pertinent observations in a notebook; this infor-
mation should be recorded prior to completing closure of the ring on the bird and is
facilitated by the use of standard forms/ headings to ensure that all essential data is
recorded.
FIGURE 4.10
Phase 1 of proper alignment of the leg ring in the pliers during ring closure:
align the gap in the ring with the open end of the pliers
and apply pressure to partially close the ring around the tarsus
CREDIT: NIGEL JARRETT64 Wild Birds and Avian Influenza: an introduction to applied field research and disease sampling techniques
FIGURE 4.11
Phase 2 of proper alignment of the leg ring in the pliers during ring closure:
rotate the ring in the pliers so that the butt ends are within the same closed
half of the pliers’ hole and apply pressure to fully close the ring
CREDIT: DARRELL WHITWORTH
When properly closed the ring should be loose enough to slide freely and spin around
the tarsus, but tight enough that it cannot slide over the leg joint or foot, or get caught
on vegetation. The ends of the ring should butt squarely and tightly, without projecting
corners or edges to abrade the leg. Stiffer rings of stainless steel or other alloys may require
considerably more pressure to completely close compared to aluminium rings.
On occasion, too much pressure may be applied when closing the ring and the ends
will overlap. Overlapping rings should be removed and replaced before the bird is released.
Removing bands is always tricky, but necessary, as the sharp edges may scrape and abrade
the bird’s leg. To remove a poorly fitted ring:
• Insert two pieces of wire or nylon fishing line between the bird’s tarsus and the
ring.
• The wire or line should be long enough that it can be easily tied into loops that can
be gripped by the handler, and strong enough that the loops will not break when
pulling the ring open.
• Insert a pencil into each loop and carefully pull the loops apart, thereby opening the
ring.
• To avoid injury to the bird while pulling the loops apart, keep the bird’s leg stationary
and maintain steady even pressure on both loops as the ring opens; at all costs avoid
jerky pulling motions which are likely to put undo pressure on the wire/line and the
bird’s leg.
BIOMETRIC MEASUREMENTS
For many bird species, the sex or age of a captured individual may not always be imme-
diately evident with a simple visual inspection. However, subtle but significant differences
in morphology are often useful for differentiating between sexes and age classes. Thus,
recording biometric measurements in conjunction with bird ringing is a common practice,Bird handling and ringing techniques 65
and can have important applications in disease sampling studies for determining differential
infection or exposure rates based on sex or age. Weight, culmen length and depth, tarsus
length, wing length and tail length are among the most commonly recorded biometric
measures. Additional data such as the presence of incubation (brood) patches and the
moult stage also provide important data revealing the breeding or physiological status of
the bird when captured.
Weight
Bird weight can be determined using electronic, beam or spring scales (or balances),
although spring scales (e.g., Pesola scales) are often the most practical for use in field situ-
ations. Have a number of different-sized scales available to cover the range of birds likely to
be captured. Birds should be placed in cloth bags or other containers for weighing. When
using spring scales the bird is suspended from the scale (Figure 4.12) to obtain the gross
weight (bird + bag). The weight of the bag or container should be measured after each
use and subtracted from the gross weight to obtain the bird weight (gross weight – bag
weight = bird weight). Always record the gross weight, bag weight and bird weight in the
field notebook.
Culmen length and depth
Culmen (bill) length and depth are measured using sliding Vernier callipers. Depending on
the bird species, three different measures of culmen length may be taken: 1) tip of the bill
to the base of the skull (passerines); 2) bill tip to the cere (birds of prey); and 3) bill tip to
feathering at base of bill (Anatids, waders and other long-billed birds). Record the method
used in field notes.
FIGURE 4.12
Weighing a bird with a spring scale
CREDIT: GIUSEPPE ROSSI66 Wild Birds and Avian Influenza: an introduction to applied field research and disease sampling techniques
FIGURE 4.13
Measuring culmen length with Vernier callipers
CREDIT: USGS WESTERN ECOLOGICAL RESEARCH CENTER
FIGURE 4.14
Measuring culmen depth with Vernier callipers
CREDIT: SCOTT NEWMANBird handling and ringing techniques 67
To measure culmen length:
• Open the callipers so that the opening is wider than the length of the bill.
• Gently place the outer calliper jaw against the base of the bill where the measure-
ment starts (base of skull, cere or feathering).
• Slide the inner calliper jaw until it just contacts the distal tip of the bill (Figure 4.13).
• Record culmen length to the nearest 0.1 mm in the field notebook.
To measure culmen depth:
• Open the callipers so that the opening is wider than the depth of the bill.
• Place the inner jaw of the callipers against the base of lower mandible.
• Slide the outer calliper jaw inward until it just touches the upper mandible, either at
the base of the bill where the feathering starts or at the proximal edge of the nostril
(Figure 4.14).
• Record the culmen depth to the nearest 0.1 mm and where the measurement was
taken (feathering or nostril) in the field notes.
Tarsus length
Tarsus length is a measure of the length of the tarsometatarsal bone and also requires the
use of Vernier callipers. To measure tarsus length:
• Open the callipers so that the opening is wider than the length of the tarsus.
• Place the inner jaw of the callipers into the notch of the intertarsal joint at the back
of the bird’s leg.
• Bend the bird’s foot downward at a 90º angle to the tarsometatarsal bone and slide
the outer calliper jaw inward until it just touches the point where the foot bends
(Figure 4.15).
• Record the tarsus length to the nearest 0.1 mm in the field notes.
FIGURE 4.15
Measuring tarsus length with Vernier callipers
CREDIT: USGS WESTERN ECOLOGICAL RESEARCH CENTER68 Wild Birds and Avian Influenza: an introduction to applied field research and disease sampling techniques
Wing length
Wing length is defined as the distance from the distal portion of the carpus to the tip of the
longest primary feather. By convention, the wing length is measured with the wing chord
flattened and straightened, a practice which yields the maximum and most consistent
FIGURE 4.16
Measuring wing length with a stopped wing ruler
CREDIT: SCOTT NEWMAN
FIGURE 4.17
Measuring a bird’s tail length with a normal ruler
CREDIT: ROB ROBINSONBird handling and ringing techniques 69
results. A stopped wing ruler (blocked off at the 0 mm mark) is needed for wing chord
measurements. To measure wing length:
• Slide the stopped wing ruler under the wing and press the carpal joint gently but
firmly against the stop.
• Flatten the wing against the ruler by gently pressing down on the covert feathers near
the base of the primaries (Figure 4.16).
• Use the index finger to gently straighten the longest primary feathers along the
ruler.
• Record the wing length to the nearest 1 mm in the field notes.
Tail length
Tail length is defined as the distance from the base to the tip of the longest tail feathers
(rectrices). Measurement of tail length requires little more than a normal ruler. To measure
tail length:
• Slide the tail ruler between rectrices and undertail coverts until it reaches the base of
the two central tail feathers.
• Use the index finger to gently flatten and straighten the tail feathers along the ruler
(Figure 4.17).
• Record the length of the longest tail feather to the nearest 1 mm in the field notes.
Brood patches
During the breeding season, many birds develop a bare patch on the abdomen where
downy feathers are shed just before the onset of incubation. This brood (or incubation)
patch permits the efficient transfer of body heat from the incubating parent to the develop-
ing eggs. Not all species develop brood patches: ducks for instance do not. Brood patches
FIGURE 4.18
Brood patch examination for a Xantus’s Murrelet (Synthliboramphus hypoleucus)
CREDIT: DARRELL WHITWORTH70 Wild Birds and Avian Influenza: an introduction to applied field research and disease sampling techniques
usually develop in both females and males if incubation duties are shared, but if incubation
is performed solely by one sex, usually only that sex develops a brood patch. Some bird
species develop just one brood patch located medially on the abdomen, while other species
develop two bilateral brood patches.
If captures are conducted during the breeding season, birds known to develop brood
patches should be inspected for their presence.
• For species with thinner, fine plumage (e.g. passerines): hold the bird (ringer’s hold)
belly-up near the handlers face with the bird’s head away from the handler, and gen-
tly blow across the bird’s abdomen to lift the body covert feathers and expose the
brood patch.
• In aquatic species with thicker, dense plumage: hold the bird (reverse two-handed
grip) belly-up with the bird’s head away from the handler and use the thumbs to gen-
tly part the body covert feathers on the abdomen to expose the brood patch (Figure
4.18).
Moult scores
Feathers are essential to the survival of birds, which spend considerable time preening to
maintain their plumage in good condition. Nevertheless, wear and tear over time causes
feathers to deteriorate. Thus, all birds undergo regular periods when they shed old feathers
and replace them with new ones during a process called moult (Figure 4.19). Moult pat-
terns differ by species; some birds moult annually, others less frequently and others more
frequently.
FIGURE 4.19
Wing moult (note the blue sheaths at base of primary feathers)
on an Egyptian Goose (Alopochen aegyptiacus)
CREDIT: GRAEME CUMMINGBird handling and ringing techniques 71 Growth of new feathers is an energetically expensive process and birds may be physi- ologically stressed or compromised during moult; thus, recording the presence of moult in captured birds is important for determining periods in which they may be weakened and more vulnerable to disease. Rather involved schemes have been devised for characteris- ing the progress of moult, but these are beyond the scope of this Manual. Those seeking more detailed information on moult should consult Ginn and Melville (1983) or Jenni and Winkler (1994). REFERENCES AND INFORMATION SOURCES Bairlein, F. 1995. Manual of Field Methods of the ESF European-African Songbird Migra- tion Project. ESF. Wilhemshaven, Germany. Baker, J.K. 1993. Guide to Ageing and Sexing Non-Passerine Birds. BTO, Thetford, UK. Balachandran, S. 2002. Indian Bird Banding Manual. Bombay Natural History Society, Mumbai, India. Bird Migration Research Centre. 1983. Bird Banding Manual, Identification Guide to Japanese Birds. Yamashina Institute for Ornithology, Shibuya, Tokyo. Busse, P. 2000. Bird Station Manual. Southeast European Bird Migration Network, Univer- sity of Gdansk, Choczewo, Poland. DeBeer, S.J., Lockwood, G.M., Raijmakers, J.H.F.A., Raijmakers, J.M.H., Scott, W.A., Oschadleus, H.D. & Underhill, L.G. eds. 2001. ADU Guide 5: SAFRING Bird Ringing Manual. Avian Demography Unit, University of Cape Town, South Africa (also available at web.uct.ac.za/depts/stats/adu/pdf/ringers-manual.pdf). Gaunt, A.S., Oring, L.W., Able, K.P., Anderson, D.W., Baptista, L.F., Barlow, J.C. & Wingfield, J.C. 1997. Guidelines for the use of wild birds in research. The Ornithologi- cal Council, Washington, D.C. Ginn, H.B. & Melville, D.S. 1983. BTO Guide 19: Moult in birds. British Trust for Ornithol- ogy, Tring, UK. Jenni, L. & Winkler, R. 1994. Moult and ageing of European passerines. Academic Press, London. Maechtle, T.L. 1998. The Aba: a device for restraining raptors and other large birds. Jour- nal of Field Ornithology, 69: 66-70. McClure, E. 1984. Bird banding. Boxwood Press, Pacific Grove, CA, USA. Rees, E.C. 2006. Bewick’s Swan. T. & A.D. Poyser. London. Schemnitz, S.D. 2005. Capturing and handling wild animals. In C.E. Braun, ed. Tech- niques for wildlife investigations and management, pp. 239-285. The Wildlife Society. Bethesda, USA.
You can also read