Pure FlashBlade with Commvault for Data Protection
←
→
Page content transcription
If your browser does not render page correctly, please read the page content below

PURE VALIDATED DESIGN

Pure FlashBlade
with Commvault
for Data Protection
PURE VALIDATED DESIGN

Contents
Executive Summary ............................................................................................................................................................3
Introduction ........................................................................................................................................................................3
    Solution Overview.............................................................................................................................................................................................. 4
      Solution Benefits ................................................................................................................................................................................................ 4

Technology Overview .........................................................................................................................................................6
   Commvault® Backup & Recovery .................................................................................................................................................................... 6
      Commvault Remote Office Appliance RO1105............................................................................................................................................. 6
      CommCell® Environment .................................................................................................................................................................................. 6
      Pure FlashBlade Storage .................................................................................................................................................................................. 9
      Network Resources ..........................................................................................................................................................................................12

Technical Solution Design ................................................................................................................................................ 12
   RO1105 Appliance ............................................................................................................................................................................................ 13
      Sizing .................................................................................................................................................................................................................. 13
      Sizing Backup Targets .................................................................................................................................................................................... 13
      Settings and Tuning .........................................................................................................................................................................................15
      Scaling................................................................................................................................................................................................................. 17
Deployment ....................................................................................................................................................................... 17
Deployment Considerations ............................................................................................................................................. 17
Deployment Guide............................................................................................................................................................. 18
   Install Pure FlashBlade Storage .....................................................................................................................................................................18
      Set-up Pure FlashBlade ...................................................................................................................................................................................18
      Add FlashBlade Replication Links ................................................................................................................................................................ 20
      Create Protection Policy for Replication ......................................................................................................................................................21
      Provision File System for Commvault DR Backups ...................................................................................................................................21
      Provision Object Bucket for Backup Data .................................................................................................................................................. 26
      Optional: Add CA Certificate ......................................................................................................................................................................... 28
      Set up the RO1105 ........................................................................................................................................................................................... 28
      Enable Virtualization Solution........................................................................................................................................................................ 33
      Validate the Commvault RO1105 Configuration ........................................................................................................................................ 35
Commvault Software Upgrade ......................................................................................................................................... 35
Monitoring........................................................................................................................................................................ 36
  Monitoring Pure FlashBlade Storage Using the Commvault Command Center ................................................................................. 36
      Monitoring Pure FlashBlade Storage Using the Purity//FB GUI Dashboard ........................................................................................ 37

Conclusion ........................................................................................................................................................................ 41
Product Support ................................................................................................................................................................ 41
Additional Documentation ............................................................................................................................................... 42
Document Updates .......................................................................................................................................................... 43
Document Revisions ........................................................................................................................................................ 43

                                                                                                                                                                                                                                2
PURE VALIDATED DESIGN

Executive Summary

Growing volumes of information and business demands for 24x7 access to applications make it harder
for companies to develop adequate data protection and disaster recovery strategies. Traditional
backup and recovery processes and infrastructure are pressed to keep pace as threats to high-value
data become more common. Commvault and Pure Storage® have partnered to design, validate and
deliver a high-performance, simple, and scalable enterprise-level data protection solution.

A Pure Validated Design (PVD) means that Pure has integrated and validated its leading-edge storage technology with an
industry-leading application solution platform to simplify deployment, reduce risk, and free up IT resources for business-critical
tasks. The PVD process validates a solution and provides design consideration and deployment best practices to accelerate
deployment. The PVD process assures the chosen technologies form an integrated solution to address critical business
objectives. This document provides design consideration and deployment best practices for the PVD using Pure FlashBlade®
with Commvault Remote Office Appliance RO1105 for data protection.

The Commvault Remote Office Appliance RO1105 (RO1105) with Pure FlashBlade is especially well-suited to address the
stringent data protection requirements of enterprise data centers. This solution allows Commvault backup clients to write
directly to object storage on FlashBlade, which lets a small, remote-office server manage data at enterprise scale. This
solution brings together a leading data protection appliance with an all-flash storage platform to offer high throughput, low
latency, and built-in, always-on deduplication and compression to deliver high performance and simplicity for enterprise
backup and restore operations.

Introduction
This document describes the benefits of implementing the RO1105 with Pure FlashBlade in addition to design considerations
and deployment best practices. It also includes sizing guidelines, installation steps, and configuration best practices to
leverage the simplicity, scalability, and agility of a Commvault with FlashBlade to provide high-performance, enterprise-class
data protection.

Companies are experiencing exponential growth in the volume of data they need to manage, while rapid changes in data types
and sources complicate data management. At the same time, growing levels of ransomware attacks threaten to bring down
not just a single application but an entire operation and cause significant financial and business losses and legal issues, in
addition to serious damage to the organization’s reputation. Traditional data protection methods are unable to meet these
evolving requirements and new ransomware threats. Current solutions are often:

• Slow: Spinning disks make shrinking backup windows, aggressive recovery time objectives (RTOs), and stringent service
  level agreements (SLAs) virtually impossible to meet.

• Complicated: Multiple hardware vendors and backup products in the environment increase storage and data management
  complexity.

                                                                                                                                 3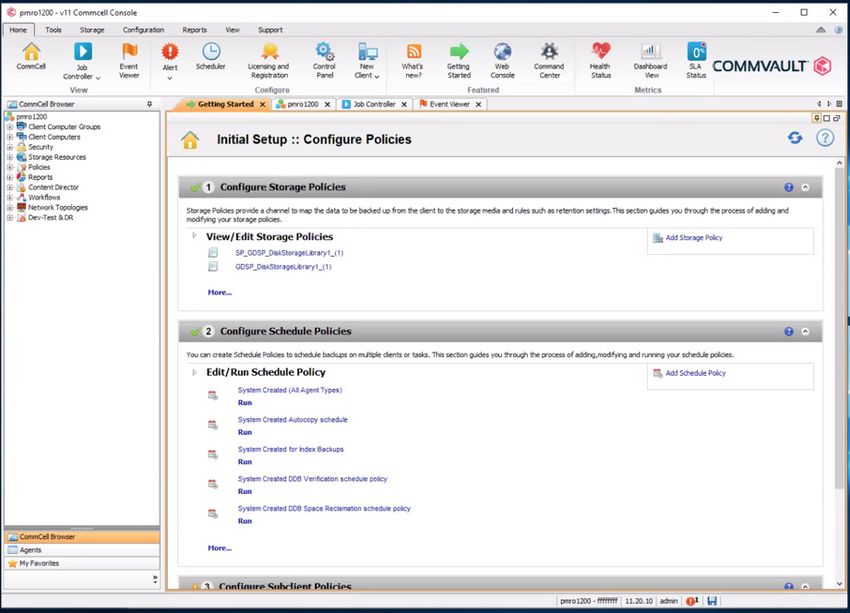
PURE VALIDATED DESIGN

• Costly: Unpredictable costs for hardware refreshes and software upgrades put a strain on budgets, making it difficult to
    scale as the business grows.

Commvault and Pure have partnered to deliver a Pure Validated Design, which combines the simplicity of the Commvault
Remote Office Appliance with the high performance and scalability of Pure FlashBlade storage to deliver a superior data
protection solution for enterprise-wide mission critical data.

Solution Overview
This PVD leverages Commvault Backup & Recovery enterprise software to provide a fast, simple, and scalable data protection
and infrastructure management solution designed for the modern data center. Included as part of the solution is the
Commvault Storage Accelerator feature. Storage Accelerator allows backup clients to write directly to object storage on
FlashBlade, removing the MediaAgents from the data stream. In this solution, the MediaAgents therefore only manage
metadata. The reduced workload on the MediaAgents lets a small, remote-office server manage data at enterprise scale.
MediaAgents also perform deduplication to efficiently use storage targets, increasing the benefits of using cloud storage for
backup and archival.

Pure Storage FlashBlade is a high-performing, scale-out, unified fast file and object storage system optimized for storing and
processing unstructured data. FlashBlade provides high throughput and fast time to first byte and it can host multiple file
systems and multi-tenant object stores for thousands of clients. FlashBlade provides a highly scalable solution to meet
growing storage demands and enables IT administrators to improve productivity and consolidate silos by supporting multiple
data sources on one storage platform. Commvault’s Deduplication Accelerated Streaming Hash (DASH) Copy process can be
used for data with a retention period longer than data backed up for operational recovery, to archive on public cloud storage.
The Commvault with FlashBlade architecture is shown in Figure 1.

Commvault Backup & Recovery’s advanced data compression and deduplication capabilities combined with Pure FlashBlade’s
intelligent replication provide the data-protection foundation needed to ensure true business continuity today and the ability to
meet growth demands of tomorrow.

Figure 1. Pure FlashBlade storage with Commvault architecture.

Solution Benefits
Rapid growth in data creation, increased data retention requirements, and the always-on nature of business combine to place
increased pressure on both Recovery Point Objectives (RPOs) and Recovery Time Objectives (RTOs). Traditional backup

                                                                                                                                 4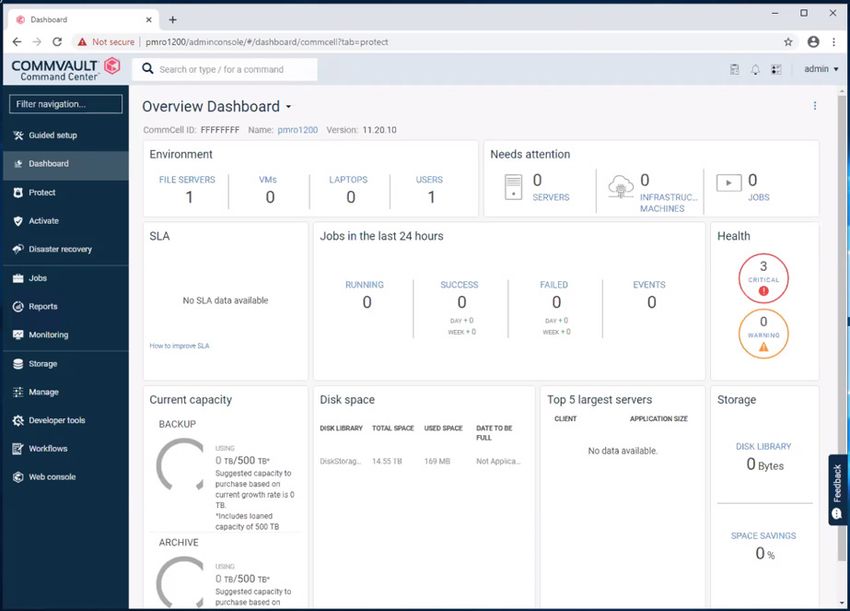
PURE VALIDATED DESIGN

solutions are not able to meet these increasingly demanding requirements. The Commvault with FlashBlade solution includes
advanced features to simplify management, improve performance, and attain the highest levels of data protection.

Performance
The FlashBlade all-flash backup target achieves data ingestion rates of up to 90TB/hour. Combining the high-performance,
high-capacity blade technology with all-flash storage and 320 Gbs bandwidth of external fabric modules, provides a storage
subsystem capable of meeting the performance demands of an enterprise-wide backup solution.

Performance throughout the backup process is important as it allows more data to be protected in a reduced timeframe. But,
restore time is what is most important. A typical data restore consists of copying backup data from secondary storage to its
original or possibly a new location. The restore is performed to return the data to its original state. But, finding and recovering
the data takes time. FlashBlade Rapid Restore allows simultaneous restore operations to different clients which dramatically
reduces restore time and delivers data-recovery speeds of up to 270TB/hour for Commvault protected data.

Load Distribution
The integration of FlashBlade object storage differentiates the Commvault with FlashBlade solution from traditional backup
solutions that rely on block and file storage. To read and write data to file storage, Commvault breaks each backup or restore
stream into chunks, which are written sequentially into large data files. In an object storage environment, the system creates a
thread pool that is shared across all streams and breaks data chunks into smaller binary large objects (BLOBs) before they are
written. As each thread is activated, it opens a TCP connection to storage and the threads write BLOBs in a highly parallel
manner. Commvault automatically expands the thread pool, up to a customizable maximum, as needed to improve throughput.
Because the threads each have their own TCP connections, Commvault’s architecture results in excellent load distribution
across FlashBlade blades and improved distribution to and across more clients.

Simplified Management
The Commvault Remote Office Appliance RO1105 protects and recovers data to and from the FlashBlade. It manages
compression and deduplication before the data is sent to the FlashBlade, thereby reducing data being backed up, storage
capacities, operating costs, and the network bandwidth required for backups and restores. The solution can also manage local
backups and restores and replicate snapshots via Commvault IntelliSnap copies for greater data protection.

Commvault IntelliSnap streamlines and simplifies snapshot management by centralizing it across one or many storage arrays,
automating object, application, and database recovery, and linking snapshots to backup processes. IntelliSnap quiesces
applications or systems, triggers the storage array-based snapshot, and returns the system to a fully operational state within
minutes. It minimizes administrative configuration and eliminates scripting requirements across arrays. In addition, IntelliSnap
offers a simple data management, indexing and reporting framework, so data can be used for more than just backup and
recovery.

Scale
FlashBlade’s scale-out metadata architecture can handle tens of billions of files and objects with maximum performance and
rich data services. A single FlashBlade can scale out instantly, simply by adding blades, up to 150 blades across 10 chassis,
providing over 7.5PB of raw storage. Each added blade increases the system throughput, which results in faster backup and
recovery as the FlashBlade grows. Adding Commvault 1U Data Servers increases the amount of data Commvault software can
manage.

                                                                                                                                      5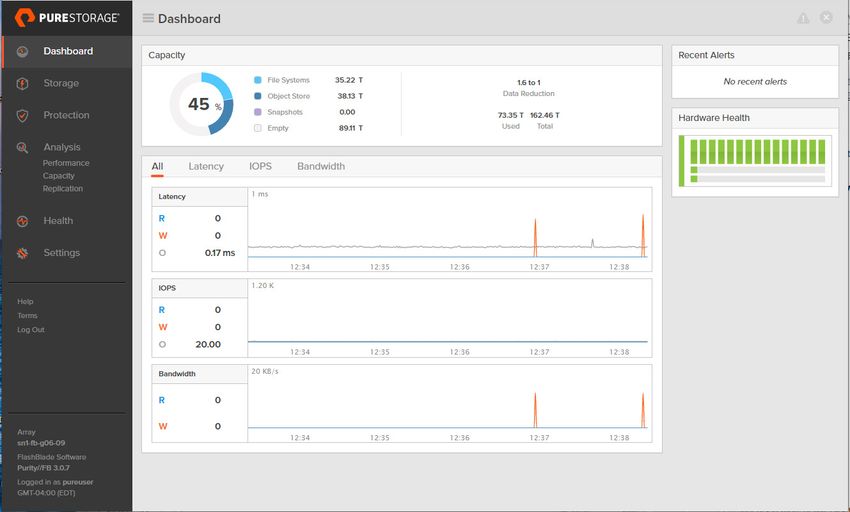
PURE VALIDATED DESIGN

Ransomware Protection with SafeMode Snapshots
Backups protect critical data against common problems such as disasters, data corruption, and accidental deletions. But the
latest threat facing corporate data is the threat of ransomware. Ransomware is a type of malware that encrypts files and
requires payment of a ransom in return for restoring access to the data. As there’s no guarantee a perpetrator will honor the
terms of the ransom, the best protection is to prevent ransomware through cybersecurity best practices and routine
snapshots.

The solution has advanced ransomware detection and mitigation capabilities to help ensure data can be recovered quickly in
the case of an attack and to identify and react early to attacks and, thus, minimize potential damage. FlashBlade features
SafeMode™ snapshots, which are uniquely designed to protect backup metadata. SafeMode snapshots allow administrators to
periodically create read-only snapshots of backup data as immutable secure copies that cannot be deleted by an attacker or
administrator. The backup data can be instantly rolled back to any snapshot, preventing malicious or accidental deletion of
backup data to enable fast recovery from ransomware attacks and similar events.

Technology Overview

Commvault® Backup & Recovery
Commvault Backup & Recovery software provides enterprise-grade protection and recovery of virtual machines, containers,
databases, applications (including cloud), endpoints and files. It provides increased visibility and role-based access control
that enables self-service, restricting unauthorized access while helping to eliminate data sprawl. Source-side deduplication
improves data transmission efficiency, with encryption available both at-rest and in-transit. Commvault supports flexible
recovery of an entire system, instance, and application; or recovery as granular as a single file or database table. Commvault
allows admins to manage backed-up data and workloads efficiently and securely, both on-premises and in any public cloud.

Commvault Remote Office Appliance RO1105
The Commvault Remote Office Appliance, also called the Data Control plane, runs the CommServe and MediaAgent Services:

• CommServe services are the single point of management, configuration, and reporting for the data protection solution.

• MediaAgent Services manage the meta data, including deduplication and job indexing, for the entire solution.

The RO1105 appliance is shown in Figure 2.

Figure 2. Commvault Remote Office Appliance

CommCell® Environment
A CommCell environment is the logical grouping of all Commvault components that protect, move, store, and manage data and
information. The CommServe Services and CommCell Console have primary roles in managing data protection operations
within the solution.

                                                                                                                                 6
PURE VALIDATED DESIGN

CommServe Services
The CommServe Services comprise the central management components of the CommCell environment, coordinating and
executing all CommCell operations across the clients, source and destination sites (Figure 3). They also maintain the
configuration, security, and operational history for the CommCell environment. The CommServe Services are responsible for:

• Managing administrative functions

• Communicating with MediaAgents when the media subsystem requires management

• Communicating with agents to initiate data protection, management, and recovery operations

• Providing tools to administer and manage the CommCell environment

Figure 3. Commvault CommServe Services

MediaAgent Services
The MediaAgent Services process deduplication and maintain a distributed database of unique data patterns. They manage
metadata indexing that enables browse-and-search-based recovery. They perform efficient replication of deduplicated data
between sites and to public cloud storage. Finally, they prune data from storage after its retention period expires.

Storage Accelerator
In a typical backup architecture, protected client systems transfer data through MediaAgents, then on to data storage. These
client systems are typically large servers attached to massive amounts of disk storage. The Commvault Storage Accelerator
feature allows clients to bypass the MediaAgent (which shifts from a data mover to a data server role) and write deduplicated
backup data directly to a FlashBlade object bucket. The data server, or MediaAgent, only processes job index and
deduplication hash metadata, minimizing overhead. Backup and restore traffic are no longer bound by the MediaAgent
network speed, and the data server can manage more backups and recoveries on less infrastructure. This is especially
powerful when performing many simultaneous restore operations to different clients.

With Storage Accelerator, backup clients send metadata only to the Data Control plane while communicating directly with the
FlashBlade to read and write data as shown in Figure 4. Commvault Storage Accelerator extension provides the ability to use
cloud storage as a backup target. In this solution, FlashBlade is configured as an Amazon S3-compatible cloud storage library.

                                                                                                                                7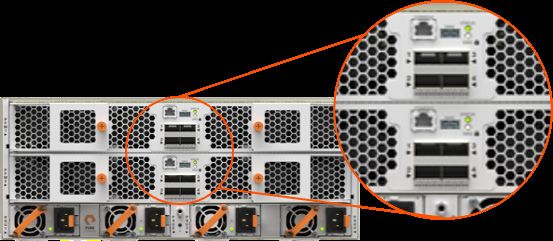
PURE VALIDATED DESIGN

Figure 4. Commvault Storage Accelerator

Command Center
Commvault Command Center is a web-based user interface for managing data protection and disaster recovery solutions. It
provides default configuration values and streamlined procedures for routine data protection and recovery tasks. Command
Center is used to set up data protection environments, to identify content to protect and to initiate and monitor backup and
restore operations.

The Command Center has several Dashboard views which present key CommCell environment health and status details via
interactive widgets. The Overview Dashboard, as shown in Figure 5, presents the number, size, and status of all entities, job
performance, and storage space in your CommCell environment. You can use the Overview Dashboard to monitor your
CommCell environment health and performance from a high level. Many tiles on the dashboard open more detailed reports
that you can use to analyze the displayed statistics.

Figure 5. Command Center Overview Dashboard

                                                                                                                                8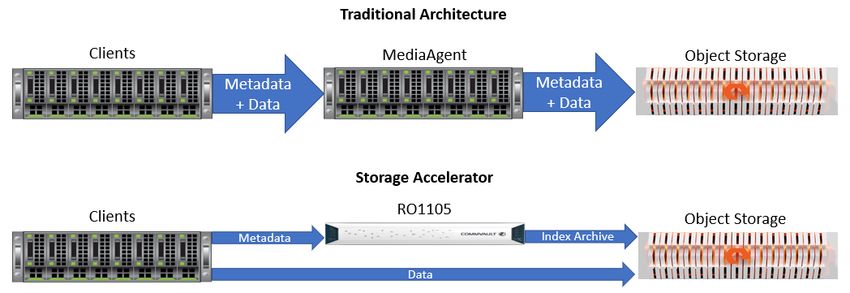
PURE VALIDATED DESIGN

CommCell Console
While the Command Center is the primary point of configuration and management, the CommCell Console (Figure 6) is an
alternative interface specifically used for more advanced, granular configuration requirements and administration tasks.

Figure 6. CommCell Console

Pure FlashBlade Storage
FlashBlade is a unified fast file and object (UFFO) all-flash storage system optimized for storing, processing, and protecting
unstructured data which addresses the data requirements of modern applications. The FlashBlade storage layer in the
Commvault PVD solution brings superior performance to the functionality of the Commvault data protection. FlashBlade is
used as an object store and also simplifies storage expansion, with seamless growth up to multiple petabytes.

Chassis
Figure 7 shows the front of each FlashBlade chassis which can be configured with up to 15 blades for processing data
operations and storage. A full FlashBlade system configuration consists of up to 10 self-contained rack-mounted chassis. For
reliability, each chassis is equipped with redundant power supplies and cooling fans. At the rear of each chassis are two on-
board fabric modules (as seen in Figure 8 below) for interconnecting the blades, other chassis, and clients using TCP/IP over
high-speed Ethernet. Both fabric modules are interconnected, and each contains a control processor and Ethernet switch
ASIC.

                                                                                                                                 9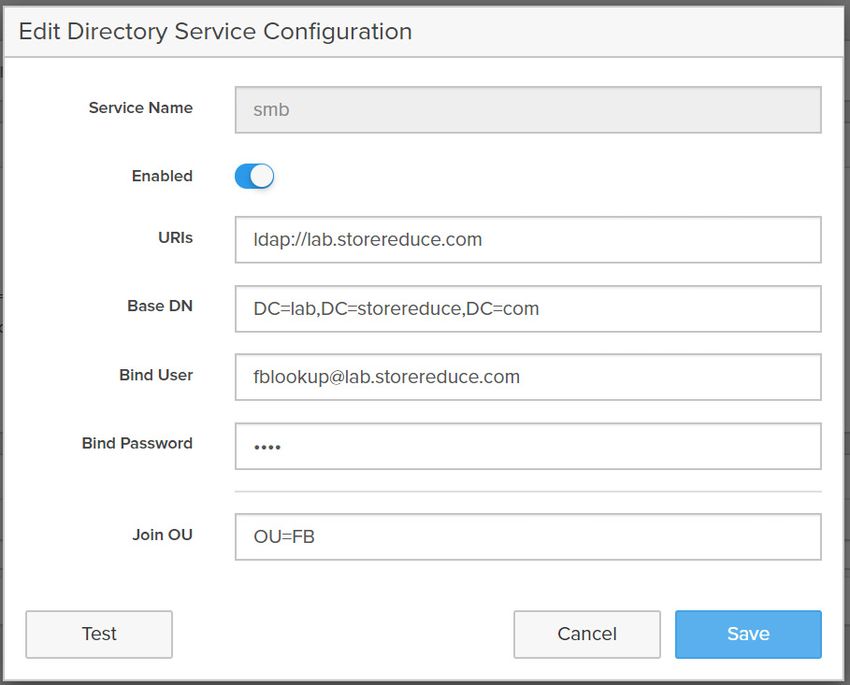
PURE VALIDATED DESIGN

Figure 7. Pure FlashBlade Chassis Front View

Figure 8. Pure FlashBlade Chassis Rear View - On-Board Fabric Modules

External Fabric Modules
For FlashBlade configurations with more than 15 blades, the rack-mounted chassis are interconnected by high-speed links to
two external fabric modules (XFM) as seen in Figure 9.

Figure 9. FlashBlade External Fabric Modules (XFM)

Blade
Each blade is a self-contained compute module equipped with processors, communication interfaces, and either 17TB or 52TB
of flash memory for persistent data storage. Each blade can be hot-plugged into the system to add capacity and performance.
Figure 10 shows the blade assembly.

                                                                                                                         10
PURE VALIDATED DESIGN
Figure 10. Pure FlashBlade Assembly
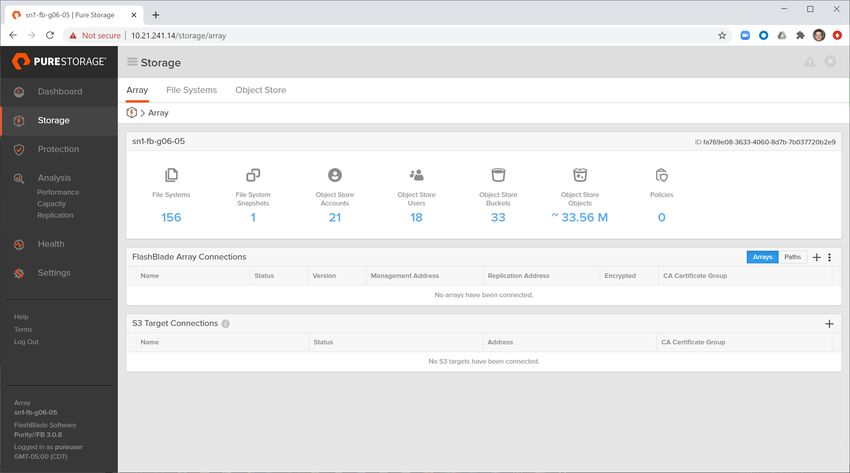
Purity//FB
Purity//FB is the operating system that runs on fabric modules. It minimizes workload-balancing problems by distributing client
operation requests among the blades on FlashBlade storage. It is the heart of FlashBlade and is architected on a massively
distributed key-value database for limitless scale and performance, delivering enterprise-class data services and management
with simplicity. NFS file and S3 object protocols are native to the Purity//FB software stack. The Purity//FB Dashboard is
shown in Figure 11.
Figure 11. Purity//FB Dashboard
11PURE VALIDATED DESIGN
Network Resources
Since backup traffic traversing a production network may adversely impact network performance, the backup LAN should be
separate from production and management networks. If the backup environment is large, consider creating VLANs on the
backup network and distribute backup load over these VLANs.
Each backup component (server, client, storage nodes) needs to open a network port in the host where the component is
installed. If firewalls or other network protection methods are used in the environment, the security administrator needs to
provide the appropriate permissions and ensure network ports are open for backup and recovery.
Technical Solution Design
The solution is broken up into three functional layers as shown in Figure 12:
• The Data Control plane, provided by the RO1105, is responsible for the cataloging, reporting, and management framework.
The Data Control plane provides a single management, indexing, and reporting framework that enables direct access to
FlashBlade storage which reduces infrastructure and management costs.
• The Data plane is provided by Pure FlashBlade UFFO storage, configured as a high-performance S3 compatible cloud
storage library that is fast and simple to administer.
• The Workloads layer is the production data that needs to be protected and recovered and the client systems that house
the data. The clients work with the Data Control plane to process deduplication and metadata and send deduplicated data
to FlashBlade for retention and operational recovery. The Workloads layer is provided by Pure Storage FlashArray™ or
other storage device.
Figure 12. Commvault with FlashBlade functional layers
The RO1105 appliance and Pure FlashBlade sit in both the primary and disaster recovery (DR) sites. The operating system,
deduplication database, and additional Commvault features for the Data Server and CommServe Services reside on local flash
storage. Replication between the primary and DR sites are shown in Figure 13.
12PURE VALIDATED DESIGN
Figure 13. Commvault with FlashBlade replication
RO1105 Appliance
The RO1105 appliance is the command and control center, or the Data Control plane, for all data management functionality.
The appliance is a fully integrated appliance that includes:
• Pre-installed Windows Server 2019 operating system
• Pre-installed Commvault software
• 4 x 10GbE ports plus 2 x 1GbE ports
• 960GB of metadata storage capacity
Once the appliance is deployed and configured, all data protection, data life cycle management, cataloging, and reporting
operations can be managed from the Commvault Command Center.
Sizing
There are many considerations that need to be made to properly size Commvault with FlashBlade. To understand how to size
an effective high-performance backup architecture, first understand the total amount of capacity that must be backed up,
then consider the types of applications involved. Determining the actual size required is a function of determining the actual
workload and calculating it with data compression and deduplication reductions.
Other considerations include how often data should be backed up and how fast recovery needs to be. Finally, the connectivity
needs to be determined,to support high-speed recovery. A very important piece of information needed to size the solution is
the annual data storage growth rate. This may come directly from the business or be extrapolated from historical information.
A single RO1105 appliance is ideally sized to protect up to 50TB of source data, and up to 500 virtual machines (VMs), and to
manage 100TB of FlashBlade storage. FlashBlade starts with 7x52TB blades and can be scaled in place with up to eight
additional 52TB blades, for up to 400TB of usable storage in a single chassis. Additional chassis can be added for even greater
capacities. Commvault 1U Data Servers expand the Commvault Data Control plane to manage the additional storage.
Sizing Backup Targets
When sizing backup targets, consider how much data needs to be backed up, how many copies must be kept, and how long
each copy should be kept. This information helps to calculate the total storage capacity required. If sizing is being performed
for new backup deployment, use this information to determine the required capacity and number of media. If the sizing is for
an existing backup environment, this information can help determine if the environment has enough backup capacity.
Data for backup = (Total data to be backed up × Frequency of backup × Retention period) / Data Reduction Ratio
13PURE VALIDATED DESIGN
The effectiveness of deduplication and compression is expressed as a data reduction ratio (DRR), denoting the ratio of the
amount of data before reduction to the amount of data after reduction.
DRR = Total data before reduction / Total data after reduction
The ratio incorporates both deduplication and compression. This ratio is typically depicted as “ratio:1” or “ratio X”, (10:1 or 10X).
For example, if 200GB of data consumes 20GB of storage capacity after reduction, the DRR is 10:1. The actual DRR varies,
based on the following factors:
• Retention period: This is the period of time that defines how long the backup copies are retained. The longer the
retention, the greater the chance of identical data existence in the backup set which would increase the deduplication
ratio and storage space savings.
• Frequency of full backup: As more full backups are performed; the amount of same data being repeatedly backed up
increases resulting in a higher deduplication ratio.
• Change rate: This is the rate at which the client data changes between backups. Data with many changes between
backups does not reduce as well as static data.
• Data type: Backups of user data such as text documents, PowerPoint presentations, spreadsheets, and e-mails are
known to contain redundant data and are good deduplication candidates. Database transaction logs and virtual machine
disk files compress very well. Other data such as audio, video, and scanned images are highly unique and typically do not
yield much data reduction.
Sample Storage Capacity Sizing
• 1TB of data to be backed up
• Assume 5x deduplication rate for first full backup
• 10% daily change rate
• Daily incremental backup: total six incremental backup per week @ 10x deduplication rate
• One synthetic full backup per week @ 25x deduplication rate
• Eight weeks of retention
• No data growth
Would result in:
• First full backup of 1TB at 5x deduplication rate requires 200GB storage space
• One incremental backup (100GB due to 10% change rate) at 10x deduplication rate requires 10GB storage space
- Therefore, for eight weeks, backup requires 480GB (10 * 6 * 8)
• One full backup per week at 25x deduplication requires 40GB storage space
- Therefore, for eight weeks, backup requires 320GB (40 * 8)
• Total space required for eight weeks retention with deduplication is 1TB (200GB + 480GB + 320GB)
14PURE VALIDATED DESIGN
Settings and Tuning
Commvault uses a pool of threads to write to object storage. By default, a process on the Storage Accelerator client can
create up to 50 concurrent connections to the FlashBlade. All concurrent jobs on that MediaAgent or client will share the
connections, and the number of active streams or jobs does not directly affect the number of threads in use. If connection
counts from a client to the FlashBlade regularly exceed 40 and the client network interface is not saturated, increase the pool
size to 100 and continue to monitor connections. The maximum pool size is 500.
Maximum read/write throughputs to FlashBlade storage can be throttled during certain periods, like the peak business hours.
To set the thread pool for a client or MediaAgent, you need to apply the nCloudGlobalUploadThreadPoolMaxCount additional
setting. This does not force the system to use a certain number of threads. Instead, it simply allows it to go beyond the default
50. This can be change using the CommCell Console or Command Line Interface. Increasing the threads will speed up the
backups but will also result in more memory and CPU consumption.
Additional settings are configured using the CommCell Console. The best way to apply the setting is through a client computer
group, a logical grouping of Commvault systems. To create a group to control the thread count: In the CommCell Console,
right-click Client Computer Groups and select New Group from the context menu (Figure 14).
Figure 14. Creating a client computer group
As shown in Figure 15, give the group a descriptive name. Select the Manual Association option. Select the clients and
MediaAgents that will send data to FlashBlade in the left pane, then click the Include button.
15PURE VALIDATED DESIGN
Figure 15. Client computer group general options
Select the Additional Settings tab. Click on Add, then enter nCloudGlobalUploadThreadPoolMaxCount (Figure 16). When the
setting appears in the search list, click it to automatically prepopulate all the fields. Enter the desired maximum number of
threads per system, as calculated earlier, in the Value field. Enter a text value in the Description field. Click OK to create the
group. The setting will automatically apply to the group members and be honored in the next job writing to FlashBlade. Make
sure that the network between the clients and FlashBlade storage system can support multiple simultaneous backups.
Figure 16. Additional Settings configuration
16PURE VALIDATED DESIGN
Scaling
Both the data control plane and data storage plane can be easily scaled. Adding data storage by adding individual blades to
the FlashBlade, up to the limits of a single chassis, does not require any configuration changes or downtime. Scaling to
multiple chassis requires additional hardware configuration, but the object storage components on the FlashBlade and in
Commvault do not need any changes. As data storage grows, the data control plane needs to expand. Simply add Commvault
1U Data Servers, with minimal configuration, to expand the Commvault data control plane to manage the additional storage.
Deployment
This section describes best practices for deployment of this PVD. It provides guidelines for installing and configuring the
hardware and software and describes the configuration options for implementing an enterprise class data protection solution.
Deployment Considerations
Prior to deploying the solution, make decisions regarding:
• Fully Qualified Domain Name or Host name
- The hostname of the RO1105 must be fully resolvable and addressable by the CommServe Services and client
computers in the CommCell environment.
• IP address, Subnet mask, and Default gateway
- By default, this information is provided by the Dynamic Host Configuration Protocol (DHCP). If the option is disabled to
automatically obtain the IPv4 address, provide the static IP address, subnet mask, and default gateway.
• DNS Server
- By default, this information is provided by the DHCP. If this information is not provided by the DHCP, type this
information. If the option is disabled to automatically obtain the DNS Server address, provide the preferred DNS server
and the alternate DNS server.
• Optional: Domain Name
- To add the RO1105 appliance to an existing Active Directory domain, specify the domain name: Existing Domain Name
• Optional: Domain Username and password
- User credentials required to add the RO1105 appliance to an existing Active Directory domain: Domain User Name and
Domain Password
• Optional: Mail server
- If the CommServe Services is installed in the RO1105 appliance, alerts can be sent for events in the CommCell.
Additionally, the e-mail server can be configured after the RO1105 is configured: E-Mail Server
• Optional: E-mail address
- E-mail address of the recipient of e-mail alerts: User E-mail Address
• License Requirements
- All core licensing is included with the appliance. The only additional license required is for Commvault Backup &
Recovery.
17PURE VALIDATED DESIGN
Deployment Guide
The basic configuration provides a quick and simple implementation of the data protection solution. Refer to the General Best
Practices and Advanced Configuration sections for advanced solution optimization guidance.
Install Pure FlashBlade Storage
Pure offers three installation options for installing a FlashBlade array. They include DIY, Install-with-Pure, and White-glove.
• Do-it-Yourself: Customers can install FlashBlade systems using tools and documentation on GitHub. While there’s a
difference between doing it yourself and paying for a Pure installation service, this option provides choice and flexibility
for those who want it.
• Install-with-Pure: Pure can help install new systems remotely, via video conference. This option is best for organizations
with on-site personnel who can unbox and rack the equipment while relying on a certified Pure Storage engineer for end-
to-end guidance.
• White Glove Installation: Pure or its authorized partners perform a complete white-glove installation where and when
local regulations allow.
This guide assumes the successful installation of the Pure FlashBlade storage and the initial setup of the FlashBlade Purity//FB
OS and appropriate networking.
Set-up Pure FlashBlade
Once FlashBlade is installed, set up data access, create replication links between FlashBlade arrays, and provision storage.
Configure Network for Data Access
1. Create a subnet for backup data traffic.
a. In the Purity//FB GUI, select Settings > Network.
b. In the Subnets list, click the Add (+) button in the Subnets title bar. The Create Subnet window appears as in Figure 17.
c. In the Name field, type the name of the subnet.
d. In the Prefix field, type the IP address of the network prefix and prefix length in the form ddd.ddd.ddd.ddd/dd for IPv4,
or xxxx:xxxx:xxxx:xxxx:xxxx:xxxx:xxxx:xxxx/xxx for IPv6.
e. In the VLAN field, specify the VLAN ID to which the subnet is configured. Valid VLAN ID numbers are between 1 and
4094.
f. In the Gateway field, type the IP address of the gateway through which the data vip communicates with the network in
the form ddd.ddd.ddd.ddd for IPv4, or xxxx:xxxx:xxxx:xxxx:xxxx:xxxx:xxxx:xxxx for IPv6
g. In the MTU field, specify the maximum transmission unit (MTU) of the data vip. If the MTU is not specified during
subnet creation, the value defaults to 1500.
h. Click Create.
18PURE VALIDATED DESIGN
Figure 17. Create Subnet Window
2. Create a virtual interface on the backup subnet.
a. Select Settings > Network.
b. In the Subnets list, find the subnet with the correct network prefix, VLAN ID, and gateway. The data vip will be attached
to this subnet for file export purposes. Create a subnet if none of the existing ones meet requirements.
c. Click the Add interface button (+) belonging to the subnet to which the data vip will be attached. The Create Network
Interface window appears as shown in Figure 18.
d. In the Name field, type the name of the data vip.
e. In the Address field, type the IP address to be associated with the data vip.
f. In the Services field, leave the service type as data.
g. In the Subnet field, leave the subnet name as the default.
h. Click Create.
Figure 18. Create Network Interface Window
3. The new subnet is displayed in the Subnets list as show in Figure 19.
Figure 19. Subnets list
19PURE VALIDATED DESIGN
4. If using FlashBlade to replicate Commvault backups or data, configure a replication network interface. This can be on the
subnet just created or a separate subnet. Follow steps 2 and/or 3 as appropriate to create the interface. In step 3, when
setting the Services option, select replication instead of data as shown in Figure 20.
5. Create forward and reverse lookup records in DNS for the data IP address that was assigned.
Figure 20. Creating a Replication Network Interface
Add FlashBlade Replication Links
To allow the primary site FlashBlade to replicate to the DR site FlashBlade, connect the arrays. To connect two arrays, perform
the following:
1. From the Storage > Array page, click the add (+) button in the FlashBlade Array Connections panel. The Connect
FlashBlade Array pop-up window appears.
2. Enter the target array hostname or management address (unless using NAT) in the Management Address field. The
address can be located from the Subnets table by navigating to the Settings > Network page.
3. On the target array, create a connection key. Connection keys are created from the FlashBlade Array Connections panel of
the Array page. To create a connection key, perform the following:
a. On the target array, navigate to the Storage > Array page.
b. In the FlashBlade Array Connections pane, click More Options > Create Connection Key. The Connection Key pop-up
window appears displaying the new connection key.
c. Copy the new connection key.
d. Once created, the key is active for two hours. If the source and target arrays have not been connected within that two-
hour period, a new connection key must be created.
4. Enter the connection key for the target array in the Connection Key field.
5. The replication address is auto-discovered unless using NAT. The source and target arrays each need a replication network
interface. If not already created, create the replication network interfaces on the source and target arrays. Enter the target
array replication network address in the Replication Address field.
6. (Optional) Enable encryption by setting the Encrypted toggle to on. If set, the _default_replication_certs CA certificate group
is applied. Note that encryption is set on the source array only. If enabled, the encryption setting displays as enabled on the
target array.
7. Click Connect.
20PURE VALIDATED DESIGN
8. If using NAT, enter the source array replication address on the target array.
a. On the target array, in the FlashBlade Array Connections panel on the Storage > Array page, click the edit button at
the end of the row displaying the connected source array. The Edit Connected Array pop-up window appears.
b. Enter the replication address for the source array in the Replication Address field and click Save.
Repeat this procedure, using the DR site FlashBlade as the source array and the primary site FlashBlade as the target. This
enables replication capability in both directions.
Create Protection Policy for Replication
To use replication in both directions, create a protection policy on each FlashBlade. The policy manages scheduling and
retention of snapshots for replication. To create a protection policy:
1. From the Protection > Policies page, click the Add (+) button in the heading of the Policies list. The Create Policy pop-up
window appears.
2. In the Name field enter the name of the snapshot policy.
3. By default, the policy is set to enabled (blue). To disable the policy, set the Enabled button to disabled (gray).
4. Click the expand button next to Create rule for policy to add rules.
5. In the field labelled Create or replicate 1 snapshot every field, enter the frequency at which snapshots are created or
replicated. The value must be entered in the format n{m|h|d|w}. For example, 15m, 3h, 2d, 1w, etc. For DR backup
replication, the frequency should be 12h or less.
6. In the At field, enter the time of day the snapshot is created. The value must be entered in the format n[am|pm], where n is
a value of 1-12. If entered without am or pm, n must be a value of 0-23. This field is only editable if the value specified in the
Create or replicate 1 snapshot every field is in days. For example, 24h, 48h, 72h, 1d, 2d, 3d, 1w, etc.
7. In the And keep for field, enter the retention period for the snapshot. The value must be entered in the format n{m|h|d|w}.
For example, 30m, 1h, 2d, 1w, etc. The retention period cannot be less than the snapshot interval. The retention for DR
backups should be 5d or greater.
8. Click Create.
Provision File System for Commvault DR Backups
FlashBlade provides a simple way to ensure availability of the DR backups Commvault DR backups.
1. Create three accounts in Active Directory.
a. User account for FlashBlade SMB to bind to Active Directory
b. User account for writing Commvault DR backups
c. Domain group to contain CommServe computer accounts
d. Set a value in the uidNumber and gidNumber attributes on both users and groups
2. Configure directory services for SMB on the FlashBlade.
a. Select Settings > Users.
b. In the Directory Service panel, select SMB.
c. Click the Edit icon to the right of Configuration. The Edit Directory Service Configuration pop-up window appears.
(Figure 21)
21PURE VALIDATED DESIGN
Figure 21. Configure SMB directory service
d. In the URIs field, type the comma-separated list of up to 30 URIs of the directory servers.
e. For file sharing over SMB, the base DN of the directory service is used in place of the URI to represent the LDAP URL.
f. Each URI must include the scheme ldap:// or ldaps:// (for LDAP over SSL), a hostname, and a domain name or IP
address. For example, ldap://ad.company.com configures the directory service with the hostname "ad" in the domain
"company.com" while specifying the unencrypted LDAP protocol.
g. We highly recommend either configuring StartTLS by enabling a certificate or certificate group, or configuring URIs by
using the ldaps:// scheme to use LDAP over SSL, unless there is no need for secure communication in your
environment.
h. For SMB, only one domain controller (DC) is supported and its preferences cannot be set when configuring the URI.
i. If specifying a domain name, it should be resolvable by the configured DNS servers.
j. If specifying an IP address, for IPv4, specify the IP address in the form ddd.ddd.ddd.ddd, where ddd is a number
ranging from 0 to 255 representing a group of 8 bits.
k. For IPv6, specify the IP address in the form [xxxx:xxxx:xxxx:xxxx:xxxx:xxxx:xxxx:xxxx], where xxxx is a hexadecimal
number representing a group of 16 bits. Enclose the entire address in square brackets ([]). Consecutive fields of zeros
can be shortened by replacing the zeros with a double colon (::).
l. If the base DN is not configured and a URI is provided, the base DN will automatically default to the domain
components of the URIs.
m. Optionally, specify a port. Append the port number after the end of the entire address. Default ports are 389 for ldap,
and 636 for ldaps. Non-standard ports can be specified in the URI if they are in use.
n. In the Base DN field, type the base distinguished name (DN) of the directory service. The Base DN is built from the
domain and should consist of only domain components (DCs). For example, for ldap://ad.storage.company.com, the
Base DN would be: DC=storage,DC=company,DC=com.
o. In the Bind User field, type the username used to bind to and query the directory.
p. For OpenLDAP and Active Directory servers, you can use the full DN of the user account that is used to perform
lookups. For example, CN=John,OU=Users,DC=example,DC=com.
q. For Active Directory servers, you may instead choose to enter the username - often referred to as the
sAMAccountName or user login name - of the account that is used to perform directory lookups. The username cannot
contain the characters " [ ] : ; | = + * ? < > / \, and cannot exceed 104 characters in length.
22PURE VALIDATED DESIGN
r. In the Bind Password field, type the password for the bind user account.
s. In the Join OU field, enter the relative DN of the organizational unit (OU) within your domain where the system machine
account should be created when joining the domain for SMB. For example,
OU=Arrays,OU=Storage,OU=ServiceMachines.
t. Click Save.
3. After you configure the directory service settings, test the directory service configuration to verify that the URI can be
resolved and that the directory service can successfully bind and query the tree using the bind user credentials.
To test the directory service configuration:
a. Select Settings > Users.
b. In the Directory Service panel, select the directory service you wish to test.
c. Click Test. The Test SMB Configuration pop-up window appears, displaying the output of the test. During the
directory service test, Purity//FB tests the directory service configuration to verify that the URI can be resolved and
that the directory service can successfully bind and query the tree using the bind user credentials.
Figure 22. Test SMB Configuration
4. Once the test passes, enable the directory service (Figure 23).
a. Select Settings > Users.
b. In the Directory Service panel, select the directory service you wish to enable and click the Edit icon.
c. Set the Enabled toggle button to enable (blue) the directory service.
d. Click Save.
23PURE VALIDATED DESIGN
Figure 23. Enable SMB directory service
5. Create a file system to store the Commvault DR backups (Figure 24).
a. Create the file system.
From the Storage > File Systems page, click the add (+) button in the heading of the File Systems list. The Create
File System pop-up window appears.
In the Name field, type the name of the directory to be exported.
In the Provisioned Size field, specify the provisioned size allocated to the file system. The size is a quota of space
that helps gauge the fullness of the file system. If left blank, the provisioned size will default to an unlimited size. You
should set the provisioned size to 100G or greater, although DR backups should consume significantly less.
Click SMB in the Protocols section.
Click the SMB Adapter toggle button to enable (blue) the SMB protocol adapter.
From the Access Control section, select Native SMB ACLs.
b. Click Create.
24PURE VALIDATED DESIGN
Figure 24. Create File System form
Note: The SMB share will have the same name as the file system.
You will see the new file system in the File Systems pane (Figure 25).
Figure 25. File Systems pane
6. Create a file replication link for the file system from the primary site FlashBlade to the DR site FlashBlade.
a. From the Protection > File Replica Links page, click the add (+) button in the heading of the File Replica Links list. The
Create File Replica Link pop-up window appears.
b. From the Local File System list, select the local (source) file system to be replicated.
c. From the Remote Connection list, select the remote (target) array.
d. Do not enter a name for the remote file system to which data from the local file system will be replicated in the Remote
File System field. The target array will create a file system with the same name as the source.
e. From the Policy list, select the replication policy you created.
f. Click Create.
25PURE VALIDATED DESIGN
7. Prepare the file system using Windows File Explorer. You may use other tools if you prefer.
a. Set permissions on the base of the SMB share (Figure 26).
• Grant full control permissions to the DR backup user account.
• Grant read and execute access to the CommServe computers group.
• Remove all other principals from the ACL.
Figure 26. File system ACL for DR backup share
IMPORTANT: Once you commit the ACL, only the DR backup user account will be able to manage data in this file system.
Provision Object Bucket for Backup Data
Create a bucket for Commvault to write backup data. Buckets are organized into accounts. To create a new account:
1. In the Accounts section of the Storage > Object Store page, click the add (+) button. The Create Account window appears
as shown in Figure 27.
Figure 27. Create Account Window
2. Enter the new account's name in the Name field and click Create.
3. The account will be listed in the Accounts pane shown in Figure 28. Click the account name to open its details.
Figure 28. Accounts pane
26PURE VALIDATED DESIGN
4. Within the account, create a user, which will have an access key associated with it. To create a new user:
a. From the Storage > Object Store page, click the account to add a new user.
b. In the Users section, click the add (+) button. The Create User window appears as shown in Figure 29.
c. Enter the new user's name in the User Name field.
d. Do not enable the Create Access Key option now. Create a key in a later step.
e. Click Create.
Figure 29. Create User Window
5. Within the same account, create a bucket to store the objects Commvault writes. To create a bucket:
a. From the Storage > Object Store page, click the account to add a bucket.
b. From the Buckets pane, click the add (+) button. The Create Bucket window appears as shown in Figure 30.
Figure 30. Create Bucket Window
c. Enter a name for the bucket and click Create.
d. The screen will display a user and an empty bucket within the object store account that was created (Figure 31).
Figure 31. New user and bucket
27PURE VALIDATED DESIGN
Optional: Add CA Certificate
To use TLS to secure the connection between Commvault clients and the FlashBlade object store, update the FlashBlade with
a certificate generated by a trusted certification authority (CA). To import a CA certificate:
1. Select Settings > System.
2. Click the More Options button from the SSL Certificate panel.
3. Click Import Certificate.
4. Complete or modify the following fields:
a. Certificate - Click Choose File and select the signed certificate. Verify that the certificate is PEM formatted (Base64
encoded), and that it includes the " -----BEGIN CERTIFICATE----- " and " -----END CERTIFICATE----- " lines.
b. Private Key - Click Choose File and select the private key.
c. Intermediate Certificate - (Optional) Click Choose File and select the intermediate certificate.
d. Key Passphrase - (Optional) If the private key is encrypted with a passphrase, enter the passphrase.
5. Click Import. The page will refresh in several seconds.
Set up the RO1105
Commvault documentation describes in detail the process to set up the appliance and then install the CommServe and
MediaAgent Software on the RO1105. The steps are also described below:
Complete Initial Appliance Setup
1. Turn on the appliance and press Ctrl+Alt+Del to log on to Windows.
2. In the Administrator box, type appliance@cv1 and press Enter. The Commvault Configuration Wizard will start automatically
after a successful login.
3. In the Commvault Installation page, click the License Agreement and review the Commvault End User License Agreement.
Click I Agree to continue.
4. The Select Network Interfaces page is displayed. Select one or more ports to configure the network settings for data and
click Next.
5. The Configure Network Interface page is displayed. Choose one of the following options:
- If you have a DHCP server to automatically assign IP addresses and detect the DNS server, select the Obtain IPV4
address automatically and the Obtain DNS server address automatically options and then click Next.
- In the absence of a DHCP server, clear the Obtain IPV4 address automatically and the Obtain DNS server address
automatically options, type the appropriate details, and then click Next.
6. The Configure Host Name and Domain Settings page is displayed. Add the following details:
- To assign a new host name, in the New Host Name box, enter a unique name to identify the computer in the network.
- To configure the appliance in an existing domain, select the Add this appliance to a domain check box. Type the
appropriate domain credentials in the Domain name, Domain user name and Domain user password boxes.
7. A message prompts you to restart your computer. Click Yes to continue. (Clicking No will proceed with the installation
without changing the host name and/or the domain.)
8. A confirmation prompt will be displayed. Click OK to restart the computer.
28You can also read