Setup Guide Microsoft Office 365 using Microsoft Graph App - for touchONE-concentrator - Cue System
←
→
Page content transcription
If your browser does not render page correctly, please read the page content below
Setup Guide
Microsoft Office 365
       using
Microsoft Graph App
   for touchONE-concentrator

              01.05.2019
Setup Guide | Contents

Contents

    2      Contents

    3      Introduction
    3      Description
    3      Requirements for Microsoft Office 365 subscription
    3      Settings

    4      Register App for Microsoft Graph

    8      Creating a resource account

    10     Office 365 options settings not available through web interface

© CUE, a.s. | All Rights Reserved. | www.touchone.eu | support@cuesystem.com                       2
Setup Guide | Introduction

Introduction
Description
        This document is intended for users of Microsoft Office 365 subscription. It describes the process of setting up app and accounts
        in the Microsoft Office 365 and settings of touchONE-concentrator working with this subscriptions. Before you start, read
        the touchONE-concentrator Setup Guide. There you will find basic information on the reservation system touchONE and a
        description of the common settings of the panels.

Requirements for Microsoft Office 365 subscription
        For proper functionality of the touchONE reservation system it is necessary to ensure the following:
        • Microsoft Office 365 subscription: any Business, Education, Enterprise or Government plan with Exchange Online service
             and with support of resource/room mailboxes; home and personal plans are not supported.
        • Registered App for Microsoft Graph.

Settings
        In order to set the touchONE system, it is necessary to:
        1. Register App for Microsoft Graph in Office 365 Azure Active Directory admin center
           App for Microsoft Graph: Microsoft Graph is a Microsoft developer platform that connects services and devices. It allows to
           integrate touchONE services with Office 365 and Azure. App for MS Graph must be registered with Azure AD. Registering
           your app establishes a unique application ID and other values that your app uses to authenticate with Azure AD and get
           tokens.
        2. Prepare an accounts on the Microsoft Office 365.
           Resource accounts: There is an email account of MEETING ROOM / WORKPLACE or RESOURCE kind designated for
           room/resource scheduling in Office 365. The touchONE system uses the calendar of this account for arranging meetings in
           the particular room or workplace reservation.
        3. Configure the touchONE-concentrator.
           For more details see touchONE-concentrator Setup Guide.

© CUE, a.s. | All Rights Reserved. | www.touchone.eu | support@cuesystem.com                                                                3
Setup Guide | Register App for Microsoft Graph
Register App for Microsoft Graph
In order to create accounts you need to have administrator access to Office 365 settings.
1. Go to https://login.microsoftonline.com and log in to your Office 365 administrator account.
admin@cuesystem.com
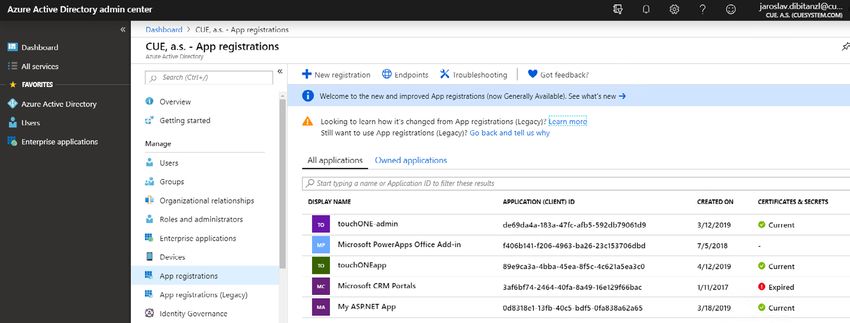
2. Go to “Admin / Admin centers / Azure Active Directory / App registration”. Then select “New registration”.
3. Select name for your application, e.g. “touchONE Workplace”. Then confirm with “Register” button.
© CUE, a.s. | All Rights Reserved. | www.touchone.eu | support@cuesystem.com 4
Setup Guide | Register App for Microsoft Graph

        4. After you have registered applications, copy Application (client) ID and Directory (tenant) ID and store it on he safe place.
           You will need it later in touchONE-concentrator settings. Then select “View API permissions”.

        5. On the next page, tap “Add a permission”.

        6. Select “Microsoft Graph”.

© CUE, a.s. | All Rights Reserved. | www.touchone.eu | support@cuesystem.com                                                                   5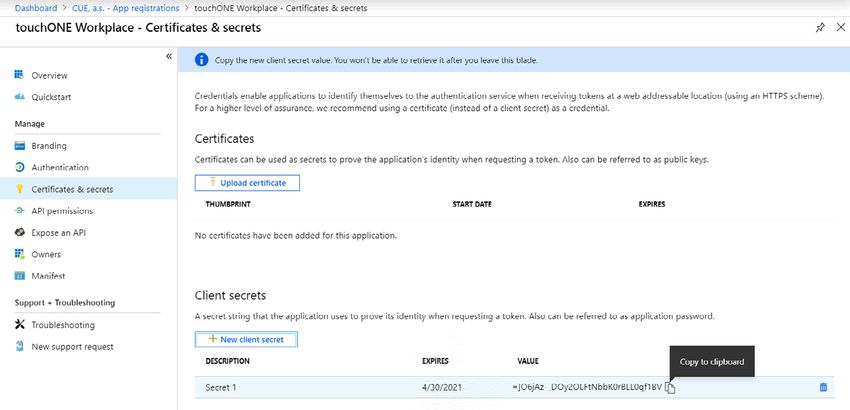
Setup Guide | Register App for Microsoft Graph

        7. Tap “Application permissions”. Then in the section “Calendars” check “Calendars.ReadWrite”. Then tap “Add Permissions”.

        8. Now you need to check, if your app has consent to access the calendar data. If not, click “Grant admin consent for ...” and
           confirm it with “Yes” button.

        9. Now you have application permissions set correctly.

© CUE, a.s. | All Rights Reserved. | www.touchone.eu | support@cuesystem.com                                                                 6
Setup Guide | Register App for Microsoft Graph

        10. Now it is necessary to create secret string for secure access. This string is called “Client Secret”. Go to section “Certificates &
            secrets” and tap button “New client secret”.

        11. Here you can fill description of the client secret and you can set the expiration time of this secret. Tap “Add” button to create
            the new client secret.

        12. When new secret is created, it is diplayed in the client secrets list. Copy the new client secret value and store it in
            the safe place. You won’t be able to retrieve it after you leave this page. This client secret you will need later in
            touchONE-concentrator setup.

        13. You can later on the same page add new client secrets, delete obsolete or hacked secrets etc.

        14. You can continue with creating resource accounts.

© CUE, a.s. | All Rights Reserved. | www.touchone.eu | support@cuesystem.com                                                                      7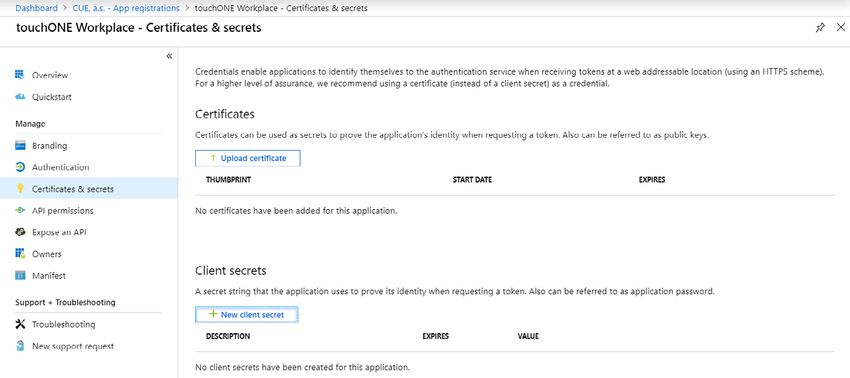
Setup Guide | Creating a resource account

Creating a resource account
        1. In the left-side menu of Office 365 Admin Center click on “Resources / Rooms & equipment” and then on a “+ Add” button.

        2. In the item “Type” select “Room”, fill in the name of the room, email address, location etc. Then confirm it by clicking on “Add”.

                Demo Room

                demoroom                  cuesystem.com

                25

                CUE Prague Headquarters

             Note: Creating account may take a longer period of time, typically 15 minutes, but sometimes up to 24 hours.
        3. Click the line with the selected room in the list. It will open windows for editing a room account.

                                                                 Demo Room              demoroom@cuesystem.com

© CUE, a.s. | All Rights Reserved. | www.touchone.eu | support@cuesystem.com                                                                            8
Setup Guide | Creating a resource account

        4. Click „Edit Exchange settings“ in this window.

        5. Click on “booking delegates” and check whether the room account is set to “Accept or decline booking requests
           automatically”. Then confirm changes by clicking on “Save”.

              Demo Room

        Now the basic account setting is done. Some of the useful options of account setting are not available through web interface.
        Even though these options are not mandatory, they can improve the behavior of the reservation system.
        For further information please see the chapter Office 365 options settings not available through web interface.

© CUE, a.s. | All Rights Reserved. | www.touchone.eu | support@cuesystem.com                                                                9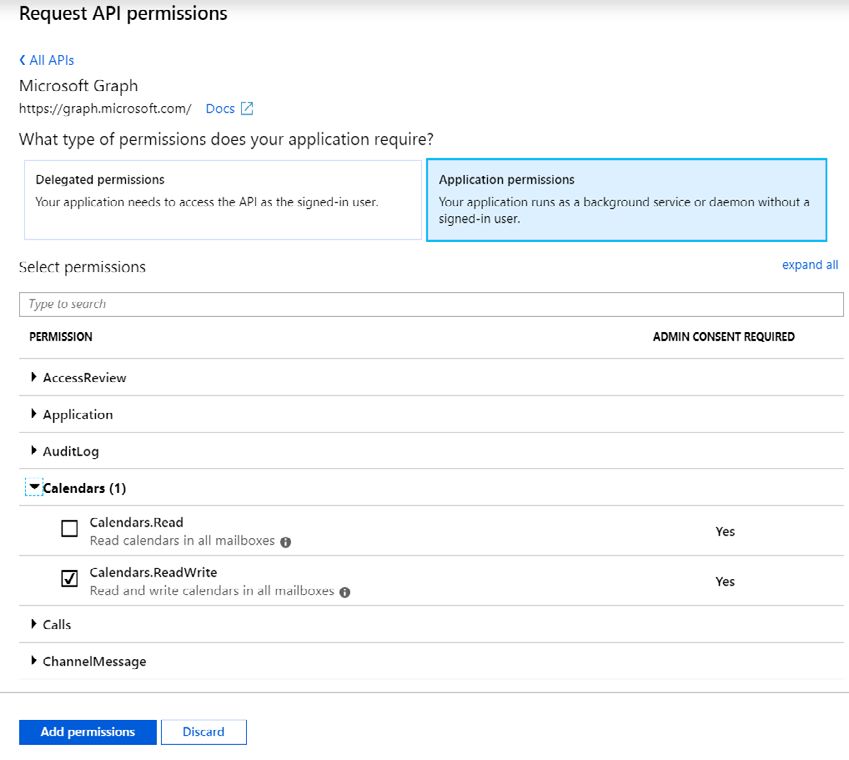
Setup Guide | Office 365 options settings not available through web interface

Office 365 options settings not available through web interface
        In the default Office 365 settings some account properties are set rather inconveniently. It can happen that, for example, you
        schedule a meeting from Outlook and reserve a room but in the room calendar the subject of the meeting will be replaced
        with your name. Another troublesome feature is that when you cancel a meeting, it will stay in the room calendar, only renamed
        to “Cancelled”. It means that the room still appears occupied and it is not possible to use it for other meetings. It may happen
        that you call a meeting labelled as private, but this specification is only indicated in your personal calendar while in the room
        calendar it is shown as public. You can change this behavior but not through the administrator web interface. The following
        method is for computers with Windows 10.
        To create and change settings of accounts you need admin acccess to Office 365 setup as well as admin rights to your
        computer.
        On your computer, run Windows Power Shell as administrator. Either click on “Start” by the right mouse button and select the
        relevant item in the context menu, or find “Windows Power Shell” using Windows search, click the right mouse button above the
        found item and select “Run as administrator”. A terminal window will open in which you can enter the respective commands.
        If it is your first time editing accounts on the given computer, you must start by installing packages for working with Office365. You
        can do this by the following commands:
             ▪▪   Install-Module MSOnline
             ▪▪   Install-Module AzureAD
        During the installation of the packages, each step has to be confirmed. If you had installed the packages before, you can skip the
        installation step.
        Now you have to sign in as administrator to the Office365 server. Enter the following commands in the correct order:
             ▪▪   Set-ExecutionPolicy Unrestricted -Force
             ▪▪   Start-Service WinRM
             ▪▪   Import-Module MSOnline -verbose
             ▪▪   $LiveCred = Get-Credential
        Now a pop-up window will appear for you to log in the administrator account, so enter the name and password of your Office
        365 administrator account.
        Enter following commands in the terminal window:
             ▪▪   $Session = New-PSSession -ConfigurationName Microsoft.Exchange -ConnectionUri https://outlook.office365.com/powershell-liveid/ -Credential $LiveCred -Authentication Basic -AllowRedirection
             ▪▪   Import-PSSession $Session -Allowclobber
             ▪▪   Connect-MsolService -Credential $LiveCred
        You are now logged in and can change account properties. The following steps need to be made for all room accounts.
        Replace the expression  with the room account (e.g. “demoroom@cuesystem.com”).

        The following command will set the room account so that the actual subject of a meeting will be displayed in the “Subject” field,
        not its organizer:
             ▪▪   Set-CalendarProcessing -Identity  -DeleteSubject $False -AddOrganizerToSubject $False
             ▪▪   Example: Set-CalendarProcessing -Identity „demoroom@cuesystem.com“ -DeleteSubject $False -AddOrganizerToSubject $False
        The following command will set the room account so that after cancelling a meeting, it will be erased, not just marked as
        “Cancelled”:
             ▪▪   Set-CalendarProcessing -Identity  -RemoveOldMeetingMessages $True
             ▪▪   Example: Set-CalendarProcessing -Identity „demoroom@cuesystem.com“ -RemoveOldMeetingMessages $True
        This command sets the room account in such a way that meetings that were called as private (and that are displayed as private
        on participants’ calendars) will also be displayed as private on the room calendar:
             ▪▪   Set-CalendarProcessing -Identity  -RemovePrivateProperty $False
             ▪▪   Příklad: Set-CalendarProcessing -Identity „demoroom@cuesystem.com“ -RemovePrivateProperty $False
        You can verify the successfulness of the settings through this command:
             ▪▪   Get-CalendarProcessing -Identity  | Format-List
             ▪▪   Example: Get-CalendarProcessing -Identity „demoroom@cuesystem.com“ | Format-List
        After you set all accounts use the following command to exit:
             ▪▪   exit

© CUE, a.s. | All Rights Reserved. | www.touchone.eu | support@cuesystem.com                                                                                                                                     10
You can also read