Test Delivery System User Guide for Test Administrators - Texas ...
←
→
Page content transcription
If your browser does not render page correctly, please read the page content below
Texas Assessment Program

                             Test Delivery System
                                    User Guide for
                              Test Administrators
                                                                                    2021–2022

                                                                                Updated April 4, 2022

                                                               Prepared by Cambium Assessment, Inc.

Descriptions of the operation of the Test Delivery System and related systems are property of Cambium
Assessment, Inc. and are used with the permission of CAI.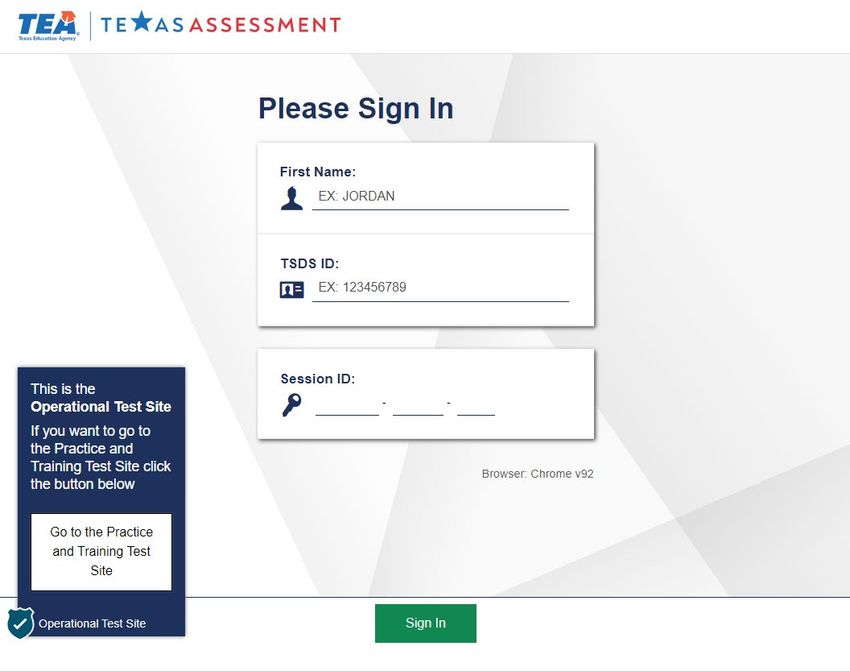
Test Delivery System User Guide for Test Administrators                                                                    Table of Contents

Table of Contents
Introduction to the User Guide .............................................................................................1
   Organization of the User Guide ............................................................................................................... 1
   Understanding the Test Delivery System’s Sites .................................................................................... 1

How Test Administrators Create and Manage Test Sessions in the Test Administrator Site ..........2
   How to Create a Test Session .................................................................................................................. 2
   How to Edit a Test Session .................................................................................................................... 10
   Test Administrator Role on Testing Day ............................................................................................... 13
   How to Log Out of the Test Administrator Site ..................................................................................... 14

How Students Sign In to the Student Interface and Complete Tests ........................................ 15
   How Students Sign In and Select Tests................................................................................................. 15
      How to Sign In to the Student Interface ........................................................................................... 15
      How to Verify Student Information ................................................................................................... 16
      How to Select a Test .......................................................................................................................... 17
      How to Check Student Device Functionality .................................................................................... 18
          How to Check Text-To-Speech Functionality............................................................................... 19
          How to Check Audio Playback Functionality ............................................................................... 21
          How to Check Recording Device Functionality ............................................................................ 21
          How to Check Sound and Video Playback Functionality ............................................................. 22
          How to Check Video Playback Functionality................................................................................ 23
      How to View Instructions and Begin Testing .................................................................................... 24
   How Students Navigate the Student Interface ..................................................................................... 25
      How to Navigate between Questions ............................................................................................... 26
      How to View Stimuli........................................................................................................................... 27
      How to Respond to Test Questions................................................................................................... 29
   How Students Use Test Tools ................................................................................................................ 29
      How to Use Global Tools ................................................................................................................... 30
      How to Use Context Menu Tools ....................................................................................................... 31
          How to Use the Text-To-Speech Tool ........................................................................................... 34
      How to Use Other Tools..................................................................................................................... 36
          How to Use the Speech-to-Text Tool............................................................................................ 37

                                                                          ii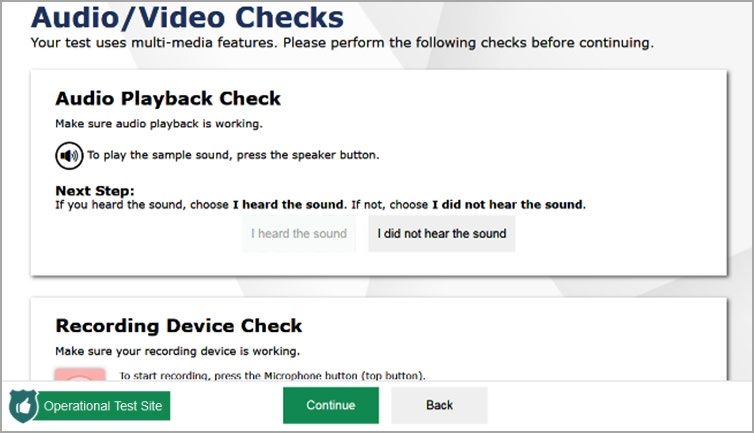
Test Delivery System User Guide for Test Administrators                                                                               Table of Contents

   How to Pause Tests................................................................................................................................ 38
   How Students Complete a Test ............................................................................................................. 38
       How to Complete a Test Segment .................................................................................................... 38
       How to Submit a Test ........................................................................................................................ 39

Appendix ......................................................................................................................... 41
   A .............................................................................................................................................................. 41
       Alert Messages ................................................................................................................................... 41
       Alternate Assessments in the Student Interface .............................................................................. 41
           Navigating Alternate Assessments ............................................................................................... 41
           Listening to Audio Content ........................................................................................................... 42
           Responding to Questions and Ending a Test ............................................................................... 43
   E .............................................................................................................................................................. 43
       Expiration Rules for Test Opportunities ........................................................................................... 43
   K .............................................................................................................................................................. 43
       Keyboard Commands in the Student Interface ................................................................................ 43
           Keyboard Commands for Sign-In Pages and In-Test Pop-Ups .................................................... 44
           Keyboard Commands for Test Navigation ................................................................................... 44
           Keyboard Commands for Global and Context Menus ................................................................. 45
               Global Menu .............................................................................................................................. 45
               Context Menus .......................................................................................................................... 45
           Keyboard Commands for Highlighting Selected Regions of Text ............................................... 45
           Keyboard Commands for Grid Questions .................................................................................... 45
           Keyboard Commands for Equation Questions ............................................................................ 47
   L .............................................................................................................................................................. 47
       Login Information for the Test Administrator Interface and Practice Site ...................................... 47
   P .............................................................................................................................................................. 49
       Pause and Test Timeout Rules .......................................................................................................... 49
           Pause Rules ................................................................................................................................... 49
           Test Timeout Rules ....................................................................................................................... 50
       Practice Tests Site Student Sign-In Process ..................................................................................... 50
       Practice Test Score Report ................................................................................................................ 52
       Prefetch Question Rules .................................................................................................................... 53

                                                                                iii
Test Delivery System User Guide for Test Administrators                                                                               Table of Contents

   S .............................................................................................................................................................. 53
       Secure Browser Application .............................................................................................................. 53
           Using the Secure Browser Application with Accessibility Software ............................................ 53
           Accessing the Secure Browser Application on Mobile Devices ................................................... 55
           Closing the Student Interface on Tablets..................................................................................... 55
           Force-Quitting the Secure Browser Application .......................................................................... 55
           Text-Response Questions ............................................................................................................. 56
               Spell Check Feature .................................................................................................................. 57
               Special Characters Feature ...................................................................................................... 58
   U ............................................................................................................................................................. 58
       User Support and Troubleshooting Information ............................................................................. 58
           User Support ................................................................................................................................. 58
           Usernames and Password Issues ................................................................................................. 59
           Common Student Sign-In Errors .................................................................................................. 60
           Resolving Secure Browser Application Error Messages ............................................................... 60

Changelog ........................................................................................................................ 62

                                                                                iv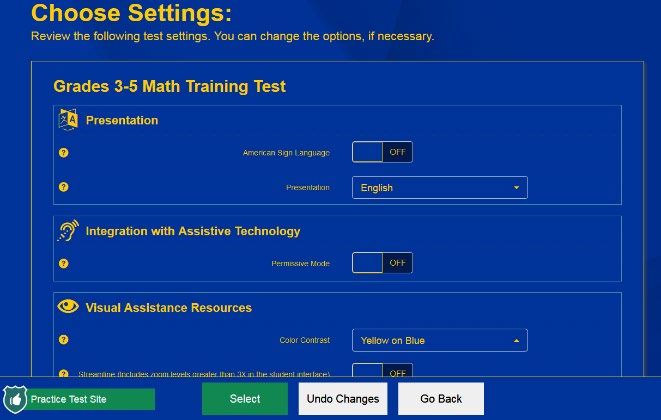
Test Delivery System User Guide for Test Administrators

                                                                                                              Introduction to the User Guide
Introduction to the User Guide
This user guide supports Test Administrators who manage testing for students participating in Texas
Assessment Program practice tests and operational tests.

Organization of the User Guide
The guide includes the following sections:

•   How Test Administrators Create and Manage Test Sessions in the Test Administrator Site
•   How Students Sign In to the Student Interface and Complete Tests
There is also an alphabetized Appendi with additional information and instructions about the Test
Administrator Site, the secure browser application, and more.

Understanding the Test Delivery System’s Sites
The Test Delivery System delivers Texas’s online tests and consists of practice sites and operational
testing sites. The practice sites function identically to the operational testing sites. However, the tests
that are available in the practice and operational sites are different. Tests administered in the Test
Administrator Practice Site are for practice, whereas the tests provided in the Test Administrator
Interface are operational and students’ scores will be official.

•   Practice Sites
    –   Test Administrator Practice Site: Allows Test Administrators to practice administering tests.

    –   Student Practice Site: Allows students to practice taking tests online and using test tools.
        Students can log in to the testing site with their name and ID or as guests. They can either take
        tests in sessions created by Test Administrators in the Test Administrator Practice Site or they
        can take tests in guest sessions.

•   Operational Testing Sites
    –   Test Administrator Interface: Allows Test Administrators to administer operational tests.

    –   Student Interface: Allows students to take operational tests.

Throughout the rest of this user guide, “Test Administrator Site” refers to both the Test Administrator
Interface and Test Administrator Practice Site.

                                                     1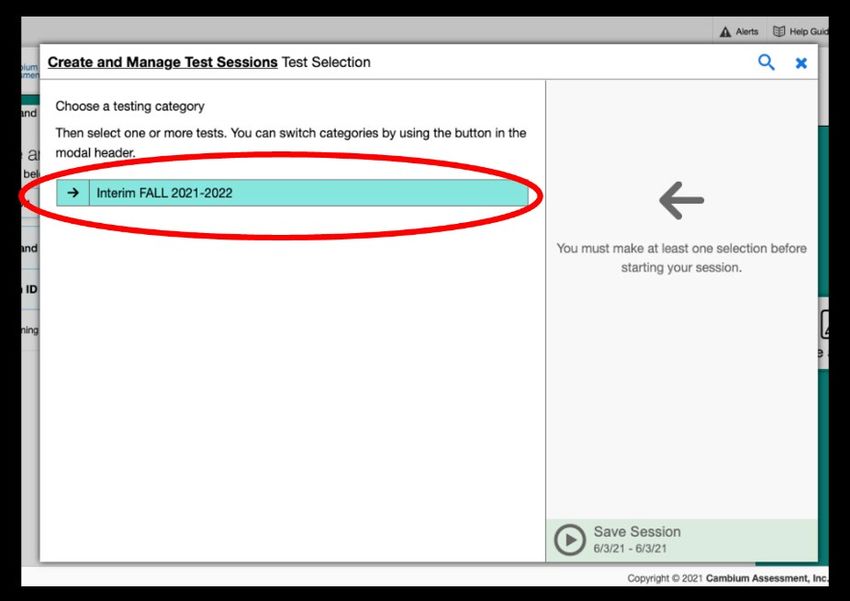
Test Delivery System User Guide for Test Administrators

                                                                                                                    How Test Administrators Create and Manage Test Sessions
How Test Administrators Create and Manage Test
Sessions in the Test Administrator Site
Administering tests in the Test Delivery System (TDS) is a straightforward process and the basic
workflow is as follows:

•    The Test Administrator starts or schedules a test session in the Test Administrator Site and selects
     the tests to be administered in the session.

•    The test administrator provides the session ID to the students.

•    Students sign in to the Student Interface using their first name, TSDS ID, and session ID.

•    Students complete and submit their tests.

This section describes how Test Administrators successfully set up test sessions by performing the
following tasks within the Test Administrator Site:

     •     How to Create a Test Session

     •     How to Edit a Test Session

For information about the testing process from a student’s perspective, see the section How Students
Sign In to the Student Interface and Complete Tests.

How to Create a Test Session
To administer online tests, test administrators must create a test session and select the tests to be
administered. You can administer state-mandated achievement tests as well as formative tests that
have been created and published in the Authoring system by districts and campuses. The tests that
you can administer are determined by your user role. While test administrators, district testing
coordinators, and campus testing coordinators may administer all tests, teachers may administer
only interim tests and tests that they have created in the Authoring system. Table 1 provides
information about the tests that each user-role can administer.

                                   Table 1. Test Administration by User Role

                     DTA & DTC               CTC                         Teacher

    TFAR             ✓                       ✓                           ✓
                                                                         (Only tests that the teacher has created
                                                                         and not existing TFARs created by
                                                                         others)

    BOY              ✓                       ✓
    Assessments

    Interim          ✓                       ✓                           ✓
    Assessments

                                                      2
Test Delivery System User Guide for Test Administrators

                                                                                                           How Test Administrators Create and Manage Test Sessions
                   DTA & DTC                CTC                       Teacher

  STAAR            ✓                        ✓
  Summative

  STAAR            ✓                        ✓
  Alternate 2
  Summative

  TELPAS           ✓                        ✓
  Summative

  TELPAS           ✓                        ✓
  Alternate
  Summative

You can schedule multiple test sessions at a time. Please note that only the tests that you include in a
test session will be available to students who join that session. You can schedule a test session ahead
of time or start a test session immediately.

You can schedule or start test sessions by following the steps below:

1. Log in to the Test Administration Site. The Create and Manage Test Sessions page appears.

                               Figure 1. Create and Manage Test Sessions Page

2. To create a new test session, select Create Session. The Create and Manage Test Sessions pop-up
   window appears.

                                                     3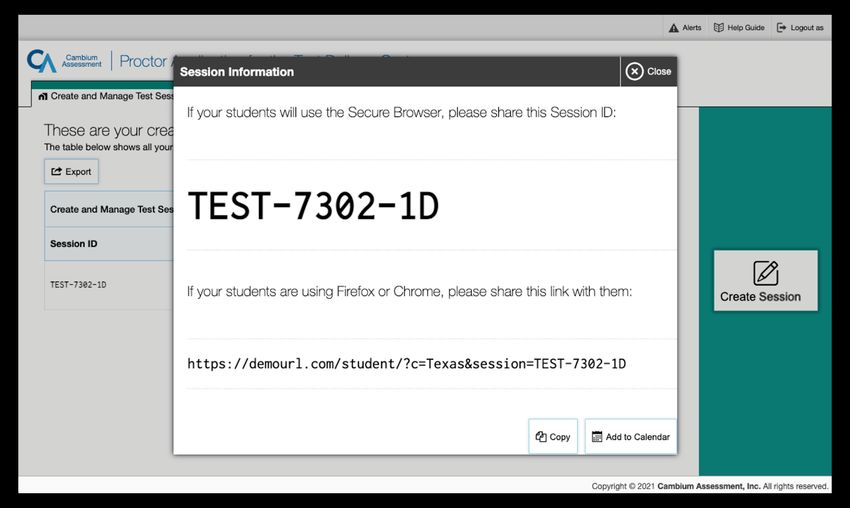
Test Delivery System User Guide for Test Administrators

                                                                                                                 How Test Administrators Create and Manage Test Sessions
                              Figure 2. Create and Manage Test Sessions Window

3. In the Start and End fields, enter a start and end date and time for the session. The time will be
   displayed in the time zone at which your computer is set. For example, if your computer is set to
   Central Standard Time, the times you select will also be in Central Standard Time. If you would
   like the test session to end at a particular time, for example, by the end of a class period, enter the
   time in the End field. If you do not enter an end time, the session will remain open for 23 hours and
   59 minutes. Note: The maximum time a session can remain open is 2 weeks.

    Students will be able to log in to a test session using the same session ID as long as the test
    session remains active. Once the test session ends, i.e., the session end date and time have been reached,
    students are automatically logged out. Students may also pause or submit their tests before the test
    session ends. For information on how students can pause or submit their tests, see the section
    How Students Sign In to the Student Interface and Complete Tests.

4. Once you have specified the test session start and end dates, select Next. The Test Selection
   window appears.

                               Figure 3. Test Selection Window: Test Categories

                                                      4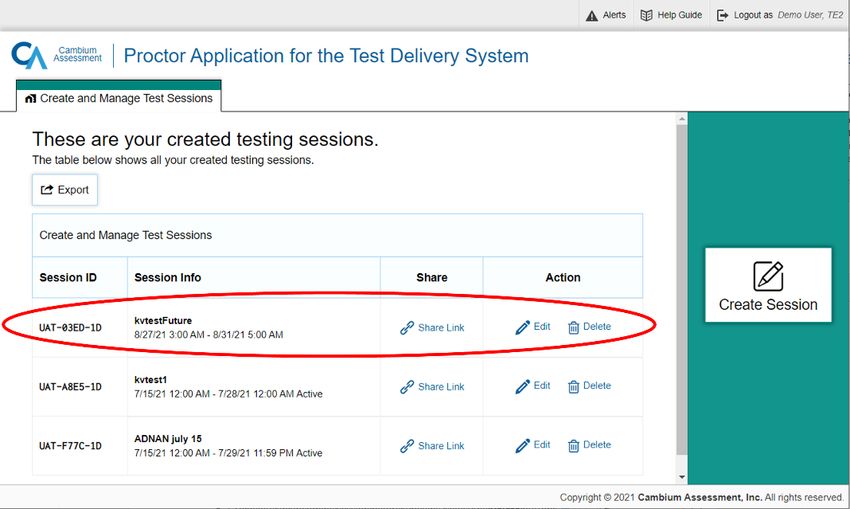
Test Delivery System User Guide for Test Administrators
How Test Administrators Create and Manage Test Sessions
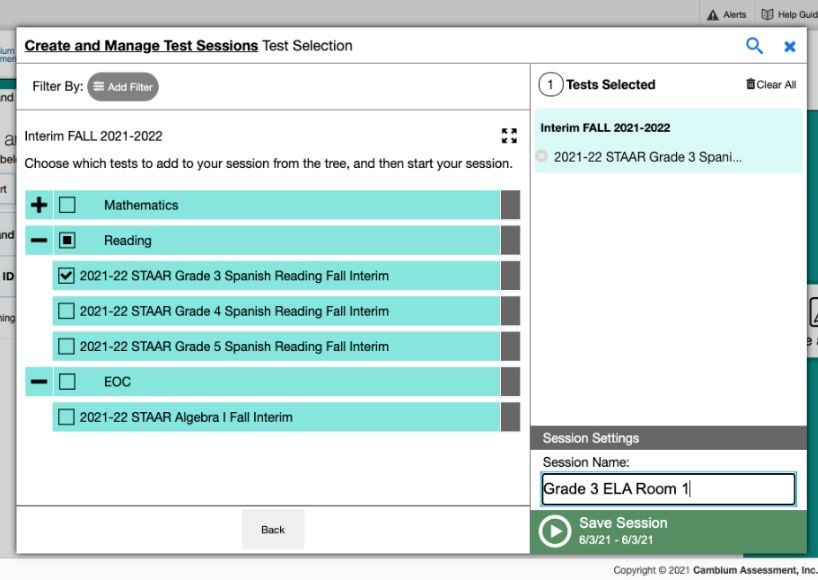
5. From the list of color-coded test categories, such as Beginning-of-Year Assessment, STAAR, and
TELPAS, select the category from which you wish to administer tests. This will display the tests or
test groups available for the selected test category. The Test Selection window only displays tests
and test categories that you are eligible to administer. For example, since teachers are not eligible
to administer Beginning-of-Year Assessment, teachers will not see the Beginning-of-Year
Assessment test category in the Test Selection window. Please see Table 1 for a list of the tests
that each user-role can administer.
Figure 4. Test Selection Window: Tests Within a Test Category
6. Optional: Expand a test subgroup to view the constituent tests. All test groups and subgroups
appear collapsed by default, and you may have to expand the test group in order to view
individual tests.
• To expand a test group, select (or Expand All).
• To collapse an expanded test group, select (or Collapse All).
• To expand or collapse all the groups within a test category simultaneously, select .
7. To select the tests you wish to administer, do one of the following:
• To select individual tests, mark the checkbox for each test you want to include.
• To select all the tests in a test group, mark the checkbox for that group.
Note: You can select more than one test to administer in a test session. For example, if you want to
administer a grade 3 RLA interim test to Student A and a grade 5 mathematics formative test to
Student B, you can do so in the same test session by selecting both tests.
5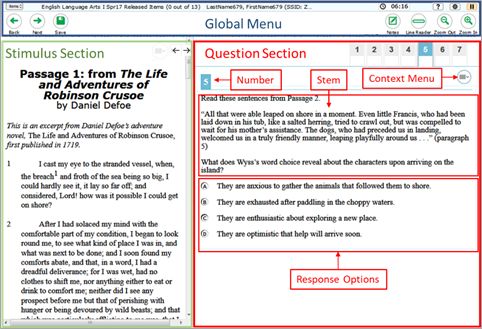
Test Delivery System User Guide for Test Administrators

                                                                                                         How Test Administrators Create and Manage Test Sessions
Once selected, the tests are displayed under their respective test categories in the right-hand side
panel of the Test Selection window (see Figure 4). Note: If viewing on a smaller screen, the test
selection count is displayed at the bottom of the Test Selection window (see Figure 5). To expand the
selected tests section, select    .

                   Figure 5. Test Selection Window: Tests Selected View for Small Screens

8. Optional: If you need to remove selected tests, from the Test Selection window (see Figure 4), do
   one of the following:

    •   To remove an individual test, select       for each test you want to remove.

    •   To remove all the selected tests, select Clear All.

9. To add tests from a different test category, from the Test Selection window (see Figure 4), do the
   following:

    a. Select Back at the bottom of the Test Selection window to return to the test categories view
       (see Figure 3).

    b. Repeat steps 5–8 to select the necessary tests.

10. Optional: When adding tests to your session, you may filter available tests on the basis of grade
    level and subject associated with the tests. To filter tests, perform the following steps:

    a. From the Test Selection window (see Figure 4), select               . The filter panel appears.

                                                     6
Test Delivery System User Guide for Test Administrators
How Test Administrators Create and Manage Test Sessions
Figure 6. Test Selection Window: Filter Panel
b. Expand the available filter categories and check the grades and subjects that you wish to filter
by. The selected filters are listed on top, as shown in Figure 7.
Figure 7. Filter Selections
You can remove a filter by selecting the applicable filter.
c. Select Apply Filter(s) to apply your selected filters. The test list then updates to display the
tests that match your filter criteria.
• Optional: You can also search for specific tests by their labels. To search for a test:
a. Select the magnifying glass icon ( ) in the upper-right corner of the Test Selection window
(see Figure 3 or Figure 4) to bring up the search panel shown in Figure 8.
7Test Delivery System User Guide for Test Administrators
How Test Administrators Create and Manage Test Sessions
Figure 8. Test Selection Window: Search Panel
`
b. In the Search Term field, enter the full or partial test label and select Go. The tests matching
the entered label will be displayed. Note, the search term must be at least three characters
long.
c. To close the search panel, select Close at the bottom of the panel.
• Once one or more tests have been selected, the Session Settings fields appear (see Figure 9).
Perform the following steps:
a. In the Session Name field, enter a name for the session.
Figure 9. Test Selection Window: Session Settings
8Test Delivery System User Guide for Test Administrators
How Test Administrators Create and Manage Test Sessions
• Select Save Session. The exact label for this button may vary depending on whether you are
starting a practice or operational session. The Session Information window appears.
Figure 10. Session Information Window
• The Session Information window provides the session ID and link teachers need to share with
students so students can join the session when it starts. Students using the secure browser
application enter their first name, TSDS ID, and session ID when signing into the Student Interface
to take the test. Except for summative tests, which must be taken via the secure browser, all other
tests are permitted to be taken using conventional web browsers like Chrome, Firefox, or Safari.
For tests taken on a conventional browser, students click the link and are taken to the Student
Interface where they can log in with their first name and TSDS ID to take the test.
• To add the session information to your calendar, select Add to Calendar. A .ics file containing
all the information displayed on the window including the start and end date and time will be
generated. You can save the file to your desired calendar application.
• To copy the information displayed in the Session Information window, select Copy. Once the
information is copied to your clipboard, the button name changes to Copied to clipboard.
• To close the Session Information window, select Close.
• The Create and Manage Test Sessions page appears displaying your active and upcoming test
sessions.
9Test Delivery System User Guide for Test Administrators
How Test Administrators Create and Manage Test Sessions
Figure 11. Create and Manage Test Sessions Page Displaying Existing Test Sessions
• You can do any of the following:
• To retrieve the session ID and link to the session again, select Share Link ( ). The
Session Information window appears displaying the session ID and link.
• To edit a session, select Edit ( ). For information on how to edit a session, please see
How to Edit a Test Session.
• To delete a session, select the Delete button ( ) and then select OK. Please note that if
you delete an active session, students logged into the testing session can continue testing.
However, other students will no longer be able to log in to the session.
• To export information about your active and scheduled sessions, select Export ( ).
The information displayed in the table on the Create and Manage Test Sessions page (see
Figure 12) will be exported as a CSV file.
Once the session date becomes current, students can log into the Student Interface to take their test.
For information on how students log in to take tests, please see the section How Students Sign In to
the Student Interface and Complete Tests.
How to Edit a Test Session
You can edit a test session if necessary. If the test session is not active yet, you can modify the test
session start and end dates, add or delete tests, and modify the session name.
Note: Once a session become active, you can update only the session end date and time. If you need
to add or remove tests, you must create a new session and provide the new session ID to your
students.
10Test Delivery System User Guide for Test Administrators
How Test Administrators Create and Manage Test Sessions
You can edit upcoming test sessions by following the steps below:
• Log into the Test Administration Site. The Create and Manage Test Sessions page appears listing
your scheduled sessions.
Figure 12. Create and Manage Test Sessions Page
• Select Edit ( ) for the test session you wish to edit. The Create and Manage Test Sessions
pop-up window appears.
Figure 13. Create and Manage Test Sessions Window
11Test Delivery System User Guide for Test Administrators
How Test Administrators Create and Manage Test Sessions
• If you wish to update the test session dates, enter the desired date and time in the Start and End
fields; then select Next. The Test Selection window appears.
Figure 14. Test Category Selection Window
• From the Test Selection window, add, edit, or delete tests from the session in the same way as
described in the section How to Create a Test Session.
Figure 15. Test Selection Window
• From the Session Settings fields, update the session name.
• Select Save Session to update your test session. The exact label for this button may vary
depending on whether you are starting a practice or operational session.
12Test Delivery System User Guide for Test Administrators
How Test Administrators Create and Manage Test Sessions
Test Administrator Role on Testing Day
For a smooth test administration, you must ensure that students have the necessary information they
need to log in to their test sessions and take tests. On testing day, a student requires the following
information for testing:
• Student first name and TSDS ID as they are recorded in TIDE
• Session ID or test session link to access the test session in which the student will test.
You can print a student’s test ticket (see Figure 16), which includes the student’s first name and TSDS
ID from TIDE. For information on how to print test tickets in TIDE, please see the TIDE User Guide
posted on the Texas Assessment Program web portal.
Figure 16. Test Ticket
The session ID is not included on the test ticket and must be communicated to students on the day of
testing for tests that are scheduled to start immediately; for tests that are scheduled to start in the
future, session IDs may be communicated in advance. Depending on the type of test (such as
summative and interims) that you are administering and the browser that the student will be using to
test (i.e., secure browser application vs conventional browsers), you may be required to provide
students with the session ID or the session link.
• For summative tests and tests that are taken in the secure browser application, you must provide
the session ID that is listed in the Session ID column on the Create and Manage Test Sessions
page (see Figure 11). Students will need the session ID along with their first name and TSDS ID to
log in to the test session.
• For interim assessments and non-summative tests that are taken in conventional browsers, you
must provide the test session link that is provided in the Session Information window (see Figure
10). When students select the link, they will be taken to the testing site, where the session ID field
will be automatically filled in, thereby allowing students to log in by simply entering their first
name and TSDS ID.
Table 2 provides details on the type of session information that must be communicated to students
for each test type.
13Test Delivery System User Guide for Test Administrators
How Test Administrators Create and Manage Test Sessions
Table 2. Session Information by Test Type
Non-Summative Non-Summative
Assessments Assessments
Summative Assessments
taken in the taken in the
Secure Browser Secure Browser
Test Session scheduled to Provide the Session ID at the start Provide the Session Provide the Session
start immediately of the session ID at the start of the Link at the start of
session the session
Test session scheduled to Provide the Session ID ahead of Provide the Session Provide the Session
start in the future time or at the start of the session. ID ahead of time or Link ahead of time
Students can only log in once the at the start of the or at the start of the
session becomes active. session. Students session. Students
can only log in once can only log in once
the session the session
becomes active. becomes active
For more information on how to prepare for testing and the role of the test administrator on testing
day, please refer to the Test Administration Manual available on the Texas Assessment Program portal.
How to Log Out of the Test Administrator Site
Once you have scheduled your test sessions, you can log out of the Test Administrator Site by
following the steps below:
• Select in the upper-right corner of the Test Administrator Site (see Figure 1). The Texas
Assessment Program portal appears.
14Test Delivery System User Guide for Test Administrators
How Students Sign In to the Student Interface and Complete Tests
How Students Sign In to the Student Interface and
Complete Tests
This section describes the following:
• How students sign in to the Student Interface on the day of the test when starting a new test or
resuming a paused test
• How students can view stimuli and respond to questions
• How students can pause a test, review previously answered questions, and submit a test
How Students Sign In and Select Tests
When testing, students must sign in to the appropriate testing site. For sessions created in the Test
Administrator Interface, students sign in to the Student Interface on the secure browser application
for summative tests and secure browser application or conventional browsers for other tests.
Students may also take practice tests on the Student Practice Site to familiarize themselves with the
online testing process. Aside from the sign-in process, the Student Practice Site has the same
appearance and functionality as the Student Interface. For information on how students sign in to the
Student Practice Site, see Practice Tests Site Student Sign-In Process.
How to Sign In to the Student Interface
• Launch the secure browser application on the student’s testing device. The Student Sign-In page
appears. If using a conventional browser, select the session link to navigate to the Student
Interface.
• Next, students enter the following information:
– In the First Name and TSDS ID fields, students enter their first name and TSDS ID as they
appear in TIDE.
– If using the secure browser application, students enter the session ID as it appears on the Test
Administrator Site. The first section of the three-part Session ID field that indicates whether a
student is on the Student Interface or the Student Practice Site will be pre-populated.
15Test Delivery System User Guide for Test Administrators
How Students Sign In to the Student Interface and Complete Tests
Figure 17. Secure Browser Student Interface Student Sign-In Page
• Students select Sign In. The Is This You? page appears.
How to Verify Student Information
After signing in to the Student Interface, students must verify their personal information on the Is This
You? page.
• If all the information on the Is This You? page is correct, the student selects Yes to proceed.
• If any of the information is incorrect, the student must select No.
You must notify the appropriate campus personnel that the student’s information is incorrect. Any
student demographic information that is incorrect must be updated before the student can begin
testing.
16Test Delivery System User Guide for Test Administrators
How Students Sign In to the Student Interface and Complete Tests
Figure 18. Is This You? Page
How to Select a Test
Students can select their tests from the Your Tests page that appears after students verify their
personal information. The Your Tests page displays all the tests that a student is eligible to take.
Students can only select tests that are included in the session and still need to be completed.
From the Your Tests Page that lists a student’s eligible tests in color-coded categories, the student
selects the name of the test.
– If a student’s required test is inactive or not displayed, the student should log out. You should
verify that the test session includes the correct tests. If necessary, create a new session with
additional tests.
17Test Delivery System User Guide for Test Administrators
How Students Sign In to the Student Interface and Complete Tests
Figure 19. Your Tests Page
How to Check Student Device Functionality
Depending on the test content and the specified test settings, students may need to verify that their
testing device is functioning properly from the Audio/Video Checks page. If a test does not require
functionality checks, this page is skipped.
• From the Audio/Video Checks page that displays each required functionality check in its own
panel, the student verifies each functionality as explained below.
• Once all functionality checks have been verified, the student automatically proceeds to the
Instructions and Help page.
To proceed without verifying any functionality, the student selects Skip A/V Checks (if available) at
the bottom of the page, and then select Yes in the affirmation message that appears.
18Test Delivery System User Guide for Test Administrators
How Students Sign In to the Student Interface and Complete Tests
Figure 20. Audio/Video Checks Page
How to Check Text-To-Speech Functionality
The Text-to-Speech Sound Check panel appears if a student has the text-to-speech (TTS)
accommodation. Students can use TTS within the secure browser application, a supported Chrome,
Firefox, or Edge browser.
If TTS does not work, students should log out. You can work with students to adjust their audio or
headset controls, or give the students another device.
• From the Text-to-Speech Sound Check panel, students select and listen to the audio.
– If the voice is clearly audible, students select I heard the voice. A check mark appears on the
confirmation button as well as on the upper-right corner of the panel, and students can
proceed to the next functionality check if available.
– If the voice is not clearly audible, students can use the sliders to adjust the settings and then
select to listen to the audio again.
19Test Delivery System User Guide for Test Administrators
How Students Sign In to the Student Interface and Complete Tests
Figure 21. Text-to-Speech Sound Check Panel
– If students still cannot hear the voice clearly, they select I did not hear the voice, which will
open the Audio Check panel. The students can then select Try Again to return to the Text-to-
Speech Sound Check panel and retry.
Figure 22. Audio Check Panel
Students can skip verifying the text-to-speech functionality by selecting Continue on the
Audio Check panel or by selecting Skip TTS Check from the Text-to-Speech Sound Check
panel.
20Test Delivery System User Guide for Test Administrators
How Students Sign In to the Student Interface and Complete Tests
How to Check Audio Playback Functionality
The Audio Playback Check panel appears for tests with listening questions and allows students to
verify that they can hear the sample audio.
If the audio does not work, students should log out. You should troubleshoot the device and
headphones or move the student to another device with working audio.
• From the Audio Playback Check panel, students select and listen to the audio.
– If the sound is clearly audible, students select I heard the sound. check mark appears on the
confirmation button as well as on the upper-right corner of the panel and students can
proceed to the next functionality check if available.
Figure 23. Audio Playback Check Panel
– If the sound is not clearly audible, students select I did not hear the sound to open the Sound
Check: Audio Problem panel.
Students can select Try Again to return to the Audio Playback Check panel and retry.
How to Check Recording Device Functionality
The Recording Device Check panel appears for tests with questions that require students to record
audio responses. The check is also automatically displayed for students who have a speech-to-text
accommodation. On this panel, students record their voice and verify that they can hear the recorded
audio.
If the recording device does not work, students should log out. You should troubleshoot the recording
device or set up a new recording device.
• From the Recording Device Check panel, students select to begin recording their voice.
• Students speak into their recording device, and then select to stop recording.
• Next, students select to listen to their recorded audio:
21Test Delivery System User Guide for Test Administrators
How Students Sign In to the Student Interface and Complete Tests
Figure 24. Recording Device Check Panel
• If the recorded audio is clearly audible, students select I heard my recording. A check mark
appears on the confirmation button as well as on the upper-right corner of the panel, enabling
students to proceed to the next functionality check if available.
• If the recorded audio is not clearly audible, students select I did not hear my recording to open
the Problem Recording Audio panel, where they will see one of two options:
Students can choose Try Again to return to the Recording Device Check panel and retry.
Students can choose Select New Recording Device (which appears only for students
testing on computers or tablets with multiple recording devices) to open the Recording
Input Device Selection panel and select a different recording device.
How to Check Sound and Video Playback Functionality
The Sound and Video Playback Check panel appears for tests with video content and allows students
to verify that they can view the sample video and hear its associated sound.
If the video or audio does not work, students should log out. You should troubleshoot the device and
headphones or move the student to another device with working audio and video.
• From the Sound and Video Playback Check panel, students select to play the video and
sound.
– If the video can be played and the sound is clearly audible, students select I could play the
video and sound. A check mark appears on the confirmation button as well as on the upper-right
corner of the panel and students can proceed to the next functionality check if available.
22Test Delivery System User Guide for Test Administrators
How Students Sign In to the Student Interface and Complete Tests
Figure 25. Sound and Video Playback Check Panel
– If students are not able to play the video or hear the sound, students select I could not play
the video or sound to open the Video Playback Problem panel.
Students can select Try Again to return to the Sound and Video Playback Check panel.
How to Check Video Playback Functionality
The Video Playback Check panel appears for tests with video content and allows students to verify
that they can view the sample video.
If the video does not work, students should log out. You should troubleshoot the device or move the
student to another device with working video.
• From the Video Playback Check panel, students select to play the video.
– If the video can be played, students select I could play the video. A check mark appears on the
confirmation button as well as on the upper-right corner of the panel and students can proceed to the
next functionality check if available.
Figure 26. Video Playback Check Panel
23Test Delivery System User Guide for Test Administrators
How Students Sign In to the Student Interface and Complete Tests
– If students are not able to play the video, students select I could not play the video to open
the Video Playback Problem panel.
Students can select Try Again to return to the Video Playback Check panel.
How to View Instructions and Begin Testing
The Instructions and Help page is the last step of the sign-in process. Students may review this page
to understand how to navigate the test and use test tools as well as review their test settings. This
page may also contain additional test instructions or acknowledgements that a student needs to
review in order to proceed.
1. Optional: To review their test settings, students select View Test Settings. To close the
window, students select OK.
2. To review additional test information or acknowledgements, if available, students review the
information on the page and proceed as instructed.
3. Optional: To view the help guide, students select View Help Guide. To close the window,
students select Back.
4. To start the test, students select Begin Test Now.
Figure 27. Instructions and Help Page
24Test Delivery System User Guide for Test Administrators
How Students Sign In to the Student Interface and Complete Tests
How Students Navigate the Student Interface
Once a student selects Begin Test Now on the Instructions and Help page (see Figure 27), the student
is presented with the first test page.
A test page can include the following sections:
• The Global Menu section displays the global navigation and tool buttons. It also includes the
Items menu, test information, help button, pause button, system settings button, and timer (if
available).
• The Stimulus section, which appears only for questions associated with a stimulus, contains the
stimulus content, context menu, and either the expand passage button or reading mode button. If
the passage content is not fully visible on the page, an arrow may also be displayed at the bottom
to indicate there is additional text below. A green scrollbar appears under the Stimulus section to
indicate how much of the passage content has been viewed.
• The Question section contains one or more test questions (also known as “items”). Each question
includes a number, context menu, stem, and response area. Each question also displays the
student’s name and the question’s most recent save date. Similar to the Stimulus section, if the
question text is not fully visible on the page, an arrow and scrollbar is displayed at the bottom of
the question section.
Figure 28: Sample Test Layout
The following sections provide details about how to navigate the Student Interface.
25Test Delivery System User Guide for Test Administrators
How Students Sign In to the Student Interface and Complete Tests
How to Navigate between Questions
• Some test pages may have only one question and others may have more or may consist of
multiple parts that students must answer.
o After students respond to all the questions on a page, they select Next in the upper-
left corner to proceed to the next page.
o To navigate to a previous question in a test, students select Back.
Figure 29. Navigation Buttons
• When multiple questions are grouped with a stimulus, the questions are tabbed for individual
viewing. Students select the tabs in the upper-right corner to proceed to the corresponding
question.
Figure 30. Paginated Questions
o The navigation tabs may also include a stimulus icon that students can select to
view the stimulus associated with the grouped questions.
• To jump directly to a question, students can select a question number from the items dropdown
that appears when students select the Items menu.
o If a question has been marked for review, is displayed next to the question.
o If a question has been skipped or not answered, is displayed next to the question.
o Questions that students cannot navigate to are grayed out.
o If a test consists of cover pages, cover page icons are displayed in the positions at
which they occur in the test.
Figure 31. Items Dropdown
26Test Delivery System User Guide for Test Administrators
How Students Sign In to the Student Interface and Complete Tests
How to View Stimuli
When a test question is associated with a stimulus, students should review that stimulus before
responding to the question. A stimulus is a reading passage or other testing material (such as a video
or graphic) that students review in order to answer associated questions.
• Reading Passages: When the stimulus is a reading passage, the content may be paginated.
o To move between the pages of a reading passage, students can select and below the
stimulus.
o Students can also select to open the Reading Mode window, which displays two pages at a
time.
o If a stimulus has multiple reading passages, students can select the numbered tabs at the top
of the stimulus to switch between the available passages.
o Some reading passages contain sections of text that students can collapse to focus on other
parts of the passage. Students can select or to expand or collapse sections of text.
Figure 32. Reading Passage
• Videos: When the stimulus is a video, students can use standard video features to control the
playback.
o To play a video, select in the lower-left corner.
o To jump to a different point in the video, drag the slider to the required location.
o To adjust the speed at which the video plays, select , and then select the required
speed from the menu that appears.
27Test Delivery System User Guide for Test Administrators
How Students Sign In to the Student Interface and Complete Tests
Figure 33. Video Playback Features
o To mute or unmute the video, select in the lower-right corner.
o To expand the video to full screen mode, select in the lower-right corner. To exit
full screen mode, select again.
• Slideshows: When the stimulus is a slideshow, students can navigate between the slides and play
associated audio, if available.
o To move between the slides of a slideshow, select and .
o To play the audio for the current slide, select . To pause the audio, select .
Figure 34. Sample Slideshow
28Test Delivery System User Guide for Test Administrators
How Students Sign In to the Student Interface and Complete Tests
How to Respond to Test Questions
The questions presented in TDS are of various types and students may need to respond to them
differently. Students can use the Student Practice Site to familiarize themselves with the question
types that may appear on tests.
All responses are saved automatically. Students can also manually save their responses to questions
by selecting Save in the upper-left corner.
Test questions may require students to do any of the following tasks:
• Select one or more choices from a list of answer options.
o For multiple choice type questions, students can re-click a selected radio button to
deselect the response option provided this feature is enabled.
• Use an on-screen keypad to generate an answer. Students can select in the answer space to
open the keypad.
• Select graphic objects or text excerpts.
• Place points, lines, or bars on a graph.
• Drag and drop text or graphic objects.
• Enter text in a text box or table.
• Match answer options together.
• Modify a highlighted word or phrase in a reading selection.
• Enter input parameters to run an on-screen simulation.
• Copy content from a passage to a text box.
• Expand categories and select options within them.
• Create graphs and charts out of unstructured data sets and draw inferences.
How Students Use Test Tools
A number of testing tools are available for students in TDS. Some tools are available for all tests, while
others are available only for a particular subject, accommodation, or type of question. There are
primarily two types of test tools available:
• Global Tools: These tools appear in the global menu at the top of the test page and are available
for all questions in a test.
• Context Menu Tools: These tools are specific to the passage or question being viewed.
Students can access tools by using a mouse or with keyboard commands. For information about
keyboard commands, please see Keyboard Commands in the Student Interface.
Some tools, such as the dictionary, calculator, formula sheet, and ASL videos, open in separate
windows. Students can resize the window using the resizing handle ( ). Students can also maximize
29Test Delivery System User Guide for Test Administrators
How Students Sign In to the Student Interface and Complete Tests
or minimize the window by selecting . When maximized, the window covers the entire test page
except for the navigation bar on top. Whenever the window is not maximized, students can drag and
move it to different parts of the test page.
How to Use Global Tools
The global menu consists of navigation buttons on the left and tool buttons on the right (see Figure
35).
• To use a global test tool, select the button for the tool to activate it.
Table 3 lists the tools available in the global menu.
Figure 35. Global Menu
Table 3. Global Tools
Tool Name Instructions
Basic Calculator To use the on-screen calculator, select Calculator in the global menu.
To look up definitions and synonyms in the Merriam-Webster dictionary or
Dictionary thesaurus, select Dictionary in the global menu.
To view the on-screen graph paper, click the Graph Paper icon in the global
Graph Paper
menu.
Help To view the on-screen Help Guide window, select the question mark icon in the
upper-right corner.
To highlight an individual line of text in a passage or question, select Line Reader
Line Reader
in the global menu. If the enhanced line-reader mode is enabled, all content
except for the line in focus is grayed out for greater emphasis.
The line-reader tool is not available while the Highlighter tool is in use.
To enter notes in an on-screen notepad, select Notes in the global menu. Notes
Notes
are available globally and can be accessed from any page in the test.
Depending on the tool’s settings, advanced editing features such as word and
character count, spell check, and text formatting options may be available. Table
10 provides a list of these editing tools.
Furthermore, if the copy/paste feature is enabled, the text entered in this tool can
be copied and pasted into text response areas or comment fields of questions
displayed on that page.
Pause To pause a test, select and then select Yes in the confirmation message that
appears.
To view the on-screen periodic table, click the Periodic Table icon in the global
Periodic Table
menu.
30Test Delivery System User Guide for Test Administrators
How Students Sign In to the Student Interface and Complete Tests
Tool Name Instructions
References To view the on-screen reference sheet, select References in the global menu.
Ruler To view the on-screen ruler, click the Ruler icon in the global menu.
System Settings To adjust audio volume during the test, select in the upper-right corner.
Students testing with TTS can also use this tool to adjust TTS settings.
Students testing on mobile devices cannot use this tool to adjust volume. To
adjust audio volume on mobile devices, students must use the device's built-in
volume control.
Zoom buttons
To enlarge the text and images on a test page, select Zoom In. Multiple zoom
levels are available. To undo zooming, select Zoom Out.
How to Use Context Menu Tools
A test page may include several elements, such as the question, answer options, and stimulus. The
context menu for each element contains tools applicable to that element (see Figure 36 and Figure
37). Table 4 lists the available context menu tools.
Figure 36. Context Menu for Questions
Figure 37. Context Menu for Answer Options
If a question has multiple parts, a context menu may be available for each part of the question. In such
cases, the active context menu (that is, the context menu for the question or stimulus currently in
focus) appears enabled, while the other context menus are grayed out. Furthermore, if this feature is
31Test Delivery System User Guide for Test Administrators
How Students Sign In to the Student Interface and Complete Tests
enabled when a student is attempting a question, the question number and context menu remain
visible and easily accessible even when the student scrolls through the content.
To use the context menu, do one of the following:
• To use a context menu tool for a stimulus or question, open the context menu by clicking the
context menu icon ( ) or by right-clicking the required elements, and then select the tool.
• To use a context menu tool for answer options, open the context menu for answer options and
select the required tool. To open the context menu for answer options, do one of the following:
– If you are using a two-button mouse, right-click an answer option.
– If you are using a single-button mouse, click an answer option while pressing Ctrl.
– If you are using a Chromebook, click an answer option while pressing Alt.
– If you are using a tablet, tap the answer option and then tap the context menu button.
Table 4. Context Menu Tools
Tool Name Instructions
American Sign You can watch videos that translate test content into American Sign Language (ASL).
Language To view ASL videos:
• From the context menu, select American Sign Language.
If only one ASL video is available, the video opens automatically.
If multiple ASL videos are available, sign language icons ( )appear next to the test content
for each video. Select the icon for the test content you wish to translate into ASL.
If the ASL video content includes chapter markers, you can jump from one point of the video
to another.
Highlighter To highlight text, select the text on the screen and then select Highlight Selection from the
context menu. If multiple color options are available, select an option from the list of colors
that appears.
To remove highlighting, select Reset Highlighting from the context menu.
Text in images cannot be highlighted. This tool is not available while the Line Reader tool is in
use.
Mark for Review To mark a question for review, select Mark for Review from the context menu. The question
number displays a flap in the upper-right corner and a flag icon ( ) appears next to the
question number on the test page. The Items pop-up window also displays a flag icon next to
the question number.
Select Previous To view and restore saved responses previously entered for a Text Response question, select
Version the Select Previous Version option from the context menu. A list of saved responses appears.
Select the appropriate response and click Select.
Sticky Notes To enter notes for a question, select Notepad from the context menu. After entering a note, a
pencil icon ( ) appears next to the question number on the test page.
You can access your notes for a question only on that question’s test page.
32Test Delivery System User Guide for Test Administrators
How Students Sign In to the Student Interface and Complete Tests
Tool Name Instructions
Depending on the tool’s settings, advanced editing features, such as word count, spell check,
and text formatting options may be available. Table 10 lists these editing tools.
Furthermore, if the copy/paste feature is enabled, the text entered in this tool can be copied
and pasted into text response areas of questions displayed on that page.
Strikethrough For selected-response questions, students can cross out an answer option to focus on the
options they think may be correct. If the tool is set to the enhanced mode, students can
strikethrough multiple lines of text, such as an answer option spanning more than a line, as
well as graphics.
There are two options for using this tool:
• Option A:
a. Activate Strikethrough mode by opening the context menu and selecting
Strikethrough.
b. Select each answer option for strike out.
c. Deactivate Strikethrough mode by pressing Esc or clicking outside the question’s
response area.
• Option B: Right-click an answer option and select Strikethrough.
Text-to-Speech To listen to passages and questions, select a Speak option from the context menu.
To listen to your responses to constructed-response questions, use the TTS button in the
question response area. For more information, see How to Use the Select Previous Version
Tool
The Select Previous Version tool allows students to view and restore saved
responses they previously entered for a text response question. For example, if
students type a response, select Save, delete the text, and enter new text, they
can use this tool to recover the original response. Please note that if the
student’s test pauses, any responses entered prior to pausing will no longer
appear in the Select Previous Version window.
• To recover a previously entered response, select the Select Previous
Version option from the context menu. The Select Previous Version
window appears, listing all the saved responses for the question in the left
panel.
• Select a response version from the left panel. The text associated with that
response appears in the right panel.
• Select Select. The selected response appears in the text box for the
question.
33You can also read