WebVRAM User Guide - December 2021 Department of Veterans Affairs Office of Information and Technology
←
→
Page content transcription
If your browser does not render page correctly, please read the page content below

WebVRAM User Guide

          December 2021

   Department of Veterans Affairs

Office of Information and Technology
Revision History

 Date        Document   Description                              Author
             Revision
 12/9/2021   4.0        Updated for WebVRAM Release 4.0,         WebVRAM Team, VA
                        (associated with informational VistA     Office of Information and
                        patch WEBG*3*5):                         Technology (OIT)
                         · Updated Section 1.2.6                 Development, Security,
                            (References and Resources) to        and Operations
                            replace “Rational” with “Jira.”      (DevSecOps) Software
                                                                 Product Management
                         · Updated verbiage in Sections 2        (SPM)
                            (System Summary), 3.1 (Logging
                            in to WebVRAM), and 4.2
                            (Changing Verify Code) to add
                            Microsoft Edge as a supported
                            internet browser.
                         · Replaced Figure 1 (WebVRAM
                            High-level System Interfaces).
                         · Replaced Figure 2 (WebVRAM
                            High-level Application Design)
                            and updated Alt Text.
                         · Replaced Figure 3 (WebVRAM
                            Data Flow and User Navigation)
                            and updated Alt Text.
                         · Replaced Figure 4 (WebVRAM
                            Terms and Conditions for Usage
                            Screen).
                         · Replaced Figure 5 (WebVRAM
                            Login Screen).
                         · Added details to introduction of
                            Section 4 (Using the Software).
                         · Corrected step 3 of Section 4.1.5
                            (Access CPRS at Remote Sites
                            Using CPRS Desktop Launcher);
                            a user MUST synchronize to a
                            remote site using WebVRAM at
                            least every 29 days to keep their
                            VistA profile active at that site.
                         · Replaced Figure 35 (WebVRAM
                            Login – Change Verify Code).
                         · Added directions on how to
                            submit a ticket to Enterprise
                            Service Desk to Section 5.1.4
                            (Other Errors).

WebVRAM User Guide                        ii                                   December 2021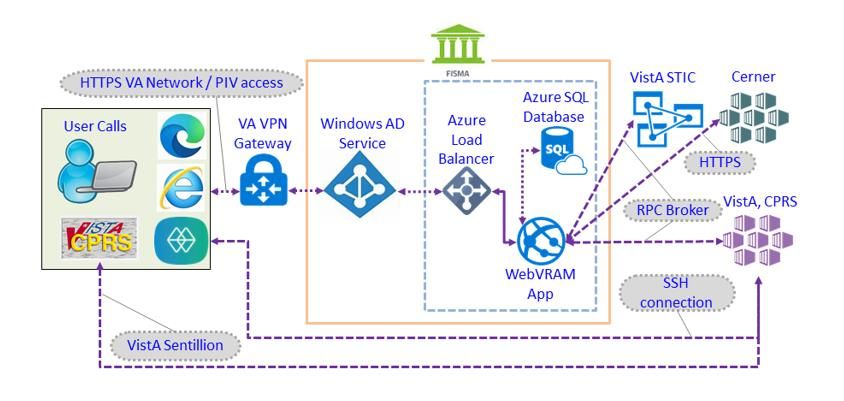
Date        Document   Description                           Author
             Revision
                        ·   Removed references to Fee
                            Basis Claims System (FBCS)
                            from Sections 2 (System
                            Summary), 2.2 (Data Flows),
                            and Appendix A (Appendix A –
                            Acronyms and Abbreviations).
                        ·   Added “WEBG” to Appendix A
                            (Appendix A – Acronyms and
                            Abbreviations).
 4/8/2021    3.0        Updated for WebVRAM Release 3.0       WebVRAM Project Team,
                        (associated with VistA patch          VA OIT EPMO
                        WEBG*3*1):
                         · Added Section 4.1.5 (Access
                            CPRS at Remote Sites Using
                            CPRS Desktop Launcher).
                         · Added note regarding use of
                            Joint Legacy viewer to Section
                            4.1.6 (Cerner Integration with
                            WebVRAM).
                         · Edited note in Section 4.1.6.1
                            (Launch Cerner).
                         · Added Section 5.1.3 (Duplicate
                            VistA Accounts at Remote Site).
                         · Retitled Section 6 to Appendix A
                            (Appendix A – Acronyms and
                            Abbreviations).
 10/22/2020 2.1         Updated for WebVRAM Release 2.0       WebVRAM Project Team,
                        (Cerner Integration):                 VA OIT EPMO
                         · Added information about
                            DIVISION field to Section 3
                            (Getting Started), step 3.
                         · Updated link to TRM in Section
                            4.1.4 (Launching Multiple CPRS
                            Sessions).
                         · Added Section 4.1.6 (Cerner
                            Integration with WebVRAM) and
                            subsection 4.1.6.1 (Launch
                            Cerner).

WebVRAM User Guide                       iii                             December 2021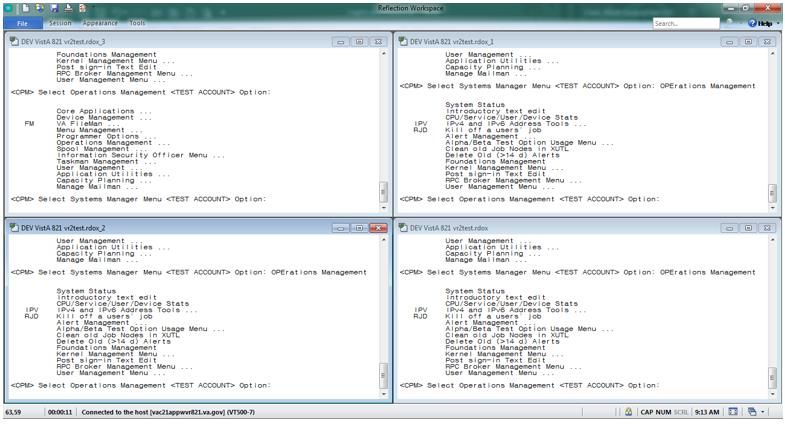
Date        Document   Description                            Author
             Revision
 4/21/2020   2.0        Updated for WebVRAM Release 1.2        WebVRAM Project Team,
                        (associated with information-only      VA OIT EPMO
                        patch WEBG*1.0*1):
                         · Added NOTE regarding PIV
                            linkage to Section 3 (Getting
                            Started), step 4.
                         · Added NOTE regarding
                            accessing Home VistA to
                            Section 3.1 (Logging in to
                            WebVRAM), step 3.
                         · Updated Figure 5 (WebVRAM
                            Login Screen).
                         · Entirely rewrote Section 3.1
                            (Logging in to WebVRAM), step
                            5.
                         · Updated Figure 7 (Tools
                            Dropdown – Update eSignature
                            Code).
                         · Clarified verbiage in Section 3.2
                            (Update eSignature Code and
                            Details), steps 1 and 3.
                         · Added Section 4.1.1 (Launch
                            Mode: Reflection), step 3.
                         · Clarified verbiage in Section
                            4.1.2 (Launch Mode: CPRS),
                            steps 3, 4, and 5.
                         · Added Section 4.1.3 (Launch
                            Mode: CPRS with Custom
                            Reflection Profiles).
                         · Added Figure 37 (Unauthorized
                            Access Error Message).
                         · Various minor formatting and
                            verbiage changes.
 12/6/2019   1.9        Technical Writer review and edit.      Technical Writer, VA OIT
                                                               EPMO
 12/5/2019   1.8        Added Section 4.1.1.2.1 CPAC           WebVRAM PMO Team
                        Users: Configure Tile View for
                        Multiple VistA Sessions at the Same
                        Site.
 12/3/2019   1.7        Updated to address comments from       Technical Writer, VA OIT
                        Health Product Support.                EPMO

WebVRAM User Guide                        iv                                December 2021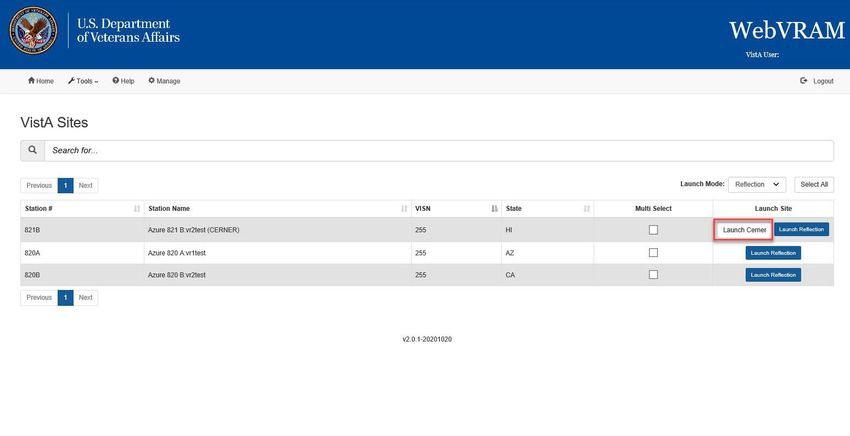
Date        Document   Description                           Author
             Revision
 11/26/2019 1.6         Updated Section 1.2.2 Assumptions     WebVRAM Project Team,
                        and Section 3 Getting Started.        VA OIT EPMO
                        Added Section 3.2 Update
                        eSignature Code and Details.
                        Technical Writer review and edit.
 10/29/2019 1.5         Technical Writer review and edit.     Technical Writer, VA OIT
                                                              EPMO
 10/25/2019 1.4         Added content to launch multiple      WebVRAM PMO Team
                        VistA and CPRS sessions, plus
                        changing Reflection settings to
                        support multiple sessions to the
                        same VistA site.
 10/24/2019 1.3         Changed date on cover page to         WebVRAM PMO Team
                        current month.
 9/16/2019   1.2        Added clarification for FBCS users.   WebVRAM PMO Team
 8/27/2019   1.1        Technical Writer review and edit.     Technical Writer, VA OIT
                                                              EPMO
 8/23/2019   1.0        Baseline.                             WebVRAM PMO Team

WebVRAM User Guide                        v                                December 2021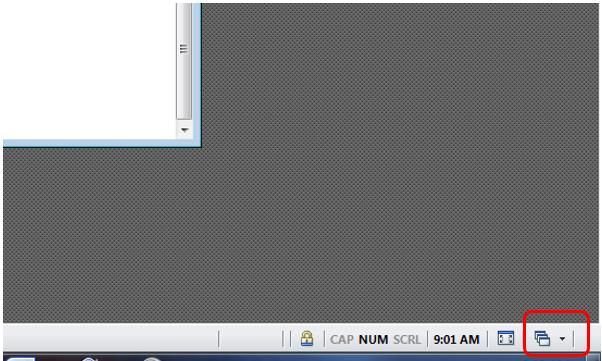
Table of Contents

1.     Introduction ......................................................................................... 1
     1.1. Purpose .......................................................................................................... 1
     1.2. Document Orientation................................................................................... 1
        1.2.1. Organization of the Manual ..................................................................... 1
        1.2.2. Assumptions ........................................................................................... 2
        1.2.3. Coordination............................................................................................ 2
        1.2.4. Disclaimers ............................................................................................. 2
              1.2.4.1. Software Disclaimer ..................................................................................... 2
              1.2.4.2. Documentation Disclaimer ........................................................................... 2
        1.2.5. Documentation Conventions ................................................................... 3
        1.2.6. References and Resources..................................................................... 3
     1.3. Enterprise Service Desk and Organizational Contacts .............................. 3
2.     System Summary ................................................................................ 4
     2.1.     System Configuration ................................................................................... 4
     2.2.     Data Flows ..................................................................................................... 5
     2.3.     User Access Levels ...................................................................................... 7
     2.4.     Continuity of Operation ................................................................................ 7
3.     Getting Started .................................................................................... 8
     3.1.     Logging in to WebVRAM ............................................................................ 10
     3.2.     Update eSignature Code and Details ........................................................ 13
4.     Using the Software............................................................................ 15
     4.1. Remote Session: Launch Mode ................................................................. 15
        4.1.1. Launch Mode: Reflection ...................................................................... 17
              4.1.1.1. Launching Different Multiple Remote VistA Sessions ................................ 18
              4.1.1.2. Launching Simultaneous Multiple VistA Sessions at a Single Site ............ 19
              4.1.1.2.1. CPAC Users: Configure Tile View for Multiple VistA Sessions at the Same
                           Site ....................................................................................................... 22
         4.1.2.       Launch Mode: CPRS ............................................................................ 25
         4.1.3.       Launch Mode: CPRS with Custom Reflection Profiles .......................... 27
         4.1.4.       Launching Multiple CPRS Sessions...................................................... 31
         4.1.5.       Access CPRS at Remote Sites Using CPRS Desktop Launcher .......... 32
         4.1.6.       Cerner Integration with WebVRAM ....................................................... 33
              4.1.6.1. Launch Cerner Button ................................................................................ 35
        4.1.7. Launch Mode: Synchronize................................................................... 37
     4.2. Changing Verify Code ................................................................................. 38
     4.3. Exit System .................................................................................................. 39
5.     Troubleshooting ................................................................................ 40
     5.1.     Special Instructions for Error Correction.................................................. 40

WebVRAM User Guide                                                vi                                                   December 2021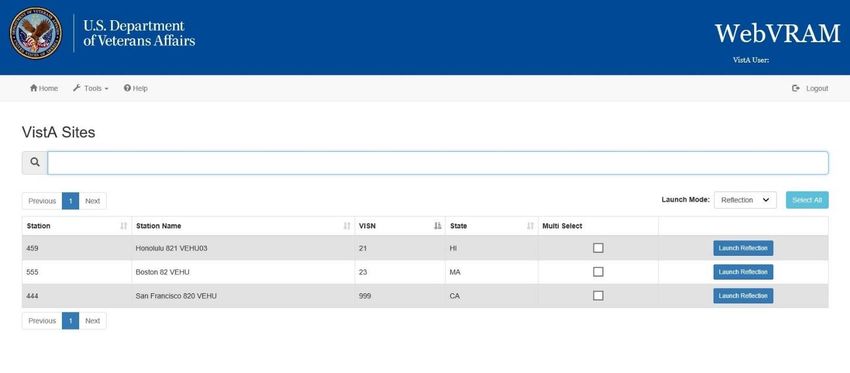
5.1.1.      Unauthorized Access Error ................................................................... 40
         5.1.2.      Reflection Fails to Launch ..................................................................... 40
         5.1.3.      Duplicate VistA Accounts at Remote Site ............................................. 41
         5.1.4.      Other Errors .......................................................................................... 42
A. Appendix A – Acronyms and Abbreviations .................................. 46

                                                 List of Figures

Figure 1: WebVRAM High-level System Interfaces ......................................................... 5
Figure 2: WebVRAM High-level Application Design ........................................................ 5
Figure 3: WebVRAM Data Flow and User Navigation ..................................................... 7
Figure 4: WebVRAM Terms and Conditions for Usage Screen..................................... 10
Figure 5: WebVRAM Login Screen ............................................................................... 11
Figure 6: WebVRAM Home Screen .............................................................................. 12
Figure 7: Tools Dropdown – Update eSignature Code .................................................. 13
Figure 8: Update eSignature Code Screen ................................................................... 13
Figure 9: Update eSignature Details ............................................................................. 14
Figure 10: Launch Mode Dropdown .............................................................................. 16
Figure 11: Launch Reflection Button ............................................................................. 17
Figure 12: VistA Login ................................................................................................... 17
Figure 13: Launch Multiple Reflection Sessions to Different Remote VistA Systems.... 18
Figure 14: Reflection Workspace Settings Access ........................................................ 19
Figure 15: Reflection – Configure User Interface Link ................................................... 20
Figure 16: Reflection – Change User Interface Mode ................................................... 21
Figure 17: Reflection – Cascading View of Multiple Same-site Sessions ...................... 22
Figure 18: Reflection – Arrange Windows Icon and Dropdown ..................................... 23
Figure 19: Reflection – Arrange Windows Tile Vertical Selection.................................. 23
Figure 20: Reflection – Tile Vertical View ...................................................................... 24
Figure 21: Launch CPRS Button ................................................................................... 25
Figure 22: CPRS Version Screen .................................................................................. 25
Figure 23: PIV Select a Certificate Screen .................................................................... 26
Figure 24: CPRS Login Screen ..................................................................................... 26
Figure 25: Tools Menu, Reflection Profiles Option ........................................................ 27
Figure 26: Reflection Profiles Screen ............................................................................ 27
Figure 27: Launch CPRS Button ................................................................................... 28
Figure 28: CPRS Version Screen .................................................................................. 29
Figure 29: PIV Select a Certificate Screen .................................................................... 29
Figure 30: CPRS Login Screen ..................................................................................... 30
Figure 31: WebVRAM Cerner Connections User Workflow .......................................... 34
Figure 32: Launch Cerner Button .................................................................................. 35
Figure 33: Cerner PIV Login Screen ............................................................................. 36
Figure 34: Launch Synchronize Button ......................................................................... 37
Figure 35: WebVRAM Login – Change Verify Code ..................................................... 38
Figure 36: WebVRAM Logout ....................................................................................... 39
Figure 37: Unauthorized Access Error Message ........................................................... 40

WebVRAM User Guide                                           vii                                             December 2021
Figure 38: Duplicate VistA Account Error ...................................................................... 41
Figure 39: yourIT Desktop Icon ..................................................................................... 42
Figure 40: yourIT – Create New Incident....................................................................... 42
Figure 41: yourIT Create Incident Form ........................................................................ 43
Figure 42: yourIT Create Incident Form – Continued .................................................... 44
Figure 43: yourIT Assignment Group Lookup – Search for WebVRAM......................... 44
Figure 44: yourIT Create Incident Form – Assignment Group WebVRAM .................... 45

                                                List of Tables

Table 1: Documentation Symbols and Descriptions ........................................................ 3
Table 2: Enterprise Service Desk Support Information.................................................... 3
Table 3: Acronyms and Abbreviations ........................................................................... 46

WebVRAM User Guide                                       viii                                         December 2021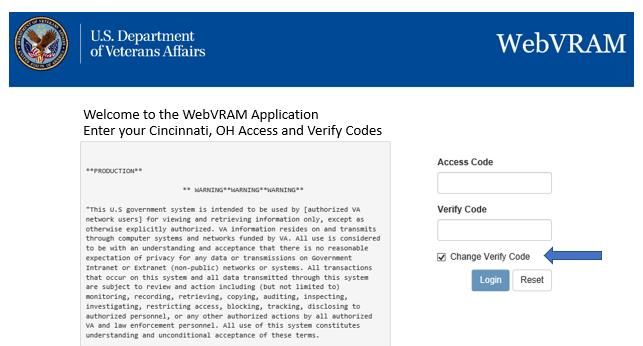
1.       Introduction
In April 2011, the Executive Director of Office of Information and Technology (OIT) Field
Operations challenged the Director, Region Field Program Office (FPO), with finding a
technology solution to solve access control complexities for the Consolidated Patient Account
Center (CPAC). As a result, a Single Sign On (SSO) project was chartered to develop a local
application, utilizing existing capabilities of the VistA CLAIMS System and Remote Procedure
Call (RPC) Broker that would potentially be migrated to the VA enterprise to allow remote
access (read and write), using a single set of credentials, for organizations requiring access to
information resources provided by Veterans Health Information Systems and Technology
Architecture (VistA).
The VistA Remote Access Management (VRAM) application was developed to address these
access control complexities. VRAM was deployed to CPAC users to allow remote terminal
emulation and certain Graphical User Interface (GUI) application connectivity to perform
consolidated Medical Care Cost Fund/Recovery and other activities as part of the CPAC mission.
To promote process improvement, implementation of the Web VistA Remote Access
Management (WebVRAM) application provides a web-based application to move the VRAM
functionality to a cloud computing environment in keeping with the VA Enterprise Cloud
initiatives and policy direction. The WebVRAM application will continue to offer a solution
which allows synchronization of account credentials by replacing the prior model of user
authorization through the VistA CLAIMS system and leveraging the VistA Station ID Callback
module (STIC) at user login while maintaining an internal user table that can be electronically
populated with user profiles, VistA menus, and keys.
With the cloud-hosted application, users of WebVRAM will continue to enjoy consistency in
access to disparate VistA systems while system administrators and systems security personnel
experience a reduction in account management activities and standardization of access according
to nationally-approved access standards. The web-based offering enhances the efficiency
achieved by both OIT and Veterans Health Administration (VHA) business partners in obtaining
access to disparate VistA systems and enterprise-wide data required to perform VA national-
level program business functions. Veteran patient care can be improved as it will take less time
for the care provider to access disparate Veteran records across the VA enterprise.
1.1.      Purpose
The purpose of the WebVRAM User Guide is to familiarize users with the key features and
navigational elements of the application. Additionally, this guide provides technical information
to system administrators, IT support staff, and other authorized users. It will be updated as
needed in subsequent releases.
1.2.      Document Orientation
The document orientation is shown below in Sections 1.2.1 through 1.2.6.
1.2.1.    Organization of the Manual
The major sections of the User Guide are shown in the Table of Contents above.

WebVRAM User Guide                              1                                    December 2021
The target audience for this guide includes authorized users, system administrators, and IT
support staff.
1.2.2.     Assumptions
This guide was written with the following assumptions:
   ·     WebVRAM users are authorized by business line management to access the application.
   ·     Users are authorized to access and use VistA applications to perform their jobs.
   ·     The user has a basic knowledge of WebVRAM access and options.
   ·     Users of the WebVRAM application have current VA Network access and an active local
         or Home VistA user profile. The user must also arrange to have the WEBG WEBVRAM
         GUI Secondary menu option added to their VistA profile. That menu option is required
         for the user to be able to login to the WebVRAM application.
   ·     The primary menu option at the user’s Home Vista system is a standard VistA menu
         name (not a custom menu name).
   ·     Required local Security Keys are identified and incorporated into User Account Profiles
         by an authorized WebVRAM Business Unit Administrator.
1.2.3.     Coordination
Users must obtain approval from their line manager to access and use the WebVRAM
application in the performance of their job. The process for obtaining approval is outlined in
Section 3 below.
WebVRAM software and documentation disclaimers include disclaimers “as written” in all VA
user documentation and are shown below in Sections 1.2.4.1 and 1.2.4.2.
1.2.4.     Disclaimers
1.2.4.1.    Software Disclaimer
This software was developed at the Department of Veterans Affairs (VA) by employees of the
Federal Government in the course of their official duties. Pursuant to Title 17 Section 105 of the
United States Code, this software is not subject to copyright protection and is in the public
domain. VA assumes no responsibility whatsoever for its use by other parties, and makes no
guarantees, expressed or implied, about its quality, reliability, or any other characteristic. We
would appreciate acknowledgement if the software is used. This software can be redistributed
and/or modified freely if any derivative works bear some notice that they are derived from it, and
any modified versions bear some notice that they have been modified.
1.2.4.2.    Documentation Disclaimer
The appearance of external hyperlink references in this manual does not constitute endorsement
by the Department of Veterans Affairs (VA) of this website or the information, products, or
services contained therein. The VA does not exercise any editorial control over the information
you may find at these locations. Such links are provided and are consistent with the stated
purpose of the VA.

WebVRAM User Guide                               2                                    December 2021
1.2.5. Documentation Conventions
This manual uses several methods to highlight different aspects of the material.
Various symbols are used throughout the documentation to alert the reader to special
information. The table below gives a description of each of these symbols.
Table 1: Documentation Symbols and Descriptions
Symbol Description
NOTE: Used to inform the reader of general information including references to
additional reading material.
CAUTION: Used to caution the reader to take special notice of critical information.
“Snapshots” of computer online displays (i.e., character-based screen captures/dialogs) and
computer source code are shown in a non-proportional font and enclosed within a box. Also
included are Graphical User Interface (GUI) Microsoft Windows images (i.e., dialogs or forms).
User's responses to online prompts (e.g., manual entry, taps, clicks, etc.) will be shown in
boldface type.
1.2.6. References and Resources
· WebVRAM System Design Document
· WebVRAM Requirement Elaboration Document
· WebVRAM User Stories and Backlog – Jira Repository
1.3. Enterprise Service Desk and Organizational Contacts
Enterprise Service Desk (ESD) support information is provided in the table below.
Table 2: Enterprise Service Desk Support Information
Name Role Org Contact Info
OIT Enterprise Tier 1 Support OIT Enterprise Service Desk (ESD): 1-855-673-4357
Service Desk
OIT Enterprise Tier 2 Support OIT Tier 1 ESD will escalate tickets to Tier 2 Support
Service Desk as required for issue resolution.
OIT Enterprise Tier 3 OIT Tier 2 Support will escalate tickets to Tier 3
Service Desk Application Support as required for issue resolution.
Support
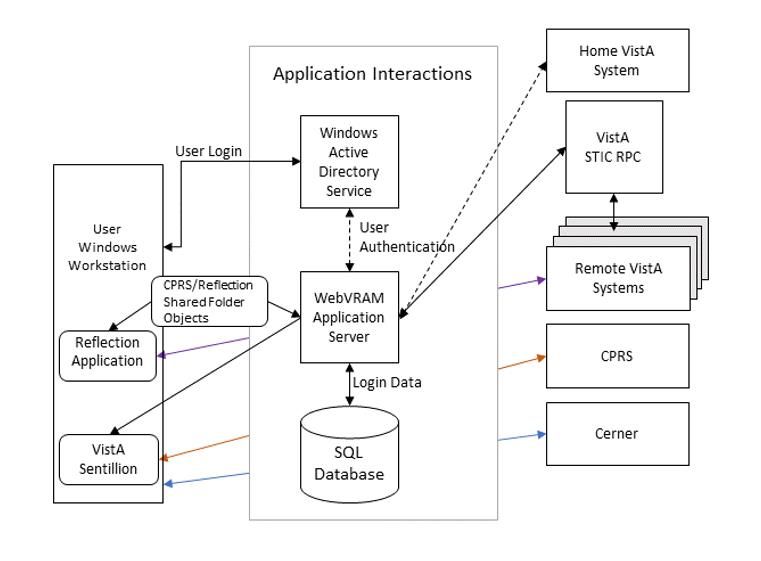
WebVRAM User Guide 3 December 20212. System Summary WebVRAM is a web-based, cloud-hosted application utilizing VA Enterprise Architecture and Design principles to facilitate user access to multiple remote VistA systems and related applications such as Computerized Patient Record System (CPRS), without requiring the user to establish login authentication and credentials at each VistA where Veteran data is to be viewed. The need for multiple VistA sessions, with separate user profile login to each VistA instance, is eliminated. Application features are provided through a Graphical User Interface (GUI). The VA-approved web browser for accessing WebVRAM is Microsoft Internet Explorer (IE) version 11.0 or Microsoft Edge version 91.0.864.67 or greater. 2.1. System Configuration The WebVRAM solution is dependent on the user’s local VistA system and the Station ID Callback module (STIC) for user authentication. A user must have a user profile archived and active in their local VistA system to be granted access to the WebVRAM application. Detailed design and architecture are available for technical review in the WebVRAM System Design Document (SDD). Relationships between systems are shown in Figure 1. This diagram shows the WebVRAM servers hosting the application, known as Virtual Machines (VMs), residing in the Azure Cloud (host) connected to an Azure Structured Query Language (SQL) database. The VMs and SQL database are accessible from the VA Network through a Load Balancer connected to the VA Virtual Private Network (VPN) Gateway. While the Azure Cloud is located within and part of the VA Network of systems, it is shown below separately from the VistA applications and the VistA STIC for data flow purposes. The figure further shows that user authentication (verifying the user is an authorized VA and WebVRAM user) is performed as the STIC is called by the WebVRAM application to validate the user’s credentials on their local VistA system. The STIC also allows them to connect through the WebVRAM application to assigned remote VistA systems. WebVRAM User Guide 4 December 2021
Figure 1: WebVRAM High-level System Interfaces

2.2.    Data Flows
Figure 2 provides a high-level architectural view of the WebVRAM solution. A discussion
follows this diagram regarding data flows from a user perspective.
Figure 2: WebVRAM High-level Application Design

WebVRAM User Guide                            5                                 December 2021
Using their local VistA Access and Verify codes, the user logs in to the WebVRAM application
through the VA intranet portal Uniform Resource Locator (URL) or web address. The
application calls the STIC to check the user’s local VistA system and validates user credentials.
If a user’s local VistA profile is active, the user profile is retrieved from the local VistA system
and sent to the WebVRAM application for storage in the WebVRAM User Table.
The user profile includes:
   ·   VistA authorized menus and keys
   ·   Electronic signature
   ·   User title
   ·   Service/section
   ·   Name
   ·   Degree
   ·   National Provider Identifier (NPI)
   ·   NPI Status
After the user is verified as an authorized user, the user is logged into the WebVRAM GUI and
allowed to select or identify the remote VistA system(s) he/she is approved by their business line
management to access. During user login, the application captures and stores the user login
transaction, including date/time of login and user identifiers in an SQL database for auditing
purposes. No Personally Identifiable Information (PII) is included in the login stored transaction.
The application launches a Micro Focus Reflection session (terminal emulation software) from
the user’s workstation, passes the single-use token to the target remote VistA system(s), and the
Reflection emulator gives the user a VistA login screen without having to enter Access and
Verify codes a second time. Multiple simultaneous VistA sessions to various remote locations
can be initiated with WebVRAM. If the user is also authorized to access the Computerized
Patient Record System (CPRS), he/she will be able to launch CPRS from the WebVRAM GUI
site selection page.
Figure 3 provides an overview of the data flow during a user login and remote VistA connection
session, and it provides more detail of the software and objects involved in the data flow.

WebVRAM User Guide                                6                                    December 2021
Figure 3: WebVRAM Data Flow and User Navigation

2.3.     User Access Levels
The WebVRAM application does not differentiate users by role. The application provides a
mechanism to access multiple VistA systems where the user may or may not have existing
credentials. All WebVRAM users have the same privileges regarding access to the software. The
only restrictions that apply to the use of the application are based on the VistA applications,
menus, and security keys the user is authorized to use in the performance of their job. The same
VistA applications the user is authorized to access on their local workstation will be available for
use at each remote VistA system after WebVRAM provides access to the system.
2.4.     Continuity of Operation
The WebVRAM application will be available for VA enterprise use 99.5% of the time, 24 hours
a day, 365 days/year. In the event of a disaster affecting the VA Azure Cloud hosting
environment where the application and associated database reside, a replication of the production
environment, the application, and WebVRAM operations will be made to a failover site in a
separate geographical location. Access to the WebVRAM application will be provided within a
few hours of that replication to the failover site. Performance of the application within the
failover environment will be similar to what the user experienced in the primary production
environment.

WebVRAM User Guide                               7                                    December 2021
3.      Getting Started
To access the WebVRAM application, the user follows these initial process steps:
     1. A WebVRAM user must have an active VA Network profile, and an active “Home” or
        local VistA user profile. Please coordinate with your business line manager to complete
        the VA onboarding processes required to obtain VA network access and to establish a
        local VistA user profile.
     2. The user obtains permission from their Business Line Director to use the WebVRAM
        application to access remote VistA systems and perform job-related work at those
        locations.
     3. Once permission is obtained, the user works with their Business Line Management and
        follows the business-defined process to:
            a. Log an Enterprise Help Desk (ESD) ticket through yourIT. Route the ticket to
               your local IT staff to request they do the following:
                    i. Add the WEBG WEBVRAM GUI Secondary Menu Option to your
                       Home VistA user profile.

                           NOTE: An Electronic Permission Access System (ePAS) request
                       may need to be completed and approved.

                             IMPORTANT: The WEBG WEBVRAM GUI Secondary Menu
                       Option must be part of the user’s VistA profile to be able to login to
                       the WebVRAM application. If it is not present, the user will
                       experience an “Invalid Access/Verify Code Pair” error when
                       attempting to login to WebVRAM.
                   ii. Check your Home VistA profile to be certain that the DIVISION field is
                       not blank or incorrectly assigned.

                             IMPORTANT: If the DIVISION field is blank or incorrect, the
                       user may not be able to connect to all authorized remote VistA sites
                       through WebVRAM.
            b. Contact the WebVRAM Business Unit Administrator assigned to the user’s
               business unit to request the user profile be added to the WebVRAM database,
               which will allow login to the application.

WebVRAM User Guide                              8                                   December 2021
4. All users need to complete this step one time only. To prepare for future 2-Factor
Authentication (2FA)/Personal Identification Verification (PIV) login to WebVRAM, the
user must perform a one-time link of their Home VistA user profile to their PIV login
capabilities through the Identify and Access Management (IAM) Link My Account
process.
NOTE: This step is NOT needed to access WebVRAM at this time, but when PIV
login to the application is integrated in a future release, it will be required to access the
application.
To perform the link, follow the instructions in the yourIT/Service Now (SNOW)
Knowledge Article entitled, “How do I bind or link my PIV card to my VistA/CPRS
account?”
Alternatively, the user may call the ESD to request help to perform the Link My Account
process.
WebVRAM User Guide 9 December 20213.1. Logging in to WebVRAM
1. From Microsoft Internet Explorer or Edge browser, navigate to the WebVRAM home
page at this link: https://WebVRAM.va.gov/
2. The Terms and Conditions web page will be the first page displayed. Read through the
conditions and click Accept the Terms and Conditions as shown below.
Figure 4: WebVRAM Terms and Conditions for Usage Screen
WebVRAM User Guide 10 December 20213. The next web page displayed is the WebVRAM Login page.
NOTE: The user’s Home VistA System is displayed above the login screen. There is no
need to use WebVRAM to access the user’s Home VistA system because the user can
already login directly to access VistA applications at their Home site.
Figure 5: WebVRAM Login Screen
4. Enter your local VistA Access and Verify Codes and click Login to access the
application features.
WebVRAM User Guide 11 December 20215. The WebVRAM application’s home page is displayed. Sometimes during login, based on
your Home VistA user profile, a window may open with a request to update your
Electronic Signature (eSignature) code. See Section 3.2 Update eSignature Code for
instructions for updating this code and associated data.
NOTE: The user’s Home VistA system will NOT be displayed in the list of VistA sites the
user can access because the user can already login directly to access VistA applications at their
Home site. The user does NOT need WebVRAM to access their Home VistA system.
CAUTION: If a user already has access to a remote VistA site, with active
credentials and customized menus and keys at that remote site, AND their custom profile
setup at the remote site is DIFFERENT from the profile at their Home VistA system, DO
NOT use WebVRAM to access that specific remote site. Instead, continue logging directly
into that remote site to perform work. When WebVRAM is used to access a remote site, the
user’s Home VistA profile overwrites the remote site profile and may change the custom options
of that remote profile. WebVRAM is intended to provide VistA access to remote sites where the
user does NOT have active VistA credentials with an already established custom user profile.
Figure 6: WebVRAM Home Screen
WebVRAM User Guide 12 December 20213.2. Update eSignature Code and Details
The Update eSignature Code window may appear during the first login to WebVRAM. The user
may also choose at any time to update their eSignature Code in their Home VistA system and
pass the new code to remote VistA systems by clicking Tools, then Update eSignature Code.
Figure 7: Tools Dropdown – Update eSignature Code
Figure 8: Update eSignature Code Screen
To update the eSignature Code:
1. If you wish to change your Home VistA eSignature code, enter a new eSignature code in
the New eSignature Code field. According to VA policy and VistA parameters, the
signature code must be 6 to 20 characters in length with no control or lowercase
characters. Letters and/or numbers can be used. If you do NOT wish to change your
Home VistA eSignature code, click Cancel to exit this option.
WebVRAM User Guide 13 December 20212. Enter the same new eSignature code in the Confirm eSignature Code field, then click
Update.
Figure 9: Update eSignature Details
3. A second window should appear to allow the user to Update eSignature Details. This
page can also be accessed from the WebVRAM main page at any time by clicking Tools,
then Update eSignature Details. If you wish to change eSignature profile data, enter the
following data elements in the appropriate fields. If you do NOT want to change your
eSignature profile data, click Cancel to exit this option.
a. eSignature Name (user’s name as it appears in VistA)
b. eSignature Title (user’s title as stored in their VistA profile)
c. eSignature Initials (user’s initials as stored in their VistA profile)
d. Office Phone Number (user’s office phone number, or cellular phone)
e. Voice Pager Number (optional; enter data if the user wants that information
updated or added to their VistA eSignature information)
f. Digital Pager Number (optional; enter data if the user wants that information
updated or added to their VistA eSignature information)
4. After adding data to each field, click Save Changes to update the VistA local eSignature
information. This same information will be passed to and used at each remote site where
the user performs work, when the remote site is accessed through WebVRAM.
WebVRAM User Guide 14 December 20214. Using the Software
This section describes the system menu first encountered by the user, as well as the navigation
paths to functions noted on the screen.
How WebVRAM Works: The software allows authorized users to access remote VA Medical
Center or Health Care System sites, outside of their Home/local VA site, they are authorized to
access by their Business Unit Director, by passing their Home VistA profile menus, keys, person
class, user class, and other profile data to the remote site where they can login to the remote site
using their Home VistA Access and Verify codes. This process makes it possible for WebVRAM
users to access remote sites with one set of login credentials instead of maintaining separate
profiles with separate credentials for several remote sites.
What WebVRAM does NOT do: The software can NOT be used to login to the user’s Home
VistA system or launch a local CPRS session. This is by design, because a user has no need for
WebVRAM to retrieve their Home VistA profile and pass it back to their Home VistA system
with their Access and Verify codes. Users can already login directly to their Home VistA system,
and there is no need for WebVRAM to do that for them.
The software should also NOT be used if a user already has an active profile at a remote site that
has been established using custom menus and keys for specific work the user performs at that
remote location. If this is the case, contact your WebVRAM Business Unit Administrator and
instruct them to leave that remote site off of your WebVRAM VistA Sites list so you do not
accidentally use WebVRAM to connect to that site. If that site is in your list and you connect to
it using WebVRAM, your Home VistA profile will overwrite the custom profile at that remote
site, and the features you did have access to in VistA or CPRS will likely stop working.
4.1. Remote Session: Launch Mode
1. Login to WebVRAM.
2. From the WebVRAM home page, select the Station Name of the remote VistA site to
which the user wants to connect. The Launch Mode provides a drop-down menu from
which the user can select the Launch Mode to use. The drop-down selection defaults to
“Reflection.”
Available drop-down options are:
· Reflection – This option is used to launch a remote VistA session with Reflection to
connect to a remote VistA system already assigned to the user’s profile.
· CPRS – This option is used to launch a remote VistA CPRS session at the selected
remote location.
· Synchronize – Similar to launching Reflection, if the user does not need to perform work
at the remote location, this option is used to connect to and setup or update an active
VistA login account at a remote VistA site. If there are changes to the user’s local VistA
profile, the Synchronize option will push those changes to the selected remote location(s).
If the user’s line management determines that he/she needs access to a new VistA site,
the new location can be added to the user’s WebVRAM profile by the business-
designated WebVRAM Business Unit Administrator.
WebVRAM User Guide 15 December 2021Figure 10: Launch Mode Dropdown WebVRAM User Guide 16 December 2021
4.1.1.     Launch Mode: Reflection
   1. Login to WebVRAM.
   2. From the WebVRAM home page, select the Station Name of the remote VistA site to
      which the user wants to connect.
   3. If the VistA site the user needs to connect to is not shown in the first 20 sites listed on the
      home page, the user can use the search window to quickly locate the VistA site. The user
      can search by Station Name, Station ID, VISN, and State.
   4. Click on Launch Reflection. WebVRAM will launch Reflection and log the user into the
      remote VistA site that was selected.

             NOTE: Reflection is the built-in workstation software that allows the user to
         connect to and work in the selected remote VistA system.
Figure 11: Launch Reflection Button

   5. Once the Launch Reflection button is clicked, the application will launch the user’s
      desktop Reflection software and make the connection to the remote VistA system where
      the user will be logged in for VistA access. The VistA “roll and scroll” features will be
      available to the user, similar to what the user has access to in their local VistA system, as
      shown in the screen shot below.
Figure 12: VistA Login

WebVRAM User Guide                               17                                    December 2021
4.1.1.1. Launching Different Multiple Remote VistA Sessions
Multiple VistA sessions at different remote VistA locations can be launched together by
checking the box for each VistA to be launched simultaneously in the Multi Select column on
the user’s home page. When one or more boxes to launch Reflection are checked, the Launch
Mode selection option changes to Launch Selected. Clicking the Launch Selected button, with
one or more boxes checked in the Multi Select column, then launches different multiple VistA
sessions at the same time. Figure 13 shows the boxes checked for each site the user intends to
launch, and the Launch Selected mode for performing this action.
Figure 13: Launch Multiple Reflection Sessions to Different Remote VistA Systems
CAUTION: If a connection to a particular site fails when multiple Reflection sessions are
launched, it can be due to several factors outside of the control of the WebVRAM application,
such as network latency issues, down time at the remote site, user profile configuration issues at
the remote site, local VistA user profile configuration issues, etc. If connection to a site fails
during a multiple launch sequence, the entire launch sequence, from that site forward, is
terminated by WebVRAM so the user can see and capture the error that occurred when the
connection failed. For example, if five sites were selected and launched, and the third site fails to
connect during launch, sites four and five will not be launched to allow the user to immediately
see the connection error displayed. That error message can then be shared with the Enterprise
Service Desk when the user logs a ticket to request help in resolving the issue. Sites four and five
can then be launched after capturing the error independently, or together by checking the Multi
Select box adjacent to each of those sites and clicking the Launch Selected button.
WebVRAM User Guide 18 December 20214.1.1.2. Launching Simultaneous Multiple VistA Sessions at a Single Site
Launching simultaneous multiple Reflection connection sessions at the same site is done by
launching the first session from the WebVRAM home page as discussed in Section 4.1.1 Launch
Mode: Reflection, then repeating the launch steps to launch additional simultaneous connection
sessions to the same VistA system at the same time.
CAUTION: For this to work, Micro Focus Reflection must have a configuration
setting in place to allow simultaneous multiple sessions to be opened. Follow the steps below
to ensure this configuration setting is in place.
1. Open Reflection Workspace on your workstation. In the upper left corner, click the File
tab.
2. In the pop-up window that opens, click on Reflection Workspace Settings in the lower
right corner, as shown below.
Figure 14: Reflection Workspace Settings Access
WebVRAM User Guide 19 December 20213. In the pop-up window that opens, under Workspace Settings, click on Configure User
Interface, as shown below.
Figure 15: Reflection – Configure User Interface Link
WebVRAM User Guide 20 December 20214. In the next pop-up window, use the drop-down option in the User Interface Mode* box
to select the Ribbon setting. Click OK in the bottom right corner to save changes, as
shown below.
Figure 16: Reflection – Change User Interface Mode
5. With this setting change, the user can now open simultaneous multiple sessions to one
VistA remote site.
WebVRAM User Guide 21 December 20214.1.1.2.1. CPAC Users: Configure Tile View for Multiple VistA Sessions at the
Same Site
For CPAC users who need to view more than one simultaneous VistA session at the same site,
arranging these sessions in a tile view must be done manually within Reflection during initial use
of WebVRAM. The following steps will create a tile view for the remote VistA site connections
the first time these connections are established. After configuring the view during the first
connection to the remote site through WebVRAM, the tile view of up to four sessions will be
presented automatically each time you use WebVRAM to establish multiple session connections
to this same site.
To set up the tile view at additional remote sites, repeat these configurations steps during the first
multi-session connection to each remote site established through WebVRAM.
These steps will set up the tile view configuration in Reflection for viewing multiple sessions at
the same VistA site:
1. Launch the first session to connect to the remote site through WebVRAM. After
Reflection opens and logs the user in, proceed to Step 2.
2. Launch a second, third, and, if needed, fourth session to the same site through
WebVRAM. Reflection will now show all four sessions in a cascading view as shown
below.
Figure 17: Reflection – Cascading View of Multiple Same-site Sessions
WebVRAM User Guide 22 December 20213. In the lower right-hand corner of the Reflection window, click on the Arrange Windows
icon, and select Tile Vertical from the drop-down menu, as shown below.
Figure 18: Reflection – Arrange Windows Icon and Dropdown
Figure 19: Reflection – Arrange Windows Tile Vertical Selection
WebVRAM User Guide 23 December 20214. With these selections, Reflection will present a tile view of all four sessions. Each session
is shrunk in size to be fully visible within one quadrant of the screen.
For a larger view of these sessions, click the Full Screen icon in the lower right-hand
corner of the screen to the left of the Arrange Windows icon.
Figure 20: Reflection – Tile Vertical View
WebVRAM User Guide 24 December 20214.1.2. Launch Mode: CPRS
1. Login to WebVRAM.
2. From the WebVRAM home page, click on the Launch Mode dropdown and select
CPRS.
3. Locate the Station Name of the remote VistA site to which to connect. Click on Launch
CPRS. WebVRAM will launch CPRS and log the user into the remote VistA site that
was selected.
Figure 21: Launch CPRS Button
4. This version of WebVRAM is not integrated with the IAM PIV 2FA login process. The
CPRS version screen appears, along with the PIV Select a Certificate screen. Click
Cancel on the PIV Select a Certificate screen, as shown below.
Figure 22: CPRS Version Screen
WebVRAM User Guide 25 December 2021Figure 23: PIV Select a Certificate Screen
5. The CPRS VistA Login screen appears. Enter your Access and Verify codes to the
remote CPRS VistA site. Upon successful entry of those codes, the CPRS patient
selection screen will appear.
Figure 24: CPRS Login Screen
WebVRAM User Guide 26 December 20214.1.3. Launch Mode: CPRS with Custom Reflection Profiles
1. Login to WebVRAM.
2. From the WebVRAM main page, click on Tools and select Reflection Profiles from the
dropdown menu. The Reflection Profiles screen is displayed.
Figure 25: Tools Menu, Reflection Profiles Option
3. The Reflection Profiles screen will display a list of custom Reflection “.rdox” profiles.
The default profile is: “SessionTemplate.rdox.” There are additional profiles based on
business processes.
Figure 26: Reflection Profiles Screen
WebVRAM User Guide 27 December 20214. Select from the following Reflection VT Session files, then click the Update User
button:
· AM-Accounts-Management-CPAC.rdox
· AM-Accounts-Management-Follow-Up-Master.rdox
· AM-Accounts-Management-Follow-Up-Refunds.rdox
· AM-Accounts-Management-Payer-Analysis.rdox
· AM-Accounts-Management-Refund-Team.rdox
· Billing-HINES.rdox
· OPECC-Outpatient-Pharmacy-Electronic-Claims-Coordinators.rdox
· SessionTemplate.rdox
· UR–Utilization-Review.rdox
· VS–Veterans-Services-CPAC.rdox
· VS–Veterans-Services-Master.rdox
5. From the WebVRAM home page, click on the Launch Mode dropdown and select
CPRS.
6. Locate the Station Name of the remote VistA site to which to connect. Click on Launch
CPRS. WebVRAM will launch CPRS and log the user into the remote VistA site that
was selected.
Figure 27: Launch CPRS Button
7. This version of WebVRAM is not integrated with the IAM PIV 2FA login process. The
CPRS version screen appears, along with the PIV Select a Certificate screen. Click
Cancel on the PIV Select a Certificate screen, as shown below.
WebVRAM User Guide 28 December 2021Figure 28: CPRS Version Screen
Figure 29: PIV Select a Certificate Screen
8. The CPRS VistA Login screen appears. Enter your Access and Verify codes to the
remote CPRS VistA site. Upon successful entry of those codes, the CPRS patient
selection screen will appear.
WebVRAM User Guide 29 December 2021Figure 30: CPRS Login Screen 9. The user is now able to use the selected Reflection Profile to perform business functions. WebVRAM User Guide 30 December 2021
4.1.4.    Launching Multiple CPRS Sessions
Multiple CPRS sessions may be launched from the WebVRAM home page. Similar to launching
different multiple Reflection sessions as discussed in Section 4.1.1.1, multiple CPRS sessions to
different VistA sites can be performed by changing the Launch Mode as outlined in Section
4.1.2 above, then clicking the checkboxes in the Multi Select column. Clicking the Launch
Selected button will then launch simultaneous multiple CPRS sessions.

        CAUTION: Until WebVRAM is integrated with IAM services for 2FA PIV login,
Access and Verify Codes must be entered into each CPRS Login session that opens to gain
access to CPRS through that session. With multiple sessions of CPRS launched at the same
time, the login screens for each session may be hidden behind other open application
windows on the desktop. Other application windows may need to be minimized in order to
see all CPRS login sessions.
Also, the user may not be able to add Access and Verify codes to each login screen before
one or more of them time out and must be relaunched. It is recommended that the user create
a VistA “shortcut” Access/Verify (A/V) pair that can be copied and pasted into the Access Code
field in each CPRS login window. This is done by combining the Access and Verify codes into a
single A/V code “string” with the Access code separated from the Verify code in that string
using a semi-colon. For example, if the user’s local VistA Access Code is USER123 and the
Verify Code is LOGIN321, then the combined A/V code string would be
USER123;LOGIN321. This string can be pasted into the Access Code field of CPRS (or VistA,
or any VistA integrated application, including WebVRAM) without the need to enter the Access
and Verify codes separately in each field. Once it is pasted into the Access Code field, press
 or click OK to login.
Do not save the A/V code “string” on your local computer. Follow VA procedures for
protecting passwords. If password storage is needed, refer to the VA Technical Reference Model
(TRM) to find approved password management software.

WebVRAM User Guide                             31                                   December 2021
4.1.5. Access CPRS at Remote Sites Using CPRS Desktop Launcher
The WebVRAM application was not designed to be used at the same time as the CPRS Desktop
Launcher to access CPRS patient data at remote sites. The CPRS Desktop Launcher is a separate
application from WebVRAM, and it provides access to CPRS at remote sites using different
pathways and connection features.
One of the security features of WebVRAM is setting a 30-day expiration date on each remote
VistA profile created or updated when a user first connects to (synchronizes) a remote site
through the WebVRAM application. By design and in keeping with VA security guidelines, if
the remote VistA profile established by a user when first synchronizing to a remote site is not
accessed through WebVRAM for 30 days after the initial connection is made, the remote VistA
profile will terminate on day 31.
It has become common practice to connect to a remote site through WebVRAM to establish a
remote VistA profile and instead of using WebVRAM to launch CPRS at that remote site after
that, to use the CPRS Desktop Launcher to access patient records at that remote site. Then, after
the WebVRAM synchronization first establishes the remote VistA profile, WebVRAM is no
longer used to access CPRS at that remote site. If this practice is followed, the user must be
aware of the following:
1. The VistA profile established at the remote site when the user connects through
WebVRAM the first time will be terminated on day 31 after that “synchronization” event.
2. On day 31 after that synchronization, if the user does not synchronize to the remote site
using WebVRAM on that day and tries to use only the CPRS Desktop Launcher to access
patient records at that remote site, their CPRS login will be denied and they will not be
able to open CPRS at that site. This is because their VistA profile at that site will have
been terminated at the end of the day before, and CPRS will not allow user access to the
patient record at that site with a terminated VistA profile.
3. If a user wishes to use only the CPRS Desktop Launcher and not WebVRAM to
access patient records at the remote site, they MUST synchronize to that remote site
using WebVRAM at least every 29 days to keep their VistA profile active at that
site. Performing a synchronization to the remote site to update the user’s VistA profile,
and resetting a new 30-day expiration cycle, only takes a few seconds in WebVRAM and
can be accomplished by selecting the Synchronize option from the Launch Mode
dropdown, and then clicking the Launch Synchronize button associated with the remote
site. It is NOT necessary to launch CPRS at the remote site and then login to CPRS to
reset the VistA profile 30-day expiration date. This must be done at least every 29 days
for each remote site the user accesses to continue using the CPRS Desktop Launcher
to work with patient records at those sites.
WebVRAM User Guide 32 December 20214.1.6. Cerner Integration with WebVRAM
As VistA sites convert from VistA CPRS to the Cerner Electronic Health Record (EHR),
WebVRAM will provide a mechanism for users to connect to the Cerner EHR at those sites,
while continuing to give users the ability to connect to remote VistA systems they are authorized
to access.
NOTE: Since the initial Cerner rollout will not replace all VistA functions, in addition to
accessing Cerner, the user can still access certain VistA functions at remote Cerner sites as
he/she did previously. Providers must use Joint Legacy Viewer (JLV) at a Cerner-converted site
to view historical VistA patient data.
The user workflow is as follows:
1. Users whose Home VistA site has converted to Cerner will:
a. Access Cerner to conduct work at local site by directly navigating to the Cerner
PIV login web page, not by going through WebVRAM.
b. Access remote Cerner sites from the Launch Cerner button on the WebVRAM
site listing page.
c. Continue to access remote VistA sites through WebVRAM as usual.
2. Users whose Home VistA site is still using the VistA EHR (CPRS) will:
a. Continue to access local VistA directly, not through WebVRAM.
b. Access remote Cerner sites from the Launch Cerner button on the WebVRAM
site listing page.
c. Continue to access remote VistA sites through WebVRAM as usual.
Figure 31 shows the user flow to access Cerner and remote VistA sites as VA locations are
converted from the VistA EHR to the Cerner EHR.
WebVRAM User Guide 33 December 2021Figure 31: WebVRAM Cerner Connections User Workflow WebVRAM User Guide 34 December 2021
4.1.6.1.   Launch Cerner Button
   1. From the WebVRAM home page, select a remote site to which to connect. If that site has
      been converted to Cerner, a Launch Cerner button will be displayed.

            NOTE: If a site has converted to Cerner, the Launch Cerner button is displayed
       alongside the existing Launch Reflection button since the initial Cerner rollout will not
       replace all VistA functions. Sites that have not yet converted to Cerner do not have the
       Launch Cerner button available.
Figure 32: Launch Cerner Button

WebVRAM User Guide                             35                                   December 2021
2. Clicking on the Launch Cerner button will open a web browser session for the user to
complete direct PIV login to the Cerner application at that site.
Figure 33: Cerner PIV Login Screen
WebVRAM User Guide 36 December 20214.1.7. Launch Mode: Synchronize
1. Login to WebVRAM.
2. From the WebVRAM home page, click on the Launch Mode dropdown and select
Synchronize. Then select the Station Name of the remote VistA site to which to connect.
3. Click on the Launch Synchronize button.
4. WebVRAM will launch Synchronize to connect to the selected VistA site.
5. Synchronize updates and syncs up your personal information on the remote VistA
system.
Figure 34: Launch Synchronize Button
WebVRAM User Guide 37 December 20214.2. Changing Verify Code
This option allows the user to change their VistA Verify Code, as needed, using the WebVRAM
application.
1. From Microsoft Internet Explorer or Edge browser, navigate to the WebVRAM home
page.
2. The Terms and Conditions web page is displayed. Click Accept the Terms and
Conditions.
3. The Login page is displayed.
4. Enter your local VistA Access and Verify Codes and click the Change Verify Code
checkbox.
5. Click Login.
Figure 35: WebVRAM Login – Change Verify Code
6. The user’s VistA login screen is displayed, and the user follows the VistA prompts to
create a new VistA Verify code.
7. Note that once the change has been made, your new Verify code will be required for all
future logins to your local VistA system and the WebVRAM application.
WebVRAM User Guide 38 December 2021You can also read