Acronis Cyber Cloud Integration with N-able N- Central - INTEGRATION GUIDE Revision: 10/1/2021
←
→
Page content transcription
If your browser does not render page correctly, please read the page content below
Acronis Cyber Cloud
Integration with N-able N-
Central

INTEGRATION GUIDE            Revision: 10/1/2021
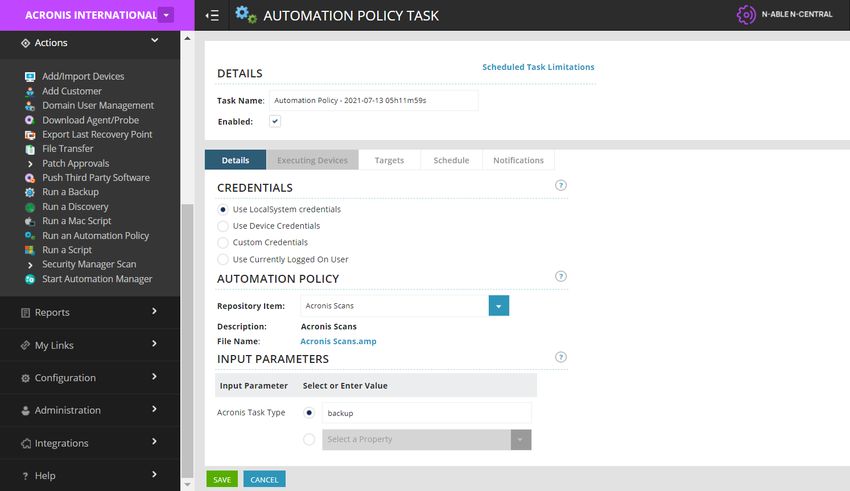
Table of contents
1 Introduction                                                                          3
2 Glossary                                                                              4
3 Prerequisites                                                                         5
4 How the integration works                                                             6
5 API configuration                                                                     7
6 Setup                                                                                 8
7 Apply company mapping                                                                 9
8 Upload scripts and configure properties                                              11
9 Deploy Acronis Cyber Protection agent for Windows                                    12
10 Uninstall the Acronis Cyber Protection agent for Windows                            13
11 Manage protection plans (Windows)                                                   14
12 Perform Acronis scans and tasks (Windows)                                           15
13 Monitor Windows devices                                                             16
14 Disablе the integration                                                             17

2                                                  © Acronis International GmbH, 2003-2021
1 Introduction
This document describes how to enable and configure the integration of Acronis Cyber Cloud with
N-able N-Central.

Once set up, the integration enables you to:

l   Deploy Acronis on Windows devices
l   Map Acronis customer tenants to N-able N-Central customers
l   Monitor protected devices
l   Apply and revoke protection plans
l   Run the following types of automated tasks - backup, antivirus scan, malware scan, vulnerability
    assessment and patch management

All this functionality is available from within N-able N-Central, without having to go to the Acronis
Cyber Protect web interface.

3                                                           © Acronis International GmbH, 2003-2021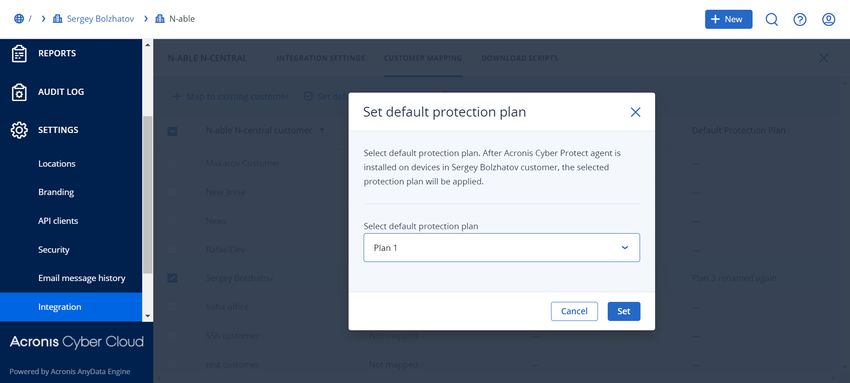
2 Glossary
l   MSP - a Managed Service Provider, who uses both N-able N-Central and Acronis Cyber Protect
l   Customer - a client of the MSP
l   Partner tenant - the account for an MSP on Acronis Cyber Cloud
l   Customer tenant - the account for a Customer on Acronis Cyber Cloud

4                                                        © Acronis International GmbH, 2003-2021
3 Prerequisites
To use this integration, you should have:

l   At least a single, fully configured N-able N-Central account
l   An Acronis Cyber Cloud account with:
    o   at least one Customer tenant set up
    o   an active user with Acronis administration permissions
    o   at least one protection plan configured to be used as the default one

5                                                            © Acronis International GmbH, 2003-2021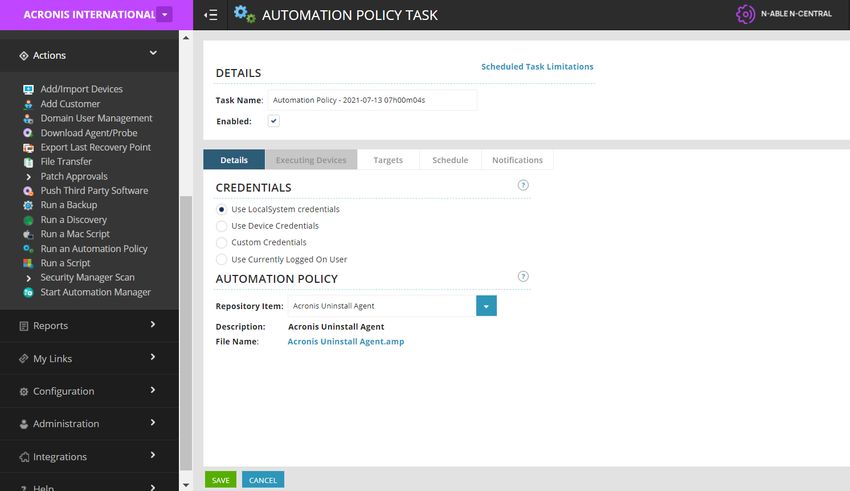
4 How the integration works
In N-Central, the MSPs most often use custom properties together with Automation Manager
policies that pull in the appropriate customer or device-specific information, rather than creating
separate Automation Manager policies per customer or per device.

In this particular integration, you should define two custom properties:

l   "Acronis Registration Token" - this property's value will be automatically populated over API from
    the Acronis Cloud. The value will be generated once customer mapping is applied/created.
    This advanced feature will be supported only for Windows OS as .amp files (automation policies)
    work on Windows only.

l   "Acronis Data Center URL" - this is the Acronis URL (without '/' at the end), which is visible in a
    browser when logged in the Acronis Cloud console. This property's value has to be entered one
    time only and can then be re-used multiple times when running an integration script/Automation
    policy.

    Once the Acronis N-Central customer mapping is applied, every 10 minutes the integration will
    create a new registration token for each mapped customer. If a default plan is selected, the token
    for this plan will include 'Apply protection plan'. If no default plan is selected, then the token will
    be just a registration one. Once the token is created, its value will be stored in Custom Property
    via an API call for that customer in N-Central, so that the integration scripts can automatically use
    this token when executed.

6                                                               © Acronis International GmbH, 2003-2021
5 API configuration
1. Go to Acronis Cyber Protect Cloud Management Console > Integrations.
2. Click on the N-able N-Central tile.
3. Enter your integration credentials:
l N-Central URL
l Username
l Password
7 © Acronis International GmbH, 2003-20216 Setup In order to set up Acronis integration for N-able N-Central, you have to do the following: 1. Go to Acronis Cyber Protect Cloud Management Console > Integrations. 2. Click on the N-able N-Central tile. 3. Download the Acronis_N-Central_Integration.zip file from the Download Scripts tab. 8 © Acronis International GmbH, 2003-2021
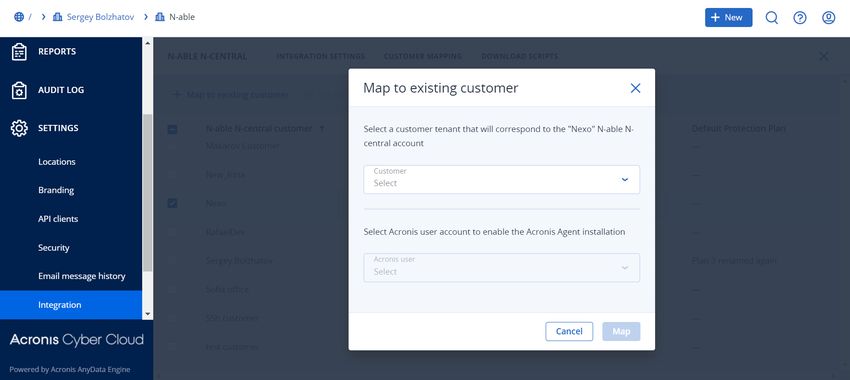
7 Apply company mapping
1. Go to Acronis > Customer Mapping tab.
2. Use the list to select a customer that is not currently mapped.
3. Click the Map to existing customer tenant button in the action bar to display a popup with
    available customer tenants and some user fields.
4. Select an unmapped customer tenant and a user account, then click Map.
    The user selected for setting default protection plan should have Acronis administration
    permissions.

5. Click Set default protection plan in the action bar to display a popup with available protection
    plans.

6. Select a default protection plan, then click Set.

9                                                          © Acronis International GmbH, 2003-2021
Note Once you have mapped an Acronis Customer tenant to N-able N-Central, you have the possibility to re-map it to another customer. To achieve that use the following workflow: l Run uninstall script (See the Uninstall chapters) l Re-map customer in Acronis Cloud UI l Run install script (See the Deploy chapters) 10 © Acronis International GmbH, 2003-2021
8 Upload scripts and configure properties
1. Go to N-able N-Central > Configuration > Scheduled Tasks > Script/Software Repository.
2. Click Add and select Automation policy script type from the list.
3. Click Browse to locate the script file, downloaded from Acronis.
4. In the Name field, provide one that is similar to the script's file name (to be easily recognizable),
then click OK.
Note
There is a total of 5 scripts in the zip file: Acronis Install Agent, Acronis Uninstall Agent, Acronis
Manage Protection Plan, Acronis Monitoring and Acronis Scans.
5. All files with .amp extension represent N-able N-Central Automation policies and are supported
only for Windows OS.
a. Log into your N-able N-Central instance.
b. Click Administration > Custom Properties.
c. Click Add > By Customers > Text Type.
d. Provide the following name: Acronis Registration Token.
e. Leave empty the default text value of the property.
f. Select the Customers and Sites that the new property will apply to.
g. Click Save.
h. Repeat the same procedure to create Custom Properties with:
name: "Backup" (or similar) , Default Text: "backup"
name: "AV_scan" (or similar), Default Text: "av_scan"
name: "Malware_scan" (or similar), Default Text: "malware_scan"
name: "Vulnerability_assessment" (or similar), Default Text: "vulnerability_assessment"
name: "Patch_management" (or similar), Default Text: "patch_management"
name: "Acronis Data Center URL" but this time the property should be of URL type.
Enter the URL of the Acronis data center as default text value, without the “/” at the end of the
URL.
Note
Under the Customers tab, it is recommended to set the “Propagate to all new Customers/Sites”
value using the drop-down list.
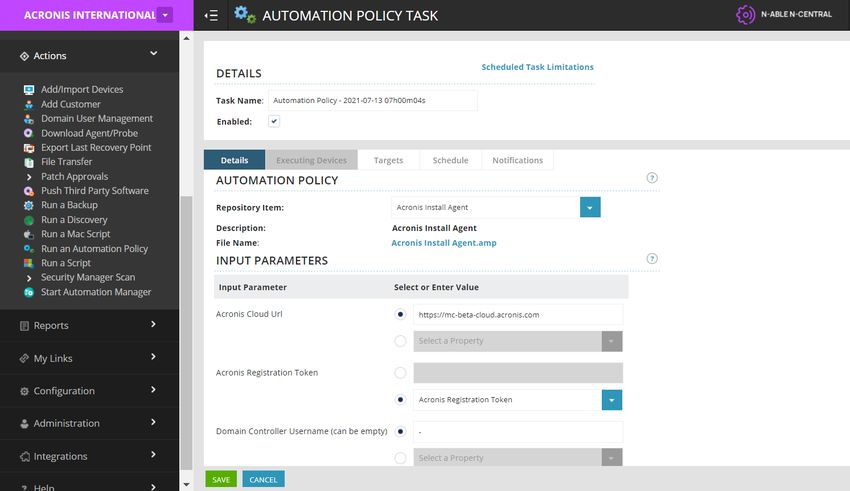
11 © Acronis International GmbH, 2003-20219 Deploy Acronis Cyber Protection agent for
Windows
1. In the N-able N-Central interface, go to All devices.
2. Select a Windows device.
3. Click Add task > Run an Automation policy.
4. Under Repository Item, select Acronis Install Agent.
5. The value for the Acronis Cloud URL parameter can be selected from a drop-down menu or
entered manually.
6. The value for the Acronis Registration Token parameter can be selected from the drop-down list.
It will be populated via API call from the Acronis Cyber Protect Cloud platform, if Company
mapping was performed properly as described in the previous chapter.
7. Select target devices.
8. Run the script.
12 © Acronis International GmbH, 2003-202110 Uninstall the Acronis Cyber Protection agent for Windows 1. In the N-able N-Central interface, go to All devices. 2. Select a Windows device. 3. Click Add task > Run an Automation policy. 4. Under Repository Item, select Acronis Uninstall Agent. 5. Select target devices. 6. Run the script. 13 © Acronis International GmbH, 2003-2021
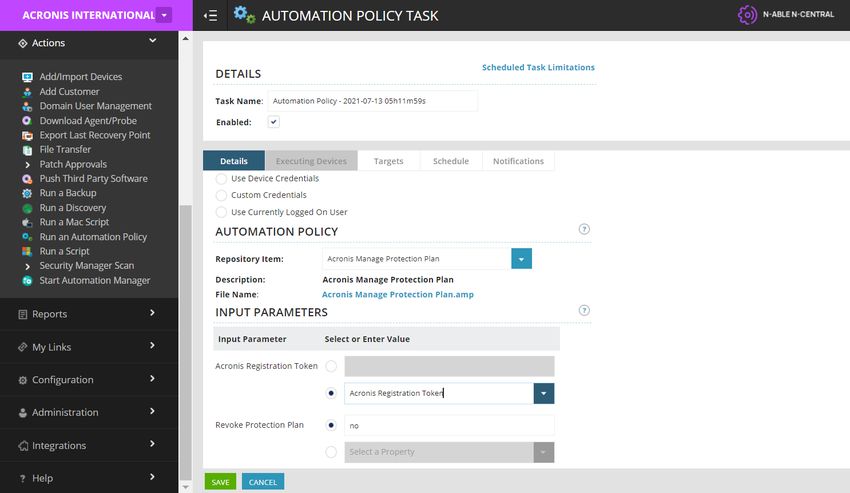
11 Manage protection plans (Windows)
1. Go to All devices in N-able N-Central.
2. Select a Windows device.
3. Click Add task > Run an Automation policy.
4. Under Repository Item, select Acronis Manage Protection Plan (or the name of the job
     defined for the script file upload in "Setup" (p. 8)).
5. The Revoke parameter value can be manually entered. The values accepted for this parameter
     are "yes" (will result in revoking of the current Protection plan) and "no" (default).
6. The Acronis Registration Token parameter value can be selected from the drop-down list. It
     will be populated via an API call from the Acronis Cyber Protect Cloud platform as long as
     company mapping was performed properly "Apply company mapping" (p. 9).
7. Select target devices.
8. Run the script.

14                                                             © Acronis International GmbH, 2003-2021
12 Perform Acronis scans and tasks (Windows)
1. Go to All devices in N-able N-Central.
2. Select a Windows device.
3. Click Add task > Run an Automation policy.
4. Under Repository Item, select Acronis Scans (or the name of the job defined for the script file
upload in "Setup" (p. 8)).
5. The value for the TaskType parameter can be either selected from a drop-down menu or
manually provided by entering one of the below-listed values, which represent the type of task
that has to be run:
l Backup
l AV_scan
l Malware_scan
l Vulnerability_assessment
l Patch_management
6. The value for the Acronis Registration Token parameter can remain empty. It will be populated
via an API call from the Acronis Cyber Protect Cloud platform provided that company mapping
was performed properly as described in "Apply company mapping" (p. 9). If not, then the value
for this parameter has to be generated in the Acronis Cyber Protect Cloud Management Console
and manually filled in in N-able N-Central.
See "How the integration works" (p. 6) for instructions on how to get this token.
7. Select target devices.
8. Run the script.
15 © Acronis International GmbH, 2003-202113 Monitor Windows devices
1. Go to All devices in N-able N-Central and select a Windows device.
2. Click Add task > Run an Automation policy.
3. Under Repository Item, select Acronis Monitoring (or the name of the job defined for the
script file upload in "Setup" (p. 8)).
4. Select target devices.
5. Go to the Schedule tab and set a time for N-able N-Central to run the task in a recurring manner.
6. Run the script.
7. Click Views > All Devices.
8. Click the name of the device to set up Windows Event Log Monitoring.
9. Navigate to the Monitoring tab and click Add.
10. Make sure that Local Agent is selected in the Monitoring Appliance drop-down list.
11. In the Services list, set the number of instances of the Windows Event Log service to 1 and click
Apply.
12. Click Windows Event Log in the Service list.
13. Navigate to the Service Details tab to configure the monitoring options.
14. In Options To Monitor, select the Error, Information and Warning checkboxes for
Application.
15. Configure the threshold settings in the Thresholds tab according to your personal preferences
and click OK.
16. The Acronis alerts will be available on the Reports tab when filtering by Application type of
events with Error, Information and Warning Event Levels. Look for Events with Acronis Agent
Event Source.
16 © Acronis International GmbH, 2003-202114 Disablе the integration
To completely disable the integration, the following is required:
1. In the Acronis Management Console, go to Integrations.
2. On the N-able N-Central integration tile, click on the three dots (...) in the top-right and select
Delete from the drop-down menu.
3. Confirm your selection.
The integration will be disabled and all mapped accounts - disconnected.
Note
Any Acronis Customer tenants, including their workloads and usages, will not be affected by this
action.
17 © Acronis International GmbH, 2003-2021You can also read