Chart Patterns Trader - Understanding and Trading Classic Chart Patterns - By: Kevin Matras Zacks Investment Research, Inc
←
→
Page content transcription
If your browser does not render page correctly, please read the page content below

Chart Patterns
Trader SUPPLEMENT
      Understanding and Trading
          Classic Chart Patterns

         By: Kevin Matras
             Zacks Investment Research, Inc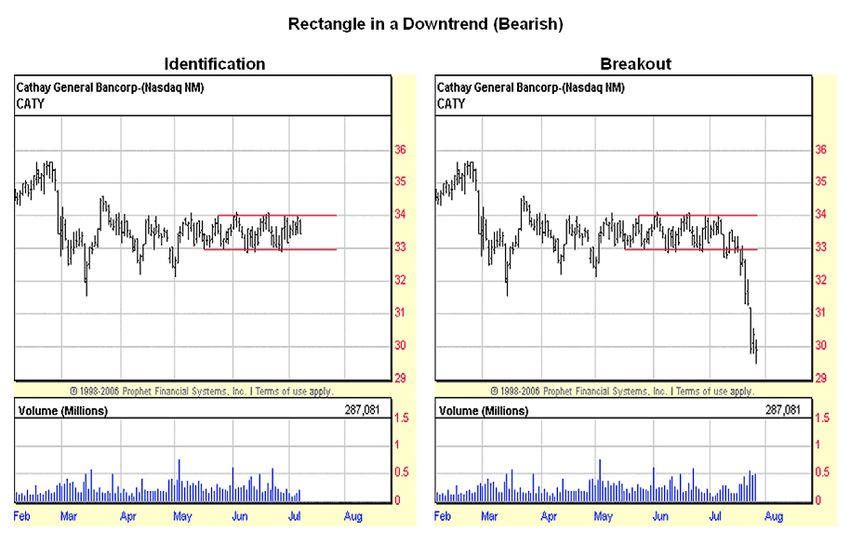
Table of Contents
Introduction . . . . . . . . . . . . . . . . . . . . . . . . . . . . . . . . . . . . . . . . . . . . . . . . . . . . . . . . . . . . . . . . . . . . . . . . . ii

Chapter 1:
Chart Patterns and Technical Analysis . . . . . . . . . . . . . . . . . . . . . . . . . . . . . . . . . . . . . . . . . . . . . . . . . 3
Chapter 2:
Symmetrical Triangles . . . . . . . . . . . . . . . . . . . . . . . . . . . . . . . . . . . . . . . . . . . . . . . . . . . . . . . . . . . . . . 4
Chapter 3:
Ascending Triangles . . . . . . . . . . . . . . . . . . . . . . . . . . . . . . . . . . . . . . . . . . . . . . . . . . . . . . . . . . . . . . . 8

Chapter 4:
Descending Triangles . . . . . . . . . . . . . . . . . . . . . . . . . . . . . . . . . . . . . . . . . . . . . . . . . . . . . . . . . . . . . . . 12

Chapter 5:
Flags and Pennants . . . . . . . . . . . . . . . . . . . . . . . . . . . . . . . . . . . . . . . . . . . . . . . . . . . . . . . . . . . . . . . . . . . . . . . 16

Chapter 6:
Rectangles . . . . . . . . . . . . . . . . . . . . . . . . . . . . . . . . . . . . . . . . . . . . . . . . . . . . . . . . . . . . . . . . . . . . . . . . . . . . . . 25
Chapter 7:
Wedges . . . . . . . . . . . . . . . . . . . . . . . . . . . . . . . . . . . . . . . . . . . . . . . . . . . . . . . . . . . . . . . . . . . . . . . . . . . . . . . . 30
Chapter 8:
Head and Shoulders . . . . . . . . . . . . . . . . . . . . . . . . . . . . . . . . . . . . . . . . . . . . . . . . . . . . . . . .        ( Coming Soon . . . )

More to Come . . .

                                                                                                              Chart Patterns Trader Supplement
                                                                                               Understanding and Trading Classic Chart Patterns
                                                                                                                                                                  i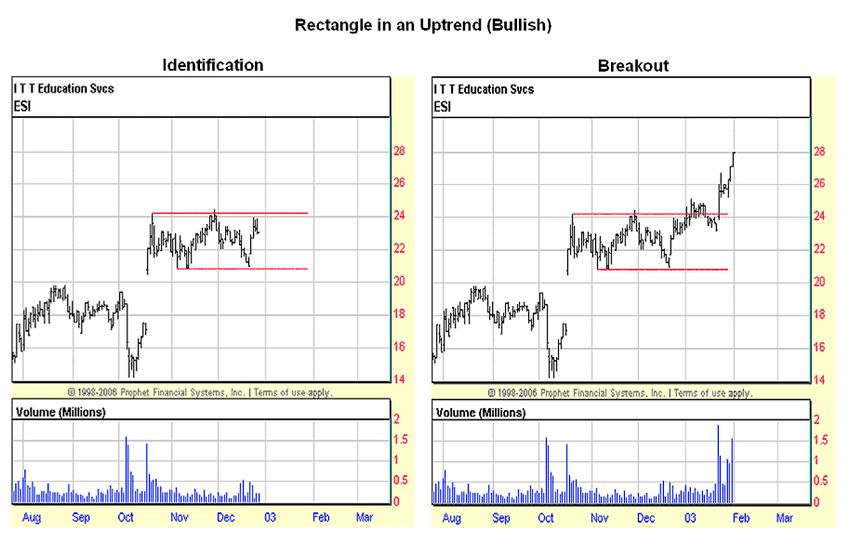
Introduction
Aside from knowing what to buy or sell, the question of when to buy and when to sell could very well
be the question of all questions when it comes to trading.

Fundamentals of course are ultimately the key in determining the price or value of a stock. And
statistics have shown that companies receiving upward earnings estimate revisions outperform the
market while companies receiving downward earnings estimate revisions underperform the market.

But technical analysis (and specifically chart pattern analysis) can give you insight as to when the
market is ready to react to those fundamentals.

Just because you think you’ve found a solid company, doesn’t necessarily mean it’s ready to go up as
you’d anticipated.

How many times have you read about, heard about or researched a certain stock, determined that the
fundamentals were bullish or bearish, only to then take a position and watch the market go the other
way? Confused and frustrated you then abandon your position only to then watch it finally go the way
you had been expecting from the beginning. And the reasons for your earlier market convictions are
now being played out in the media while you stand by wondering what happened?

Brutal, huh? It happens all the time.

Very often, the price action on a chart can form meaningful
patterns. These chart patterns reflect the collective buying and
selling sentiment of the market and can in turn be used in trying
to forecast future price direction and the timing surrounding
it.

Keep in mind, nothing is foolproof. But a strong fundamental
outlook combined with a good technical viewpoint creates
a very potent combination for the trader and investor.

In the pages that follow, we’ll identify the eight classic
chart patterns, what they mean and how to trade them.

The best part about this form of technical analysis is
that it’s very straight forward. The chart action has
either formed a certain shape or it hasn’t. No
guesswork. No subjective interpretation. It’s
either there or it isn’t. It’s quick. It’s easy.
And oh yeah, it works!

Kevin Matras
Zacks Investment Research, Inc.

                                                                                   Chart Patterns Trader Supplement
                                                                    Understanding and Trading Classic Chart Patterns
                                                                                                                       ii
1
Chapter
Chart Patterns
and Technical Analysis
Why Chart Patterns?
Identifying chart patterns is simply a form of technical analysis. And technical analysis is just a method for trying
to forecast the ups and downs of the market. Research has proven that some chart patterns have high forecasting
probabilities. These patterns include:
• Symmetrical Triangles
• Ascending Triangles & Descending Triangles
• Wedges Research has proven
• Flag & Pennants
• Rectangles that some chart patterns
• Head and Shoulders patterns
have high forecasting
What do these chart patterns all have in common?
probabilities.
They were all patterns in some of the biggest market moves!
Continuation Patterns and Reversal Patterns
Different chart patterns can be classified as either continuation patterns or reversal patterns.
Continuation Patterns are called that because they generally will continue the direction of the trend. For example: if a
stock is in an uptrend and then pauses or enters into a period of consolidation (i.e., trading is temporarily confined to
a well-defined pattern or range), the expectation is that the market will ultimately breakout to the upside and continue
the direction of the trend.
If the trend was down prior to the consolidation, the expectation would be for the stock to breakout to the downside and
continue the direction of the downtrend.
Symmetrical Triangles, Ascending & Descending Triangles, Rectangles and Flags & Pennants are the most common
continuation patterns.
Reversal Patterns have a tendency of reversing the trend. These consolidation patterns can signal a reversal in both
uptrends as well as downtrends.
The Head and Shoulders patterns (which includes the Inverted Head and Shoulders) is typically identified as a reversal
pattern. Interestingly, there are times when a Head and Shoulders pattern can act as a continuation pattern. These
instances can be explosive and we’ll show you how to identify which is which.
Wedges can act as both continuation patterns and reversal patterns as well. The preceding trend and the slant of the
Wedge make it easy to identify which is which and what direction the ensuing move is likely to be.
Chart Patterns Trader Supplement
Understanding and Trading Classic Chart Patterns
32
Chapter
Symmetrical Triangles
Overview
Symmetrical Triangles are continuation patterns that generally mark a pause in the preceding trend. It’s identified as
having two converging trendlines that take the shape of a sideways triangle.
This pattern can mean the market has simply gotten ahead of itself and it needs to consolidate or it truly is in a period
of indecision and is looking for direction. Attempts to push higher are met by selling and attempts to push lower are met
with buying. Each new lower high and higher low becomes shallower than the last. Volume will usually diminish during
this period as well.
Eventually, the symmetrical triangle resolves itself and often with an explosive breakout in the direction of the preceding
trend.
Symmetrical Triangles in Uptrends / Bullish
The majority of the time, a Symmetrical Triangle in an uptrend will breakout to the upside. A high volume breakout is
more reliable than a low volume breakout.
Symmetrical Triangles in Downtrends / Bearish
Symmetrical Triangles in downtrends will typically breakout to the downside. However, an increase in volume is not
required for a successful breakout. In fact, a significant increase in volume might be considered suspect. Although,
volume should start to increase as the downside move continues.
Identifying and Drawing Symmetrical Triangles
Triangles are usually quite easy to see on a chart. Especially when the lines have already been drawn in. To identify a
Symmetrical Triangle pattern on your own, remember that it has to have at least four points: two points at the top to
draw the downward slanting trendline and two points at the bottom to draw the upward slanting trendline. Connecting
Chart Patterns Trader Supplement
Understanding and Trading Classic Chart Patterns
4Symmetrical Triangles continued...
the high point and the subsequent lower high forms the top part of the triangle. Connecting the low and the subsequent
higher low forms the bottom part of the triangle.
Symmetrical Triangles in uptrends are bullish, while Symmetrical Triangles in downtrends are bearish.
For a bullish Symmetrical Triangle pattern, the first
point (the point farthest left, i.e., the earliest point) is
at the top.
For a bearish pattern, the first point is at the bottom.
A triangle can have more than four points. The image
to the right has six.
Measured Moves (Minimum Profit Targets)
To determine your projected minimum profit target,
measure the distance between points 1 and 2. This is
the widest part of the triangle and is often referred to
as the base.
For example: if the top of the base (point 1) was $56
and the bottom of the base (point 2) was $50, the base
would be $6. This is your measured move.
To project your minimum profit target, identify at what
price the stock broke thru the triangle. For this example,
let’s say $54. Then add $6 to the breakout price of $54
and you have you minimum projected profit target of
$60. (See image to the right.)
Chart Patterns Trader Supplement
Understanding and Trading Classic Chart Patterns
5Symmetrical Triangles continued...
Failures and Stop-Out Points
There are different failure points based on how you enter the trade.
If you enter the trade after a breakout, you should use a move below the apex point as your failure point and exit the
trade. (The image below depicts a Symmetrical Triangle in an uptrend for illustration.)
If you get in before a breakout occurs in anticipation
of one, a move below the last point of the triangle (e.g.,
point 4 in a four pointed triangle or point 6 in a six
pointed triangle, etc.) should be your failure point and
you should consider exiting the trade. (The image to the
right depicts a Symmetrical Triangle in an uptrend for
illustration.)
For the more experienced chart pattern trader, you might
choose to stay in a little longer if you believe the pattern
is being ‘re-drawn’ into a new pattern such as a larger triangle, or a bullish flag or even a wedge. This can makes sense
if your early entry was near the bottom of the pattern and staying in a little longer still keeps your risk within your level
of tolerance.
Summary
The use of the word ‘Symmetrical’ in describing the Triangle is used loosely and is more of a way of distinguishing it
from an Ascending Triangle and Descending Triangle. The Symmetrical Triangle doesn’t have to be symmetrical per se’,
but as stated earlier, it does have to have two converging trendlines -- the top line slanting downward and the bottom
line slanting upward so that they eventually come together to form a right sided triangle.
Since this pattern is a continuation pattern, it’s most profitable to trade this in the direction of the
preceding trend.
You can get in after a breakout has occurred or you can choose to get in early in anticipation of a breakout taking place. Either way,
pay attention to the volume and your failure points and the Symmetrical Triangle will become a trusted pattern in your trading.
Chart Patterns Trader Supplement
Understanding and Trading Classic Chart Patterns
6Symmetrical Triangles continued...
Examples
Chart Patterns Trader Supplement
Understanding and Trading Classic Chart Patterns
73
Chapter
Ascending Triangles
Overview
The Ascending Triangle is a variation of the Symmetrical Triangle. The difference is that the Ascending Triangle has a
flat line on top (i.e., horizontal trendline) instead of a downward slanting trendline like in the Symmetrical Triangle. The
bottom of the pattern has an upward slanting trendline. The two lines eventually come together to form a flat-topped,
right-sided triangle.
The Ascending Triangle is a continuation pattern. It’s generally considered bullish and is most
reliable when found in an uptrend.
In ascending triangles, the market becomes overbought and needs to consolidate. As prices try to advance, they are
turned back by selling. Buying then re-enters the market and prices soon reach their old highs. Resistance is met again
and they are turned back once more. Resistance occurs at approximately the same high price each time (horizontal
trendline), while new buying on the pullbacks, serve to lift the support levels higher (upward slanting trendline).
This bullish price action most often leads to an upside breakout in the direction of the preceding trend, as the old highs
are taken out and prices are propelled even higher as new buying comes in. Volume usually diminishes during the
formation of the pattern, but explodes on the breakout.
Ascending Triangles in Uptrends / Bullish
As in the case of the Symmetrical Triangle, Ascending Triangles in uptrends are bullish and the breakout is generally
accompanied by a marked increase in volume. Low volume breakouts should be watched carefully as they are more
prone to failure. Ascending Triangles in downtrends are less reliable and are therefore not a part of the classic Chart
Patterns set-ups.
Chart Patterns Trader Supplement
Understanding and Trading Classic Chart Patterns
8Ascending Triangles continued...
Identifying and Drawing Ascending Triangles
Ascending Triangles are also quite easy to see on a chart. To identify an Ascending Triangle pattern on your
own, remember that it has to have at least four points: two points at the top to draw the horizontal trendline
and two points at the bottom to draw the upward slanting trendline. Connecting the two, approximately same,
high points forms the top (flat) part of the triangle. Connecting the low and the subsequent higher low forms
the bottom part of the triangle.
Ascending Triangles in uptrends are bullish.
For a bullish Ascending Triangle pattern, the first point (the
point farthest left, i.e., the earliest point) is at the top.
And just like Symmetrical Triangle, an Ascending Triangle
can have more than four points. The image to the right has
six.
Measured Moves (Minimum Profit Targets)
To determine your projected minimum profit target, measure
the distance between points 1and 2. This is the widest part
of the triangle and is often referred to as the base.
For example: if the top of the base (point 1) was $70 and the bottom of the base
(point 2) was $63, the base would be $7. This is your measured move.
To project your minimum profit target,
identify at what price the stock broke thru the
Ascending Triangle. (This is easy to predict
even if it hasn’t yet broken out because the
breakout point is essentially the high of the
pattern (i.e., the flat trendline at the top).
So if the breakout price is $70, then add
$7 to that price and you get your minimum
projected price target of $77. (See the image
to the right.)
Chart Patterns Trader Supplement
Understanding and Trading Classic Chart Patterns
9Ascending Triangles continued...
Failures and Stop-Out Points
There are different failure points based on how you enter the trade.
If you enter the trade after a breakout, you should use a move below the apex point as your failure point and exit the
trade. A secondary failure point could be placed at the last point (or point 4 in this example). (See the gray dotted line
showing this scenario.) This additional failure point is usually only used if the breakout and subsequent trading has not
extended beyond the length of the pattern (i.e., apex) and the risk levels are still within your tolerance. (The image below
depicts an Ascending Triangle in an uptrend for illustration.)
If you get in before a breakout occurs in anticipation of one, a move below the last point of the triangle (point 4 in this
example) should be your failure point and you should consider exiting the trade. For the more experienced trader, you
might choose to stay in a little longer if you believe the pattern is being ‘re-drawn’ into a new pattern such as a larger
ascending triangle or a rectangle. If this is the case, use the bottom of the base (point 2) as the failure point and exit
below there. (See the gray dotted line that shows this scenario.)This can makes sense if your early entry was near the
bottom of the pattern and staying in a little longer still keeps your risk within your level of tolerance. (The image below
depicts an Ascending Triangle in an uptrend for illustration.)
Chart Patterns Trader Supplement
Understanding and Trading Classic Chart Patterns
10Ascending Triangles continued...
Summary
Since this pattern is a continuation pattern, it’s most profitable to trade this in the direction of the preceding trend. And
remember, it’s most reliable when found in uptrends. In fact, the Ascending Triangle has an astounding success rate,
breaking out to the upside 70% of the time.
You can get in after a breakout has occurred or you can choose to get in early in anticipation of a breakout taking place.
This high probability pattern is a great bullish indicator.
Example
Chart Patterns Trader Supplement
Understanding and Trading Classic Chart Patterns
114
Chapter
Descending Triangles
Overview
The Descending Triangle is basically the reverse of an Ascending Triangle. The flat line (horizontal trendline) is on
the bottom and a descending trendline defines the top part of the pattern. The two lines come together to form a flat-
bottomed, right-sided triangle.
The Descending Triangle is a continuation pattern and is generally considered bearish. It is most reliable when found
in a downtrend.
In the Descending Triangle, prices drop to a point where they are considered oversold. Tentative buying comes in at
the lows and prices perk up. The higher prices however attract more selling and the old lows (horizontal trendline) are
re-tested. Buying once again lifts prices, although resulting in a lower high (downward slanting trendline). New selling
comes in and pushes it back down.
This bearish price action typically leads to a downside breakout to new lows, continuing the direction of the downward
trend. Volume decreases during the formation of the pattern but should noticeably increase on the breakout.
Descending Triangles in Downtrends / Bearish
Descending Triangles in downtrends are bearish and the breakout usually sees an increase in volume. A low volume
breakout should be carefully watched. Descending Triangles in uptrends are less reliable and are therefore not a part
of the classic Chart Patterns set-ups.
Identifying and Drawing Descending Triangles
Descending Triangles are easy to spot. To identify a Descending Triangle on your own, remember that it has to have at
least four points: two points at the bottom to draw the horizontal trendline (you’ll draw a line connecting the recurring
lows) and two points at the top to draw the downward slanting trendline (a line connecting the lower highs).
Chart Patterns Trader Supplement
Understanding and Trading Classic Chart Patterns
12Descending Triangles continued...
Descending Triangles in downtrends are bearish.
In bearish Descending Triangles, the first point (the point farthest left, i.e., the earliest point) should be at the bottom.
Like the other triangles covered so far, the Descending Triangle
can have more than four points. The image to the right has six.
Measured Moves (Minimum Profit Targets)
To determine your projected minimum profit target, measure
the distance between points 1 and 2. This is the widest part of
the triangle and is often referred to as the base.
For example: if the bottom of the base (point 1) was $50 and
the top of the base (point 2) was $60, the base would be $10.
This is your measured move.
To project your minimum profit target, identify at
what price the stock broke thru the Descending
Triangle. (Like the Ascending Triangle, this is easy
to predict even if it hasn’t yet broken out because
the breakout point is essentially the low of the
pattern (i.e., the flat trendline at the bottom). So if
the breakout price is $50, then subtract $10 from
that price and you get your minimum projected price
target of $40. (See the image to the left.)
Chart Patterns Trader Supplement
Understanding and Trading Classic Chart Patterns
13Descending Triangles continued...
Failures and Stop-Out Points
Since the Descending Triangle in a downtrend is bearish, a breakout to the upside would constitute a failure.
If you enter the trade after a breakout, you should use a move above the apex point as your failure point and exit the
trade. A secondary failure point could be placed at the last point (or point 4 in this example). (See the gray dotted line
showing this scenario.) This additional failure point is usually only used if the breakout and subsequent trading has not
extended beyond the length of the pattern (i.e., apex) and the risk levels are still within your tolerance. (The image below
depicts a Descending Triangle in a downtrend for illustration.)
If you get in before a breakout occurs in anticipation of one taking place, a move above the last point of the triangle
(point 4 in this example) should be your failure point and you should consider exiting the trade. For the more experienced
trader, you might choose to stay in a little longer if you believe the pattern is being ‘re-drawn’ into a new pattern such as
a larger descending triangle or a rectangle. If this is the case, use the top of the base (point 2) as the failure point and
exit above there. (See the gray dotted line that shows this scenario.) This can makes sense if your early entry was near
the top of the pattern and staying in a little longer still keeps your risk within your level of tolerance. (The image below
depicts a Descending Triangle in a downtrend for illustration.)
Chart Patterns Trader Supplement
Understanding and Trading Classic Chart Patterns
14Descending Triangles continued...
Summary
The Descending Triangle is a continuation pattern that is most reliable when found in downtrends. This makes it a high
probability bearish chart pattern.
Whether you choose to trade it early or wait for a confirming breakout – act as a short seller or use it to exit longs, the
Descending Triangle can help you accurately spot stocks that look to be headed lower.
Example
Chart Patterns Trader Supplement
Understanding and Trading Classic Chart Patterns
155
Chapter
Flags and Pennants
Overview
Both Flags and Pennants can be categorized as continuation patterns.
The consolidation part of the pattern usually represents only a brief pause in an otherwise powerful market. They are
typically seen right after a big, quick move – either up or down. The market then usually takes off again in the same
direction. Research has shown that Flags and Pennants are some of the most reliable chart patterns to trade. And they
can be found in some of the most explosive price moves.
Flags: Bullish in Uptrends
Flag patterns in uptrends are bullish. They are typically referred to as simply ‘Bull Flags’. Bull Flags are characterized
first by a sharp upward price move. This can be one big day or multiple days of progressive price action. The steepness
of the move can sometimes look almost like a straight line up (like a flagpole). The consolidation that follows is identified
by a short series of lower tops and lower bottoms that slant against the trend. The trendlines that can be drawn on the
top of the pattern and the bottom of the pattern run parallel to one another (like a downward sloping rectangle). Volume
typically diminishes during this ‘time-out’, but then explodes higher as it breaks out.
Chart Patterns Trader Supplement
Understanding and Trading Classic Chart Patterns
16Flags and Pennants continued...
Flags: Bearish in Downtrends
Flags in downtrends are bearish. Bear Flags look like the inverse of Bull Flags. Bear Flags are characterized by a sharp
downward price move, followed by a short series of higher lows and higher highs. The trendlines that can be drawn also
run parallel to one another. But this time, it looks like an upward sloping rectangle. Volume will also typically diminish
during this period, but will expand on the downside breakout.
Pennants: Bullish in Uptrends
Pennants in uptrends are bullish. Pennants look very much like small symmetrical triangles. But the characteristic, near
straight-up, ‘pole-like’ move that precedes the pennant part, makes its identification unmistakable. The pause after the
sharp move higher is defined by two converging trendlines that form a small right sided triangle. Just like in the Flagging
patterns, volume should dry up during the pennant part and then explode higher on the breakout.
Pennants: Bearish in Downtrends
Pennants in downtrends are bearish. Bear Pennants look like upside down Bull Pennants. In the Bear Pennant, there’s
a big move to the downside, followed by a short consolidation pattern that looks like a small triangle. The market then
breaks out to the downside in the same dramatic way that set the pattern up in the first place. Volume drops off during
the pennant part, but then quickly picks up on the breakout.
Identifying and Drawing Flags and Pennants
Flags and Pennants are some of the easiest patterns to spot on a chart. And just like all the other patterns described
so far, you need a minimum of four points to draw a Flag or Pennant: two points at the top of the pattern and two points
at the bottom. Remember, the defining lines of a Flag run parallel to each other. The Flag part should also slant against
the trend. The defining lines of a Pennant converge to form a small triangle that points to the right.
Flags in uptrends are bullish while Flags in downtrends are bearish.
Chart Patterns Trader Supplement
Understanding and Trading Classic Chart Patterns
17Flags and Pennants continued...
In both bullish or bearish Flags, the first point should be the point farthest left, i.e., the earliest point. In uptrends, the
first point of the Flag, should be at the top of the pattern. In downtrends, the first point of the Flag should be at the
bottom.
The same is true for bullish and bearish Pennants. In Bull Pennants, the first point should be the point farthest left and
at the top. In Bear Pennants, the first point should be the point farthest left and at the bottom.
Flags and Pennants can also have more than four points. The Bull Flag and Bear Pennant illustrations below show them
with six points each. Although, since these types of consolidation patterns typically form over short periods of time, it’s
less likely to find patterns with more than six points.
Chart Patterns Trader Supplement
Understanding and Trading Classic Chart Patterns
18Flags and Pennants continued...
Measured Moves (Minimum Profit Targets)
To determine your projected minimum profit target, measure
the size of the pattern’s ‘Pole-like’ move (i.e., the sharp
price advance that set the pattern up). Once again, this
move is often called the Flagpole or just Pole. Calculate
the distance between the bottom of the Pole (beginning
of the price move) to the top of the Pole (first point of the
pattern). This is your measured move.
For example, if the beginning of the upmove was $35 (as
shown in the Bull Flag example to the right), and the top of
the Flag (point 1) was $45, the measured move would be
$10. Then add $10 to the Flag’s breakout point ($43 in this
example), and your minimum profit target is $53.
The same measuring technique is applied to the Bear Flag
and the Bull and Bear Pennant.
Bear Pennant
In the Bear Pennant example to the left, calculate the size
of the Flagpole (i.e., the distance between the beginning
of the price move (beginning of the Pole-like move) to
the first point of the pattern (end of the Pole-like move).
For instance: if the beginning of the sharp downmove
was $70 and the bottom the Pennant (point 1) was $59,
the measured move would be $11. Subtract $11 from the
breakout price ($57 in this example), and your minimum
profit target is $46.
Chart Patterns Trader Supplement
Understanding and Trading Classic Chart Patterns
19Flags and Pennants continued...
Failures and Stop-Out Points
Bull Flags and Bear Flags follow the same basic rules when it comes to failure points.
If you enter the trade after a breakout, you should use a move thru the 2nd point as your failure and exit the trade. If the
Flag is a small pattern that doesn’t slant too steeply against the trend, you might consider using the 4th point (or the 6th
point for instance in a 6 point Flag) as your failure point. But only do this if it stays within your tolerance for risk. (Keep
in mind, the first tip-off that a Flag breakout might not succeed is the fact that the market is making its way back into
the pattern as opposed to the customary explosive move out of it.)
If you get positioned early in anticipation of a breakout, a move thru the bottom part of the Bull Flag or the top part of
the Bear Flag (enough so that the market is no longer confined within the parallel trendlines), is your cue that the pattern
is breaking down along with its implications.
Chart Patterns Trader Supplement
Understanding and Trading Classic Chart Patterns
20Flags and Pennants continued...
Bull Pennant and Bear Pennant failures are virtually identical to Symmetrical Triangle failures. This makes sense
because a Pennant is really nothing more than a small triangle. (The preceding Pole-like move that distinguishes the
Pennant from an ordinary triangle does not change what constitutes a failed consolidation pattern.)
If you enter the trade after a breakout, you should
use a move below the apex point as your failure point
and exit the trade. The image to the right depicts a
Bull Pennant breakout and then failure. The failure
point is the same for a Bear Pennant as well. A move
thru the apex is your failure point and you should
exit the trade.
If you get in before a breakout occurs in anticipation
of one happening, a move thru the last point of the
Pennant (e.g., point 4 in a four pointed Pennant or
point 6 in a six pointed Pennant, etc.) should be your
failure point and you should consider exiting the
trade. (The image below depicts both a Bull Pennant
and Bear Pennant for illustration.)
For the more experienced trader, you might choose to stay in a little longer if you believe the pattern is being ‘re-drawn’
into a new pattern such as a larger Pennant/Triangle or Flag or even a Wedge. This can makes sense if your early entry
was close to the failure point and staying in a little longer still keeps your risk within your level of tolerance.
Chart Patterns Trader Supplement
Understanding and Trading Classic Chart Patterns
21Flags and Pennants continued...
Below are examples of a Bull Pennant failure being re-drawn into a Bull Flag, and of a Bear Pennant failure being re-
drawn into a Bear Flag. Can you see the ‘new pattern in gray?
Summary
The Flag and Pennant patterns are continuation patterns and are most reliable when traded in the direction of the trend.
In general, the breakout of the Flag or Pennant and the move that follows should be approximately the same size as the
sharp move (Flagpole) that preceded it.
These patterns are often traded before they breakout for many reasons. Of course, their high probability of success is
one of them. But also, since Flags and Pennants are typically small, short-term patterns, it doesn’t take long to see if the
trade will be a winner or not. And, since the patterns are typically small, there’s usually only a relatively small distance
between an early positioning and a potential failure point.
So whether you decide to get in early in anticipation of a breakout or if you prefer to wait for the confirming breakout
before you do, history has shown that these patterns have produced some spectacular price action. Now you know how
to incorporate these dynamic patterns into your own trading.
Chart Patterns Trader Supplement
Understanding and Trading Classic Chart Patterns
22Flags and Pennants continued...
Examples
Chart Patterns Trader Supplement
Understanding and Trading Classic Chart Patterns
23Flags and Pennants continued...
Chart Patterns Trader Supplement
Understanding and Trading Classic Chart Patterns
246
Chapter
Rectangles
Overview
Rectangles are continuation patterns. They are consolidation areas that are usually resolved in the direction of the trend.
The horizontal trendlines of course run parallel in a rectangle. Buyers and sellers seem equally matched at this point.
The same ‘highs’ are constantly tested as are the same ‘lows’ within this trading range. And while volume doesn’t seem
to suffer like it does in other patterns, volume should noticeably increase on the breakout.
The Rectangle has a good success rate as a continuation
pattern. But it should be noted too that after it’s broken out, it
has a higher tendency to pullback (make a rectracement) to the
original breakout area. After a successful test, it’ll then continue
in the direction of the breakout and resume the trend.
The image to the right shows an example of a breakout, then
retracement and then the resumption of the breakout/trend.
(The illustration depicts a Rectangle in an uptrend.)
Rectangle in Uptrends / Bullish
The majority of the time, a Rectangle in an uptrend will breakout to the upside. A good way to confirm the bullish bias
is to see if the volume increase as it trades up to the top of the pattern and decreases as it falls to the bottom of
the pattern. The increase in volume on the upside shows more buying interest. Volume will also pickup on the upside
breakout as well.
Rectangle in Downtrends / Bearish
Rectangles in downtrends will breakout to the downside the majority of the time. In this case, the volume should increase as it
trades to the bottom of the pattern and diminish as it trades to the top of the pattern. Again, the increase in volume as the price
goes down, helps confirm the downside bias. Volume should also increase as it breaks thru the bottom of the Rectangle as well.
Chart Patterns Trader Supplement
Understanding and Trading Classic Chart Patterns
25Rectangles continued...
Identifying and Drawing Rectangles
Rectangles are easy to see on a chart. These trading ranges are confined by two horizontal trendlines. The Rectangle
has to have at least four points in order to drawn the two trendlines: two equal high points to draw a line across to form
the top trendline and two equal low points to draw in the bottom trendline. While a Rectangle needs to have at least four
points, it will often have six and can have even more. In fact, it’s more common for a Rectangle to have more than four
points rather than only four points. (The images below illustrate a Rectangle with four and with six points.)
Rectangles in uptrends are bullish, while Rectangles in downtrends are bearish.
For a bullish Rectangle, the first point (the point farthest left, i.e., the earliest point) is at the top. For a bearish Rectangle,
the first point is at the bottom.
Measured Moves
(Minimum Profit Targets)
To determine your projected minimum profit target,
measure the distance between points 1 and 2. This
is the widest part of the triangle and is often referred
to as the base.
For example: if the top of the base (point 1) was $37
and the bottom of the base (point 2) was $30, the
base would be $7. This is your measured move.
To project your minimum profit target, identify at
what price the stock broke thru (or should break thru)
the Rectangle. (Determining the projected breakout
price is easy since the horizontal trendline areas are
already defined.) For this $37. Then add $7 to the breakout price of $37 and you have your minimum projected profit
target of $44. (The image to the right uses a Rectangle in an uptrend for illustration.)
The same technique applies for a Rectangle in a downtrend, except that you’ll subtract the base ($7), from the bottom
of the Rectangle ($30) for your measured move ($23). (Not pictured.)
Chart Patterns Trader Supplement
Understanding and Trading Classic Chart Patterns
26Rectangles continued...
Failures and Stop-Out Points
If you enter the trade after a breakout, you can use a move below the bottom of the pattern in bullish Rectangles and
above the top of the pattern in bearish Rectangles as your failure point and exit the trade. However, if the size of the
Rectangle puts a move like that outside of your risk tolerance, you can use another technique to arrive at a stop-out
point. That technique is to watch the volume on a pullback. If the retracement move back inside of the rectangle is made
on increasing volume, that can be a sign that the breakout is failing or has failed. Decide how much room you’re willing
to give it and exit the trade. (The image below depicts a Rectangle in an uptrend for illustration.)
If you get in before a breakout occurs in anticipation of one, a move below the pattern in bullish Rectangles and above
the pattern in bearish Rectangles, should be considered a failure point and exit the trade. (The image below depicts a
Rectangle in an uptrend for illustration.)
Since the trading ranges are so well defined in a Rectangle, getting in near the bottom of a bullish Rectangle or top of
a bearish Rectangle means you won’t need to see much of a move against you to determine it to be a failure.
Summary
The Rectangle is most reliable when traded as a continuation pattern. But pay attention to the volume as it can reveal
the market’s upside or downside bias, i.e., an increase in volume as it trades up in the pattern is bullish and an increase
in volume as it trades down in the pattern is bearish. Overall volume doesn’t really diminish that much within the pattern
itself as it does with other patterns, but again, volume should increase as it breaks out.
Chart Patterns Trader Supplement
Understanding and Trading Classic Chart Patterns
27Rectangles continued...
Depending on how big the Rectangle’s size (base) is you can trade the range within the Rectangle: buying at the bottom
of the Rectangle and selling at the top of the Rectangle. Of course, you should allow enough time to pass to make sure
an established range is in place. For less experienced traders however, you might want to avoid countertrend trading,
such as buying the lows in a bearish pattern and selling the highs in a bullish pattern, as you might get caught the
wrong way when an in-trend breakout occurs. (The image below illustrates range trading in a bullish Rectangle in an
uptrend.)
The Rectangle is a great pattern to trade. It has a high probability of success and the clearly defined support and
resistance lines make early entries or breakout entries easy to do. And, if you miss the breakout, you can always get in
after a successful retracement and position yourself before it resumes the trend.
Chart Patterns Trader Supplement
Understanding and Trading Classic Chart Patterns
28Examples
Chart Patterns Trader Supplement
Understanding and Trading Classic Chart Patterns
297
Chapter
Wedges
Overview
The Wedge pattern can be classified as both a continuation pattern and a reversal pattern. The slant of the Wedge
makes it easy to identify which is which.
The Wedge looks similar to a Symmetrical Triangle in that they both have converging trendlines that come together at
an apex. However, Wedges are distinguished by a noticeable slant, either to the upside or to the downside. The Wedge
can also look similar to a Pennant or a Flag as well since Wedge patterns are often preceded by a ‘Pole-like’ move like
that of a Pennant or Flag.
A Falling Wedge is generally considered bullish and is usually found in uptrends. But they can also be found in downtrends
as well. The implication however is still generally bullish. This pattern is marked by a series of lower tops and lower
bottoms.
A Rising Wedge is generally considered bearish and is usually found in downtrends. They can be found in uptrends too,
but would still generally be regarded as bearish. Rising wedges put in a series of higher tops and higher bottoms.
Chart Patterns Trader Supplement
Understanding and Trading Classic Chart Patterns
30Wedges continued...
Falling Wedge in Uptrends: Bullish
Falling Wedges in uptrends are bullish continuation patterns. Like in Bull Flag, the Bullish Wedge in an uptrend slants
downward and against the trend. Volume dries up during the formation of the patterns but then increases as it breaks
out to the upside. While the Wedge has similar characteristics to that of the Pennant and the Flag, the duration of the
Wedge (i.e., the size of the pattern or the amount of time it takes before a resolve or breakout happens) is longer.
Falling Wedge in Downtrends: Bullish
Falling Wedges in downtrends are bullish. This pattern can be characterized as a reversal pattern. This Wedge slants in
the direction of the trend, but is in fact bullish, serving as a reversal to the downtrend. Volume will diminish during the
formation of the Wedge, but increase as it breaks out to the upside.
Rising Wedge in Uptrends: Bearish
Rising Wedges in uptrends are bearish reversal patterns. The Rising Wedge slants upward in the direction of the trend,
but is a bearish pattern that serves to reverse the uptrend downwards. Volume should drop off as this pattern is being
formed and increase as it breaks thru the bottom of the Wedge.
Rising Wedge in Downtrends: Bearish
Rising Wedges are bearish continuation patterns. Just like in a Bear Flag, the Bearish Wedge slants up and against the
downtrend. Volume will typically diminish during the formation of the Wedge and increase on the downside breakout of
the pattern.
Identifying and Drawing Wedges
Wedges are easy patterns to identify and draw on a chart. You need a minimum of four points to draw a Wedge: two
points at the top of the pattern to draw the upper trendline and two points at the bottom to draw the lower trendline. The
upper and lower trendlines will converge (come together) to form an apex. In short, the Wedge looks like a slanted right
sided triangle with one trendline a little longer than the other. While having four points is the minimum number of points
needed to draw a Wedge, it’s not uncommon to have five or six points or more. The illustrations below and on the next
page show Wedge patterns with various numbers of points. Regardless of the number of points however, the implications
remain the same. Falling Wedges are generally bullish and Rising Wedges are generally bearish. Proper identification
shows that the first point should be the point farthest left, i.e., the earliest point. In uptrends, the first point of the Wedge
should be at the top of the pattern. In downtrends, the first point should be at the bottom.
Chart Patterns Trader Supplement
Understanding and Trading Classic Chart Patterns
31Wedges continued...
Measured Moves (Minimum Profit Targets)
To determine your minimum projected profit target, measure the distance between points 1 and 2. This is the widest part
of the Wedge and is often referred to as the base.
For example: if the top of the base (point 1) was $52 and the bottom of
the base (point 2) was $47, the base would be $5. This is your measured
move (in green).
To project your minimum profit target, identify at what price the stock broke thru (or should break thru) the Wedge. If
the breakout point is $49 (as in the bullish Falling Wedge example above), simply add the base ($5) to it to get your
minimum projected profit target of $54.
Whether it be a Falling Wedge or a Rising Wedge; bullish pattern or bearish, the measuring technique is the same.
A secondary measuring technique involves measuring the ‘Pole-like’ move if one preceded it. This is done in the same
manner as described in the Flags and Pennants Chapter. Determine the size of the ‘Pole-like’ move (i.e., the sharp price
advance that set the pattern up) and calculate the distance between the bottom of the Pole (beginning of the price
move) to the top of the Pole (first point of the pattern). This is your measured move (in purple). Add that to the Wedge’s
breakout point for your secondary or ‘extended ‘minimum’ projected profit target.
Chart Patterns Trader Supplement
Understanding and Trading Classic Chart Patterns
32Wedges continued...
Failures and Stop-Out Points
If you enter the trade after a breakout, you can use a move thru the last point as your failure and exit the trade. (In the
Falling Wedge example to the bottom left, it’s point 4. In the Falling Wedge example to the bottom right, it’s point 5.) You
can also decide to use a move thru the apex of the Wedge pattern as your failure and exit there. However, if the size of
the Wedge is too big or the slant of the slope is too steep, waiting for an apex violation might put the risk level outside
of your level of tolerance. If that’s the case, use the last point instead. (In the Falling Wedge examples below, the last
point and the apex are in close proximity to each other, so using an apex violation gives the trade a bit more room with
much additional risk. It’s a good idea to determine your risk before you place a trade so you’ll always know what to do
and how much you could lose if the pattern fails.
The same is true for Rising Wedges as well. Use the last point as your failure and exit the trade. Only use an apex
violation/failure if it’s within your level of risk tolerance.
Pay attention to volume changes as well. If the pattern is failing on increased volume, it’s likely that even more price
action in that direction is coming. Even if you can tolerate a farther out stop-out point (i.e., an apex failure), you might
choose to exit the trade earlier on this sign.
If you get in before a breakout occurs, use a move thru the ‘wrong’ side of the pattern as your failure and exit the trade.
Note: the last point isn’t used as a failure for an early entry because since the Wedge slants either up of down against
the trend, it can move past the ‘last’ point and still trade within the pattern itself. So a move thru the ‘wrong’ side of the
pattern (meaningful enough so the Wedge is no longer intact), should be your failure point and exit the trade.
Chart Patterns Trader Supplement
Understanding and Trading Classic Chart Patterns
33Wedges continued...
Be aware that if the size of the Wedge pattern is big enough or the slant of the slope is steep enough, it can trade within
the confines of the pattern and against your position. So you might choose to exit the trade before a pattern failure
takes place if the trade is against you and you run the risk of exceeding your level of risk tolerance. But pay attention
to the volume as it can give clues to its bullishness or bearishness. If volume starts increasing as it’s going up, it could
be a sign of its bullish tendencies. And if the volume is increasing while it’s going down, it could be a sign of its bearish
tendencies. These clues can help you keep your losses smaller by potentially exiting earlier.
The illustrations below depict early entry failures.
Summary
Wedge patterns can be both continuation patterns and reversal patterns. Although, they are most common as continuation
patterns.
The Wedge can be a powerful pattern and has an excellent success rate in forecasting breakouts. The pattern can be
even more powerful and profitable when preceded by a ‘Pole-like’ move, like that of a Flag or Pennant. Volume typically
decreases during the formation of the Wedge but increases on its breakout.
Whether you use the Wedge as a signal for a continuing trend or a reversal -- whether you get in early in anticipation
of a breakout or if you wait for a confirming breakout before you do, these classic Wedge patterns can provide great
insight and give your trading an edge.
Chart Patterns Trader Supplement
Understanding and Trading Classic Chart Patterns
34Wedges continued...
Examples
Chart Patterns Trader Supplement
Understanding and Trading Classic Chart Patterns
35Wedges continued...
Chart Patterns Trader Supplement
Understanding and Trading Classic Chart Patterns
36You can also read