Creating Spatial Data in Google Earth: Marine Protected Area Example
←
→
Page content transcription
If your browser does not render page correctly, please read the page content below
Creating Spatial Data in
Google Earth:
Marine Protected Area Example
Creating spatial data
Google Earth can be used to perform simple mapping
functions, such as creating placemarks (points), lines
(paths), and polygons (shapes), to represent geographic
features.
Marine Protected Areas by definition are polygons, so this
tutorial will focus on creating and editing polygons, but it
will also provide a brief overview of placemarks (points)
and lines (paths).
Creating placemarks
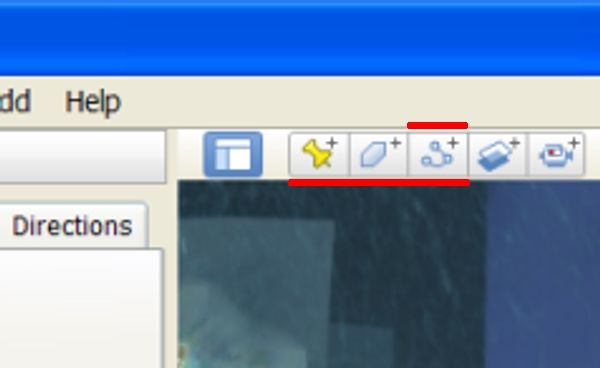
First make sure the toolbar is turned on: Go to 'View'
then select 'Toolbar'.
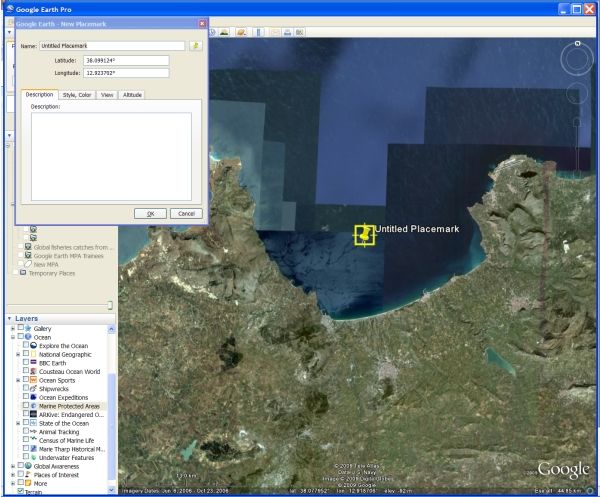
To add a placemark, click on the yellow pushpin icon in
the toolbar. Two things now happen:
1. A new yellow placemark appears in Google Earth
2. A Properties window also opens, called 'Google
Earth - New Placemark'
You can move the placemark as long as the Placemark
Properties window is open.
Move the placemark by clicking on it with your left
mouse button, holding the left mouse button down, and
dragging the placemark with your mouse.
Release your left mouse button to stop moving the
placemark.
You can still zoom in or out, and move around, in Google
Earth, even with the placemark properties box open.
© Copyright 2009. Google is a trademark of Google Inc. All other company and product names may be trademarks of the respective companies with
which they are associated.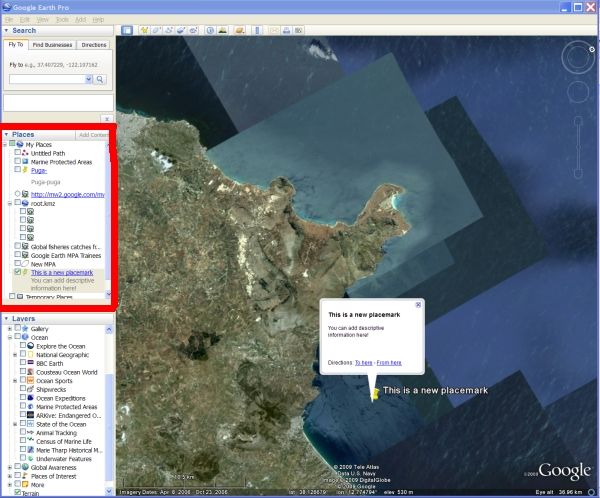
Creating basic descriptive information for
                                                                 placemarks
                                                                 Once you are satisfied with the location of your
                                                                 placemark, you can add some basic descriptive
                                                                 information about it in the Properties box:

                                                                       1. Name: specify a name
                                                                       2. Description. This can be written as plain text OR
                                                                          it can be written in html (this enables you to
                                                                          include photos, tables, etc in the popup).
                                                                       3. Style, Color: change the appearance of the
                                                                          placemark
                                                                       4. View: change the default position, level of zoom,
                                                                          and perspective that Google Earth flies to when
                                                                          you open the file
                                                                       5. Altitude: change the altitude that the placemark
                                                                          is anchored to

                                                                 Once you have finished making edits, click OK. When you
                                                                 click on the placemark in Google Earth, a popup will
                                                                 appear that includes the changes you made.

                                                                 Once you have closed the Properties box, the Placemark
                                                                 will be listed in your 'My Places' panel (highlighted in
                                                                 red). The 'My Places' panel is where you can save files
                                                                 that you use frequently and want quick access to.

                                                                 From My Places, you can right-click on the placemark
                                                                 and:
                                                                      • Save the placemark as a .kml or .kmz file to a
                                                                        folder of your choice
                                                                      • Re-open the Properties box to do more editing

© Copyright 2009. Google is a trademark of Google Inc. All other company and product names may be trademarks of the respective companies with
which they are associated.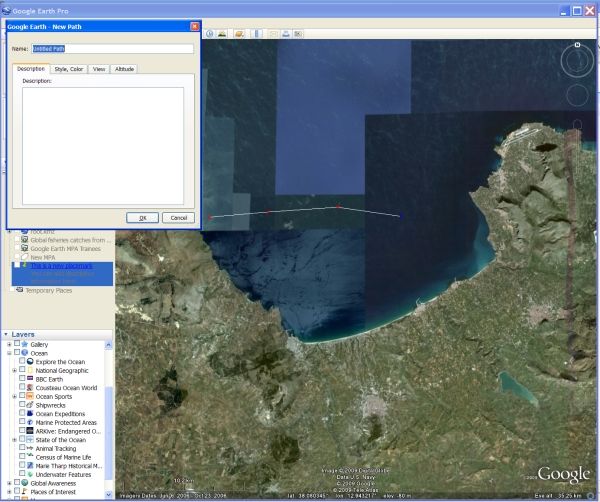
Creating lines
                                                                 First make sure the toolbar is turned on: Go to 'View'
                                                                 then select 'Toolbar'.

                                                                 To add a line, click the add line button from the toolbar.

                                                                 While the Properties box is open, the mouse cursor has
                                                                 changed to a white square shape. This indicates that you
                                                                 are in 'edit mode'

                                                                 Create a line by left-clicking to create several points.
                                                                 Google Earth automatically connects the points to make
                                                                 a line (path)

                                                                 Creating basic descriptive information for lines
                                                                 As with placemarks, you can create some basic
                                                                 decsriptive information for the line in the line Properties
                                                                 box, including changing the colour and width of the line.

                                                                 Editing lines
                                                                 The points along the line are color-coded as follows:

                                                                 Red - inactive / not being edited

                                                                 Dark Blue - active / edits made AROUND that point:
                                                                 Click on a red point to make it active - it will turn blue.
                                                                 When a point is blue it means that:
                                                                       • any new points added are inserted after that
                                                                         point, moving in a clockwise direction, OR,
                                                                       • any existing points deleted are deleted starting
                                                                         with the blue point and moving in a counter-
                                                                         clockwise direction.

                                                                 Green - active / edits made TO that point:
                                                                 Click on a red point to make it blue, then hover your
                                                                 mouse over the blue point. When it turns green it means
                                                                 you can MOVE that particular point, by holding your
                                                                 mouse button down, and dragging.

                                                                        • To add points, left click.
                                                                        • To add a smoothed boundary, left click to create
                                                                          a new point, then drag the mouse from there.
                                                                        • To move an existing point, left click & hold, wait
                                                                          for the point to turn green, then drag
                                                                        • To delete points, select it then right click.

                                                                 Remember to save the new line: From My Places, right-
                                                                 click on the line and:
                                                                       • Save the placemark as a .kml or .kmz file to a
                                                                          folder of your choice
                                                                       • Re-open the Properties box to do more editing

© Copyright 2009. Google is a trademark of Google Inc. All other company and product names may be trademarks of the respective companies with
which they are associated.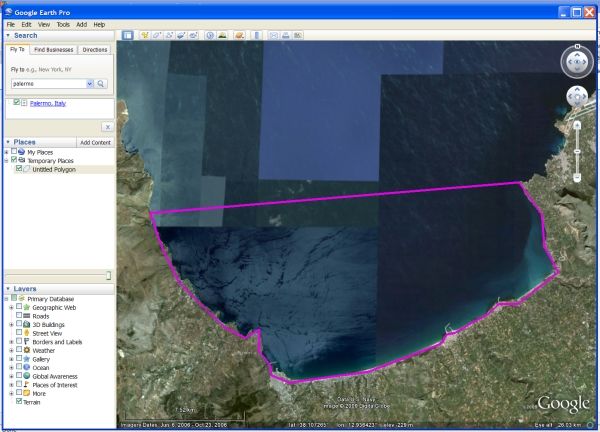
Creating polygons
                                                                 First make sure the toolbar is turned on: Go to 'View'
                                                                 then select 'Toolbar'.

                                                                 To create a polygon, click the add polygon (shape)
                                                                 button from the toolbar.

                                                                 While the Properties box is open, the mouse cursor has
                                                                 changed to a white square shape. This indicates that you
                                                                 are in 'edit mode'

                                                                 Create a polygon by left-clicking to create several points.
                                                                 Google Earth automatically connects the points to make
                                                                 an outer boundary of the polygon.

                                                                 If you want to make a smooth boundary, hold the left
                                                                 mouse button down and drag the mouse to make a
                                                                 smooth line.

                                                                 Creating basic descriptive information for polygons
                                                                 As with placemarks and lines, you can create some basic
                                                                 decsriptive information for the line in the line Properties
                                                                 box, including changing the colour and width of the line.

                                                                 Editing polygons
                                                                 A good example of where this is useful is for MPAs with
                                                                 complex coastal boundaries, e.g. the boundary crosses
                                                                 the mouth of a bay, and follows the coastline within that.

                                                                 It can be hard to follow the coastline as accurately as
                                                                 you would like in one attempt, particularly if the MPA is
                                                                 large.

                                                                 To edit the polygon:
                                                                 RIGHT click on the polygon in Places panel on the left of
                                                                 your screen,
                                                                 Select Properties

 At the scale of the entire MPA, the polygon appears to follow   The Properties box opens, and all of the points (vertices)
 the coastline quite well.                                       that you created when you first digitised the polygon
                                                                 become visible:

                                                                 Editing polygons works in the same way as editing lines :

                                                                 The points along the line are color-coded as follows:

                                                                 Red - inactive / not being edited

© Copyright 2009. Google is a trademark of Google Inc. All other company and product names may be trademarks of the respective companies with
which they are associated.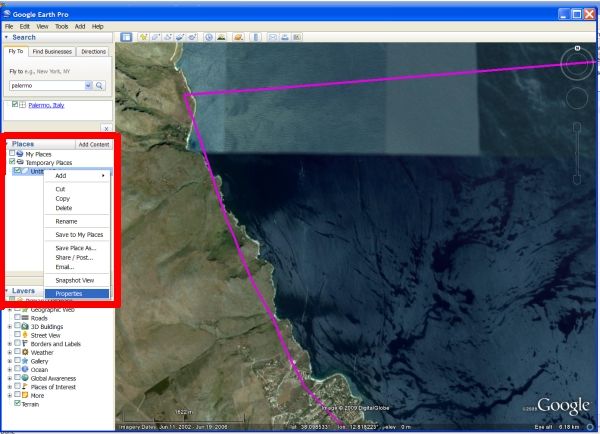
Dark Blue - active / edits made AROUND that point:
                                                                    Click on a red point to make it active - it will turn blue.
                                                                    When a point is blue it means that:
                                                                          • any new points added are inserted after that
                                                                            point, moving in a clockwise direction, OR,
                                                                          • any existing points deleted are deleted starting
                                                                            with the blue point and moving in a counter-
                                                                            clockwise direction.

                                                                    Green - active / edits made TO that point:
                                                                    Click on a red point to make it blue, then hover your
                                                                    mouse over the blue point. When it turns green it means
                                                                    you can MOVE that particular point, by holding your
                                                                    mouse button down, and dragging.
 Zooming in to the polygon shows that the boundary does not
 follow the coastline closely. Open Properties to do more editing        • To add points, left click.
                                                                         • To add a smoothed boundary, left click to create
                                                                           a new point, then drag the mouse from there.
                                                                         • To move an existing point, left click & hold, wait
                                                                           for the point to turn green, then drag
                                                                         • To delete points, select it then right click.

                                                                    You can keep doing this as you zoom closer and closer in
                                                                    to continually improve the resolution of the polygon.

                                                                    Remember to save the new line: From My Places, right-
                                                                    click on the line and:
                                                                          • Save the placemark as a .kml or .kmz file to a
                                                                             folder of your choice
                                                                          • Re-open the Properties box to do more editing

                                                                    Creating data from GPS or coordinates

                                                                    GPS visualiser is a free online tool that can create .kml
                                                                    files from GPS waypoints or coordinates stored in a
                                                                    spreadsheet or text file (e.g. excel, .csv)
                                                                    The URL is http://www.gpsvisualizer.com/
                                                                    map_input?form=googleearth

                                                                    Use this tool to create a TRACK (i.e. a line with multiple
                                                                    points along it). You need to change the following
                                                                    parameters on the webpage for this to work:

                                                                    General map parameters:
                                                                        • Google Eath doc name: insert your file name

                                                                    Track options:
                                                                         • GPS/CSV routepoints: change to 'Convert to
                                                                           tracks only'

                                                                    Waypoint options:
                                                                        • Show waypoints: change to 'None'

© Copyright 2009. Google is a trademark of Google Inc. All other company and product names may be trademarks of the respective companies with
which they are associated.
Data upload:
                                                                       • Upload your data as GPS file, OR
                                                                       • Paste it into the text box, using comma-
                                                                          separated format: (name, description, latitude,
                                                                          longitude).
                                                                       • If you paste the data into the text box, be sure
                                                                          to change 'Force plain text to be this type:' to
                                                                          trackpoints.
                                                                 (More help on building lat/long files in plain-text format
                                                                 is available at
                                                                 http://www.gpsvisualizer.com/tutorials/tracks.html)

                                                                 Click Create KML File
                                                                 Save the file to your computer

                                                                 Open and edit the file in Google Earth

                                                                 The file produced by GPS Visualiser is a LINE (path). To
                                                                 convert it to a polygon, use the line / polygon editing
                                                                 techniques described above and:
                                                                     1. Select the point at one end of the line (turn it
                                                                          blue)
                                                                     2. Create a new point next to it (left click)
                                                                     3. Select that point (turn it green) and drag it to
                                                                          overlap with the point at the other end of the
                                                                          line.
                                                                     4. Once those points overlap, the line will
                                                                          automatically be converted to a polygon.

© Copyright 2009. Google is a trademark of Google Inc. All other company and product names may be trademarks of the respective companies with
which they are associated.


You can also read