Ever-E-Day Using Your Bike Friday
←
→
Page content transcription
If your browser does not render page correctly, please read the page content below
Using Your Bike Friday®

Ever-E-Day
Green Gear Cycling, Inc.
            3364 W 11th Ave. Eugene, OR 97402
            800-777-0258 USA & Canada
            +1-541-687-0487 Int’l • +1-541-687-0403 Fax
            www.bikefriday.com • info@bikefriday.com
            version 4/30/20

800-777-0258 • +1-541-687-0487   www.bikefriday.com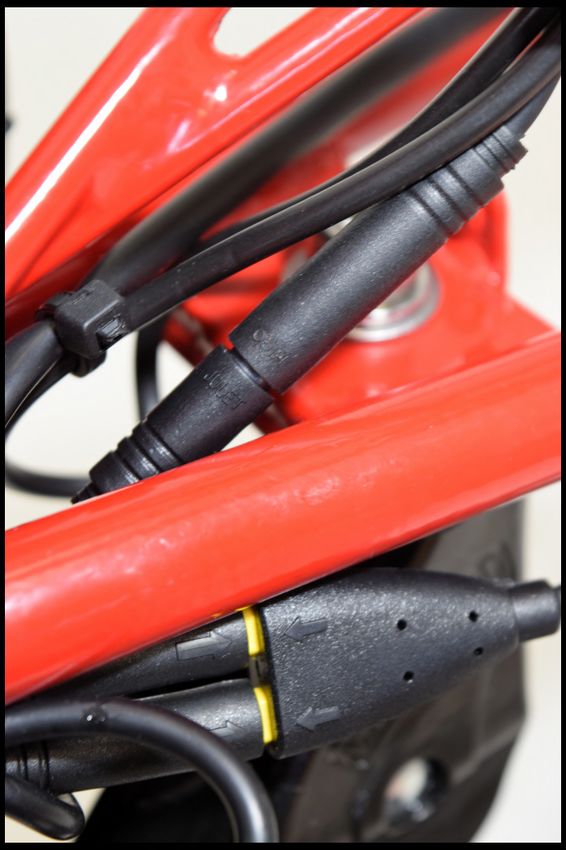
Table of Contents
Congratulations / If You Need Help                        3
A Word on Safety / Your Tools                             4

Unpacking your Ever-E-Day                                 5
Assembly: Install seatmast and seatpost                6-10
           Assembling Riser, Stem, and Handlebars         7
           Connect OSATA Frame                            8
           Installing wiring, housing, and cabling        9
           Install and connect battery                   10
Using a Quick Release                                 11-12
Assembly: Install Front Wheel, Disc Brake                12
           Adding Brake Cable Slack                      13
           Double Check Steering                         14
           Install Pedals                                15
Double Check Your Bike Friday                            16
Adjusting your Ever-E-Day                             17-18
           Saddle Height                                 17
           Handlebar Height                              18

Bike Friday Service Overhauls                            19
Bike Friday Service                                      20
More Maintenance Tips and Information                 21-23
Airport and Travel Tips                                  24
Warranty Information                                     25

  2     www.bikefriday.com    800-777-0258 • +1-541-687-0487
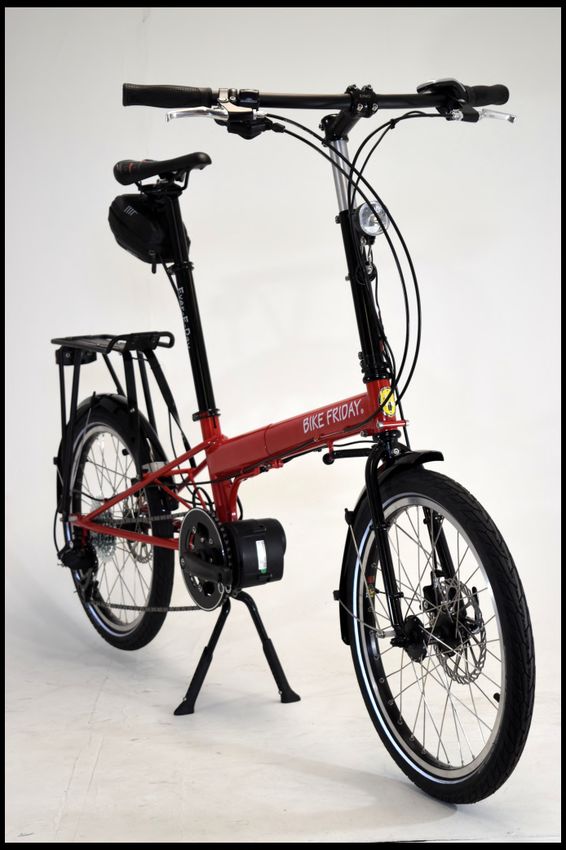
Welcome to the Community
Congratulations!
You have just purchased the most versatile Electric Cargo
Bike available today. Your bike has been carefully
designed and constructed for your personal needs. All of
our bikes are manufactured in our Eugene, Oregon factory
by real cyclists who care about our customers and our
products.

Please take your time reviewing this manual before you
assemble your new Bike Friday. You will find your new
bicycle to be simple and reliable anywhere you go!

If You Need Help . . .
If you need technical assistance with any Green Gear® Cycling
product, or are unclear on the proper operation of your Bike
Friday, please email us at service@bikefriday.com or give us a
call and a Service Technician will help you get back on the
road. Our toll-free number in the US and Canada is
800-777-0258; international is +1-541-687-0487. Normal
business hours are 9 a.m. to 5 p.m. Monday through Friday
Pacific Time.. Because we understand the needs of world
travelers, we offer 24-hour technical support in emergencies.
If necessary, please call our regular number and our
answering service can forward you to a Service Technician on
call.

Extra Accessories
We also sell an extensive line of bicycle and travel
accessories. Whether you are riding the local back roads or
venturing into foreign lands we have the gear you need. Call
us for information on spare tires, tubes, replacement parts,
fenders, racks, bags, or other items to complete your Travel
System. You can purchase these products from our online
store: www.store.bikefriday.com

More Information
To check out our products, find other useful information,
discover Bike Friday events and Yak with other Bike Friday
owners on the bulletin board, go to our main website at:
www.bikefriday.com
Blue skies and happy trails from Green Gear Cycling

  3      www.bikefriday.com    800-777-0258 • +1-541-687-0487
A Word on Safety
Bicycles are a lot of fun, but improper use can result in
harm. Please, always ride safely!
• Always have all passengers wear a helmet.
• Follow the rules of the road, and be courteous.
• Use front and rear lights after dark.
• Dress appropriately for the weather, the season, and
   lighting conditions. Be seen!
• Always carry a spare tube, patch kit, pump and a tool
   kit.
• Keep your bicycle in good shape.
• Check your tire pressure before every ride.
• Make sure all quick releases are secure.
• Have your bicycle routinely serviced for trouble-free
   travels.

Bicycle Assembly and Maintenance
Correct assembly is essential to ensuring your comfort,
performance and safety while riding the Ever-E-Day. Even if
you have the experience and tools to complete these
essential assembly steps before your first ride, Bike Friday
recommends having a reputable bike mechanic check your
work.

If you feel you do not have the experience and tools to
complete assembly and fit, Bike Friday strongly
recommends having the bike assembled by a reputable bike
mechanic for best results.

Your Ever-E-Day uses industry standard components and
most bike shops should be able to service your bicycle.
They are welcome to call or email us with questions. We
also encourage you to learn how to work on your own bike.
If you are not familiar with bicycle maintenance, consider
taking a local class. It will improve your confidence and
self-sufficiency as you venture across the globe or explore
your own hometown.

  4     www.bikefriday.com     800-777-0258 •
  +1-541-687-0487
Unpacking your Ever-E-Day
Unpacking Your Ever-E-Day From a Box
Opening your box may present an intimidating
sight, particularly if you ordered many accessories.
Do not worry; we work hard to keep our products as
simple as possible. We recommend finding a quiet
area and some room to spread out.
This manual will address the fundamentals of unpacking,
assembly and adjusting techniques. However, because
your bicycle was built for you, you might discover that
your bike was packed at the factory slightly different
than the one in this manual.
Your Ever-E-Day should only require minimal assembly. It
will take approximately 40-60 minutes and require a
basic level of technical skill.
You will need a safety knife for
cutting the box open, 4, 5 and
6mm Hex/Allen wrenches, a
15mm open/pedal wrench and
a pair of scissors (or better yet
wire cutters, snips or diagonal
cutters) to cut zip ties.

                  Fig. 1 Tools Required for Ever-E-Day assembly.
[Note: Depending on the components and accessories you
have purchased with your Bike Friday, your specific model
may require additional tools.]

Fig. 2 Open the shipping box and remove this manual,
packing material, and various bicycle parts at the top of
the box. Take care not to damage the frame while cutting
zip ties.

 5      www.bikefriday.com      800-777-0258 • +1-541-687-0487
Unpacking your Ever-E-Day
Remove the bubble wrap and zip ties
to expose your seatmast, seatpost, and
saddle. Minding the minimum insertion
marks, install these components using
the 5mm Allen as shown to the right in
Fig 3.

Note: The minimum insertion mark is
etched at 4” from the bottom on the
mast. This is the minimum amount of
the mast that must be inserted
(overlapped) in the frame.

Now the bike is ready to be lifted and clamped in a repair
stand if desired. The instructions for assembly will
proceed as if you do not have a repair stand available.

Fig. 4. Either cut the front panel of the box and fold it
down, or lift the bike out of the box so it is set up as
shown. Accessories and components will differ for your
specific Ever-E-Day ensemble.

  6     www.bikefriday.com     800-777-0258 • +1-541-687-0487
Assembling your Ever-E-Day

Assembling Riser, Stem, and Handlebars
Locate riser clamp [Fig.5] Push down the button on the steerer
tube, slide riser clamp over steerer tube until button pops into
place. [Fig. 6] Tighten riser clamp. [Fig. 7]
Check that this system is secure by holding the front wheel
between your legs and attempt to turn the handlebars. If
properly adjusted you should be unable to turn the handlebars
while the wheel is held in place.

Fig. 5 Riser Clamp   Fig. 6 Push Button   Fig. 7 Tighten Riser Clamp

Cut zip ties over the front wheel and handlebars [Fig.8]
Check that all cables and housing are not kinked or twisted
around before installing [Fig.9] . Also note minimum insertion
mark on aluminum riser. This mark must be covered by the top
of the riser clamp for safe riding. Use 5mm allen to tighten.

Fig. 8 Cut zip ties over the
front wheel and
handlebars

                               Fig. 9 Ensure housing is untwisted

   7     www.bikefriday.com        800-777-0258 • +1-541-687-0487
Assembling your Ever-E-Day
                                  Attaching front section to
                                  mid section (One Size
                                  Adjusts To All (OSATA))
                                  Cut zip ties and remove packing
                                  material on the front frame
                                  section. Remove the sizing bolt
                                  from the front frame section.
Fig. 10 Remove sizing bolt        [Fig.10]

                                  Insert the front frame section
                                  (male) into the frame mid
                                  section (female) opening.This
                                  connection should be greased
                                  and slide easily when aligned.
                                  [Fig. 11] Align threaded hole at
Fig. 11 Insert front section
                                  end of front section to
                                  preferred OSATA sizing hole.
                                  50-60cm range. Reinsert sizing
                                  bolt.[Fig. 13]

                                  Before tightening the OSATA
                                  pinch bolts, align the frame by
                                  sighting along the riser and seat
                                  mast. Riser and mast should be
                                  parallel.[Fig.12]

                                  Tighten the sizing bolt. Tighten
                                  the main frame pinch bolts with
                                  a 5mm hex wrench. [Fig. 13]
Fig. 12 OSATA frame aligned
properly                          Alternate tightening OSATA
                                  pinch bolts until 8-10 Nm
                                  torque is reached. This is
                                  important for handling and
                                  safety!

Fig. 13 Tighten pinch bolts and
sizing bolt.

8         www.bikefriday.com      800-777-0258 • +1-541-687-0487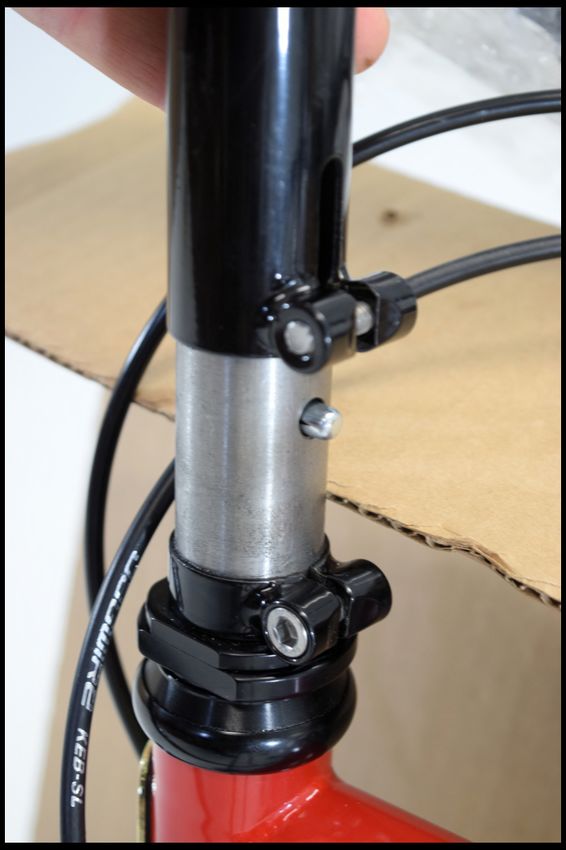
Assembling your Ever-E-Day
Installing wiring, housing, and cabling
Seat cable housing for rear brake
into rear cable stop and pull
front section of housing into front
cable stop. Repeat this process
for the rear derailleur.
[Fig. 14]
Fig. 14 Seat housing in stops
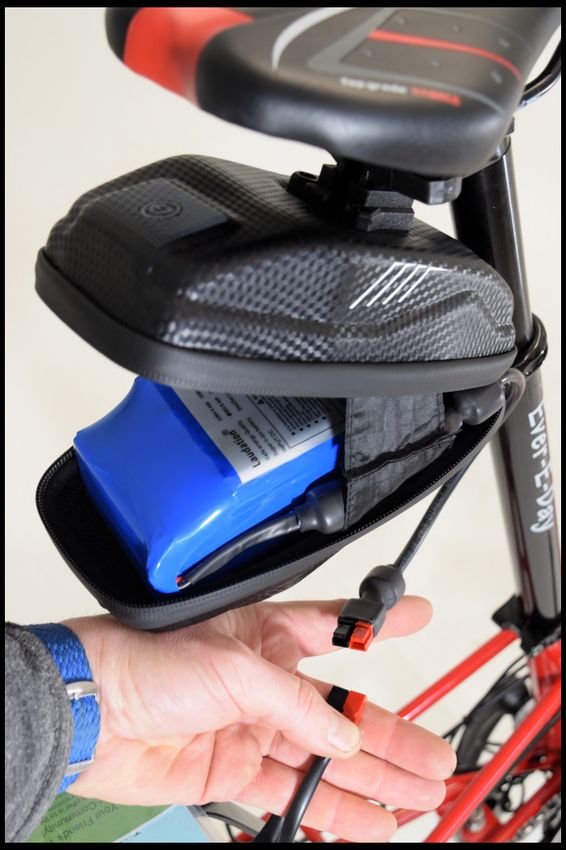
Integrated front and rear LED lights come
standard on the Ever-E-Day. Connect red to
red, black to black for the front light. If you
get the order incorrect don’t worry, the light
just won’t turn on. Flip the order and try
again. [Fig. 15] The rear light wiring
connects red to “+” and black to “-” [Fig. 16]
Fig. 15 Front Light
Fig. 16 Rear Light
Fig. 17 Wiring Detail Fig. 18 Speed Sensor
Wiring connections behind the bottom bracket shell are tested at the
factory. [Fig. 17] Small arrow/triangle on speed sensor should align
with magnet on rear wheel. [Fig. 18]
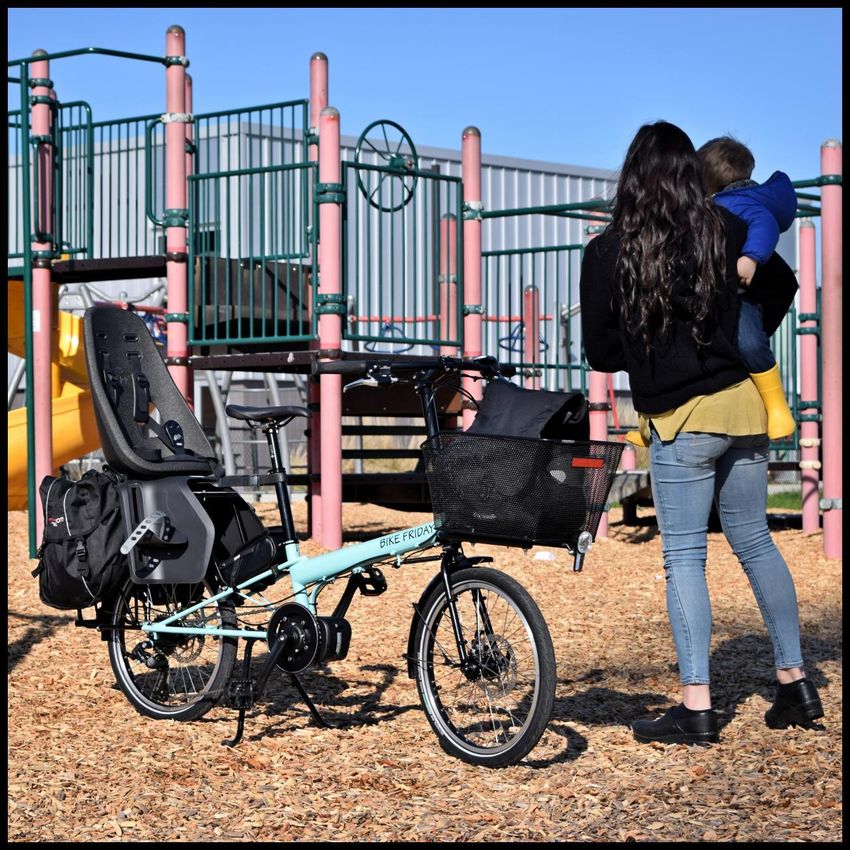
9 www.bikefriday.com 800-777-0258 • +1-541-687-0487Assembling your Ever-E-Day Install, connect and charge battery Locate Separately wrapped battery and battery bag. Bag can be attached to saddle rails and seatpost. [Fig. 20] Bag and battery can also be attached to seat stays between seatmast and rear rack. Battery, battery cable, and charger use Anderson quick-connectors. Connect Red to Red, Black to Black. [Fig. 20] Batteries have built in protection against misuse, but it is still important to prevent damage, including water penetration from harming the Battery. We recommend fully closing the battery bag with the wiring exiting the bag from the lowest point. [Fig. 21] To recharge the battery use the barrel plug connector or Anderson connector depending on the type of battery and charger you have. Fig. 20 Battery in bag Fig. 21 Ready to connect or charge Electrical wiring is secured with a combination of zipties, spiral wrap, and velcro straps for ease of customization, maintenance, and upgrading. The battery charger works like a standard laptop battery charger. Several hours may be required for charging, depending on battery size and level of charge. If you’re not using your electric bike for a while, it is best to remove it from the bike and store it in a warm area at least 40 degrees Fahrenheit or more It’s best to keep it around 40 to 90 percent charged during this storage. Do not leave the battery on the charger during storage, but charge it every month or so to keep the levels in check. Batteries that are not cared for can deplete beyond the point of recharge and become unusable or have a shortened lifespan. 10 www.bikefriday.com 800-777-0258 • +1-541-687-0487
Using a Quick Release
Using Those Nifty Quick Releases

The quick release is one of those simple but great inventions that really
makes life better. However, if used incorrectly, it can be potentially
dangerous. Although a reliable and safe product when used properly,
people have been injured or killed due to improper use.

 If you are not familiar with their operation,PLEASE study these
directions carefully. If you are still unclear on their operation, call
us or contact your local bike shop before you ride!

Quick Release Operation
A quick release has a simple cam with a lever that swings through an
arc that is square to the axle. As the lever moves, the cam clamps the
wheel to the frame, or secures the frame joint. It is not a wing nut to
be rotated around the axle.

The tension on the quick release is controlled by how tight the knurled
nut on the other end is set. Only wheel quick releases have the small
cone-shaped springs. Note that the small ends of the springs face
toward the center of the hub.
Quick Release Maintenance

We recommend adding a few drops of light oil to the lever where it
enters the cap several times per year. This will keep your quick release
working smoothly for years.

11      www.bikefriday.com      800-777-0258 • +1-541-687-0487
Assembling your Ever-E-Day
Install the Front Wheel
Make certain the wheel is fully
seated in the fork drop-outs,
with the disc brake rotor
properly aligned, you can now
securely close the quick release
lever. [Fig 20.] The quick release
levers (front and rear) are to be
placed on the non-drive side of
the bicycle. When the quick
release is properly adjusted, you
should be able to freely swing
the quick release lever for the
first half of its arc, at which
point the     lever should offer
resistance but still allow for the
lever to be fully closed.
                                       Fig. 20 Secured quick release.

Disc Brakes
When inserting the front wheel into the fork, ensure the disc
rotor (on wheel) fits nicely into the slot on the caliper (installed
on the fork leg). You will want to avoid the rotor getting hung
up or caught on some part of the caliper as you are installing
the wheel into the fork to prevent rotor damage. Also avoid
touching the disc brake rotor as oil can make your brakes squeal
and degrade brake performance.

  12      www.bikefriday.com         800-777-0258 • +1-541-687-0487
Assembling your Ever-E-Day Fine Tuning the Brakes For quick minor adjustments to the brake tension in the brake cable, you can turn the barrel adjuster on the brake lever. Turn this adjuster clockwise to loosen the cable or counter clockwise to add tension to the cable. Ensure that you don’t thread the barrel adjuster out too far and always tighten the lock nut to the lever after making an adjustment. More major adjustments can be performed at the brake caliper. Some brake calipers feature both individual pad and cable adjustment while others only off cable adjustment and control over the fixed pad. Since these adjustments can, please consult with the manufacturer's instructions or contact us and we can provide you with the necessary information. ALWAYS DOUBLE CHECK YOUR BRAKES BEFORE RIDING! Improperly adjusted brakes can be a recipe for disaster. If you are not confident in your brakes, please have them inspected by a local bike shop. Assembly: Pedals Pedal Thread Directions Bike pedals have two different thread directions. The right pedal has a right-hand (clockwise) thread, and the left pedal has a left-hand (counter-clockwise) thread. Pedals are often stamped with an R or L on the pedal axle near the threads. Always grease your pedal threads on new pedals before their first installation. We recommend starting thread engagement with your hands instead of a wrench. If something doesn’t feel right STOP. It is very easy to trip the thread of an aluminum crank arm if pedals are installed incorrectly. Mechanic’s Tip: You can put a wrench on the pedal’s wrench flats, and use a back pedaling motion to screw the pedals on. This is a quick and easy way to remember which way to thread your pedals on and is applicable to either side of the bike. 13 www.bikefriday.com 800-777-0258 • +1-541-687-0487
Double Check Your Friday
Double Check Your Bike Friday!
At this point your bike should be ready to ride. However,
before you ride away, be sure to double-check your assembly.
• Are the handlebars tight?
• How about the stem and pedals?
• Are the quick releases all secure?
• Is the saddle secure and at a reasonable angle?
• Are the handlebar and control levers in a proper place
  and clamped tight?
• Do the electronics power on?

Although we always inflate the tires at the factory, check
your tire pressure for proper inflation. Under-inflated tires
not only wear faster and are more prone to flats, but they
also add rolling resistance.

Be sure to have at least the 5/6mm wrenches with you for
quick roadside adjustments. You will probably want to stop
and adjust saddle height and the angle, as well as perhaps
adjust a few other items during your first ride or two.

Mechanic’s Tip: Grease is your friend. Be sure to keep a
light film of grease on any intersecting bike parts. This
will help to prevent corrosion, facilitate disassembly, and
eliminate annoying noises. Areas include: Ever-E-Day frame
coupling joint, seatposts, saddle rails, handlebars, stems,
pedal threads and seatmast. Doing this a couple of times
per year during routine maintenance should be enough.
Wipe off any excess or visible grease. Also be sure to
lightly grease all bolt threads on your bicycle as you repair
or upgrade com-ponents. Lubricating your bolts will allow
you to adequately tighten the fasteners and keep them
from seizing in the future.

  14    www.bikefriday.com     800-777-0258 • +1-541-687-0487
Adjusting your Ever-E-Day
How to Adjust Your Ever-E-Day to Fit Each Individual Rider
The Ever-E-Day is adjustable to a wide range of riders.
Adjustments can be made to the main frame (frame size) as well
as the seatmast / saddle height and stem / handlebar height.
Frame Size: The Ever-E-Day frame can be adjusted between a
50 cm and 60 cm in 2 cm increments.
If you are comfortable with your current bike, you can use that
measurement as a guideline for your frame adjustment.
If you experience pain in your neck, shoulders, back or knees
from your current bike, you might want to go to a bike shop that
offers fitting. They can find the correct size to set your
Ever-E-Day to for a perfect fit.

Saddle Height: Proper saddle height is important in
prevent-ing injuries as well as increasing riding efficiency and
com-fort. A rough rule of thumb method for determining
proper saddle height is when the pedal is in the 6 o’clock
position, your leg should have a slight bend in it with the ball
of your foot centered on the pedal, your knee almost fully
extended (but not quite). A quick way of achieving this is to
raise your saddle in small increments until you notice your leg
is fully extended in the 6 o’clock position and then lower the
saddle slightly. Rocking your hips to be able to reach the
pedals during the pedal stroke is to be avoided.
Special Feature: If you require the saddle to be lower than
the current lowest setting, you can purchase a shim and
seatpost from Bike Friday so the seat post is usable directly
inserted into the mainframe without the use of the seatmast.

                                    Fig. 27 Lower Seatmast
                                    no seatpost.
  Fig. 26 Lower Seatmast, shim.
  15     www.bikefriday.com       800-777-0258 • +1-541-687-0487
Adjusting: Handlebar Handlebar Height: This is a subjective preference. Handle- bar height can be classified into three general categories: 1) bars below saddle; 2) bars level with saddle; 3) bars higher than saddle. For reference you can use an existing comfortable bike or you can try out the three settings and see which one works best for you. Do note that humans tend to acclimate to whatever position we are given to the point that we may subsequently be set up with a properly sized bike and it will feel improper. You may find it quite constructive to try a few positions, just be sure to try them out for more than a few minutes because that initial period may feel awkward, but possibly because you have acclimated to incorrect sizing. The beauty of the Ever-E-Day is the ability to try and use a wide range of positions on the bike. 16 www.bikefriday.com 800-777-0258 • +1-541-687-0487
Bike Friday Service
Bike Friday Service Overhauls

All of this, and the health of other components, can be checked
by our mechanics during your optional yearly overhaul.

A Bike Friday Overhaul includes:
• Check all components for wear and recommendations
    on replacements
• Strip frame and clean components (optional solvent tank
    option)
• Clean and optional alignment of the frame
• Replace stickers
• New cables and housing
• New bar tape, where applicable
• Test ride and packing

Don’t hesitate to call Bike Friday’s Customer Service
Depart-ment for help: 1-800-777-0258 (U.S.) or 1-541-687-0487
(world), or email Service@bikefriday.com

 17     www.bikefriday.com      800-777-0258 • +1-541-687-0487
Bike Friday Service New Bike Maintenance Like all bikes, your Bike Friday travel bike will go through a break-in period. After the first few weeks of riding you might find that your drive train doesn’t shift as crisply as it did when new, or perhaps the brakes are slightly loose. This happens as new cables stretch, housing compresses and parts wear in. After the initial break-in period, but before a significant tour, it is important to have your Bike Friday bicycle professionally serviced at your local favorite bike shop. A new bike tune-up takes very little time and the small cost for the work is minor considering the improved performance and reliability it provides. Then, at least once a year and before any major tour, take your bike back to your local shop for another tune-up to be sure that it runs smoothly. After a few years of use and a few thousand miles of riding, you might notice that the decals on your bike are starting to look worn and the paint has some scratches. Perhaps your bike doesn’t ride as smoothly as it used to, and the local bike shop can’t get it to function as well as you would like. We offer factory service programs including tune-ups, overhauls, and other repair work by our expert mechanics. A month or two before your next big ride, you may wish to send the bike back for a complete overhaul. Visit our website for repair packages, costs, and details at www.bikefriday.com/Service/. For those who plan ahead, we can gen-erally offer the quickest repair turn-around during the winter months. 18 www.bikefriday.com 800-777-0258 • +1-541-687-0487
Bike Friday Maintenance
New Bicycle Tips and Maintenance Recommendations

Unlike other new bicycles purchased from a shop, your Bike
Friday Ever-E-Day has been disassembled partly and placed in a
suitcase or box. Then it was shipped across town, the country
or the world.

As with any new bicycle, your Bike Friday will need several
minor adjustments as it “settles in.” Knowing how to use barrel
adjusters on brakes and derailleurs and adjust spring tension on
brakes will help you through this settling in period. These skills
are also handy for when you travel with your bike.

Your local bike shop can help, or, check out the excellent
adjustment and repair guides at Park Tool Company’s
website: http://www.parktool.com/repair.

The Initial Break-in Period

It is reasonable to expect that a new bicycle will have an initial
break-in period where adjustments will need to be made after
a hundred-ish miles. The following items may occur or need
at-tention during this break in period:

•   Brake and derailleur cables may stretch. You can perceive
    this as you squeeze the brake lever and you have to
    squeeze farther than previously OR you have to squeeze so
    far before the pads contact the rims that there is not
    sufficient braking force.
•   Some bearing surfaces, notably some headsets, might
    settle in after some use. If they are properly adjusted after
    this initial break in period, they tend to then hold that
    adjust-ment for a much longer period of time.
•   For square taper bottom brackets (and the
    corresponding crankset), it is a good idea to use an 8mm
    hex / Allen wrench to ensure the crank bolt is tight.

    19    www.bikefriday.com      800-777-0258 • +1-541-687-0487
Bike Friday Maintenance Maintenance Maintenance frequency depends on how much you ride and under what conditions. Wet weather will hasten the need for lubing your chain and greasing bearings, for instance. Ongoing Maintenance: • Keep the chain lubed. • Maintain recommended tire pressure (prevents flats and provides the best ride feel). • Keep the bike clean. A Clean bike is a happy bike Areas Requiring the Occasional Application of Grease: • In the steerer tube, where the stem fits in. At least once a year, ideally twice a year. A light film of grease on the out-side unpainted and exposed part of the steerer tube is also recommended. • Inside the Easy Pack seat tube. • Inside the seat mast, where the seatpost fits in. • Inside the tandem joints where the mid-tubes of the stoker compartment are clamped. • Inside the stoker’s adjustable stem, if you have one. Overhauling the Bearings The hubs and the headset are the last remaining components on modern bicycles that can have their loose bearings replaced with new ones and new grease. Most bottom brackets (and many hubs and headsets) have cartridge bearings and have a different procedure. For cartridge bearings, make sure they are properly adjusted to ensure a long life. [CONTINUED ON PAGE 44.] 20 www.bikefriday.com 800-777-0258 • +1-541-687-0487
Bike Friday Maintenance
Overhauling the Bearings [CONTINUED]
To increase their lifespan before replacement, cartridges can be
serviced. Using a thin knife, you can peel back the rubber/ plastic
(metal in the case of Chris King) seal, clean out the old grease as
much as possible, pack in new grease and reassemble.

Under wet riding conditions, overhauling loose ball
bearings should be done every month, otherwise:
• Recommended at six months.
• Once a year if only a moderate amount of time was spent
   riding.
• Every two years if the bike is rarely ridden.

Cables and Housing
Replace the brake/shift cables and their housing every year.

Components That Wear Out

The following is a rough guide on when to replace those parts
on a bike that wear out with use. Tires:

•  When a smooth/bald spot begins to appear on the
   riding surface.
• When you are getting consistent flats.
• The sidewalls appear to no longer be structurally sounds
   (dry rot, slashes, etc.).
Rims:
• For bikes with rim brakes, when the braking surface of the
   rim feels concave.
• Some rims have a “trench” running on the braking
   surface— this is the wear line. When this begins to
   disappear, it is time to replace.
Chain:
• Check at 1500-2500 miles, depending on riding conditions.
• Should be replaced after 3,000 miles.
Gates Carbon Drive Belt:
•      Should be replaced after 10,000
miles. Cassette:
• 10,000 miles if chain replaced frequently.
• If a new chain “skips” on any of the cassette cogs while
   riding, cassette is worn.
• Around 6,000 miles under hard use.
• Brake Pads: Most brake pads have a “wear line”. When
   the pad is worn down to this line, it is time to replace.

    21   www.bikefriday.com       800-777-0258 • +1-541-687-0487
Travel Tips & Airport Security Traveling with your Ever-E-Day Traveling with your Bike Friday on the airlines today will, for the most part, be as convenient as it was just a few years ago in the good old days. However, because of the need for extensive inspec-tions required by the TSA, there are a few points to consider. Do not lock your TravelCase when traveling by air with a non-TSA approved lock. All luggage must be inspected by TSA agents when checking in your luggage. TSA agents can, and have, broken open locked TravelCases. Even after the initial inspection, do not lock your case; we have had reports of subsequent inspections where the TravelCase lock was broken open. You may ask to be present during the inspection, however, you may not touch your bike or TravelCase once you have handed it over to the TSA. By asking to be present, you may be able to give some repacking tips to a very busy agent. Alternatively, you may wish to provide your contact information so if any questions arise in regards to the packing of your luggage, you can be a resource for TSA. When traveling by air, you might consider not over-packing your TravelCase. With some practice it is quite possible to get a tremendous amount of gear into your TravelCase; however this only obscures the inspector’s view and they will deconstruct your care-fully packed case. Consider using extra straps, bungee cords, or toe straps, etc. to bundle the packed bike together as one unit instead of multiple, separable layers. This way an inspector can remove the bike as one piece, look it over, and replace it back into the case quickly and accurately. Consider taking a photo(s) of how the packed bicycle fits in the TravelCase. Any information to make the TSA agent more success-ful in repacking an inspected piece of luggage is to your advan-tage. Photos can be taped to the inside surface of the TravelCase, viewable when the case is open. This can increase the likelihood the TravelCase is properly packed AFTER the inspection, reducing the risk of future damage. Observe airline luggage weight limitations. For domestic flights (including domestic legs of international flights), the checked lug-gage needs to weigh less than 50 pounds. For international flights, the checked luggage limit is 70 pounds. Luggage which exceeds these limitations may be charged an excess baggage fee. Check with the airlines for regulation updates. 22 www.bikefriday.com 800-777-0258 • +1-541-687-0487
Warranty Information
Bike Friday® Guarantee
We at Green Gear Cycling, Inc. (Bike Friday) want you, the customer,
to be happy with your new bicycle. For direct orders shipped from the
factory if your bike does not meet your expec-tations, you may return
the bicycle to us for a full refund, less all shipping charges and a 15%
restocking fee (as of 06-01-18). For bikes ordered through a dealer we
allow the dealer to use their own return policy. This applies to the
purchase of new Cus-tom and Stock bicycles. In all cases, the return
shipping charges are your responsibility. To take advantage of this
guarantee, you must notify our service department (800.777.0258 /
service@ bikefriday.com) within 30 calendar days of your receipt of
your bike of your intent to return the bike, and we must receive it in
our possession within 35 calendar days of you taking delivery of the
bike. We also accept returns on parts within 30 days as long as the
part is unused and undamaged. Processing your refund usually takes
2-6 weeks from the time that we receive back your returned item(s).

We want your bicycle to work for you, and in order for your bicycle
to work well, it should fit. We’ll need some help from you to
ensure that your new Bike Friday fits you well, specifically by
providing us with the measurements of your best fitting bike (if you
own a bike that fits well) and a description of how you feel on this
bike. Additionally, you will be asked for some per-sonal
measurements with a required accuracy within 1/4″ (5mm) and 3
pounds (1.35kg) – yes of your current weight and not your ideal
weight – as well as a description of your riding style and the places
you most likely envision riding your new Friday. Our Consultants
can guide you through the process of obtaining and interpreting this
information. This guarantee does not apply to Stock Bikes, which
are not custom built to your specifications, but come in standard
small, medium and large sizing.

Armed with this data, we can guarantee the fit of your new Fri-day
if (1) we are matching exactly the dimensions from your cur-rent,
best fitting bicycle, or (2) we build a Friday from your body
measurements that includes our optional “fit stem” program.
If you choose to have us build a bike for you that is sized in any
other way, the bike will be sized per that method and built in a
manner that allows for later fine-tuning of the sizing should
you choose, at your expense, to pursue a more exacting fit.

23        www.bikefriday.com         800-777-0258 • +1-541-687-0487
Warranty Information
BIKE FRIDAY WARRANTY
As part of the consideration for buyer’s purchase, buyer
understands and agrees to the following: Green Gear Cycling
warrants your bicycle frame set, including fork purchased from
Green Gear Cycling or an authorized Green Gear dealer against
defects in workmanship and materials for 10 years. This does not
cover paint or powder coat fin-ishes. Green Gear Cycling honors
the original manufacturer’s warranty on parts and components
against defects in manufacturing. Tubes and tires are sold as-is.

This warranty is expressly limited to the repair or replacement of
the defective frame, fork, or defective part at the discretion of
Green Gear Cycling. This is the sole remedy of the warranty. This
warranty applies only to the original owner and is not
transferable.

Claims must be made through Green Gear Cycling or an authorized
dealer. Proof of purchase is required. This warranty covers bicycles
and components purchased outside of the United States only if
purchased through an authorized Green Gear Cycling dealer.

This warranty does not cover normal wear and tear, improper
assembly or maintenance, or installation of parts or accessories
not originally in-tended or compatible with the bicycle as sold.
Under no circumstance shall Green Gear Cycling be responsible
for incidental or consequential damages.

This warranty gives you specific rights, and those rights may vary from
place to place. This warranty does not affect the statutory rights of
the consumer. The warranty applies to bicycles and parts purchased
directly from Green Gear Cycling, Inc., or from its authorized dealers.
Except as provided herein, this product is provided “as is” without any
additional WARRANTY of any kind, including the WARRANTY OF
MERCHANTABILITY and the WARRANTY of FITNESS FOR A PARTICULAR
PURPOSE, whether EXPRESSED or IMPLIED.

  24      www.bikefriday.com        800-777-0258 • +1-541-687-0487
Pre-Owned Bike Guarantee
We at Green Gear Cycling, Inc. (Bike Friday) want you, the
cus-tomer, to be happy with your preowned bicycle. If the bike
does not meet your expectations, you may return the bicycle to
us for a full refund, less shipping charges. This applies to the
purchases of pre-owned bicycles. In all cases, the return
shipping charges are your responsibility. To take advantage of
this guarantee, you must notify our service department
(800.777.0258 / service@ bikefriday.com) within 30 calendar
days of you originally receiving the bike. We must receive it
within 35 calendar days of you taking delivery of the bike. We
also accept returns on parts within 30 days as long as the part is
unused and undamaged. Processing your refund usually takes
2-6 weeks from the time that we receive back your returned
item(s).
The sizing of the pre-owned bicycles are limited by their
cur-rent construction. Bike Friday will, as part of the
purchase price, replace the stem if necessary before
shipping to you or allow for an upgrade to the “fit stem”
program for a more exacting fit. No other modification to a
pre- owned frame is allowed. Any expenses for future
corrections to the siz-ing will be borne by the purchaser.
Green Gear Cycling, Inc. 3364 W. 11th Avenue. Eugene, OR 97402

  25     www.bikefriday.com       800-777-0258 • +1-541-687-0487
You can also read