How to install OS X Snow Leopard 10.6.2 on a Nokia Booklet 3G - By Adam Bradley (computid) Email me at: Twitter: @computid
←
→
Page content transcription
If your browser does not render page correctly, please read the page content below
How to install OS X Snow Leopard
  10.6.2 on a Nokia Booklet 3G

         By Adam Bradley (computid)

       Email me at: adam@craywiki.co.uk

              Twitter: @computid
Introduction:
• We will first be installing OS X Snow Leopard onto the external drive using a Mac
• We will then modify the installation to boot on the Booklet 3G
• After we have booted OS X on the Booklet 3G we will proceed to add drivers/kexts
for all the other hardware.
• Once it is configured we will copy OSX to the internal HDD and from there finalise
the installation
Requirements for this hack:
• Retail Snow Leopard Disc (10.6.0 or 10.6.1) or external HDD with the bootable
installer on.
• Apple Mac that can run/boot the SL DVD (Intel)
• External USB Flashdrive or HDD bigger then 15gb
• Nokia Booklet 3G
At this point, heres what is working correctly:
• Machine boots properly to Snow Leopard with simple push of power button. No
manual keystrokes necessary during boot.
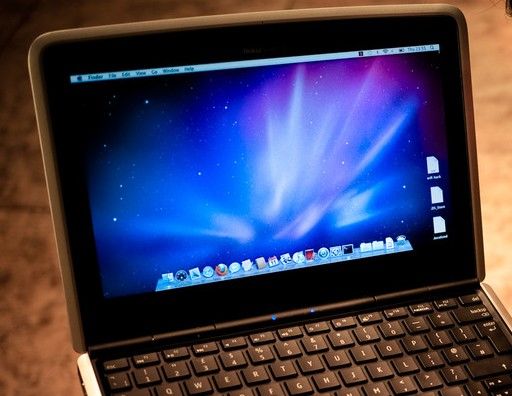
• Screen Resolution is auto-set to native 1280 x 720. For some reason, the display
comes up at about 45% brightness each time, so you have to go into system
preferences to bring it up to full (presuming you want too)
• WiFi comes on, quickly finds the network, but we still have the problem of
having to type "sudo killall mDNSResponder" after each reboot.
• Bluetooth is defaulted to "ON", but there is no option in the menubar to disable
it. (Fn + F10 will toggle on/off all radios (GSM/BT/WiFi)
• Sound is NOT working, nor does the System Profiler show any internal sound
device. I am working on this!
NOTE: All the files are provided in the following package but to save my bandwidth please
use the RapidShare download links if you can:
http://www.atechplace.co.uk/downloads/Nokia%20Booklet%20OSX.zipCreating the Snow Leopard Installation
1. Boot to the Snow Leopard Installer on the Mac
2. Plug in your external USB Disk
3. In OS X installer run Disk Utility from the tools menu
4. Reformat the External Drive as HFS+ (Mac OSX Journalled) (DO NOT FORMAT
YOUR INTERNAL DRIVE!)
5. Continue with the Snow Leopard installation and customize the install to not install
languages, at the same time you may want to install quicktime 7 and Rosetta, it will
save you hassle later. (Removing the languages is optional, but it does cut down on
space and install time)
6. Once the installer is finished reboot to the NEW Snow Leopard installation by
holding down the "Option" key at boot, then select the USB Drive.
7. Download and install SuperDuper
http://www.shirtpocket.com/SuperDuper/SuperDuperDescription.html
8. Download and install the 10.6.1 combo installer
http://www.apple.com/downloads/macosx/apple/macosx_updates/macosxv1061up
date.html
9. Download the following Files/Applications
1. Download KextHelper. This application helps install KEXT files correctly.
http://cheetha.net/
2. Download KEXT (Kernal Extensions) vaiop20091014us.tar.bz2 from
http://rapidshare.com/files/349547875/vaiop20091014us.tar.bz2
3. Download Chameleon 2 RC3 (DO NOT USE RC4, ONLY RC3). This is used to
boot the
system.http://rapidshare.com/files/349330606/Chameleon_2_RC3.zip
10.Run the Chameleon 2 RC3 installer. Choose to install it to the USB Snow Leopard
installation. DO NOT INSTALL THIS TO YOUR MACS HARDDISK, YOUR MAC WILL
NOT BOOT IF YOU DO!
11.Go to the root level (Top Level) of the USB drive. There will now be a folder called
"Extra".
12.In the vaiop20091014us folder there should be a folder called "Extra". Copy the
contents of this folder to the “Extra” folder on the USB Snow Leopard install.
13.Open up a terminal window and type "sudo" then drag the file "extra.sh" in the
"Extra" folder to the terminal window. You should have a command string that looks
similar to this: sudo /Volumes/USBDRIVE/Extra/extra.sh14.Hit return and type in your password 15.Next open up KextHelper 16.Drag the two kext files from vaiop20091014us/System/Library/Extensions into the application. Type in your password and hit Easy install. 17.Shut down your Mac 18.Congratulations, you should now be able to boot this drive on the Booklet!
Moving the Installation to the Booklet 3G:

    1. Put the USB drive into the Booklet 3G

    2. Power the booklet on and press F12 until the bios boot menu appears asking what
       device you want to boot from. You should see the internal hard drive and the USB
       drive. Select the USB drive.

    3. At this point the chameleon bootloader should appear, Press any key to interrupt
       the count down. Use the arrow keys to highlight the USB drive then type "-v -f" and
       press return. This will boot the USB Snow Leopard volume in verbose mode and
       rebuild the kext cache's

    4. This may take a little while to boot depending on your USB drive. If everything went
       ok, you should now be sitting at a Snow Leopard desktop (in a bad Resolution,
       mind you.)

    5. Fire up disk utility (Applications/Utilities)

    6. This is when it become permanent, this will ERASE ALL DATA ON THE
       INTERNAL DISK.

    7. Select the internal hard drive and go to the partitions tab. Select one partition from
       the pull down menu, name the partition whatever you like (I used Documentallys
       Hackbook), select MAC OS Extended Journaled. Go to options and select GUID.

    8. Hit the apply button - This will erase all contents of the internal drive!

    9. Close Disk Utility

    10.Open SuperDuper. Set it up as follows:
          1. Copy: (your external USB drive) to: Internal (the drive you just partitioned)
          2. Using: Backup - all files
          3. Options: select repair permissions on Booklet
          4. During Copy: Erase  then copy files from
          5. On successful - Restart from

    11.Hit OK and then press "Copy Now"

    12.Wait unit it finishes, go make yourself a coffee, this will take a while.

    13.Reboot with the external USB drive still connected to your Booklet.

    14.Press F12 to select the USB drive again (last time!)

    15.At the chameleon screen highlight the internal drive and type "-v -f" and hit return.
      You are now booting Snow Leopard from the internal drive.

    16.It may take a while to boot, BE PATIENT.
17.You should now arrive at the desktop! Congratulations, you've installed OS X on your Booklet 3G! 18.Remove "Windows7 Starter" sticker from the lower left side of netbook palmrest if you haven't already done so. (Optional) 19.Go take a break, Grab a drink or something, then continue.
Finishing up the installation:
    1. Fire up terminal
           1. Type: "sudo killall mDNSResponder". This should ensure that your Wifi is
              working properly. At present, you will need to re-enter this command each
              time you reboot the booklet until I get around to writing a startup script.
           2. Enter your password
           3. Quit the Terminal

    2. Download the following files to your desktop:
          1. Download the modified boot loader file which will, when installed, set your
             display to its correct native resolution of 1280 x 720 on your next reboot.
                 1. Download the file from here:
                    http://rapidshare.com/files/349336710/boot.nokia-booklet-gma500-
                    v2.gz
                 2. When the file appears on your desktop, double click on it and it will
                    extract to "boot.nokia-booklet-gma500-v2"
          2. Download Aboutthismac.pkg: This will make the information in "About This
             Mac" Correct, This isn't needed but it is nice.
             http://rapidshare.com/files/349337197/AboutThisMac.pkg.zip

    3. Re-install Chameleon 2 RC3 to the Internal Disk

    4. Double check in the Extra's folder that it still contains the Kexts

    5. Install the modified boot loader file to correct the Resolution:
           1. Back up your original boot loader file by firing up Terminal and typing the
               following command: "sudo mv /boot /boot.orig"
           2. Hit enter, type your password and hit enter again.
           3. On your desktop, rename the "boot.nokia-booklet-gma500-v2" to simply
               "boot"
           4. Now copy over the modified bootloader to replace the old one by typing:
               "sudo cp /users/YOURHOMEFILENAME/desktop/boot /boot"
           5. Hit enter, type your password and hit enter again.
           6. Quit Terminal

    6. Eject the USB Disk.

    7. Restart. You should get the Chameleon boot loader now when booted to the
       internal hard drive.
           1. NOTE: if you have trouble booting you should interrupt the the bootloader by
              pressing any key and boot up using the -v -f flags.

    8. Install the aboutthismac package to get the correct info in “about this mac”

    9. Set up your Atheros 9280 3G modem:
           1. Go to: http://www.option.com/en/support/software-download/usb-
              modems/icon225/
           2. Download and install MAC Driver 2.17.0
           3. Download and install the GlobeTrotter® Connect For Mac
4. In System Preferences>Network>GI40x, set up your carrier information for
your 3G connection and it should begin working
5. (Optional) - Check the box at the bottom that says "Show modem status in
menu bar"
10.Run the 3g modem to check the hardware initializes with the sim card installed.Upgrading to 10.6.2:
1. Download the patched kernel from:
http://rapidshare.com/files/349340631/mach_kernel_atom_with_pm_support.zip or
here if you have an insanely mac account.
2. Before you update you need to backup your old kernel:
1. Open terminal and type: sudo cp -p /mach_kernel /mach_kernel.1061
2. Press return
3. enter your password
4. Press return
5. Quit terminal
3. Update your OS to 10.6.2: Apple Menu>Software Update>Update to 10.6.2
4. Upon completion of update to 10.6.2, your computer will reboot
5. During the reboot, MAKE SURE YOU INTERRUPT THE CHAMELEON BOOTLOADER
by pressing any key.
6. Then, specify the kernel at chameleon's screen by typing: mach_kernel.1061
7. Hit enter, and boot should continue until you're in Snow Leopard.
8. Patch the kernel:
1. Expand the 106atom64.zip file you downloaded before updating. This will
create a file called "patch"
2. Drag the two files ("binchg.rb" and "1062atom64.xml") from "patch" into
your root directory (Top level HDD Directory)
3. open Terminal once again and type: sudo /binchg.rb /mach_kernel /
1062atom64.xml
1. This will initiate a conversion process that takes about 20-30 minutes
2. During this time you should see:
0x000286c0 hit -> cpumodel is always 0x1e x86_64
0x005e6a83 hit-> cpumodel is always 0x0e i386
3. These messages are completely normal. Be patient, this takes a while.
When the process is completed, you will get a command prompt.
4. Now you need to replace the kernel:
Run in terminal:
sudo mv /mach_kernel /mach_kernel.1062
sudo mv /mach_kernel.patched /mach_kernel
sudo touch /System/Library/Extensions
9. This should complete the upgrade. Reboot the booklet and enjoy Snow Leopard
10.6.2 on your new Hackbook!You can also read