Otoscan User Guide - Natus Partner
←
→
Page content transcription
If your browser does not render page correctly, please read the page content below

Otoscan
 User Guide
Doc. No. 7-50-1420-EN/06
 Part No. 7-50-14200-EN
Copyright notice
    © 2017, 2020 Natus Medical Denmark ApS. All rights reserved. ® Otometrics, the Otometrics Icon, AURICAL, MADSEN, HI-PRO 2,
    Otoscan, ICS and HORTMANN are registered trademarks of Natus Medical Denmark ApS in the U.S.A. and/or other countries.
    Version release date
    2020-01-28 (216005)
    Technical support
    Please contact your supplier.
    Patents
    This product is covered by one or more patents or patent applications as listed at: www.unitedsciences.com/patents:
    1. U.S. Patent 8,715,173
    2. U.S. Patent 8,900,126
    3. U.S. Patent 8,900,125
    4. U.S. Patent 8,900,129
    5. U.S. Patent 8,900,128
    6. U.S. Patent 8,900,127
    7. U.S. Patent 8,900,130
    8. U.S. Patent Application 14/040,973
    9. U.S. Continuation Patent Application 14/538,994
    10. U.S. Patent Application 14/041,943
    11. U.S. Patent Application 14/049,542
    12. U.S. Patent Application 14/049,538
    13. U.S. Patent Application 14/049,666
    14. U.S. Patent Application 14/049,530
    15. U.S. Patent Application 14/049,687
    16. U.S. Patent Application 14/049,678
    17. U.S. Patent Application 14/049,504
    18. U.S. Patent Application 14/049,518
    19. U.S. Patent Application 14/150,863
    20. U.S. Patent Application 14/462,619
    21. PCT Patent Application PCT/US2012/029806
    22. PCT Patent Application PCT/US2013/028347
    23. Australian National Phase Patent Application 2012231140 Corresponding to PCT Patent Application PCT/US2012/029806
    24. European National Phase Patent Application 12760319.9 Corresponding to PCT Patent Application PCT/US2012/029806
    25. Chinese National Phase Patent Application Corresponding to PCT Patent Application PCT/US2012/029806
    26. South Korean National Phase Patent Application 10-2013-7027859 Corresponding to PCT Patent Application
    PCT/US2012/029806
    27. Japanese National Phase Patent Application Corresponding to PCT Patent Application PCT/US2012/029806
    28. Canadian National Phase Patent Application Corresponding to PCT Patent Application PCT/US2012/029806
    29. Hong Kong National Phase Patent Application Corresponding to PCT Patent Application PCT/US2012/029806
    30. PCT Patent Application PCT/US2014/59512
    31. PCT Patent Application PCT/US2014/59521
    32. PCT Patent Application PCT/US2014/59535
    33. PCT Patent Application PCT/US2014/59530

2                                                                                                       Otometrics - Otoscan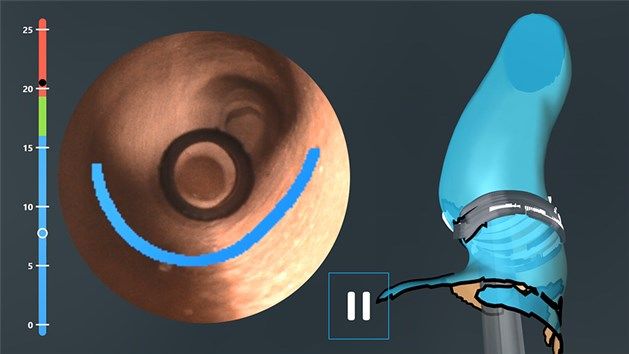
User Guide

             Table of Contents

              1   Introduction                              4

              2   Intended use                              5

              3   Unpacking                                 7

              4   Getting acquainted with Otoscan           8

              5   Logging into the system                   14

              6   Managing patient records                  16

              7   Preparing the patient for scanning        19

              8   The scanning session                      23

              9   Managing patients and scans in Otocloud   35

              10 Logging out                                37

              11 Cleaning                                   37

              12 Service and maintenance                    38

              13 Troubleshooting                            40

              14 Standards and warnings                     44

              15 Technical specifications                   49

              16 Other references                           55

              17 Manufacturer                               55

Otometrics - Otoscan                                                     3
User Guide

1            Introduction
             Otoscan is a comprehensive ear scanning solution that provides a new, safe and easy way to make digital impressions for
             earmolds or customized in-ear devices.
             It eliminates clinical concerns related to traditional silicone impressions, such as risk to the patient, patient discomfort,
             and inconsistent outcomes.
             The primary function of Otoscan is to make digital 3D scans of the patient's ear canal and pinna, to be used in the man-
             ufacture of customized in-ear devices. The scanning software transforms the scans into image files that are ready for use in
             3D modeling. During the scanning process, the scanner performs video otoscopy in order to help the user navigate the
             scan in the patient’s ear. See Intended use ► 5.

             Scanner and software
             The scanner is used in connection with Otoscan Session Manager installed on a dedicated PC.
             Session Manager synchronizes data with the online application Otocloud, from where you can access, annotate and, sub-
             sequently, submit patient scans electronically as custom orders to manufacturers or earmold laboratories.

1.1          The Otoscan system
             The Otoscan system consists of:
             •   A dedicated laptop with pre-installed Otoscan software
             •   A hand-held scanner
             •   A cradle for secure docking of the scanner
             •   A headset for precise targeting of the ear and ear canal during scanning
             •   A training kit for practicing the scanning technique. (Optional)
             The individual parts of the system are further described in the following sections.

             Fig. 1    The Otoscan set
             A. Scanner seated in its desktop cradle                         B.   Headset

4                                                                                                                       Otometrics - Otoscan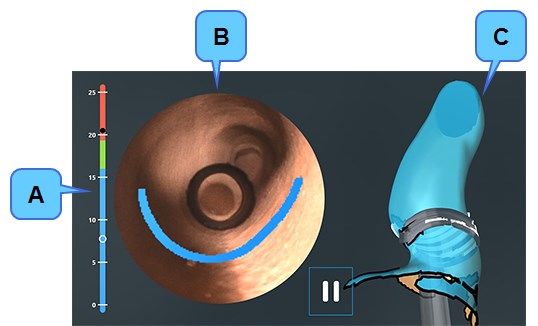
User Guide

1.2          About this manual
             Read the User Guide
             Read this User Guide before using the scanner for scans involving patients.
             Where relevant, the procedure to be followed is listed at the beginning of the section, and a detailed description of the
             individual steps can be found in the sections following the procedure.
             To obtain a free printed copy of the user documentation, contact Natus Medical Denmark ApS (www.natus.com).

             The use of Warning, Caution and Note
             To draw your attention to information regarding safe and appropriate use of the device or software, the manual uses pre-
             cautionary statements as follows:

                Warning • Indicates that there is a risk of death or serious injury to the user or patient.

                Caution • Indicates that there is a risk of injury to the user or patient or risk of damage to data or the device.

                Note • Indicates that you should take special notice.

             Reference to screen items in this User Guide
             Menus, icons and functions to select are shown in bold type, as for instance:

              "In this example, which displays an ongoing scan, the trigger will activate the Pause button."

2            Intended use
             Otoscan provides a magnified visual image for inspection of the external ear canal and tympanic membrane, and provides
             illumination of the ear canal for inspection.
             Otoscan records and presents to the hearing professional in an image file a topology measurement of the external ear
             canal.

2.1          Indications for use
             The primary application of the scanner and Session Manager is to make digital three dimensional (3D) impressions (scans) of
             the patient's ear(s) for manufacturing earmolds and customized hearing instruments.
             The 3D impression can also be used for manufacturing customized noise protection headsets, ear plugs or swimming ear
             plugs.

Otometrics - Otoscan                                                                                                                         5
User Guide

             The secondary application of this product is video otoscopy. The video otoscope function is mainly to help the user nav-
             igate the scan in the patient’s ear.

2.2          Physical operating principle
             The Otoscan scanner projects a blue ring or line of light from the probe onto the surface of the ear canal or the outer ear.
             This projection is converted to 3D coordinates through a complex camera system.
             A 3D model is created by scanning the probe over the surfaces of the ear. The camera system also allows the operator to
             navigate the probe inside the ear canal, which is illuminated by a white light source.
             The user can operate the scanner directly from the hand-held scanner display.
             The scanner is intended for transient use.

2.3          Intended user profile
             Audiologists, hearing instrument dispensers, ENT doctors and other trained personnel.Please note that local regulations
             may define users for video otoscopy differently. Local regulations must be complied with at all times.

2.4          Intended patient population
             Otoscan is indicated for use on patients 18 years of age and older presenting for inspection of the external ear canal.

2.5          Intended part of the body or type of tissue applied to or interacted with
             The external ear of the patient is the only intended body part for scanning.

2.6          Contraindications

               Warning • If the patient experiences severe discomfort during the scanning procedure, stop the process.

               Caution • It is strongly recommended that you perform an otoscopic exam with a traditional or dedicated video oto-
               scope to assess the status of the outer ear prior to performing a scan.
               - Cerumen should be absent, or present in only a small amount that does not interfere with the scanning process.
               - If excessive cerumen is present, either do not scan the ear or clean the ear before scanning.
               - Make sure that there is no residual fluid in the patient's ear after cleaning or wax removal.

               Warning • Scanning should not be performed on patients displaying the following contraindications:
               - If there is discharge or signs of infection in the ear
               - If the patient recently has undergone ear surgery
               - If the ear canal is occluded or cerumen is present in moderate amounts that will interfere with the scanning process
               - If the patient is uncooperative
               - If the patient is unable to be still during the scanning process due to uncontrollable or involuntary movements of the
                 head and/or body

6                                                                                                                     Otometrics - Otoscan
User Guide

             - If the patient has a history of seizures, migraines, or other sensitivity to strobing lights
             - If the patient experiences severe discomfort during the procedure

3            Unpacking
              Package 1: Laptop                          Package 2: Scanner and headset               Optional: Training kit

             Fig. 2     The Otoscan set and optional training kit

             Unpacking the PC
             •    Remove all packaging and make sure to store all cables and parts, including the instruction material.
             •    Keep the enclosed insert note at hand for reference. Possible later users may need the description of how to start the
                  PC and find the present user guide.

             Unpacking the scanner, cradle and headset

                 Note • Carefully remove all packaging and note that the scanner probe tip is fragile!
                 Be particularly careful when removing the tape that keeps the scanner attached to the cradle and when handling the
                 scanner once it is free.

             •    When the scanner is not in use, always place it in the cradle to protect the probe tip.

             Inspecting the equipment for possible damage

                 Caution • Visually inspect the equipment for possible damage.
                 If damage has occurred, do not put the device into operation. Contact your local distributor for assistance.

Otometrics - Otoscan                                                                                                                       7
User Guide

             Fig. 3    To avoid damage, always leave the scanner in the cradle when it is not in use!

             Checking the packing list
             •   Check the packing list to make sure that you have received all necessary parts and accessories. If your package is incom-
                 plete, contact your local distributor.

             Storing packaging for later use
             •   Keep all packing materials as the original packing material will protect against damage during shipping, for example
                 when sending the scanner in for an annual calibration check or service.

3.1          Storage of the Otoscan units
             If you need to store the Otoscan devices, follow these guidelines:
             •   Store Otoscan and accessories in the boxes provided to protect the equipment from damage.
             •   Store Otoscan and accessories in a dry environment. See also Technical specifications ► 49.

4            Getting acquainted with Otoscan
4.1          The Otoscan PC
             The PC is dedicated to be used exclusively for the Otoscan process. It powers the scanner during use, and the installed Ses-
             sion Manager controls the scanner and stores the data derived from the scanning process in a local database.
             When online, the local patient database will be synchronized with a second database which is part of the online applic-
             ation Otocloud.

             Installation procedure
             1. Set up the PC on a suitable location. (See below).
             2. Power the PC: Connect it to an electrical outlet. (See below).

             Setting up the PC
             •   Place the PC on a suitable desktop and leave a space for the scanner nearby. Make sure that the PC's air vents are not
                 obstructed.
             •   Consider placing the PC screen in full view of the patients, so they can follow the scanning process.

8                                                                                                                    Otometrics - Otoscan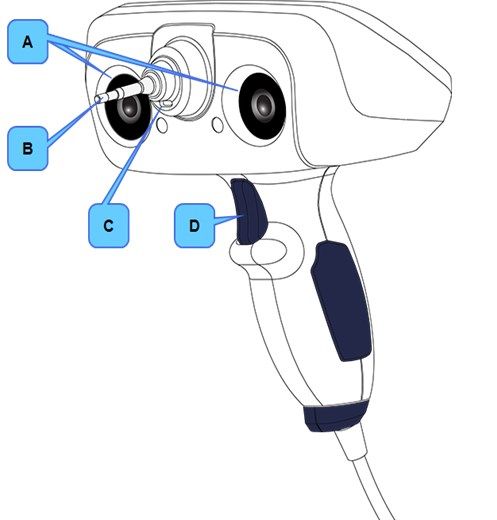
User Guide

             Otoscan Session Manager and all required accessories have been installed on the PC at the factory.
             The PC is to be connected to a wired or wireless network prior to use. See Connecting to Internet ► 9.
             To get started you need a log-in and a password which is provided by the local Otoscan administrator.
             For instructions on how to use the Otoscan software units, see the sections:
             •    Logging into the system ► 14.
             •    Managing patient records ► 16.
             •    The scanning session ► 23.
             •    Managing patients and scans in Otocloud ► 35.

             Powering the PC
             1. Plug the external power supply into the Power socket on the PC.
             2. Plug the external power supply directly to an AC electrical wall outlet with a three-wire protective ground.

             Battery operation
             If needed, the PC can run on its built in battery for a short period before it must be connected to an electrical outlet for
             recharging. To prolong battery life, do not let the PC discharge entirely before recharging it.

             Further instructions
             If you need further instructions on how to connect the PC to an electrical outlet or how to use general functions on the
             PC, see the user instructions from the PC manufacturer, which are supplied with the PC.

4.2          Connecting to Internet
             The PC can be connected to a network by a wired Ethernet cable or by a wireless (Wi-Fi) connection.

             Connecting to a wireless (Wi-Fi) network
             1. To access the list of available wireless networks, click the network icon in the system tray in the lower right corner of
                the PC screen.
             2. Locate the network to which you want to connect and click its name. If it is a network you know and you will connect
                to it on a regular basis, you should also check the option that says: Connect automatically. Then, click Connect.
             3. After you have clicked Connect, Windows will do a scan for the security settings of the wireless network. When it is
                done, it will ask you for the security key.
             4. Once you have entered the security key (password) required by the wireless network, click Next.

             Connecting to a wired network
             1. Plug the Ethernet cable into the network adapter on the PC.
             2. The network connection should be established automatically.

                 Note • Contact your network administrator for support with establishing or maintaining a network connection.

Otometrics - Otoscan                                                                                                                        9
User Guide

4.3          The Otoscan cradle

             Fig. 4       To avoid damage, always leave the scanner in the cradle when it is not in use!

             The cradle is designed for safe docking of the scanner when not in use. In addition, the inside back wall of the cradle is
             covered by a dotted pattern. Before each scan, the scanner will use this pattern for a self-test of the functionality of the
             scanner.

4.4          The scanner
             The scanner is an advanced unit with built-in lasers and cameras. See Physical operating principle ► 6.
             The patient headset serves as the reference point for the entire scanning process. See The headset ► 14.
             During scanning, the two cameras placed on either side of the probe continuously track the position of the headset rel-
             ative to the 3D data that is being collected by the scanner. This allows the system to build an accurate 3D model of the ear
             canal and the required parts of the pinna. See The scanner components ► 11, Fig. 5 and Fig. 6.

                 Caution • The scanner probe tip is fragile. To avoid damage, always leave the scanner in the cradle when it is not in
                 use!

4.4.1        Connecting the scanner

                 Warning • The Otoscan system must always be installed in accordance with the instructions in the Otoscan User
                 Guide.

             The scanner is fully assembled on delivery, and you simply have to connect cables.

                               Caution • To connect the scanner to the PC, use only the supplied USB cable.

             •    Connect the USB cable that is attached to the scanner into one of the PC’s USB ports on the side of the PC.

10                                                                                                                     Otometrics - Otoscan
User Guide
Warning • The scanner must not be connected to PCs other than the locked-down laptop provided by Otometrics. No
attempts should be made to use it with any software other than Otoscan Session Manager, Otocloud and training
software.
Place the cradle and scanner next to the PC
• Keep the scanner in the cradle and place the set on a stable desktop next to the PC.
Choose a location where you will have convenient access to the scanner when it is parked in the cradle.
Also, ensure that you have a clear view of the PC screen during the scanning session. This will be useful when you
pause to evaluate the scanned image, if you prefer to see it on the larger screen, and when you finalize the scanning
session.
4.4.2 The scanner components
The individual components of the scanner that work together to form the 3D scans are described below, as seen from the
probe-side and the touchscreen side of the scanner, respectively.
Scanner components — seen from the probe side
A. Tracking cameras
Cameras on either side of the probe detect the tracking
ring of the headset worn by the patient. The cameras
track the position of the scanner in relation to the
patient’s ear. To function properly, the cameras’ view of
the tracking ring must remain unobstructed.
B. Ring laser
Scans outwards from the tip of the probe (E on Fig. 6 ►
12). Scans the canal (in Canal Ring mode) and the
curved portions of the pinna such as the helix, sidewalls
of the concha, and intertragal notch (in Concha Ring
mode).
C. Line laser
Scans in front of the probe tip in a horizontal line (in
Pinna Line mode), similar to a bar code scanner. It is
used for scanning the flatter parts of the pinna, such as
the center part of the concha bowl, and ridges at the
edge of the concha..
D. Trigger button
Selects the most common next action, based on the cur-
rent state of the device. If more than one action is avail-
able, the most common next action is shown
highlighted on the screen. For example, you will use
Fig. 5 The hand-held scanner, seen from the probe
the trigger to set the depth gauge and start a scan. Dur-
side.
ing a scan, you can press the trigger to pause the scan.
Otometrics - Otoscan 11User Guide
Scanner components (continued) — seen from the touchscreen side
E. Probe
The probe is the portion of the scanner which can be inser-
ted into the ear canal. It contains lighting, the video oto-
scope camera, and the Ring laser scanner. It is fragile and
can break if the device is not seated in the cradle while
not in use.
F. Status indicator
The color of the Otometrics logo indicates the status of
the scanner. The device is on and ready when the light is
green. See Legend: Status indicator colors below.
G. Touchscreen
The screen is a touchscreen. It serves as the primary inter-
face used throughout the scanning process and can be used
in combination with the trigger. All aspects of the pro-
cedure are shown on the screen, including the 3D scan
image, the video otoscopic view, depth readings, and mes-
sages.
Fig. 6 The hand-held scanner, seen from the touch-
screen side
Legend: Status indicator colors
Green: Ready/Standby
Blue: Scanner active or in scanning mode, with headset tracking
Yellow: Scanner in scanning mode, but tracking lost
Action required: Correct scanner position vs. tracking ring.
Orange: Depth warning and any error condition.
Action required: Correct the error.
4.4.3 Switching the scanner on and off
Switching the scanner on
The PC controls the power to the scanner. This means that the scanner will be switched on automatically when you ini-
tiate a scan from within a patient record in Session Manager. See Beginning the 3D scan ► 23.
To open Session Manager, you need a registered user name and a password. See Logging into the system ► 14
Warning • Do not stare into the laser, or point the laser in the direction of other people’s eyes. It can damage the
eyes.
Switching the scanner off
The scanner automatically switches off a short time after completion of a scanning session.
12 Otometrics - OtoscanUser Guide
Note • If you accidentally unplug the scanner from the PC during use, this will switch off the scanner but not the scan-
ning application. Plug the same scanner back in and continue the scanning session.
4.4.4 Using the Otoscan trigger and touchscreen
Operating methods
The recommended way to control the scanner is by means of its touchscreen and trigger.
Using the touchscreen
During scanning, the touchscreen on the scanner displays a duplicate of the screen on the PC. This allows you to operate
the scanner by means of its touchscreen, while you can use the PC display for a larger view of the partial or completed
scan. When needed, you can also make scanner selections on the PC screen by using a PC mouse or the PC's touch pad.
Caution • The Otoscan touchscreen display may get hot during heavy use. Do not touch the display surface for longer
than 1 minute.
Using the trigger
The Otoscan trigger is located on the handle of the device. See point D in The scanner components ► 11. It allows the
user to start or pause the scan as well as proceed to next steps in the scanning process. Pressing the trigger will always
select the button seen on the touchscreen. If more than one button is available, the button to be selected next will
appear highlighted on the screen. Generally, the highlighted buttons on the screen will guide you through the normal scan-
ning procedure.
In the example in Fig. 7, which displays an ongoing scan, the trigger will activate the Pause button.
Fig. 7 An ongoing scan. The Pause button is the only selection available at this point.
4.5 Accessories
Unpacking the accessories
Unpack the headset and (if relevant) the optional training kit and place them next to the scanner.
Otometrics - Otoscan 13User Guide
4.5.1 The headset
The headset is fitted on the head of the patient before scan-
ning. It is essential for the scanning process, as the tracking ring
of the headset serves as the reference point for the two cam-
eras on the scanner, which keep track of the exact location of
the ear during the scan.
It is, therefore, very important for a successful scan that the
headset is placed correctly, and that it remains in place during
the entire scan. See Placing the headset ► 21.
In order to facilitate correct placement, the headset is
designed for scanning of one ear. When scanning the other ear
(if required), reposition the headset to target that ear. This pro-
cedure is found to maximize efficiency and maintain high accur-
acy for both scans.
Fig. 8 The headset, with the tracking ring correctly centered over the ear
4.5.2 Training kit
A training ear stand, permanently fitted with a ring from a headset, and two interchangeable ear models are available as an
optional extra for training purposes.
If the training kit was part of your order, place them in a convenient location for training such as next to the scanner.
Along with the included training software which is accessible from the desktop of the Otoscan PC, this set of ears
provides a safe and convenient opportunity to experiment with the scanner until you feel that you have gained suf-
ficient proficiency to use it with real people.
4.5.3 Otoscan training
Otoscan training sessions are arranged in order to ensure that users quickly become familiar with using the equipment in a
safe and efficient manner.
Please consult your supplier for information on available training in your area.
5 Logging into the system
User ID and password
All Otoscan users must have a user ID (the user’s email address) and password to access Otoscan Session Manager and the
online application Otocloud. There are two ways to access Otocloud: Either through Session Manager on the Otoscan PC,
or via the separate Otocloud login on any PC with internet connection. See the Otocloud User Guide for further inform-
ation.
14 Otometrics - OtoscanUser Guide
Initially, the primary administrator for a clinic receives an email with instructions on how to log into Session Manager and
Otocloud. The primary administrator can then add other users who need access to the application.
5.1 Logging in
The first log-in
Otoscan administrators can set up users in the online application Otocloud.
Each new user who has been set up by the administrator, will receive an email with a user name and password for Oto-
scanSession Manager and Otocloud.
To log in, follow this procedure:
Start the PC and open the Otoscan software application
1. Press the ON/OFF button on the PC to switch it on.
2. Click the Otoscan icon on the desktop of your PC.
Wait while the system checks for new software
When Session Manager starts, it checks for updates to the software. If an update is available, we recommend that you let
the system install it. If the update notification is shown at an inconvenient time, you can skip the update for a limited num-
ber of times. However, the system will continue in offline mode until the software has been updated.
If the update is critical for continued performance, you will not be allowed to skip the update.
• To start the update, click the Update button.
Update available for
Otoscan Session Manager
• To skip the update, just log into the system.
Log into the system
The system will prompt you to enter your user name and password:
• Enter the user name and password that you have received from the Otoscan admin-
istrator in your clinic.
• Click the button Login.
Note • If you leave the PC idle for 20 minutes, the system automatically logs you out.
See Logging out ► 37 for instructions on how to log out and close down after use.
Otometrics - Otoscan 15User Guide
Forgotten password
If you have forgotten your password, do as follows:
• Click the link below the Login button: Forgot Password
You will be redirected to another window, where you can enter your email address.
You will then receive an email with instructions on how to reset the password and create a new one.
5.2 Overview of the Otoscan software application
Session Manager contains a patient database, which opens automatically when you start Session Manager. Here patient
data is created and kept updated. See Managing patient records ► 16.
The scanner can only be started from within a patient record. While performing a scan you can operate the scanner dir-
ectly from its built-in touchscreen. See The scanning session ► 23.
5.3 Overview of Otocloud
Otocloud is Otoscan's online application. It is used to transmit scans and images to hearing instrument manufacturers and
earmold laboratories in association with hearing instrument orders.
There are two ways to access Otocloud: Either through Session Manager on the Otoscan PC, or via the separate Otocloud
login on any PC with internet connection. See the Otocloud User Guide for further information.
When the Otoscan PC is online and a user is logged in, the application will keep the patient record in the local database on
the PC synchronized with the corresponding data records in Otocloud.
While you are working in Otocloud from the Otoscan PC, Session Manager on the PC remains open in background.
• To switch between Otocloud and Session Manager: press the keyboard keys Alt + Tab.
• Alternatively, click the relevant icon, that is, the Otoscan icon or the browser icon on
the task bar at the bottom of your PC screen. or
If you leave Session Manager idle in the background for 20 minutes, the system automatically logs you out. This is done to
minimize the risk of unauthorized access to the data.
See Managing patients and scans in Otocloud ► 35 and the Otocloud User Guide for further information.
6 Managing patient records
Otoscan Session Manager and Otocloud store all patient data and saved scans in mutually synchronized patient records.
It is good practice to check if a patient is already in the database, before you create a new patient record.
This description covers Session Manager. For instructions on how to work with patient records within Otocloud, see the
Otocloud User Guide.
Opening or adding a patient record in Session Manager
• See Opening a patient record ► 17.
• If no record exists for the current patient, create one. See Creating a new patient record ► 19.
For information on how to work with patient records in Otocloud, see the Otocloud User Guide.
16 Otometrics - OtoscanUser Guide
More options
• Editing a patient record ► 18.
• Deleting a patient record ► 18.
6.1 Opening a patient record
When you start Session Manager, the Patient list appears.
To find an existing patient record in the Patient list, you can either use search filters or sort the list by the column head-
ers.
Using filters to search for a patient
1. If the patient list is long, use the filter selections in the left panel to search for the patient:
A. Enter either the patient's name, ID, Date of
Birth, or date of last activity in the cor-
responding fields. The list will narrow down as
you type.
B. If you need to reset the filter in order to make a
new search, click the button Clear Filter.
Fig. 9 The Patient List
C. When the patient is found, click the patient name
in the Patient Name column to open the record.
Fig. 10 Example: List sorted by starting to write the patient's last name in the Patient Name field
(A on Fig. 9 ► 17).
Using column headers to sort the list of patient records
You can click one of the column headers to have the list sorted according to the selected column:
• The first click on a column header will sort the list in ascending order.
• A second click on the column header will reverse the sorting order.
Otometrics - Otoscan 17User Guide
A green arrowhead next to the column name will indicate that this column was used for sorting. If the arrowhead points
upward, the sorting is in ascending order; if it points downward, the sorting is in descending order.
Editing a patient record
If you need to make changes to a patient record:
1. Open the relevant patient record from the Patient list.
2. In the top left corner, click the Pencil icon.
A. The Pencil icon.
Fig. 11 The Pencil icon, located in the top left corner, next to the patient name.
3. Make the required changes.
4. Click Save to save your changes, or Cancel to quit without making changes.
You will be returned to the patient record window.
If more than one scan exist for an ear, the other
scans can be found via the drop-down list at the top
of each frame.
A. List of scans for the Left ear.
B. List of scans for the Right ear.
C. To return to the Patient list, click
< Patient List.
Fig. 12 The patient record window. In this example, a scan of each ear has been made at an earlier stage. New
scans will not overwrite earlier scans.
Closing a patient record
• To close a patient record and return to the Patient List, click the < Patient List button in the top left corner of the
patient record.
Deleting a patient record
It is not possible to delete a patient record once it has been created.
If a patient record contains data that needs editing, use the above option Editing a patient record ► 18.
18 Otometrics - OtoscanUser Guide
6.2 Creating a new patient record
If the patient record is not already in the system, a new record must be created in Session Manager (or in Otocloud)
before you scan the patient.
To add a new patient in Session Manager:
1. Open the Patient list and click the Add Patient button, which is located in the Action bar at the top of the workspace.
Fig. 13 The Add Patient (Add Patient) dialog box.
2. Enter all relevant patient information.
The required fields are marked with an asterisk (*). They are:
• Patient Last Name. Required if Patient ID not specified.
• Patient First Name. Required if Patient ID not specified.
• Date of Birth: Patient Date of Birth. Required.
• Patient ID: Patient identifier. Required if name not specified.
• Gender of the patient.
3. After entering at least the required data of the patient, click Save.
A new patient record is now created in Session Manager. This is where patient data and scans for the new patient are
stored for viewing or editing.
• To close the dialog box without adding a new patient, click Cancel.
For instructions on how to add a patient record in the Otocloud database, see the Otocloud User Guide.
7 Preparing the patient for scanning
Procedure
1. Performing otoscopy and cleaning the ear canal ► 20.
2. Instructing the patient ► 21.
3. Placing the headset ► 21.
Otometrics - Otoscan 19User Guide
4. Positioning the patient ► 22.
7.1 Performing otoscopy and cleaning the ear canal
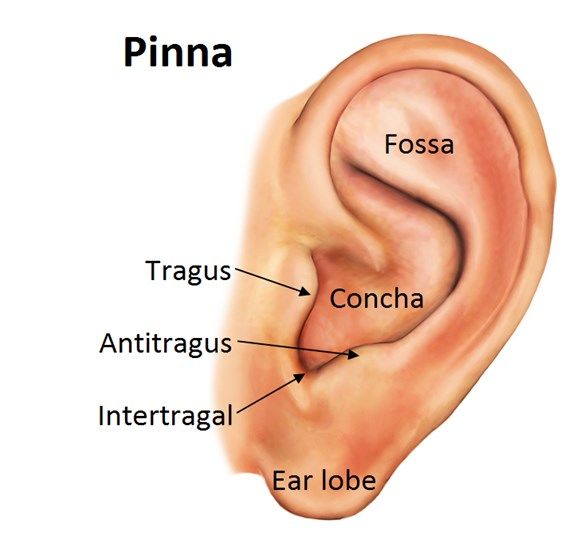
In this User Guide, the individual parts of the pinna are referred to as indicated in Fig. 14 ► 20.
Fig. 14 The pinna
Before you scan a patient, perform an otoscopic exam using a traditional or dedicated video otoscope to determine if any
contraindications exist:
1. Examine the patient’s ear canals in order to determine whether scanning is safe and advisable.
A small amount of wax will not interfere with the scanning process if it does not partially occlude or change the shape
of the surface of the canal. Oil and wax transferred onto the probe can distort the 3D image and can also make it dif-
ficult to clearly see into the ear canal with the scanner.
2. If necessary, clean the patient's ears with a cotton swab dipped in 70% isopropyl alcohol to remove loose oils and wax
from the canal prior to scanning.
Other elements in the ear such as hair and exostoses will have a minimal effect, and the scanning can be attempted. Also,
patients with healed surgical ears can be safely scanned.
Warning • If the patient experiences severe discomfort during the scanning procedure, stop the process.
Caution • It is strongly recommended that you perform an otoscopic exam with a traditional or dedicated video oto-
scope to assess the status of the outer ear prior to performing a scan.
- Cerumen should be absent, or present in only a small amount that does not interfere with the scanning process.
- If excessive cerumen is present, either do not scan the ear or clean the ear before scanning.
- Make sure that there is no residual fluid in the patient's ear after cleaning or wax removal.
20 Otometrics - OtoscanUser Guide
Warning • Scanning should not be performed on patients displaying the following contraindications:
- If there is discharge or signs of infection in the ear
- If the patient recently has undergone ear surgery
- If the ear canal is occluded or cerumen is present in moderate amounts that will interfere with the scanning process
- If the patient is uncooperative
- If the patient is unable to be still during the scanning process due to uncontrollable or involuntary movements of the
head and/or body
- If the patient has a history of seizures, migraines, or other sensitivity to strobing lights
- If the patient experiences severe discomfort during the procedure
7.2 Instructing the patient
It is very important that the patient remains still during the scan. If there is excessive movement of the patient this may
cause errors in the scan. Slight movements will not affect the scan.
To accomplish patient cooperation, make sure that the patient is well prepared.
• Spend some time instructing the patient. Relevant subjects to include would be:
– a short description of the process
– an estimate of the time the scan will take per ear
– an explanation as to why it is important that the headset does not shift from its original position
– that the patient should minimize movements during the scan
– that it is important that the patient does not talk or yawn during the scan.
• Ask the patient to try to indicate unavoidable moves - for example an upcoming sneeze.
7.3 Placing the headset
The headset is fitted on the head of the patient before scanning. It is essential for the scanning process, as the tracking ring
of the headset serves as the reference point for the two cameras on the scanner, which keep track of the exact location of
the ear during the scan.
The headset must be placed correctly on the patient's head (Fig. 15).
• Make sure that the ear is roughly centered within the tracking ring, that all parts of the pinna are free of the ring, and
that no hair or other obstacles cover the dot pattern on the ring.
If the pinna is too large to fit within the tracking ring, the ring can be adjusted to sit over the earlobe as long as the
natural shape of the pinna is not changed.
• For the best fit, rest the headband cushion on the top of the patient's head. Use the hinges above the tracking ring to
adjust the ring so that it sits as close as possible to the head without actually touching. If the ring is sitting too far away
from the head it will limit the probe depth in the ear canal. If the ring is touching the head it may be easily moved if
the patient talks or swallows.
Once the scanning has started, the headset must not be bumped or moved.
Otometrics - Otoscan 21User Guide
Fig. 15 Correctly fitted headset
Incorrect: Pressing on pinna, thereby dis- Incorrect: Hair obstruction. The dot pattern
torting the shape of the ear. must remain fully visible during scanning.
Fig. 16 Examples of incorrect placement of the headset
7.4 Positioning the patient
It is important for a safe and convenient scanning procedure that you have free and easy access to the ear being scanned
and are not hampered by obstacles near the patient or on the floor, or by an impractical positioning of the patient.
1. Check the work space for possible obstacles that should be removed prior to scanning.
2. Position the patient in such a way that you have free access to the ear to be scanned. In particular, make sure that the
shoulder of the patient is not in the way of the scanner and its cable. You can often achieve this by turning the
patient's head toward the opposite shoulder and tilting the top of the head slightly away from you.
22 Otometrics - OtoscanUser Guide
8 The scanning session
The procedure lists the usual steps of a scanning session. You will find detailed explanations to the individual steps in the
following sections.
Procedure
Caution • Before scanning the patient’s ear, make sure that you have cleaned the scanner probe tip and checked the
placement of the headset.
1. Make sure that the current patient's record is open on the PC screen. See Managing patient records ► 16.
2. Select Begin Scan. See Beginning the 3D scan ► 23.
3. Wait for the scanner self-test to finish. See Beginning the 3D scan ► 23.
4. Select the ear to be scanned. See Selecting ear to scan ► 24.
5. Set the depth gauge. See Setting the depth gauge ► 25.
6. Scan the ear canal (Canal Ring mode). See Scanning the ear canal ► 27.
7. Pause the scan to review results. See Reviewing a scan in progress ► 29.
8. Scan the relevant parts of the pinna (Pinna Line mode). See Scanning flat surfaces in Pinna Line mode ► 30.
9. Pause the scan to review results. See Reviewing a scan in progress ► 29.
10. Scan the curved portions of the pinna (Concha Ring mode). See Completing curved surfaces in Concha Ring mode ►
31.
11. Review and save the scan. See Saving the scan ► 32.
12. Mark the horizontal plane, if required. See Mark horizontal ► 32.
13. If relevant, scan the other ear after cleaning the probe. See Selecting the other ear ► 34.
14. Clean the scanner and place it in the cradle. See Ending the scanning session ► 34.
8.1 Beginning the 3D scan
Make sure that the scanner is connected to the laptop PC. See Connecting the scanner ► 10. The scanner will be activ-
ated when you start the scanning procedure from a patient record.
Warning • Do not stare into the laser, or point the laser in the direction of other people’s eyes. It can damage the
eyes.
Before you start the scan
This procedure assumes that:
• You have already opened the relevant patient record from the Patient List. See Opening a patient record ► 17.
• You have examined, instructed, fit the headset, and positioned the patient. See Preparing the patient for scanning ►
19.
Otometrics - Otoscan 23User Guide
Initiating the scan
A. From within the patient record, click Begin Scan in the upper and center part of the Patient Record screen. The scan-
ner switches on and a new window opens.
Fig. 17 A patient record, in this example already containing an earlier scan for both ears.
The Begin Scan button (A) is seen on the Action bar near the top of the screen.
Scanner start-up and self-test
Before each scan, the scanner performs a self-test while it is seated in the cradle. A screen message informs you accord-
ingly:
Scanner self-test in progress...
Leave scanner in cradle.
If the scanner does not pass the self-test, you will see an error message on the screen. In that case, clean the probe tip
with an alcohol swab. Place the scanner in the cradle for a re-check. Before you start the re-check, make sure that the scan-
ner is correctly seated in the cradle.
8.2 Selecting ear to scan
The screen displays a frame for the left and right ear, respectively. When you start a new session, they show corresponding
drawings of a left and right ear. When you have scanned an ear, the scan is shown in the relevant frame and is available for
further actions.
24 Otometrics - OtoscanUser Guide
Fig. 18 Select an ear to begin.
• On the PC: Click inside the Left (L) or Right (R) ear frame to start the scan.
• On the scanner touchscreen: Tap inside the Left (L) or Right (R) ear frame.
(If you accidentally select the wrong ear, you can swap the scan to the other ear after the scanning.)
The screen now displays the Set Depth Gauge view. See Fig. 21 ► 26.
8.3 Setting the depth gauge
The first step in the scanning procedure is to set the depth gauge. This is done in order to establish a reference zero point
with which to determine the depth of the probe in the ear canal during scanning. It is very important for an accurate and
safe scan that this step is carried out correctly. It is important that you observe the following warnings and cautions:
Caution • Always carefully inspect the probe before each use and do not use if there are any signs of damage to the
probe, or if the unit is malfunctioning. Contact your supplier for assistance.
Caution • To prevent cross-infection or re-infection, clean and disinfect the probe with alcohol wipes between patients
and between scans of patient’s ears.
Warning • Be careful when you insert the probe into the ear of the patient - there is a risk of damaging the wall of the
ear canal and/or the tympanic membrane. Do not apply excessive force to the outer ear with the probe.
Note • Do not straighten the ear at any time during the scanning process, including during depth gauge setting. It is
also important that the patient does not move their jaw. This includes talking, laughing, smiling, and other motions
that would change the shape of the ear canal.
Bracing the Scanner
The scanner is designed to allow single-handed use, but in order to improve scanning precision, minimize fatigue, and
ensure patient safety, you should use a proper bracing technique.
Otometrics - Otoscan 25User Guide
Hold the scanner in your dominant hand. Place the finger of your other hand against the neck or jaw of the patient and
then rest the scanner on the thumb of that hand as shown in Fig. 19 ► 26. Be careful not to allow your fingers to block
the tracking ring or the tracking cameras.
Fig. 19 Proper bracing technique when using the scan- Fig. 20 Where to place the scanner probe when setting
ner the zero point.
Setting the zero point for the depth gauge
• Gently touch the flat part of the concha next to the ear canal opening with the probe tip, as shown in Fig. 20 and Fig.
21 and press the trigger on the hand-held scanner. This action marks a user specified zero reference point.
Once this action is complete, the scanning process will begin automatically. As the probe tip enters the ear canal, the
depth gauge will display current estimated depth readings. The depth reading is the length of the probe inserted into
the ear canal as estimated beyond the user specified zero reference point. A visual and audio warning will appear if a
depth reading is detected beyond that recommended by Otometrics. The recommendations are based on an average
adult ear differentiated by gender. See Scanning the ear canal ► 27.
A Headset not detected icon is seen
to the left on the screen. It will dis-
appear as soon as the scanner comes
within range of the tracking ring and
detects it.
Fig. 21 Set the depth gauge.
26 Otometrics - OtoscanUser Guide
Warning • The user is the sole person responsible for marking the correct reference point and for keeping the end of
the probe at a safe distance from the tympanic membrane. The depth measurement and warning shown on the screen
are based on the zero reference point specified by the user and average canal lengths as recommended by Otometrics,
and are provided as guidelines only. The depth measurement and depth warning do NOT represent the actual safe
scanning depth of the patient’s ear canal.
8.4 Scanning the ear canal
After setting the depth gauge, the scanner will automatically start scanning in the Canal Ring mode. In this mode it uses
the Ring laser to complete a scan of the ear canal.
Procedure
• Using a suitable bracing technique, slowly insert the probe tip, while monitoring the scanning process on
the screen of the scanner. The screen items that you see during scanning are explained in detail below with
reference to Fig. 22 The live scanning view in Canal Ring mode ► 27.
• When required, press the trigger of the scanner or tap the Pause button on the touchscreen to pause the
scanning and evaluate the result. See Reviewing a scan in progress ► 29.
Live scanning view
To provide full control of the process, the screen displays three live items simultaneously. They are updated concurrently
and show different aspects of the ongoing scanning.
A. The depth gauge
B. The video otoscopic view
C. The developing 3D scan
Fig. 22 The live scanning view in Canal Ring mode
A. The depth gauge
On the left part of the scanning screen you see the ear canal depth gauge. The depth gauge provides guidance on the
estimated depth of the probe tip within the ear canal. This gauge will warn you if the probe tip comes within an estimated
unsafe distance of the tympanic membrane.
On the depth gauge, the current probe tip location is indicated by a white dot, and the deepest location during the cur-
rent scanning pass is indicated by a black dot.
Otometrics - Otoscan 27User Guide
The insertion depth of the probe tip is indicated by color coding:
Green: The probe tip is within the target range (male: 16-18 mm; female: 14-16 mm)
Blue: Indicates a shallow probe tip insertion (male: 0-15 mm; female: 0-13 mm)
Red:
Warning • RED indicates a too deep probe position in the ear canal!
If you reach the red area, the entire frame of the screen will also turn red as a very clear warning sign.
At the same time, a warning signal will sound. The audible warning begins 2 mm into the depth warning
zone.
For a male the red color starts at 19 mm, but the audible warning does not start until 21 mm.
For a female the red color starts at 17 mm, but the audible warning does not start until 19 mm.
In that case, immediately reposition the probe to ensure proper depth in the patient’s ear canal!
B. The video otoscopy screen item
A live otoscopic view of the ear canal is seen to the right of the depth gauge. The colored lines in the video otoscopy
image, called the data capture lines, indicate surfaces that are being captured in the scan. The color of the line changes
between blue, green, and red according to the insertion depth and in synchrony with the color indication on the depth
gauge. Hence, the blue line indicates shallow depth, green indicates target depth, and red is too deep.
Fig. 23 In the otoscopic view, to the right of the depth gauge, the area of the ear canal that is currently being scanned is
indicated by means of a bright blue line.
Further to the right, the developing 3D scan is seen. The probe tip is visible in the lower part of the image, and
behind it follows trailing white and gray shadows which indicate the area that has just been scanned.
C. The developing 3D scan
On the right side of the screen, you will see the 3D image of the ear scan developing as the scanning continues. The
smooth blue surface indicates the parts that have already been scanned. The data capture line shown on the video oto-
scopy image is also seen here as a white curve and is shown together with a faint grey image of the scanner probe. Behind
the area being scanned you will see trailing shadows, indicating the area that you have just scanned.
Unfinished parts of the scan are indicated by a colored edge:
• Gaps that are so small that they do not require additional scanning are visualized by means of a black edge.
• Large gaps that need attention before the scan is complete are indicated by a yellow edge.
28 Otometrics - OtoscanUser Guide
Fig. 24 ► 29 and Fig. 25 ► 29 show two scans seen in Pause mode. Gaps are indicated by means of black and yellow out-
lines.
Fig. 24 Smaller gaps that do not require additional scanning are shown with a black outline.
Fig. 25 Large gaps that need additional scanning are shown with a yellow outline.
Recommended ear canal scanning sequence
It is recommended that you concentrate on scanning the bottom of the ear canal in one pass, and the top of the ear canal
in the next pass. Then, observe the 3D image for gaps that need to be filled using additional passes. Pay extra attention to
the posterior wall of the ear canal, as it may be a bit tricky to scan this part. Complete the ear canal scan before moving on
to scan the pinna.
8.5 Reviewing a scan in progress
During an ongoing scan, Pause is the only button that can be selected.
• To review a scan in progress, press the trigger to select Pause before removing the scanner from the ear (so as not to
have the scanner inadvertently pointed at the eye) and move the scanner away from the ear canal.
The screen will now show the current 3D scan to the right, and the optional next steps to perform to the left.
Otometrics - Otoscan 29User Guide
Evaluating the scan
The 3D model can be rotated in multiple viewing planes to ideally visualize the preliminary scan.
• Use the arrows on the touchscreen of the scanner to rotate the scan for a better view.
Alternatively, you can view the image on the PC screen. Here you can use the mouse in two ways:
• To turn the image stepwise in a specific direction, click repeatedly near the Arrow symbol that points in that dir-
ection.
• To rotate the image in any direction, press and hold down the left mouse button at the center of the 3D image and
drag the mouse in the intended directions.
For an accurate 3D digital impression, gaps indicated with a yellow outline should be rescanned in an attempt to fill them
in. Utilize your clinical judgment regarding continuing to scan or moving on to the next step. Smaller gaps outlined in black
do not require additional scanning. See Fig. 24 ► 29 and Fig. 25 ► 29.
The buttons for scan mode selection shown to the
left are:
A. Canal Ring mode,
B. Pinna Line mode,
C. Concha Ring mode.
Fig. 26 The scanner view during Pause.
At this point, only the canal of the patient's ear has been scanned.
Resuming scanning after a pause
The scan mode selection buttons are shown in the left part of the display.
The suggested next step has been highlighted (step B in the example above). The highlighted step is the one that will be
selected when you press the trigger on the hand-held scanner.
If you want to select one of the other steps in the process, tap the relevant selection on the touchscreen.
• To continue the scanning:
1. Select the button that shows the portion of the ear that you wish to scan next:
A. The ear canal - Canal Ring mode,
B. The flat surfaces of the pinna - Pinna Line mode, or
C. The concha cavities - Concha Ring mode.
2. Point the scanner probe at the ear canal and press the trigger to resume scanning.
8.6 Scanning flat surfaces in Pinna Line mode
When the ear canal scan is complete, continue by scanning the concha and other relevant parts of the pinna.
Use the Line laser to scan the flatter surfaces of the pinna and most of the visible surfaces of the ear. During Line scanning,
position the probe so that it is pointing at the area to be scanned and is close to (but not touching) the surface of the skin.
• Scan the flat surfaces of the pinna using the Pinna Line mode:
30 Otometrics - OtoscanUser Guide
1. Select Pinna Line mode. See Fig. 26 ► 30.
2. Press the trigger to activate the Line laser and begin scanning the pinna, starting with the flat surfaces of the
concha.
3. After scanning as much as possible with the Line laser, select Pause.
4. Review the scan for accuracy and missing spots to be scanned. See Reviewing a scan in progress ► 29.
Fig. 27 Example of a scan after scanning in Pinna Line mode. The screen suggests that you continue in Concha Ring
mode, in order to fill in possible missing parts.
8.7 Completing curved surfaces in Concha Ring mode
The next step is to use the Ring laser for scanning the less visible parts of the pinna, such as the curved surfaces inside the
concha bowl. During the scanning, position the probe parallel to the area being scanned.
1. Select Concha Ring mode. (See Fig. 26 ► 30).
2. Press the trigger to activate the Ring laser in Concha Ring mode. Use the Ring laser to scan the helix, the lower part of
the concha bowl, and other side surfaces of the ear.
3. Pause the scanning and review the scan.
4. If there are still gaps on the 3D image, use the Pinna Line mode or the Concha Ring mode as required to complete
the scan.
Fig. 28 Example of a finished scan, seen during Pause.
The mode selector in the left side has returned to the starting point.
Otometrics - Otoscan 31User Guide
8.8 Saving the scan
• After reviewing the scan for completeness, start the Save procedure by selecting the Next icon.
You now get three options:
• Return. Continue scanning the same ear. See Return ► 32.
• Mark Horizontal. See Mark horizontal ► 32.
• Save. See Save ► 33.
Return
Use this option to cancel the Save operation and continue the scanning session with the same ear.
Mark horizontal
You can mark the horizontal plane on the 3D image. This feature is useful when ordering directional microphones with cus-
tomized hearing instruments.
1. To mark the horizontal plane for the microphones, move the scanner close to the ear and select Mark Horizontal.
The Line laser will switch on.
Fig. 29 Select Mark Horizontal on the menu to open the Mark Horizontal screen.
2. Point the scanner at the ear in such a way that the line marks the horizontal plane. Press the scanner trigger or select
Mark Horizontal on the touchscreen to set the line. A green check-mark will indicate that the horizontal plane has
been marked.
32 Otometrics - OtoscanUser Guide
Fig. 30 The line that indicates the horizontal plane has been set.
Save
When you select Save, the application will begin the process of filling in any remaining gaps and save the scan. The size of
the gaps will affect the accuracy of the final 3D digital impression of the ear.
The finished scan will appear in the frame corresponding to your initial selection of Left or Right ear.
Swapping ears
If you have selected the opposite ear by mistake, you can assign the digital impression to the other ear.
• To swap ear(s), click the Swap ear button at the bottom of the screen.
After a moment the scan(s) will shift to display in the opposite ear frame.
Fig. 31 The screen display after scanning of the right ear.
Accepting a scan
The saved scan is rotating slowly in its frame, allowing you to give it a final examination.
At this point, either continue to scan the other ear, or switch off the scanner:
• To continue to scan the other ear, clean the scanner probe and select that ear on the screen. See Selecting
the other ear ► 34.
• To switch off the scanner and return to the patient record, click the Power button in the top left corner of
the screen.
Otometrics - Otoscan 33User Guide
Deleting a scan
If the scan outcome is not acceptable (the patient moved the jaw, the headset moved, the scan is incomplete or poor qual-
ity), it should be deleted and repeated.
• Select the Trashcan icon for the ear to be deleted in order to delete the scan and begin again.
You will be prompted to confirm that you want to delete the scan.
8.9 Selecting the other ear
Preparations
1. If both ears are to be scanned, reposition the headset to fit the opposite ear.
Again, make sure to center the headset on the ear and check that no hair obstructs the dot pattern on the tracking
ring. The tracking ring should be positioned close to, but not touching the head.
If in doubt, see Placing the headset ► 21.
2. Place the patient at an appropriate angle for convenient scanning of this ear. See Positioning the patient ► 22.
Selecting the other ear
3. On the screen, select the other ear in order to begin the scanning for this ear.
See Selecting ear to scan ► 24.
Caution • After scanning the patient’s first ear, make sure that you clean the probe tip to prevent cross-infection, and
reposition the headset correctly before scanning the other ear.
Scanning the other ear
4. Set the depth gauge and scan the ear.
If required, review the steps from Setting the depth gauge ► 25.
Fig. 32 The final result seen on the scanner touchscreen after scanning both ears.
8.10 Ending the scanning session
• When you have finished scanning a patient and saved the scan, clean the probe tip and place the scanner in its
cradle. See Cleaning ► 37.
34 Otometrics - OtoscanUser Guide
• If you have not already done so, click the Power icon in the top left corner to switch off the scanner and
return to the patient record.
Scans will be listed in the patient record and will be automatically uploaded to Otocloud.
Fig. 33 The Patient record with the latest scans displayed.
To see possible earlier scans for an ear, click the drop-down list for that ear, located at the top of the frames:
A. List for left ear
B. List for right ear
C. To return to the Patient list, click < Patient List.
Troubleshooting scanning results
If you find faults in the scan at this point, such as large areas that have not been scanned, consider discarding the scan and
making a new scan to replace it.
9 Managing patients and scans in Otocloud
You can send the scans to your chosen manufacturer via the online application Otocloud. This section describes how you
open Otocloud from Session Manager and close it after use.
It is also possible to open Otocloud directly from the PC desktop.
For further instructions on how to work with patient data in Otocloud, see the Otocloud User Guide.
9.1 Opening Otocloud
When the ear scan(s) for the current patient are completed, you can continue working with the data in Otocloud. Oto-
cloud is a web application that allows hearing healthcare providers to access their scans and send them to hearing instru-
ment and earmold manufacturers.
In Otocloud you can also view details of previously sent scans.
Procedure
1. If you have not done so already, open the patient's record in Session Manager, where you can see the scanned images.
See Opening a patient record ► 17.
Otometrics - Otoscan 35You can also read