What's New in Autodesk Inventor 2016 - CAD Studio
←
→
Page content transcription
If your browser does not render page correctly, please read the page content below
What's New in Autodesk Inventor 2016
Inventor 2016 enables you to break through boundaries typically associated with 3D modeling, delivering an
invaluable connected design experience between you, the data, people, and processes involved in getting your
job done. From providing seamless parametric, direct editing, and freeform design tools, to associatively
connecting your Inventor data to non-native CAD formats, to truly integrating your electrical and mechanical
data into a single design - Inventor 2016 helps you connect with your design like never before.
Work More Efficiently in a Multi-CAD Environment
New Technology for Importing Files from other CAD Systems.
An associative import of CAD data from CATIA, SolidWorks, NX, Pro-E/Creo, and Alias files allows you to
maintain a link to the selected file. The imported geometry in Inventor updates as the model changes.
Selective import support allows you to only read in the geometry that is important to you, speeding the
import process: The new Select tab provides you the option to specify which objects to import when
importing a CATIA, SolidWorks, Pro-E/Creo, NX, Alias, STEP, IGES, or Rhino file.
Multi-thread support has been enabled. This allows Inventor to more efficiently use the available
hardware on which Inventor is running. As a result, you will experience improved performance when
working on files from other CAD systems.
The options for importing CATIA, SolidWorks, Pro-E/Creo, NX, Alias, STEP, IGES, Rhino, SAT, Parasolid
Binary files are simplified and provide clear choices for import.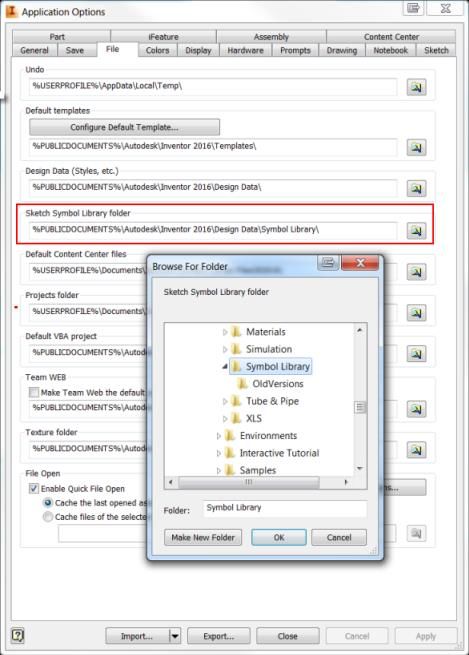
Associative DWG
Quickly insert an AutoCAD DWG file in an Inventor part file as a DWG underlay using the Import command
in the 3D Model tab, Create panel.
You can add assembly relationships to underlay geometry.
Use the Project DWG Geometry command to project DWG geometry, polylines, open or closed loops, and
DWG blocks. Then you can use the projected sketch elements to create modeling features.
Your 3D Inventor models based on the DWG geometry update when the 2D geometry changes in
AutoCAD.
AutoCAD Electrical and Inventor Interoperability
The new Electromechanical link between Inventor and AutoCAD Electrical provides a smooth data
exchange between your 2D and 3D electrical designs.
When you create a link between an AutoCAD Electrical and an Inventor assembly (not available in Inventor
LT), the project files become associative: Design data changes made in one product are updated in the
other via Sync.
The Location View command on the new Electromechanical tab on the Assembly (not available in Inventor
LT) ribbon in Inventor displays the devices and wiring contained in both the AutoCAD Electrical Drawings
and Inventor Assemblies.
Shape Creation
Use powerful new commands and workflows in the Freeform modeling environment. Some of the highlights
are:
Work with open surfaces or closed shapes.
Convert existing model faces to freeform geometry for shape refinement.
The new Freeform Thicken command creates solids, offset surfaces, or shell walls.
Unweld edges to split and move a freeform body segment.
Delete faces.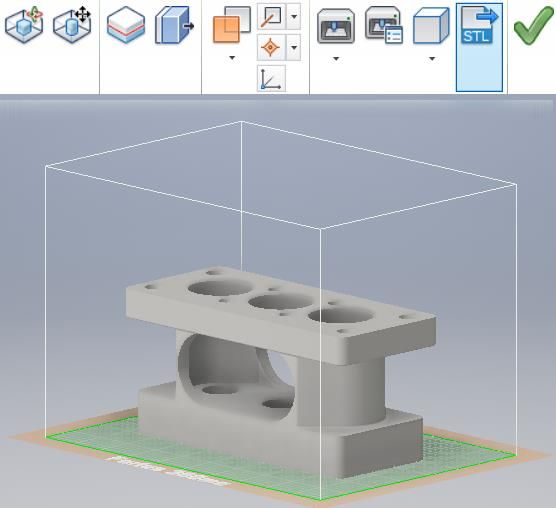
3D Printing Environment
A new environment is added that lets you position and orient your design within the print space of the
selected 3D printer. You can also update the part in the print environment that does not impact the source
document. When you are finished, you can send the results to Print Studio or other printing software to begin
printing the part.
Drawing Environment
Drawing view creation is simplified, and uses in-canvas tools.
Text formatting is expanded with new options: Bullets and numbering, strike-through text, enhanced
formatting (all caps, title case, lower case).
Surface texture and feature control frame symbols are updated to the latest standards.
Many new graphical symbols are available, and can be inserted in various types of drawing annotations.
Balloon styles can use custom balloon shapes.
A new Single Segment Leader option allows you to create drawing annotations with a single leader
segment.
You can align drawing annotations vertically, horizontally, or to an edge.
Create a view sketch on a model with included work features and select those work features with the
Project Geometry command.
Quickly access and share your collection of sketch symbols through a new external Sketch Symbols Library.
This library is an Inventor drawing file that, by default, is located in a subfolder of the Design Data location
of your project. This new feature offers the following new functions:
o A search and filter feature in the Sketch Symbols Library dialog box.
o Preview the sketch in a preview pane within the dialog box before placing the sketch.
o Browser expansion state remains throughout session when placing sketch symbols.
o A Sketch Symbol Library can be created in IDW and DWG formats, allowing insertion of symbols
contained within the library file from either format.
o Save your sketch symbols to a customized library.
Improved Start Up and Learning Experience
The new start-up and learning experience combine to make learning and using Inventor faster and easier.
Movable and resizable Inventor Home panels.
Home provides greater access to common file tasks.
Files can be removed from the recent documents list.
Vault status is displayed in the recent documents list.
Create custom shortcuts to provide fast access to frequently used files and locations.
Help content was edited to provide better search results.
Topic content was combined to reduce the number of clicks.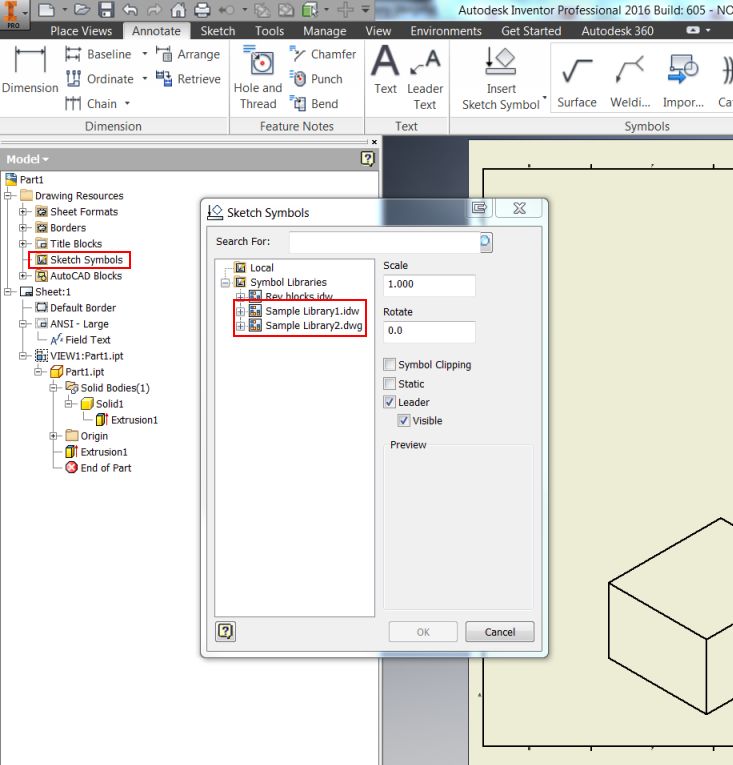
Graphics/Visualization/Studio Enhancements
Some highlights are:
ALL lighting styles in Inventor Studio are now associated with an IBL. A lighting style can have zero local
lights but must have one IBL.
IBL (Image Based Lighting) based lighting styles provides better lighting sources in Inventor Studio with
enriched IBL collection.
When you enter the Studio Environment, all legacy local lights are now disabled by default. It is
recommended you use IBL for better rendering results. You can turn on specific local lights manually when
necessary.
All newly created lighting styles are associated with the default IBL automatically. You can change the
associated IBL to another IBL as desired.
The enhanced visual effect for shaded visual style makes it more consistent with the realistic visual style.
The rendering engine in Inventor Studio was changed to RapidRT with advanced configurations for better
quality rendering.
The Studio Render Illustration settings have been moved to the View tab Appearance Panel Visual Styles
drop-down menu. The new and enhanced Technical Illustration command creates a realistic illustration
effect in the graphics window.
Workflow Enhancements Among the many enhancements, are: General Use Escape (Esc) key to cancel an operation in select processes. Multiple productivity enhancements made to dialog boxes. Add all window tile styles to the task bar. Dock an Inventor browser on any application's window edge. Hide all sketch dimensions now available in the Object Visibility menu. Import/Export external rules configuration for iLogic (not available in Inventor LT). Sheet metal parts Multi-body support is added to sheet metal. Support for zero bend radius is added to many commands. Material thickness is detected when you convert a part to a sheet metal part. Punch tool shows a count of the center selections. Part appearance and body, feature, or face color overrides can be pushed from derived part to new part A new Use color override from source component option has been added to the Derived Assembly (not available in Inventor LT), Derived Part, Make Part, and Make Component dialog boxes. Selecting this option pushes the Part appearance and body, feature, or face color overrides to be pushed from the derived part to the new part. Tube and Pipe setting enhancements (not available in Inventor LT) You can now customize file names for fittings and populate part numbers into your parts list within the drawing environment. Previously, you could only change the name of your conduit items, but now you can update fittings as well.
Parts Face draft contains powerful new options that let you Fix or Move the parting line. Ruled Surface is added to the surfacing commands. The Mirror and Pattern commands support multiple solid body selection. Previously, nonlinear patterns of a solid body in a multi body part file have not been possible. You can now create nonlinear patterns for solid bodies. Drag a sketch above the parent feature in the browser to share it. The Measure command now allows you to measure an angle to the midpoint of any segment. This option is achieved by hovering your mouse over the midpoint of a segment until a yellow dot appears. Sketch Identify which workplane or face a sketch was created on. The selected Show All or Hide All Constraints display setting remains active as you sketch and throughout your editing session. You can now create tangent dimensions between circular or arc geometry within a 2D sketch. The Initial View Scale property of the first drawing review placed on the sheet is added in the Sheet Properties group within the Format Text dialog box. The Sketch Dimensions option is added to the Object Visibility list. Select this option to display 2D or 3D sketches and hide all related sketch dimensions. Sharing a sketch is made visible by dragging above the feature in browser. New snap points added to the context menu: Endpoint, Apparent Intersection, Quadrant, and Mid of 2 points. You can now modify Start Sketch and select a view or sheet before sketching. Assembly (not available in Inventor LT) New safety factor calculation warning displays in Stress Analysis. The Midplane option has been added to the assembly Pattern command. Select the Midplane option to create a pattern distributed on both sides of the original component. Replace All feature available for highlighted components within an assembly. Select multiple sick constraints within Design Doctor to delete. Drawings You can start a drawing from any open model, and automatically apply the current model camera and representations in the base view. In-canvas tools in the Base View command simplify creation of a base view and projected views. For example, you can use the ViewCube to orient the model, set the view scale by dragging a view corner, or adjust projected views while creating the base view. Presentations (not available in Inventor LT) Tweak command is redesigned to use direct manipulation tools. Creating and editing of trails is easier. Component selection is simplified. Auto Explode command is added to the ribbon and improved. Keep reading for details on all of these great enhancements and more.
General
Visualization, Graphics, and Studio Enhancements

Studio Enhancements
New support for Image Based Lighting (IBL)

All lighting styles in Inventor Studio are now associated with an IBL. IBL provides a better lighting source.

Image-based lighting from the modeling environment is now supported by Inventor Studio. To render from
the modeling lighting environment, use the commands available on the View tab, then use the Current
Lighting in the Studio Render Image dialog box, or change to other lighting styles from Render Image dialog
box.
New 2016 IBL Lighting Style features IBL provides association Background turn on/off Support additive lights Advanced rendering engine RapidRT provides new configurations for rendering Time duration/iterations/unlimited mode Lighting and Material Accuracy modes
Obsolete options removed:
Scene Style: The Ground plane and shadow effect settings specified in the View tab now display in the
rendered model in Inventor Studio.
The Studio Render Illustration settings have been moved to the View tab Appearance Panel Visual Styles
drop-down menu. The new Technical Illustration command creates a realistic illustration effect in the
graphics window.
Ground Plane and Shadow Effect display in final rendering result
The Ground plane and shadow effect settings specified in the View tab will now display in the rendered model.Graphics Enhancements The enhanced Shaded visual style display effect is now more consistent with Realistic visual style. Enhanced visual effect for shaded view. The following two images compare the results of using Shaded View in 2015 and 2016. High rendering performance is maintained. Technical Illustration Visual Style The Studio Render Illustration settings have been moved to the View tab > Appearance Panel > Visual Styles drop-down menu. The new Technical Illustration command creates a realistic illustration effect in the graphics window. New IBL styles 11 new lighting styles are added to the View tab > Appearance Panel > Lighting Styles menu. These include Dark Sky, Gray Room, Infinity Pool, Photo Booth, Tranquility Blue, Sharp Highlights, Rim Highlights, Cool Light, Warm Light, Soft Light, and Grid Light. Changes to Ray Tracing The Ray Tracing modes are changed to Low, Draft, and High to indicate the lighting and material accuracy. The progress status bar is changed to display quality measurement instead of percentage progress. You can now save an image any time during Ray Tracing.
Visual enhancement in drawings

The new Reflection Environment settings in the drawing Document Settings dialog box allow you to apply
specular effect and specify a Reflection map in a Drawing (.idw) file.
Text and Leader Text

Redesigned Format Text Dialog Box
The Format Text dialog box is simplified and refined to be clear and easy to use. Size of the dialog box is
reduced to provide more space for editing in the graphic window.

Bullets and Numbering in Text

You can create bulleted or numbered lists in the Format Text dialog box. One bulleting style and several
numbering styles are available.

Text Case Options

In the Format Text dialog box, select a string, and select a Text Case option to convert the string to
UPPERCASE, lowercase, or Title Case.

Strikethrough Text

In the Format Text dialog box, click the Strikethrough button to apply strikethrough formatting for a string.
Enhanced Symbols List
New graphical symbols are added in the Symbols list in the Format Text dialog box.

Graphical symbols are organized in the following groups: Most Common, Geometric Characteristic, Material
Removal Modifier, Additional Symbols, General, and Character Map.
Note: The active Feature Control Frame style controls the list of symbols available in the Format Text dialog
box.

Edit Dimension Dialog Box
The symbol drop-down list has been removed and replaced by the graphic symbols as first-level options.
Text Preview in the Graphic Window
Text in a drawing file is dynamically previewed in the graphic window when you create or edit it. You can
refine the appearance of text before you close the Format Text dialog box.
Zoom Edited Text In and Out
The Zoom In and Zoom Out buttons are removed from the Format Text dialog box. To zoom the edited text,
place the cursor in the editing field, hold the CTRL key on your keyboard, and scroll the mouse wheel.

Rotation for Leader Text
In the Format Text dialog box, use the Rotation Angle option to rotate leader text in a specified angle.

When you drag the end point of the landing line, text remains aligned to the landing line and keeps the
original Rotation Angle.

Retained Formatting for Copied Text
Numbered or bulleted lists and text formatting are retained when you copy text from a Microsoft Office
document, or from AutoCAD.

Retained Formatting for Imported or Exported DWG Files
When you open an AutoCAD DWG file in Inventor, imported text is read-only, but keeps the original
formatting. When you open an Inventor DWG file in AutoCAD, text keeps its formatting.
In-Canvas Text Rotation
Select a text object, and drag the blue rotation grip point to rotate text to the desired position.
Other General Enhancements
Inventor Home
Inventor Home includes many new tools to make file management fast and simple.
The panel workspace is customizable.
o Drag the handles to resize the panels.
o Use Flip to reconfigure the panels.
o Use Reset to restore the default layout.
o Use Maximize Recent to fill the space with the Recent Documents panel.
Presentation files are added to the New file list.
Click Advanced in the New file panel to access all file templates.
Vault status is displayed for recent documents.
Projects, Shortcuts, and File Details tabs are added to Home.
o Click Projects to set the active project file.
o Click Shortcuts to create fast access to project locations, files, and folders.
o Click File Details to view rich file information.
New filter option allows you to view the information you want in the Recent Documents display.
o Set the Project filter to show only files in the active project, or all recent documents.
o Set the File Types filter to add or remove file types from the display.
o The Sort By filter provides multiple sorting options.
o The Date Modified filters allow you to fine tune the display with a wide range of dates.
Add or remove file types from the display.
Move your mouse over a file in the Recent Documents list to view the available operations. For example:
o Open the file
o Remove from the list
o Open with options
o Open containing folder
o Explore containing folder
o File details
o Clear unpinned documents
Tip: The action to Clear unpinned documents from the recent files list is permanent and cannot be
undone. You must open the file again to display in the recent documents list.
Click Tiles, Large, Small, or List to change the display of the Recent Documents list.Access Team Web and Online Help
Some proxy servers require authentication before granting access to the internet. If authentication is required,
a new dialog box appears that lets you provide a username and password.
Work Plane
The Tangent to Surface and Parallel to Plane option supports a NURBS surface as the tangent selection.
Changes to Content Center Libraries (not available in Inventor LT)
The Content Center libraries are updated to the latest industry standards.
You can now set the maximum length for Structural Steel to 50 m for all libraries. This setting is no longer
limited to ANSI.
For complete details on the changes to the Content Center libraries, click here.
Enhancement Updates to Dialog Boxes
The following dialog boxes contain new features:
Parameters: A Copy and Paste function is now available within the right-click context menu. The Paste
option is available only when there is content copied to the clipboard.
Link Parameters: This dialog box is now resizable to accommodate extra rows. When you resize this dialog
box, the size persists from session to session.
Thicken/Offset dialog box: The Apply option is added so you can execute multiple operations without
exiting the command box.
Parameters dialog box: The numerical sort order is now based on value rather than the leading digit.
Hole dialog box: The Centers option now has a selection counter, displaying in parentheses the number of
selections made.
Punch dialog box: The Centers option now has a selection counter, displaying in parentheses the number
of selections made.
Application Options/General tab: A link is provided in Help options to download the local Help.
Resizable dialog boxes: The following dialog boxes are now resizable and persist throughout your session.
o Pack & Go
o Symbol Library
o Boundary Patch
o Edit Balloon (drawings)
o Project Editor
o Link Parameters (parts and assemblies) dialog boxUpdate to Export Formats for Global Bill of Materials (BOM), Parts Lists, and Revision Tables (not available in Inventor LT) A new list of acceptable formats to export your Global BOM, parts lists, and revision tables is now available in the drop-down menu. The Access, DBF, Text, CSV, and Unicode exports require Microsoft Access Database Engine to be installed on your computer, which is part of Microsoft Office installation. For 64-bit Inventor, install 64-bit Microsoft Office in order to export these files. If 64-bit Microsoft Office is not installed, the following error message displays: Changes to Operating System Support (not available in Inventor LT) Inventor 2016 now supports 64-bit Windows 7, Windows 8, and Windows 8.1 operating systems. Inventor LT also supports 32-bit Windows 7. All inventor products, except for Inventor LT, no longer offer support for operating systems with 32-bit processors. Security Enhancements to Add-In Manager (not available in Inventor LT) When a non-Autodesk product add-in is loaded, a new dialog box displays. You can now choose to Allow or Block an add-in from loading. This setting will be retained for future sessions. You can examine and change the Allow/Block settings using the Add-In Manager.
The following three security controls are now available in the Add-In Manager 2016 dialog box:
Allow/Block check box in the Load Behavior area. This box is checked and disabled when Autodesk, Inc.
approves the add-in.
Signature text box shows the add-in is signed and has valid certificates.
Publisher text box shows the add-in approved by Autodesk, Inc.
Enhanced Representation Support in Presentations (not available in
Inventor LT)
Use the new Representations dialog box to change the current design view and associativity. To access this
new dialog box, right-click the Explosion node within your model browser in a Presentation and select
Representations.New Taskbar Menu Options Available for Tiling
Tile Horizontally and Tile Vertically menu options were previously only found in the top ribbon. Now there is
convenient access to these options through the taskbar menu found at the bottom left corner of your
workspace.
Added Window Select for Faces When Using Delete Face and Thicken
Offset
In these commands, you can use a selection window to pick connecting faces of one set of body selections. If a
surface body and a solid body are defined, you cannot select faces from both bodies at the same time. After
you make the initial selection on a body, you can select more surfaces from the same body.
Standard window selection methods are:
Cross selection: Select from right to left. Anything that is 100 percent contained within the selection frame
is selected.
Window selection: Select from left to right. Anything that is partially contained within the selection frame
is selected.
Use Keyboard Shortcuts for Select Other
In model views, when you select a component or a subassembly, you can use the shortcut, Ctrl+A for Select
Other. This option is listed in the shortcut and command alias reference in the Customize dialog box, Keyboard
tab, and View category, where you can customize them.
Dock Inventor Browsers on Any Application or Window Edge
While working with one or more monitors, you can undock and drag any of the Inventor browsers. This can be
done with modeling, iLogic (not available in inventor LT), Vault browser, or the Tutorial (Learn) browser. The
browsers attach to one another and to any Inventor application edge. They attach either side by side or
stacked.
An Always on top context option is available for all detached browsers. Browser positions and settings persist
from session to session.
Use Escape (Esc) key to Cancel an Operation
Press the Escape key to abort or cancel an operation in process. The time it takes to cancel an operation may
vary depending on the feature or data set that is in use. For operations with realistic preview, such as shell or
fillet you can interrupt the preview.
Currently, not all operations are interruptible and some operations do not respond immediately when
pressing the Escape key. A message displays when the cancellation is complete.Copy Parameters to User Parameters While working with Parameters, you can now copy an existing parameter, including all its settings and multivalues, as a User Parameter. Previously, recreation and manual entry was required for each value. Import and Export External Rules Configuration for iLogic (not available in Inventor LT) You can now import/export iLogic configuration settings (as an XML file) to be shared between different users and machines. Once configured, externally mapped folders appear beneath a Standards Directory tree that will update/refresh immediately when content changes (sub folders and rules). In the past, external paths had to be manually added. External rules configuration settings can also be leveraged and mapped during creation of deployments. Global forms can now be refreshed through a right-click context option to reflect the most up-to-date form. New Import and Export SMT File Extension Available for Autodesk Shape Manager (ASM) Files Autodesk has introduced a new import and export file type associated with ASM files. You can now import and export ASM files using the SMT file extension. Mockup 360 Now Available from the Inventor App Store You can now download Mockup 360 from the Inventor App Store. Mockup 360 is no longer available for install from the Inventor installer. Update to Allow Part Appearance and Body, Feature, or Face Color to be Pushed from Derived Part to New Part A new Use color override from source component option is available in Derived Assembly, Derived Part, Make Part, and Make Component dialog boxes. This checkbox, when checked, pushes the Part appearance and body, feature, or face color overrides applied to faces from the derived part into the new part. If unchecked, the appearance is set to default.
Example dialog boxes 1:

Example dialog boxes 2:
A global setting can be set to default the Use color override from source component check box to remain
checked or unchecked throughout your session. This check box can be accessed through the Application
Options dialog box under Make/Derive default, under the Tools tab in the ribbon.

Tube and Pipe Setting Enhancements (not available in Inventor LT)
You can now customize file names for fittings and populate part numbers into your parts list within the
drawing environment. Previously, you could only change the name of your conduit items, but now you can
update fittings as well.

Updates to dialog box options within the Tube and Pipe environment:

Prompt for fitting file names (insert content as custom): By selecting this option, you are able to customize
the name of your fittings within the Conduit File Names dialog box.

Enable Part Number Settings: Allows you to populate a part number into the parts list within the drawing
environment. The part number is updated within the part file and then populates the parts list. This option
also makes available the Part Number Settings options in the Conduit File Names dialog box.
Part Number Settings: The Part Number Settings field is made available by selecting the Enable Part Number
Settings check box in the Tube and Pipe Settings dialog box. New options within this dialog box are:
Inherit from Content Center: Uses the name provided by the Content Center Library as your file name.
Use File Name: Allows you to customize file names, later allowing you the option to populate the
information to the parts list within the drawing environment.
Empty: Available in Inventor 2014. If selected, the File name remains empty.Additive Manufacturing The 3D Print Environment provides tools for additive manufacturing or 3D printing. Models can be printed whole or in-part based on the 3D printer in use. The 3D Print environment is available only in the Part document. To print an assembly, first derive it into a part model using the option to keep each solid body as a separate body. In the derived part use the 3D Print Environment. The 3D Print output is based on component or feature visibility. If you have features you do not want to print, change the visibility state or suppress the feature if doing so does not affect other features you want to print. A list of 3D Printers is included. You can modify the list and specify a default 3D printer. In the 3D Print environment you can: Select the printer and print options you want to use. Rotate the model into position relative to the build space.
Position the model within the build space.

Partition components too large for the build space and place alignment features so the parts are easily
assembled after printing.

Use modeling commands, such as direct edit, to adjust features according to the needs of the printer or
process. You can control quantity and location of alignment features and their size parameters.
Explicitly edit an alignment feature by exploding the partition and editing the sub-features. The explode action
is persistent.
Parts
Sheet Metal Parts
Sheet Metal Multi-body
The multi-body part environment is extended to include sheet metal parts. You can now use a top-down
workflow to create multi-body sheet metal parts. Use the Make Components or Make Part command and then
open the derived components to create flat patterns for each part in a multi-body part file.
The New solid body option is available in the following commands:
Face
Contour Flange
Contour Roll
Lofted Flange
Split
The following features support multi-body workflows:
Flange, Corner Hem, Bend
Cut, Fold, Rip, Punch
Zero Bend Radius
Support for zero bend radius is added to the following commands:
o Face
o Bend
o Flange
o Contour Roll
o Lofted Flange
o Hem
o FoldPunch Tool The quantity of punch tool instances is added to the PunchTool dialog box, Geometry tab. Thickness Detection When you convert a part to sheet metal, you are now prompted to select a base face. This pick allows Inventor to measure the material thickness for you. After you select a face, the Sheet Metal Defaults dialog box appears. The measured thickness is displayed in the Thickness value box. Click OK to accept the measured thickness value. Dismiss Warning You can permanently dismiss the warning message when you make edits to the flat pattern.
Export DWG and DXF
Some shop tools were unable to use an exported DWG or DXF flat pattern file if a bend centerline crossed a
hole in the bend. A new option is added to the Geometry tab in the Flat Pattern DXF or DWG Export Options
dialog box. Check the new Trim Centerlines at Contour option in the Geometry tab to trim bend centerlines to
the edge of the cut.
Freeform Parts

Freeform Environment
When you start a Freeform command a Freeform ribbon tab is activated providing full access to the
environment.

Work Features are added to the Freeform ribbon and can be created in the Freeform environment. For
example, create a work plane to use as a flatten reference or create a work plane to use as an alignment
plane.

When you exit the Freeform environment the topology is simplified. Simplification means that there are fewer
faces and edges in the model, but the freeform body shape is preserved.
Edit Form
The following enhancements are added to the Edit Form dialog box:
The dialog box is reorganized for better access to options.
The Extrude option is added to the dialog box. Both previous extrude workflows; holding the ALT key and
using the context menu when editing, are preserved.
A Reset option is added next to Undo and Redo.
The Soft Modification option is added. Set the type and the falloff gradient to control the influence your
changes have over the surrounding area. In the following image, soft modification is off in the upper right
image, and on in the lower right image.
Freeform Plane
Use the Freeform Plane command to create a planar sheet body and then manipulate the faces.
Freeform Cylinder
The Cylinder command supports creation of closed or open cylinder bodies.Edit Form The Edit Form command supports extruding open sheet edges and faces. Freeform Face Use the Freeform Face command to create a three-dimensional sheet body and then use Edit Form or Thicken to extrude the face or selected edges. Delete Command The Delete command now supports the Delete key. You can also delete faces to create an open sheet body. Delete one or more faces from a freeform shape, and then use the Freeform Face command to close the opening. Convert to Freeform Use the Convert command to copy solid body or surface faces to the freeform environment. Use the freeform edit tools to manipulate the shape.
Body Management
Intelligent body management. Freeform bodies and surfaces are converted to their respective solids or
surfaces when you exit the environment.

Align Form
Use Align Form to precisely move a freeform body to a target plane or planar face.

Flatten
Use Flatten to move the selected vertices to single plane passing through the vertices. Select at least four
vertices to use Flatten.

Weld Vertices
Use Weld Vertices to join vertices or to close a hole in a freeform body. Pick points individually to move the
first vertex to the second vertex.
Unweld Edges
Use Unweld Edges to disconnect an edge or a loop to enable separating the edges.

Insert Point
Use Insert Point to add control points to your model.

Merge Edges
Use Merge Edges to close gaps and join edges.
Thicken
The Thicken command is added to the freeform environment. You can choose Sharp, Soft, and No Edge
solutions to thicken a body. The following image shows an open sheet body thickened with the No Edge
option.

Mirror
The Mirror command is added to the freeform environment. You can use a work plane or planar face to mirror
a body.

Crease and Uncrease
The Crease and Uncrease commands are available in the ribbon. Previously they were available only in a
context menu. Creased edges are colored.

Bridge
The Bridge command has added the ability to select edges.
Add Distance
Use the Add Distance command to place a reference dimension between points, planes, edges, and faces.

Make Uniform
Use the Make Uniform command to relax the freeform body and make the intervals between star points
uniform. You can also use this command as a repair operation if you encounter issues with the body.

Copy
The Copy command supports copying bodies and faces. The Edit Form, Transform option is active when you
use Paste so you can easily move the duplicated geometry.

Toggle Translucent
Enable the Toggle Translucent command to see though the body and view existing geometry or sketches.
Toggle Select Through
Use Toggle Select Through to filter crossing window geometry selection. When enabled, geometry selection is
normal. When toggled off, only geometry that is visible in the view is selected.
Match Edge
The Match Edge command is more robust and works with open sheet bodies. In addition, the following new
functionality is added:
Expand the Matches folder in the browser, right-click the matched edge, and select Rematch if the source
geometry changes.
G0, G1, and G2 continuity control is provided between a NURB edge and a freeform body edge.
Selection
Freeform selection is enhanced to include the following:
You can now window select vertices.
Vertex display is enabled on bodies when you start a command that requires vertex selection.
Select an edge, press Shift and double-click another edge in the loop range to add all edges between the
two selections.
Select a face, press Shift and double click another face in the loop range to add all faces between the two
selections.
Select a vertex, press Shift and double-click another vertex in the loop range to add all vertices between
the two selections.Symmetry Symmetry is displayed with a different line type and color.
Part Design
Face Draft
Face draft enhancements allow you to control which part of the model thickness is preserved.

Ruled Surface
The Ruled Surface command is added to create Normal, Tangent, or Sweep surfaces. Ruled surfaces are used
to create pockets, split a complex body after shelling, or to create a parting surface for mold design.

Silhouette Curve
New exclude options are added to the Silhouette Curve command to provide greater control of curve
generation.
Parting Line
Surfaces can be used to generate a parting line split.

Replace Face

Replace Face supports both surface and solid faces as replacement faces.
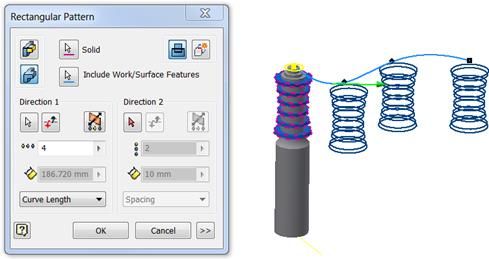
General Design
The Mirror and Rectangular Pattern commands now support selecting multiple solid bodies. Use these
new options to create new bodies or join the bodies.
The Measure command now allows you to measure an angle to the midpoint of any segment. This option
is achieved by hovering your mouse over the midpoint of a segment until a yellow dot appears.
You can now use the Rectangular Pattern command to create nonlinear solid body patterns.
Enhancements to Boundary Patch
The Boundary Patch command no longer requires the input edges to form a closed loop(s) to preview and
create a patch.
The Boundary Patch command now tries to create a patch whenever it is possible. If the input edges do not
form a closed loop, it creates a patch that is large enough to encompass all input edges. It is no longer
necessary for the boundary of the open loop patch to correspond to input edges.
The user interface is unchanged. You can still specify continuity constraints (G1/G2) and tangent scale values
for each input edge. The OK and Apply buttons are enabled when it is possible to create a patch from input
edges. You do not need to specify whether an open or closed loop patch is created. The Boundary Patch
command automatically determines what to create.
If feature preview is enabled, the preview gets updated every time when you select or deselect an edge as
shown in the following images going from left to right: 1) One edge is selected, 2) A second edge is added, 3) A
third edge is added and a closed loop is formed.Sketch Sketch Identify the Sketch Source Plane You can now identify which face or plane a sketch was initially created on. Select a sketch in the browser and select Show Input in the context menu to display the source plane or face. Create Tangent Dimensions Between Circular or Arc Geometry Within a 2D Sketch You can now create tangent dimensions between circular or arc geometry within a 2D sketch. This workflow will allow you to fully constrain a circle using tangent dimensions instead of a traditional diameter dimension, or the use of the center point of the circle. The Show/Hide All Constraints Display Setting Persists The selected Show All or Hide All Constraints display setting remains active as you sketch and throughout your editing session. Previously the show or hide setting did not persist when you created new geometry or when you started a new sketch.
Hide Sketch Dimensions
The Sketch Dimensions option is added to the Object Visibility list. Select this option to display 2D or 3D
sketches and hide all related sketch dimensions. Previously, you could not hide sketch dimensions separately.
This option is available in both parts and assemblies.

Consistency in Sketch Sharing
When sharing a sketch, by dragging it above its feature within the browser, it is now automatically made
visible. The visibility state of the shared sketch is now consistent with the context menu method of choosing
Share Sketch.

3D Sketch Wrap to Surface
The Wrap to Surface option of the Project to Surface command is enhanced. Wrap to Surface is more
predictable and can now wrap to a wider variety of surfaces. The following image shows the results of
wrapping a straight line onto two planes and a curve in both 2015 and 2016.
New Snap Points in the Context Menu Previously, the only snap points that were available through the right-click > Point Snaps option were Midpoint, Center, and Intersection. The following snap points are added: Endpoint Apparent Intersection Quadrant Mid of 2 points 3D Sketch Silhouette Curve The create silhouette curve command includes new options. You can now choose to exclude selected faces, straight faces, and internal faces from curve generation.
Assembly

Assembly
Stress Analysis
Changing the Safety Factor for materials triggers a new warning message. While assigning materials In Stress
Analysis, if you change Safety Factor from Yield Strength to Ultimate Tensile Strength (UTS), a warning
message displays. The warning advises that the safety factor calculation of one or more materials is based on
UTS. UTS uses Principal Stress and is appropriate for brittle materials.

Large Assembly Performance
The Disable Automatic Refinement option is added to the Application Options, Display tab. Disabling
automatic refinement provides a coarser model display and improves graphics performance in large
assemblies such as when changing a level of detail. Coarse faceting is used until you select the Refine
Appearance command in the View tab.
Tip: Disabling refinement can also improve graphics performance in complex models.

Replace Selected Components
The Replace command now supports more than a single component selection. Multiple similar or dissimilar
component selections can be made before or after the Replace command is invoked.
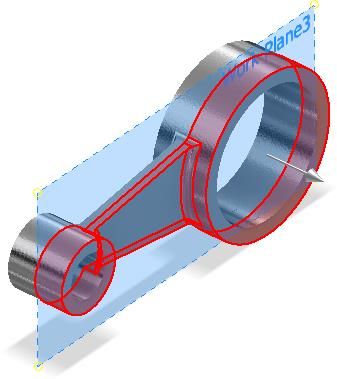
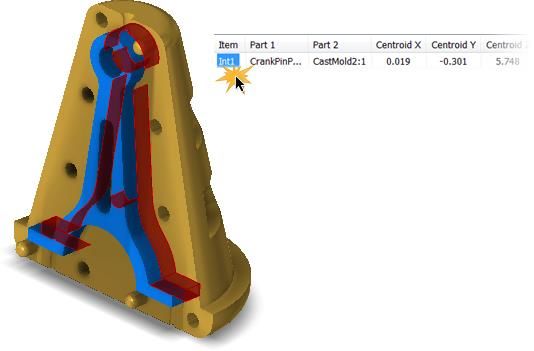
Analyze Interference
The following new functionality is added to the Analyze Interference workflow:
You can use a crossing window to add components to the selection set. Previously you selected
components one at a time.
You can now zoom to an interference. If interferences are detected, expand the dialog box and
double-click an entry to zoom to the interference.Assembly Pattern The Midplane option is added to the assembly Pattern command. Select the Midplane option to create a pattern distributed on both sides of the original component. Act on Multiple Sick Constraints You now can select multiple sick constraints within the Design Doctor and delete or suppress them.
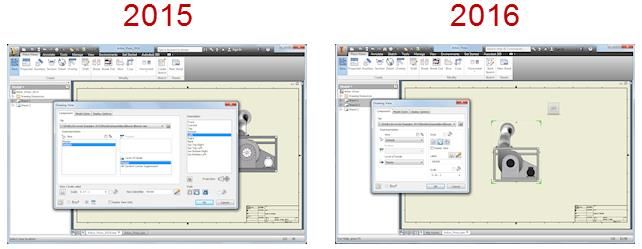
Drawings General Enhancements in Drawings Fast Drawing Creation A new Create Drawing View command merges several steps to one, so you can quickly create drawing views from a model file. In the model file, arrange the model as desired. Then right-click the root component in the browser, and click Create Drawing View. The following model properties are automatically propagated from the model to the drawing: All active representations (design view, position, and level of detail representation) Current camera including Orthogonal/Perspective setting Active iPart/iAssembly member Fast drawing creation is supported in the following environments: Part, Weldment Assembly, Assembly, Presentation, Sheet Metal, and Flat Pattern. It also supports iPart, and iAssembly factories and member files.
Centralized External Sketch Symbol Library Features
You can now easily access and share your collection of sketch symbols through a new external Sketch Symbol
Library. This library is an Inventor drawing file that, by default, is located in a subfolder of the Design Data
location of your project.

Sketch Symbols dialog box

Search and filter function

You can now search and filter your libraries with more accurate results when inserting sketch symbols from a
Symbol Library.

Preview sketch symbol

You can now see a preview of your selected sketch symbol before placing it.

Enhancement to browser expansion state when placing sketch symbols

The library's browser expansion is now remembered when you select a symbol from the specified library and
select OK . It will remain expanded in the last viewed position, based on the state it was left in before closing
the dialog box. This will be remembered throughout your session.

For example, when you select OK, the next time you insert a symbol from the library, the last sketch symbol
that was inserted, will be selected automatically from within the last library accessed.
Both IDW and DWG file types are supported in your sketch symbol libraries

The ability to place IDW or DWG file formats into the sketch symbol library is now possible. A Sketch Symbol
Library can be created in IDW and DWG formats allowing insertion of symbols contained within the library file
from either format.

Save all to symbol libraries

To save all sketch symbols to a given library, right-click on the Sketch Symbol, Drawing Resources node in your
browser and select Save All to Symbol Library.
Save to desired sketch symbol library

Save your sketch symbols to a library of your choice. Right-click on a symbol in the graphics from beneath a
sheet or beneath the Sketch Symbols node under Drawing Resources to display the Save to Symbol Library
dialog box. Here, you can choose which library to save your sketch symbols to. To create a library, select the
Create a new library icon. To create a folder within a library, select the Create a new folder icon.

Retain your library's folder structure when saving your sketch symbols to a library. To accomplish this, click the
Retain Resource Folder Structure check box.
New Sketch Symbol Library folder entry available in Application Options dialog box

A new configuration entry is available in the Application Options dialog box under the file tab called Sketch
Symbol Library folder. Here, you can specify a folder outside of the Design Data structure to store your sketch
symbol library templates. Select the Browse icon to locate a file or Make New Folder to create a location to
store your libraries.

Initial View Scale Property in Title Block or Text
The Initial View Scale property scale of the first drawing review placed on the sheet is added in the Sheet
Properties group within the Format Text dialog box. You can insert the Initial View Scale property to title
blocks in your drawing templates or to Text objects in your drawing. Initial View Scale property value is not
changed when you reorder views in the browser or delete the first drawing view.
Work Features Can Now Be Projected Into a View Sketch You can now create a view sketch on a model with included work features and select those work features with the Project Geometry command. This capability in a drawing view sketch allows you to reference, constrain, or annotate other sketch geometry to projected work features that were included in the view. Hidden Line Views for Standard Fasteners A new option is available to exclude all standard fasteners from hidden line views. In the Drawing View dialog box, on the Display Options tab, choose a Hidden Lines option: Select Never to remove hidden lines for all standard fasteners. Select Obey Browser to respect the browser Hidden Lines setting for each standard fastener. Note: The Hidden Lines option applies only on Content Center parts from the Fasteners folder and Sheet Metal folder.
Transparent Components in Drawing Views
In the Drawing Browser, select the Transparent option in the component context menu to make a component
transparent in a drawing view. Transparent components do not hide geometry of other components.
Note: Component transparency applies only to precise drawing views.
In the example below, the highlighted component is set as transparent in the drawing view.

Workflow Modified to Start Sketch
The drawing Start Sketch command is modified to work similarly as the Start 2D Sketch command in the
modeling environment. When you click Start Sketch, you have to select a sheet, drawing view, or existing
sketch in the browser or graphic window. The new or edited sketch is highlighted in the browser and opened
for editing.

If the current drawing sheet does not include any drawing views or sketches, a sheet sketch is started
automatically.

Tip: Alternatively, you can select a sheet, drawing view, or sketch before you click Start Sketch.
Base and Projected Views

Model Orientation in Base Views
When you create a base view, View Cube is displayed next to the upper right corner of the base view. Click a
View Cube face, edge, or corner, or click the rotation manipulators to set the desired orientation of the model.
The View Cube replaces the Orientation options from the Drawing View dialog box.

Temporary Base View Position
When you start the Base View command and specify the model, the base view is placed in a temporary
position on the drawing sheet. Hover over the base view to display the Move manipulator. Then drag the base
view to the desired place.
Custom View Orientation
Right-click the View Cube, and click Custom View Orientation to enter the Custom View environment. Then
specify the orientation of the custom view.

Orthographic and Perspective Projection
By default, Orthographic projection is used to create drawing views. To use Perspective projection, when you
create a base view or edit a base view or independent projected view, right-click the view cube, and click
Perspective.
Saved Camera for Presentation Views
For drawing views based on a presentation view of the model, you can access and apply camera settings saved
in the presentation file (.ipn). Right-click the View Cube, and click Saved Camera.

Model orientation in the drawing view changes to match orientation saved in the presentation view.
Revised Drawing View Dialog Box
The Drawing View dialog box is streamlined to support new workflows with direct interaction in the graphic
window.
Size of the dialog box is reduced:
Some dialog box options are moved, changed, or removed:
Component tab
Style controls, the Raster View option, and label and scale controls are moved from the base dialog box
area to the Component tab.
The Projected View option is removed and projected view creation is controlled directly in the graphics
window.
The View, Position, and Level of Details Representation controls are changed from list boxes to drop-down
lists.Display Options tab
The most frequently used controls are on top.
The All Model Dimensions option is visible only for Part models. The option is hidden and replaced with
the Interference Edges option for other types of referenced files.
Show Trails option is moved to the Components tab > Presentations frame.Model State tab
Weldment controls are moved from the Display Options tab to the Model State tab to be colocated with
the other weldment-specific options.Projected Views Use the direct interaction tools to create multiple projected views with the Base View command, and to place projected views in the drawing. To create an orthographic or isometric projected view, click a triangular icon on the base view border. The projected view is placed in a default location. To add a projected view to a specific place on the sheet, drag the projected view bounding box to the desired location. Then click to create the view. To move a projected view, drag the view to the desired position.
To remove a projected view, click the x mark.

Drawing View Scale
When you create a base view and projected views, a temporary scale value is used to fit the model view to the
sheet. Drag a corner of the base view to change the view scale directly in the graphic window.
By default, within the range of scales predefined in the current Standard style, the view size snaps to the
preset scale values. Hold the CTRL key to enable free dragging, and set arbitrary view scale.

Child projected views are dynamically resized to respect the new base view scale.

Editing of Base and Isometric Projected Views
When you edit a base view or an isometric projected view, direct-editing tools are available.
Use the View Cube to specify new orientation and type of projection for the view. Drag a view corner to
change the scale.
Balloons
Custom Balloons in Balloon Styles
You can use a sketch symbol as the default balloon shape in a balloon style. In the balloon style, switch on the
Used-Defined Symbol button, and select a symbol from the list.

Tip: To make your custom balloon shapes available in all drawings within a project, add sketch symbols
defining the custom balloons to the centralized sketch symbol library.

Align To Edge Option
A new To Edge option is available to align balloons. You can select any linear edge on the drawing sheet to
specify direction of the aligned balloons.

Corrected Split Balloons
When you insert a split balloon, the middle line is connected to the circle.
Migrated balloons are not automatically updated to the new type. Edit a legacy balloon to update its
appearance.
Window Selection for Aligned Balloons
Any window selection that includes balloons is valid, and displays Align commands in the right-click menu.
After you start an alignment command, all objects that cannot be aligned are automatically removed from the
selection set.

Improved Auto Balloon command
Placement of automatic balloons was improved to optimize the balloon start points, and position and length
of balloon leaders.
Symbols and Symbol Styles Enhanced Symbols List in Drawing Annotations New graphical symbols are added to the list accessed by the Symbols button, and can be inserted in various types of drawing annotations. The Symbols list is divided into six segments: Common Symbols, Geometric Characteristic, Material Removal Modifier, Additional Symbols, General Symbols, and Character Map. Note: The active Feature Control Frame style controls the list of symbols available in drawing annotations. Double-Click Editing for Symbols Double-click editing is now available for more types of symbols: Surface Texture Symbols Feature Control Frames Weld Symbol
Surface Texture Symbol Enhancements
The following improvements are available in the Surface Texture dialog box:

Symbol layout
Various layouts of Requirements fields are available. The layout in the Surface Texture dialog box corresponds
to the current drafting standard.

Improved tooltips
A tooltip shows a detailed description for each Requirement field.

Inset Symbol
Use the Insert Symbol button to add graphical symbols to any of the Requirements fields.
Surface Texture Symbol Styles
Surface texture symbol style is updated to provide symbol formats corresponding to a number of drafting
standards. When you define a Surface Texture style, in Style and Standard Editor, select the desired standard
from the Standard Reference list.

The Requirements field in the Surface Texture style panel shows a preview of the surface texture symbol that
corresponds to the selected standard. Examples of symbol layouts (DIN ISO 1302 - 1992, DIN EN ISO 1302 -
2002, and JIS B 0031 - 2003) are on the following images:

Note: When you open a drawing created in previous versions of Autodesk Inventor, the appearance of surface
texture symbols is retained. To apply a new layout to the surface texture symbols, change the Standard
Reference in the Surface Texture style.
Feature Control Frame Enhancements
The following improvements are available in the Feature Control Frame dialog box:

Top note field
A new edit field is available to add notes in the top of the feature control frame symbols.

Insert Symbol
Use the Insert Symbol button to add graphical symbols to any of the editing fields.

Insert Letter
Use the Insert Letter button to add a letter to the editing fields. The Insert Letter list replaces the single letter
buttons available in the legacy dialog box.
Merged Format for Dual Hole Notes
A new Group Dual Values Together option is available to support adjacent placement of dual dimensions
within hole notes. The option is available in Styles and Standard Editor Dimension Style Alternate Units tab,
and it is selected by default.

The following image shows two formats currently available for hole notes with dual dimensions. The Group
Dual Values Together option is selected for the hole note at the top, and it is unselected for the hole note at
the bottom.

Pressed Joint Welding Symbol
The Pressed Joint symbol is added to the list of graphical welding symbols.
Tip: To make the symbol available in the drawing, in the current Weld Symbol style, in the Symbol Filter list,
select the Pressed Joint symbol.
Annotation Leaders

Single Segment Leader Option
Select the Single Segment Leader option to change the default procedure and create drawing annotations with
a single leader segment. The Single-Segment Leader option is available for balloons, leader text, surface
texture symbols, welding symbols, feature control frames, datum targets, and sketch symbols. You set the
option separately for each type of drawing annotations.

Aligned Leader Annotations
Drawing annotations with leaders can now be aligned in one step. In the drawing, select the annotations to
align. Right-click, and on the menu, click Align > Vertical, Horizontal, or To Edge.
Window Selection for Aligned Annotations
Any window selection that includes annotations supported in the Align commands is valid, and displays Align
commands in the right-click menu. After you start an alignment command, all objects that cannot be aligned
are automatically removed from the selection set.

No Snap for Annotation Leaders
The default behavior and CTRL-key behavior for placing drawing annotations are switched. Hold CTRL key to
enable 15° leader snapping.
Presentations General Enhancements in Presentations Window Selection and Selection Filters The Select command works similarly as in other environments, including color highlighting and window selection. The following filters are available on the Quick Access toolbar: Component selects either sub-assemblies or parts. Part restricts selection to parts only. Trail selects trails. Note: The Component and Part filters are available also on the Tweak Components minitoolbar. Browser Views The Filter icon is replaced with name of the current browser view. Click the arrow to switch between the available browser views. Consistent Tweak Names Tweak names are now consistent in all browser views.
You can also read