Canterbury Maps Quick Start - Finding Locations and Identifying Features - Quick Start Guide
←
→
Page content transcription
If your browser does not render page correctly, please read the page content below
Canterbury Maps

Canterbury Maps Quick Start -
Finding Locations and Identifying
Features
Quick Start Guide
Standard GIS Viewer
2     Canterbury Maps Quick Start - Finding Locations and Identifying Features

    Introduction
    This document will help the user to locate areas or properties of interest. Once they have located an area they can
    turn on the features the Canterbury Maps contributing partners have captured in that area and use the identify tools
    to find more information about each of these features.

    Contents
    Introduction ...................................................................................................................................................................... 2
    User Notes......................................................................................................................................................................... 3
       Map Navigation ............................................................................................................................................................. 6
       Changing the base map................................................................................................................................................. 8
       Identifying Features ...................................................................................................................................................... 8
       Working with Search Results ...................................................................................................................................... 10
    Notes and Advice ............................................................................................................................................................ 12

    Last Updated: May 2013
3    Canterbury Maps Quick Start - Finding Locations and Identifying Features

    User Notes
       1. Open the viewer and enter the address of the property you wish to find into the search element at the top of
          the page. Addresses are based on the Land Information New Zealand electoral address dataset, and may not
          reflect deliverable mail addresses or all street addresses.
       2. As you type the possible match options should appear. If you need to reset the search, select the red cross
          at the end of the search box.

       3. Use the mouse or the up & down keys to select the option that best suits what you are looking for. Click on
          the correct match and the property title will appear in the search Result screen at the bottom of the map

       4. Double click on the highlighted record. This will turn the selected record red and the map will open that
          property.

    Last Updated: May 2013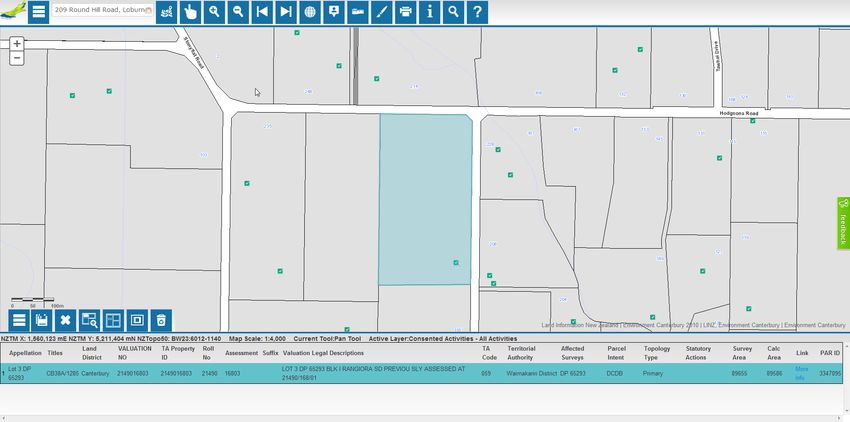
4    Canterbury Maps Quick Start - Finding Locations and Identifying Features

       5. To minimise the search results box click on the toggle icon         in the toolbar above the results grid. This
          will allow you to have a larger map area.

       6. To turn on the feature layers you are interested in, open the side bar by clicking the toggle icon      next to
          the search box.

       7. Make sure the Legend window is visible by clicking the legend icon         in the side bar.

       8. When making a layer visible on screen, you need to activate the layer group that it sits in first by ticking its
          box, and then tick the box for the individual layers within that group that you are interested in.

    Last Updated: May 2013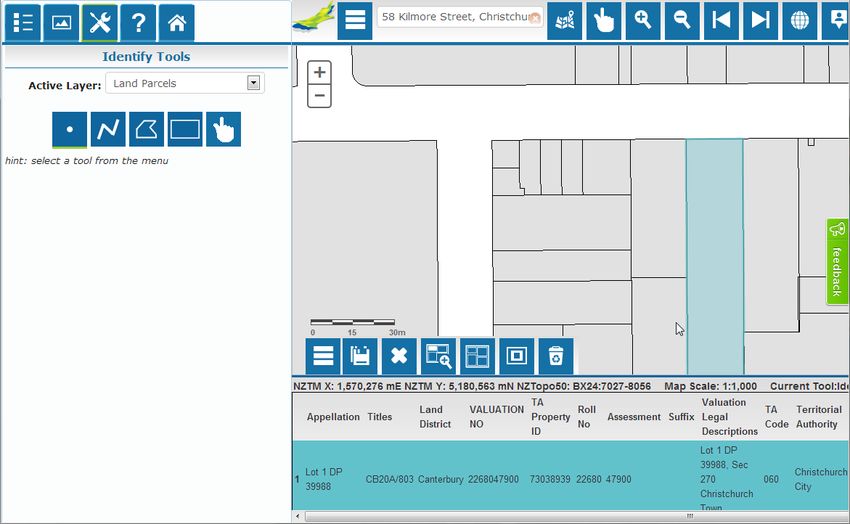
5 Canterbury Maps Quick Start - Finding Locations and Identifying Features
Layer Group (Turned Off) Layer Group (Turned On)
You can turn the features off by simply unticking the layers you don’t require anymore.
9. The map will be displayed with all the selected (ticked) features showing.
Last Updated: May 2013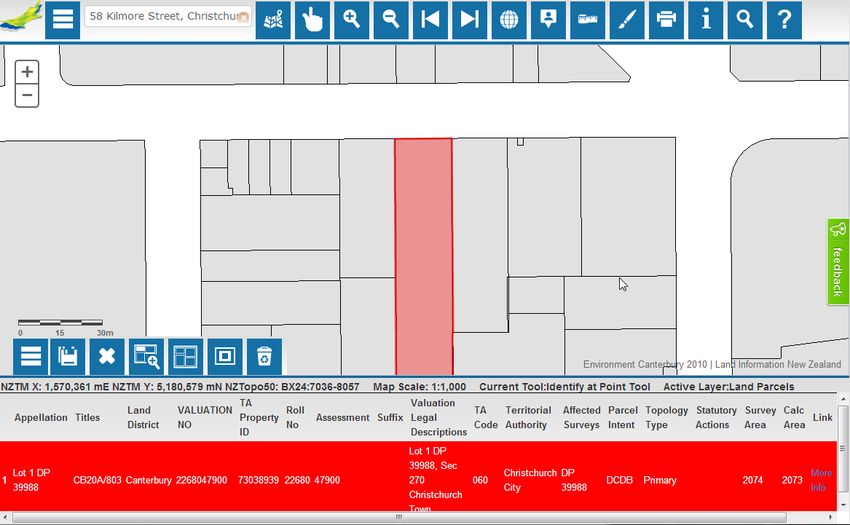
6    Canterbury Maps Quick Start - Finding Locations and Identifying Features

    Map Navigation
       1. You can move around the map using the Navigation tool bar. Note – This toolbar is available when viewed
          on a desktop computer. When viewing on a tablet or mobile device such as a smart phone, parts or all of the
          toolbar may be hidden.

    Icon          Action         Description
                   Pan           Moves the map around. Click and drag to change the focal area of the map.

                 Zoom in         Moves the map extent in. Click and drag a rectangle on the map. The map will zoom in
                                 to fit that extent of that rectangle (as best as possible).
                 Zoom out        Moves the map extent out. Click and drag a rectangle on the map. The map will zoom
                                 out to fit the previous visible extent of the map into the area of the drawn rectangle (as
                                 best as possible).
                Zoom to the      Changes the map to the last zoom setting or pan position. Cleared when a new tool is
              previous extent    activated.
                Zoom to the      Changes the map to the next zoom setting or pan position if a zoom to previous extent
                next extent      has been used recently. Cleared when a new tool is activated
              Zoom to the full   Zooms the out to show all of New Zealand
                  extent

       2. When using a touch enabled device, the following actions and gestures can be used to navigate the map.

    Action             Do this                                                                       Touch Action
                                                                                                     Equivalent (see
                                                                                                     below)
    Move map           Use a single finger and touch a point on the map. Draw that finger across the Pan
                       screen in any direction - the viewable area of the map should move in the
                       same direction centred on the point that was initially touched. Remove the
                       finger to release the map.
    Zoom in            Use your finger and thumb pressed together and touches a point on the map. Spread
                       Spread the fingers and thumb towards each other across the screen in a
                       pinching motion. The screen should zoom out in a factor proportional to the
                       area being pinched.
    Zoom out           Use your finger and thumb spread apart and touch two points on the map. Pinch
                       Pull the fingers and thumb towards each other across the screen in a pinching
                       motion. The screen should zoom out in a factor proportional to the area
                       being pinched.
    Draw               Used by any action that requires the user to draw a rectangle e.g. using the Pan
    Rectangle          drawing tools or identify draw rectangle tool.
                       Activate the tool and tap and hold the map at one point representing one of
                       the rectangle's corners. Draw the finger in the direction of the diagonally
                       opposite corner. Release the finger to complete the drawing action.
    Draw               Used by any action that requires the user to draw a line e.g. using the drawing Series of taps and
    Line/Polygon       tools or identify draw line tool. Note: The freehand line tools are not double tap to
                       available for touch devices.                                                    finish
                       Activate the tool and tap the map at one point representing start of the shape.
                       Tap the map at each change of direction along the line. Double tap to finish
                       the shape. Polygons require a minimum of 3 points to be completed.

    Last Updated: May 2013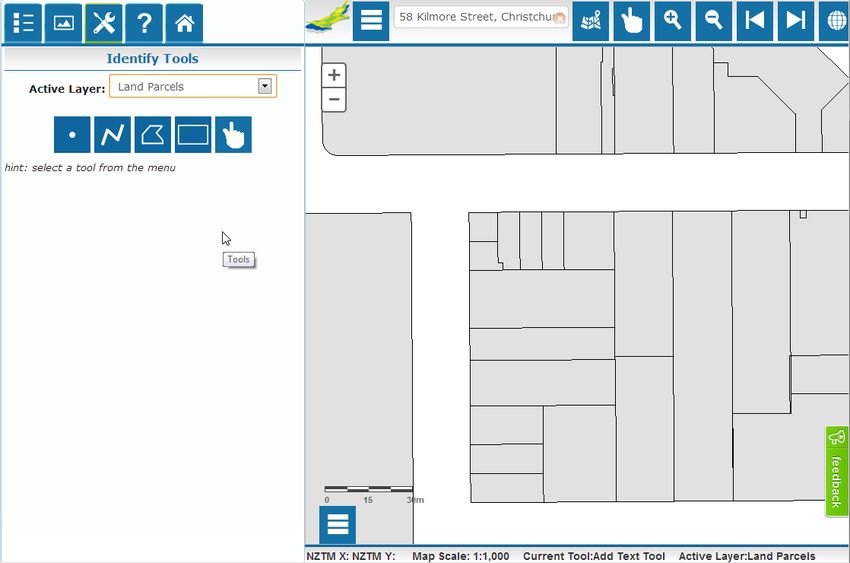
7    Canterbury Maps Quick Start - Finding Locations and Identifying Features

             Tap                    Double Tap                       Long Press                      Scroll

             Pan                        Flick                    Two Finger Tap                Two Finger Scroll

    Pinch                     Spread                        Rotate
                                                                                       Images sourced from Wikipeadia.
                                                                                       http://en.wikipedia.org/wiki/Multi
                                                                                       -touch

       3. The map zoom scroller can also be used to zoom in and out based on the centre of the map. The zoom
          scroller is visible when viewing on desktop computer.

                                                    Click    +   to zoom the map in

                                                    Click    –   to zoom the map out

    Last Updated: May 2013
8 Canterbury Maps Quick Start - Finding Locations and Identifying Features
Changing the base map
1. To turn on the change the basemap used by the map, open the side bar by clicking the toggle icon next
to the search box.
2. Make sure the Basemap window is visible by clicking the legend icon in the side bar.
3. Click the tile for the base map you wish to use. The base map in the map should change and the side bar will
close automatically.
Identifying Features
1. To find out more information about the selected features use the Identify Tool. Click the identify tool icon in
in the tool bar. The sidebar should open and display the Identify Tools.
Last Updated: May 20139 Canterbury Maps Quick Start - Finding Locations and Identifying Features
2. Then choose how you would like to select the features you are interested in by clicking one of the select
shape icons and then drawing the appropriate shape on the map.
Icon Action Description
Identify at Point Click on the individual feature.
Identify with Line Draw a line in the area you are interested in this will return search results for all features
intersecting the line. Double click to finish the line.
Identify with Draw the shape you are interested in, the search results will show all the features within
Polygon the shape. Double click to finish the polygon.
Identify with Drag a box around the features you are interested in.
Rectangle
Stop Drawing Stops an existing drawing action and reactivates the pan tool.
3. The matching search results will open in the results grid at the bottom of the map.
4. Select the record you are interested in by clicking the row in the grid. This will turn the record red.
The shape will also be highlighted in red on the map.
Last Updated: May 201310 Canterbury Maps Quick Start - Finding Locations and Identifying Features
Working with Search Results
There are a number of options available when there are search results in the grid.
Save results as a CSV file: Click the save icon in the tool bar above the search results grid. This will
export your search results into a file that is compatible with Microsoft Excel.
Filter results: Highlight a record (or records by holding the shift key down when clicking the row) that you
do not wish to see and click the Remove Highlighted icon in the toolbar above the search results grid.
This will remove these records from the result grid and remove the highlights for those records from the
map.
Zoom to records extent: Click the Zoom to Extent icon in the toolbar above the search results grid.
This will reposition the visible map extent to show all of the records currently within the results grid. If any
of the records in the results grid are highlighted in red, clicking the Zoom to Extent icon will reposition
the visible map extent to show only those highlighted records.
Clear highlighted records: Click the Clear Highlighted Records icon in the toolbar above the results grid
to remove the red highlight from any records in the result grid. It will also remove the red highlight from the
feature in the map.
Buffer selected records: Create a buffer around any record(s) that are currently highlighted in red in the
results grid. Select the individual features you are interested in by clicking the rows in the results grid (hold
the shift key down when clicking if you wish to select multiple rows). Note – at least one record must be
highlighted in red before the buffer tool will work. Click the buffer features icon in the toolbar above
the results grid. The buffer dialog will be displayed.
Last Updated: May 201311 Canterbury Maps Quick Start - Finding Locations and Identifying Features
Choose the buffer distance from the available list, or choose custom distance and enter your own values.
Click the Buffer button to create the buffer as a drawing graphic.
Clear the result grid: Click the clear results icon in the toolbar above the results grid to reset the
search and remove the highlights from the records on the map. The results grid and its tool bar should
automatically hide.
Last Updated: May 201312 Canterbury Maps Quick Start - Finding Locations and Identifying Features
Notes and Advice
When the side menu is open, part of the map display is hidden off screen. When creating a printable map,
make sure you close the side menu to make sure that the visible extent is correctly centred.
The results from a search will appear on any printed maps, including those highlighted in red.
Last Updated: May 2013You can also read