Infinite Campus - Traditional Gradebook Basics
←
→
Page content transcription
If your browser does not render page correctly, please read the page content below

Infinite Campus - Traditional Gradebook Basics
The Infinite Campus Grading portion of the program consists of two parts that work together:
Assignments and the Gradebook. Assignments allow you to create categories for assignments
very similar to folders in which you save files. In Assignments, you can also create your
assignments (Chapter 10 test, Plants diagram, etc.). Assignments must be set up prior to
entering scores in the Gradebook.

The Gradebook is where you enter student’s scores for assignments, exactly as you would in a
paper gradebook.

Assignments
The Assignments tool is the equivalent of lesson plans. You will define calculation settings, add
categories and assignments, and copy set-up to other courses and sections. New features are
always being added, so be sure to keep up on any future enhancements.

Use Assignments to:
   • Select a grading scale for the class
   • Create categories
   • Create assignments
   • Copy specific assignments from one section to another

Navigating to Assignments
Assignments is a section-specific tool. Each section may have a different setup in Assignments
or an assignment may be copied from one section to another.
    1. Verify the Calendar for the appropriate school year.
   2. Select the Term and Section in the Section dropdown in the
      Campus toolbar.
   3. Expand the Instruction module by clicking the name of the
      module or the plus sign.
   4. Select Assignments.

                                                1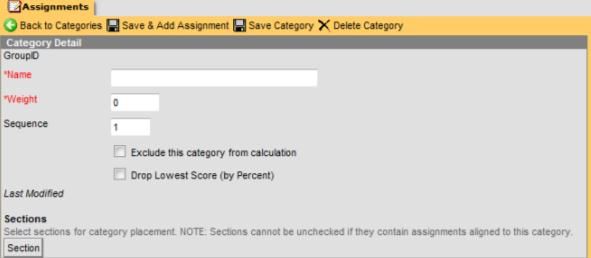
Assignments Window
Assignments created for the section selected will be visible in a grid format.

1. Assignments Menu - Edit Teacher Preferences, Edit Grade Calc Options, Edit Categories,
    Create Assignment, Copy Assignments, View Tree, and Validate
   a. View Tree- shows all categories and assignments associated with each under each
       Grading Task; folders are categories and the Gradebook icon is the assignment; you can
       edit and grade from this page.
2. Filtering Options - can filter by term, standard/task, category, or student group.
3. Sorting Options - can sort columns using the arrows located in the column heading.
4. Assignments can be marked Active (able to be graded) or Inactive individually or as a group.
   a. To mark all assignments active or inactive, check Active in the dark gray box.
   b. To mark individual assignments active or inactive, check Active for the specified
       assignment(s).
5. Assignments can be hidden from the Gradebook and Portal individually or as a group.
   a. To mark all assignments hidden, check Hide in the dark gray box.
   b. To mark individual assignments hidden, check Hide for the specified assignment(s).
6. The Assigned Date and Due Date are visible and can be edited here by changing the date
   manually or selecting the calendar icon and choosing the date.
7. The Assignment Name displays the name. When you click on an assignment, the
   Assignment Detail window opens for editing purposes. When the Gradebook icon is
   selected, the Standard & Grading Task Legend     opens with only that assignment visible.
8. Alignment displays the grading task, category, and term of the assignment. It also displays
   the number of students who have turned in the assignment.
9. Flags
        turned in; use this flag to let a parent know a student has turned in assignment but it
     T
        has not yet been graded
     M Missing; lowers student’s overall grade
      L Late; does not affect student’s grade
      I Incomplete; does not affect a student’s grade
     Ch Cheated; marks the student’s grade as 0
     X Exempt; does not affect a student’s grade

                                                   2
Setting up Assignments
To set how Campus calculates student grades for a particular grading task, click Edit Grade Calc
Options in Assignments.
1. The screen will refresh and the Calculations Options box will appear.
2. In the gray Calculate In Progress Grade
area, click on the drop down arrow to
select the Grading Scale that will be used
to convert student percentages to a letter
grade. In our district, there are already
some preset grading scales, but you may
also include your own grading scale.
Helpful Hint:
If you do not have a grading scale selected
here, the Gradebook will not display the
points earned by a student or the
resulting letter grade.
3. Weight Categories – check this box if your categories have weight to them.
4. Use score’s percent value – DO NOT check this box.
5. Select Fill All. This will fill the grading scale for all terms.
6. Click Save when finished.
7. Repeat steps 1-6 for each subject area.
Creating Categories
Once preferences for a term are set, a category or multiple categories can be created and
attached to the term. Categories are the containers for assignments. Assignments cannot be
created for a class until at least one category exists for that class. You can:
• Create multiple categories to define assignment types. (e.g., homework, tests, quizzes,
performances, essays, participation, etc.)
• Create a single category and place all class assignments in it.
To create a new category
1. Click on Edit Categories.
2. Click on Create Category. The
Category Detail window opens.
3. Enter a Name for the category.
Leave the setting at 0.
4. Enter the Sequence for this
group. This number will
determine the order in which
3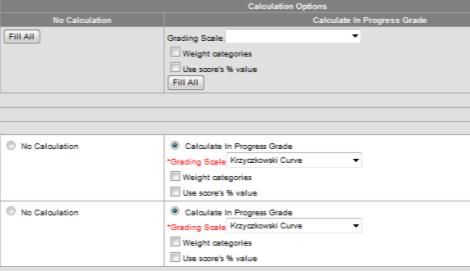
the category and assignments appear in the Gradebook and on reports.
5. Exclude this Category from Calculation: assignments stored in this folder will not
calculate in Gradebook, e.g., spelling.
6. Drop Lowest Score: will automatically drop lowest score in the category.
7. Under Sections, check those sections you want to have the same category.
8. Click Save Category or Save & Add Assignment when finished. Save Category goes back
to the Assignments window and Save & Add Assignment opens the Assignment Detail
window and you’ll be able to add an assignment right away.
9. Repeat steps 1-8 to create additional categories.
To edit a category
1. To edit a category, click on Edit Categories from the Assignments tab.
2. Click on the name of the category you wish to edit. The Category Detail window opens.
3. To edit, change any information necessary.
4. Click on Save Category.
To delete a delete category
1. To delete a category, select Edit Categories from the Assignments tab.
2. Click the name of the category you wish to delete. The Category Detail window opens.
3. Click on Delete Category.
4. A warning message will pop up. Click Ok to delete or Cancel to keep the category.
Helpful Hint:
If a Category is deleted, all assignments in that group will also be deleted.
Creating Assignments
1. Click on Create Assignment from the Assignments tab. An Assignment Detail table will
open.
*Fields in red with an
asterisk are required.
2. Enter a Name for the
assignment.
3. Enter an Abbreviation. It
is limited to five
characters and will
appear as the column
header in the Gradebook.
44. Click the radio button to indicate whether it’s an unscored activity (e.g., field trip) or
scored assignment.
5. Under Notes, type in any information you want parents and students to see in the
Portal.
6. Under Section Placement, check the section(s) that will include this assignment.
a. From here, the
assignment can be
hidden from the
Portal by checking
Hide.
b. You can enter an
assigned date, but you
must select a Due
Date by entering the
date manually or selecting the calendar icon and choosing the date.
c. Adjust the sequence of the assignment in the Seq column.
d. If you have created student groups, assignments can be created for specific groups
in the Student Group column.
7. Under Information for Students, click the Show button to open up the Descriptions,
Objectives and References text boxes. Type in any information you want parents and
students to see in the Portal. If you click on the Resources button, you may upload and
attach up to 4 documents.
58. Under Student Work Product, click on the radio button to allow students to submit
work via the Portal.
9. Under Grading Tasks, click
to check Term Grade.
Once this is checked, total
points can be entered for
the assignment.
a. Check the appropriate
category. Only one
category can be checked.
b. Leave Scoring Type as
Points.
c. Enter the Total Points for
the assignments. This
field is defaulted at 100.
d. The Multiplier field works in
conjunction with the points
possible field to set how the
assignment affects the child’s
grade. For example, a 50 point assignment with a multiplier of .5 will actually be
calculated as being a 25-point assignment. It is recommended that you leave the
Multiplier at 1.
10. Click either Save, Save & Score or Save & Create New Assignment. Save will refresh the
page. Save & Score will open a pop up window asking which section you would like to
score if multiple sections were selected when creating the assignment. Once that is
selected, it will open to the Standard & Grading Task Legend window.
11. Save & Create New Assignment will refresh the Assignment Detail window so a new
assignment can be entered.
To edit an assignments
1. To edit an assignment, click on the assignment name from the Assignments window.
2. The Assignment Detail window opens.
3. To edit, change any information necessary.
4. Click Save, Save & Score, or Save & Create New Assignment.
To delete an assignment
1. From the Assignments window, click on the name of the assignment. The Assignment
Detail window will open.
2. Click the Delete Assignment link at the top of the page.
63. A pop-up warning message will appear. Click on OK if the item chosen should be
deleted, or click Cancel.
Helpful Hint:
If an assignment is deleted, only the assignment will be removed. If you delete an
assignment that you have already marked in your Gradebook, the scores will be deleted
and the Gradebook calculation will automatically adjust.
Gradebook
Overview
The web-based Campus Gradebook allows teachers to enter assignments and student scores
from anywhere with a computer that has Internet access.
To use Gradebook:
You have to first go to Instruction Assignments and complete the setup:
• Select a Grading Scale
• Create Categories
Navigating to the Gradebook
1. Click the Section you want in the
section dropdown on the
Campus toolbar.
2. Click on Instruction
Gradebook.
3. Your computer will then
download the Java application.
Since Java is a programming
language, you may encounter a
security warning when opening
the Gradebook. Click will need to
click on Run. If you click Cancel
when the Java warning appears,
the Gradebook will not load and the computer will need to be restarted in order for the
message to reappear.
7Gradebook Preview
Here is a breakdown of the components of the Gradebook screen.
Toggle between progress
marks and final marks Collapse and expand categories
Toggle to hide, or display points,
percentages, and grades
Calculated points, Posted Term Scores entered here
percentages and grades final marks
Entering Individual Scores
1. Enter assignment scores by finding the column for the assignment you will mark.
2. Type in the score you want the first student to receive.
Helpful Hint:
To see the total possible points for the assignment look in the parentheses in the
column header for the assignment.
3. After entering a score, hit Enter on your keyboard.
This brings you to the next student in the list.
When you leave the cell you edited, the calculated points, percentage and grade in
the yellow and white grid will be updated.
Extra Credit—type in a score greater than the assignment total and the score
appears in green to indicate extra credit. Hover the mouse over the score to see the
total extra credit points.
4. When finished entering scores, click Save.
Helpful Hint:
To save a score, click out of the cell you were typing in.
When the Save button is red, new information has been entered that has not been
saved.
Once grades are entered, they are instantly visible on the student and parent portal.
8Flags
In addition to scores, a series of codes may also be entered in the Gradebook for a student by
right-clicking on the cell for a student’s score. Hover the mouse over the cell to see the flag
applied.
Turned In Use this flag to let a parent know a student has turned in assignment but hasn’t
been graded yet.
Late Assignments flagged as late will appear with a red score. If there are
deductions, the grade will need to be entered manually.
Type L or select the flag in the cell to designate a late
assignment.
Exempt An exempt assignment will be grayed out and will not count
for that student. Type X or select the flag in the cell to
designate an exempt assignment.
Missing Missing assignments count as 0 points earned. Type M
or select the flag in the cell to designate a missing
assignment.
Incomplete Entry will calculate as 0 or you can enter the number of
points earned.
Cheated An assignment flagged as cheated will count as a 0. Cheated will appear on the
portal. Type C or select the flag in the cell to designate a student cheated on an
assignment.
Dropped The dropped flag is automatically marked if drop lowest score was set on the
group in Categories. As scores are entered, Campus will analyze each student’s
scores and flag the score with the lowest overall percentage, thus removing it
from the grade calculation.
*If you type in L, X, M, or C, you cannot enter a score. To have a score and a flag, enter the
score and select the appropriate flag from the dropdown menu.
Comments
Two types of comments can be made in the Gradebook that may be included on reports and on
the portal- student level comments and score comments. A student-level comment is a
comment pertaining to the student. A score-level comment is a comment pertaining to the
score. Both types of comments are visible on the Portal. These comments are different than
report card comments, which are entered elsewhere. Hover the mouse over the score to see
the comments.
To create a score-level comment, right-click on the score and click to highlight Edit
Comment. Enter comments as needed. Click OK when done. Cells that have comments
will have a red triangle in the top right corner.
9 To create a student-level comment, right-click on the student’s name and click to
highlight Edit Comment. Enter comments as needed. Click OK when done. Cells that
have comments will have a red triangle in the top right corner.
Right-click here Right-click here
for student comment for score comment
To delete a comment
1. Right-click on the flag in the corner.
2. Click Edit Comment.
3. Remove the text from the comment field.
4. Click OK.
To change scores
There are three options to make changes to scores once they have been entered: clear all
scores, fill empty scores, and overwrite all scores.
Clear All Scores: clears all scores for that particular task. Once you click it, there is no
warning message - all scores will disappear.
Fill Empty Scores: fills any empty score for a task with whatever score you designate. You
have 3 options:
Zero: will fill every empty score with 0
With this value: enter the value to fill empty scores
Total points possible: will fill empty scores with the total points possible for that
assignment
Overwrite All Scores: will overwrite all scores in that assignment with whatever score
designated.
Zero: will fill every empty score with 0
With this value: enter the value to fill empty scores
Total points possible: will fill empty scores with the total points possible for that
assignment
Post End of the Grading Period Grades
General Information
Following is general information about posting grades. Read this carefully prior to posting to
verify that your Gradebook is ready for posting grades.
101. Yellow and white columns must be visible.
The yellow and white columns that display points, percentages and grades must be
visible in the yellow columns of your Gradebook. To display them, click on Show Grade
Totals (in yellow).
2. Totals and percentages must be displayed in the yellow and white columns.
Be sure that each of the yellow/white columns displays the total points and percentage
information (% column). If this information is missing, make sure that you have selected
the correct class at the top of the page and make sure that the Gradebook is set on the
appropriate term.
3. Calculated Grade (from Grade column) appears.
If percentages are visible but grades do not appear in the yellow Grade column, make
sure that you have a Grading Scale selected. To check your Grading Scale, go to
Instruction and click on the appropriate term. When the Preference box appears on the
right side of the window, verify/select a Grading Scale, and then Save.
To post end of grading period grades
Use the Post Grades option only when all
of your assignments have been entered
into the Gradebook and scored.
1. Right-click anywhere in the green
grading columns.
2. Choose Post Grades.
3. Click Save.
4. The grades will appear in the green column in your Gradebook.
Helpful Hint:
If students complete assignments after grades have been posted, you will need to enter those
grades in the Gradebook, then repeat steps 1-3 above to update grades.
Teacher Admin
Overview
In Infinite Campus, you can create seating charts and set up preferences for your Gradebook,
attendance view, seating charts, and using canned comments. These preferences can also be
assigned across all of the sections/subjects that you teach.
11Preferences:
1. From the Index tab, click on the Instruction Admin.
2. Click on Preferences.
3. Check any options that you desire.
4. Be sure to check Use Canned Comments. If it is not checked, you will not be able to put
comments on the report card.
5. Do not check Remove percentages and calculations when using Standards.
6. Enter a website if you’d like.
7. Click Save.
8. Click Mass Assign to multiple classes, if desired. You can either click Check All or check
off individual classes to apply the settings.
9. Click Save.
12You can also read