Injection-Molding Problems in Engineering Thermoplastics - Causes and Solutions
←
→
Page content transcription
If your browser does not render page correctly, please read the page content below
Injection-Molding Problems
      in Engineering Thermoplastics
      Causes and Solutions
      BASF Plastics – key to your success

RZ_Spritzgussfehler_Technische Kunststoffe_e.indd 1   31.07.2009 12:12:02 Uhr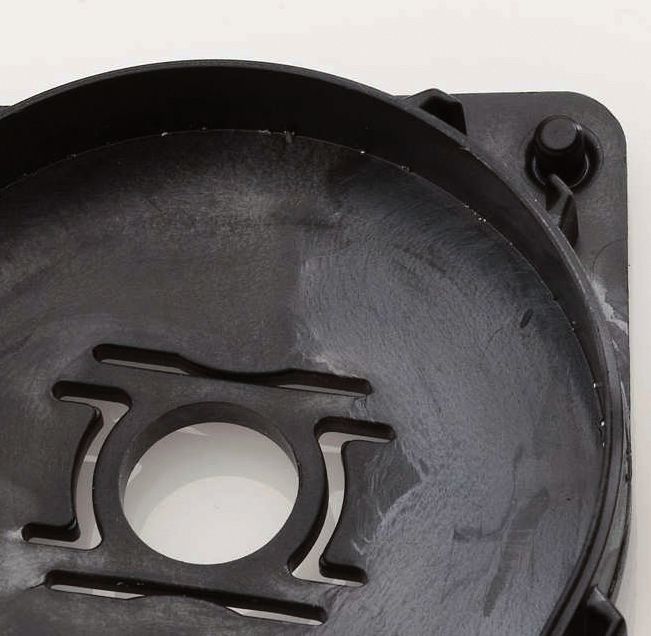
TABLE OF CONTENTS

                    Table of contents                      2    13   Dull spots                          40 - 41

                    Introduction                           3    14   Record grooves effect               42 - 43

            1       Weld line                           4-7          Surface streaks

            2       Delamination                        8-9     15       Colored streaks                 44 - 45

            3       Diesel effect / Burning           10 - 11   16       Moisture streaks                46 - 47

            4       Black specks                      12 - 13   17       Streaks with reinforcements     48 - 51

            5       Sink marks                        14 - 17   18       Burning streaks                 52 - 53

            6       Demolding problems                18 - 21   19   Tiger lines                         54 - 55

            7       Jetting                           22 - 25   20   Stress crack formation              56 - 57

            8       Gloss variations                  26 - 27   21   Unmolten material                   58 - 59

            9       Flash                             28 - 29   22   Short shot                          60 - 61

           10       Cold slug                         30 - 33   23   Warpage                             62 - 65

           11       Air entrapment                    34 - 37   24   Plate-out / Mold deposit            66 - 67

           12       Voids                             38 - 39        Troubleshooting table               68 - 69

RZ_Spritzgussfehler_Technische Kunststoffe_e.indd 2                                                    31.07.2009 12:12:02 Uhr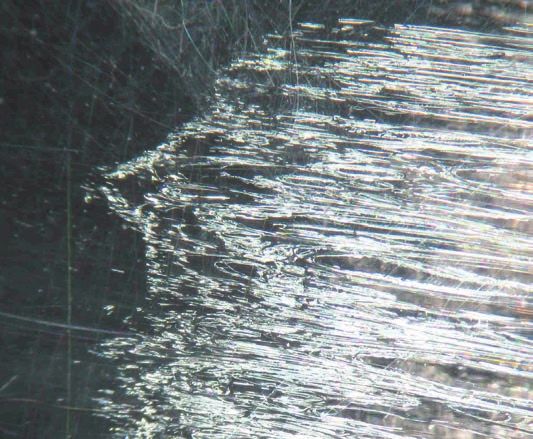
Introduction                                                         Note
        The demands on the quality of injection-molded components            This handbook contains advice on optimizing the processing
        made from engineering thermoplastics have become ever more           temperatures. In general, it should be ensured that the pro-
        stringent in the past few years. This is due to the higher quality   cessing temperatures do not exceed or fall below the limits of
        awareness among end consumers. In addition, technically sophis-      the melt and mold temperatures. In particular, exceeding the
        ticated moldings are becoming more of a requirement in today’s       maximum melt temperature can cause molecular breakdown
        projects.                                                            or cross-linking of the thermoplastic (for example, in the case
                                                                             of Ultrason® ) and /or can cause the formation of gases and
        The complex interplay between the design of a molded part and        vapors.
        the mold, between the properties of the chosen plastic and the
        diverse parameters of the injection-molding process, needs a lot
        of experience in order to achieve optimum results, especially if
        the aim is a short-notice remedy for processing errors which are
        frequently identified in the final stage of a project.

        This guide provides support for technicians; it systematically
        lists errors which may occur when producing molded parts from
        engineering plastics. It also provides solutions which have proved
        their worth in application technology. Advice is also given as to
        which factors must be considered during the preliminary stages,
        i.e. machine recommendations, or when designing the component
        or producing the mold, in order to avoid errors before the
        production process is begun.

        INTRODUCTION                                                                                                                                             3

RZ_Spritzgussfehler_Technische Kunststoffe_e.indd 3                                                                                            31.07.2009 12:12:02 Uhr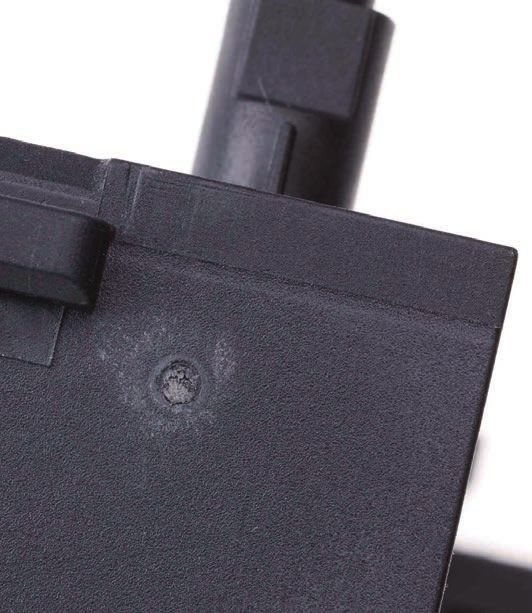
01 WELD LINE

           Description
           A scratch-like or notch-like line where the two melt flows meet during filling. This effect is particularly pronounced in dark or transparent plastic parts with
           polished surfaces, in parts with glassfiber reinforcement or in plastics with effect pigments. If the temperatures and pressures are too low in this area, the
           colder and stiffer melt skin on the edges no longer comes to lie against the mold surface and a visible notch is produced on the surface. In conjunction with
           poor flow fronts that are too cold, this can also lead to a deterioration in the mechanical properties. A weld line is often unavoidable. Its appearance can be
           improved by adjusting parameters. In addition a weld line can be moved to an area where it is less visible. Therefore, it is recommended to do a moldflow
           study prior to the mold being built.

           Causes                                                    Recommendations
           Two or more melt fronts meet, having an effect on         PROCESSING CHANGES
           the appearance and usually also on the mechanical
           properties of the molded part.                            • Optimize the switch-over point to the holding pressure: shortly before the volumetric filling has
                                                                       been reached (approximately 98 % of the filling level ), change over to holding pressure.
                                                                     • Improvements can often be achieved, for instance, by increasing the injection speed. However,
                                                                       if venting problems are encountered in the area of the weld line, the injection speed should be
                                                                       reduced.
                                                                     • Increase the melt temperature.
                                                                     • Clean the venting channels.
                                                                     MOLD-RELATED SOLUTIONS
                                                                     • By moving the gate and, if possible, by changing the wall thicknesses, the path of the polymer
                                                                       melt in the cavity and thus the position of the weld line can be influenced. Since this is asso-
                                                                       ciated with changes to the mold, the effectiveness of the measure should be checked by first
                                                                       carrying out a moldflow study.
                                                                     • Improve the venting in the affected areas of the mold to help filling.

RZ_Spritzgussfehler_Technische Kunststoffe_e.indd 4                                                                                                              31.07.2009 12:12:02 Uhr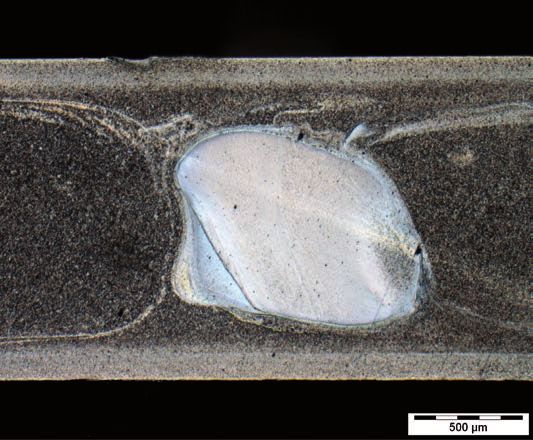
Multi-point gating                         Hole                               Change in wall thickness

           Differences in flow length                 Feeds coming from opposite sides   Change in wall thickness

           Various geometric causes of weld lines

        WELD LINE                                                                                                                 4-5

RZ_Spritzgussfehler_Technische Kunststoffe_e.indd 5                                                                 31.07.2009 12:12:08 Uhr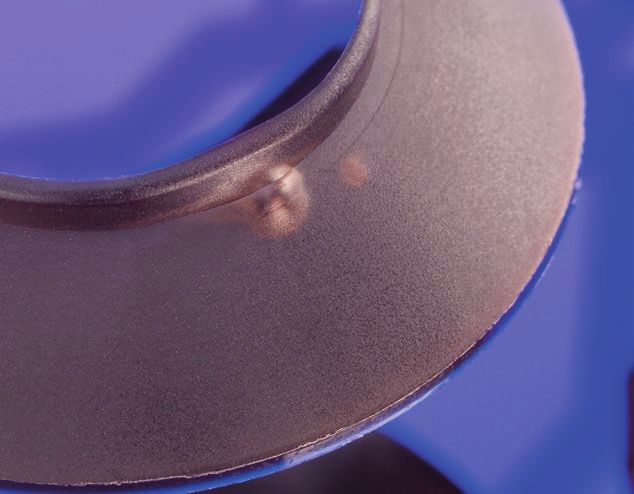
01 WELD LINE

          Weld lines after holes

RZ_Spritzgussfehler_Technische Kunststoffe_e.indd 6   31.07.2009 12:12:10 Uhr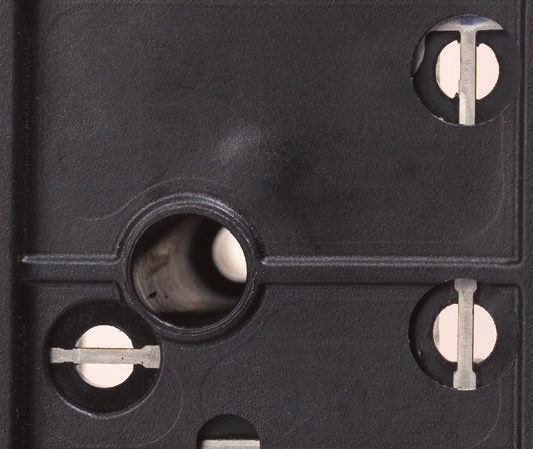
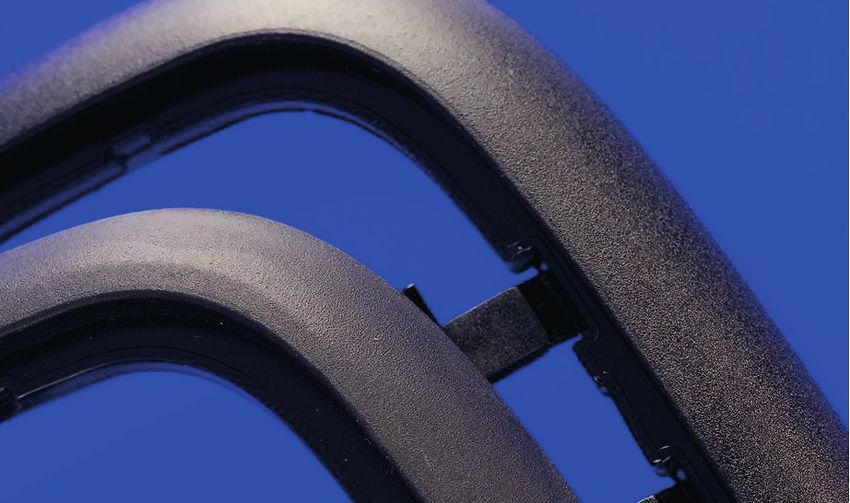
Vertical illumination, magnification 11: 1

                                                                Weld line with metallic effect pigments

                                                                                                          Orientation of glass
                                                                                                          fibers at the weld
                                                                                                          line

          Transmitted light, polarized, magnification 560 : 1

           Notches in a weld line

        WELD LINE                                                                                                                 6-7

RZ_Spritzgussfehler_Technische Kunststoffe_e.indd 7                                                                 31.07.2009 12:12:12 Uhr
02 DELAMINATION

           Description
           Delamination in plastic injection-molded parts refers to the peeling of surface layers. The cause of this inadequate bond between the polymer layers is
           excessive shear in the relatively cold melt in combination with intense cooling of the mold (cold mold ). In the case of semi-crystalline thermoplastics, this
           can lead to the formation of layers having different crystal structures, while in amorphous thermoplastics, this can lead to de-mixing of the melt-additive-
           pigment mixture.

           Causes                                                    Recommendations
           The layer formation is caused by excessive shear          • Increase the melt temperature.
           during the filling of the mold.                           • Reduce the injection speed.
                                                                     • Reduce the pressure loss in the sprue and the runners by enlarging the cross section.
                                                                     • Change the gate type, for example, a film gate instead of a pin gate.
                                                                     • Increase the wall thickness of the molded part.
           The machine and possibly the hot runner are               • Thoroughly clean the machine and the hot runner prior to processing.
           contaminated with foreign material.
           An incompatible masterbatch is used.                      • Check whether the masterbatch is appropriate for the plastic being used. If necessary,
                                                                       change to a masterbatch with a suitable carrier.
           Air becomes entrapped during the metering.                • Raise the back pressure while the material is being fed.
           Thin skins that can be pulled off are present             • Check whether the maximum permissible metering stroke has been exceeded; if necessary,
           on the surface of the molded part. This problem             use a machine with a larger screw.
           is encountered mainly with unreinforced, semi-            • Use a screw with an optimized design, for example, a shallow-flighted three-zone screw.
           crystalline thermoplastics.

RZ_Spritzgussfehler_Technische Kunststoffe_e.indd 8                                                                                                               31.07.2009 12:12:12 Uhr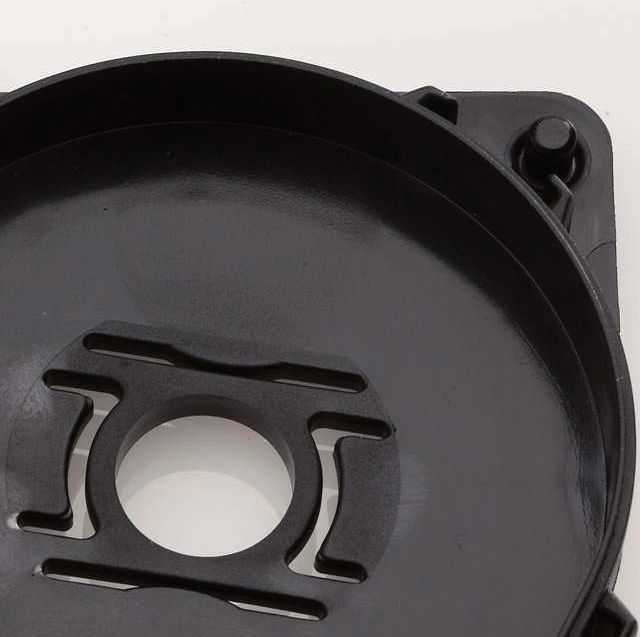
Delamination caused by an injection speed that
          is too high ( mineral-filled Ultramid® )
                                                           Delamination due to an injection speed that is too high ( Ultramid T )

                                                                                                                                    Delamination
                                                                                                                                    caused by
                                                                                                                                    entrapped air
                                                                                                                                    during metering
                                                                                                                                    (unreinforced
                                                                                                                                    Ultramid )

          Delamination due to material contamination

        DELAMINATION                                                                                                                                       8-9

RZ_Spritzgussfehler_Technische Kunststoffe_e.indd 9                                                                                          31.07.2009 12:12:16 Uhr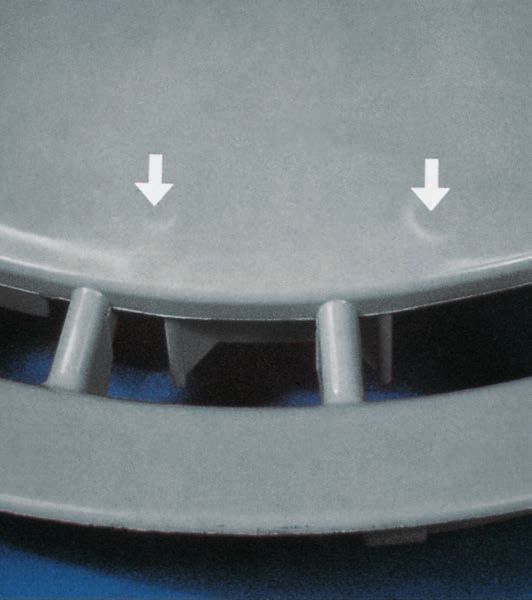
03 DIESEL EFFECT/ BURNING

           Description
           Locally black discolorations of the molded part occur in the area of the weld lines, at the end of the flow path or of individual areas of the molded part
           (for example, a rib). Occasionally, the molded part has not been completely filled at these places. It can also be the case that changes appear on the mold
           surface ( plate-out or corrosion). The reason is that the injected plastic melt pushes air ahead of itself in the cavity, compressing it. If the air cannot escape
           through parting lines, ejectors or special venting inserts, it becomes so hot that it causes burnt spots on the plastic.

           Causes                                                     Recommendations
           The mold is filled at an injection speed that is           • Reduce the injection speed. It might already be sufficient to lower the speed only at the
           too high.                                                    end of the filling phase (select a graduated injection profile).
           The channels for venting the mold are contami-             • Clean the mold venting system and improve the vents.
           nated or clogged by plate-out.
           The air cannot escape through the parting                  • If the burning occurs close to the parting surface, reduce the clamping force of the machine.
           surface of the mold.
           The mold is insufficiently vented.                         • Check the venting channels in terms of their position and effectiveness. If applicable, provide
                                                                        additional venting channels in the parting surfaces and /or install core pins in the mold at the
                                                                        places where melt flows meet.
           Several melt flows meet.                                   • Analyze the filling situation. Adjust the flow pattern by optimizing the gate position or by providing
                                                                        flow promoters in such a way that the air can escape through the parting surfaces of the mold.

RZ_Spritzgussfehler_Technische Kunststoffe_e.indd 10                                                                                                                 31.07.2009 12:12:16 Uhr
Diesel effect in a rib due to a lack of venting
2.
1.
1. Venting improved by
means of core pins
The flow pattern shows the weld lines of
2. Lack of venting several melt flows.
DIESEL EFFECT/ BURNING 10 - 11
RZ_Spritzgussfehler_Technische Kunststoffe_e.indd 11 31.07.2009 12:12:35 Uhr04 BLACK SPECKS
Description
Impurities or thermal damage to the polymer cause dark inclusions that become visible on the surface of the molded part or inside the molded part in the
case of transparent plastics.
Causes Recommendations
The material is contaminated with foreign matter. • Reduce the time during which the granules are exposed to the open.
• Check the condition of the material conveying system for possible leakages, dirt deposits
or wear and tear.
• Thoroughly clean the material conveying system, the dryer and the machine prior to any
material change.
The temperature of the melt is too high. • Check the melt temperature and, if necessary, lower the temperature of the barrel and
of the hot runner.
• Reduce the screw speed and the back pressure.
The material degrades in so-called dead spots in • Check the design of the plasticizing unit (non-return valve, machine head, machine nozzle)
the plasticizing unit and /or in the hot runner. and of the hot runner system and eliminate all dead spots.
Metallic particles come loose from the plasticizing • Check the condition of the plasticizing unit and /or of the mold for wear and tear or partial
unit and /or from the mold because of wear and detachment of any coating that might be present; replace the affected components.
tear.
The residence time of the melt in the barrel and /or • Check the residence time in the plasticizing unit, if applicable, change to a smaller barrel or
in the hot runner is too long. use a screw with a shallow-flighted geometry.
• Reduce the residence time in the hot runner, for instance, by means of a shorter cycle time
or by reducing the cross sections of the flow channels.
The selected heating and /or cooling times are • Heat up or cool down the cylinder in two stages ( Ultrason® ).
too long or the periods when the machine is at a • During interruptions, frequently purge out and /or reduce the temperature.
standstill are too long.
RZ_Spritzgussfehler_Technische Kunststoffe_e.indd 12 31.07.2009 12:12:35 UhrBlack specks Black specks
caused by
foreign granules
Deposits from a Impurities in a bottle
hot runner following due to dead spots in
a standstill of the the plasticizing unit
machine ( Ultrason)
BLACK SPECKS 12 - 13
RZ_Spritzgussfehler_Technische Kunststoffe_e.indd 13 31.07.2009 12:12:37 Uhr05 SINK MARKS
Description
The term sink mark refers to indentations in the surface of the molded part. Sink marks occur mainly where there is an increase in a wall section. This
causes a local increase in the volume shrinkage, which pulls the surface layer inwards. Sink marks sometimes only occur after ejection from the mold when
the hot centre of the polymer heats up the edge layers that have already cooled off, causing them to yield. Sometimes they can only be recognized by the
gloss difference in comparison to the surrounding areas.
Causes Recommendations
The volume contraction during the cooling phase • Increase the holding pressure.
is not sufficiently compensated for by the holding • Increase the holding pressure time: first, check the gate open time by means of weight or pressure
pressure. measurements. Starting with a short holding pressure time, raise this value incrementally until no
more changes in the weight or in the cavity pressure can be detected.Select the optimal holding
pressure time so that it is longer than the gate open time.
• Reduce the melt temperature.
• Decrease the mold temperature.
The design of the molded part is not appropriate • Avoid sudden changes in the wall thickness and material sections, do not use excessively
for processing this plastic (e.g. material sections large radii for ribs; a rib thickness that is half the wall thickness is advantageous.
with an increase in wall thickness, sudden changes • Change the wall thicknesses of the molded part so as to achieve even pressure transfer
in the wall thickness along the flow path). along each flow path. Avoid thin sections along a flow path.
There is no melt cushion. • Lengthen the metering stroke and adjust the change-over point as necessary.
• Check the sealing function of the non-return valve and, if necessary replace it.
Check for barrel wear.
A large pressure loss has occurred in the machine • Enlarge the flow cross sections of the runner and gating system.
nozzle and /or in the gating system.
The molded part is gated into a thin wall. • Always where possible, gate or inject the molded part in the area where the wall section
is the greatest.
RZ_Spritzgussfehler_Technische Kunststoffe_e.indd 14 31.07.2009 12:12:38 UhrBack of the plate
Sink marks caused
by ribs ( glassfiber-
reinforced Ultramid® )
SINK MARKS 14 - 15
RZ_Spritzgussfehler_Technische Kunststoffe_e.indd 15 31.07.2009 12:12:44 Uhr05 SINK MARKS
Sink mark in a section with an increase of wall thickness: the design of Sink marks caused by ribs
the screw-in mandrel is not appropriate for processing this plastic
RZ_Spritzgussfehler_Technische Kunststoffe_e.indd 16 31.07.2009 12:12:45 Uhrunfavorable s unfavorable
s
R 0.3
favorable 0.5 • s favorable
s
R 0.3
Avoiding sink marks (voids) by designing the rib connection Design of ribs
so as to be appropriate for processing this plastic
SINK MARKS 16 - 17
RZ_Spritzgussfehler_Technische Kunststoffe_e.indd 17 31.07.2009 12:12:46 Uhr06 DEMOLDING PROBLEMS
Description
The plastic part is deformed by forces that are too high or that are applied unfavorably during ejection. After the part has been removed from the mold,
the ejectors leave distinct markings on the surface of the molded part as indentations or elevations, as differences in the gloss or as whitish discolorations
(stress-whitening). Demolding problems can cause cracks or fractures of the material.
Causes Recommendations
The molded part and /or the gating system have • Blend any undercuts.
undercuts or scratches. • Improve the surface quality of the mold. Polish it in the demolding direction.
The demolding system has too few ejector pins, • Optimize the geometry of the ejector system.
they are incorrectly positioned or their surfaces are
too small.
The selected drafts are too small or the surface • Increase the draft angle.
structure finish ( texture) used does not match the
draft.
The mold is overpacked during the mold filling • Adjust the switch-over point in such a way that, shortly before the volumetric mold filling level has
procedure due to excessive holding pressure. been reached ( filling level of approximately 98 % ), a change is made over to holding pressure.
• Reduce the holding pressure, if applicable, establish a decreasing holding pressure profile.
Owing to excessive shrinkage, the material shrinks • Raise the holding pressure and, if applicable, employ a holding pressure profile.
too much towards the core, thus making the
removal from the mold more difficult.
The cooling time selected is too short. • Prolong the cooling time.
The actual mold temperature is too low. • Increase the mold temperature.
A vacuum is created between the molded part and • Improve the venting of the mold inserts by incorporating channels, parting lines or special inserts
the mold surface during the removal from the mold. into the mold through which the air can flow between the molding and the cavity, as the mold
opens.
RZ_Spritzgussfehler_Technische Kunststoffe_e.indd 18 31.07.2009 12:12:46 UhrEjector markings caused by the cooling time being too short The sprue gets stuck to the cavity plate because of an undercut.
DEMOLDING PROBLEMS 18 - 19
RZ_Spritzgussfehler_Technische Kunststoffe_e.indd 19 31.07.2009 12:12:48 Uhr06 DEMOLDING PROBLEMS
The ejectors puncture the molded part because the cooling time is Mold-removal problems caused by overpacking
too short. (holding pressure is too high)
RZ_Spritzgussfehler_Technische Kunststoffe_e.indd 20 31.07.2009 12:12:49 UhrCorner with a sharp edge
Rib without draft, asymmetrical arrangement of the ejectors
Cracks occurring when molded parts made of Ultrason® are Ejector markings – remedied by increasing the ejector diameters
removed from the mold
DEMOLDING PROBLEMS 20 - 21
RZ_Spritzgussfehler_Technische Kunststoffe_e.indd 21 31.07.2009 12:12:51 Uhr07 JETTING
Description
Starting from the gate, a snake-like, often rough or matt strand of material appears on the surface of the plastic molded part. This occurs when, due to the
very high flow rate during the transition to a large cross section, there is nothing to disturb the melt. Instead, the polymer melt squirts into the free cavity in
the form of a jet, a process in which coincidental contact with the mold wall ( brief adhesion) leads to crumpling. Since the surface of the strand has cooled
off, it no longer bonds properly to the subsequent melt, which can lead not only to a poor appearance but also to reduced strength.
Causes Recommendations
The position selected for the gate is incorrect. • Change the gate position in such a way that the emerging polymer melt strikes an obstacle
The gate design is not suitable. immediately beyond the gate.
• Enlarge the cross section of the gate.
• Round off the transition area between the gate and the molded part.
Unfavorable process conditions during the filling • Reduce the injection speed.
procedure. • Increase the melt temperature.
The design of the molded part is not appropriate • Change the design of the molding so as to prevent sudden changes in the wall thickness.
for processing this plastic ( for example, sudden
changes in the wall thickness along the flow path).
RZ_Spritzgussfehler_Technische Kunststoffe_e.indd 22 31.07.2009 12:12:51 UhrJetting due to the unfavorable position of the gate
JETTING 22 - 23
RZ_Spritzgussfehler_Technische Kunststoffe_e.indd 23 31.07.2009 12:12:54 Uhr07 JETTING
R
R
R
R
Jetting on a sleeve caused by three-fold gating
through a pin gate Ensure proper radii in the transition area from the gate to the molded part
RZ_Spritzgussfehler_Technische Kunststoffe_e.indd 24 31.07.2009 12:12:57 Uhrunfavorable
favorable
Melt deflection in order to prevent jetting
Gate design ( injection via the parting surface)
JETTING 24 - 25
RZ_Spritzgussfehler_Technische Kunststoffe_e.indd 25 31.07.2009 12:13:01 Uhr08 GLOSS VARIATIONS
Description
The surface of the plastic molded part shows different levels of gloss at different places, even though the cavity surfaces are the same. Generally speak-
ing, the intensity of the gloss depends on how good the surface of the cavity is. In the case of structured mold surfaces, a well-designed mold
usually yields a part with a more matt appearance since the rays of light are reflected diffusely, that is to say, undirected, off the many rough irregularities.
In contrast, in the case of polished mold surfaces, a good impression usually brings about higher gloss. Key parameters are those adjusting variables which
affect the formation of the solidified outer or peripheral plastic layer and its pressing against the wall of the mold. In addition, the polymer melt should be as
uniform as possible.
Causes Recommendations
Sudden changes in the wall thickness caused by ribs • Prevent material accumulations and sudden changes in the wall thickness; as much as
or by mounting bosses. These sink marks lead to dif- possible, gate the molded part in the area where the wall is the thickest.
ferences in the gloss.
Differences in the gloss are visible in the area of • Check whether, by modifying the gate position or by using flow promoters or flow retarders,
weld lines, for example, due to a changed orienta- the position of the weld lines can be changed to places where they do not interfere; a filling
tion of the melt and to changed flow conditions. simulation is helpful in such a case.
The temperature of the mold wall, the temperature • Increase the mold temperature.
of the melt and the injection speed as well as the • Increase the melt temperature.
change-over to holding pressure have not been well- • Optimize the injection speed.
chosen. • Optimize the switch-over point in such a way that, shortly before the volumetric mold filling
level has been reached ( filling level of approximately 98 % ), a change is made to holding pressure.
The holding pressure value and the holding pressure • Increase the holding pressure.
time are inadequate. • Check the holding pressure time. The holding pressure should be maintained until the sprue has
frozen. The right holding pressure time can be found by weighing the part ( incremental increase
of the holding pressure time until no more weight increase occurs).
The homogeneity of the melt is insufficient, for • Raise the back pressure and /or the screw speed.
instance, due to unfavorable processing conditions. • Use a screw with a mixing section.
• Use a shallow-flighted screw.
• Install an injection unit with a screw having a larger diameter.
RZ_Spritzgussfehler_Technische Kunststoffe_e.indd 26 31.07.2009 12:13:02 UhrInfluence of the mold
temperature ( TW ) on
the gloss (glassfiber-
TW = 50 ºC [122 ºF] reinforced Ultramid ® )
TW = 80 ºC [176 ºF]
GLOSS VARIATIONS 26 - 27
RZ_Spritzgussfehler_Technische Kunststoffe_e.indd 27 31.07.2009 12:13:02 Uhr09 FLASH
Description
The term flash refers to fine excess of material projecting from the plastic molded part. Flash occurs when the thermoplastic melt penetrates into gaps and
joints located in the parting surfaces of the mold.
Causes Recommendations
The clamping force of the machine is set too low • Increase the clamping force.
or the clamping force of the selected machine is • Use a machine with greater clamping force.
insufficient.
The fit tolerance of the two mold halves or the fit • Adjust the fit tolerances of the mold parts involved.
tolerance of splits in the mold is too great.
The sealing surfaces in the mold parting surface • Repair the damage in the parting surface.
are damaged.
The cavity pressure is too high during the filling • Increase the temperature of the thermoplastic melt.
and holding pressure phases. • Adjust the change-over position to occur earlier.
• Reduce the injection speed, especially at the end of the mold filling phase.
The viscosity of the thermoplastic melt is too low • Lower the melt temperature.
because the selected melt temperature is too high • Reduce the residence time of the melt in the plasticizing unit and in the hot runner.
or because of material degradation. The material • Dry the material.
degradation can result, if the melt temperature
is too high, if the residence time is too long or if
moist material is being processed.
The mold is deforming under filling pressure. • Strengthen the mold construction.
RZ_Spritzgussfehler_Technische Kunststoffe_e.indd 28 31.07.2009 12:13:02 UhrFlash
FLASH 28 - 29
RZ_Spritzgussfehler_Technische Kunststoffe_e.indd 29 31.07.2009 12:13:07 Uhr10 COLD SLUG
Description
Due to unfavorable temperature conditions, the plastic will solidify in the machine nozzle or in the hot runner prior to the mold being filled. This will be
injected with the next shot. Especially in the case of thin-walled or transparent parts, this can be recognized by the presence of markings near the gate in
the form of a comet’s tail or by the presence of locally concentrated streaks. If the slug does not melt, it can clog the flow channel to such an extent that
the melt has to divide up, creating a weld line. In extreme cases, a cold slug can block off the gate, preventing the mold cavity from being completely filled.
Moreover, the mechanical properties are detrimentally affected if the cold slug does not fuse properly with the rest of the melt.
Causes Recommendations
The temperature of the machine nozzle is too low. • Increase the nozzle temperature.
The machine nozzle is unheated or the output of • Heat the machine nozzle with additional heater bands.
the band heaters is too low. • Raise the output of the band heaters or install several heater bands on the machine nozzle.
The material drips out of the machine nozzle or out • After plasticizing decompress the melt by retracting the screw a few millimeters.
of the hot runner, cools off and is injected into the • Reduce the back pressure.
cavity at the time of the next shot. • Lower the temperature of the machine nozzle.
• Use a needle shut-off mechanism for the machine nozzle or for the hot runner nozzle.
• Incorporate a cold slug area (catcher) within the sprue /runner.
The bore of the machine nozzle does not have any • Modify the bore of the machine nozzle with a reverse draft.
draft.
The tip of the tunnel gate breaks off when the part • Modify the angle of the gate in a way that is appropriate for the material.
is removed from the mold and ends up in the cav- • Do not use a tunnel gate for brittle plastics.
ity at the time of the next shot.
RZ_Spritzgussfehler_Technische Kunststoffe_e.indd 30 31.07.2009 12:13:07 UhrSprue
Cold slug from the bore of a machine nozzle that has cooled and broken Cold slug in a molded part made of glassfiber-reinforced Ultramid®
off (glassfiber-reinforced Ultradur® )
COLD SLUG 30 - 31
RZ_Spritzgussfehler_Technische Kunststoffe_e.indd 31 31.07.2009 12:13:11 Uhr10 COLD SLUG
Streaks in Ultrason® caused by cold slug
RZ_Spritzgussfehler_Technische Kunststoffe_e.indd 32 31.07.2009 12:13:14 UhrSurface blemish caused by a gate that has broken off (unreinforced Cold slug catcher in a gate with a deflection in order to prevent jetting
Ultradur) (injection through the parting surface)
COLD SLUG 32 - 33
RZ_Spritzgussfehler_Technische Kunststoffe_e.indd 33 31.07.2009 12:13:19 Uhr11 AIR ENTRAPMENT
Description
The appearance of this problem varies, depending on the cause of the air entrapment. If the polymer melt flows around the air, the flaw pattern can range
from incomplete filling to blemishes on the surface and even to charred spots as a result of diesel effect. If the air is entrapped in the mold cavity by
the thermoplastic melt, bubbles are formed. The bubble structure varies from small to large and often reveals the flow direction. In contrast to voids, the
bubbles can be close to the outside wall.
Causes Recommendations
During the mold filling, air is entrapped due to the • Change the filling pattern by adding flow promoters and /or flow retarders.
molded part design and gating. • Change the position of the gates.
( In both cases it is recommended that the filling pattern be optimized by means of a moldflow study.)
After the plasticizing, air present in front of the screw • Shorten the path of the screw decompression.
or in the hot runner is entrapped in the melt because • Decompress at a reduced screw retraction speed.
the screw decompression is too intense or too fast.
During the plasticizing of the material, air is • Increase the back pressure when the material is being metered in.
entrapped via the screw because of processing • Lower the temperature in the feed zone.
conditions or because a screw that is not appro- • Check whether the maximum permissible metering stroke has been exceeded; if necessary,
priate for the material is being used. use a machine with a larger screw diameter.
• Use a screw with an optimized design, for example, a shallow-flighted three-zone screw or a
screw with a shorter feed zone.
RZ_Spritzgussfehler_Technische Kunststoffe_e.indd 34 31.07.2009 12:13:19 UhrImage of a section of
a molded part, taken
by 3D computer tomo-
graphy
Air entrapment in a housing made of glassfiber-reinforced Ultradur®
AIR ENTRAPMENT 34 - 35
RZ_Spritzgussfehler_Technische Kunststoffe_e.indd 35 31.07.2009 12:13:20 Uhr11 AIR ENTRAPMENT
Air entrapment caused by entrapped air during the metering (unreinforced Ultramid® ) Air entrapment caused by an unfavorable molded part design
RZ_Spritzgussfehler_Technische Kunststoffe_e.indd 36 31.07.2009 12:13:21 UhrStreaks caused by entrapped air (Ultrason®)
AIR ENTRAPMENT 36 - 37
RZ_Spritzgussfehler_Technische Kunststoffe_e.indd 37 31.07.2009 12:13:23 Uhr12 VOIDS
Description
Hollow spaces in the form of microcells or bubbles are formed inside the plastic molded part during or after the cooling phase. In contrast to gas bubbles,
voids always occur in the molten center of the plastic (normally the middle of the wall ) and in areas with thick sections. Drilling into the part while holding it
under water shows whether water is penetrating (voids) or not (gas bubbles). As is the case with sink marks, voids are also formed in areas of high volume
shrinkage due to inadequate packing of the material. Voids are formed instead of sink marks whenever the edge layers have solidified to such an extent
that they no longer yield to the contraction forces when the material cools off.
Causes Recommendations
The volume contraction during the cooling phase • Raise the holding pressure.
is not sufficiently compensated for by the holding • Prolong the holding pressure time: first of all, the gate open time is ascertained by means of
pressure. weight or pressure measurements. Starting with a short holding pressure time, raise this value
incrementally until no more changes in the weight or in the cavity pressure can be detected.
Select the optimal holding pressure time so that it is somewhat longer than the gate open time.
• Reduce the melt temperature.
• Increase the mold temperature. In this case, optimize the holding pressure time by checking the
gate sealing point.
The design of the molded part is not appropriate • Avoid sudden changes in the wall thickness and material sections, do not use excessively large
for processing this plastic (e.g. presence of mate- radii for ribs; a rib thickness that is half the basic wall thickness is advantageous.
rial accumulations, sudden changes in the wall • Change the wall thicknesses of the molded part so as to achieve proper pressure transfer along
thickness along the flow path). each flow path. Avoid thin sections along a flow path.
There is no melt cushion. • Lengthen the metering stroke and adjust the change-over point.
• Check the sealing function of the non-return valve, if necessary, replace it; check the barrel
for wear.
A large pressure loss has occurred in the machine • Enlarge the flow cross sections of the runner and gate; use round diameter runners where
nozzle and /or in the gating system. The molded possible.
part is gated into a thin wall. • Try to gate or inject into the molded part in an area where the wall has the thickest section.
RZ_Spritzgussfehler_Technische Kunststoffe_e.indd 38 31.07.2009 12:13:23 UhrPolished section,
optical light micro-
scopic images with
vertical illumination
1 mm 1 mm
Voids resulting from excessively Voids in the area of a sudden
short holding pressure time change in the wall thickness 2 mm
Voids in molded parts made of glassfiber-reinforced Ultramid®
Images taken by
3D computer
tomography
200 µm
Detail from image above, polished section, optical light
microscopic image with vertical illumination
Bearing element made of Housing made of glassfiber-
Ultraform® reinforced Ultradur®
Voids caused by material accumulation in an
Voids caused by material accumulation engine cover made of reinforced Ultramid
VOIDS 38 - 39
RZ_Spritzgussfehler_Technische Kunststoffe_e.indd 39 31.07.2009 12:13:25 Uhr13 DULL SPOTS
Description
Halo-like dull spots are often formed in the area of gates; sometimes they also occur behind cross section transitions. The causes for this are the high
shear stresses at these places as well as the diminished adhesion of the plastic to the wall due to the cross section transitions.
Causes Recommendations
The selected injection speed is too high. • Optimize the injection speed, set a graduated profile (slow – fast ).
The gate is not optimally configured. • Optimize the gate. To the extent possible, the gate should be designed so as to be rounded,
having an adequate cross section.
The temperature selected for the melt is too low. • Increase the melt temperature.
There is an abrupt cross section transition. • Optimize the design of the molded part; ensure a gradual cross section transition.
The molded part is gated at an unsuitable place. • Move the feed point to a less critical area or gate the molded part via a separate runner located
outside the visible area.
RZ_Spritzgussfehler_Technische Kunststoffe_e.indd 40 31.07.2009 12:13:25 UhrDull spots in the area of a film gate
Dull spots caused by a cross section transition Dull spots in the area of the gate caused by high shear
DULL SPOTS 40 - 41
RZ_Spritzgussfehler_Technische Kunststoffe_e.indd 41 31.07.2009 12:13:27 Uhr14 RECORD GROOVES EFFECT
Description
The record grooves effect refers to markings that are formed perpendicular to the flow direction of the polymer melt, appearing as a concentric or parallel
fluted structure on the surface of the molded part. The reason for this can be that the convex melt front cools down excessively due to a reduced flow rate
( possibly only at times ). The solidified plastic edge layer can become so thick that it extends all the way into areas of the melt front that are not yet touch-
ing the mold wall. These areas can no longer be pressed against the mold wall over their entire surface, even as the filling continues and thus the pressure
rises.
Causes Recommendations
The selected mold temperature, melt temperature • Increase the temperature of the mold surface.
and injection speed are too low. • Select a higher injection speed.
• Increase the melt temperature.
The design of the molded part is not appropriate • Optimize the geometry of the molded part and avoid sudden changes in the wall thickness.
for processing this plastic ( for instance, thicker
walls at the end of the flow path or a sudden
change in the wall thickness).
A large pressure loss has occurred in the gating • Increase the gate diameters.
system.
RZ_Spritzgussfehler_Technische Kunststoffe_e.indd 42 31.07.2009 12:13:27 UhrRecord grooves effect because the melt temperature and the injection Record grooves effect at the end of the flow path because the melt
speed are too low viscosity is too high
RECORD GROOVES EFFECT 42 - 43
RZ_Spritzgussfehler_Technische Kunststoffe_e.indd 43 31.07.2009 12:13:29 Uhr15 STREAKS: COLORED STREAKS
Description
Color differences on the surface of injection-molded parts are referred to as colored streaks. They can occur over a large surface area and can be near
the gate or away from the gate. They frequently appear in areas of weld lines and occasionally behind sharp edges. The reason for this is an irregular
distribution of the pigments (either compounded colored material or masterbatch ). This can give rise to the formation of agglomerations or accumulations
of pigments (agglomerates).
Causes Recommendations
During self-coloring
Unfavorable processing conditions have been • Raise the back pressure.
selected. • Lower the screw speed.
• Increase the melt temperature.
The selected plasticizing unit is unsuitable for • Use a plasticizing unit with a longer screw.
self-coloring due to inadequate dispersing action. • Install a plasticizing unit with a mixing section. In actual practice, the BASF mixing ring has
proven to work well for self-coloring.
• Use a shallow-flighted screw instead of a standard screw. Shallow-flighted screws allow a more
gentle melting in conjunction with a greater homogeneity of the melt.
Processing of colored materials
The pigments are damaged due to an excessively • Check the melt temperature and, if necessary, lower it.
high thermal and /or mechanical load during the • Select a lower injection speed.
plasticizing or the filling procedure. • Reduce the screw speed and the back pressure.
Foreign material accumulates in dead spots in the • Thoroughly clean the plasticizing unit and the hot runner.
plasticizing unit and /or in the hot runner.
RZ_Spritzgussfehler_Technische Kunststoffe_e.indd 44 31.07.2009 12:13:29 UhrColored streaks caused by the use of an Colored streaks due to impurities in the hot Colored streaks caused by the use of a screw
unsuitable masterbatch runner with an unsuitable geometry
Avoidance of colored
streaks by using
mixing sections
Ultraform® N2320 003
+ 0.5 % batch blue
Non-return valve BASF mixing ring BASF mixing ring
STREAKS: COLORED STREAKS 44 - 45
RZ_Spritzgussfehler_Technische Kunststoffe_e.indd 45 31.07.2009 12:13:34 Uhr16 STREAKS: MOISTURE STREAKS
Description
Moisture streaks are usually elongated, parabolic streaks that occur on the surfaces of molded parts. Their points always face in the direction of flow. Melt
emerging from the machine nozzle can foam and display bubbles.
Causes Recommendations
The material has too much residual moisture. • Measure the moisture content of the granules; if applicable, dry the material to a value that is
When it is melted, steam vapor bubbles are formed lower than the limit value indicated for the product. Check the dryer unit is working correctly.
that burst while the mold is being filled and come
to lie on the surface of the molded part.
The mold, whose temperature is controlled with • Repair the mold tool of all leaks.
water, is leaking into the cavity. • Select negative pressure on mold heater controls for a temporary solution.
The temperature in the area of the feed hopper • Increase the cylinder temperature below the feed hopper.
temperature control is too low, condensation water
is formed.
RZ_Spritzgussfehler_Technische Kunststoffe_e.indd 46 31.07.2009 12:13:34 UhrMoisture streaks
in Ultrason®
moist granules
Processing of
moist Ultradur®
(purged melt
cake)
dry granules (moisture moist granules (mois-
content of 0.01 %) ture content of 0.12 %), dried granules
melt cake with bubbles
STREAKS: MOISTURE STREAKS 46 - 47
RZ_Spritzgussfehler_Technische Kunststoffe_e.indd 47 31.07.2009 12:13:38 Uhr17 STREAKS: STREAKS WITH REINFORCEMENTS
Description
Streaks in glassfiber-reinforced or mineral-filled materials can appear in the form of rough spotty and irregular surface areas but also as uniform surface
blemishes whose shape partially matches the form of the flow front in this area of the molded part. Depending on the light incidence, the appearance can
vary from matt to metallically glossy. Such streaks occur primarily after openings, diversions and at weld lines.
Causes Recommendations
The injection speed is too low. • Increase the injection speed; it might be practical to select a graduated injection profile.
The temperature of the mold surface is too low. • Increase the mold temperature.
The selected melt temperature is not high enough. • Increase the temperature of the melt, if necessary, also in the hot runner.
The orientation of the glass fibers changes in • Check whether material accumulations and sudden changes in the wall thickness can be avoided.
areas where there are material accumulations,
for example, in areas with sudden changes in the
wall thickness, in ribs or with mounting bosses.
RZ_Spritzgussfehler_Technische Kunststoffe_e.indd 48 31.07.2009 12:13:38 UhrGlassfiber
streaks influ-
enced by the
product
glassfiber-reinforced PA glassfiber-reinforced Ultramid® High Speed
STREAKS: STREAKS WITH REINFORCEMENTS 48 - 49
RZ_Spritzgussfehler_Technische Kunststoffe_e.indd 49 31.07.2009 12:13:42 Uhr17 STREAKS: STREAKS WITH REINFORCEMENTS
Glassfiber streaks
influenced by the
product
glassfiber-reinforced
PA
glassfiber-reinforced
Ultramid Surface
Improved ( SI ) Glassfiber streaks caused by low mold temperature (glassfiber-reinforced
Ultramid )
RZ_Spritzgussfehler_Technische Kunststoffe_e.indd 50 31.07.2009 12:13:49 UhrStreaks in a molded
part made of mineral-
filled Ultramid –
optimization of the
processing conditions
TM = melt temperature
v = injection speed TM = 260 °C [ 500 °F ], v = low TM = 280 °C [ 536 °F ], v = high
STREAKS: STREAKS WITH REINFORCEMENTS 50 - 51
RZ_Spritzgussfehler_Technische Kunststoffe_e.indd 51 31.07.2009 12:13:50 Uhr18 STREAKS: BURNING STREAKS
Description
Charred streaks occur in the form of silver, light-brown to very dark discolorations on the surface of the molded part. The cause for this is severe thermal
damage to the polymer melt. Gaseous bubbles are formed that reach the surface of the molded part during the injection phase. Charred streaks can also
occur at and around the gate area as well as irregularly on the surface of the molded part. The appearance of the streaks allows a preliminary classification
of the type of damage. Light-brown to very dark discolorations often indicate severe thermal damage to the plastic melt caused by oxidation or degradation.
Silver streaks normally result from excessive friction, which is usually locally limited, for instance, in the case of small flow channel cross sections or sudden
flow changes around obstacles.
Causes Recommendations
The melt is damaged by an excessively high • Measure the melt temperature and check whether it falls within the permissible processing
temperature. window and, if applicable, lower the temperature of the melt in the barrel and in the hot runner.
• Reduce the screw speed and /or the back pressure.
The melt is damaged by an excessively long • Check whether a machine has been stopped.
residence time. • Check the residence time in the barrel, if applicable, change to a smaller barrel or use a
shallow-flighted screw.
• Reduce the residence time in the hot runner, for instance, by selecting a shorter cycle time
or by reducing the channel diameters.
The streaks are caused by high shear during the • Optimize the injection speed and profile, if necessary.
mold filling procedure. • Check the flow channel cross sections of the gate, of the sprue and, if applicable, of the hot
runner system and enlarge them.
RZ_Spritzgussfehler_Technische Kunststoffe_e.indd 52 31.07.2009 12:13:50 UhrBurning streaks due to thermal degradation Burning streaks due to high shear in the gating Streaks caused by thermal factors
system
Burning streaks caused
by exceeding the maxi-
mum limit for the melt
temperature (TM) in the
case of Ultramid® T
Sprue
Burning streaks caused by excessively high
shear in the gate ( glassfiber-reinforced
TM = 340 °C [ 644 °F ] TM = 320 °C [ 608 °F ] Ultrason® )
STREAKS: BURNING STREAKS 52 - 53
RZ_Spritzgussfehler_Technische Kunststoffe_e.indd 53 31.07.2009 12:13:56 Uhr19 TIGER LINES
Description
The term tiger lines refers to the alternating occurrence of glossy and matt stripes on the surface of the molded part perpendicular to the flow direction.
They resemble the pattern on the coat of a tiger and are caused by a pulsating melt flow which occurs especially with thermoplastic multiphase systems
( blends).
Causes Recommendations
The cross sections of the gate, sprue and runners • Increase the cross sections of the gating system and runners.
are too small.
The selected cross section of the machine nozzle • Install a machine nozzle with a larger bore diameter.
is too small.
The thickness of the molded part wall is not • Check whether it is possible to increase the thickness of the wall of the molded part.
sufficient.
A large pressure loss occurs along the flow path. • Increase the temperature of the melt.
The tool temperatures are too cold. • Increase the tool temperature to the maximum recommended.
RZ_Spritzgussfehler_Technische Kunststoffe_e.indd 54 31.07.2009 12:13:56 UhrTiger lines caused Tiger lines caused
by a gate that is by unfavorable pro-
too small ( glass- cessing conditions
fiber-reinforced ( Ultraform® )
Ultramid® )
d = 2 mm d = 3.3 mm Improved
l = 2 mm l = 0.4 mm molded part
surface due
to an improved
gating system
with less pres-
sure loss
d = 5 mm d = 6.5 mm
r = 7 mm
TIGER LINES 54 - 55
RZ_Spritzgussfehler_Technische Kunststoffe_e.indd 55 31.07.2009 12:14:10 Uhr20 STRESS CRACK FORMATION
Description
Stress cracks are external or internal cracks caused by stresses that are less than the ultimate tensile stresses. Local internal stresses, among other things,
are responsible for the formation of stress cracks. The crack formation is initiated either by external tensile stress and/or by the effect of aggressive sol-
vents and chemicals. The magnitude of the internal stresses incorporated into the injection-molded part is influenced by the processing. Process-related
internal stresses can be analyzed using solvents or chemicals, which initiate stress cracks.
Causes Recommendations
The material is overloaded because the holding • Reduce the back pressure, if applicable, set a decreasing back pressure profile.
pressure is too high or the mold construction is not • Improve the mold construction.
good enough.
The temperature selected for the mold is too low. • Increase the mold temperature.
Cracks are formed during ejection owing to severe • Reduce the undercut or avoid it through design measures.
external forces because of the forced removal from • Improve the removal from the mold by means of larger drafts.
undercuts from the mold. This is due to not enough • Optimize the ejector system.
draft angle and the number of ejectors being
insufficient, because the ejectors are positioned
incorrectly.
The molecular weight of the selected product is too • Use a material with a higher molecular weight.
low; this has to be taken into consideration when
agressive solvents or chemicals are used.
RZ_Spritzgussfehler_Technische Kunststoffe_e.indd 56 31.07.2009 12:14:11 UhrAfter contact with methyl ethyl ketone Influence of the
mold temperature
180 °C [356 °F ] on stress crack-
ing (unreinforced
Ultrason® )
155 °C [311 °F ]
125 °C [257 °F ]
Processing window for
the mold temperature:
95 °C [203 °F ] 140 °C to 180 °C
[284 °F to 356 °F ]
65 °C [149 °F ]
Stress cracks caused Stress cracks
by overloading ( hold- because of low
ing pressure too high) mold temperature
after media
contact ( Ultrason )
STRESS CRACK FORMATION 56 - 57
RZ_Spritzgussfehler_Technische Kunststoffe_e.indd 57 31.07.2009 12:14:16 Uhr21 UNMOLTEN MATERIAL
Description
Under unfavorable plasticizing conditions, unmolten material can pass through and end up in the molded part in the case of semi-crystalline thermoplastics.
If the walls are thin, the unmolten material leaves a contour in the form of elevations on the surface. In the case of unreinforced, uncolored product bubbles
having greater transparency can be seen.
Causes Recommendations
Unfavorable plasticizing conditions have been • Select a horizontal temperature profile for the cylinder ( instead of a rising profile).
selected. • Increase the melt temperature.
• Raise the back pressure.
• Pre-heat the granules.
The residence time of the material in the cylinder is • Use a machine having a larger screw diameter.
too short. • Use an injection cylinder with a longer screw.
The screw being used has an unsuitable geometry. • Use a screw with a design that is appropriate for the material. Positive results have been obtained
with shallow-flighted three-zone screws.
RZ_Spritzgussfehler_Technische Kunststoffe_e.indd 58 31.07.2009 12:14:16 UhrVertical illumination / interference contrast
Unmolten material due to unsuitable screw geometry (Ultraform®) Unmolten material in a molded part made of Ultraform because the
metering stroke is too large
UNMOLTEN MATERIAL 58 - 59
RZ_Spritzgussfehler_Technische Kunststoffe_e.indd 59 31.07.2009 12:14:23 Uhr22 SHORT SHOT
Description
The plastic molded part is not completely formed, mainly in areas furthest from the gate or in areas with thin walls, since the mold has not completely been
filled.
Causes Recommendations
Not enough plastic melt was metered in. • Increase the metering stroke.
There is no melt cushion. • Check the function of the non-return valve.
The selected melt temperature and /or mold • Increase the melt temperature of the plastic melt and /or the mold temperature. The melt temper-
temperature are too low. ature should be increased first since it lowers the filling pressure. Increase the mold temperature,
which, however, could also lengthen the cooling time.
The selected injection speed is too low. • Increase the injection speed.
The mold is not adequately vented. • Check the vents and improve the venting of the cavity if necessary.
The gating system has too much pressure loss. • Enlarge the flow channel cross sections of the machine nozzle, of the runners and of the gates.
The molded part has been designed with a wall • Increase the wall thickness of the molded part.
that is too thin or the selected flow path is too • Change the gate position or increase the number of gates.
long. • Introduce a flow leader, if possible.
Near the gate, there is a thin-walled area of the • Change the gate position in such a way that the area with the thin wall is the last to be filled.
molded part that already freezes during the mold • Introduce an additional runner.
filling procedure.
The flowability of the selected plastic is insufficient, • Use a material that flows more easily.
even after the process parameters have been
optimized.
RZ_Spritzgussfehler_Technische Kunststoffe_e.indd 60 31.07.2009 12:14:23 UhrIncompletely filled Incompletely filled
molded part due molded parts
to large pressure
loss in the gate
Incompletely filled
molded part
SHORT SHOT 60 - 61
RZ_Spritzgussfehler_Technische Kunststoffe_e.indd 61 31.07.2009 12:14:29 Uhr23 WARPAGE
Description
The plastic molded part deviates from the desired shape; it exhibits twisting, warping, wavy surfaces and angle deviations. The cause for this is the different
shrinkage tendency (shrinkage potential ) of the various areas of the molded part. The shrinkage differences are caused by different degrees of packing in
different areas of the molded part as well as by different orientations.
Causes Recommendations
The selected mold temperatures are • Select different temperatures for the mold halves and sliding cores; this solution is often only helpful
unfavorable. in the case of unreinforced thermoplastics.
The molded part has different wall thicknesses. • Optimize the design of the molded part. Reduce sudden differences in the wall sections, blend out
theses differences if possible.
The pressure gradient of the molded part is too • Gate the molded part in several places (only recommended in the case of unreinforced
high along the flow path. thermoplastics ).
Since the selected cooling time is too short, the • Select a longer cooling time.
molded part is removed from the mold at too • Check if the molding is not catching or being held with negative draft.
high a temperature; the molded part becomes
deformed after being removed from the mold.
An unfavorable material is being used. • Use low-warpage materials, e.g. blends with an amorphous phase. In such products, the difference
between the lengthwise and the crosswise shrinkage – which causes the warpage – is smaller.
The glass fibers of glassfiber-reinforced thermo- Numerical simulation methods can be employed to predict the filling behavior and the orientation of
plastics are oriented predominantly in the flow the glass fibers. The following rules have proven advantageous for optimizing the warpage:
direction. Warpage occurs if the orientation of • Gate the molded part so as to establish a uniform flow direction (= orientation).
the glass fibers changes from place to place. • Gate elongated molded parts in the lengthwise direction. Symmetrical parts prove to be the best.
The causes for this are, for example, deflections • Avoid ribs or walls perpendicular to the flow direction.
in the flow, orientation effects at the end of the
flow path, at the weld lines and at the gates. • Position the end of the flow path in corners whenever possible.
• Strive to create abutting weld lines whenever possible ( keep the strength in mind ).
• Avoid weld lines on exposed webs and place them into the corners whenever possible.
RZ_Spritzgussfehler_Technische Kunststoffe_e.indd 62 31.07.2009 12:14:29 Uhr1.0 5.0 2.8
1. 2. 3.
2.4 2.4 2.4
Holding mandrels made of Ultraform®
Influence of the mold temperature on the warpage Insulating panel made of glassfiber-reinforced Ultradur®
Mold temperature: top: molded part geometry optimized by simulation
Cavity Core Play bottom: original situation
1. 80 °C [176 °F ] 80 °C [176 °F ] - 1.4
2. 80 °C [176 °F ] 30 °C [ 86 °F ] +2.6
3. 80 °C [176 °F ] 50 °C [122 °F ] +0.4
WARPAGE 62 - 63
RZ_Spritzgussfehler_Technische Kunststoffe_e.indd 63 31.07.2009 12:14:33 Uhr23 WARPAGE
Warpage of a
molded part
made of Ultrason®
glassfiber-reinforced
Warpage of a power drill housing made of glassfiber-
reinforced Ultramid® unreinforced
RZ_Spritzgussfehler_Technische Kunststoffe_e.indd 64 31.07.2009 12:14:35 UhrSimulation of the glass fiber orientation and warpage of a housing
left: initial situation, right: optimized geometry of the molded part
WARPAGE 64 - 65
RZ_Spritzgussfehler_Technische Kunststoffe_e.indd 65 31.07.2009 12:14:39 Uhr24 PLATE-OUT / MOLD DEPOSIT
Description
This refers to impurities on the surface, in the parting surface and in the venting system of the mold. The plate-out can be breakdown products of the
polymer, additives or flame retardants.
Causes Recommendations
The melt temperature is too high. • Use a needle thermometer to check whether the temperature of the melt falls within the recom-
mended processing window as it emerges from the machine nozzle and, if applicable, also in the
hot runner. If necessary, lower the temperature.
The injection speed is too high during the filling • Reduce the speed of the screw. It might be sufficient to lower the speed only at the end of the
procedure. filling phase (select a graduated injection profile).
The material has not been dried sufficiently. • Measure the moisture content of the granules; if applicable, dry the material to a value that is
lower than the limit value indicated for the product.
The mold is not adequately vented. • Check the venting channels in terms of their position and effectiveness. If applicable, incorporate
additional venting channels into the parting surfaces and /or incorporate core and ejector pins into
places of the mold where the melts meet.
The residence time in the plasticizing unit and /or • Check the residence time in the plasticizing unit; if applicable, switch to a smaller barrel or use
in the hot runner is too long. a shallow-flighted screw.
• Reduce the residence time in the hot runner, for instance, by setting a shorter cycle time or by
reducing the flow channel diameters.
The melt is exposed to severe shear along the • Check the design of the gate, sprue and runners and, if applicable, enlarge the flow cross
flow path. section. Install a machine nozzle with a larger flow diameter.
RZ_Spritzgussfehler_Technische Kunststoffe_e.indd 66 31.07.2009 12:14:39 UhrYou can also read