KALLISTO Owner's Notes for Guests - San Juan Sailing
←
→
Page content transcription
If your browser does not render page correctly, please read the page content below
KALLISTO Owner's Notes for Guests
Welcome aboard KALLISTO!
KALLISTO is a 2010 Jeanneau Sun Odyssey 39i Performance, with 3 staterooms, 2 heads, generous
water capacity and ample storage for food and gear. With a 7’ 2” draft, 60’ mast, traditional loose
foot main with ample battens and a powerful foresail KALLISTO is a very rewarding boat for
enthusiastic sailors. The boat’s helm behavior and balance are remarkably sweet natured.

KALLISTO’s characteristics and equipment are well suited to typical charter season sailing
conditions in the San Juans and destinations north. She sails happily in light airs, accelerates
swiftly, points pleasingly high and is always ready to take full advantage of stronger winds.
Amenities and systems on KALLISTO are focused on improving the coastal cruising experience while
remaining reasonably simple to operate; along with her excellent performance KALLISTO is full of
features for making life on a boat pleasant.

 KALLISTO has been with San Juan Sailing since her commissioning. Second and present owners
Ann and Doug Bostrom have chartered various boats of all descriptions in both hemispheres over the
years and bring a charter guest's perspective on what can help to maximize fun and convenience
while enjoying and caring for another person's boat.

As a package KALLISTO is a nifty synthesis of performance and comfort.

Why KALLISTO? The word “KALLISTO” in Greek means “most beautiful.” We hope that you
agree she is. In Greek mythology KALLISTO was a daughter of the Arkadian King Lykaon and a
hunting companion of the Goddess Artemis. She was seduced by the God Zeus, and bore a son
named Arkas. Zeus’ jealous wife, Hera, transformed KALLISTO into a bear. Later Arkas became a
hunter, and in order to spare KALLISTO from his arrow, Zeus transferred her to the stars to become
the constellation Ursa Major. That theme is seen in our spinnaker.
About these owner's notes:
A fully built-out cruising sailboat is a very complex system. Although there are elements of
commonality between all sailboats, a myriad of specific choices go into the construction and
equipment of any particular boat. Whether you're an experienced sailor or newer to the
game, you'll likely benefit from taking some time to read these notes. Once underway the
chances of a calm moment for studying up on features making your trip more fun will be
scant.

Thanks for reading this!

Two symbols appear throughout this guide:

       Indicates a safety-related hint or caution

       Describes a helpful hint or boat quirk

Charter Boat Stewardship
Operating a boat in charter with a popular fleet involves an amazing chain of stewardship,
with many hands on a given boat as she keeps a busy schedule. In high season, vessels in
service with San Juan Sailing return to harbor late on a Friday morning and must be fully
cleaned, scrupulously serviced, fully restocked and ready for preboard of the next crew, all in
a mere 6 hours of effort that sometimes approaches the level of synchronized dancing.
Our charter guests are part of this symphony of care and coordination. Lockers left with con-
tents appropriately returned and distributed, deck keys returned to where deck keys live,
PFDs returned to dry stateroom lockers and general “how would I like to find this?” think-
ing is a serious help to making the next crew’s outing as enjoyable as that crew disembark -
ing.
We sincerely Thank You for anything you may be able to do to help make KALLISTO’s next
crew find everything in its place when needed, with any discrepancies you may have en-
countered or that have developed during your cruise remedied thanks to your advice and no-
tice to San Juan Sailing.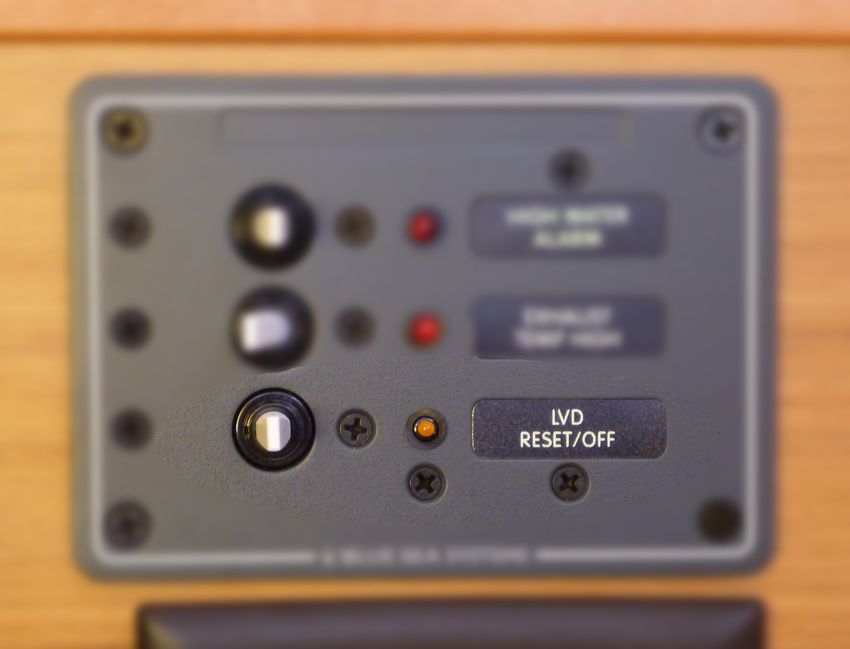
Notes and suggestions for our next revision:
Table of Contents
KALLISTO Specifications:........................................................................................................1
Anchors & Stern Tie..................................................................................................................2
Anchor Windlass & Anchor Operations....................................................................................3
Barbecue....................................................................................................................................6
Batteries & Charging.................................................................................................................6
Bilges and bilge pumps.............................................................................................................9
Bow Thruster...........................................................................................................................13
Dinghy.....................................................................................................................................14
Docking...................................................................................................................................15
Dodger.....................................................................................................................................16
Electrical Panels......................................................................................................................16
Emergency / Safety Equipment...............................................................................................19
Handling Under Power............................................................................................................23
Engine Operation....................................................................................................................24
Fuel Tank, Fuel Consumption & Fueling................................................................................28
Heads, Toilets & Holding Tanks.............................................................................................30
Heater......................................................................................................................................36
Hotspot....................................................................................................................................37
Inverter & AC Power Away From the Dock...........................................................................37
Navigation Electronics............................................................................................................39
Outboard..................................................................................................................................45
Refrigerator/Freezer................................................................................................................46
Sails.........................................................................................................................................47
Shower and Hot Water............................................................................................................50
Spares......................................................................................................................................50
Storage.....................................................................................................................................50
Stove/Oven/Galley..................................................................................................................51
Tools........................................................................................................................................52
Ventilation...............................................................................................................................52
Water Pressure and Tanks........................................................................................................53

(alphabetical by topic/subject)

KALLISTO Specifications:
Year Built: 2010
LOA:38' 11”
LWL: 35.2”
Beam: 12'9”
Draft: 7'2”
Air Draft/Mast Height Above Waterline: 62' with antenna
Dry/Light Displacement: 15760 lb.
Maximum Displacement for CE “A” conditions rating: 19,280 lb.
Wet Payload for CE “A” conditions rating: 2,200 lb. (wet displacement includes full holding
tanks)
Disp/LWL: 150.8
Beam/LoD: 0.3
Sail Area/Disp: 21.1
Engine: Yanmar, 39HP
Fuel consumption: 0.6GPH @6knt.
Fuel Capacity: 34 gal.
Thruster: Low drag, low weight Lewmar 110TT, 65 lbs. thrust
Potable Water Capacity: 90 gallons
Holding Tank Capacity: 35 gallons, 12+23 in two tanks fore and aft respectively
Refrigerator capacity: 35 gallons, 4.6 cubic feet
Domestic Batteries: 300AH nominal, 225AH usable
AC Inverter: full sine, 2.7kW
Permanent Berths: 6 in 2:2:2 cabin arrangement
Headroom in Saloon Center: 6'3”
Ground Tackle:
Main anchor: 44# Lewmar Claw w/300' 5/16” chain rode
Secondary anchor: 15# Bruce aluminum w/50' 5/16” chain, 260' 5/8” nylon rode
Navigation Aids:
AIS (Si-Tex)
Radar (Raymarine 4KW digital)
Autopilot (Raymarine SPX-30, SmartPilot head)
2 multi-function chart plotter/displays (Raymarine Axiom Pro)
3-D sonar (Raymarine RV-212, dual transducer)
6 multi-function instrument displays (5x Raymarine ST-70, 1x ST-60 Multi)
DSC VHF w/cockpit controls (Standard Horizon)
Safety:
4 smoke detectors/alarms
Carbon monoxide detector/alarm
Propane leak detector/alarm
6 fire extinguishers
Fire blanket
2 bilge pumps, ~2,000GPH combined capacity
Portable electric crash/dewatering pump w/30' 3” collapsible hose, ~6,000 GPH
First aid kit
USCG-required signaling, flotation and other gear (electronic flares)
Jacklines, 2X harnesses
Entertainment:FM/AM/CD/MP3/iPod/iPhone/Bluetooth/DVD compatible receiver, 22” HD
display, off-the-dock Internet

                                               1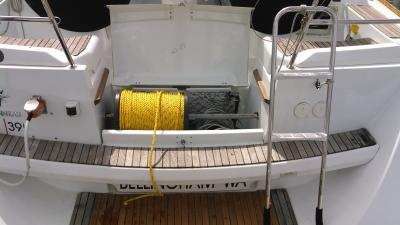
Anchors & Stern Tie

KALLISTO is equipped with two anchors. The primary bow anchor is a 44 # Lewmar
Claw (Bruce) with 300 feet of 5/16” hi-test chain. The chain is marked at 25’ intervals by
yellow rope rove into the links (ignore residual yellow paint). 15’ before reaching the
bitter end, the chain is marked with red paint and red line rove into the links. If you see
red, STOP paying out chain as you are about to spill the chain off the gypsy.

A relatively strong but easily cut rope section serves as a mechanical fuse past the chain
rode and as a way of easily slipping the ground tackle should it become necessary.

The secondary anchor is an aluminum 15 # Fortress, light but competent, with 50 feet of
chain and 260 feet of nylon rode. Because the rode and anchor as an assembled unit are
hazardous to move around together, the secondary anchor itself is stowed in the bow
anchor locker, while the rode is in the port aft deep cockpit locker. Use the boat hook to
pick up the handle of the bucket containing the chain portion of the rode and heave it up.

Safety Note: The chain portion of the secondary rode weighs 58 pounds and
presents a potential injury hazard while being lifted out of the locker.

A rule of thumb anchor scope to use in the islands is 4-to-1 for
the highest water depth you’ll encounter in the spot where you
choose to drop anchor. Tides are large in our area; check your
tide data to know how much water you may gain and how much
water you will lose as the tide floods in and ebbs out during your
stay as this may significantly affect your scope.

It’s worth checking set; after you have paid out the suitable
amount of chain, 1 or 2 minutes of gentle reverse power (perhaps
1200-1300 RPM) sets the anchor and tests holding power while
you sight a fixed object to confirm movement has stopped. If you
wish to sleep even better or are expecting 30 knot winds, throttle
up to about 1500 RPMs in reverse for another 30 seconds to
prove to yourself that the anchor is set well!
                                                                         KALLISTO, rode
For storm conditions (sustained winds of 25+ knots), extend your
                                                                         and Space
scope to 7 or even 10-to-1 provided you have room to leeward.
                                                                         Needle, to
Otherwise, set two bow anchors in a v-type pattern for extra
                                                                         vertical scale.
holding power. The secondary anchor can easily be dropped and
recovered from the dinghy.

The stern tie line is a 600 foot reel of yellow polypropylene line for stern ties, located in
the aft-most center cockpit locker on an axle.

The easiest way to use the reel is from its normal position in the stern locker. Otherwise,
you can put the boat hook through the reel and place it on the stanchions on the rail hooks
provided.

                                              2
We recommend using appropriate gloves while handling polypropylene line in the lengths
necessary for stern tying as the line is not at all “palm friendly.” Gloves are available in
the tool space at the bottom of the companionway. Please put them back fully dry.
The stern tie axle in the aft locker is designed to
allow the reel to “jump out” if too much tension
is applied to the line (a lot).
It almost goes without saying that you’ll need to
cleat-off both ends of the stern tie line on
KALLISTO’s sturdy stern cleats. Neither the reel
axle nor the pushpit rails are adequate to
Stern tie in default position handle a working load from the line.
With 600’ of rope available, usually you’ll have enough scope to take a loop from the
stern and around a (sturdily attached) object on shore, then back to the boat, cleating port
and starboard.
With the amount of activity in our operating area in the long run it’s harmful to
draft living trees for stern tie duty. You may have no alternative but using a live tree
for stern tie is best avoided if possible.
Please do not store the stern tie reel and line in any but the aft-most center stern
locker; the line absorbs quickly but drains slowly a lot of salt water which we
do not want draining into KALLISTO’s bilges.
Anchor Windlass & Anchor Operations
Safety Note: The windlass produces high torque and is geared down at a
high ratio. Fingers or other extremities caught in the windlass gypsy or
trapped by chain in other areas of chain movement will not be noticed by
this apparatus. Please use all due caution when operating the windlass,
particularly during steps requiring intervention by hand. Never allow
children to be in the vicinity of an operating chain windlass and do not let yourself
become harried or distracted while manipulating the windlass yourself. Pause to consider
before and while using hands around the windlass and chain, if it becomes necessary to
use hands on the rode.
General:
• Windlass power is received from the engine starter battery and a forward auxiliary
battery. The windlass will only operate while the engine is running!
• The up-down controller for the windlass is located inside the chain locker (leave
plugged in please).
• KALLISTO has a wonderfully deep chain locker but chain being it what it is, the
links dropping off the gypsy sometimes bunch up under the windlass; you might
3need to push the resulting heap down several times to the bottom of the chain
locker to prevent the chain from jamming in the windlass. The boat hook is ideal
for this as it keeps your own appendages away from the gypsy etc.
Review on deploying and setting anchor:
• Use the controller to ease out some slack in the chain, across the locker
• Ease the anchor over the rollers by foot or hand
• Without delay so as to avoid bashing the hull, continue lowering the anchor
Safety Note: Anchoring is not complete until the snubber is set on the
rode. Failure to set a snubber is not only poor seamanship but puts the boat
and crew at risk in the event that the windlass is damaged by shock and can
no longer move chain. This is a cruise-ending event but easily avoided with
the use of a snubber.
A fixed snubber is mounted on deck. Use the full length of the snubber and deploy
chain until the chain is slack and the snubber taut.
Correctly deployed snubber: chain slack and
snubber taut
Anchor retrieval review:
• When retrieving the anchor, never use a windlass to pull the boat forward
to the anchor
• If you don’t have back pain or other requirements for help:
Once the anchor breaks surface, finish retrieval by hand
• Some of us have trouble handing the anchor manually:
After the anchor breaks surface and as it approaches the rollers,
“bump” the controller so that the anchor has an opportunity to
4rotate on its own (it will) and come in. Don’t allow the chain to
become taut under windlass power.
• KALLISTO’s 1kW anchor windlass is easily capable of working the rode
in a deep anchorage. If you encounter a stalled windlass you’ve likely
become fouled or the anchor is so deeply set that additional measures will
be needed.
• DO NOT use the windlass power to take up the last few inches of slack.
Just take the extra chain and snug it up and hand-set the chain back onto
the gypsy.
• After raising, use the snubber and starboard cleat to fix the anchor chain,
ensuring it cannot slip off the rollers if the windlass brake should become
unset.
5Barbecue
General:
• The solenoid valve control in the galley controls the BBQ as well.
• Turn the control to the “on” or “light” position, and with the LID OPEN, light the
burner through the opening at the bottom of the grill using the galley stove lighter.
• The barbecue cooking surface is fairly massive. For grilling meat or fish directly
on the grill, allow plenty of warmup time.
• Please make up an aluminum foil, grease tray to fit on the bracket under the BBQ.
Otherwise, the grease drips on the transom and the teak step, which is difficult to
clean.
• The degreaser in the galley and long-handled brush will deal with spills to the
transom but the less to clean the better, of course.
• During breezy conditions you may find that the ignition hole in the lower center
front of the barbecue is letting in too much wind and upsetting combustion. Stuff
a piece of aluminum foil into the hole to correct this.
As a courtesy to the next crew, please use the wire brush attached to the BBQ to clean it
after use.
Batteries & Charging
Batteries are a fairly big deal when it comes to cruising on boats. We’re accustomed to
infinite electricity from our utility service at home but
when on a boat we have to pay attention to our electrical
consumption more closely. If we don’t pay attention,
various disappointments will ensue. Please forgive us
while we possibly over-explain how to use KALLISTO’s
batteries.
KALLISTO is equipped with LiFePO4 (lithium iron
phosphate batteries. LiFePO4 voltage profile
during discharge is very different from that of the older
lead-acid technology. For the user, this is reflected in a
longer and flatter discharge voltage curve, with the
batteries reaching 70% discharge at 12.8V under typical
loads. Recharge at 12.8V.
Scheiber battery display
“How long will batteries last and please skip the man-
splaining:”
• In practice we have found that an overnight stay in cooler weather (45 F) with
typical battery usage for cooking, sanitation, lighting, refrigeration, “device”
charging and overnight heating at 65 degrees leaves the batteries at ~70%
capacity. During summer and/or when the boat furnace is not in heavy use, this
time will be extended.
6• The electrical system will automatically disconnect many non-safety loads if you
over-discharge, requiring you to recharge before using potable water, flushing
toilets etc.
How to check available charge and discharge rate:
• State of Charge (SOC): Press “Meter”on Magnum panel twice. Turn the knob so
that “BM: SOC” appears in display. Push the knob.
• Discharge rate: Press “Meter” on Magnum panel twice. Turn the knob so that
“BM: Meters:” appears in the display. Push the knob, rotate to select “DC Amps,”
push again.
Recharge when you reach 12.8V. Fully charging requires several hours of engine
operation or shore charger connection.
Charging:
An important benefit of LiFePO4 batteries is that they don’t mind sitting in a partially
discharged condition. For those of us trained to properly try to keep lead acid batteries as
full as possible this is a bit of a mental shift. There is more of an option to be calculating
about battery usage, possibly to forestall engine charging for one more night if underway
use of the engine is planned for the next day.
The house bank stores a total 300 amp-hours in LiFePO4 (lithium iron phosphate)
batteries. Except in emergencies or when coping with a failed alternator, for long term
health batteries shouldn't be depleted much below 20% capacity, meaning there are
240AH of routinely usable electrical reserve power available on the boat.
Charging at the dock with shore power:
• The Magnum inverter/charger panel will indicate the status of the shore charging
process.
• Recharging at the dock is limited somewhat by the AC supply from the dock
outlet.
• Expect a full charge to require about 6-7 hours from complete depletion of usable
battery capacity.
Charging with engine and alternator:
• At typical cruising RPM and starting from full depletion, about 3 hours are
needed to completely charge batteries.
• For charging while on the hook or ball, note that the alternator will not effectively
charge the batteries at low or idle speed; it will require many hours to charge with
the engine running slowly. At 1,500 RPM batteries will be fully charged after
about 4.5 hours.
• Running the engine for prolonged periods at low RPM will cause coking
problems. 1,500 RPM is a reasonable speed for charging while stationary. Again,
1,500 RPM is appropriate for charging while not underway.
Details:
Two nominal 100W solar panels located on the companionway hatch garage and dodger
supplement the electrical supply and are helpful for offsetting navigation and
7refrigeration loads while sailing. In fair conditions these panels will supply enough juice
to make quite a difference in battery charge state when reaching a mooring after being
underway all day under sail. They’re also quite helpful while on the hook or a mooring
ball. When moored, a fanatical skipper will find it helpful to use the traveler to adjust the
boom so as to reduce shading of the panels.
The engine starter battery is a single high-amperage-output model specifically designed
for starting diesel engines and is normally paralleled with the forward windlass/thruster
battery.
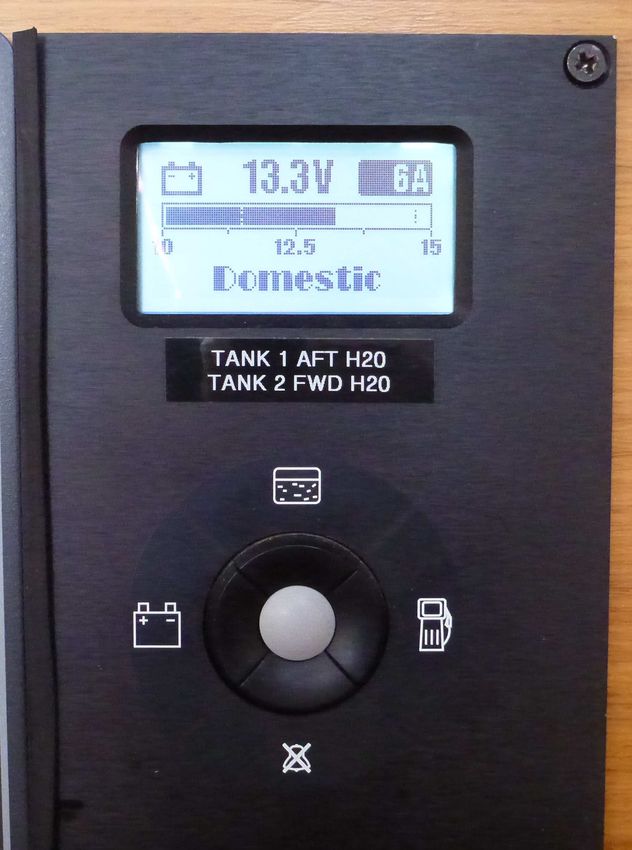
Battery voltage and current domestic bank DC electrical discharge rate in amperes can be
monitored on the Scheiber monitor panel at far right of KALLISTO's nav desk panels.
Push the button with the battery icon to cycle through voltage readings for the starter and
domestic batteries.
If the domestic battery discharge rate is at least 1 ampere, the discharge rate will be
shown at upper right of the Scheiber panel. In the illustration, 6 amperes are flowing out
of the domestic battery.
Some system current demands (significantly the heater) are not reflected on Scheiber
panel. More comprehensive battery information can be obtained via the Magnum
inverter/charger panel as detailed above.
To help with battery usage planning, here are consumption figures for some single loads
on KALLISTO's batteries (you'll need to consider how things add up):
Load Hours available
Anchor light 1,575
Stereo 225
Generous onboard lighting 90
All nav with autopilot active 56
Laptop via inverter 50
Diesel heater 37
Hairdryer via inverter 1.75
8Low Voltage Disconnect
Because most of us now expect and are largely trained to rely on electricity for safe
operation of our vessels, KALLISTO's electrical system prioritizes battery loads and
reserve power so as to preserve power
for navigation. When battery voltage
reaches 12.2 volts, most domestic loads
(water pressurization, TV and stereo etc.)
will be dropped automatically by a “Low
Voltage Disconnect” contactor, or
“LVD.” Before this happens a yellow
light will flash for 10 minutes on the nav
station alarm panel, affording an
opportunity to start the engine and
recharge. If this advance warning is not
noticed and power drops at an
inopportune moment, flipping the “LVD
Reset/Off” switch leftward to “10 min
override” will restore domestic power for 10 minutes.
Protection built into the domestic batteries wiil disconnect them from loads if
the batteries should fall to drastically low levels. If this should happen, start the
engine and charge immediately. In practice this should never happen.
Battery disconnects:
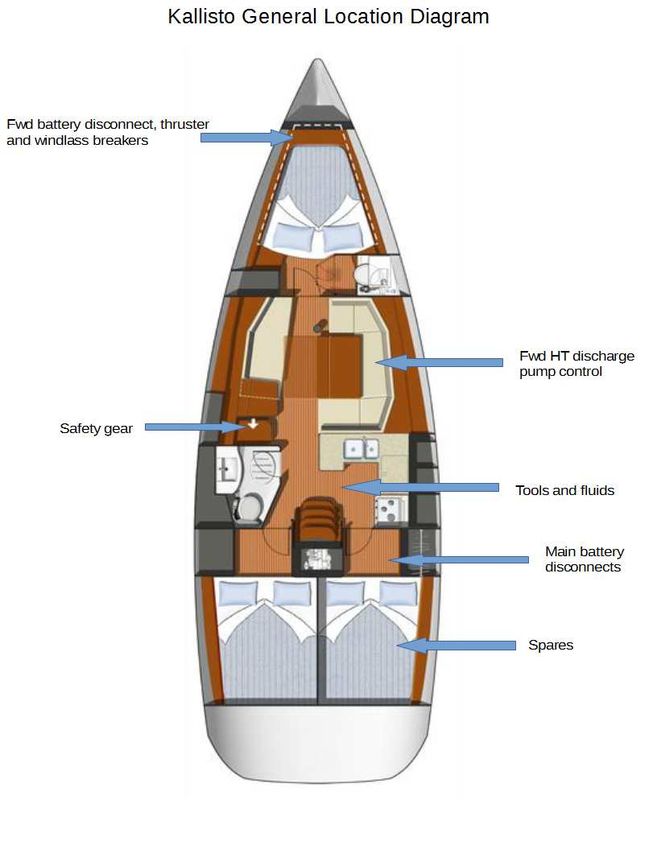
Disconnects for the engine and domestic batteries are located in the port aft berth on the
bulkhead at the head of the bunk. Circuit protection for the forward battery supply cables
is located on the same panel.
Never turn a battery switch to “off” while the engine is running! This can blow
the diodes on the alternator, may destroy important navigational equipment and
your batteries will no longer charge.
Bilges and bilge pumps
KALLISTO has several bilge pumps and a high bilge water level alarm:
• A small primary electric pump located in the bilge sump handles routine bilge
duties such as evacuating melted ice water from the refrigerator.
• Located above the sump level, a more powerful electric “casualty” pump
(~1,700GPH) is intended to assist with more serious leakage problems.
• A hand-operated pump in the cockpit acts as a backup to the bilge sump pump and
as a pump of last resort in cases of emergency.
9• A visible and audible alarm will activate if bilge water should rise above the level
normally handled by the sump pump.
• A portable high capacity evacuation pump is also on the boat; see the
Emergency and Safety Equipment section of these notes for details.
Pump operation:
• Operation of both electric pumps is normally fully automatic.
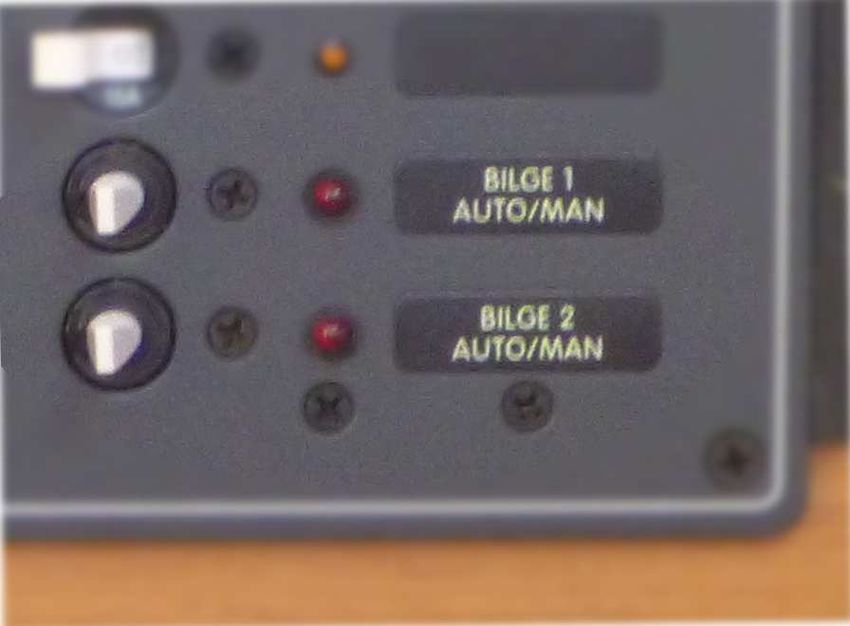
• Both electric pumps can be tested and operated manually using their respective
switches at lower right of the DC distribution panel (illustration 6).
• Whether in manual or automatic operation, a red light will flash next to an
operating pump's auto/manual switch on the panel.
• All bilge pumps overboard discharges are at the transom; water continuously
draining over the transom should be investigated regardless of whether the bilge
alarm can be heard or seen.
Manual bilge pump:
The manual bilge pump folds and closes as not to clutter the cockpit, thus is a little hard
to find and use for the first time. It is installed just beneath and inboard of the starboard
helm. These photos show how the manual pump deploy and operates:
The manual bilge Manual bilge pump
pump cover leve unfolded and
extended
Monitoring the bilge:
It's good practice to check the bilge for unusual amounts of
water each day, morning and evening. KALLISTO has a bilge
sump for collection and disposal of condensation, routine
leakage through deck fittings, ports accidentally left open,
refrigerator flushing and the like. This sump is located
immediately aft of the mast, and ordinarily water should be well
below the top of the sump. If there is substantial water in this
area it is cause for further investigation.
If excess water is found in bilge or bilge alarm sounds:
10• Check to make sure the breaker “Bilge 1” on the main breaker panel is switched
on.
• Use the “Bilge 1 Auto/Man” switch at lower right of the DC distribution panel to
manually test the bilge pump.
• If the pump actuates (clearly audible in normal circumstances), the float switch is
defective. If the pump fails to actuate then the pump is defective. In either case,
please notify San Juan Sailing so that repairs may be arranged.
• While the primary pump is out of service, use the cockpit hand-pump to manage
water in the bilge sump-- the cockpit pump draws from the bilge sump.
• If there is a substantial amount of water in the bilge, well above the sump level,
taste it. If it’s salt you need to discover where it’s coming from, immediately.
Note that the refrigerator drains into the bilge; most of the water that
accumulates in the bilge sump is from melting ice and condensation. The mere
presence of water in the sump is not a matter for concern. Frequent
operation of the pump should be investigated.
Secondary bilge pump
The secondary bilge pump is located beneath the deck just ahead of the aft settee.
Unlike “Bilge 1”, the higher capacity “Bilge 2” is a centrifugal pump and depends on
water cooling of its bearings and motor. It should not be operated in a dry condition.
If the secondary bilge pump is called into play it’s likely you’re facing an emergency.
Continued efficient operation of the pump becomes very important. Expect debris from
bilges to interfere with pump operation. Ensure the inlet screen is kept clean while
the pump is needed and running.
Bilge High Water Level Alarm:
In sea stories it's often the case that flooding
bilges are only noticed when floorboards float.
KALLISTO has a high bilge water level alarm
that will sound when the sump is full but
before the secondary bilge pump activates. If
the alarm sounds and investigation reveals
water in the bilges (check the space with the
bilge sump, at the floorboard indicated with
red dot on the handle), urgent response is
indicated. Taste the water in the bilge; if it's
salt water then you have a sea water leak large Bilge high water alarm
enough to overwhelm the sump pump and need
to swiftly execute a response.
11In a flooding emergency you'll need the engine, for electricity to power
pumps, navigation, communications. As it may be impossible to start the
engine should the starter motor become soaked, start the engine as soon
as you feel concern about flooding. If you have any doubt about being
able to manage the flooding, issue at minimum a “PAN” call to alert
possible local help and if need be issue a “MAYDAY” via DSC and voice.
12Bow Thruster
KALLISTO is equipped with a bow
thruster, the equivalent of an invisible
crew member who can walk on water and
shove the bow port or starboard. If
you're short-handed or have a green crew
who need a bit more time to go through
docking procedures the thruster can lend
a hand and buy time while shrinking the
yelling coefficient of docking.
Thruster control
The bow thruster is intentionally sized
quite modestly so as to avoid weight
gain, loss of buoyancy and increased drag
in the performance-critical entry area of the boat.
Nominal thrust is 65 lbs., the equivalent of a fairly heroic push on the boat by a person.
Thruster operation:
• Activate the thruster by pushing the button on the thruster panel, located at the
starboard helm position.
• “Ready” is indicated by the flashing red pilot light.
• Push the boat's bow starboard or port by pushing the control lever to starboard or
port. There is no automatic timeout on enabling the thruster-- turn the unit off
when done so as to avoid accidental activations.
Thruster thermal protection:
• Like all electric thrusters this one has a powerful motor but is not able to operate
for extended periods of time.
• The thruster is rated for 7 minutes of operation in a given session of more or less
continuous action.
• If you overdo it with the thruster, a thermal trip will engage and the thruster will
be disabled until it cools.
• You'll need to wait about 20 minutes before resuming operation, with the second
and subsequent session times being much shorter before trip-out due to
accumulated heat.
• In practice the thruster is mostly only “blipped” for a few seconds at a time; 7
minutes essentially amounts to “forever” in terms of actual docking activity.
Thruster electrical supply:
• The thruster and windlass draw from the engine starter battery and also share an
auxiliary battery, the auxiliary batter being located along with the thruster in the
forward-most accessible space beneath the v-berth.
• Circuit breakers protecting the power supply from aft and the windlass are in the
same space, as well as a disconnect switch for the forward battery.
13• The thruster fuse is adjacent to the forward battery. A spare fuse for the thruster
motor is attached to the thruster. However, a blown fuse should not be replaced
until a definite reason is established for losing the first fuse.
Foreign objects dragged into the thruster tunnel are the most likely cause
of a blown fuse and generally will need to be cleared before there is any
point in replacing the fuse. Do not attempt to clear a jammed thruster
on your own -- reaching into the submerged tunnel is a hazardous
operation with risk of serious injury or worse, and even trying to pull an
object protruding from the tunnel is prone to problems with miscommunication leading to
harm. Instead, avoid using the thruster in water with obvious debris floating in it.
Dinghy
KALLISTO has an inflatable, AB, 10’
aluminum RIB dinghy, one seat, oars and an
outboard engine. (See “Outboard” section.)
In order to lock the oars in place for use,
insert the oarlocks with the hand grip facing
outboard, then rotate the oar back inboard.
Towing works best when the dinghy is
brought close to the boat – pay out only
about 4 or 5 feet of painter line from the stern
cleat to the bow of the dinghy. Better yet, Optimum dinghy towing
lead the painter through the starboard grip on
the transom step. At the correct length the
dinghy will be continuously surfing KALLISTO’s wake, assuming the boat is traveling at
typical cruising speed.
This method of towing the dinghy with the painter led under the transom grip works
excellently; the dinghy will “hunt” far less and you'll even notice that the autopilot works
a little less hard because it's not constantly fighting a veering tow. Highly recommended.
Tie the painter off twice – once at a cleat with a standard cleat hitch, then the bitter end to
the stern rail. SJS has recovered dinghies “lost at sea” by others who relied on a single
cleat hitch.
Belay the dinghy to the starboard side of the boat, paying attention to
it not being able to drift under the heater or engine exhaust. If you
use the preferred short leash method shown in the illustration, the
dinghy will not be able to come in contact with exhaust.
Please take special care when beaching the dinghy (refer to the dinghy beaching
procedure in your charter guest book). Most of the beaches you will land at are strewn
with barnacle-covered, bottom-slicing rocks.
14When approaching/reaching the shore:
• Weight the dinghy aft by moving crew aft.
• Disembark over the bow.
• Lift (don’t drag) the dinghy above barnacle height using the handles on either side
• Also remember to secure the painter under a rock or to a large driftwood log so
your dinghy won’t float away – we have very large tidal fluctuations! The painter
is a soft, yellow, 3/8”bouyant line.
• There is a second 30’ length of line stowed in the port cockpit locker for use at
low tide on a long beach.
Easy to forget: if for some reason you have a long length of dinghy
painter deployed, take it up before anchoring, mooring or docking.
Don't let the oil pressure alarm on the engine be the harbinger of a stalled
engine due to wrapping the painter in the prop while backing down!
Also please note that the velcro straps provided in the dinghy for oar storage are
effectively useless. Tie the oars through the locks and a hull handle when towing the
dinghy, lest they be lost during a flip. Better yet, stow them in KALLISTO’s port aft deep
locker when not in use.
Docking
For many sailors docking is a relatively stressful time. Taking into account that even
experienced sailors can be very tired after a long day of fun, make the process easier by
having a plan:
• On what side will your crew need to deploy fenders and docklines? Who will
perform what role? Are all the parts ready?
• Can you staff a roving fender?
• What's the wind doing, compared to your slip's orientation?
• It's well worth getting an assigned slip number and checking your Waggoner so
that you know in advance what you’ll encounter reaching the dock. If you're not
happy with your slip assignment it doesn't hurt to mention that to the port staff
and ask for an alternative. Sometimes harried dock staff will assign a 39’ boat to a
15’ slip-- don’t be too stoic about making this work.
Vessel particulars when docking:
• Make bow thruster ready for use; switch on, blip port, wait a second, blip
starboard.
• KALLISTO carries momentum very well and remains quite responsive to the helm
at very low speeds, so your final approach and turn in toward your slip can
usually be done with the shifter in neutral; you’ll certainly need no more than
“idle speed forward” (unless there are high winds).
• Note that despite favorable testing results, KALLISTO's prop is not as
authoritative in reverse as in forward. Bear in mind that quick reversals will
need a commensurately authoritative hand on the throttle.
15San Juan Sailing says: 'When coming into our docks in high winds or if
you’d just like a little assistance upon arrival, simply hail “San Juan
Sailing” on VHF channel 80. We’ll be glad to offer some “coaching”
and/or catch your lines. In fact, most marinas in the islands will help
you if you hail them and ask for assistance. Asking for docking
assistance, especially in windy conditions or with an inexperienced crew, is a sign of
prudent seamanship.'
Excellent advice! Asking for help is much less embarrassing than performing a lot of
unnecessary dockside drama. Many docks in summertime are littered with loafers waiting
to lend a hand. Sober volunteers are wonderful even when they’re a bit too full of advice.
Dodger
Our dodger not only protects the crew from the weather when in the cockpit, but it has
several stainless steel grab handles for safety.
Please don’t remove panels from the dodger as they’re quite tricky to reattach and easily
damaged when dismounted.
The dodger’s plastic “glass” is vulnerable to scratching from salt crystals, especially after
sailing into a challenging breeze. When salt spray on the glass dries in the wind, tiny salt
deposits are left behind and tend to obscure your vision. Please avoid directly touching
salty glass with a damp rag or sponge as attempting to wipe salt crystals even with a
damp rag will leave scratches. Instead and if vision is becoming a problem, use a
container to sluice fresh water on the windows. Or, wait until you’re at a dock where you
can hose off the salt crystals.
CAUTION: We have found that most spray sunscreens react
chemically with the Plexiglas. So please inform your crew to spray
sunscreen downwind of the dodger glass. And please don’t lean against
the dodger with sunscreen on your back and shoulders.
Electrical Panels
Most switches (circuit breakers) at the panel board are self-explanatory. Certain switches
are always to be left on; these switches are marked with colored dots or protective and
discouraging covers.
A full list of breakers and fuse-protected branch circuits and locations is in an appendix at
the end of these notes.
AC Panel & Loads
16AC (120V) Shore Power. AC outlets function while connected to shore power
or when the inverter is operating, in either case when the AC Outlets breaker is in
the “on” position. The water heater and battery charger operate only while on
shore power.
Shore Power A/C Circuit Breaker. 30A breaker at top of AC distribution panel
should never trip. Simultaneously running the electric space heater, warming the
hot water heater and bulk charging batteries might cause a trip. Reduce loads and
reset the breaker.
Battery Charger. The Battery Charger breaker switch must be turned “on” for
shore power to charge the batteries.
AC Outlets. The vessel charger/inverter is involved as an alternate source of
power to AC outlets. When connecting or changing AC power sources, before
power to outets is available there will maybe a short delay while the
charger/inverter takes stock of the situation.
DC Panel & Loads
Many DC breakers are self-explanatory. Here we call out a few to highlight details of
operation.
#1 Bilge & #2 Bilge. These provide power not only to bilge pumps
but also other important life-safety equipment, such as propane
leak alarms, fire sensors and the like. Do not turn these breakers
off; in the normal course of affairs both bilge pump breakers
should always be left on, as hinted by guards. Manual bilge pump
actuation is via a pair of switches at lower right of the DC panel.
Cabin Lights. All cabin lights are fed via a single breaker, with most lights
switched individually at individual locations so as to afford maximum flexibility
and economy. All cabin lights are LEDs and consume very modest power; there is
no need to huddle in the dark on KALLISTO; even operating all interior lamps
simultaneously consumes only about 5A.
Running Lights. Please be advised that night passage making is not permitted
under terms of your charter agreement with San Juan Sailing. Use running lights
in cases of reduced visibility (like fog or on the rare days in the Pacific Northwest
when there’s heavy overcast). If you find yourself in a pickle and running in the
dark, the rule is that these lights must be on after sunset.
Steaming Light. Steaming light should be on when motorsailing, day or night.
Anchor Light. Should be on all night in an anchorage. (this is an LED and
won’t deplete the batteries.)
17Foredeck Light. Useful for trips forward to check mooring/anchoring integrity
with both hands free from flashlights. This light is also handy as a porchlight of
sorts when returning to the boat at night. This light uses about 1A and won’t have
a serious impact on battery life if left on for a few hours.
Accessory. KALLISTO is equipped with 12-volt DC “cigar lighter” type DC
outlets in all cabins and at the nav desk. As well, each cabin has dual USB
charger outlets for phones, tablets, etc. Sleeping cabin DC and USB outlets are
controlled with the Accessory breaker. Devices connected to cigar lighter sockets
should be restricted to those with relatively modest power consumption.
CPAP: The vessel has successfully supported simultaneous use
of two CPAP machines of the style that can run on 12V in routine
overnight use with a negligible effect on batteries. If in doubt,
check the DC amps indicator with the CPAP machines on and off
so as to ensure you won’t deplete batteries.
Water Pressure. This pump pressurizes a small accumulator tank located on
starboard behind the aft-most salon seat back and shuts down when the tank is at
“working pressure.” If you don’t hear the pump start up when you turn it on at
the panel board, this generally means that the system is already at working
pressure.
Forward and Aft Head Pumps. Both heads need electrical power to operate
toilet flush and shower sump pumps, etc. These breakers you'll want to leave on
when the boat is occupied. Leave off when crew are gone.
Each head has an illuminated holding tank gauge. Advise your crew: “If it ain't
glowin', you shouldn't be goin'. “
18Emergency / Safety Equipment
We've tried to provide a fairly comprehensive and robust set of safety and emergency
gear on KALLISTO, based on real-world incident data gathered from the US NTSB and
the UK MAIB and taking into account the boat’s typical cruising grounds. If you feel we
could do better, suggestions are welcome!
Most emergency gear is stored in the locker beneath the nav desk seat. Please ensure that
any items in this locker you must use are properly returned. If any expendable items are
used, please make a note of it at the end of your trip (you will not be billed for use of
emergency gear).
We highly recommend locating and sighting all of the emergency gear on the boat, before
it's necessary.
First Aid Kit: A complete first aid kit is located in the aft head vanity. Please
note any usage of these items so they may be replaced for the next guest.
Flares: Visual day/night distress signals are located under the nav table seat.
Due to the various hazards and maintenance problems of pyrotechnic flares, the
boat is equipped with electronic flares.
Flashlights: LED flashlights are clipped port and starboard alongside the inside
companionway handrails. On/Off buttons are on the end of the flashlight opposite
the lens. An additional small flashlight is inserted in a pocket on the bottom
middle aft edge of the dodger.
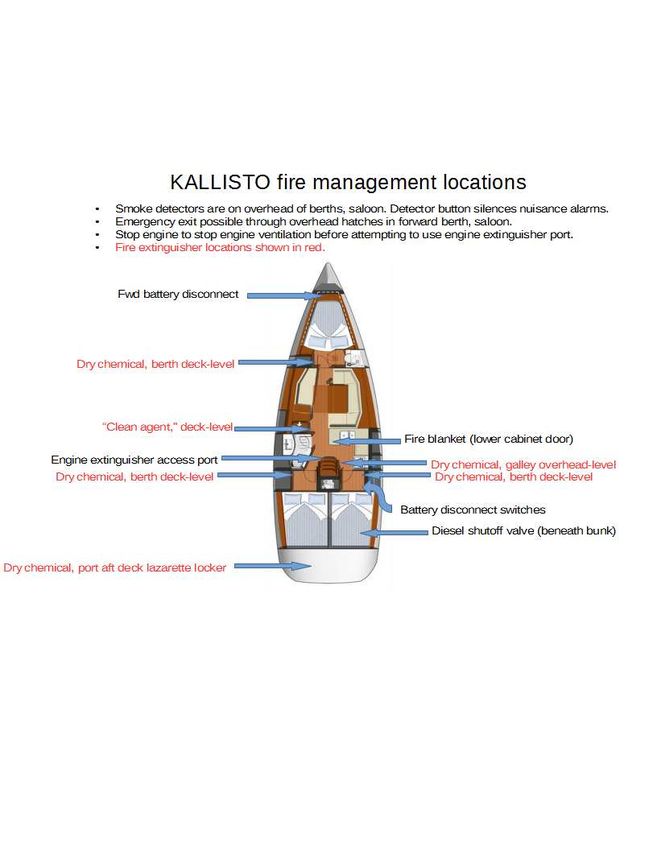
Fire Extinguishers: There are six fire extinguishers on KALLISTO, rather a lot
but they're often not useful unless they're immediately to hand and on the right
side of a fire, which turns out not to be the case all too often. So we’ve littered the
boat with extinguishers. Extinguisher locations are in the diagram included with
these notes.
Sad for a boat owner to say, for all but the most trivial fires your primary
objective in using a fire extinguisher will probably be to save your crew and
yourself, not the necessarily the boat. Think about salvaging the boat only after
your own safety is assured. Maybe the boat needs to be saved to save you and if
so that's great, but please think of human safety first and foremost. In a serious
fire situation you should be buying time to communicate and evacuate, with
further assessment of the situation and/or incidental boat saving a secondary goal.
A large and highly effective “clean agent” extinguisher is attached to the inboard
nav desk seat base. Smaller dry chemical extinguishers are in the galley at the top
of the companionway, in each of the cabins attached to the hanging lockers, and in
the cockpit port lazarette locker.
19If possible, for best efficacy in case of need choose the large “clean agent”
extinguisher located at the nav desk seat.
A fire extinguisher port is located in the companonway steps and allows an
extinguisher nozzle to be inserted so as to flood the engine compartment with
extinguishing agent. If at all possible, use the extinguisher mounted on the nav
desk seat should it be necessary to combat an engine fire; the larger extinguisher
with better dispersion will more effectively knock down and extinguish flames in
the deeper recesses of the engine compartment. If engine ventilation is still
running when you attempt to extinguish a fire, chances of success are much
diminished. Turn off the engine to stop engine ventilation before using the
extinguisher port.
Note that dealing with a fire of any but the most trivial nature
should include at least a “PAN PAN PAN” radio call so as to
minimally establish a means of assistance and a possible exit path
from the boat. In the case of a fire that has taken hold, use
available time purchased with extinguishers to try to get a
VHF MAYDAY out using both the emergency DSC button (first!) and voice,
and assembling your crew and any gear necessary for leaving the boat. If you
can't access the VHF below, use the remote VHF remote access microphone
located in the cockpit.
Fire Blanket: Especially for possible galley disasters a fire blanket is quick and
effective. A fire blanket may be found hanging inside the lowermost inboard
galley locker, below and to the left of the sink.
Emergency Tiller: It sort of looks like a metal pipe, with an “elbow” bend in it.
It’s located in the starboard cockpit locker. The rudder post attachment point is at
the aft end of the cockpit. To remove the cover, insert a winch handle in the star-
shaped fitting and unscrew. Emergency tillers are fairly exhausting to use; plan
on frequent relief if dealing with extended rudder operation with the emergency
tiller.
If you test the emergency tiller (and nothing wrong with that), please
make sure the deck plate is snugged down properly with the o-ring
clean of debris when done, so as to avoid leakage below decks.
Crash/Evacuation Pump: Stored beneath the forward outboard corner of the aft
starboard bunk is a portable 12VDC electric pump with a nominal capacity of
8,000GPH. Coupled to the 30' of 3” firehose included, this pump has an effective
capacity of about 6,000GPH. The included cable harness and switch should be
connected directly to 12VDC battery posts or equivalent capacity 12V terminals.
Power consumption is large; extended use will soon require recharging of
batteries via engine or other means. You'll need to attach the hose the to the pump;
clamps are attached to the pump body for this purpose.
20Flooding is one of the more frequent calls for help you'll hear on VHF; perhaps
you can save the day for somebody if you hear a call for help within reach of
KALLISTO. If you feel as though offering this pump will help another vessel at
risk, feel free to do so. Record the name and port of the affected vessel and if safe
and convenient please try to recover the pump when the incident is concluded. If
the pump is lost as part of an effort to help another vessel, we're OK with that but
please let us know so we can arrange a replacement.
Horn: A hand-powered (and obnoxiously loud) air horn signal is located under
the nav desk seat. As well there is a disposable gas cylinder type. The hand-
powered unit is much more fun to operate and as well will operate longer. Gas
cylinders will only provide about 60 signals, barely enough for a typical short
encounter with fog.
Safety harnesses, tethers and jacklines: Beneath the nav station seat are a set of
jacklines for port and starboard application to D-rings found on deck fore to aft,
as well as two sets of safety harnesses and tethers. Mostly of potential application
when sailing to points north such as Desolation Sound, these safety appliances
require familiarity and some training in order to be effective; only qualified
crewmembers should employ jacklines, harnesses and tethers except in cases of
duress.
CO and smoke detectors: A CO detector is located in the aft port cabin. Any
activity on the part of this detector should be cause for suspicion and
investigation. Potential culprits might be failure of the exhaust systems of the
diesel engine or heater.
If the CO detector sounds, respect it until it's proven a liar. These devices are very
reliable so if the detector generates an alarm, take swift action. Turn off the
remote propane valve and cabin heater if in use. Make sure the VHF radio is on.
Leave the cabin of the boat and use the external handles on the deck hatches to
open them for ventilation. Wait for a generous period of time before reentering the
boat (and of course wait for the alarm to silence) and then in conjunction with San
Juan Sailing investigate what might have been the problem.
There is a battery powered, independent smoke detector in each cabin.
Particularly in the case of the saloon detector
(located just ahead of the mast compression post
at the head of the cabin) a confined space such as
KALLISTO's belowdecks might result in a false
alarm, especially due to cooking fumes. A button
on the side of each detector will allow the
detector alarm to acknowledged and temporarily
silenced.
LPG leak detector
21Propane Leak Detector: Leaking propane is denser than air and can collect in
lower recesses of the boat without necessarily being obvious. A detector for this
potential hazard feeds a display and control head, located just forward of the
galley and facing forward. If the detector sounds, leave the cabin immediately,
without manipulating any electrical switches. Using the manual valves in the
propane locker at starboard aft of the cockpit, turn off propane supply. If at dock,
leave the boat entirely and seek further instructions from San Juan Sailing. If
under way or at anchor or a mooring buoy, open as many deck hatches from
outside as possible and then wait a generous period of time before reentering the
boat. If the VHF is already on, it's safe to use the remote mic in cockpit but do not
reenter the boat and manipulate breakers etc. until time has passed for gas to
dissipate. The detector alarms at 20% of the concentration needed for ignition and
is located where the concentration of leaking gas would likely be highest; the
intention here is to provide an early alert, long before gas becomes an explosion
hazard.
Radar reflector: KALLISTO is fitted with a Tri-Lens radar reflector, mounted
above the radar antenna. This unit takes the place of the standard collapsible
corner reflector.
PFDs and throwable flotation: Two automatic inflatable PFDs are in each
cabin’s hanging locker. As well, two throwable flotation cushions are provided per
regulations. Please let us know if you find fewer than 6 PFDs on the boat, or if
you find a throwable flotation cushion to be missing.
Please return PFDs to their normal location when finished with
them. Do not leave PFDs in deck lockers or other non-standard
locations when ending your charter. PFDs need to be in
predictable and known locations in order to be reliable safety
appliances in an emergency.
Annapolis Book of Seamanship: Compared to swifter vehicles such as airplanes,
one of the great things about boats is that emergencies may unfold over a leisurely
period of time, making due consideration and formation of a plan much easier.
Many “emergencies” turn out as nearly routine operations when just a little more
information is available. Thus the Annapolis Book of Seamanship may be
considered an emergency response tool. A copy is in the book rack beneath the
nav desk.
22Handling Under Power
Propulsion:
KALLISTO has a 3-bladed folding “Flexofold”
prop for sailing efficiency, gaining you a
additional speed under sail.
Ensure the prop folds after using the engine.
after engine shutdown andonce under sail, with
the boat moving more than a couple of knots,
click the throttle back to the reverse idle
position, wait a few seconds, then return to
neutral. If you hear or feel an unusual
whirring/thrumming sound or vibration while
under sail, the prop is not folded.
There are many crab pots during certain times
of the year in our cruising grounds. A rope
cutter on the prop shaft improves luck in case
The Engine
you encounter a crab pot line, but of course it’s
better to make even more luck by not running
over pot floats.
Reverse:
• KALLISTO “walks to port” such a small amount that -- unless a reversing
operation near the dock is very prolonged -- prop-walk is not noticeable.
• As with any other boat, allow the shaft to come to a halt when changing from
forward to reverse and vice versa. If this needs to be done very quickly, it’s a hint
of too much speed on the boat.
• Whatever the formal testing indicated, KALLISTO’s reverse is not as powerful at
any given revolution setting in reverse compared to forward. In reality she’ll stop
in a very short distance but this requires authoritative use of the throttle.
• The rudder is an unbalanced design and needs to be held firmly when reversing at
any significant speed
Forward:
• KALLISTO is very responsive to a strong blip of the throttle with rudder set hard
over; the technique is very rewarding in this boat.
• Allow the shaft to fully stop when changing from forward to reverse.
“KLUNK!!” is very hard on the transmission!
23Engine Operation
Absolute maximum RPM for the engine is 3,200. The engine manufacturer
specifies that this speed not be used more than 5% of engine operation time.
Operation from 2,800 RPM to 3000 RPM should not be for more than 20% of
engine operation time. Please DO NOT EXCEED 2800 RPM except in cases of
genuine need for emergency speed.
KALLISTO's engine is a very reliable Yanmar 3JH with 3 cylinders and 39HP output.
Engine monitoring:
Tachometer, oil pressure and coolant temperature are available on the boat’s
instrumentation network. In particular it’s helpful not to need to stoop to see the engine
RPMs.
• Repeatedly press the up or down arrow on the inboard starboard ST70 helm
display to access engine parameters.
• The electronic tach display is damped, so when using it to adjust RPM, advance
or retard the throttle relatively slowly.
• Oil pressure, coolant temperature and alternator problems will cause a lamp to
illuminate and a horn to sound at the helm engine controls. A separate alarm
monitors raw water flow (covered later in this section).
What RPM to run?
Experimenting with adjusting the throttle between 2000 and 2800 RPM reveals that
running at 6.5 knots at 2200 RPM is a much better deal than increasing fuel consumption
a lot to get the last knot of permissible engine-powered speed from the boat by running at
2800 RPM. In sum, extra RPMs beyond 2200 are rarely worth it.
Precise passage planning and dead reckoning in the San Juans is extremely
difficult due to constantly shifting currents. We’ve found that planning on an
average speed of 5 knots when under power generally produces decently reliable
ETAs.
With winds of 8-9 knots or better KALLISTO can very often travel faster (attain
better overall VMG) under sail than power.
The engine compartment contains exposed moving parts that could cause
injury, including belts and pulleys. To ensure that confusion can’t lead to an
injury, remove the key from the ignition switch prior to checking belt tension,
oil level etc. Although it’s best avoided, if it is necessary to start the engine with the
compartment open use extreme caution, do not allow clothing or hair to dangle near
the engine when it is operating, and be extremely aware of where your hands and
fingers are going in relation to the engine.
24You can also read