The Teaching and Learning Center - Smart Classroom Operation Manual: Advanced Level III Classroom
←
→
Page content transcription
If your browser does not render page correctly, please read the page content below
The Teaching and Learning Center

           Smart Classroom Operation Manual:
                   Advanced Level III Classroom

Teaching and Learning Center
Dr. Joe Zisk and C.J. DeJuliis
Email: tlc@calu.edu
Phone: 724-938-4168

UTech Services
Phone: 724-938-5991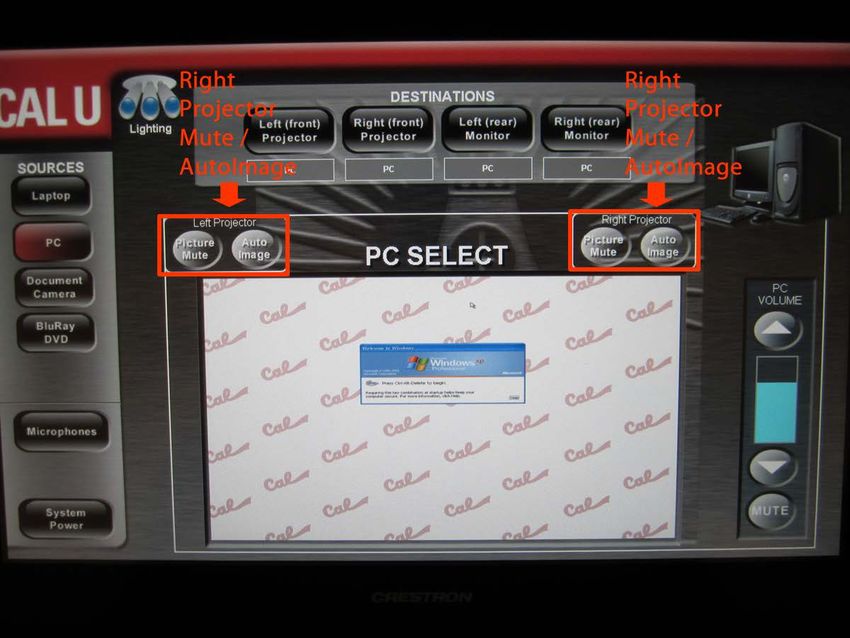
TABLE OF CONTENTS

Local Classroom Mode . . . . . . . . . . . . . . . . . . . . . 1

Source Routing/Source Volume . . . . . . . . . . . . . . . . . 2

Picture Mute/Auto Imaging . . . . . . . . . . . . . . . . . . . 3

Microphones   . . . . . . . . . . . . . . . . . . . . . . .     . 4

Document Camera. . . . . . . . . . . . . . . . . . . . . . . 5

BluRay DVD . . . . . . . . . . . . . . . . . . . . .        . . . 6

System Power . . . . . . . . . . . . . . . . . . . . . . . . 7

Call Classroom-To-Classroom . . . . . . . . . . . . . . . . . . 8

Call Any Classroom on Any Campus . . . . . . . . . . . . . . . 9

Display PC . . . . . . . . . . . . . . . . . . . . . . . . . 11

Display Document Camera . . . . . . . . . . . . . . . . . . . 12

Teaching Camera/Student Cameras. . . . . . . . . . . . . . . . 13

Send Multiple Sources to the Far-End. . . . . . . . . . . . . . . 14

Shutdown . . .   . . . . . . . . . . . . . . . . . . . . . . 15

Shutdown Confirmation   . . . . . . . . . . . . . . . . . . . 16

Student Nameplates . . . . . . . . . . . . . . . . . . . . . 17

Polling . . . . . . . . . . . . . . . . . . . . .     . . . . . 19
Advanced Classroom Manual

              Advanced classrooms are located in Keystone 209, Eberly 120 and Duda 117.

These classrooms are identical to the intermediate rooms in that they have two operation modes: Local
Classroom Presentation or Classroom to Classroom. The only difference between the advanced
classroom and intermediate classroom is the student nameplates, student push-to-talk microphones,
and interactive polling.

Classroom Presentation Mode:

This is the main “home” screen of the touchpanel for all intermediate classrooms. Located in the top
right corner are buttons to control the lighting, microphone volume, and recording. To enter
Presentation Mode, simply press “System Start Presentation”.

With the press of this single button, the projection screens will lower, the projectors will turn on, the
lights will dim to the appropriate level, and the PC will be automatically displayed on both projection
screens.

                                                      1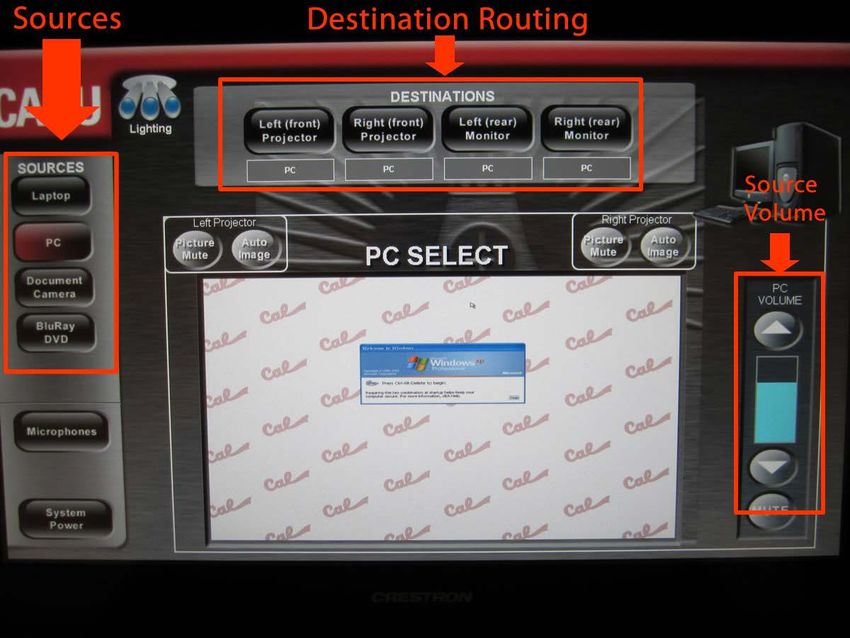
Source Routing

Once the system has turned on, you will be able to route any source (Laptop, PC, Document Camera, or
BluRay DVD) to any destination (Left Projector, Right Projector, Left Monitor, Right Monitor). To display
the PC through the system, first select “PC” from the sources column. Once selected, the button will
turn red to show it is the active source. Then, in the destination bar at the top of the touchpanel, press
the destination where you would like the PC to be shown. In the photo above, we have routed the PC to
both projectors and both rear monitors.

By default, the rear monitors “duplicate” the projector’s source. So, if laptop is being shown on the left
projector, the left monitor will also switch to laptop. However, you can override what is being shown on
the monitor by manually routing a source to that destination.

Source Volume
On the right side of the touchpanel is the volume control for the selected source. In the example above,
since PC is selected, you control the volume of the PC using the volume bar. A blue status bar provides a
visual indication of the volume level. Simply press the up arrow to turn up the volume, the down arrow
to turn down the volume, or the mute button to turn off the audio.

                                                    2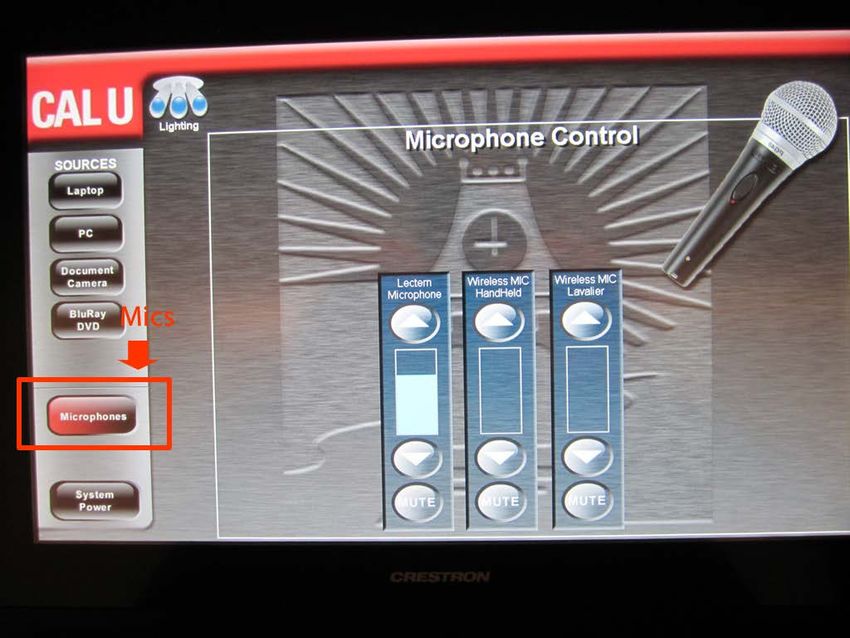
Picture Mute
Picture Mute is the ability to “blank” the image on the projector so no one can see what’s being
displayed through the projects. For example, if a professor is showing his/her laptop, but must check an
email, by pressing “Picture Mute” the screen will go black. After checking your email, you can press
Picture Mute again and the laptop will again be shown on the screen.

Auto Image
Sometimes when connecting a PC or a laptop to the system, the projector may crop the image or show
the image in an incorrect resolution. Simply press “Auto Image” and the system will resync the image
and correct the problem.

                                                   3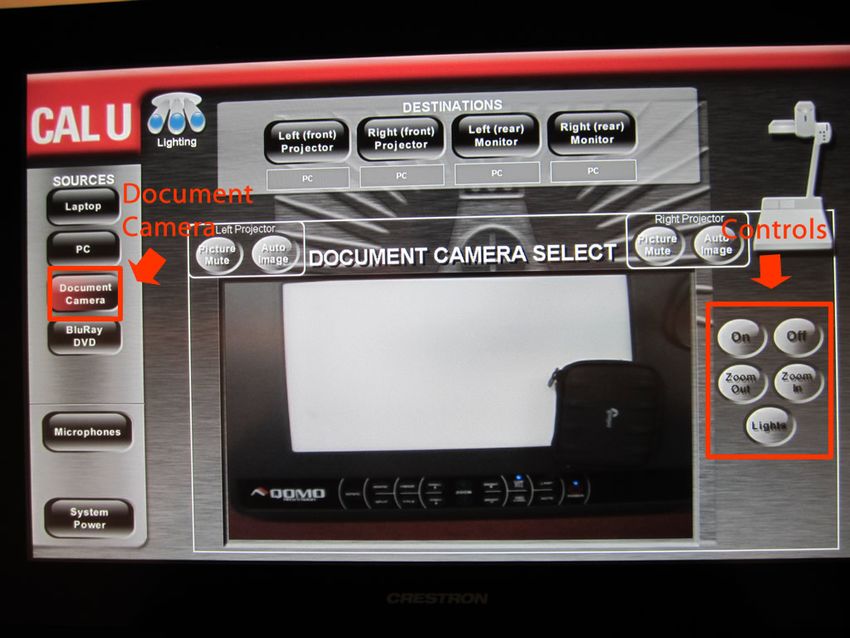
Microphones
Under your source selections, you have the ability to control the room’s microphone volume. Simply
select the “Microphones” button to bring up the microphones volume levels. The microphones are
grouped into three categories: lectern mic, wireless handheld, and wireless lavalier. Each of these three
styles of microphones have their own volume controls. For example, a soft spoken professor may need
to turn up the lectern microphone very high, but a loud spoken presenter might need a lower volume
level on the handheld microphone.

                                                    4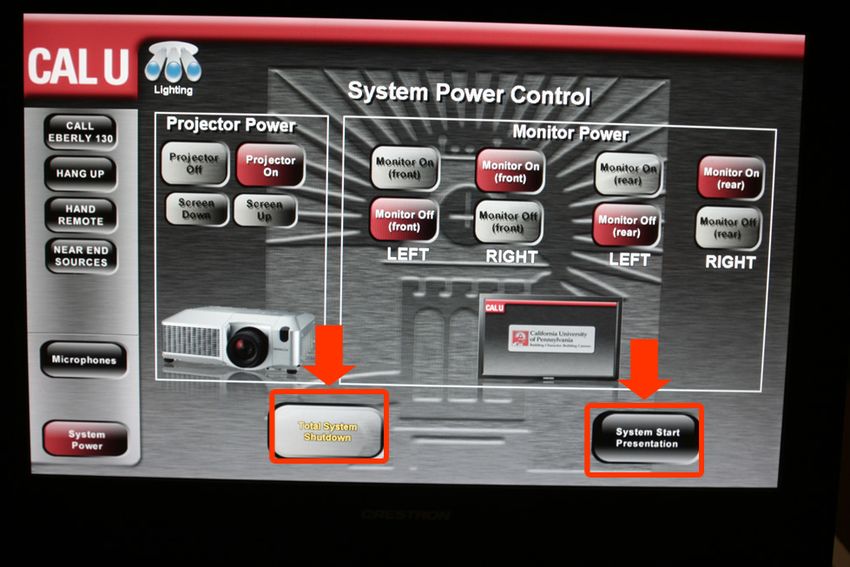
Document Camera
The document camera is a source that can be displayed through the system. A document camera allows
the presenter to display any three dimensional object to the class through the projection system.
Common uses are professors writing on a standard sheet of paper under the document camera rather
than the chalk boards, displaying very small objects since the document camera has a powerful zoom
tool, or showing fragile or expensive objects that you do not want to pass around the room.

On the right side of the touchpanel, the presenter has the ability to control the document camera. The
buttons include On, Off, Zoom In, Zoom Out, and Light. The “Light” button toggles through two lights on
the document camera in order to provide the best lighting for your object.

                                                  5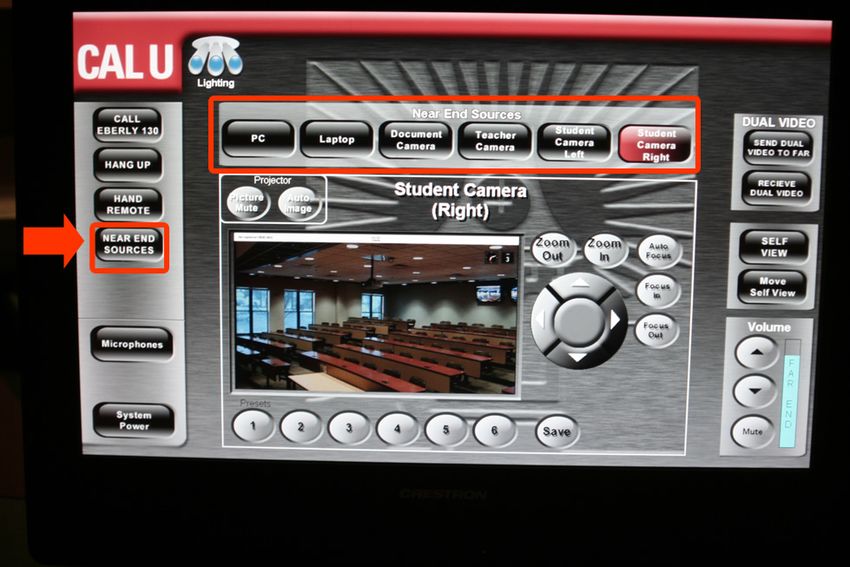
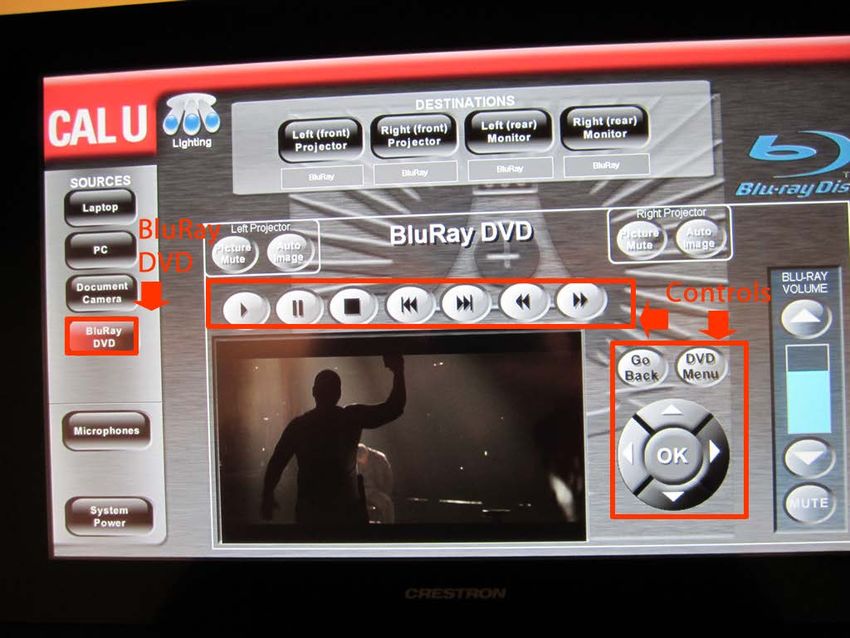
BluRay DVD
The presenter can select to display a BluRay DVD through the system. From the source selection screen,
simply press the BluRay DVD button. After this button is pressed, the presenter now has the ability to
control all aspects of the BluRay. Buttons available include play, pause, stop, last chapter, next chapter,
rewind, fast forward, go back, dvd menu, up, down, left, right, and ok.

                                                     6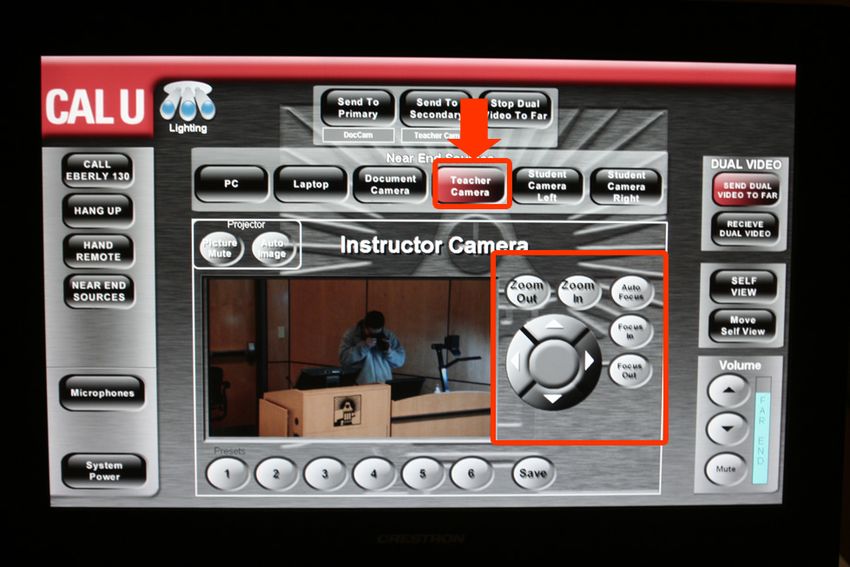
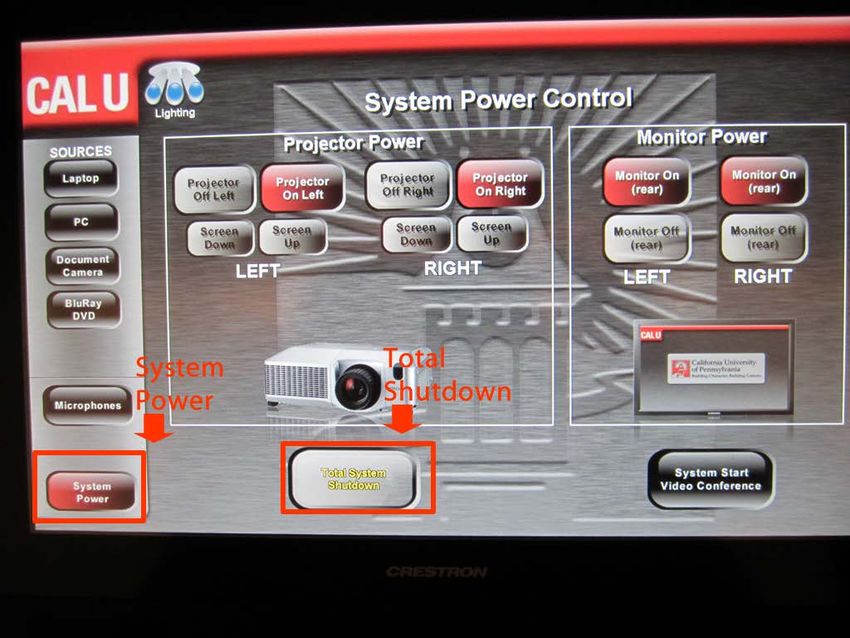
System Power
When you are finished using the classroom technology system, select “System Power” on the left side of
the touchpanel. The screen above will now be active. You have the ability to shut off individual
projectors, screens, or monitors; or you can shut down the entire system. 99% of the time, you will use
“Total System Shutdown” to shut down the entire room.

                                                   7
Classroom to Classroom Mode:

This is the main “home” screen of the touchpanel for all intermediate classrooms. Located in the top
right corner are buttons to control the lighting and microphone volume. To enter Classroom to
Classroom Mode, simply press “System Start Video Conference”.

With the press of this single button, the projection screens will lower, the projectors will turn on, the
lights will dim to the appropriate level, and the PC will be automatically displayed on both projection
screens.

                                                     8
Call Any Classroom on Any Campus:
If you wish to dial a classroom on Cal U’s campus or any other campus, you simply enter the IP address
using the numbered keypad with the “*” acting as the period. For example, to dial 192.168.1.1, you
would enter 192*168*1*1. If the classroom you wish to connect to is a connected to often from Cal U,
simply press the directory button and navigate using the arrow keys on the touchpanel to find the
classroom in the address book. Classrooms at Clarion, Southpointe, and other Cal U classrooms are
preprogrammed into the address book.
9Once connected to a classroom, press the “Near End Sources” button to select what source you would
like to display in both your local classroom and the far-end classroom. All sources available for sending
are listed horizontally across the top of the screen. These sources include PC, laptop, document camera,
teacher camera, student camera left, and student camera right.
10Display PC
You can display the local PC located in the lectern by pressing the “PC” button. This PC will be shown
both in your classroom and the classroom you’re connected to.
11Display Document Camera
You can display the document camera by pressing the “Document Camera” button. The document
camera will be shown both in your classroom and the classroom you’re connected to.
12Teacher Camera/Student Cameras
Instead of the far-end classroom staring at a PowerPoint presentation for the entire class, it is suggested
that the professor often switch the source to “Teacher Camera”. This will show the far-end classroom
the professor teaching. You can zoom-in/out and position the camera to best fit your teaching stance
using the arrow buttons located in the orange box above. The same is true of the student cameras.
13Send Multiple Sources to the Far-End
Just as in local presentation mode, if you wish to send two sources to the far-end classroom, you have
the ability to do so. Simply press the “Send Dual Video to Far” located on the right side of the
touchpanel. You will then need to route a source to the primary and secondary display located
horizontally at the top of the touchpanel. Just as in local mode, select the source, then press “send to
primary”. In this example, Doc Cam has been sent to Primary and Laptop has been send to Secondary.
To exit Dual Video mode, select “Stop Dual Video to Far”.
14ShutDown
To shut down the entire system, select “System Power” on the left side of the touchpanel. You will now
have the option for “Total System Shutdown” or “System Start Presentation”. If you select “System
Start Presentation”, you will enter normal, local operation mode. To shut down the system, select
“Total System Shutdown”.
15Shutdown Confirmation
Once “total shutdown” is selected, you will be asked to confirm shutdown. If you confirm shutdown, all
equipment in the room will shutdown.
16Student Nameplates
Once the professor presses “Activate Nameplates” from the touchpanel, the students now have the
ability to enter their names into the student touchpanel located at each seat location.
Using the digital keyboard, the student should type their first name and then press the enter button.
Then they should type their last name.
17Once they enter their name, the student will see a confirmation screen. Simply press “Enter” and the
student’s name will be displayed on the LED screen located in front of their seat.
18POLLING
The professor can activate student polling by pressing “Enable Polling” on the teacher’s touchpanel.
This will enter the student nameplates into polling mode.
The student can then use the buttons on the left side of the student touchpanel to select: A,B,C,D, or E.
The professor will see real time results on the professor’s touchpanel.
19The professor can then decide to show the results to students by pressing the “Show Results to
Students”. This button will distribute the polling results to each individual student panel. To take
another poll, the professor simply presses “Start Poll” and the current results will be cleared.
20The above photo is an example of what the student’s will see when the professor sends the poll results
to the student touchpanels.
21You can also read