BEYONDINSIGHT FOR UNIX & LINUX 22.2 USER GUIDE - BEYONDTRUST
←
→
Page content transcription
If your browser does not render page correctly, please read the page content below
BeyondInsight for Unix & Linux 22.2
                               User Guide

©2003-2022 BeyondTrust Corporation. All Rights Reserved. Other trademarks identified on this page are owned by their respective owners. BeyondTrust is not a chartered bank or trust company, or   TC:6/29/2022
depository institution. It is not authorized to accept deposits or trust accounts and is not licensed or regulated by any state or federal banking authority.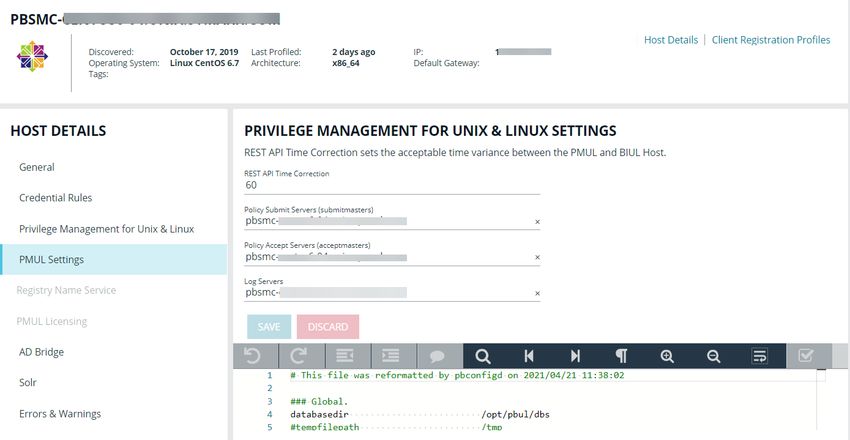
BEYONDINSIGHT FOR UNIX & LINUX 22.2
                                                                                                                                                                                                   USER GUIDE

                                 Table of Contents

                                      BeyondInsight for Unix & Linux User Guide                                                                                                    5
                                          Overview                                                                                                                                 5
                                          Run BeyondInsight for Unix & Linux                                                                                                       7

                                              Set Up the Console Using the First-Run Wizard                                                                                        7
                                              View the BeyondInsight for Unix & Linux Home                                                                                         7
                                              View the BeyondInsight for Unix & Linux Dashboard                                                                                    8
                                          Hosts Inventory with BeyondInsight for Unix & Linux                                                                                      9
                                              Discover Host Methods                                                                                                                9
                                              Use the BeyondInsight for Unix & Linux Hosts Inventory Grid                                                                        12
                                              Use Privilege Escalation for BeyondInsight for Unix & Linux Credentials                                                            15
                                              Profile Servers in BeyondInsight for Unix & Linux                                                                                  15
                                              Manage AD Bridge Hosts                                                                                                             16
                                              Manage Privilege Management for Unix and Linux Hosts                                                                               18
                                              Install and Manage Solr                                                                                                            20
                                              Deploy Keyfiles                                                                                                                    22
                                              Delete Hosts                                                                                                                       23
                                              View Host Details                                                                                                                  23
                                              Manage Client Registration Profiles                                                                                                25
                                          Use SSH Keys                                                                                                                           28

                                          Manage SSH Fingerprints                                                                                                                29
                                          Use Host Credential Rules                                                                                                              30
                                          Manage the Registry Name Service                                                                                                       32
                                              Manage Registry Name Service Groups                                                                                                32
                                              Manage Policy Service Groups                                                                                                       33
                                              Manage File Integrity Monitoring Service Groups                                                                                    33
                                              Manage Privilege Management for Networks Service Groups                                                                            34
                                              Manage Log Server Service Groups                                                                                                   35
                                              Manage Log Archive Service Groups                                                                                                  35
                                          Configure Settings and Manage Software                                                                                                 37
                                              Manage BeyondInsight for Unix & Linux Settings                                                                                     37
                                              Add a Directory Service Connection                                                                                                 39

SALES: www.beyondtrust.com/contact             SUPPORT: www.beyondtrust.com/support                 DOCUMENTATION: www.beyondtrust.com/docs                                                                     2
©2003-2022 BeyondTrust Corporation. All Rights Reserved. Other trademarks identified on this page are owned by their respective owners. BeyondTrust is not a chartered bank or trust company, or     TC: 6/29/2022
depository institution. It is not authorized to accept deposits or trust accounts and is not licensed or regulated by any state or federal banking authority.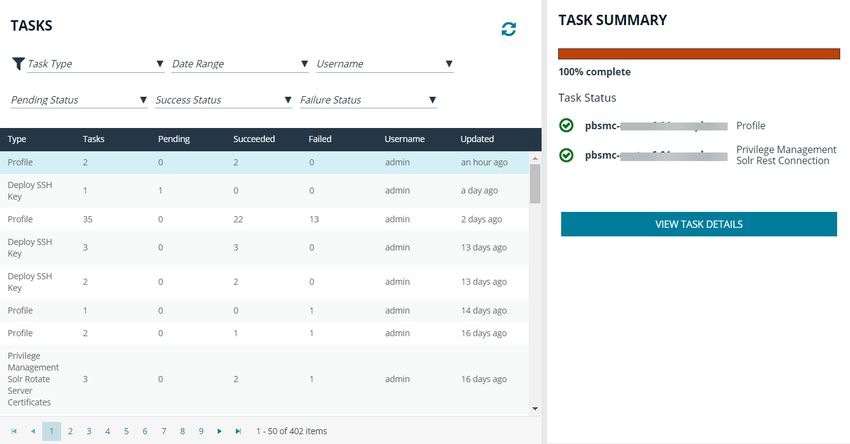
BEYONDINSIGHT FOR UNIX & LINUX 22.2
USER GUIDE
Manage BeyondInsight for Unix & Linux Console Access 40
Configure Role-Based Access 43
Integrate Password Safe with BeyondInsight for Unix & Linux 44
Configure the Privilege Management for Unix and Linux Integration 47
Manage Software 47
Manage SIEM Connections 49
Add SMTP Server Connection 50
Manage Privilege Management for Unix and Linux Policies 51
Manage Privilege Management for Unix and Linux Role Based Policies 54
Manage Role Based Policy Roles 55
Manage Role Based Policy Users and User Groups 60
Manage Role Based Policy Command Groups 63
Manage Role Based Policy Host Groups 64
Manage Role Based Policy Schedule Groups 64
Manage Role Based Policy Backup and Restore 66
Manage Privilege Management for Networks Policies 66
Manage Sudo Policies 70
Manage File Integrity Monitoring Policies 71
File Integrity Monitoring Reports 73
File Integrity Monitoring Clients 74
Manage Privilege Management for Unix and Linux Script Policies 76
View Privilege Management for Unix and Linux Settings 77
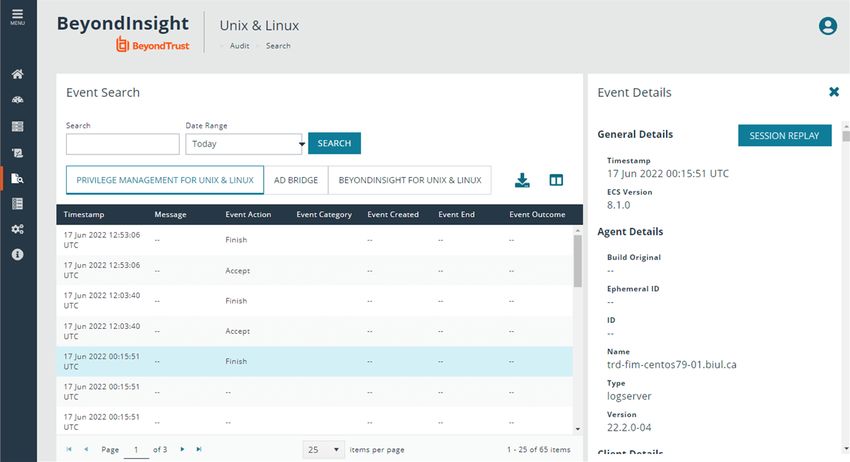
Audit Activity Using BeyondInsight for Unix & Linux 79
Perform a Unified Search 79
View PMUL Events 80
View Console Audit Activities 81
Replay Sessions in BeyondInsight for Unix & Linux 81
Enable Session Recording in Script Policy Mode 81
Enable Session Recording in Role-Based Policy Mode 82
Play a Recorded Session 82
View Entitlement Reports 82
Manage Certificates 84
Manage Credentials in BeyondInsight for Unix & Linux 86
SALES: www.beyondtrust.com/contact SUPPORT: www.beyondtrust.com/support DOCUMENTATION: www.beyondtrust.com/docs 3
©2003-2022 BeyondTrust Corporation. All Rights Reserved. Other trademarks identified on this page are owned by their respective owners. BeyondTrust is not a chartered bank or trust company, or TC: 6/29/2022
depository institution. It is not authorized to accept deposits or trust accounts and is not licensed or regulated by any state or federal banking authority.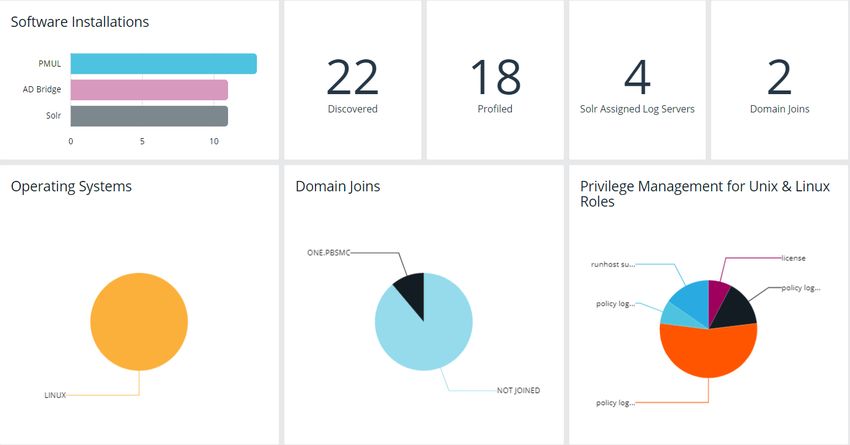
BEYONDINSIGHT FOR UNIX & LINUX 22.2
                                                                                                                                                                                                   USER GUIDE

                                          View Tasks and Task Details in BeyondInsight for Unix & Linux                                                                          87
                                          Troubleshoot Common Issues with BeyondInsight for Unix & Linux                                                                         89
                                              Troubleshoot Password Safe Issues                                                                                                  89

SALES: www.beyondtrust.com/contact             SUPPORT: www.beyondtrust.com/support                 DOCUMENTATION: www.beyondtrust.com/docs                                                                     4
©2003-2022 BeyondTrust Corporation. All Rights Reserved. Other trademarks identified on this page are owned by their respective owners. BeyondTrust is not a chartered bank or trust company, or     TC: 6/29/2022
depository institution. It is not authorized to accept deposits or trust accounts and is not licensed or regulated by any state or federal banking authority.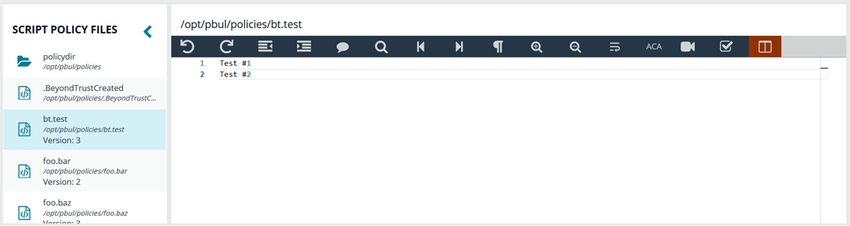
BEYONDINSIGHT FOR UNIX & LINUX 22.2
                                                                                                                                                                                                   USER GUIDE

      BeyondInsight for Unix & Linux User Guide
      This guide shows system administrators and security administrators how to configure and use BeyondInsight for Unix & Linux. It provides
      an overview of how BeyondInsight for Unix & Linux works and instructions for its configuration and use.

      BeyondTrust Product Name Conventions
      This guide uses the following naming conventions for BeyondTrust products:

       BeyondInsight for Unix & Linux                                                                       BIUL
       (formerly PowerBroker Servers Management Console)
       Privilege Management for Unix and Linux                                                              PMUL
       (formerly PowerBroker for Unix and Linux)
       Solr                                                                                                 Solr
       (formerly PowerBroker Solr)
       File Integrity Monitoring                                                                            FIM
       Advanced Control and Audit                                                                           ACA
       Role Based Policy                                                                                    RBP

      Overview
      BeyondInsight for Unix & Linux is a web-based tool that you can use to:

             l   Manage software for AD Bridge, Privilege Management for Unix and Linux, and Solr.
             l   Remotely assess the suitability of a remote host's state by running a profile. After a profile is complete, installs, uninstalls, domain
                 joins, and other actions can be performed on remote hosts.
             l   Manage Privilege Management for Unix and Linux licenses on policy servers.
             l   Manage Privilege Management for Unix and Linux script, File Integrity Monitoring (FIM), and role-based policies.
             l   Manage Sudo host groups and FIM policy host assignment.
             l   View, replay, and audit Privilege Management for Unix and Linux logs.

      Core Features

             l   Dashboard: Provides visual insight into host and software metrics.
             l   Host Discovery: The first stage of adding any remote hosts to be managed by the console. Hosts available by SSH are added.
             l   Hosts Inventory:The central page of the console. On the Hosts > Hosts Inventory page, you can profile targets, install, and
                 uninstall AD Bridge, Privilege Management for Unix and Linux, and Solr. Additionally, you can remove hosts, upgrade software,
                 join hosts to domains, manage SSH fingerprints, and assign log servers to be indexed by Solr.
             l   Credentials: Manage user credentials for remote assets (typically SSH credentials).
             l   SSH Fingerprints: Manage SSH fingerprints for remote hosts.
             l   Registry Name Service: Manage Privilege Management for Unix and Linux Registry Name Service systems.
             l   Policy Management: Allows for management of Privilege Management for Networks, FIM, and role-based and script-based
                 policies on Privilege Management for Unix and Linux policy servers.

SALES: www.beyondtrust.com/contact             SUPPORT: www.beyondtrust.com/support                 DOCUMENTATION: www.beyondtrust.com/docs                                                                     5
©2003-2022 BeyondTrust Corporation. All Rights Reserved. Other trademarks identified on this page are owned by their respective owners. BeyondTrust is not a chartered bank or trust company, or     TC: 6/29/2022
depository institution. It is not authorized to accept deposits or trust accounts and is not licensed or regulated by any state or federal banking authority.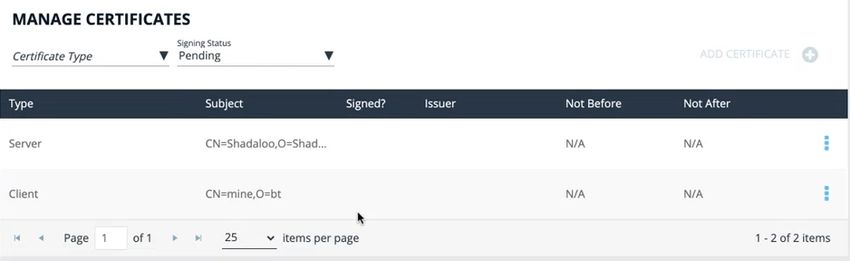
BEYONDINSIGHT FOR UNIX & LINUX 22.2
                                                                                                                                                                                                   USER GUIDE

             l   Audit: View, replay, and audit Privilege Management for Unix and Linux events and I/O logs. I/O logs can be replayed as they
                 occurr. Users can add comments on the logs. Query and view PMUL and AD Bridge events that have been exported to an external
                 SIEM.
             l   Tasks: Provides details about results and status of any remote actions performed by the console.
             l   Settings: Configuration settings available to the end user, including integration settings for products like Password Safe.

SALES: www.beyondtrust.com/contact             SUPPORT: www.beyondtrust.com/support                 DOCUMENTATION: www.beyondtrust.com/docs                                                                     6
©2003-2022 BeyondTrust Corporation. All Rights Reserved. Other trademarks identified on this page are owned by their respective owners. BeyondTrust is not a chartered bank or trust company, or     TC: 6/29/2022
depository institution. It is not authorized to accept deposits or trust accounts and is not licensed or regulated by any state or federal banking authority.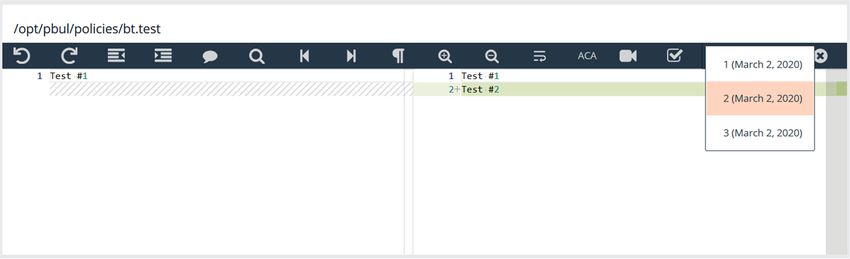
BEYONDINSIGHT FOR UNIX & LINUX 22.2
                                                                                                                                                                                                   USER GUIDE

      Run BeyondInsight for Unix & Linux
      Log in to the console using a supported browser: https://localhost:4443. If this is your first time logging into the console, the first-run wizard
      starts.

                     IMPORTANT!

         If the wizard starts and this is not the first time the console has been run, do not go through the wizard again. All data in the system will
         be lost. Contact BeyondTrust Technical Support.

      Set Up the Console Using the First-Run Wizard
      If this is the first time you are logging on to the console, complete the wizard and configurethe system settings.

      Configure BeyondInsight for Unix & Linux
      The following sections match the layout of the First Run Wizard in BeyondInsight for Unix & Linux. Please follow along for assistance with
      BIUL's initial configuration and setup.

            1. Welcome: Read the available information carefully to ensure a smooth configuration process.

                   Note: Proceeding will reset the database to its initial state. This is an unrecoverable action.

            2. Users:
                        l   Create the administrative accounts that will be used to log into the console. On this step, you can add multiple accounts.
                        l   Click Save after entering each new account to confirm the account details and to populate a list of accounts under
                            Configured Host Users.
                        l   To delete an account, click the Delete icon next to the account's name.
                        l   When you've added the desired number of accounts, click Next Step.
            3. Credentials Create credentials for remote hosts. The credentials are used to connect to the remote hosts.
            4. Summary: Review the settings and save. You are now able to log in to the console using the administrator account you created in
               the wizard.

      View the BeyondInsight for Unix & Linux Home
      The Home screen allows administrators to view BeyondInsight for Unix & Linux options on the landing page for easy access. The options
      include:

             l   Host Inventory: Discover, add, and manage hosts for BeyondInsight for Unix & Linux.
             l   Settings: Configure BeyondInsight for Unix & Linux.
             l   Audit: View, replay, and audit Privilege Management for Unix and Linux logs.
             l   Policy Management: Create, edit, and modify policies on managed Policy Servers.
             l   Tasks: View jobs executed by BeyondInsight for Unix & Linux.

SALES: www.beyondtrust.com/contact             SUPPORT: www.beyondtrust.com/support                 DOCUMENTATION: www.beyondtrust.com/docs                                                                     7
©2003-2022 BeyondTrust Corporation. All Rights Reserved. Other trademarks identified on this page are owned by their respective owners. BeyondTrust is not a chartered bank or trust company, or     TC: 6/29/2022
depository institution. It is not authorized to accept deposits or trust accounts and is not licensed or regulated by any state or federal banking authority.
BEYONDINSIGHT FOR UNIX & LINUX 22.2
USER GUIDE
View the BeyondInsight for Unix & Linux Dashboard
The dashboard provides an easy-to-read visual summary of the console data metrics.
Summary Metrics
The top section of the dashboard displays the following details:
l Software Installations: Lists the products and the number of hosts where the product is installed.
l Discovered: The number of discovered and available hosts.
l Profiled: The number of successfully profiled hosts.
l Solr Assigned Log Servers: The number of log servers using Solr indexing.
l Domain Joins: The number of hosts joined to a domain.
Charts
The following statistics are provided:
l Operating Systems: Displays the most common operating systems discovered on the network.
l Domain Joins: Displays the most common domains joined by discovered hosts.
l Privilege Management for Unix and Linux Roles: Displays the most common PMUL roles discovered on hosts.
SALES: www.beyondtrust.com/contact SUPPORT: www.beyondtrust.com/support DOCUMENTATION: www.beyondtrust.com/docs 8
©2003-2022 BeyondTrust Corporation. All Rights Reserved. Other trademarks identified on this page are owned by their respective owners. BeyondTrust is not a chartered bank or trust company, or TC: 6/29/2022
depository institution. It is not authorized to accept deposits or trust accounts and is not licensed or regulated by any state or federal banking authority.BEYONDINSIGHT FOR UNIX & LINUX 22.2
USER GUIDE
Hosts Inventory with BeyondInsight for Unix & Linux
On the Hosts Inventory page, you can find hosts that are accessible using SSH. Discovered assets are stored as hosts and can also be
managed on the Hosts Inventory page.
This stage does not require a credential. It performs a port scan to test for an SSH connection.
Hosts are discovered in parallel batches to avoid saturating the network connection. The default size is 20. This can be configured by
changing the pool settings option.
For more information, please see Configure BIUL at https://www.beyondtrust.com/docs/privilege-
management/console/beyondinsight-unix-linux/install/configure.htm.
Discover Host Methods
Hosts are discovered through the following methods:
l Scan for Hosts
l Import Hosts
l Scan the Registry Name Service
To access any of these methods, on the Host Inventory page, click the Add Hosts dropdown menu.
Note: While using any of these methods, the grid refreshes automatically every 5 seconds.
Scan for Hosts
IP addresses can be added using one of the following formats:
l Single IP: To discover a single host, type the IP address. For example, 10.1.100.15.
l IP Range: Discover any hosts in a range. For example, 10.1.100.15–10.1.100.20.
l CIDR Notation: Discover hosts in a CIDR block. For example, 10.100.1.10/24.
SALES: www.beyondtrust.com/contact SUPPORT: www.beyondtrust.com/support DOCUMENTATION: www.beyondtrust.com/docs 9
©2003-2022 BeyondTrust Corporation. All Rights Reserved. Other trademarks identified on this page are owned by their respective owners. BeyondTrust is not a chartered bank or trust company, or TC: 6/29/2022
depository institution. It is not authorized to accept deposits or trust accounts and is not licensed or regulated by any state or federal banking authority.BEYONDINSIGHT FOR UNIX & LINUX 22.2
USER GUIDE
To manually discover hosts:
1. Enter the IP addresses using one of the accepted formats.
2. Enter an SSH port. The value should map to the SSH port for the
host provided. If no SSH port is provided, the default port is 22.
Each discovery scan uses a single port regardless of the number of
machines.
Note: To update the SSH port for the host, navigate to Host
Details. The value can then be configured under General >
Connection Details.
3. When discovering a single host, you can enter an SSH fingerprint
using SHA-256 format. If the value matches the received fingerprint,
the host is automatically accepted. This is optional and only applies
when performing single IP discovery.
4. Check the Automatically accept SSH fingerprints box to accept
all SSH fingerprints for discovered hosts. If the host already exists in
the system, the SSH fingerprint is ignored.
5. Click Scan for Host.
Tip: Search for non-sequential IP addresses at the same time by entering each IP address before clicking Scan for Host.
Import Hosts
To import hosts, create a CSV file with a host address, port, and SSH fingerprint (optional) per line. Do not use headers in the file.
The contents of a valid file may look like the following:
"10.100.3.6",22,SHA256:HASHED-KEY
"10.100.3.7",22,SHA256:HASHED-KEY
"10.100.3.8",22,SHA256:HASHED-KEY
"10.100.3.9",22,SHA256:HASHED-KEY
Note: The CSV file can contain fingerprints in the SHA-256 format. If the fingerprint matches, the SSH fingerprint is accepted.
SALES: www.beyondtrust.com/contact SUPPORT: www.beyondtrust.com/support DOCUMENTATION: www.beyondtrust.com/docs 10
©2003-2022 BeyondTrust Corporation. All Rights Reserved. Other trademarks identified on this page are owned by their respective owners. BeyondTrust is not a chartered bank or trust company, or TC: 6/29/2022
depository institution. It is not authorized to accept deposits or trust accounts and is not licensed or regulated by any state or federal banking authority.BEYONDINSIGHT FOR UNIX & LINUX 22.2
USER GUIDE
To import a CSV file:
1. On the Host Inventory page, click the targeted area to upload a
CSV file in the Import Hosts pane. Alternatively, drag the file into
the targeted area.
2. Check the Automatically accept SSH fingerprints from new
hosts box to automatically accept discovered fingerprints.
3. Locate the CSV file, and then click Open.
Scan the Registry Name Service
The Registry Name Service can be scanned in order to discover hosts. This scans the servers listed in Primary Registry Servers for all
of the hosts in the network, adding previously unknown hosts to the console as appropriate.
To scan the Registry Name Service:
1. In the Registry Name Service section, enter an SSH Port. The
value should map to the SSH port for the host provided. If no SSH
port is provided, the default port is 22. Each discovery scan uses a
single port regardless of the number of machines.
2. Check the Automatically accept SSH fingerprints box to accept
all SSH fingerprints for discovered hosts. If the host already exists in
the system, the SSH fingerprint is ignored.
3. Click Scan Registry Name Service.
For more information on the Scan Registry Name Service action, please see the Tasks > Task Details page. Any new hosts
found will appear on the Hosts > Hosts Inventory page.
SALES: www.beyondtrust.com/contact SUPPORT: www.beyondtrust.com/support DOCUMENTATION: www.beyondtrust.com/docs 11
©2003-2022 BeyondTrust Corporation. All Rights Reserved. Other trademarks identified on this page are owned by their respective owners. BeyondTrust is not a chartered bank or trust company, or TC: 6/29/2022
depository institution. It is not authorized to accept deposits or trust accounts and is not licensed or regulated by any state or federal banking authority.BEYONDINSIGHT FOR UNIX & LINUX 22.2
USER GUIDE
Use the BeyondInsight for Unix & Linux Hosts Inventory Grid
On the Hosts > Hosts Inventory page, you can manage hosts and software deployments. A smart form assists in generating actions to
run on one or many hosts, and you are notified when actions are complete. Hosts can be filtered by Hostname, IP Address, Operating
System, and Tags.
Most actions require credentials be provided so the console can authenticate with the selected host. Credentials are managed on the
Credentials page.
For more information, please see the following:
l "View Tasks and Task Details in BeyondInsight for Unix & Linux" on page 87
l "Manage Credentials in BeyondInsight for Unix & Linux" on page 86
Use the Hosts Inventory Grid
The Hosts Inventory page displays all the assets found during a discovery.
Click on the Hostname and Updated headers to sort and refresh the grid. When performing an action, you can quickly select all of the
hosts in a grid by checking the box in the header row. To view more details about a host, select a host, and then at the far right, click the
ellipsis menu icon and select View Host Details.
For more information on adding hosts, please see "Hosts Inventory with BeyondInsight for Unix & Linux" on page 9.
SALES: www.beyondtrust.com/contact SUPPORT: www.beyondtrust.com/support DOCUMENTATION: www.beyondtrust.com/docs 12
©2003-2022 BeyondTrust Corporation. All Rights Reserved. Other trademarks identified on this page are owned by their respective owners. BeyondTrust is not a chartered bank or trust company, or TC: 6/29/2022
depository institution. It is not authorized to accept deposits or trust accounts and is not licensed or regulated by any state or federal banking authority.BEYONDINSIGHT FOR UNIX & LINUX 22.2
USER GUIDE
Select Which Columns to View
You can select which columns to view in the grid. To select which columns to view, at the right of the grid, click the Columns icon, and
then check the boxes for the columns you want to appear in the grid.
Download the Results Data
You can download the results data as a JSON or CSV file. To download a results file, click the Download icon, and then select JSON File
or CSV File. The file downloads to your Download folder.
Primary Server Columns
The following indicators are possible:
Privilege Indicates Primary License servers.
Management for
Unix and Linux
License Primary
Registry Name Indicates Primary Registry Name Service servers.
Service Primary
Hostname Column
The DNS name of the host. This column also contains the host IP address, operating system, and version.
Alerts Column
The following indicators are possible:
Error Indicates a critical issue with the host.
Warning Indicates a problem with the host.
Install Status Columns
The following columns provide information on installed components. The available columns are:
AD Bridge
If AD Bridge is installed, the AD Bridge column displays the software version number, agent, and joined status.
l Agent: Indicates if the agent is installed.
l Joined: Indicates the domain joined status, which will either display it is not joined or the domain the host is joined to.
SALES: www.beyondtrust.com/contact SUPPORT: www.beyondtrust.com/support DOCUMENTATION: www.beyondtrust.com/docs 13
©2003-2022 BeyondTrust Corporation. All Rights Reserved. Other trademarks identified on this page are owned by their respective owners. BeyondTrust is not a chartered bank or trust company, or TC: 6/29/2022
depository institution. It is not authorized to accept deposits or trust accounts and is not licensed or regulated by any state or federal banking authority.BEYONDINSIGHT FOR UNIX & LINUX 22.2
USER GUIDE
PMUL
If Privilege Management for Unix and Linux is installed, the PMUL column displays the version number and an icon for each feature and
role the host has enabled.
l Policy: Policy server
l Log: Log server
l Client: Submit or run host
l FIM: FIM policy applied to the server
l License: License server
l RNS: Registry Name Service server
Solr
l Server: Solr Server
l Client: Client (indexed machine)
Sudo Manager
l Client: Client (index machine)
Updated Column
The last time data related to the host changed.
Manage a Host
On the Hosts > Hosts Inventory page, access host actions for a server from the vertical ellipsis menu. Select Peform Host Actions
from the menu to start the Host Actions wizard. Host actions include:
l Profile
l Install software for AD Bridge, Privilege Management for Unix and Linux, and Solr
l Manage Solr
l Join domain
l Deploy keyfile
Additionally, from the menu for each server, you can:
l View host details
l Delete hosts
When using the Host Actions wizard, only 25 hosts are displayed at a time. Select Check All to apply settings to all discovered hosts.
Apply Updates to Servers Using Bulk Actions
Alternatively, you can apply actions to more than one server at a time. On the Hosts > Hosts Inventory page, you can select more than
one host and select the Actions menu.
SALES: www.beyondtrust.com/contact SUPPORT: www.beyondtrust.com/support DOCUMENTATION: www.beyondtrust.com/docs 14
©2003-2022 BeyondTrust Corporation. All Rights Reserved. Other trademarks identified on this page are owned by their respective owners. BeyondTrust is not a chartered bank or trust company, or TC: 6/29/2022
depository institution. It is not authorized to accept deposits or trust accounts and is not licensed or regulated by any state or federal banking authority.BEYONDINSIGHT FOR UNIX & LINUX 22.2
USER GUIDE
Use Privilege Escalation for BeyondInsight for Unix & Linux Credentials
Most actions require a credential be supplied in BeyondInsight for Unix & Linux. This is the account BIUL authenticates as on selected
servers. However, this account might not have sufficient privileges to execute the required commands. The console allows users to
choose a Delegation Tool to escalate user privileges. Selecting sudo su requires the user to choose a second credential to delegate to.
Profile Servers in BeyondInsight for Unix & Linux
Run a profile on a host to gather preinstall check information. This check ensures that a host is prepared for software installs. Profiling
requires a credential that is a valid SSH user for a selected host. This credential does not require superuser privileges, but the credential
must have Write permission on the host’s /tmp folder.
You can configure a remote working directory. For more information, please see "Deployment Settings" on page 37.
Note: To access the hosts, a valid SSH credential with administrative rights on the host is required.
1. Go to the Hosts > Host Inventory page.
2. Select a host, and then at the far right, click the ellipsis menu icon and select Perform Host Actions.
3. Select Profile, and then click Next Step.
4. On the Credential Selection page, select a logon credential to access the remote system. If you cannot log on as root, then select
one of the following to run the action with escalated privileges: pbrun, sudo, or sudo su. This may require choosing a second
credential.
5. Review the Summary page, and then click Finish.
6. Review the Task page, and verify the completed status of attempted actions under Task Summary.
7. Click Task Details to view more information about Task Status.
Profile a Host using a Credential Rule
Configure a credential rule to avoid requiring password authentication when you run a host profile. You can use default credentials to run a
profile on one or many hosts.
1. Go to the Hosts > Hosts Inventory page.
2. Select the hosts you want to profile:
l One host: Select the host, and then at the far right, click the ellipsis menu icon and select Profile Host with Default
Credentials.
l More than one host: To select the hosts to profile, check the boxes on the left of the hostnames. From the Actions menu,
select Profile Host with Default Credentials.
For more information on setting up default credentials, please see "Use Host Credential Rules" on page 30.
SALES: www.beyondtrust.com/contact SUPPORT: www.beyondtrust.com/support DOCUMENTATION: www.beyondtrust.com/docs 15
©2003-2022 BeyondTrust Corporation. All Rights Reserved. Other trademarks identified on this page are owned by their respective owners. BeyondTrust is not a chartered bank or trust company, or TC: 6/29/2022
depository institution. It is not authorized to accept deposits or trust accounts and is not licensed or regulated by any state or federal banking authority.BEYONDINSIGHT FOR UNIX & LINUX 22.2
USER GUIDE
Manage AD Bridge Hosts
Note: To access the hosts, a valid SSH credential with administrative rights on the host is required.
Install and Upgrade AD Bridge
To install or upgrade AD Bridge hosts:
1. Go to the Hosts > Host Inventory page.
2. Select a host, and then at the far right, click the ellipsis menu icon and select Perform Host Actions.
3. On the Primary Action page, select Active Directory Bridge.
4. On the Secondary Action page, select one from the following:
l Install: Install AD Bridge software.
l Upgrade: Upgrade AD Bridge software to the version loaded in the console. If you select Upgrade, you can skip to step 6.
5. If you select Install, you can configure the Active Directory information on the Action Requirements page. By default, the Use
Domain Browser toggle is turned on. To manually enter the information, click the toggle to turn it off.
l Perform optional Domain join: Select to join the Active Directory host to the domain. The join action occurs after the AD
Bridge software installation completes. The toggle is turned on by default. Click the toggle if you do not want to join the host
to the domain at this time.
l Forest: Select the forest from the list. The forest listed here is the directory service connection already configured from the
Settings > Directory Services menu.
l Domain: Select a domain from the list.
l OU: Click Browse to search for the OU.
l AD Credential: Select the credential you want to use to access Active Directory. This credential is added when you create
the directory services connection.
l Additional Arguments: Add domain-join cli arguments.
6. On the Credential Selection page, select a logon credential to access the remote system. If you cannot log on as root, then select
one of the following to run the action with escalated privileges: pbrun, sudo, or sudo su. This may require choosing a second
credential.
7. Review the Summary page, and then click Finish.
8. Review the Task page, and verify the completed status of attempted actions under Task Summary.
9. Click Task Details to view more information about Task Status.
Join the Host to an Active Directory Domain
To join selected AD Bridge hosts to a domain:
1. Go to the Hosts > Host Inventory page.
2. Select a host, and then at the far right, click the ellipsis menu icon and select Perform Host Actions.
3. On the Primary Action page, select Active Directory Bridge.
4. On the Secondary Action page, select Domain join.
5. On the Action Requirements page, select the Active Directory information. By default, the Use Domain Browser toggle is
turned on. To manually enter the information, click the toggle to turn it off.
SALES: www.beyondtrust.com/contact SUPPORT: www.beyondtrust.com/support DOCUMENTATION: www.beyondtrust.com/docs 16
©2003-2022 BeyondTrust Corporation. All Rights Reserved. Other trademarks identified on this page are owned by their respective owners. BeyondTrust is not a chartered bank or trust company, or TC: 6/29/2022
depository institution. It is not authorized to accept deposits or trust accounts and is not licensed or regulated by any state or federal banking authority.BEYONDINSIGHT FOR UNIX & LINUX 22.2
USER GUIDE
l Forest: Select the forest from the list. The forest listed here is the directory service connection already configured from the
Settings > Directory Services menu.
l Domain: Select a domain from the list.
l OU: Click Browse to search for the OU.
l AD Credential: Select the credential you want to use to access Active Directory. This credential is added when you create
the directory services connection.
l Additional Arguments: Add domain-join cli arguments.
6. On the Credential Selection page, select a logon credential to access the remote system. If you cannot log on as root, then select
one of the following to run the action with escalated privileges: pbrun, sudo, or sudo su. This may require choosing a second
credential.
7. Review the Summary page, and then click Finish.
8. Review the Task page, and verify the completed status of attempted actions under Task Summary.
9. Click Task Details to view more information about Task Status.
For more information about the Domain Join Tool commands, please see the AD Bridge Linux Administration Guide at
https://www.beyondtrust.com/docs/ad-bridge/getting-started/linux-admin/index.htm.
Remove the Host from an Active Directory Domain
You can remove an Active Directory host from a domain.
To remove a joined domain:
1. Go to the Hosts > Host Inventory page.
2. Select a host, and then at the far right, click the ellipsis menu icon and select Perform Host Actions.
3. On the Primary Action page, select Active Directory Bridge.
4. On the Secondary Action page, select Domain Leave.
5. On the Action Requirements page, check the box Delete Computer account in Active Directory, and then select an Active
Directory credential from the list.
6. On the Credential Selection page, select a logon credential to access the remote system. If you cannot log on as root, then select
one of the following to run the action with escalated privileges: pbrun, sudo, or sudo su. This may require choosing a second
credential.
7. Review the Summary page, and then click Finish.
Uninstall AD Bridge
When you uninstall AD Bridge, you can also choose to leave the domain and delete the Active Directory account.
1. Go to the Hosts > Host Inventory page.
2. Select a host, and then at the far right, click the ellipsis menu icon and select Perform Host Actions.
3. On the Primary Action page, select Active Directory Bridge.
4. Select Uninstall.
5. On the Action Requirements page, select one of the following:
l Uninstall: Select to uninstall AD Bridge software from the host.
l Leave and Uninstall: Select to remove the host from the domain and uninstall AD Bridge software.
SALES: www.beyondtrust.com/contact SUPPORT: www.beyondtrust.com/support DOCUMENTATION: www.beyondtrust.com/docs 17
©2003-2022 BeyondTrust Corporation. All Rights Reserved. Other trademarks identified on this page are owned by their respective owners. BeyondTrust is not a chartered bank or trust company, or TC: 6/29/2022
depository institution. It is not authorized to accept deposits or trust accounts and is not licensed or regulated by any state or federal banking authority.BEYONDINSIGHT FOR UNIX & LINUX 22.2
USER GUIDE
l Leave Domain, Delete Account, and Uninstall: Select to remove the host from the domain, delete the Active Directory
account in Active Directory, and remove the AD Bridge software.
l AD Credential: Select the credential to use to access Active Directory. The setting is required when you select Leave
Domain, Delete Account, and Uninstall. This credential is added when you create the directory services connection.
6. On the Credential Selection page, select a logon credential to access the remote system. If you cannot log on as root, then select
one of the following to run the action with escalated privileges: pbrun, sudo, or sudo su. This may require choosing a second
credential.
7. Review the Summary page, and then click Finish.
Manage Privilege Management for Unix and Linux Hosts
Note: To access the hosts, a valid SSH credential with administrative rights on the host is required.
To manage Privilege Management for Unix and Linux hosts:
1. Go to the Hosts > Host Inventory page.
2. Select a host, and then at the far right, click the ellipsis menu icon and select Perform Host Actions.
3. Choose the action to perform, and then follow the procedures in this section.
Software is installed with default configuration values, unless RNS Primary and All Components is selected. If not detected during
installation, the installer generates network and REST encryption keys. All future Privilege Management for Unix and Linux installations
will use these keys. The keys can be managed on the Settings page.
Install the Privilege Management for Unix and Linux Policy Server
To install Privilege Management for Unix and Linux Policy Server:
1. Go to the Hosts > Host Inventory page.
2. Select a host, and then at the far right, click the ellipsis menu icon and select Perform Host Actions.
3. Select Privilege Management for Unix and Linux, and then select Next Step.
4. Select Install, and then click Next Step.
5. On the Action Requirements page, select an installation template. The features enabled in the template affect the options
available. The following list displays default templates.
l All Components: All Privilege Management for Unix and Linux components will be installed except for RNS server.
l License Server Only: Only the Privilege Management for Unix and Linux license server will be installed.
l Policy and Log Server Only: All server components of Privilege Management for Unix and Linux will be installed except
for RNS server.
l Submit and Run Host Only: The client components of Privilege Management for Unix and Linux will be installed.
l Primary Registry Server and All Components: All Privilege Management for Unix and Linux components will be
installed including RNS server.
6. After selecting a template, you can choose to use client registration. Note that some features selected in installation templates may
require or disallow using client registration. To use client registration select a Client Registration Server, and then select a Client
Registration Profile.
7. If you choose not to use client registration, you can manually select multiple policy, log, and license servers if your Installation
template allows it. If you are installing a new primary policy, log, or license server click the toggle switch to indicate that this host
will become a new primary policy, log, or license server.
SALES: www.beyondtrust.com/contact SUPPORT: www.beyondtrust.com/support DOCUMENTATION: www.beyondtrust.com/docs 18
©2003-2022 BeyondTrust Corporation. All Rights Reserved. Other trademarks identified on this page are owned by their respective owners. BeyondTrust is not a chartered bank or trust company, or TC: 6/29/2022
depository institution. It is not authorized to accept deposits or trust accounts and is not licensed or regulated by any state or federal banking authority.BEYONDINSIGHT FOR UNIX & LINUX 22.2
USER GUIDE
8. On the Credential Selection page, select a logon credential to access the remote system. If you cannot log on as root, then select
one of the following to run the action with escalated privileges: pbrun, sudo, or sudo su. This may require choosing a second
credential.
9. Review the Summary page, and then click Finish.
10. Review the Task page, and verify the completed status of attempted actions under Task Summary.
11. Click Task Details to view more information about Task Status.
For more information please see the following:
l On installation templates, "Privilege Management for Unix and Linux Installation Templates" on page 48
l On client registration profiles, "Manage Client Registration Profiles" on page 25
Upgrade the Privilege Management for Unix and Linux Policy Server
To upgrade the Policy Server to the version loaded in the console:
1. Go to the Hosts > Host Inventory page.
2. Select a host, and then at the far right, click the ellipsis menu icon and select Perform Host Actions.
3. Select Privilege Management for Unix and Linux, and then click Next Step.
4. Select Upgrade, and then click Next Step.
5. On the Credential Selection page, select a logon credential to access the remote system. If you cannot log on as root, then select
one of the following to run the action with escalated privileges: pbrun, sudo, or sudo su. This may require choosing a second
credential.
6. Review the Summary page, and then click Finish.
7. Review the Task page, and verify the completed status of attempted actions under Task Summary.
8. Click Task Details to view more information about Task Status.
Uninstall the Privilege Management for Unix and Linux Policy Server
To remove the Policy Server:
1. Go to the Hosts > Host Inventory page.
2. Select a host, and then at the far right, click the ellipsis menu icon and select Perform Host Actions.
3. Select Privilege Management for Unix and Linux, and then click Next Step.
4. Select Uninstall, and then click Next Step.
5. On the Credential Selection page, select a logon credential to access the remote system. If you cannot log on as root, then select
one of the following to run the action with escalated privileges: pbrun, sudo, or sudo su. This may require choosing a second
credential.
6. Review the Summary page, and then click Finish.
7. Review the Task page, and verify the completed status of attempted actions under Task Summary.
8. Click Task Details to view more information about Task Status.
SALES: www.beyondtrust.com/contact SUPPORT: www.beyondtrust.com/support DOCUMENTATION: www.beyondtrust.com/docs 19
©2003-2022 BeyondTrust Corporation. All Rights Reserved. Other trademarks identified on this page are owned by their respective owners. BeyondTrust is not a chartered bank or trust company, or TC: 6/29/2022
depository institution. It is not authorized to accept deposits or trust accounts and is not licensed or regulated by any state or federal banking authority.BEYONDINSIGHT FOR UNIX & LINUX 22.2
USER GUIDE
Configure SIEM for Use With a Privilege Management for Unix and Linux Server
Note: To configure a SIEM connection, it must first be set up under Settings > SIEM Connections. For more information,
please see "Manage SIEM Connections" on page 49.
To configure SIEM for use with a Privilege Management for Unix and Linux server:
1. Go to the Hosts > Host Inventory page.
2. Select a host, and then at the far right, click the ellipsis menu icon and select Perform Host Actions.
3. Select Privilege Management for Unix and Linux, and then click Next Step.
4. Select Configure a SIEM for use with one or more Privilege Management for Unix & Linux servers, and then click Next
Step.
5. On the Action Requirements page, select a SIEM connection from the dropdown.
6. On the Credential Selection page, select a logon credential to access the remote system. If you cannot log on as root, then select
one of the following to run the action with escalated privileges: pbrun, sudo, or sudo su. This may require choosing a second
credential.
7. Review the Summary page, and then click Finish.
8. Review the Task page, and verify the completed status of attempted actions under Task Summary.
9. Click Task Details to view more information about Task Status.
Install and Manage Solr
Solr Connectivity
Certificates must be used to communicate between the Solr server and the log servers.
BeyondInsight for Unix & Linux is a certificate signing authority. The console can generate and distribute the required certificates.
Note: If Solr was installed using BeyondInsight for Unix & Linux, the necessary certificates are distributed as a part of the
installation.
If Solr was installed outside of BeyondInsight for Unix & Linux, some of the Solr management actions require that you first
"adopt" the Solr server. This puts the necessary certificates in place to enable trusted communication between Solr and
BeyondInsight for Unix & Linux. For more information, please see "Adopt a Solr Server" on page 21.
Install Solr
To install Solr:
1. Go to the Hosts > Host Inventory page.
2. Select a host, and then at the far right, click the ellipsis menu icon and select Perform Host Actions.
3. Select Solr, and then click Next Step.
4. Select Install, and then click Next Step.
5. Solr tries to detect the location of the Java environment on the server. Otherwise, you can enter the Java Home details.
6. On the Credential Selection page, select a logon credential to access the remote system. If you cannot log on as root, then select
one of the following to run the action with escalated privileges: pbrun, sudo, or sudo su. This may require choosing a second
SALES: www.beyondtrust.com/contact SUPPORT: www.beyondtrust.com/support DOCUMENTATION: www.beyondtrust.com/docs 20
©2003-2022 BeyondTrust Corporation. All Rights Reserved. Other trademarks identified on this page are owned by their respective owners. BeyondTrust is not a chartered bank or trust company, or TC: 6/29/2022
depository institution. It is not authorized to accept deposits or trust accounts and is not licensed or regulated by any state or federal banking authority.BEYONDINSIGHT FOR UNIX & LINUX 22.2
USER GUIDE
credential.
7. Review the Summary page, and then click Finish.
8. Review the Task page, and verify the completed status of attempted actions under Task Summary.
9. Click Task Details to view more information about Task Status.
Uninstall Solr
To remove Solr:
1. Go to the Hosts > Host Inventory page.
2. Select a host, and then at the far right, click the ellipsis menu icon and select Perform Host Actions.
3. Select Solr, and then click Next Step.
4. Select Uninstall, and then click Next Step.
5. On the Credential Selection page, select a logon credential to access the remote system. If you cannot log on as root, then select
one of the following to run the action with escalated privileges: pbrun, sudo, or sudo su. This may require choosing a second
credential.
6. Review the Summary page, and then click Finish.
7. Review the Task page, and verify the completed status of attempted actions under Task Summary.
8. Click Task Details to view more information about Task Status.
Assign a Log Server
The log servers selected are indexed by the Solr server.
To assign a log server:
1. Go to the Hosts > Host Inventory page.
2. Select a host, and then at the far right, click the ellipsis menu icon and select Perform Host Actions.
3. Select Solr, and then click Next Step.
4. Select Assign Solr Indexing Server, and then click Next Step.
5. Select a Solr server from the Solr Server list, and then click Next Step.
6. On the Credential Selection page, select a logon credential to access the remote system. If you cannot log on as root, then select
one of the following to run the action with escalated privileges: pbrun, sudo, or sudo su. This may require choosing a second
credential.
7. Review the Summary page, and then click Finish.
8. Review the Task page, and verify the completed status of attempted actions under Task Summary.
9. Click Task Details to view more information about Task Status.
Adopt a Solr Server
You can create a connection to a Solr server instance not deployed by BeyondInsight for Unix & Linux.
1. Go to the Hosts > Hosts Inventory page.
2. Select the Solr server you want to establish a connection to, and then at the far right, click the ellipsis menu icon, and then select
Perform Host Actions. Optionally, select one or more Solr servers, and then select Actions > Perform Host Actions.
3. Select Solr, and then click Next Step.
4. Select Adopt Solr server for management by BeyondInsight for Unix & Linux, and then click Next Step.
SALES: www.beyondtrust.com/contact SUPPORT: www.beyondtrust.com/support DOCUMENTATION: www.beyondtrust.com/docs 21
©2003-2022 BeyondTrust Corporation. All Rights Reserved. Other trademarks identified on this page are owned by their respective owners. BeyondTrust is not a chartered bank or trust company, or TC: 6/29/2022
depository institution. It is not authorized to accept deposits or trust accounts and is not licensed or regulated by any state or federal banking authority.BEYONDINSIGHT FOR UNIX & LINUX 22.2
USER GUIDE
5. On the Credential Selection page, credential rules are automatically used if any are configured for the selected host. Otherwise,
enter a credential, and then click Next Step.
6. Review the settings on the Summary page, and then click Finish.
Rotate the Certificate on the Solr Server
Deploy host certificates for selected Solr hosts. If the Solr host name matches a certificate name in the BeyondInsight for Unix & Linux
certificate store then that certificate is deployed.
You can update the certificate at any time.
1. Go to the Hosts > Hosts Inventory page.
2. Select a Solr server where you want to rotate certificates, then at the far right, click the ellipsis menu icon, and then select Perform
Host Actions. Optionally, select one or more Solr servers, and then select Actions > Perform Host Actions.
3. Select Solr, and then click Next Step.
4. Select Rotate TLS server certificates for Solr server.
5. On the Credential Selection page, credential rules are automatically used if any are configured for the selected host. Otherwise,
enter a credential, and then click Next Step.
6. Review the settings on the Summary page, and then click Finish.
Deploy Keyfiles
The Deploy PMUL Network and REST encryption key files action uses the network and encryption keys configured on the Settings >
Integration page.
To deploy keyfiles:
1. Go to the Hosts > Host Inventory page.
2. Select a host, and then at the far right, click the ellipsis menu icon and select Perform Host Actions.
3. Select Privilege Management for Unix and Linux, and then select Next Step.
4. Select Deploy PMUL Network and REST encryption key files, and then click Next Step.
5. On the Credential Selection page, select a logon credential to access the remote system. If you cannot log on as root, then select
one of the following to run the action with escalated privileges: pbrun, sudo, or sudo su. This may require choosing a second
credential.
6. Review the Summary page, and then click Finish.
7. Review the Task page, and verify the completed status of attempted actions under Task Summary.
8. Click Task Details to view more information about Task Status.
SALES: www.beyondtrust.com/contact SUPPORT: www.beyondtrust.com/support DOCUMENTATION: www.beyondtrust.com/docs 22
©2003-2022 BeyondTrust Corporation. All Rights Reserved. Other trademarks identified on this page are owned by their respective owners. BeyondTrust is not a chartered bank or trust company, or TC: 6/29/2022
depository institution. It is not authorized to accept deposits or trust accounts and is not licensed or regulated by any state or federal banking authority.BEYONDINSIGHT FOR UNIX & LINUX 22.2
USER GUIDE
Delete Hosts
The Delete Host action can be selected from the ellipsis menu icon on the
Hosts > Hosts Inventory page. It removes the selected host from the
console database. No action is taken on the host nor on any credentials the
console may have stored for it.
To delete more than one host, select the hosts in the list, and then select
Delete Hosts from the Actions list.
View Host Details
You can view more information about host servers including errors and warnings for particular products deployed.
On the Host Details pane, you can manage the following settings:
l Configure the Privilege Management for Unix and Linux Rest API Time Correction, which is the acceptable time offset between
BeyondInsight for Unix & Linux and the Privilege Management for Unix and Linux host in seconds.
l Apply licenses and view license details.
Note: For Privilege Management for Unix and Linux versions 9.4.5 and earlier, the license is entered in a text box. In versions
10.0 and later, the user can upload a license file.
To view more information about a host:
1. On the Hosts > Host Inventory page, select a server, and then at the far right, click the ellipsis menu icon and then select View
Host Details. General host details are displayed, including:
l Discovered
l Last Profiled
l IP
l Operating System
l Architecture
l Default Gateway
l Tags
2. Select a product name in the Host Details list to view details about the host collected by BeyondInsight for Unix & Linux. Details
on errors and warnings are included here, if any.
SALES: www.beyondtrust.com/contact SUPPORT: www.beyondtrust.com/support DOCUMENTATION: www.beyondtrust.com/docs 23
©2003-2022 BeyondTrust Corporation. All Rights Reserved. Other trademarks identified on this page are owned by their respective owners. BeyondTrust is not a chartered bank or trust company, or TC: 6/29/2022
depository institution. It is not authorized to accept deposits or trust accounts and is not licensed or regulated by any state or federal banking authority.BEYONDINSIGHT FOR UNIX & LINUX 22.2
USER GUIDE
REST API Connectivity
BeyondInsight for Unix & Linux automatically configures a REST connection to Privilege Management for Unix and Linux Policy Servers.
Note the following when using the REST API:
l REST API connections can only be made to a Policy Server with Privilege Management for Unix and Linux v 9.4 or later.
l REST connectivity does not open any firewall ports. This must be done by the user.
l By default, Privilege Management for Unix and Linux uses self-signed certificates. BeyondInsight for Unix & Linux does not verify a
certificate authority.
To assist in sourcing errors and troubleshooting connections, a task displays on the Tasks page. Additional troubleshooting information
may be available on the Host Details page.
Tag a Discovered Host
Tags are user-defined values that can be assigned to hosts to aid in filtering the discovered hosts in the Hosts Inventory grid. Tags are
freely entered and as such allow the user to navigate to and manage hosts quickly.
Example: You can create a tag for all hosts in a group such as Log Servers. Assign that tag to the log servers in your
environment. Tags can then be used for filtering throughout the application. To find the log servers in the Hosts Inventory
grid, simply filter by the Log Servers tag.
SALES: www.beyondtrust.com/contact SUPPORT: www.beyondtrust.com/support DOCUMENTATION: www.beyondtrust.com/docs 24
©2003-2022 BeyondTrust Corporation. All Rights Reserved. Other trademarks identified on this page are owned by their respective owners. BeyondTrust is not a chartered bank or trust company, or TC: 6/29/2022
depository institution. It is not authorized to accept deposits or trust accounts and is not licensed or regulated by any state or federal banking authority.BEYONDINSIGHT FOR UNIX & LINUX 22.2
USER GUIDE
Create a New Tag
To create a new tag for a discovered host:
1. Go to Hosts > Hosts Inventory page.
2. Select a host, and then at the far right, click the ellipsis menu icon and then select View Host Details.
3. Under General Details, type the desired tag name in the Add tags field, and press Enter.
Assign Tags to Hosts
To assign an existing tag to a discovered host:
1. Go to Hosts > Hosts Inventory page.
2. Select a host, and then at the far right, click the ellipsis menu icon and then select View Host Details.
3. Under General Details, click the Add tags field and enter the tag name or scroll until you find the desired tag.
4. Select the tag to apply it to the host.
Filter Hosts by Tags
To filter discovered hosts by a specific tag:
1. Go to Hosts > Hosts Inventory page.
2. Click the Tags dropdown menu at the top of the Host Inventory grid.
3. Enter the tag name in the Search Term field and click Update to filter the results.
Delete an Existing Tag
To delete an existing tag on a discovered host:
1. Go to Hosts > Hosts Inventory page.
2. Select a host, and then at the far right, click the ellipsis menu icon and then select View Host Details.
3. Under General Details, click the Add tags field, and scroll till you find the desired tag.
4. Click the X that appears beside the tag name to delete it from the list.
Manage Client Registration Profiles
Client Registration Profiles (CRP) simplify PMUL deployments by allowing the user to configure some environmental settings during an
installation. For example, a profile might be used to copy encryption keys from machine to machine to enable communication, to copy a
settings file, or to immediately join RNS groups. Without using CRP, administrators must manually provision files, keys, etc. on every host.
CRP provides a centralized, customizable definition of what an installation looks like and handles that provisioning. A Client Registration
Profile editor is available for policy and RNS servers on the Client Registration page.
Note: Client Registration Profiles can optionally be used with any PMUL install, but must be used with RNS.
To manage Client Registration Profiles go to Hosts > Hosts Inventory > View Host Details > Client Registration Profiles. A new
Client Registration Profile can be created by selecting Add New Registration Profile, entering a Profile name, and clicking Create.
SALES: www.beyondtrust.com/contact SUPPORT: www.beyondtrust.com/support DOCUMENTATION: www.beyondtrust.com/docs 25
©2003-2022 BeyondTrust Corporation. All Rights Reserved. Other trademarks identified on this page are owned by their respective owners. BeyondTrust is not a chartered bank or trust company, or TC: 6/29/2022
depository institution. It is not authorized to accept deposits or trust accounts and is not licensed or regulated by any state or federal banking authority.BEYONDINSIGHT FOR UNIX & LINUX 22.2
USER GUIDE
Update a Profile
Existing Client Registration Profiles can be edited by selecting an entry from the Client Registration Profiles list. As necessary,
configure the following options and select Save to save your changes or Reset to undo all changes.
Settings File
Provide the path to a pb.settings file to copy to clients. Set destination to save the file to an alternative location.
The following options are available:
l Setting File Source
l Setting File Destination
File Deployment Operations
Provide paths to files to copy from server to client. Set Destination to save files to an alternative location.
The following options are available:
l Filename
l Destination
Settings Controlled File Deployment Operations
Copy files pointed to by pb.settings keys to copy said files from server to client. Set destination to save files to an alternative location.
The following options are available:
l Setting name
l To
Certificate Deployment Operations
Copy certificates from the server to the client. If only Destination is set, a certificate will be saved to the provided path. If Setting Name is
provided, a certificate will be saved to the value of that setting. If Setting Name and Key are provided, a certificate pair is saved to the
value of those settings.
The following options are available:
l Setting name
l Key setting name
l Destination
Role Registration
Assign Registry Name Services groups and roles within. Select a Category and Group Name and Role options for the category will
become available.
The following options are available:
l Category
l Group name
SALES: www.beyondtrust.com/contact SUPPORT: www.beyondtrust.com/support DOCUMENTATION: www.beyondtrust.com/docs 26
©2003-2022 BeyondTrust Corporation. All Rights Reserved. Other trademarks identified on this page are owned by their respective owners. BeyondTrust is not a chartered bank or trust company, or TC: 6/29/2022
depository institution. It is not authorized to accept deposits or trust accounts and is not licensed or regulated by any state or federal banking authority.You can also read