Configure Authentication for EAP via Omada Controller - TP-Link
←
→
Page content transcription
If your browser does not render page correctly, please read the page content below
Configure Authentication for EAP via Omada Controller

CONTENTS
1   Portal Authentication.................................................................................................... 3
    1.1    No Authentication.........................................................................................................................................................4

    1.2    Simple Password...........................................................................................................................................................8

    1.3    Local User.....................................................................................................................................................................12

    1.4    Voucher.........................................................................................................................................................................20

    1.5    SMS.................................................................................................................................................................................27

    1.6    Facebook......................................................................................................................................................................32

    1.7    External RADIUS Server..........................................................................................................................................33

    1.8    External Portal Server..............................................................................................................................................39

2   Free Authentication Policy.......................................................................................40
1   Portal Authentication
    Portal authentication enhances the network security by providing authentication service to the
    clients that just need temporary access to the wireless network. Such clients have to log into a
    web page to establish verification, after which they will access the network as guests. What's more,
    you can customize the authentication login page and specify a URL which the newly authenticated
    clients will be redirected to.

    To configure Portal Authentication, go to Wireless Control > Portal and click                     .

    Then the following window will pop up:

    These authentication methods are available: No Authentication, Simple Password, Local User,
    Voucher, SMS, Facebook, External RADIUS Server and External Portal Server. The following
    sections introduce how to configure each Portal authentication.

                                               1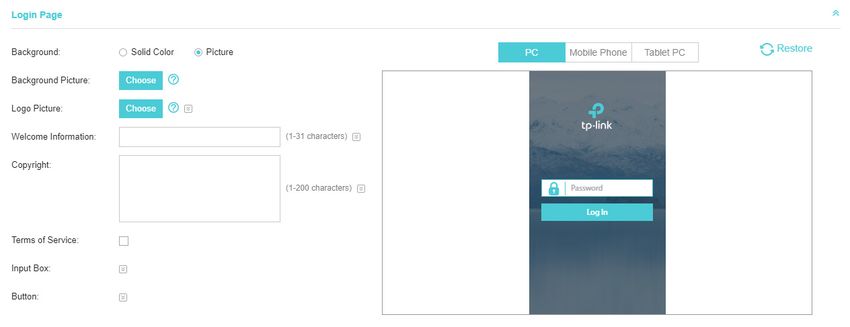
1.1 No Authentication
    With No Authentication configured, clients can access the network without any authentication.

    Follow the steps below to configure No Authentication:

    1. Go to Wireless Settings > Basic Wireless Settings and create an SSID for the Portal.

    2. Go back to the Portal configuration page. In the Basic Info section, complete the basic settings
       for the portal authentication.

       Configure the following parameters:

         Portal Name             Specify a name for the Portal.

         SSID                    Select an SSID for the Portal.

         Authentication Type     Select No Authentication.

         Authentication          With Daily Limit disabled, the client's authentication will expire after the time
         Timeout                 period you set and the client needs to log in again on the web authentication
                                 page to access the network.
                                 Options include 1 Hour, 8 Hours, 24 Hours, 7 Days and Custom. Custom
                                 allows you to define the time in days, hours and minutes. The default value is
                                 one hour.

                                 With Daily Limit enabled, the client’s authentication will expire after the time
                                 period you set and the client cannot log in again in the same day.
                                 Options include 30 Minutes, 1 Hour, 2 Hours, 4 Hours and Custom. Custom
                                 allows you to define the time in hours and minutes. The default value is 30
                                 minutes.

         Daily Limit             With Daily Limit enabled, after authentication times out, the user cannot get
                                 authenticated again in the same day.

         HTTPS Redirect          With this function enabled, the unauthorized clients will be redirected to the
                                 Portal page when they are trying to browse HTTPS websites.
                                 With this function disabled, the unauthorized clients cannot browse HTTPS
                                 websites and are not redirected to the Portal page.

                                                  2
Redirect If you enable this function, the portal will redirect the newly authenticated
clients to the configured URL.
Redirect URL If the Redirect function above is enabled, enter the URL that a newly
authenticated client will be redirected to.
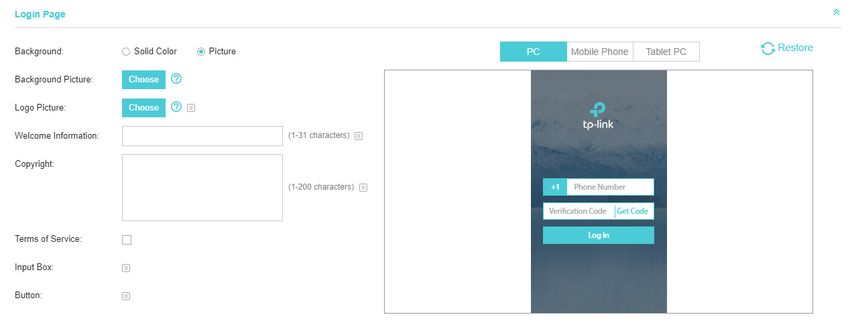
3. In the Login Page section, configure the login page for the Portal.
Configure the following parameters:
Background Select the background type. Two types are supported: Solid Color and
Picture.
Background Color If Solid Color is selected, configure your desired background color through
the color picker or by entering the RGB value manually.
Background Picture If Picture is selected, click the Choose button and select a picture from
your PC. Drag and scale the clipping region to edit the picture and click
Confirm.
Logo Picture Click the Choose button and select a picture from your PC. Drag and scale
the clipping region to edit the picture and click Confirm.
In addtion, you can click and configure the logo position. The options
include Middle, Upper and Lower.
3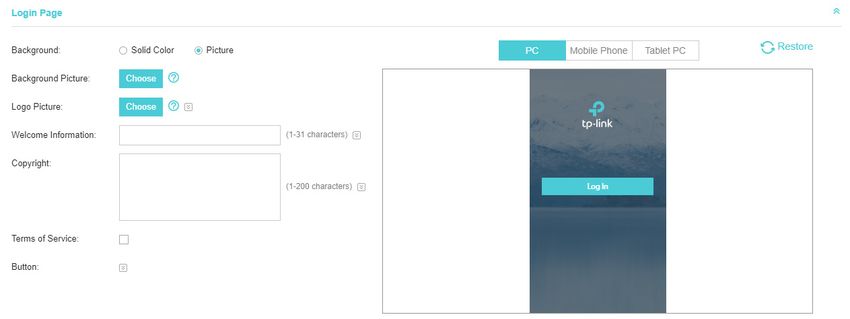
Welcome Information   Specify the welcome information.

                      In addtion, you can click    and select your desired text color for the
                      welcome information through the color picker or by entering the RGB value
                      manually.

Copyright             Specify the copyright information.

                      In addtion, you can click   and select your desired text color for Copyright
                      information through the color picker or by entering the RGB value manually.

Terms of Service      Enable or disable Terms of Service. With this option enabled, specify the
                      terms of service in the following box.

                                     4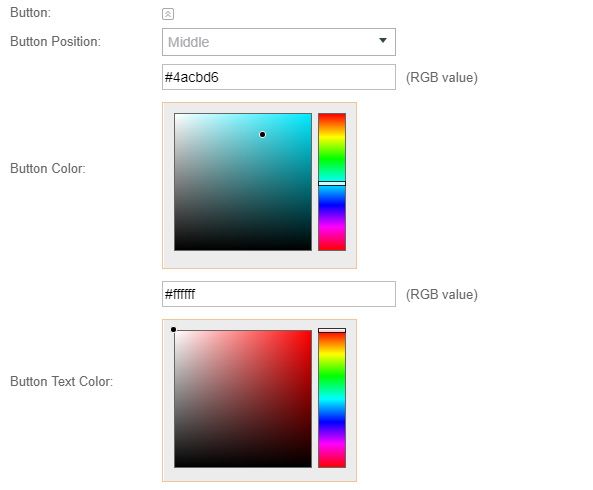
Button                  Click     and configure the button.
                            Button Position: Set the position of the login button. The options include
                            Middle, Upper and Lower.
                            Button Color: Select your desired login button color through the color
                            picker or by entering the RGB value manually.
                            Button Text Color: Select your desired text color for the button through the
                            color picker or by entering the RGB value manually.

4. In the Advertisement section, select whether to display advertisement pictures for users and
  configure the related parameters.

  Configure the following parameters:

    Advertisement          Specify whether to enable the Advertisement feature. With this feature
                           enabled, you can add advertisement pictures on the authentication page.
                           These advertisement pictures will be displayed before the login page
                           appears. You can also allow users to skip the advertisement by enabling
                           Allow Users To Skip Advertisement. The advertisement picture should
                           be less than 2MB. And only JPG, PNG, BMP, GIF and JPEG file types are
                           supported.

                                           5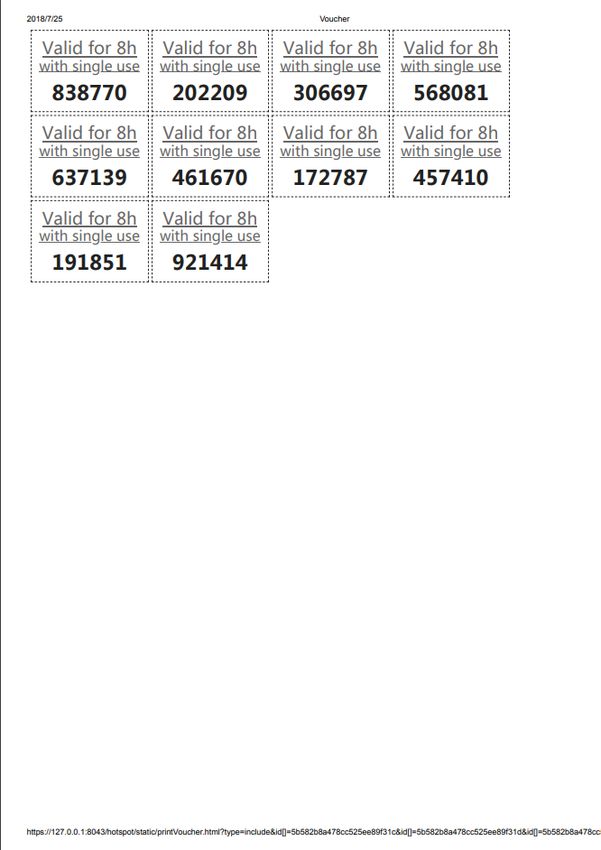
Picture Resource        Upload advertisement pictures. When several pictures are added, they will
                                 be played in a loop.

         Advertisement           Specify how long the advertisement will be displayed for. For this duration,
         Duration Time           the pictures will be played in a loop. If the duration time is not enough for all
                                 the pictures, the rest will not be displayed.

         Picture Carousel        Specify the picture carousel interval. For example, if this value is set as 5
         Interval                seconds, the first picture will be displayed for 5 seconds, followed by the
                                 second picture for 5 seconds, and so on.

         Allow Users To Skip     Specify whether to enable this feature. With this feature enabled, the user
         Advertisement           can click the Skip button to skip the advertisement.

    5. Click Apply.

1.2 Simple Password
    With this Simple Password configured, clients are required to enter the correct password to pass
    the authentication.

    Follow the steps below to configure No Simple Password Portal:

    1. Go to Wireless Settings > Basic Wireless Settings and create an SSID for the Portal.

    2. Go back to the Portal configuration page. In the Basic Info section, complete the basic settings
       for the portal authentication.

       Configure the following parameters:

         Portal Name             Specify a name for the Portal.

         SSID                    Select an SSID for the Portal.

         Authentication Type     Select Simple Password.

         Password                Set the password for authentication.

                                                  6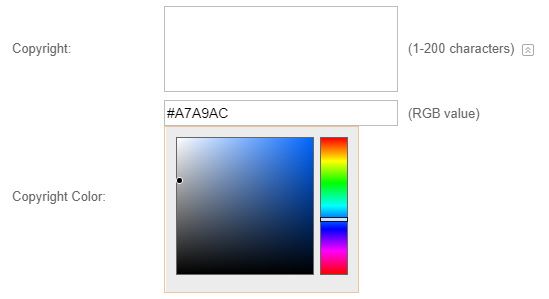
Authentication          The client's authentication will expire after the time period you set and the
     Timeout                 client needs to log in again on the web authentication page to access the
                             network.
                             Options include 1 Hour, 8 Hours, 24 Hours, 7 Days and Custom. Custom
                             allows you to define the time in days, hours and minutes. The default value is
                             one hour.

     HTTPS Redirect          With this function enabled, the unauthorized clients will be redirected to the
                             Portal page when they are trying to browse HTTPS websites.
                             With this function disabled, the unauthorized clients cannot browse HTTPS
                             websites and are not redirected to the Portal page.

     Redirect                If you enable this function, the portal will redirect the newly authenticated
                             clients to the configured URL.

     Redirect URL            If the Redirect function above is enabled, enter the URL that a newly
                             authenticated client will be redirected to.

3. In the Login Page section, configure the login page for the Portal.

   Configure the following parameters:

     Background               Select the background type. Two types are supported: Solid Color and
                              Picture.

     Background Color         If Solid Color is selected, configure your desired background color through
                              the color picker or by entering the RGB value manually.

     Background Picture       If Picture is selected, click the Choose button and select a picture from
                              your PC. Drag and scale the clipping region to edit the picture and click
                              Confirm.

                                             7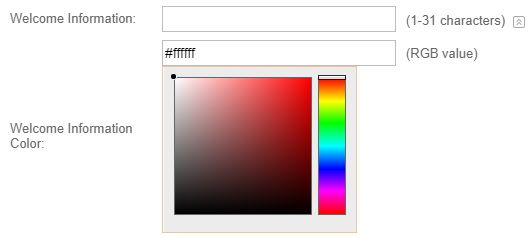
Logo Picture          Click the Choose button and select a picture from your PC. Drag and scale
                      the clipping region to edit the picture and click Confirm.

                      In addtion, you can click   and configure the logo position. The options
                      include Middle, Upper and Lower.

Welcome Information   Specify the welcome information.

                      In addtion, you can click    and select your desired text color for the
                      welcome information through the color picker or by entering the RGB value
                      manually.

Copyright             Specify the copyright information.

                      In addtion, you can click   and select your desired text color for Copyright
                      information through the color picker or by entering the RGB value manually.

Terms of Service      Enable or disable Terms of Service. With this option enabled, specify the
                      terms of service in the following box.

                                     8
Input Box Click and configure the input box.
Select your desired color for the input box through the color picker or by
entering the RGB value manually.
Button Click and configure the button.
Button Position: Set the position of the login button. The options include
Middle, Upper and Lower.
Button Color: Select your desired login button color through the color
picker or by entering the RGB value manually.
Button Text Color: Select your desired text color for the button through the
color picker or by entering the RGB value manually.
4. In the Advertisement section, select whether to display advertisement pictures for users and
configure the related parameters.
9Configure the following parameters:
Advertisement Specify whether to enable the Advertisement feature. With this feature
enabled, you can add advertisement pictures on the authentication page.
These advertisement pictures will be displayed before the login page
appears. You can also allow users to skip the advertisement by enabling
Allow Users To Skip Advertisement. The advertisement picture should
be less than 2MB. And only JPG, PNG, BMP, GIF and JPEG file types are
supported.
Picture Resource Upload advertisement pictures. When several pictures are added, they will
be played in a loop.
Advertisement Specify how long the advertisement will be displayed for. For this duration,
Duration Time the pictures will be played in a loop. If the duration time is not enough for all
the pictures, the rest will not be displayed.
Picture Carousel Specify the picture carousel interval. For example, if this value is set as 5
Interval seconds, the first picture will be displayed for 5 seconds, followed by the
second picture for 5 seconds, and so on.
Allow Users To Skip Specify whether to enable this feature. With this feature enabled, the user
Advertisement can click the Skip button to skip the advertisement.
5. Click Apply.
1.3 Local User
With this Local User configured, clients are required to enter the correct username and password of
the login account to pass the authentication. You can create multiple accounts and assign different
accounts for different users.
Configure Local User Portal
Follow the steps below to configure Local User Portal:
1. Go to Wireless Settings > Basic Wireless Settings and create an SSID for the Portal.
2. Go back to the Portal configuration page. In the Basic Info section, complete the basic settings
for the portal authentication.
10Configure the following parameters:
Portal Name Specify a name for the Portal.
SSID Select an SSID for the Portal.
Authentication Type Select Local User.
User Management You can click this button to configure user accounts for authentication later.
Please refer to Create Local User Accounts.
HTTPS Redirect With this function enabled, the unauthorized clients will be redirected to the
Portal page when they are trying to browse HTTPS websites.
With this function disabled, the unauthorized clients cannot browse HTTPS
websites and are not redirected to the Portal page.
Redirect If you enable this function, the portal will redirect the newly authenticated
clients to the configured URL.
Redirect URL If the Redirect function above is enabled, enter the URL that a newly
authenticated client will be redirected to.
3. In the Login Page section, configure the login page for the Portal.
Configure the following parameters:
Background Select the background type. Two types are supported: Solid Color and
Picture.
11Background Color If Solid Color is selected, configure your desired background color through
the color picker or by entering the RGB value manually.
Background Picture If Picture is selected, click the Choose button and select a picture from
your PC. Drag and scale the clipping region to edit the picture and click
Confirm.
Logo Picture Click the Choose button and select a picture from your PC. Drag and scale
the clipping region to edit the picture and click Confirm.
In addtion, you can click and configure the logo position. The options
include Middle, Upper and Lower.
Welcome Information Specify the welcome information.
In addtion, you can click and select your desired text color for the
welcome information through the color picker or by entering the RGB value
manually.
Copyright Specify the copyright information.
In addtion, you can click and select your desired text color for Copyright
information through the color picker or by entering the RGB value manually.
12Terms of Service Enable or disable Terms of Service. With this option enabled, specify the
terms of service in the following box.
Input Box Click and configure the input box.
Select your desired color for the input box through the color picker or by
entering the RGB value manually.
Button Click and configure the button.
Button Position: Set the position of the login button. The options include
Middle, Upper and Lower.
Button Color: Select your desired login button color through the color
picker or by entering the RGB value manually.
Button Text Color: Select your desired text color for the button through the
color picker or by entering the RGB value manually.
134. In the Advertisement section, select whether to display advertisement pictures for users and
configure the related parameters.
Configure the following parameters:
Advertisement Specify whether to enable the Advertisement feature. With this feature
enabled, you can add advertisement pictures on the authentication page.
These advertisement pictures will be displayed before the login page
appears. You can also allow users to skip the advertisement by enabling
Allow Users To Skip Advertisement. The advertisement picture should
be less than 2MB. And only JPG, PNG, BMP, GIF and JPEG file types are
supported.
Picture Resource Upload advertisement pictures. When several pictures are added, they will
be played in a loop.
Advertisement Specify how long the advertisement will be displayed for. For this duration,
Duration Time the pictures will be played in a loop. If the duration time is not enough for all
the pictures, the rest will not be displayed.
Picture Carousel Specify the picture carousel interval. For example, if this value is set as 5
Interval seconds, the first picture will be displayed for 5 seconds, followed by the
second picture for 5 seconds, and so on.
Allow Users To Skip Specify whether to enable this feature. With this feature enabled, the user
Advertisement can click the Skip button to skip the advertisement.
5. Click Apply.
Create Local User Accounts
Follow the steps below to create the user accounts for authentication:
1. In the Basic Info section on the portal configuration page, click User Management. The
management page will appear. Go to the User page and click .
142. The following window will pop up. Configure the required parameters and click Apply.
Configure the following parameters:
Username Specify the username. The username should not be the same as any
existing one.
Password Specify the password. Users will be required to enter the username and
password when they attempt to access the network.
Authentication Specify the authentication timeout for formal users. After timeout, the users
Timeout need to log in again on the web authentication page to access the network.
MAC Address Binding There are three types of MAC binding: No Binding, Static Binding and
Type Dynamic Binding.
Static Binding: Specify a MAC address for this user account. Then only the
user with the this MAC address can use the username and password to
pass the authentication.
Dynamic Binding: The MAC address of the first user that passes the
authentication will be bound. Then only this user can use the username and
password to pass the authentication.
15Maximum Users Specify the maximum number of users able to use this account to pass the
authencitation.
Name Specify a name for identification.
Telephone Specify a telephone number for identification.
Rate Limit (Download) Select whether to enable download rate limit. With this option enabled, you
can specify the limit of download rate.
Rate Limit (Upload) Select whether to enable upload rate limit. With this option enabled, you
can specify the limit of upload rate.
Traffic Limit Select whether to enable traffic limit. With this option enabled, you can
specify the total traffic limit for the user. Once the limit is reached, the user
can no longer use this account to access the network.
3. In the same way, you can add more user accounts. The created user accounts will be displayed
in the list. Users can use the username and password of the account to pass the portal
authentication.
By default, the account Status is , which means that the user account is enabled and valid.
You can also click this button to disable the user account. The icon will be changed to , which
means that the user account is disabled.
Additionally, you can click to backup all the user account information into a CSV
file or XLS file and save the file to your PC. If needed, you can click and select the
file to import the account information to the list.
Note
Using Excel to open the CSV file may cause some numerical format changes, and the number may be displayed
incorrectly. If you use Excel to edit the CSV file, please set the cell format as text.
Manage the Guests
On the Guest page, you can view the information of clients that have passed the portal
authentication and manage the clients.
16You can select an icon to execute the corresponding operation:
Disconnect client.
Extend the effective time.
Create Operator Accounts
Operator account can be used to remotely manage the Local User Portal and Voucher Portal. Other
users can visit the URL https://Omada Controller Host’s IP Address:8043/hotspot (For example:
https://192.168.0.64:8043/hotspot) and use the Operator account to enter the portal management
page.
Note
•• Make sure the host that is used to enter the portal management page with operator account can visit the
Controller host.
•• Only the user that log in to the controller with the administrator role can add or remove the operator
account for portal management.
•• The users who enter the portal management page by operator account can only create local user accounts
and vouchers and manage the clients.
Follow the steps below to create Operator account.
1. Go to the Operator page.
2. Click and the following window will pop up.
3. Specify the Name, Password and Notes of the Operator account.
4. Select Site Privileges from the drop-down list (multiple options available) for the Operator
account.
5. Click Apply to create an Operator account. Then other users can use this account to enter the
hotspot management page.
171.4 Voucher
With Voucher configured, you can distribute the vouchers automatically generated by the Omada
Controller to the clients. Clients can use the vouchers to access the network.
Configure Voucher Portal
Follow the steps below to configure Voucher Portal:
1. Go to Wireless Settings > Basic Wireless Settings and create an SSID for the Portal.
2. Go back to the Portal configuration page. In the Basic Info section, complete the basic settings
for the portal authentication.
Configure the following parameters:
Portal Name Specify a name for the Portal.
SSID Select an SSID for the Portal.
Authentication Type Select Voucher.
User Management You can click this button to configure vouchers for authentication later.
Please refer to Create Vouchers.
HTTPS Redirect With this function enabled, the unauthorized clients will be redirected to the
Portal page when they are trying to browse HTTPS websites.
With this function disabled, the unauthorized clients cannot browse HTTPS
websites and are not redirected to the Portal page.
Redirect If you enable this function, the portal will redirect the newly authenticated
clients to the configured URL.
Redirect URL If the Redirect function above is enabled, enter the URL that a newly
authenticated client will be redirected to.
183. In the Login Page section, configure the login page for the Portal.
Configure the following parameters:
Background Select the background type. Two types are supported: Solid Color and
Picture.
Background Color If Solid Color is selected, configure your desired background color through
the color picker or by entering the RGB value manually.
Background Picture If Picture is selected, click the Choose button and select a picture from
your PC. Drag and scale the clipping region to edit the picture and click
Confirm.
Logo Picture Click the Choose button and select a picture from your PC. Drag and scale
the clipping region to edit the picture and click Confirm.
In addtion, you can click and configure the logo position. The options
include Middle, Upper and Lower.
Welcome Information Specify the welcome information.
In addtion, you can click and select your desired text color for the
welcome information through the color picker or by entering the RGB value
manually.
19Copyright Specify the copyright information.
In addtion, you can click and select your desired text color for Copyright
information through the color picker or by entering the RGB value manually.
Terms of Service Enable or disable Terms of Service. With this option enabled, specify the
terms of service in the following box.
Input Box Click and configure the input box.
Select your desired color for the input box through the color picker or by
entering the RGB value manually.
20Button Click and configure the button.
Button Position: Set the position of the login button. The options include
Middle, Upper and Lower.
Button Color: Select your desired login button color through the color
picker or by entering the RGB value manually.
Button Text Color: Select your desired text color for the button through the
color picker or by entering the RGB value manually.
4. In the Advertisement section, select whether to display advertisement pictures for users and
configure the related parameters.
Configure the following parameters:
Advertisement Specify whether to enable the Advertisement feature. With this feature
enabled, you can add advertisement pictures on the authentication page.
These advertisement pictures will be displayed before the login page
appears. You can also allow users to skip the advertisement by enabling
Allow Users To Skip Advertisement. The advertisement picture should
be less than 2MB. And only JPG, PNG, BMP, GIF and JPEG file types are
supported.
Picture Resource Upload advertisement pictures. When several pictures are added, they will
be played in a loop.
Advertisement Specify how long the advertisement will be displayed for. For this duration,
Duration Time the pictures will be played in a loop. If the duration time is not enough for all
the pictures, the rest will not be displayed.
21Picture Carousel Specify the picture carousel interval. For example, if this value is set as 5
Interval seconds, the first picture will be displayed for 5 seconds, followed by the
second picture for 5 seconds, and so on.
Allow Users To Skip Specify whether to enable this feature. With this feature enabled, the user
Advertisement can click the Skip button to skip the advertisement.
5. Click Apply.
Create Vouchers
Follow the steps below to create vouchers for authentication:
1. In the Basic Info section, click Voucher Manager. The voucher management page will appear. Go
to the Voucher page and click .
2. The following window will pop up. Configure the required parameters and click Apply.
22Configure the following parameters:
Code Length Specify the length of the voucher codes to be created.
Amount Enter the voucher amount to be generated.
Type Select Single Use or Multi Use.
Single Use means one voucher can only be distributed to one client. Multi Use
means one voucher can be distributed to several clients, who can use the
same voucher to access the network at the same time.
If you select Multi Use, enter the value of Max Users. When the number of
clients who are connected to the network with the same voucher reaches the
value, no more clients can use this voucher to access the network.
Duration Select the period of validity of the Voucher.
The options include 8 hours, 2 days and User-defined. The period of valid of
the voucher is reckoned from the time when it is used for the first time.
Rate Limit Select whether to enable download rate limit. With this option enabled, you
(Download) can specify the limit of download rate.
Rate Limit (Upload) Select whether to enable upload rate limit. With this option enabled, you can
specify the limit of upload rate.
Traffic Limit Specify the total traffic limit for one voucher. Once the limit is reached, the
client can no longer access the network using the voucher.
Notes Enter a description for the Voucher (optional).
3. The Vouchers will be generated and displayed on the page.
4. Click to print a single voucher; click to print your selected vouchers;
click to print all unused vouchers.
235. Distribute the vouchers to clients, and then they can use the codes to pass authentication.
6. When the vouchers are invalid, you can click to delete the Voucher or click to
delete the selected vouchers.
Manage the Guests
On the Guest page, you can view the information of clients that have passed the portal
authentication and manage the clients.
You can select an icon to execute the corresponding operation:
Restrict the client to access the network.
Extend the effective time.
Create Operator Accounts
Operator account can be used to remotely manage the Local User Portal and Voucher Portal. Other
users can visit the URL https://Omada Controller Host’s IP Address:8043/hotspot (For example:
https://192.168.0.64:8043/hotspot) and use the Operator account to enter the portal management
page.
24 Note
•• Make sure the host that is used to enter the portal management page with operator account can visit the
Controller host.
•• Only the user that log in to the controller with the administrator role can add or remove the operator
account for portal management.
•• The users who enter the portal management page by operator account can only create local user accounts
and vouchers and manage the clients.
Follow the steps below to create Operator account.
1. Go to the Operator page.
2. Click and the following window will pop up.
3. Specify the Name, Password and Notes of the Operator account.
4. Select Site Privileges from the drop-down list (multiple options available) for the Operator
account.
5. Click Apply to create an Operator account. Then other users can use this account to enter the
hotspot administrative system.
1.5 SMS
With SMS portal configured, client can get verification codes using their mobile phones and enter
the received codes to pass the authentication.
Follow the steps below to configure SMS Portal:
1. Go to www.twilio.com/try-twilio and get a Twilio account. Buy the Twilio service for SMS. Then
get the account information, including ACCOUNT SID, AUTH TOKEN and Phone number.
2. Go to Wireless Settings > Basic Wireless Settings and create an SSID for the Portal.
3. Go back to the Portal configuration page. In the Basic Info section, complete the basic settings
for the portal authentication.
25Configure the following parameters:
Portal Name Specify a name for the Portal.
SSID Select an SSID for the Portal.
Authentication Type Select SMS.
Twilio SID Enter the Account SID for Twilio API Credentials.
Auth Token Enter the Authentication Token for Twilio API Credentials.
Phone Number Enter the phone number that is used to send verification messages to the
clients.
Maximum Users A telephone can get several codes via messages one by one, and different
clients can use different codes to pass the authentication. However, the
number of clients that is allowed to be authenticated using the same
telephone at the same time has a upper limit.
Specify the upper limit in this field.
Authentication The client's authentication will expire after the time period you set and the
Timeout client needs to log in again on the web authentication page to access the
network.
Options include 1 Hour, 8 Hours, 24 Hours, 7 Days and Custom. Custom
allows you to define the time in days, hours and minutes. The default value is
one hour.
Preset Country Code Set the default country code that will be filled automatically on the
authentication page.
HTTPS Redirect With this function enabled, the unauthorized clients will be redirected to the
Portal page when they are trying to browse HTTPS websites.
With this function disabled, the unauthorized clients cannot browse HTTPS
websites and are not redirected to the Portal page.
26Redirect If you enable this function, the portal will redirect the newly authenticated
clients to the configured URL.
Redirect URL If the Redirect function above is enabled, enter the URL that a newly
authenticated client will be redirected to.
4. In the Login Page section, configure the login page for the Portal.
Configure the following parameters:
Background Select the background type. Two types are supported: Solid Color and
Picture.
Background Color If Solid Color is selected, configure your desired background color through
the color picker or by entering the RGB value manually.
Background Picture If Picture is selected, click the Choose button and select a picture from
your PC. Drag and scale the clipping region to edit the picture and click
Confirm.
Logo Picture Click the Choose button and select a picture from your PC. Drag and scale
the clipping region to edit the picture and click Confirm.
In addtion, you can click and configure the logo position. The options
include Middle, Upper and Lower.
27Welcome Information Specify the welcome information.
In addtion, you can click and select your desired text color for the
welcome information through the color picker or by entering the RGB value
manually.
Copyright Specify the copyright information.
In addtion, you can click and select your desired text color for Copyright
information through the color picker or by entering the RGB value manually.
Terms of Service Enable or disable Terms of Service. With this option enabled, specify the
terms of service in the following box.
28Input Box Click and configure the input box.
Select your desired color for the input box through the color picker or by
entering the RGB value manually.
Button Click and configure the button.
Button Position: Set the position of the login button. The options include
Middle, Upper and Lower.
Button Color: Select your desired login button color through the color
picker or by entering the RGB value manually.
Button Text Color: Select your desired text color for the button through the
color picker or by entering the RGB value manually.
5. In the Advertisement section, select whether to display advertisement pictures for users and
configure the related parameters.
29Configure the following parameters:
Advertisement Specify whether to enable the Advertisement feature. With this feature
enabled, you can add advertisement pictures on the authentication page.
These advertisement pictures will be displayed before the login page
appears. You can also allow users to skip the advertisement by enabling
Allow Users To Skip Advertisement. The advertisement picture should
be less than 2MB. And only JPG, PNG, BMP, GIF and JPEG file types are
supported.
Picture Resource Upload advertisement pictures. When several pictures are added, they will
be played in a loop.
Advertisement Specify how long the advertisement will be displayed for. For this duration,
Duration Time the pictures will be played in a loop. If the duration time is not enough for all
the pictures, the rest will not be displayed.
Picture Carousel Specify the picture carousel interval. For example, if this value is set as 5
Interval seconds, the first picture will be displayed for 5 seconds, followed by the
second picture for 5 seconds, and so on.
Allow Users To Skip Specify whether to enable this feature. With this feature enabled, the user
Advertisement can click the Skip button to skip the advertisement.
6. Click Apply.
For more details about how to configure SMS Portal, you can go to https://www.tp-link.com/en/
configuration-guides.html and download the configuration guide for SMS Portal.
1.6 Facebook
With Facebook Portal configured, when clients connect to your Wi-Fi, they will be
redirected to your Facebook page. To access the internet, clients need to pass the
authentication on the page.
Note
Omada Controller will automatically create Free Authentication Policy entries for the Facebook Portal. You don’t
need to create them manually.
Follow the steps below to configure Facebook Portal:
1. Go to www.facebook.com and get a Facebook account. Create your Facebook page according
to your needs.
2. Go to Wireless Settings > Basic Wireless Settings and create an SSID for the Portal.
3. Go back to the Portal configuration page. In the Basic Info section, complete the settings for the
portal authentication.
30Configure the following parameters:
Portal Name Specify a name for the Portal.
SSID Select an SSID for the Portal.
Authentication Type Select Facebook.
Facebook Page Click this button to specify the Facebook Page.
Configuration
Facebook Checkin If the Facebook page is successfully got by the Omada Controller, the name
Location of the Facebook page will be displayed here.
HTTPS Redirect With this function enabled, the unauthorized clients will be redirected to the
Portal page when they are trying to browse HTTPS websites.
With this function disabled, the unauthorized clients cannot browse HTTPS
websites and are not redirected to the Portal page.
For more details about how to configure Facebook Portal, you can go to https://www.tp-link.com/
en/configuration-guides.html and download the configuration guide for Facebook Portal.
1.7 External RADIUS Server
If you have a RADIUS server, you can configure External RADIUS Server Portal. With this type of
portal, you can get two types of portal customization: Local Web Portal and External Web Portal.
The authentication login page of Local Web Portal is provided by the built-in portal server of the
controller. The External Web Portal is provided by external portal server.
Note
Omada Controller will automatically create Free Authentication Policy entries for the External RADIUS Portal.
Follow the steps below to configure External RADIUS Server Portal:
1. Go to Wireless Settings > Basic Wireless Settings and create an SSID for the Portal.
2. Go back to the Portal configuration page. In the Basic Info section, complete the basic settings
for the portal authentication.
31Configure the following parameters:
Portal Name Specify a name for the Portal.
SSID Select an SSID for the Portal.
Authentication Type Select External RADIUS Server.
Authentication Timeout The client’s authentication will expire after the time period you set and
the client needs to log in again on the web authentication page to access
the network.
Options inclde 1 Hour, 8 Hours, 24 Hours, 7 Days, Custom. Custom
allows you to define the time in days, hours, and minutes. The default
value is one hour.
RADIUS Server IP Enter the IP address of the RADIUS server.
RADIUS Port Enter the port number you have set on the RADIUS server.
RADIUS Password Enter the password you have set on the RADIUS server.
Authentication Mode Select the authentication protocol for the RADIUS server. Two
authentication protocols are available: PAP and CHAP.
32NAS ID Configure a Network Access Server Identifier (NAS ID) using 1 to 64
characters on the portal. The NAS ID is sent to the RADIUS server by the
controller through an authentication request packet. With the NAS ID
which classifies users to different groups, the RADIUS server can send a
customized authentication response. The default value is TP-Link.
RADIUS Accounting Enable or disable RADIUS Accounting feature.
Accounting Server IP Enter the IP address of the accounting server.
Accounting Server Port Enter the port number of the accounting server. The default port number
is 1813.
Accounting Server Enter the shared secret key of the accounting server.
Password
Interim Update With this option enabled, you can specify the duration between
accounting information updates. By default, the function is disabled.
Enter the appropriate duration between updates for EAPs in Interim
Update Interval.
Interim Update Interval With Interim Update enabled, specify the appropriate duration between
updates for EAPs. The default duration is 600 seconds.
Portal Customization Select Local Web Portal or External Web Portal.
Local Web Portal: If this option is selected, refer to step 3 to configure
the login page and step 4 to configure the advertisement.
External Web Portal: If this option is selected, follow the steps below.
1. Configure the external RADIUS server.
2. Enter the authentication login page’s URL provided by the external
portal server in the External Web Portal URL field.
Note that you should update the External Web Portal after you upgrade
your controller with old version to version 3.1.4 or above. Otherwise, the
External Web Portal will not take effect.
HTTPS Redirect With this function enabled, the unauthorized clients will be redirected to
the Portal page when they are trying to browse HTTPS websites.
With this function disabled, the unauthorized clients cannot browse
HTTPS websites and are not redirected to the Portal page.
Redirect If you enable this function, the portal will redirect the newly authenticated
clients to the configured URL.
It is disabled by default.
Redirect URL If the Redirect function above is enabled, enter the URL that a newly
authenticated client will be redirected to.
3. Local Web Portal is configured, configure the login page for the Portal in the Login Page section.
33Configure the following parameters:
Background Select the background type. Two types are supported: Solid Color and
Picture.
Background Color If Solid Color is selected, configure your desired background color through
the color picker or by entering the RGB value manually.
Background Picture If Picture is selected, click the Choose button and select a picture from
your PC. Drag and scale the clipping region to edit the picture and click
Confirm.
Logo Picture Click the Choose button and select a picture from your PC. Drag and scale
the clipping region to edit the picture and click Confirm.
In addtion, you can click and configure the logo position. The options
include Middle, Upper and Lower.
Welcome Information Specify the welcome information.
In addtion, you can click and select your desired text color for the
welcome information through the color picker or by entering the RGB value
manually.
34Copyright Specify the copyright information.
In addtion, you can click and select your desired text color for Copyright
information through the color picker or by entering the RGB value manually.
Terms of Service Enable or disable Terms of Service. With this option enabled, specify the
terms of service in the following box.
Input Box Click and configure the input box.
Select your desired color for the input box through the color picker or by
entering the RGB value manually.
35Button Click and configure the button.
Button Position: Set the position of the login button. The options include
Middle, Upper and Lower.
Button Color: Select your desired login button color through the color
picker or by entering the RGB value manually.
Button Text Color: Select your desired text color for the button through the
color picker or by entering the RGB value manually.
4. If Local Web Portal is configured, select whether to display advertisement pictures for users and
configure the related parameters in the Advertisement section, .
Configure the following parameters:
Advertisement Specify whether to enable the Advertisement feature. With this feature
enabled, you can add advertisement pictures on the authentication page.
These advertisement pictures will be displayed before the login page
appears. You can also allow users to skip the advertisement by enabling
Allow Users To Skip Advertisement. The advertisement picture should
be less than 2MB. And only JPG, PNG, BMP, GIF and JPEG file types are
supported.
Picture Resource Upload advertisement pictures. When several pictures are added, they will
be played in a loop.
Advertisement Specify how long the advertisement will be displayed for. For this duration,
Duration Time the pictures will be played in a loop. If the duration time is not enough for all
the pictures, the rest will not be displayed.
36Picture Carousel Specify the picture carousel interval. For example, if this value is set as 5
Interval seconds, the first picture will be displayed for 5 seconds, followed by the
second picture for 5 seconds, and so on.
Allow Users To Skip Specify whether to enable this feature. With this feature enabled, the user
Advertisement can click the Skip button to skip the advertisement.
5. Click Apply.
1.8 External Portal Server
The option of External Portal Server is designed for the developers. They can customized their
own authentication type according to the interface provided by Omada Controller, e.g. message
authentication and WeChat authentication etc.
1. Go to Wireless Settings > Basic Wireless Settings and create an SSID for the Portal.
2. Go back to the Portal configuration page. In the Basic Info section, complete the settings for the
portal authentication.
Portal Name Specify a name for the Portal.
SSID Select an SSID for the Portal.
Authentication Type Select External Portal Server.
External Portal Server Enter the complete authentication URL that redirect to an external
portal server, for example:
http://192.168.0.147:8880/portal/index.php or http://192.168.0.147/
portal/index.html
HTTPS Redirect With this function enabled, the unauthorized clients will be redirected
to the Portal page when they are trying to browse HTTPS websites.
With this function disabled, the unauthorized clients cannot browse
HTTPS websites and are not redirected to the Portal page.
3. Click Apply.
372 Free Authentication Policy
Free Authentication Policy allows some specified clients to access the network resources without
authentication. Follow the steps below to add free authentication policy.
1. Go to Wireless Control > Free Authentication Policy.
2. Click and the following window will pop up.
3. Configure the following parameters. When all conditions are met, the client can access the
network without authentication.
38Policy Name Specify a name for the policy.
Match Mode Select the match mode for the policy. Two options are provided:
URL: With this option selected, configure an URL that is allowed to be visited
by the clients without authentication.
IP-MAC Based: With this option selected, configure Source IP Range,
Destination IP Range, Source MAC and Destination MAC to specify the
specific clients and service that will follow the Free Authentication feature.
URL Set the URL.
Source IP Range Set the Source IP Range with the subnet and mask length of the clients.
Destination IP Range Set the Destination IP Range with the subnet and mask length of the server.
Source MAC Set the MAC address of client.
Destination Port Enter the port the service uses.
Status Check the box to enable the policy.
4. Click Apply and the policy is successfully added.
39You can also read