JetCis Quick Start Guide - Evaluation Platform for Mira Sensor Family For All Evaluation Kits Based on NVIDIA Jetson Nano - ams AG
←
→
Page content transcription
If your browser does not render page correctly, please read the page content below
Quick Start Guide
QG001006

JetCis
Evaluation Platform for Mira Sensor Family

For All Evaluation Kits Based on NVIDIA Jetson Nano
v1-00 • 2021-Feb-04
Document Feedback         JetCis ● Evaluation Platform for Mira Sensor
                                                                                                                                   Family
                                                                                                                           Content Guide

Content Guide

1         Introduction ................................... 3                  5.3      Python Scripting, API and More ................. 17
                                                                              5.4      Shutting Down the System ......................... 18
1.1       Description.................................................... 3
1.2       Key Features ................................................ 3     6        Transferring Data to Another
                                                                                       Computer ...................................... 19
2         Out of the Box................................ 4
                                                                              7        Updating the Software ................. 20
3         Hardware Description ................... 5
                                                                              7.1      Updating the GUI Software......................... 20
3.1       NVIDIA Jetson Nano Schematic View ......... 5
3.2       Connecting the Hardware ............................. 6             8        Resolving Common Problems .... 21
3.3       Powering Up the System .............................. 7
4         ISP Architecture ............................ 8
5         Software Description .................... 9
5.1       The GNOME Desktop .................................. 9
5.2       JetCis GUI .................................................. 11

Quick Start Guide • PUBLIC
QG001006 • v1-00 • 2021-Feb-04                                                                                                       21 │ 2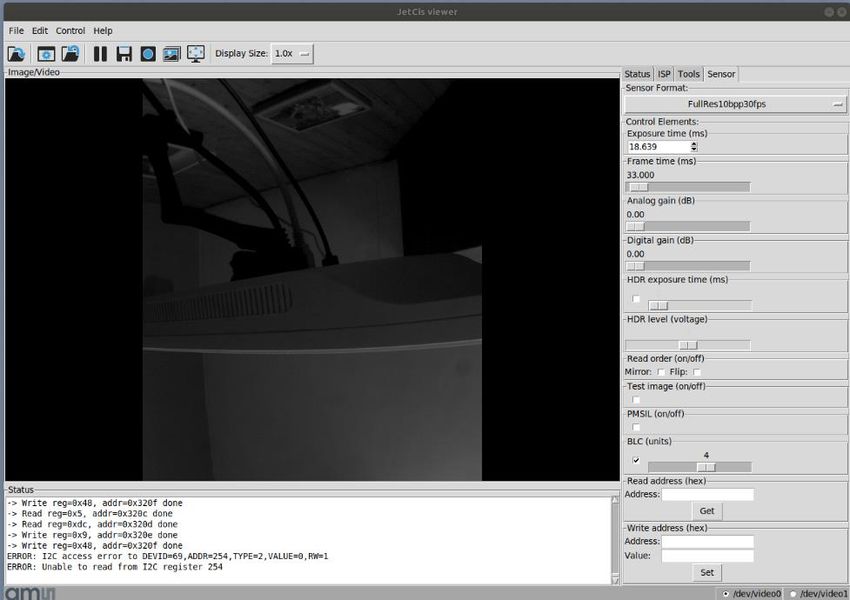
Document Feedback          JetCis ● Evaluation Platform for Mira Sensor
                                                                                                                    Family
                                                                                                               Introduction

1             Introduction

1.1           Description
              JetCis is a platform for evaluating CMOS image sensors of the Mira product family. The platform is
              built on top of an NVIDIA Jetson Nano developer kit. The purpose of this guide is not to explain the
              sensor functionality, nor will it replace the NVIDIA Jetson manual. For that purpose, please refer to the
              appropriate datasheet/manual. The goal of this document is to get started quickly with this evaluation
              kit, to connect the camera board to the NVIDIA Jetson, to explain the GUI and how to take pictures
              with the kit. The EVK (Evaluation Kit) does not need an external computer to be operated, instead the
              NVIDIA Jetson runs a modified version of GNU/Linux Ubuntu 18.04 and can be operated by
              connecting keyboard, mouse and monitor.

1.2           Key Features
              ●       Raw image capture for sensor evaluation
              ●       H.264 video capture
              ●       Dual camera support
              ●       API with python example scripts for image capture automation
              ●       Hardware accelerated NVIDIA ISP pipeline

Quick Start Guide • PUBLIC
QG001006 • v1-00 • 2021-Feb-04                                                                                      21 │ 3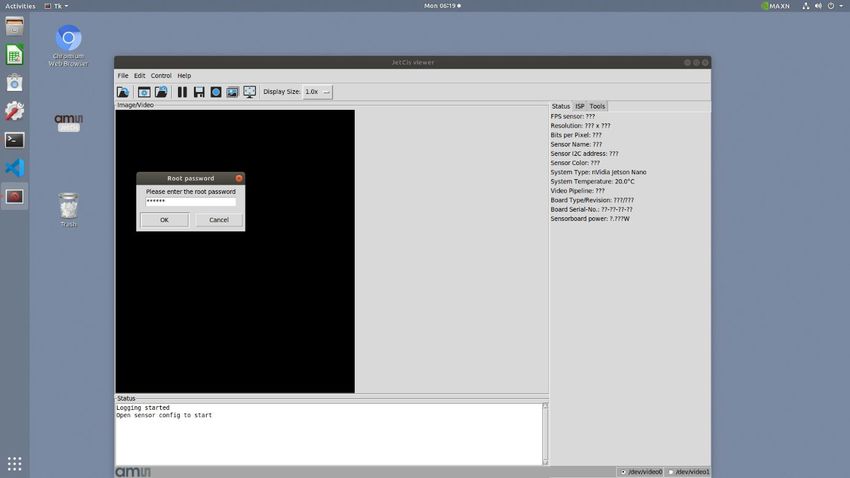
Document Feedback JetCis ● Evaluation Platform for Mira Sensor
Family
Out of the Box
2 Out of the Box
The kit contains the following items out of the box. Please check if all items listed below are in the box.
● NVIDIA Jetson Nano
● Sensor board with lens, lens holder, VCSEL
● Connector cable for sensor board
● Tripod with adaptor for sensor board mounting
● Power supply EU/UK/US
● Flash drive with documentation
Carefully follow all the steps in the next chapter. Make sure the power supply is not yet connected
before booting. Always make sure the power adapter is disconnected when connecting or
disconnecting any other hardware.
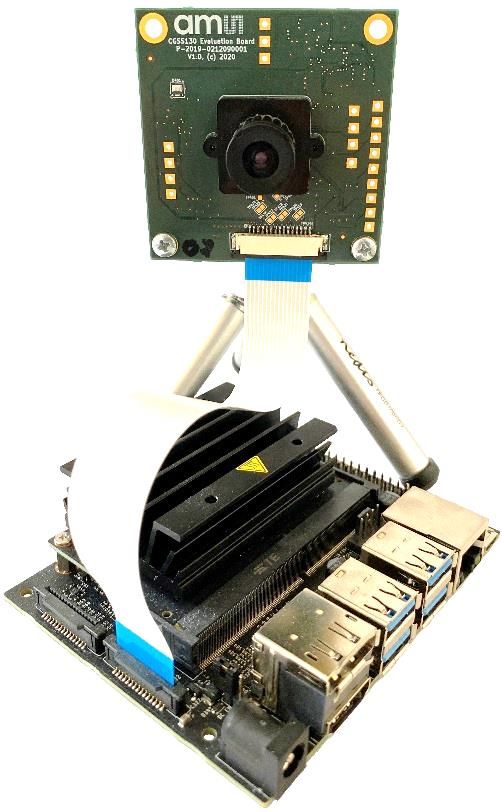
Figure 1:
Typical Setup of the Evaluation Kit
CAUTION
1. Do not connect or disconnect the sensor boards while the system is powered on. This could
cause short circuits and may damage the system.
2. Do not put anything on top of the Jetson board as this might cause short circuits.
Quick Start Guide • PUBLIC
QG001006 • v1-00 • 2021-Feb-04 21 │ 4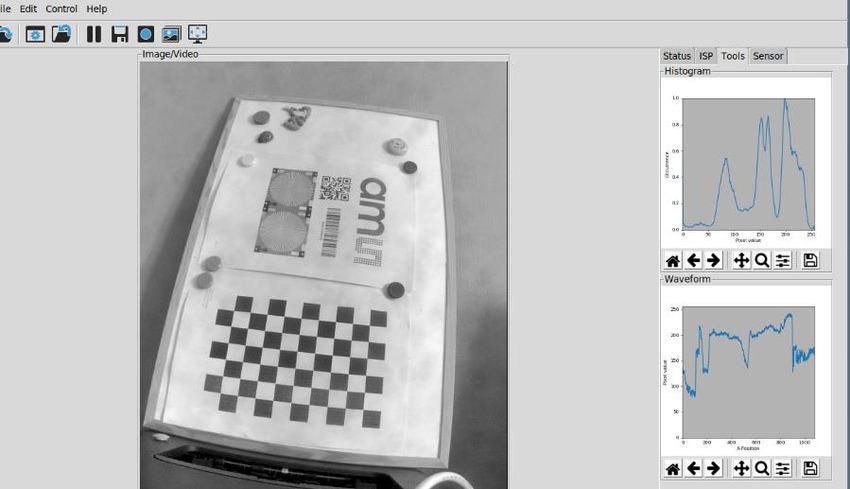
Document Feedback JetCis ● Evaluation Platform for Mira Sensor
Family
Hardware Description
3 Hardware Description
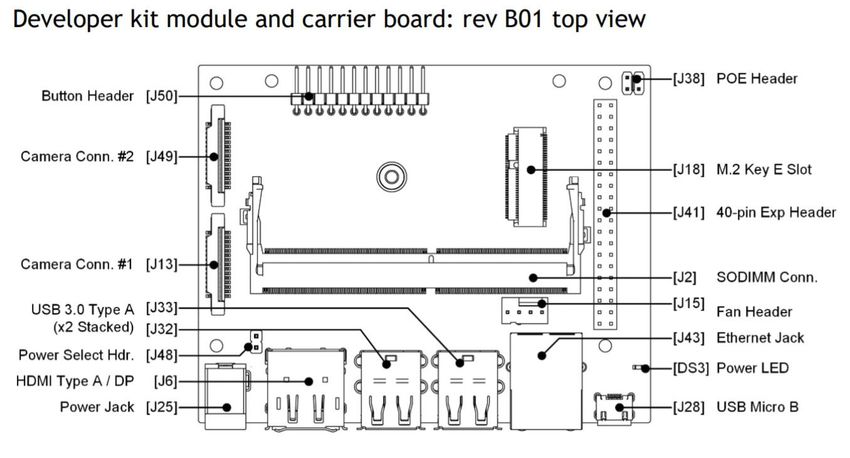
3.1 NVIDIA Jetson Nano Schematic View
Figure 2:
Schematic Overview of the Jetson Nano Connections, Featuring 2 Camera Connectors.
Quick Start Guide • PUBLIC
QG001006 • v1-00 • 2021-Feb-04 21 │ 5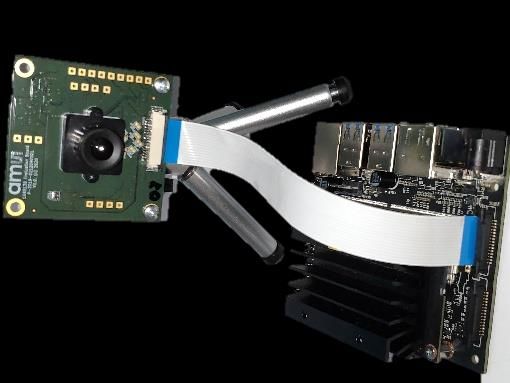
Document Feedback         JetCis ● Evaluation Platform for Mira Sensor
                                                                                                                   Family
                                                                                                    Hardware Description

3.2           Connecting the Hardware
              Figure 3:
              Jetson Nano Connections. Mind the Orientation of the Blue Part of the Cable

              Connecting the Jetson Nano to the sensor board is done by opening the connectors both on the
              sensor board and on the Jetson Nano board. Make sure to insert the cable in the Camera Conn.1 port
              on the right. Insert the flex cable as depicted on Figure 3. An optional, second camera board can be
              connected to Camera Con#2 port.

              Connect the Nano to the sensor board using the flex cable. Mind the orientation of the blue part.

              The EVK does not include a keyboard, mouse and display. The user can use his own hardware
              instead. Four USB ports are available, which can be used for keyboard and mouse. Next, there is an
              HDMI and DisplayPort available for a display. For the internet connection, Ethernet LAN is available.

              Connect other hardware such as monitor, keyboard and mouse.

Quick Start Guide • PUBLIC
QG001006 • v1-00 • 2021-Feb-04                                                                                    21 │ 6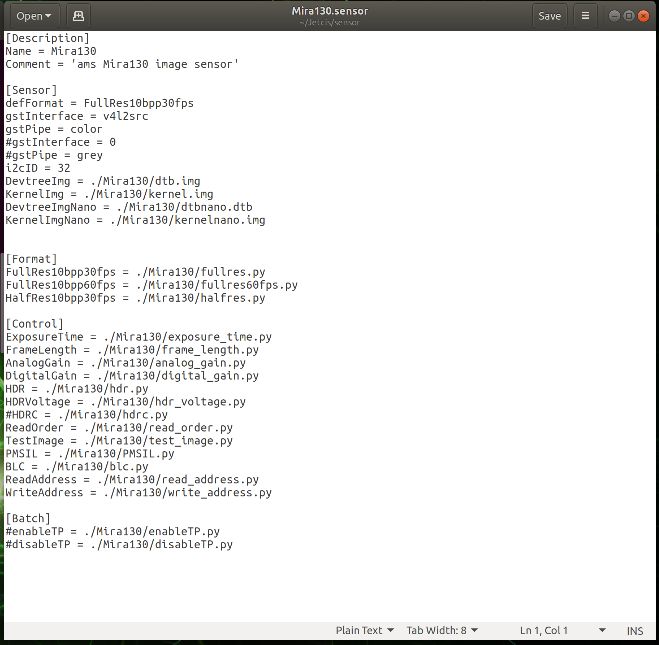
Document Feedback         JetCis ● Evaluation Platform for Mira Sensor
                                                                                                                  Family
                                                                                                   Hardware Description

3.3           Powering Up the System
              The Jetson Nano does not have a power button. There are two ways to power the Jetson Nano, either
              with a 5 V barrel jack, or via a micro USB connector. To power on the system, plug in the cable in the
              appropriate connector (J25 or J28 in Figure 2). Depending on the power input source, the J48 jumper
              may have to be removed. Refer to Nvidia documentation for more information.

              The system will then boot up once power is connected.

              Plug in the barrel 5 V power supply or the microUSB cable.

Quick Start Guide • PUBLIC
QG001006 • v1-00 • 2021-Feb-04                                                                                   21 │ 7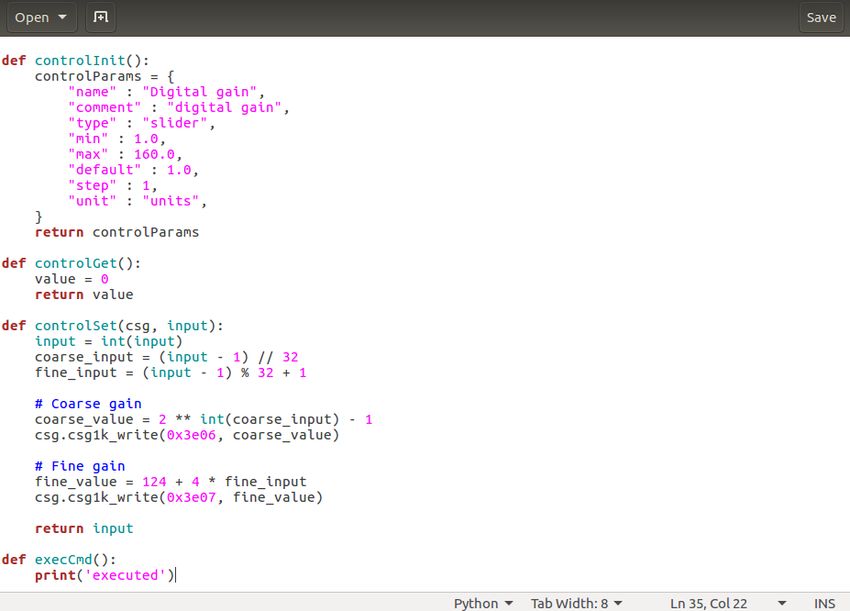
Document Feedback        JetCis ● Evaluation Platform for Mira Sensor
                                                                                                                  Family
                                                                                                        ISP Architecture

4             ISP Architecture
              The JetCis system integrates two image pipelines.

              One is able to capture RAW, unprocessed images. These images are often desired to judge the image
              quality of the image sensor or to perform characterization of certain parameters.

              On the other hand, we have the ISP pipeline that is used for the live view in the GUI, as well as for
              capturing video. This pipeline is able to do hardware accelerated image scaling, automatic gain, lens
              correction, gamma correction, edge enhancement and more.

              Figure 4:
              Simplified Image Pipeline

Quick Start Guide • PUBLIC
QG001006 • v1-00 • 2021-Feb-04                                                                                   21 │ 8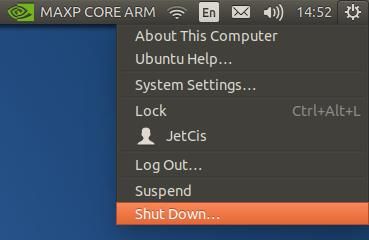
Document Feedback          JetCis ● Evaluation Platform for Mira Sensor
                                                                                                                    Family
                                                                                                      Software Description

5             Software Description
              This chapter will explain how to use the graphical user interface of the EVK. Before proceeding to this
              step, check if the system is powered on, and the login screen appears.

5.1           The GNOME Desktop
              Figure 5:
              Desktop/Main Screen

              After booting, the GNOME desktop will appear. On the left, there is the sidebar, with various useful
              applications such as a file browser, a text editor, an internet browser, a terminal and a system settings
              shortcut. On the desktop, you will find a shortcut to launch the ams GUI.
              For more general information on the GNOME desktop environment, please refer to the Gnome
              desktop website (https://www.gnome.org/)

5.1.1         Configuring the Screen Resolution

              For an optimal experience, the resolution of the system should match the resolution of the connected
              monitor. To change the resolution, press Start key (bottom left), Win key or ALT + F1 + Enter on your
              keyboard and search for Displays. There you should find an option to adjust the display resolution and
              scaling options.

Quick Start Guide • PUBLIC
QG001006 • v1-00 • 2021-Feb-04                                                                                     21 │ 9
Document Feedback         JetCis ● Evaluation Platform for Mira Sensor
                                                                                                                   Family
                                                                                                     Software Description

5.1.2         Configuring the Keyboard Layout

              By default, the systems sets the keyboard to US QWERTY. In case another keyboard layout is
              desired, this can be changed in the system settings menu. Refer to the Ubuntu manual for more
              information: https://help.ubuntu.com/

5.1.3         Connecting to a Network

              The Jetson Nano features an Ethernet port for internet access.

5.1.4         Unlocking the System

              Normally the system will automatically log in at boot. Enter the following credentials whenever a pop
              up dialog appears, the screen is locked or sudo is used in a terminal:

              User: jetcis

              Password: jetcis

Quick Start Guide • PUBLIC
QG001006 • v1-00 • 2021-Feb-04                                                                                  21 │ 10
Document Feedback JetCis ● Evaluation Platform for Mira Sensor
Family
Software Description
5.2 JetCis GUI
5.2.1 Starting the GUI
Figure 6:
JetCis Viewer
On the desktop, there is a shortcut called JetCisViewer.
Double click the desktop icon to open the GUI software. There will appear a prompt to ask a
password. Enter the default password (‘jetcis’).
Information
The GUI can be opened twice. This can be useful in situation where the user wants to stream
images from two sensors simultaneously.
5.2.2 Select Video Source
Select either video0 (default) or video1 in the bottom right corner of the GUI before proceeding to
the next step.
Quick Start Guide • PUBLIC
QG001006 • v1-00 • 2021-Feb-04 21 │ 11Document Feedback JetCis ● Evaluation Platform for Mira Sensor
Family
Software Description
5.2.3 Loading a Configuration File
The next step is to select the appropriate configuration file that matches the sensor board.
Now press File -> Open Sensor Configuration and select the desired configuration file in the directory
~/JetCis/sensor. Make sure the connected sensor board matches the configuration file. Click open to
load all the registers and GUI configurations. When the register upload is finished, a live image will
appear.
Figure 7:
Live Image
Information
The image shown in the live image has a gamma curve applied. When saving an image, the actual
raw data is saved.
5.2.4 GUI Features
The GUI contains different features as seen in Figure 7. In this section, a detailed overview is given for
each of the areas in the window.
Quick Start Guide • PUBLIC
QG001006 • v1-00 • 2021-Feb-04 21 │ 12Document Feedback JetCis ● Evaluation Platform for Mira Sensor
Family
Software Description
Menu Bar
Figure 8:
Menu Bar
On top of the window, several actions can be selected by pressing the buttons in the menu bar. For
some actions, a shortcut key exists. This is written on the right, e.g. F to toggle full screen.
Information
Documentation such as datasheets and schematics can be accessed from the help menu.
Toolbar
Figure 9:
Toolbar
Below the menu bar, the toolbar is present. The meaning of the different icons are from left to right:
● Open a sensor configuration file (see tooltip when hovering the pointer)
● Save GUI settings
● Open GUI settings
● Play/pause the live stream
● Save the presented images as 16-bit raw TIFF
● Capture a video in 8-bit h264 compression
● Burst image capture as 16-bit raw TIFF
● Enable full screen
● Display size
Quick Start Guide • PUBLIC
QG001006 • v1-00 • 2021-Feb-04 21 │ 13Document Feedback JetCis ● Evaluation Platform for Mira Sensor
Family
Software Description
Widgets
On the right of the window, widgets are shown. This contains four tabs:
● Status: sensor live information, see figure below
● ISP: image signal processing, see figure below
● Sensor: control to change sensor parameters, see Figure 7
Figure 10:
Status and ISP Tab
Waveform and Histogram
Figure 11:
Waveform and Histogram
Two image analysis tool are implemented in the GUI. These are a histogram and a row/column profile
of the image. This is illustrated in the figure below. The plots are a live view of the presented image
and can be modified with the buttons on the bottom of the window. To zoom in on the image, go to the
Quick Start Guide • PUBLIC
QG001006 • v1-00 • 2021-Feb-04 21 │ 14Document Feedback JetCis ● Evaluation Platform for Mira Sensor
Family
Software Description
main window again and scroll on the live image. Hence, the plot will be updated. Note that drawing the
plot will reduce the framerate, so it is better to pause the image when displaying the histogram.
5.2.5 Read/Write Registers with the GUI
On the right side, it is possible to enter an address in the ‘Read’ section. Press GET or ENTER to
readout the value from the register. The output will be shown in the Status window at the bottom.
To write a register, enter address and value in the appropriate fields. Press the SET or ENTER button
to write. Note that all addresses and values should be written in a hexadecimal notation, for example,
‘3e09’ can be entered.
Figure 12:
Read and Write Registers with the GUI
5.2.6 Save and View Images/Video
Figure 13:
Capturing Images Using the Toolbar Buttons.
1 Save picture (raw/tiff 16-bit)
2 Start/stop video capture (H.264)
3 Capture burst sequence (raw/tiff 16-bit)
Starting from version 2.1.7, images are saved as 16-bit TIFF. This means, when using the sensor in
12-bit mode, all pixel values are multiplied to scale to 16-bit TIFF values. There is also a burst capture
functionality, which will capture a predefined amount of images. The number of images can be
configured by modifying the file ~/JetCis/config.cfg.
Images can be opened with most image viewers.
To capture video, click the video icon. To stop recording, click it again.
Quick Start Guide • PUBLIC
QG001006 • v1-00 • 2021-Feb-04 21 │ 15Document Feedback JetCis ● Evaluation Platform for Mira Sensor
Family
Software Description
5.2.7 Adding Widgets to the GUI (advanced users)
To automate a specific setting, a widget can be added to the GUI. To add a widget to the GUI, select
first the directory specific to the sensor, for example: ~/JetCis/Mira130-10bpp2lanes where all the
descriptions of the already present widgets are located. Here, select a random python file or one that
contains settings which are close to what is desired. Copy and paste the file in the same directory and
change the filename. This file will contain the functionality of the widget.
When the file is created, go to the directory ~/JetCis/sensor. Here, the configuration files of the
sensors are stored. Open the file Mira130-10bpp2lanes.sensor with a text editor, e.g. Gedit or Vim. In
this file, specify under [Control] the path of the python file made earlier to add the widget to the GUI.
Figure 14:
Add Python File to Configuration File
In the created python file, you need to have at least the function controlInit() and controlSet(). Those
are normally present because a file was copied. In controlInit(), change the name and other settings.
The types where you can choose from are slider, list, checkbutton, text_entry_read, text_entry_write,
checkbutton_and_slider and two_checkbuttons. In controlSet(), specify what will happen when the
widget is changed by e.g. moving a slider or pressing a button.
Quick Start Guide • PUBLIC
QG001006 • v1-00 • 2021-Feb-04 21 │ 16Document Feedback JetCis ● Evaluation Platform for Mira Sensor
Family
Software Description
Figure 15:
Example Code of the Digital Gain Slider
3.
5.3 Python Scripting, API and More
Besides the GUI, there is another possibility to interface with the camera board. In the folder
~/JetCis/scripting the user can find multiple example python script to directly interface with the camera.
To edit and run the python scripts, an editor such as VS Code can be installed on the Jetson Nano.
The default installed text editor ‘Gedit’ can also be used to edit the python files. As an alternative, the
scripts can be run from the command line.
Quick Start Guide • PUBLIC
QG001006 • v1-00 • 2021-Feb-04 21 │ 17Document Feedback JetCis ● Evaluation Platform for Mira Sensor
Family
Software Description
To run one of the scripts:
1. Make sure the GUI is closed
2. Open a terminal from the folder containing the script (right click -> new terminal)
3. Execute the following command, and the python script will be executed:
python3 example_file.py
4. Or for help, enter to see command line arguments:
python3 example_file.py –help
5. Some scripts support arguments, so you can run e.g.:
python3 dual_cam.py –e 5 –d 0 1
this script will open a live view with 2 cameras connected and exposure of 5 ms
For more information or feature requests, contact your ams application support person.
5.4 Shutting Down the System
Figure 16:
Shut Down Screen
Click the top right icon in the status bar, and click shutdown. The system will turn off. Now it is safe to
plug or unplug the sensor boards.
Quick Start Guide • PUBLIC
QG001006 • v1-00 • 2021-Feb-04 21 │ 18Document Feedback JetCis ● Evaluation Platform for Mira Sensor
Family
Transferring Data to Another Computer
6 Transferring Data to Another Computer
Using the free application WinSCP, one can copy files between a JetCis kit and a Windows computer.
1. Make sure the JetCis is connected to the internet.
2. Then, find its ip address by running ifconfig in a terminal.
3. On the Windows computer, create a new session in WinSCP. Choose for SFTP protocol, enter
the credentials and press Login.
4. You can then browse files on the JetCis and drag and drop to copy files to your Windows PC.
Figure 17:
WinSCP
Quick Start Guide • PUBLIC
QG001006 • v1-00 • 2021-Feb-04 21 │ 19Document Feedback JetCis ● Evaluation Platform for Mira Sensor
Family
Updating the Software
7 Updating the Software
7.1 Updating the GUI Software
Contact your ams Application Support team for information on how to update the GUI software.
They will provide you with further instructions. Note: an internet connection is advised when updating
the kit.
Checkout https://ams.com/download-center for updates or contact your application engineer.
The update procedure typically goes as follows:
1. Download the zip file from the link above
2. Copy the zip file to the downloads folder of the NVidia Jetson Nano
3. Right click the zip folder, and press ‘open with Archive manager’
4. Click Extract
5. Go to the folder called ShellInstaller
6. Right click in this folder and click Open in Terminal
7. Enter the command: “sudo chmod +x install.sh”
8. Enter the command: “./install.sh”
9. Open the GUI via the desktop shortcut
Quick Start Guide • PUBLIC
QG001006 • v1-00 • 2021-Feb-04 21 │ 20Document Feedback JetCis ● Evaluation Platform for Mira Sensor
Family
Resolving Common Problems
8 Resolving Common Problems
This chapter explains how to resolve the most common issues.
Figure 18:
Common Issues
Issue Solution/Suggestion
Make sure the power supply is plugged in the wall socket and in the
The system is not booting NVIDIA Jetson. Make sure the red POWER LED is on after pressing
the power button.
Make sure the HDMI cable is plugged in and the correct input
Display remains blank source is selected on the monitor. Also, make sure the POWER LED
is on.
Turn off the system. Make sure the flat cable is properly connected
No image in the GUI
to the board on both sides. Turn on the system.
The image is not sharp Rotate the lens to focus.
Headquarters Please visit our website at www.ams.com
ams AG Buy our products or get free samples online at www.ams.com/Products
Tobelbader Strasse 30 Technical Support is available at www.ams.com/Technical-Support
8141 Premstaetten Provide feedback about this document at www.ams.com/Document-Feedback
Austria, Europe For sales offices, distributors and representatives go to www.ams.com/Contact
Tel: +43 (0) 3136 500 0 For further information and requests, e-mail us at ams_sales@ams.com
Copyright ams AG. Trademarks Registered. All rights reserved. The material herein may not be reproduced, adapted, merged,
translated, stored, or used without the prior written consent of the copyright owner.
ams AG shall not be liable to recipient or any third party for any damages, including but not limited to personal injury, property
damage, loss of profits, loss of use, interruption of business or indirect, special, incidental or consequential damages, of any
kind, in connection with or arising out of the furnishing, performance or use of the technical data herein. No obligation or
liability to recipient or any third party shall arise or flow out of ams AG rendering of technical or other services.
Quick Start Guide • PUBLIC
QG001006 • v1-00 • 2021-Feb-04 21 │ 21You can also read