Performance Installs AXO-3-288 & -289 Lowering Springs
←
→
Page content transcription
If your browser does not render page correctly, please read the page content below
AXO-3-288 & -289 Lowering Springs                              Guide ID: 888 - Approved Release: R4.00 [major] 2021-09-01

                                     Performance Installs
              AXO-3-288 & -289 Lowering Springs
 Installation Instructions for the CorkSport Performance Lowering Springs for the 2019+ Mazda 3
                                      and 2021+ Mazda 3 Turbo.

                                       Written By: Barett Strecker

This document was generated on 2021-09-01 10:03:11 AM (MST).

© 2021                                                                                                       Page 1 of 42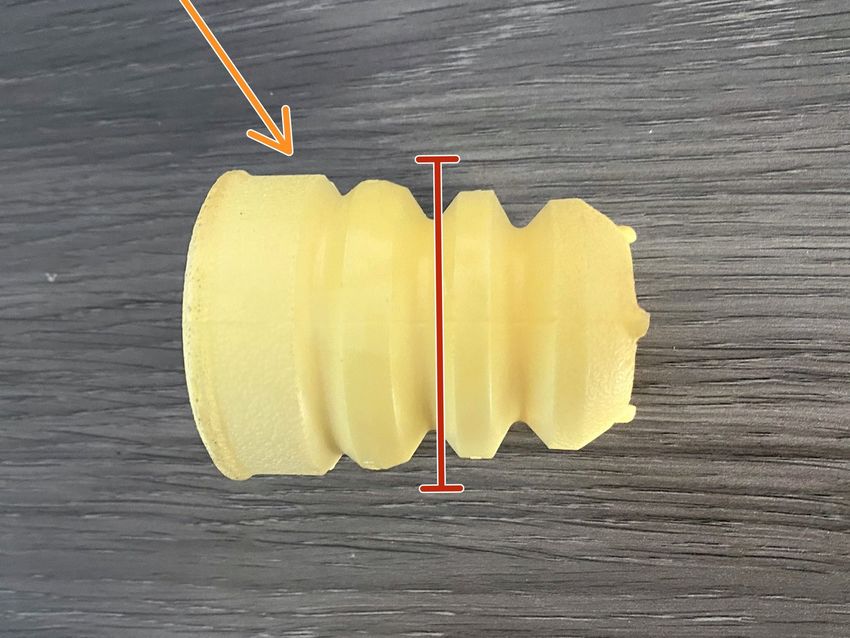
AXO-3-288 & -289 Lowering Springs                              Guide ID: 888 - Approved Release: R4.00 [major] 2021-09-01

    INTRODUCTION

    In this installation guide we have provided step by step instructions to remove the OEM front and
    rear springs and install the CorkSport Performance Lowering Springs.

    Advisory:

          Working under the vehicle requires a safe and sturdy location for the vehicle to sit on
          jackstands.
          Spring compressors can be dangerous. Follow the manufacturer's instructions and safety
          precautions to prevent injury.

This document was generated on 2021-09-01 10:03:11 AM (MST).

© 2021                                                                                                       Page 2 of 42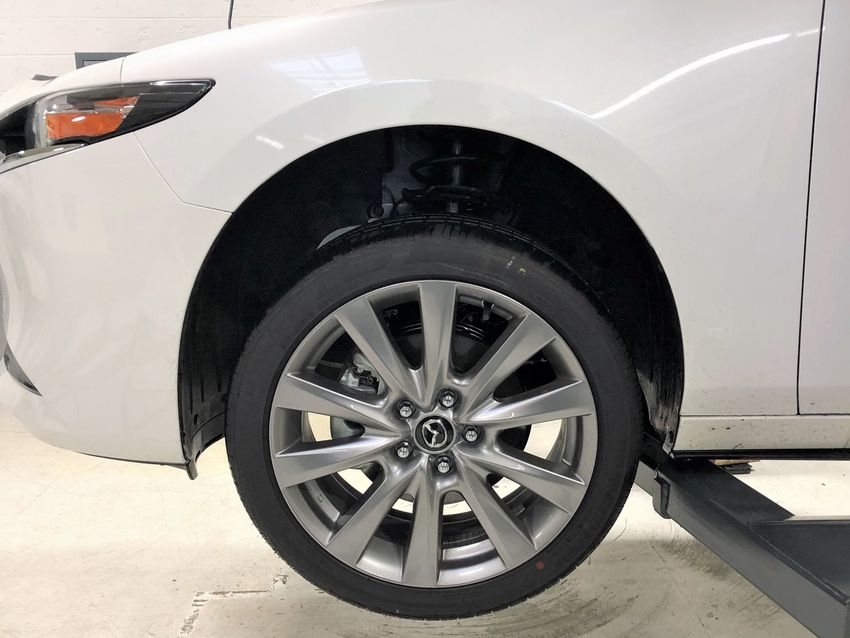
AXO-3-288 & -289 Lowering Springs                              Guide ID: 888 - Approved Release: R4.00 [major] 2021-09-01

      TOOLS:                                                          PARTS:
     Hydraulic Jack (1)                                               AXO-3-28X Front Spring (2)
     Jack Stand (2)                                                   AXO-3-28X Rear Spring (2)
     Spring Compressors (2)
     3⁄8" Drive Ratchet (1)
     1⁄2" Drive Breaker Bar (1)
     1⁄2" Torque Wrench (1)
     1⁄2" Impact Gun (if available) (1)
     3/8" Drive Electric Impact Gun (1)
     10mm Socket - Deep (1)
     12mm Socket - Deep (1)
     14mm Socket - Deep (1)
     17mm Socket - Deep (1)
     21mm Socket - Deep (1)
     5mm Allen Key Socket (1)
     6mm Allen Key Socket (1)
     Wrench, 14mm (1)
     Wrench, 17mm (1)
     Wrench, 19mm (1)
     Small Needle Nose Pliers (1)
     Flathead Screwdriver (1)
     Razor Knife (1)
     WD-40 Lubricant Spray (1)
     Shop Towels/Rags (1)
     Small Sledge Hammer (1)
     Large Wire Cutters/Bolt Cutters (1)
     Safety Glasses (1)
     Gloves (1)

This document was generated on 2021-09-01 10:03:11 AM (MST).

© 2021                                                                                                       Page 3 of 42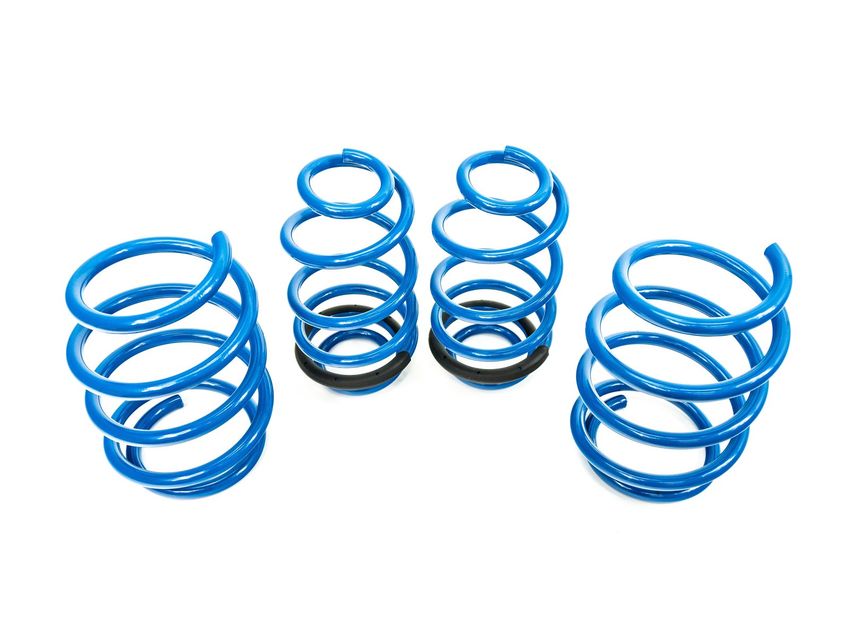
AXO-3-288 & -289 Lowering Springs Guide ID: 888 - Approved Release: R4.00 [major] 2021-09-01
Step 1 — Getting Started
First and foremost; THANK YOU for
becoming a part of the CorkSport
Family. We hope to bring you the
highest level of Parts, Customer
Service, & Support
How To Use These Instructions
The instruction format will relate
colored marking in the image to
the color dot in the text to the
right of the image
The vehicle used in these
instructions was a 2020 Mazda 3
Sedan AWD. Other model years,
hatchback vehicles, and FWD
vehicles will be identical.
These instructions were written
using a non-turbo model. Installation
of springs on turbo model is identical
unless noted.
Springs for turbocharged models
will be red instead of the blue
shown in the following pages.
This document was generated on 2021-09-01 10:03:11 AM (MST).
© 2021 Page 4 of 42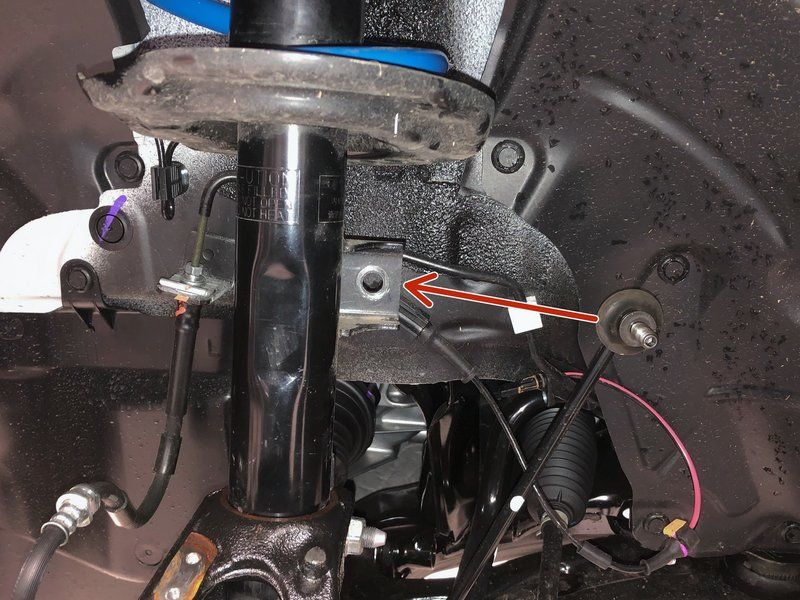
AXO-3-288 & -289 Lowering Springs Guide ID: 888 - Approved Release: R4.00 [major] 2021-09-01
Step 2 — Lifting the Car & Removing the Front Wheel
Ensure the vehicle is parked on a level surface before proceeding.
Start by lifting up the front of the car using the hydraulic jack and jack stands.
Be sure to reference your owners manual for jack points and the jack manufacturer's
instructions for proper practices.
Remove the left side front wheel from the vehicle using the 1/2" drive breaker bar or impact gun
and 17mm or 21mm socket.
17mm or 21mm lug nuts present depending on year and trim level of your 3.
A different socket may be required if you have aftermarket or locking lug nuts.
This document was generated on 2021-09-01 10:03:11 AM (MST).
© 2021 Page 5 of 42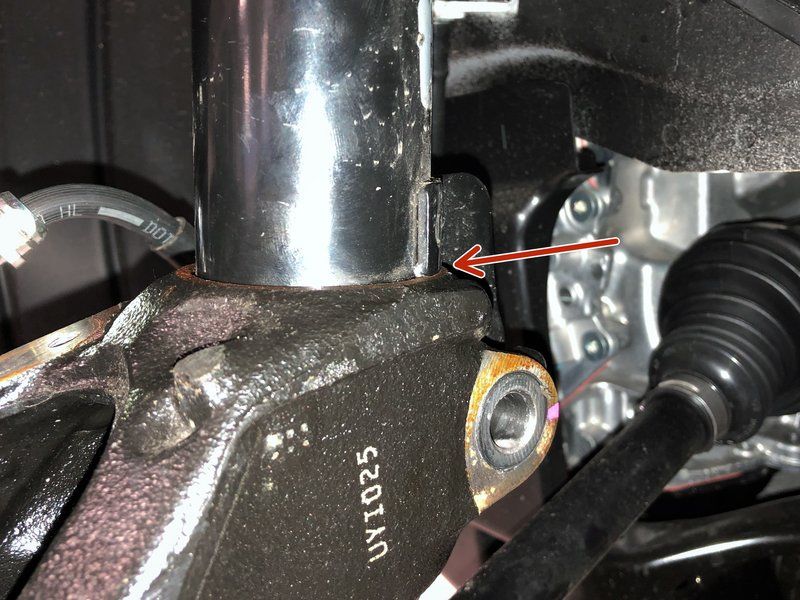
AXO-3-288 & -289 Lowering Springs Guide ID: 888 - Approved Release: R4.00 [major] 2021-09-01
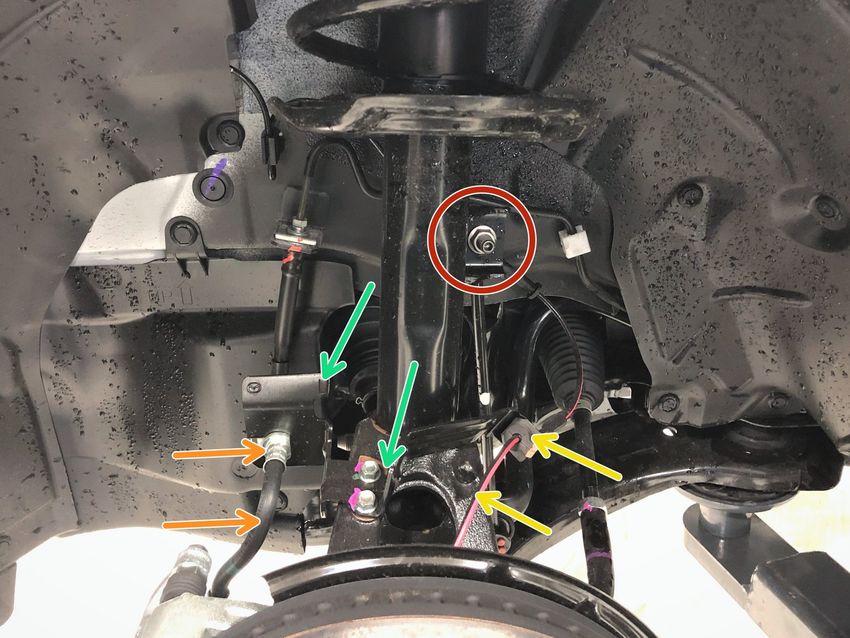
Step 3 — Front Suspension Component Identification
This image serves as a location
reference for components
referenced in the following steps.
Front swaybar endlink.
Front brake line.
ABS wiring.
Front brake line and ABS wiring
bracket.
This document was generated on 2021-09-01 10:03:11 AM (MST).
© 2021 Page 6 of 42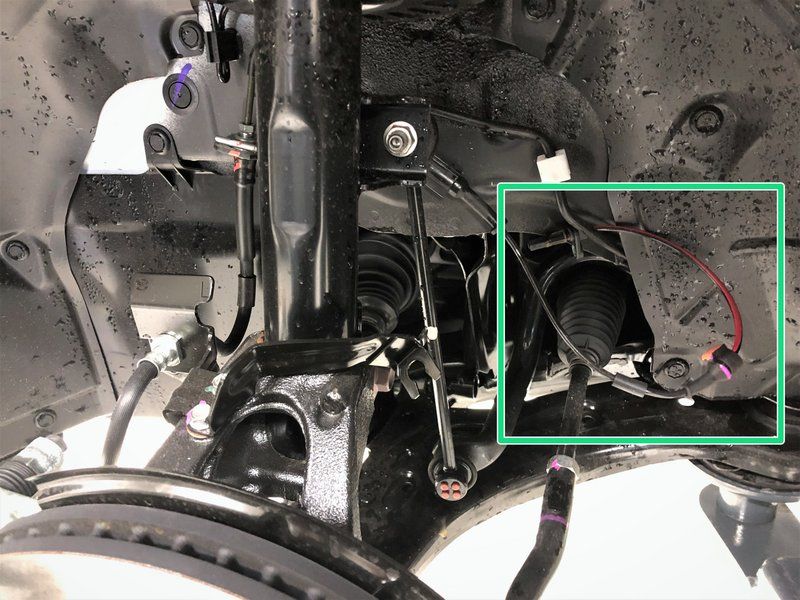
AXO-3-288 & -289 Lowering Springs Guide ID: 888 - Approved Release: R4.00 [major] 2021-09-01
Step 4 — Front Suspension Disassembly Part 1
Locate the ABS wiring.
Pull the ABS wiring free from the mounting bracket by pulling the rubber grommet in the direction
shown.
Trace the ABS wiring to where the sensor is attached to the knuckle near the back of the brake
rotor.
Using a 10mm socket and ratchet, remove the ABS sensor. Pull it free from the knuckle.
Move the ABS wiring out of the way as shown.
This document was generated on 2021-09-01 10:03:11 AM (MST).
© 2021 Page 7 of 42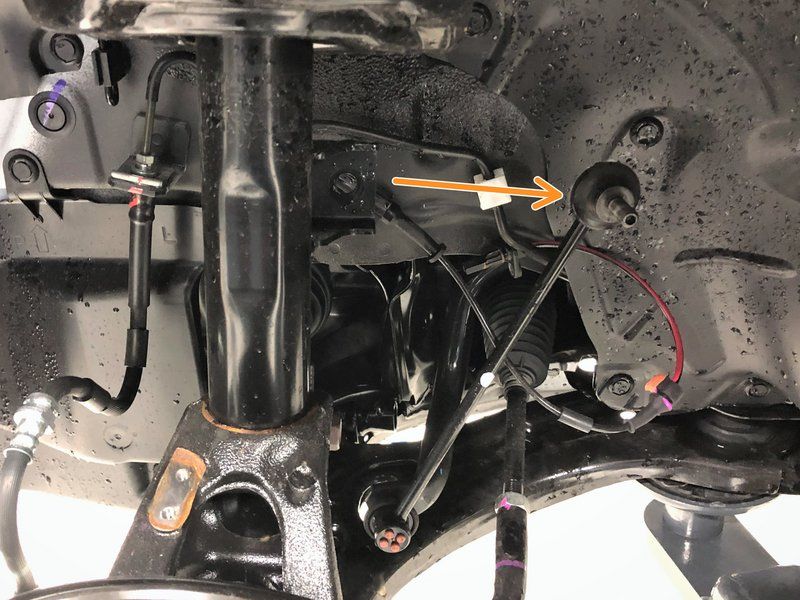
AXO-3-288 & -289 Lowering Springs Guide ID: 888 - Approved Release: R4.00 [major] 2021-09-01 Step 5 — Front Suspension Disassembly Part 2 Locate the front brake line. Using needle nose pliers or flathead screwdriver, remove the silver brake line retainer clip. Then free the front brake line from the mounting bracket. Locate the front brake line and ABS wiring bracket. Remove the front brake line & ABS wiring bracket by removing the two 10mm bolts. This document was generated on 2021-09-01 10:03:11 AM (MST). © 2021 Page 8 of 42
AXO-3-288 & -289 Lowering Springs Guide ID: 888 - Approved Release: R4.00 [major] 2021-09-01
Step 6 — Front Suspension Disassembly Part 3
Locate the front sway bar end link.
Using a 14mm socket and ratchet, remove the front swaybar end link nut
If the nut is spinning without loosening, use a 5mm Allen key in the center to keep it secure and a
14mm wrench to loosen.
Push the front swaybar endlink out of the mounting point on the strut and out of the way.
This document was generated on 2021-09-01 10:03:11 AM (MST).
© 2021 Page 9 of 42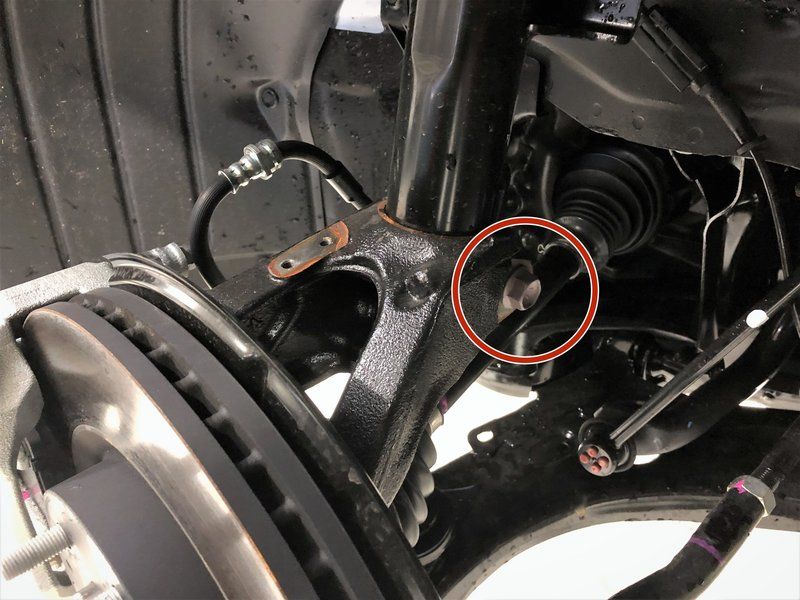
AXO-3-288 & -289 Lowering Springs Guide ID: 888 - Approved Release: R4.00 [major] 2021-09-01
Step 7 — Front Suspension Disassembly Part 4
Locate the strut pinch bolt near the bottom of the front strut.
Using a 17mm socket and ratchet on the head of the bolt and 19mm wrench on the nut, remove
the strut pinch bolt.
Using WD-40 or a penetrating fluid, lubricate where the strut meets the knuckle.
Letting the WD-40 sit for a few minutes can help the knuckle release the strut.
This document was generated on 2021-09-01 10:03:11 AM (MST).
© 2021 Page 10 of 42AXO-3-288 & -289 Lowering Springs Guide ID: 888 - Approved Release: R4.00 [major] 2021-09-01
Step 8 — Front Suspension Disassembly Part 5
Push the knuckle downwards to free the bottom portion of the strut.
If the knuckle is not moving, use a hammer to hit the knuckle in the location shown.
If using a hammer use extreme caution to not hit anywhere except where shown or damage
may occur.
The knuckle will need to travel downwards about 3 inches. The second image shows the strut
nearly free.
When the strut is free from the knuckle, the knuckle will likely rotate forward as shown in the third
image.
This document was generated on 2021-09-01 10:03:11 AM (MST).
© 2021 Page 11 of 42AXO-3-288 & -289 Lowering Springs Guide ID: 888 - Approved Release: R4.00 [major] 2021-09-01
Step 9 — Front Suspension Disassembly Part 6
Open the hood of your vehicle.
Locate the three nuts holding the front strut to your vehicle. They will be near the back corner of
the engine bay.
Loosen these three nuts with a 14mm socket and ratchet.
Hold the bottom of the strut with one hand so it does not fall during the next step.
Completely remove the nuts with the other hand.
Remove the front strut from the vehicle
This document was generated on 2021-09-01 10:03:11 AM (MST).
© 2021 Page 12 of 42AXO-3-288 & -289 Lowering Springs Guide ID: 888 - Approved Release: R4.00 [major] 2021-09-01
Step 10 — Front Strut Disassembly Part 1
Remove the black plastic cap from the top of the strut. It should pull straight off.
Ready your spring compressors. The second image shows a standalone unit that makes
compressing springs easier if done frequently.
The third image shows more traditional spring compressors.
Spring compressors can be very dangerous if used improperly. Ensure you understand how to use
them and are following the manufacturer's recommended practices.
Use personal safety equipment when using a spring compressor - safety glasses & gloves for
example
This document was generated on 2021-09-01 10:03:11 AM (MST).
© 2021 Page 13 of 42AXO-3-288 & -289 Lowering Springs Guide ID: 888 - Approved Release: R4.00 [major] 2021-09-01
Step 11 — Front Strut Disassembly Part 2
Compress the spring until the top spring coil is no longer touching the spring top hat.
Remove the 17mm nut on top of the strut using a 17mm wrench and a 6mm Allen key or socket.
If you have an impact gun, you can also use it to remove the strut top nut. Be sure to turn your air
pressure down to 60-80psi to prevent damage to the strut.
You may need a pass-through socket to remove the nut depending on the tools you have
available.
This document was generated on 2021-09-01 10:03:11 AM (MST).
© 2021 Page 14 of 42AXO-3-288 & -289 Lowering Springs Guide ID: 888 - Approved Release: R4.00 [major] 2021-09-01 Step 12 — Front Strut Disassembly Part 3 Remove the spring top hat and dust boot from the front strut. Slowly decompress the OEM front spring, then remove the OEM spring from the strut. Ensure the OEM lower spring seat remains seated on the strut as shown in the first image. Separate the dust boot from the spring top hat. Pull the bump stop free from the spring top hat. This document was generated on 2021-09-01 10:03:11 AM (MST). © 2021 Page 15 of 42
AXO-3-288 & -289 Lowering Springs Guide ID: 888 - Approved Release: R4.00 [major] 2021-09-01
Step 13 — Cutting the Front Bump Stop (Non-Turbo)
In order to deliver the best ride quality, the bump stop must be trimmed. This ensures the same
amount of travel before the bump stop is hit at the lower ride height.
Owners with turbocharged models, please skip to the next step, your bump stops are
slightly different.
Cut the bump stop in between the first and second bulge as shown.
Keep the lower half with the two bulges, the upper half can be discarded.
This document was generated on 2021-09-01 10:03:11 AM (MST).
© 2021 Page 16 of 42AXO-3-288 & -289 Lowering Springs Guide ID: 888 - Approved Release: R4.00 [major] 2021-09-01
Step 14 — Cutting the Front Bump Stop (Turbo)
In order to deliver the best ride
quality, the bump stop must be
trimmed. This ensures the same
amount of travel before the bump
stop is hit at the lower ride height.
Owners with non-turbo models,
please skip to the next step, you
already completed this step.
Cut the bump stop in between the
second and third bulge as shown.
Keep the upper half with the two
larger bulges, the lower half can be
discarded.
This document was generated on 2021-09-01 10:03:11 AM (MST).
© 2021 Page 17 of 42AXO-3-288 & -289 Lowering Springs Guide ID: 888 - Approved Release: R4.00 [major] 2021-09-01
Step 15 — Front Strut Reassembly Part 1
Locate the bottom of the CS lowering spring as shown.
The bottom is the smaller diameter end that is not flat.
There is a sticker labeling the spring for use at CS. These stickers are sometimes placed
upside-down. Do not use this sticker to orient the spring.
If desired, the stickers can be removed with the help of some brake parts cleaner or acetone.
Install the CS front lowering spring onto the OEM front strut.
Ensure the bottom of the CS lowering spring is fully seated on the OEM lower spring seat as
shown in the third image.
This document was generated on 2021-09-01 10:03:11 AM (MST).
© 2021 Page 18 of 42AXO-3-288 & -289 Lowering Springs Guide ID: 888 - Approved Release: R4.00 [major] 2021-09-01
Step 16 — Front Strut Reassembly Part 2
Install the spring cushion with dust boot.
Reinstall the OEM dust boot and trimmed bump stop as shown - small end of bump stop down.
You do not need to use spring compressors with the CorkSport lowering spring.
Install the spring top hat and hand thread the 17mm nut removed in Step 11.
Tighten to 41-47ft-lbs. using the method shown in Step 11.
If tightening with an impact gun, ensure the pressure is turned down to about 60-80psi to prevent
damage to the strut.
Check that the top coil of the spring is centered on the top hat and touching all around.
Reinstall the black plastic cap onto the top of the strut that was removed in Step 10.
This document was generated on 2021-09-01 10:03:11 AM (MST).
© 2021 Page 19 of 42AXO-3-288 & -289 Lowering Springs Guide ID: 888 - Approved Release: R4.00 [major] 2021-09-01
Step 17 — Front Suspension Reassembly Part 1
Lift the assembled strut back into place.
Look in the fender to align the three top strut mounting studs to the three holes in the shock tower.
Hold the bottom of the strut with one hand.
Lightly push the strut through the three holes in the strut tower.
Use the other hand to loosely tighten the qty(3) 14mm nuts removed in Step 9.
Tighten the three upper strut nuts to 37-43 ft-lbs. using a 14mm socket.
Rotate the strut as needed until the sway bar end link mount points toward the rear of the vehicle
as shown.
This document was generated on 2021-09-01 10:03:11 AM (MST).
© 2021 Page 20 of 42AXO-3-288 & -289 Lowering Springs Guide ID: 888 - Approved Release: R4.00 [major] 2021-09-01
Step 18 — Front Suspension Reassembly Part 2
Rotate the knuckle until the bottom of the strut aligns with the hole in the knuckle.
Lift the knuckle upwards and insert the bottom of the strut into the knuckle.
Step 19 — Front Suspension Reassembly Part 3
Using a hydraulic jack, lift the knuckle upwards from the lower control arm as shown.
Ensure you are lifting from the area shown in the second image and not from the brake rotor or
brake dust shield.
This document was generated on 2021-09-01 10:03:11 AM (MST).
© 2021 Page 21 of 42AXO-3-288 & -289 Lowering Springs Guide ID: 888 - Approved Release: R4.00 [major] 2021-09-01
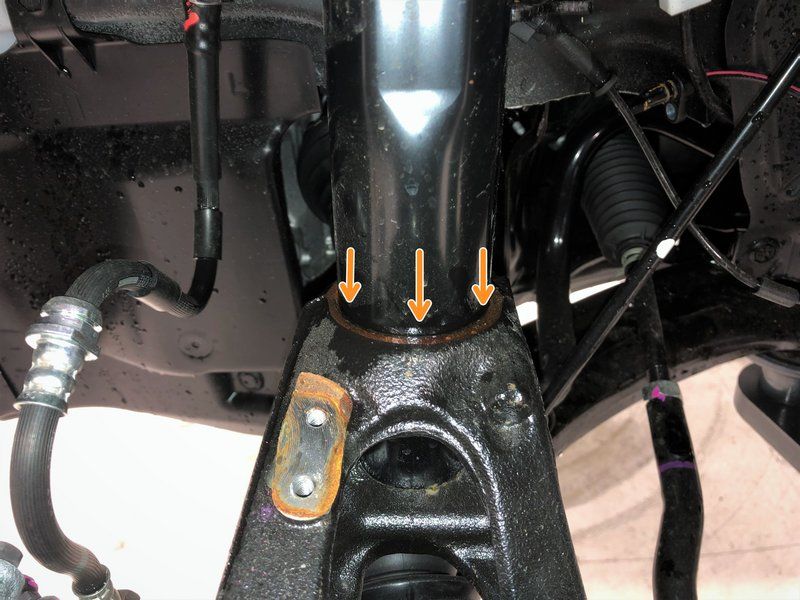
Step 20 — Front Suspension Reassembly Part 4
Lift the suspension upwards until the knuckle hits the stop on the strut as shown.
You may need to rotate the strut to fit the alignment tab in between the two sides of the knuckle.
Alignment tab shown in the second image.
Once the hub stop is reached, install the 17mm strut pinch bolt and 19mm nut that were removed
in Step 7.
Tighten the strut pinch bolt to 48-54ft-lbs.
Lower the hydraulic jack once tightening is complete.
This document was generated on 2021-09-01 10:03:11 AM (MST).
© 2021 Page 22 of 42AXO-3-288 & -289 Lowering Springs Guide ID: 888 - Approved Release: R4.00 [major] 2021-09-01
Step 21 — Front Suspension Reassembly Part 5
Install the front sway bar end link through the mounting bracket on the strut.
Secure the front sway bar end link by installing the nut removed in Step 6 and tightening to 34-40
ft-lbs with a 14mm socket and ratchet.
If the nut is spinning without tightening, use a 5mm Allen key in the center to keep it secure and
a 14mm wrench to tighten.
This document was generated on 2021-09-01 10:03:11 AM (MST).
© 2021 Page 23 of 42AXO-3-288 & -289 Lowering Springs Guide ID: 888 - Approved Release: R4.00 [major] 2021-09-01
Step 22 — Front Suspension Reassembly Part 6
Install the brake line and ABS wiring mounting bracket onto the knuckle. Tighten the two 10mm
bolts until snug using a 10mm socket and ratchet.
Insert the brake line into the mounting bracket you removed it from earlier.
Push forward on the line slightly to ensure it is fully seated, then secure the brake line with the
retaining clip.
Ensure the retaining clip is in the orientation shown.
You may need to tap the retainer clip gently with a hammer in order to get it fully installed.
This document was generated on 2021-09-01 10:03:11 AM (MST).
© 2021 Page 24 of 42AXO-3-288 & -289 Lowering Springs Guide ID: 888 - Approved Release: R4.00 [major] 2021-09-01
Step 23 — Front Suspension Reassembly Part 7
Reinstall the ABS sensor into the knuckle near the brake rotor. Press it down gently to ensure it is
fully seated.
Secure the ABS sensor with the 10mm bolt removed earlier. Tighten until snug with a 10mm
socket and ratchet.
Secure the ABS wiring in the mounting bracket. Push the rubber portion of the wiring onto the
bracket until the wiring is snug.
Step 24 — Front Suspension Wrap Up
Repeat steps 2-23 for the right side
of the vehicle.
Reinstall both front wheels. Using a
17mm or 21mm socket on each of
the 5 lug nuts.
Lower the front of the car down off
the jack stands.
Torque the lug nuts in a star pattern
to 80-90ft-lbs.
This document was generated on 2021-09-01 10:03:11 AM (MST).
© 2021 Page 25 of 42AXO-3-288 & -289 Lowering Springs Guide ID: 888 - Approved Release: R4.00 [major] 2021-09-01
Step 25 — Lifting the Car & Removing the Rear Wheel
Lift up the rear of the car using a
hydraulic jack and jack stands.
Be sure to reference your owners
manual for jack points and the jack
manufacturer's instructions for
proper practices.
Remove the rear wheels from the
vehicle using the 1/2" drive breaker
bar or impact gun and 17mm or
21mm socket.
A different socket may be required if
you have aftermarket or locking lug
nuts.
Both sides of the rear suspension
are worked on simultaneously
unless noted.
This document was generated on 2021-09-01 10:03:11 AM (MST).
© 2021 Page 26 of 42AXO-3-288 & -289 Lowering Springs Guide ID: 888 - Approved Release: R4.00 [major] 2021-09-01
Step 26 — Rear Suspension Disassembly Part 1
Locate the plastic covers on the bottom of the torsion beam.
Using a 10mm socket and ratchet, remove three 10mm bolts from the left and right side plastic
covers. (Left side cover shown)
There are two tabs for each plastic cover that must be released before the plastic covers can be
removed. Their locations are shown with the orange arrows in the first image.
Push in the sides of the tabs as shown to release the tabs.
Once the tabs are released, remove the plastic torsion beam covers from the vehicle.
This document was generated on 2021-09-01 10:03:11 AM (MST).
© 2021 Page 27 of 42AXO-3-288 & -289 Lowering Springs Guide ID: 888 - Approved Release: R4.00 [major] 2021-09-01
Step 27 — Rear Suspension Disassembly Part 2
Inside the wheel well, locate the parking brake wiring. It is just to the rear of the shock.
Remove the 10mm bolt that secures the emergency brake wiring to the chassis using a 10mm
socket and ratchet. Left side shown.
Repeat this step for the opposite side of the vehicle.
Locate the under body shielding in front of the torsion beam.
Remove one 10mm bolt and one plastic nut from each side of the under body shielding.
Removing these two fasteners will allow the under body shield to bend slightly to allow for easier
rear spring removal.
This document was generated on 2021-09-01 10:03:11 AM (MST).
© 2021 Page 28 of 42AXO-3-288 & -289 Lowering Springs Guide ID: 888 - Approved Release: R4.00 [major] 2021-09-01
Step 28 — Rear Suspension Disassembly Part 3
Place the hydraulic jack directly below the driver's side end of the torsion beam and apply a small
amount of upward pressure.
Ensure your jack is secure and is not contacting the brake rotor or other brake components.
Using a 17mm socket and ratchet, remove the lower shock mounting bolt.
Carefully lower the hydraulic jack.
Once completed, the suspension will look like the third image.
Repeat the red, orange, and yellow steps for the passenger side of the vehicle.
This document was generated on 2021-09-01 10:03:11 AM (MST).
© 2021 Page 29 of 42AXO-3-288 & -289 Lowering Springs Guide ID: 888 - Approved Release: R4.00 [major] 2021-09-01
Step 29 — Rear Suspension Disassembly Part 4
Pull downward on the left side of the torsion beam.
Pull the spring downward and toward the center of the vehicle to remove it.
It will take some force to remove the spring as you must compress it slightly to free the rubber top
from the chassis.
Repeat the red and orange steps for the other side of the vehicle.
Step 30 — Rear Suspension Disassembly Part 5
Starting on the rear left side, trace the shock upwards to locate the upper shock mount.
Remove the two upper shock mounting nuts using a 14mm socket and ratchet.
Hold the shock while removing the mounting bolts to prevent it from falling.
Remove the shock from the vehicle.
This document was generated on 2021-09-01 10:03:11 AM (MST).
© 2021 Page 30 of 42AXO-3-288 & -289 Lowering Springs Guide ID: 888 - Approved Release: R4.00 [major] 2021-09-01
Step 31 — Trimming the Rear Bump Stops Part 1
In order to deliver the best ride quality, the bump stop must be trimmed. This ensures the same
amount of travel before the bump stop is hit at the lower ride height.
The next step can be very difficult without an electric impact gun. You can trim the bump stop with
the shock assembled but you risk damaging the shock and causing premature failure. Skip to Step
33 if you do not have access to an impact gun.
Pull off the plastic cover from the top of the shock.
Using an electric impact gun and a 12mm socket, remove the shock top hat nut.
Remove the shock top hat from the shock by pulling it off the end of the shock shaft. The plastic
dust cover will be removed with the top hat as shown.
This document was generated on 2021-09-01 10:03:11 AM (MST).
© 2021 Page 31 of 42AXO-3-288 & -289 Lowering Springs Guide ID: 888 - Approved Release: R4.00 [major] 2021-09-01
Step 32 — Trimming the Rear Bump Stops Part 2
Using a flathead screwdriver, gently pry around the top edge of the plastic dust cover. Pull
downward while doing so and separate the dust cover from the shock top hat.
You will be left with the bump stop attached to the shock top hat as shown.
Cut the bump stop using a razor knife just above the black plastic ring (bottom of the third "bulge").
Separate the two sections of the bump stop. The lower section may be discarded.
This document was generated on 2021-09-01 10:03:11 AM (MST).
© 2021 Page 32 of 42AXO-3-288 & -289 Lowering Springs Guide ID: 888 - Approved Release: R4.00 [major] 2021-09-01
Step 33 — Trimming the Rear Bump Stop with Shock Assembled Part 1
Skip to Step 35 if you disassembled your shock.
Trimming the rear bump stop with the shock assembled can damage the shock if you are not
careful. Use extreme care to not touch the shock shaft with your razor knife.
Using a flathead screwdriver, gently pry around the top edge of the plastic dust cover. Pull
downward while doing so and separate the dust cover from the shock top hat.
Cut the bump stop using a razor knife just above the black plastic ring (bottom of the third "bulge").
Ensure your knife does not touch the shock shaft.
Cutting downward, away from the shock shaft as shown can get you most of the way through the
bump stop with minimal risk.
Take your time, it will take multiple passes with the razor knife to get through the bump stop.
This document was generated on 2021-09-01 10:03:11 AM (MST).
© 2021 Page 33 of 42AXO-3-288 & -289 Lowering Springs Guide ID: 888 - Approved Release: R4.00 [major] 2021-09-01
Step 34 — Trimming the Rear Bump Stop with Shock Assembled Part 2
Slide the black plastic ring off the lower portion of the bump stop as shown.
Cut vertically down the bump stop. Ensure your knife does not touch the shock shaft.
Cutting off to the side of the shock shaft as shown minimizes risk to damage the shock shaft.
Once through, the lower portion of the bump stop can be removed from the shock shaft.
Using large wire cutters or bolt cutters, cut the black plastic ring. Then remove it from the strut.
Ensure your cutters do not touch the shock shaft.
You will likely need to cut the plastic ring in two places to remove it.
Skip to step 36 if you cut your bump stop with the shock assembled.
This document was generated on 2021-09-01 10:03:11 AM (MST).
© 2021 Page 34 of 42AXO-3-288 & -289 Lowering Springs Guide ID: 888 - Approved Release: R4.00 [major] 2021-09-01
Step 35 — Rear Shock Reassembly
Reinstall the dust boot onto the shock top hat. Push it on until it fits snugly in the groove on the top
hat.
Slide the dust boot/top hat assembly back onto the shock.
Tighten the strut top nut using your electric impact gun and a 12mm socket. You only need 20-
30ft-lbs, do not over-tighten.
If using a 1/2" drive electric impact gun or air impact, do not over tighten as you can break the
shock shaft.
Reinstall the shock top hat plastic cover by pushing it on until it clicks into place.
This document was generated on 2021-09-01 10:03:11 AM (MST).
© 2021 Page 35 of 42AXO-3-288 & -289 Lowering Springs Guide ID: 888 - Approved Release: R4.00 [major] 2021-09-01
Step 36 — Rear Shock Installation
Insert the rear shock back into position on the rear left side.
Align the top hat holes with the studs on the chassis.
Secure the shock with the two 14mm nuts removed earlier. Tighten to 26-30ft-lbs using a 14mm
socket and ratchet.
Step 37 — Bump Stop Modification Right Side
Repeat steps 30-36 on the rear
right side of the vehicle.
This document was generated on 2021-09-01 10:03:11 AM (MST).
© 2021 Page 36 of 42AXO-3-288 & -289 Lowering Springs Guide ID: 888 - Approved Release: R4.00 [major] 2021-09-01
Step 38 — Rear Suspension Reassembly Part 1
Remove the rubber upper spring perches from the OEM springs. Rotate the perch counter-
clockwise to remove from each spring.
Install the upper spring perches onto the top of the CorkSport rear lowering springs. Rotate the
perch clockwise until the stop to install.
The top of the CS lowering spring is opposite of the side with the noise isolator as shown.
There is a sticker labeling the spring for use at CS. These stickers are sometimes placed
upside-down. Do not use this sticker to orient the spring.
If desired, the stickers can be removed with the help of some brake parts cleaner or acetone.
The third image shows a perch fully installed on a CS spring.
This document was generated on 2021-09-01 10:03:11 AM (MST).
© 2021 Page 37 of 42AXO-3-288 & -289 Lowering Springs Guide ID: 888 - Approved Release: R4.00 [major] 2021-09-01
Step 39 — Rear Suspension Reassembly Part 2
Insert the CorkSport Lowering Spring onto the torsion beam.
Rotate the CS spring until the "finger" protruding from the rubber upper spring perch fits in the hole
in the chassis as shown.
There will be a 1/2"-1" gap between the end of the spring and the stop of the lower spring perch as
shown. This is normal.
Repeat these steps on the other side of the vehicle.
This document was generated on 2021-09-01 10:03:11 AM (MST).
© 2021 Page 38 of 42AXO-3-288 & -289 Lowering Springs Guide ID: 888 - Approved Release: R4.00 [major] 2021-09-01
Step 40 — Rear Suspension Reassembly Part 3
Place the hydraulic jack underneath the end of the torsion beam like in Step 28.
Raise the hydraulic jack until the hole in the torsion beam lines up with the lower shock mounting
hole.
As you raise the jack, ensure the upper spring stays positioned correctly on the spring seats.
Install the lower shock mounting bolt removed earlier. Tighten to 62-73 ft-lbs using a 17mm
socket and ratchet.
Once tight, lower the hydraulic jack.
Repeat these steps for the other side of the vehicle.
This document was generated on 2021-09-01 10:03:11 AM (MST).
© 2021 Page 39 of 42AXO-3-288 & -289 Lowering Springs Guide ID: 888 - Approved Release: R4.00 [major] 2021-09-01
Step 41 — Rear Suspension Reassembly Part 4
Reposition underbody shielding that was loosened in Step 27.
Reinstall the one 10mm bolt and one plastic nut removed from each side of the under body
shielding. Tighten 10mm bolts until snug, tighten plastic nut hand tight.
Reposition the emergency brake wiring into the alignment hole on the frame.
Secure the emergency brake wiring using the 10mm removed earlier. Tighten until snug.
Repeat for the other side emergency brake wiring.
Reinstall the plastic torsion beam covers. They snap into position with the two push clips.
Secure the plastic torsion beam covers with the three 10mm bolts removed from each side.
Tighten all 10mm bolts until snug.
This document was generated on 2021-09-01 10:03:11 AM (MST).
© 2021 Page 40 of 42AXO-3-288 & -289 Lowering Springs Guide ID: 888 - Approved Release: R4.00 [major] 2021-09-01
Step 42 — Rear Suspension Wrap Up
Reinstall both rear wheels. Using a
17mm or 21mm socket on each of
the 5 lug nuts.
Lower the rear of the car down off
the jack stands.
Torque the lug nuts in a star pattern
to 80-90ft-lbs.
This document was generated on 2021-09-01 10:03:11 AM (MST).
© 2021 Page 41 of 42AXO-3-288 & -289 Lowering Springs Guide ID: 888 - Approved Release: R4.00 [major] 2021-09-01
Step 43 — Installation Complete
This completes your installation of
the CorkSport Performance
Lowering Springs!
Listen for any strange noises
upon first drive. If any are
present, inspect the suspension.
Contact us with any questions or
concerns at sales@corksport.com or
(360) 260-2675.
Please leave a review here:
https://corksport.com/2019-mazda-
3-lower...
If you have a Turbo Mazda 3 with
the red CS springs, please leave a
review here:
Share your experience using
#CorkSport on Instagram,
Facebook, and Twitter.
This document was generated on 2021-09-01 10:03:11 AM (MST).
© 2021 Page 42 of 42You can also read