APTARE IT Analytics Data Collector Notes and Troubleshooting - Release 10.5 - Veritas
←
→
Page content transcription
If your browser does not render page correctly, please read the page content below

APTARE IT Analytics Data
Collector Notes and
Troubleshooting

Release 10.5

APTARE IT Analytics Data Collector Notes and
Troubleshooting
          Last updated: 2021-01-04

          Legal Notice
          Copyright © 2021 Veritas Technologies LLC. All rights reserved.

          Veritas and the Veritas Logo are trademarks or registered trademarks of Veritas Technologies
          LLC or its affiliates in the U.S. and other countries. Other names may be trademarks of their
          respective owners.

          This product may contain third-party software for which Veritas is required to provide attribution
          to the third party (“Third-party Programs”). Some of the Third-party Programs are available
          under open source or free software licenses. The License Agreement accompanying the
          Software does not alter any rights or obligations you may have under those open source or
          free software licenses. Refer to the Third-party Legal Notices document accompanying this
          Veritas product or available at:

          https://www.veritas.com/about/legal/license-agreements

          The product described in this document is distributed under licenses restricting its use, copying,
          distribution, and decompilation/reverse engineering. No part of this document may be
          reproduced in any form by any means without prior written authorization of Veritas Technologies
          LLC and its licensors, if any.

          THE DOCUMENTATION IS PROVIDED "AS IS" AND ALL EXPRESS OR IMPLIED
          CONDITIONS, REPRESENTATIONS AND WARRANTIES, INCLUDING ANY IMPLIED
          WARRANTY OF MERCHANTABILITY, FITNESS FOR A PARTICULAR PURPOSE OR
          NON-INFRINGEMENT, ARE DISCLAIMED, EXCEPT TO THE EXTENT THAT SUCH
          DISCLAIMERS ARE HELD TO BE LEGALLY INVALID. VERITAS TECHNOLOGIES LLC
          SHALL NOT BE LIABLE FOR INCIDENTAL OR CONSEQUENTIAL DAMAGES IN
          CONNECTION WITH THE FURNISHING, PERFORMANCE, OR USE OF THIS
          DOCUMENTATION. THE INFORMATION CONTAINED IN THIS DOCUMENTATION IS
          SUBJECT TO CHANGE WITHOUT NOTICE.

          The Licensed Software and Documentation are deemed to be commercial computer software
          as defined in FAR 12.212 and subject to restricted rights as defined in FAR Section 52.227-19
          "Commercial Computer Software - Restricted Rights" and DFARS 227.7202, et seq.
          "Commercial Computer Software and Commercial Computer Software Documentation," as
          applicable, and any successor regulations, whether delivered by Veritas as on premises or
          hosted services. Any use, modification, reproduction release, performance, display or disclosure
          of the Licensed Software and Documentation by the U.S. Government shall be solely in
          accordance with the terms of this Agreement.

          Veritas Technologies LLC
          2625 Augustine Drive.
          Santa Clara, CA 95054
http://www.veritas.com

.

Technical Support
Technical Support maintains support centers globally. All support services will be delivered
in accordance with your support agreement and the then-current enterprise technical support
policies. For information about our support offerings and how to contact Technical Support,
visit our website:

https://www.veritas.com/support

You can manage your Veritas account information at the following URL:

https://my.veritas.com

If you have questions regarding an existing support agreement, please email the support
agreement administration team for your region as follows:

Worldwide (except Japan)                 CustomerCare@veritas.com

Japan                                    CustomerCare_Japan@veritas.com

Documentation
Make sure that you have the current version of the documentation. Each document displays
the date of the last update on page 2. The latest documentation is available on the Veritas
website.

Veritas Services and Operations Readiness Tools (SORT)
Veritas Services and Operations Readiness Tools (SORT) is a website that provides information
and tools to automate and simplify certain time-consuming administrative tasks. Depending
on the product, SORT helps you prepare for installations and upgrades, identify risks in your
datacenters, and improve operational efficiency. To see what services and tools SORT provides
for your product, see the data sheet:

https://sort.veritas.com/data/support/SORT_Data_Sheet.pdf
Contents

Chapter 1   Data Collector Troubleshooting                            ...................................... 6

            Verify the Data Collector Configuration ............................................... 7
            Verify Connectivity .......................................................................... 8
            Configuring Web Proxy Updates ....................................................... 9
            Collecting Missed Events for Veritas Backup Exec ................................ 9
            Substituting ODBC for JDBC to Connect to SQL Server for Veritas
                 Backup Exec ......................................................................... 10
            Useful Data Collection Scripts for Capacity ........................................ 13
            Host Resources Troubleshooting ..................................................... 15
            Host Resources: Check the Status of the WMI Proxy Server ................. 15
                 Prerequisites: ........................................................................ 16
                 Usage: ................................................................................. 16
                 Simple Usage: ....................................................................... 16
                 Example 1: ............................................................................ 16
                 Example 2: Remote WMI Queries .............................................. 16
            Host Resources: Post-Installation Verification ..................................... 18
            Host Resources: Check Host Connectivity Using Standard SSH ............ 18
                 Checking Paths for SSH .......................................................... 19
                 Environment setting for bash users: ........................................... 20
            Host Resources: Check Host Connectivity ......................................... 20
            Host Resources: Check Host Connectivity ......................................... 21
            Host Resources: Generating Host Resource Configuration Files ............ 21
                 Sample lines in an input file: ..................................................... 22
            Host Resources: Check the Execution of a Command on a Remote
                 Server .................................................................................. 22
            Host Resources Data Collection ...................................................... 23
            Host Resources: Collection in Stand-Alone Mode ................................ 23
            Configuring Parameters for SSH ...................................................... 24
                 Configure channelWaitTime: ..................................................... 25
                 Configure singleChannelSession: .............................................. 25
                 Configure sudoWithPassword: .................................................. 25
            Identifying Windows File System Access Errors (File Analytics) ............. 25
            Collect from Remote Shares (File Analytics) ...................................... 26
            Adding a Certificate to the Java Keystore .......................................... 26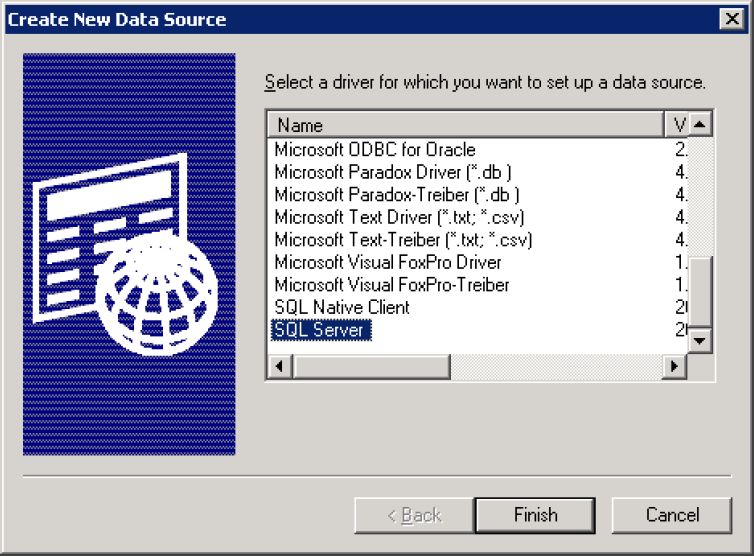
Contents   5

Chapter 2   Clustering Data Collectors with VCS and Veritas
               NetBackup (RHEL 7) .................................................. 29
            Clustering Data Collectors with VCS and Veritas NetBackup (RHEL
                7) ........................................................................................   29
            Prerequisites ...............................................................................     29
            Getting with started with Data Collector clustering ...............................               30
            Main.cf .......................................................................................   32
            Upgrading a Clustered Data Collector ...............................................              35

Chapter 3   Clustering Data Collectors with VCS and Veritas
               NetBackup (Windows) ............................................... 37
            Clustering Data Collectors with VCS and Veritas NetBackup (Windows)
                ...........................................................................................   37
            Prerequisites ...............................................................................     37
            Getting with Started with Data Collector Clustering ..............................                38
            Main.cf .......................................................................................   39
            Upgrading a Clustered Data Collector ...............................................              42

Chapter 4   Firewall Configuration: Default Ports ........................... 44
            Firewall Configuration: Default Ports ................................................. 44

Chapter 5   CRON Expressions and Probe Schedules ................ 49
            CRON Expressions and Probe Schedules ......................................... 49
Chapter                          1
Data Collector
Troubleshooting
      This chapter includes the following topics:

      ■   Verify the Data Collector Configuration

      ■   Verify Connectivity

      ■   Configuring Web Proxy Updates

      ■   Collecting Missed Events for Veritas Backup Exec

      ■   Substituting ODBC for JDBC to Connect to SQL Server for Veritas Backup Exec

      ■   Useful Data Collection Scripts for Capacity

      ■   Host Resources Troubleshooting

      ■   Host Resources: Check the Status of the WMI Proxy Server

      ■   Host Resources: Post-Installation Verification

      ■   Host Resources: Check Host Connectivity Using Standard SSH

      ■   Host Resources: Check Host Connectivity

      ■   Host Resources: Check Host Connectivity

      ■   Host Resources: Generating Host Resource Configuration Files

      ■   Host Resources: Check the Execution of a Command on a Remote Server

      ■   Host Resources Data Collection

      ■   Host Resources: Collection in Stand-Alone Mode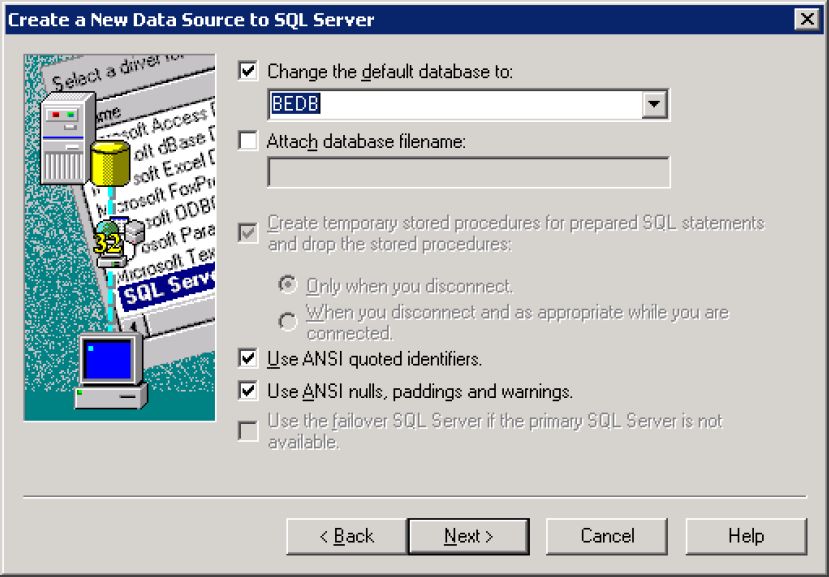
Data Collector Troubleshooting    7
                                                        Verify the Data Collector Configuration

          ■   Configuring Parameters for SSH

          ■   Identifying Windows File System Access Errors (File Analytics)

          ■   Collect from Remote Shares (File Analytics)

          ■   Adding a Certificate to the Java Keystore

Verify the Data Collector Configuration
          The Data Collector configuration file contains key information captured during the
          installation process. If the information was entered incorrectly, this may be the cause
          of the failure.
Data Collector Troubleshooting   8
                                                                              Verify Connectivity

          To check the configuration file
          1   Edit the configuration file.
              Windows:

              edit “C:\Program Files\Aptare\mbs\conf\wrapper.conf”

              Linux:

              edit “/opt/aptare/mbs/bin/startup.sh” and
              "/opt/aptare/mbs/bin/updateconfig.sh"

          2   Verify the values of the following parameters and update them, if necessary.

              wrapper.app.parameter.2                           Should match the Collector Name
                                                                you specified when adding a
                                                                collector policy.

              wrapper.app.parameter.3                           Should match the Passcode you
                                                                specified when adding a collector
                                                                policy.

              wrapper.app.parameter.4                           For IN-HOUSE installations:

                                                                http://aptareagent.yourdomain.com

                                                                where: yourdomain.com has the
                                                                appropriate value.

                                                                For APTARE HOSTED installations:
                                                                http://agent.storageconsole.com

                                                                For third-party HOSTED
                                                                installations:

                                                                http://aptareagent.domain.com

                                                                where: domain.com has the
                                                                appropriate value.

          3   If you changed any of the configuration file parameters, you’ll need to:
              ■   Restart the Data Collector service.
              ■   Re-run the installation validation utility.

Verify Connectivity
          To verify that the Data Collector Server can access the Portal Server: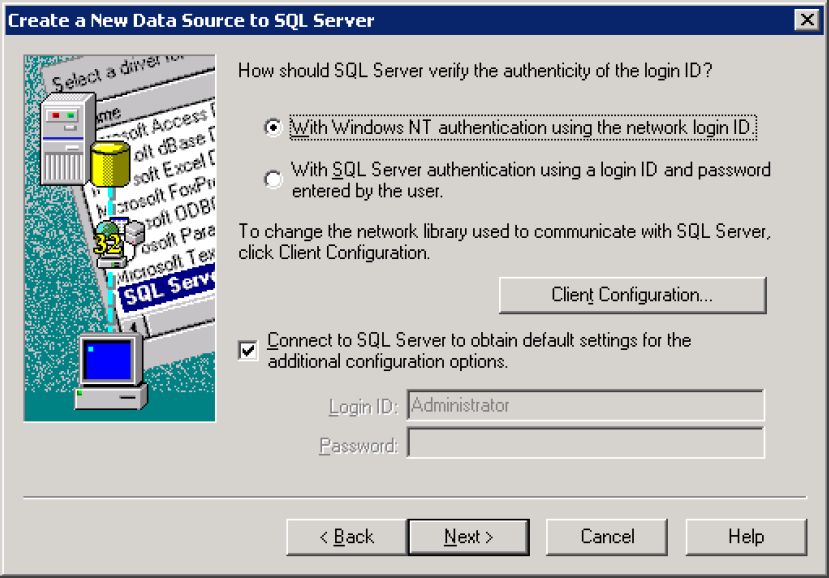
Data Collector Troubleshooting     9
                                                                Configuring Web Proxy Updates

          1.    Ping the Data Collector URL:

                ping http://aptareagent.yourdomain.com

          2.    Verify that the URL has been set up correctly in DNS or in the local hosts file,
                to resolve to the Portal Server.

Configuring Web Proxy Updates
          If you are using a proxy server to connect to the Portal, the Data Collector was
          configured during installation to use the proxy to connect to the Portal. If the web
          proxy configuration changes in your environment, the Data Collector must be aware
          of those changes in order to maintain connectivity. These settings can be found in:

          /opt/aptare/mbs/conf/collectorsystem.properties

Collecting Missed Events for Veritas Backup Exec
          Occasionally, there may be data that was missed by the scheduled Data Collection
          process. For example, the server may have been unavailable for a period of time.
          Or, you may want to capture data that was available before you actually installed
          the Backup Exec Data Collector software.
          To capture data from a specific period, use the following utility:

          buehistoricevents.{sh/bat} {AdministratorDomain} {AdministratorUser}
           {AdministratorPassword} [{Start Date} {End Date}] [verbose]

          Where:
          ■    Dates need to be in yyyy-mm-dd hh:mm:ss format.
          ■    Specifying verbose will log the Backup Exec commands called to the
               eventcollector.log file.

               Note: If the Start and End Dates are not specified, the utility will capture Events
               that occurred in the last 24 hours.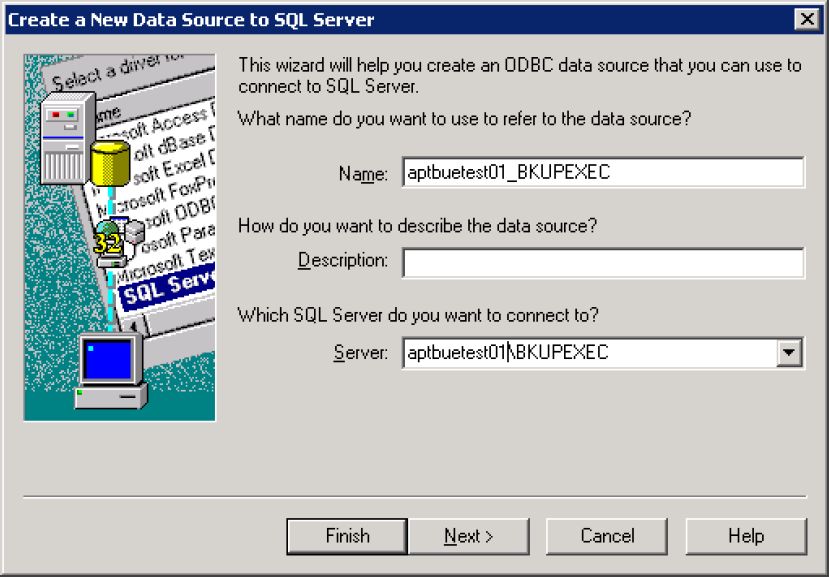
Data Collector Troubleshooting     10
              Substituting ODBC for JDBC to Connect to SQL Server for Veritas Backup Exec

Substituting ODBC for JDBC to Connect to SQL
Server for Veritas Backup Exec
         The Backup Exec data collector, by default, uses JDBC (Java Database
         Connectivity) to connect to the SQL Server database. In most cases, this is the
         preferred mechanism for communicating with the SQL Server. However, in some
         instances--for example, TCP/IP is disabled for the SQL Server--JDBC will not be
         feasible.
         In these rare situations, you can configure ODBC (Open Database Connectivity)
         to connect. The main limitation of this option is that it requires that a DSN (Data
         Source Name) be set up for each Backup Exec server for which the data collector
         needs access.

         Note: The data collector can be configured to use a mixture of JDBC and ODBC
         for specific servers.

         Use the following steps to turn on ODBC for specific servers:
         1.   Obtain a copy the servers.csv file from the Portal Server (the one that you
              created to load the Backup Exec servers into the database).
         2.   Edit servers.csvanddelete those servers that you do not want to use ODBC.
              The format of the entry in the CSV file is:

              , , , , , BKUPEXEC

         3.   Save the file to $APTARE_HOME/mbs/conf as odbcservers.confon the Data
              Collector server.
         4.   Launch the ODBC Data Source Administrator window:

              Control Panel > Administrative Tools > Data Sources (ODBC)

         5.   Set up the ODBC DSN for each of the Backup Exec servers in
              odbcservers.conf, as depicted in the following sequence of windows.
              The DSN needs to be of the form hostname_BKUPEXEC, where hostname
              is the second token in odbcservers.conf.

              Note: If the hostname_BKUPEXEC form does not work (see the third window
              in the following example), try substituting the IP address for the hostname. If
              you use the IP address, be sure to make appropriate changes to the CSV file
              to comply with the following required format:
Data Collector Troubleshooting 11 Substituting ODBC for JDBC to Connect to SQL Server for Veritas Backup Exec , , , , , BKUPEXEC The DSN needs to be of the form hostname_BKUPEXEC, where hostname is the second token in odbcservers.conf.
Data Collector Troubleshooting     12
Substituting ODBC for JDBC to Connect to SQL Server for Veritas Backup Exec

Note: If the hostname_BKUPEXEC form does not work (see the third window
in the following example), try substituting the IP address for the hostname. If
you use the IP address, be sure to make appropriate changes to the CSV file
to comply with the following required format:

, , , , , BKUPEXEC
Data Collector Troubleshooting     13
                                                            Useful Data Collection Scripts for Capacity

Useful Data Collection Scripts for Capacity
                   The following data collection scripts are available by capacity product. These scripts
                   execute the data collection threads to capture the data. These scripts typically are
                   used only when working with the support and services teams while troubleshooting
                   data collection issues.

Capacity Product Scripts                                      Location

EMC VNX          emccheckinstall                              Windows:

                 emcvnxactivedirectorydetails                 C:\Program Files\Aptare\mbs\bin\emc

                 emcvnxarraydetails

EMC Symmetrix    emcsymmetrixarrayperfdetails                 Linux:

                                                              /opt//mbs/bin/emc
Data Collector Troubleshooting 14
Useful Data Collection Scripts for Capacity
Capacity Product Scripts Location
EMC CLARiiON emcclariionarrayperfdetails
Hitachi hitachicheckinstall Windows:
hitachiarrayperfdetails C:\Program Files\Aptare\mbs\bin\hitachi
hitachiarrayhdtdetails Linux:
hitachiarraydetails /opt//mbs/bin/hitachi
Host Resources hostvalidate Windows:
hostresourcevalidate C:\Program
Files\Aptare\mbs\bin\hostresources
hostresourcediscover
Linux:
hostresourcedetail
/opt//mbs/bin/hostresources
hostresourhostresourceasmcollectorcecheckinstall
HP EVA hpevaarraydetails Windows:
C:\Program Files\Aptare\mbs\bin\hp
Linux:
/opt//mbs/bin/hp
HP 3PAR hp3parperf Windows:
hp3pardetails C:\Program Files\Aptare\mbs\bin\hp3Par
Linux:
/opt//mbs/bin/hp3Par
IBM XIV ibmxivarrayperfdetails Windows:
ibmxivarraydetails C:\Program Files\Aptare\mbs\bin\ibm
IBM VIO ibmviodetail Linux:
/opt//mbs/bin/ibm
IBM SVC ibmsvcarrayperfdetails
ibmsvcarraydetails
IBM Enterprise ibmenterprisearraydetails
ArraysData Collector Troubleshooting 15
Host Resources Troubleshooting
Capacity Product Scripts Location
NetApp netappsnapvaultdetails Windows:
netappsnapmirrordetails C:\Program Files\Aptare\mbs\bin\netapp
netappcheckinstall Linux:
netapparrayperfdetails /opt//mbs/bin/netapp
netapparraydetails
Host Resources Troubleshooting
Use the following sequence of steps to determine the source of host resources data
collection issues. All commands--except for the SSH commands and the WMI Proxy
command--report errors to metadata.log. After executing a command, check the
metadata.log file for error messages. If there is an error noted, correct the problem
and then re-issue the command. If the command succeeds, proceed to the next
command in this sequence:
1. See “Host Resources: Check the Status of the WMI Proxy Server” on page 15.
2. See “Host Resources: Post-Installation Verification” on page 18.
3. See “Host Resources: Check Host Connectivity Using Standard SSH”
on page 18.
4. See “Host Resources: Check Host Connectivity” on page 20.
5. See “Host Resources: Check the Execution of a Command on a Remote Server”
on page 22.
6. See “Host Resources: Collection in Stand-Alone Mode” on page 23.
Host Resources: Check the Status of the WMI
Proxy Server
Use the following checkwmiproxyutility to verify that the WMI Proxy Server is up
and running.
The WMI Proxy logs are written to:
C:\Program Files\Aptare\WMIProxyServer\logs\aptarewmiserver.logData Collector Troubleshooting 16
Host Resources: Check the Status of the WMI Proxy Server
Prerequisites:
Either checkinstall or updateconfig must have been run before running
checkwmiproxy. Otherwise, checkwmiproxy will not have access to the proxy
server settings that are saved in the collector configuration file.
Usage:
checkwmiproxy.[sh|bat] [wmiProxyServer wmiProxyPort remoteWinHost
DomainOfUserId UserId Password "Command"]
Where:
wmiProxyServer is the name of the WMI Proxy Server
wmiProxyPort is the proxy’s port (default is 1248)
Simple Usage:
checkwmiproxy.[sh|bat]
By default, this utility will look for the WMI Proxy Server details in the Host Resources
Collector section of the collector configuration file. If it does not find a Host
Resources Collector section, the checkwmiproxy will terminate with an error and
a recommendation to pass explicit parameters, as shown in the usage statement
above.
Example 1:
[root@aptaredev3 bin]# ./checkwmiproxy.sh
MetaDataChildThread.init(). Going to initialize.
Will try to connect to the APTARE WMI Proxy at 172.16.1.152:1248
APTARE WMI Proxy Version: APTAREWMIServer 6.5.01 06/25/07 21:00:00
Connection to APTARE WMI Proxy server successfully validated.
Example 2: Remote WMI Queries
This utility also can be used to execute remote WMI queries, as shown in the
following example.
[root@aptaredev3 bin]# ./checkwmiproxy.sh 172.16.1.152
Administrator password 172.16.1.152 "select * from
Win32_OperatingSystem"
MetaDataChildThread.init(). Going to initialize.
Will try to connect to the APTARE WMI Proxy at 172.16.1.152:1248Data Collector Troubleshooting 17
Host Resources: Check the Status of the WMI Proxy Server
APTARE WMI Proxy Version: APTAREWMIServer 6.5.01 06/25/07 21:00:00
Connection to APTARE WMI Proxy server successfully validated.
APTAREWMIServer Response:
instance of Win32_OperatingSystem
{
BootDevice = "\\Device\\HarddiskVolume1";
BuildNumber = "3790";
BuildType = "Multiprocessor Free";
Caption = "Microsoft(R) Windows(R) Server 2003, Standard
Edition";
CodeSet = "1252";
CountryCode = "1";
CreationClassName = "Win32_OperatingSystem";
CSCreationClassName = "Win32_ComputerSystem";
CSDVersion = "Service Pack 1";
CSName = "APTARESTGRPT1";
CurrentTimeZone = -420;
DataExecutionPrevention_32BitApplications = TRUE;
DataExecutionPrevention_Available = TRUE;
DataExecutionPrevention_Drivers = TRUE;
DataExecutionPrevention_SupportPolicy = 2;
Debug = FALSE;
Description = "aptarestgrpt1";
Distributed = FALSE;
EncryptionLevel = 168;
ForegroundApplicationBoost = 2;
FreePhysicalMemory = "160264";
FreeSpaceInPagingFiles = "1967860";
FreeVirtualMemory = "2084508";
InstallDate = "20070212110938.000000-480";
LargeSystemCache = 1;
LastBootUpTime = "20080507115419.343750-420";
LocalDateTime = "20080520142117.484000-420";
Locale = "0409";
Manufacturer = "Microsoft Corporation";
MaxNumberOfProcesses = 4294967295;
MaxProcessMemorySize = "2097024";
Name = "Microsoft Windows Server 2003 R2 Standard
Edition|C:\\WINDOWS|\\Device\\Harddisk0\\Partition1";
NumberOfLicensedUsers = 10;
NumberOfProcesses = 90;Data Collector Troubleshooting 18
Host Resources: Post-Installation Verification
NumberOfUsers = 8;
Organization = "Aptare";
OSLanguage = 1033;
OSProductSuite = 272;
OSType = 18;
OtherTypeDescription = "R2";
PAEEnabled = TRUE;
Primary = TRUE;
ProductType = 3;
QuantumLength = 0;
QuantumType = 0;
RegisteredUser = "Aptare";
SerialNumber = "69712-OEM-4418173-93136";
ServicePackMajorVersion = 1;
ServicePackMinorVersion = 0;
SizeStoredInPagingFiles = "2039808";
Status = "OK";
SuiteMask = 272;
SystemDevice = "\\Device\\HarddiskVolume1";
SystemDirectory = "C:\\WINDOWS\\system32";
SystemDrive = "C:";
TotalVirtualMemorySize = "3256472";
TotalVisibleMemorySize = "1363400";
Version = "5.2.3790";
WindowsDirectory = "C:\\WINDOWS";
};
Host Resources: Post-Installation Verification
Execute this utility to verify that the host resources installation was successful.
hostresourcecheckinstall.{sh|bat}
Host Resources: Check Host Connectivity Using
Standard SSH
APTARE IT Analytics uses SSH to communicate with devices to run SSH
commands. Sometimes, a connectivity issue is simply an incorrect path to a host.
Note: Use the following SSH commands before attempting to collect data.Data Collector Troubleshooting 19
Host Resources: Check Host Connectivity Using Standard SSH
To check host connectivity using standard SSH:
1. Check that the connection to a Host is successful, using the credentials
provided.
[user@host ~] ssh @ ls
Similarly, if you are using Telnet, check your host access via Telnet and run
sudo commands, as shown in the following step.
2. In access-controlled environments such as sudo, a sudo user must be set up.
Ensure that the sudo user can run the commands required for the host operating
system platform.
To verify sudo access:
[user@host ~] ssh @ “sudo ”
If this command results in errors, such as command not found, set up the paths
correctly and re-run this command.
See “Checking Paths for SSH” on page 19.
on page 11.
3. Paths should be set correctly for the commands to run.
Checking Paths for SSH
If you find messages in the metadata.log file that indicate that some of the commands
are not found, then most likely the reason for it is the paths have not been set
properly.
APTARE IT Analytics uses a non-interactive login shell to execute ssh commands
on devices.
1. Check the environment setting for the shell by running the command.
[user@host ~] ssh @ “env”
Check the PATH shown in the output and make sure that it contains the path
to all the commands required for APTARE IT Analytics for the OS platform of
the host.
Sample PATH for each of the host operating system platforms:
Linux: /bin:/sbin:/usr/bin:/usr/sbin
Solaris: /usr/xpg4/bin:/usr/sbin:/usr/bin
AIX: /usr/bin:/usr/sbin
HPUX: /usr/bin:/usr/sbin:/opt/fcms/bin:/sbinData Collector Troubleshooting 20
Host Resources: Check Host Connectivity
Note: Since Veritas Volume Manager is supported, its path needs to be included
in the PATH env variable.
2. In sudo environments, make sure that the sudo path is also in the PATH shown
in the output of the above command.
Environment setting for bash users:
1. Define all your settings in the file: ~/.bashrc
2. Make sure that the file ~/.bash_profile only contains the line: source ~/.bashrc
Host Resources: Check Host Connectivity
This utility displays information on the connection status of a list of host names, IP
addresses, or a range of IP addresses.
chkHostConnection.{sh|bat} HostAddresses userId password
[domain ]
[exclude ] [wmiserver ]
[cto ] [sto socketTimeout>]
[accessCmd=accessControlCommand>]
Table 1-1
HostAddresses The hosts to verify. It can be hostname, IP address, or
range of IP addresses, or a comma-separated list of
them.
domain The Domain for the Windows hosts
excludeHostAddresses The hosts to be excluded from the HostAddresses list. It can be
hostname, IP address, or range of IP addresses, or a comma
separated list of them.
wmiserver Name of the WMI Proxy Server
cto Connection time-out in milliseconds
sto Socket time-out in milliseconds
accessCmd An access control command such as sudo
As a result: for each host, the status of the connection is listed.Data Collector Troubleshooting 21
Host Resources: Check Host Connectivity
Connectivity Check Server List: [172.16.1.10, 172.16.1.12, APTAREaix1]
172.16.1.10 ............. SUCCESS
172.16.1.12 ............. SUCCESS
Host Resources: Check Host Connectivity
This utility provides information on the connection status of a list of Host Addresses
that are provided in the Host Resource Configuration file.
chkHostConnection.{sh|bat} file [wmiserver
]
[cto ] [sto ]
Table 1-2
HostResourceFile The file should be located under the
home directory:
/mbs/conf/hostresourceconf
wmiserver Name of the WMI Proxy Server
cto Connection time-out in milliseconds
sto Socket time-out in milliseconds
Result: For each host, the status of the connection is listed.
Connectivity Check Server List: [172.16.1.10, 172.16.1.12, aptareaix1]
172.16.1.10 ............. SUCCESS
172.16.1.12 ............. SUCCESS
Host Resources: Generating Host Resource
Configuration Files
This utility automatically generates the host resource configuration files and collector
configuration file for each valid line provided in the input file.
genHostResourceConf.{sh|bat} {CollectorID} {fileName}
CollectorID Identifier name used for the configuration filesData Collector Troubleshooting 22
Host Resources: Check the Execution of a Command on a Remote Server
filename File containing the list of parameters--one per line--in the format:
HostAddresses:userId:password:domain:excludeHostAddress
Comments are allowed by using a # at the beginning of the line.
cto Connection time-out in milliseconds
sto Socket time-out in milliseconds
Sample lines in an input file:
# Sample configuration file to generate Host Resource Conf files
172.16.1.11-13,aptarelab3:root:adminpwd::172.16.1.12-13,apataredlab3
aptareaix1:root:superpwd::
apatrewin2k:samuel:adminpwd:aptarewin2kdomain:
Results
■ For each valid line, a host resource configuration is created under the home
directory: /mbs/conf/hostresourceconf. Lines that are not valid are sent to
standard output.
■ Creates a collector configuration xml file with Meta Data Collector child thread
tags for each successfully created host resource configuration file. The file is
saved in the home directory under /mbs/conf. The collector configuration xml
is named in the following format:
collectorconfig-.xml where date is in DDMMMYYYHHMM format
Host Resources: Check the Execution of a
Command on a Remote Server
This utility provides the output of a command by running it on the specified remote
server.
remoteExecCommand.{sh|bat} HostAddress [enc] userId password
[domain=]
[wmiserver=] [cto=] [sto=socketTimeout>]
[accessCmd=accessControlCommand>]
HostAddresses The hosts to verify. It can be
hostname, IP address, or range of IP
addresses, or a comma-separated list
of them.Data Collector Troubleshooting 23
Host Resources Data Collection
userId password Use the [enc] option to provide
encrypted user ID and password
arguments.
domain The Domain for the Windows hosts
(only for connecting to a Windows
server)
wmiserver Name of the WMI Proxy Server
cto Connection time-out in milliseconds
sto Socket time-out in milliseconds
accessCmd An access control command such as
sudo
Example
remoteExecCommand.sh 172.16.1.21 myuser mypasswd /usr/bin/df -k
remoteExecCommand.sh 172.16.1.21 myuser mypasswd accessCmd=sudo
cto=10000 /usr/bin/df -k
Host Resources Data Collection
APTARE IT Analytics can collect the following types of host resources:
■ Capacity
■ Oracle
■ SQL Server
■ Exchange
■ Network
■ Processor
■ Memory
■ Process
■ System
Host Resources: Collection in Stand-Alone Mode
This utility executes the data collection process against the specific host resources
files.Data Collector Troubleshooting 24
Configuring Parameters for SSH
Usage (3 options)
hostresourceDetail.{sh|bat} all
hostresourceDetail.{sh|bat}
hostresourceDetail.{sh|bat} HostAddresses uid=userId pwd=password
[]
[]
all This option runs host resource
policies against all Meta Collectors.
MetaCollectorID The ID used to identify the
MetaCollector within the collector
configuration xml file.
HostResourcePolicyName The Policy ID within the Meta
Collector ID specified.
HostAddresses The hosts to verify. It can be
hostname, IP address, or range of IP
addresses, or a comma separated list
of them.
domain The Domain for the Windows hosts
excludeHostAddresses The hosts to be excluded from the
HostAddresses list. It can be
hostname, IP address, or range of IP
addresses, or a comma separated list
of them.
Configuring Parameters for SSH
To add any configurable SSH parameters, modify the following scripts:
hostResourceDetail.{sh|bat} and aptarecron.{sh|bat}
For example, to add the channelWaitTimeparameter, insert the following after
java:
-DchannelWaitTime=5000Data Collector Troubleshooting 25
Identifying Windows File System Access Errors (File Analytics)
Configure channelWaitTime:
If you are experiencing slow connectivity from the Data Collector Server to the Host,
update the scripts with this Configurable Parameter. This parameter is specified in
milliseconds.
-DchannelWaitTime=5000 // This will set the wait time for data from
the server.
Configure singleChannelSession:
This will run each command in a separate session.
-DsingleChannelSession=true // This will run the each command in a
separate session.
Configure sudoWithPassword:
In sudo environments, this will send the password without waiting for a prompt.
-DsudoWithPassword=true // This will allow running sudo with -S option
to send the password without waiting for a prompt.
Identifying Windows File System Access Errors
(File Analytics)
While profiling the Windows master file table and file systems, a number of error
messages may appear in the MFT.Aptare_File_Inventory.log file. These errors
actually may require no follow-up actions. Typically, the errors are legitimate, such
as a file being locked for exclusive use. Therefore, some files in the
C:\Windows\System32 directory will not be profiled.
Example of a Log Error Message:
Unable To Access File C:\Windows\System32\Boot. Error 2. Skipping!!!
The following table lists System Errors with descriptions.
System Error Description
2 System cannot find the file specified; This error occurs
when accessing certain files in: C:\Windows\System32.
On a Windows 64-bit OS, access is redirected by the
filesystem to a 64-bit directory where the files in
question do not exist.Data Collector Troubleshooting 26
Collect from Remote Shares (File Analytics)
System Error Description
3 System cannot find the path specified; This system
error occurs when accessing certain files in:
C:\Windows\System32. On a Windows 64-bit OS,
access is redirected by the filesystem to a 64-bit
directory where the files in question do not exist.
5 Access Denied; The file is accessible only to SYSTEM;
for example,
C:\Windows\System32\LogFiles\WMI\RtBackup
32 Another process has the file opened in exclusive mode;
for example, database files used by the SQL server
Collect from Remote Shares (File Analytics)
The functionality of the host File Analytics probe excludes remote shares that are
mounted to the target host, thereby capturing only local files and folders.
To collect from remote shares, an advanced parameter must be configured.
1. In the Portal, navigate to Admin > Advanced > Parameters.
2. Click Add to add an advanced parameter with a value of
FA_HOST_CAPTURE_REMOTE_SHARES with a default value of Y, along
with the target server host name.
Adding a Certificate to the Java Keystore
Use the following steps to add an SSL certificate to the Java keystore for a Data
Collector. Some servers, such as VSphere, require a certificate for connection while
communicating with SSL.
Keystore File Location
Note: For the following commands, if you are not running in the default collector
location (/opt/aptare or C:\opt\aptare), substitute the appropriate APTARE_HOME
in the command path.
For Windows Data Collector:
C:\opt\aptare\java\lib\security\cacerts
For Linux Data Collector:Data Collector Troubleshooting 27
Adding a Certificate to the Java Keystore
/opt/aptare/java/lib/security/cacerts
Copy the certificate file (certfile.txt) to the Data Collector. Run the following command
to add the certificate:
For Windows Data Collector:
C:\opt\jre\bin\keytool -import -alias "somealias" -file certfile.txt
-keystore
C:\opt\aptare\java\lib\security\cacerts
For Linux Data Collector:
/usr/java/bin/keytool -import -alias "somealias" -file certfile.txt
-keystore /opt/aptare/java/lib/security/cacerts
When prompted, enter the default password to the keystore:
changeit
The results will be similar to the following example:
Enter keystore password:
......
Certificate Shown here
......
......
......
Trust this certificate? [no]: yes
Once completed, run the following keytool command to view a list of certificates
from the keystore and confirm that the certificate was successfully added. The
certificate fingerprint line displays with the alias name used during the import.
For Windows Data Collector:
C:\opt\jre\bin\keytool -list -keystore
C:\opt\aptare\jre\lib\security\cacerts
For Linux Data Collector:
/usr/java/bin/keytool -list -keystore
/opt/aptare/jre/lib/security/cacerts
Sample Linux Output
Enter keystore password:
Keystore type: JKS
Keystore provider: SUNData Collector Troubleshooting 28
Adding a Certificate to the Java Keystore
Your keystore contains 79 entries
digicertassuredidrootca, Apr 16, 2008, trustedCertEntry,
Certificate fingerprint (SHA1):
05:63:B8:63:0D:62:D7:5A:BB:C8:AB:1E:4B:DF:B5:A8:99:B2:4D:43
trustcenterclass2caii, Apr 29, 2008, trustedCertEntry,
Certificate fingerprint (SHA1):
AE:50:83:ED:7C:F4:5C:BC:8F:61:C6:21:FE:68:5D:79:42:21:15:6E
.....Chapter 2
Clustering Data Collectors
with VCS and Veritas
NetBackup (RHEL 7)
This chapter includes the following topics:
■ Clustering Data Collectors with VCS and Veritas NetBackup (RHEL 7)
■ Prerequisites
■ Getting with started with Data Collector clustering
■ Main.cf
■ Upgrading a Clustered Data Collector
Clustering Data Collectors with VCS and Veritas
NetBackup (RHEL 7)
These instructions cover configuring APTARE IT Analytics data collectors with
Veritas Infoscale Availability (VCS) with NetBackup running on Red Hat Enterprise
Linux 7.
Prerequisites
■ Veritas NetBackup (NBU) is installed and configured on the Veritas Infoscale
Availability (VCS) in a clustered mode.
■ Veritas NetBackup (NBU) data volume resides on a volume shared across
cluster nodes.Clustering Data Collectors with VCS and Veritas NetBackup (RHEL 7) 30
Getting with started with Data Collector clustering
■ Data Collector is installed on a volume shared across cluster nodes.
Getting with started with Data Collector clustering
1. Install the Veritas NetBackup Data Collector on shared volume attached to the
active node.
2. On the same node, delete the start up scripts, by running the command:
# find /etc -name "*aptare*"
3. Manually delete the following files:
/etc/rc.d/rc0.d/K30aptare_agent
/etc/rc.d/rc3.d/S80aptare_agent
/etc/rc.d/rc3.d/K40aptare_agent
/etc/rc.d/rc5.d/S80aptare_agent
/etc/rc.d/rc5.d/K40aptare_agent
4. Update the /etc/hosts file with IP and hostname mapping of aptareagent portal
on all the cluster nodes.
5. Using Veritas Infoscale Availability (VCS), create a separate service group for
the agent. The following set of screen shots show the visual representation in
VCS. There are multiple methods to set up the configuration. These instructions
use the main.cf to setup.
See “Main.cf” on page 39.Clustering Data Collectors with VCS and Veritas NetBackup (RHEL 7) 31
Getting with started with Data Collector clustering
6. Create a file /opt/aptare_scripts/aptare_dc_monitor.sh on all the cluster nodes
with the following. Ensure execute permission is provided to the file for root
user as owner.
#!/bin/sh
# APTARE_HOME should be set to the base path where aptare data-colletor is
# installed
APTARE_HOME="/aptare_vol"
# Exit codes that VCS understands
E_APTARE_IS_ONLINE=110
E_APTARE_IS_OFFLINE=100
E_APTARE_IS_UNKNOWN=99Clustering Data Collectors with VCS and Veritas NetBackup (RHEL 7) 32
Main.cf
SCRIPT="${APTARE_HOME}/mbs/bin/aptare_agent"
if [ ! -f ${SCRIPT} ]; then
exit $E_APTARE_IS_OFFLINE
fi
${SCRIPT} status | grep 'WatchDog is running' >/dev/null 2>&1
ret=$?
if [ "$ret" -eq "0" ]; then
exit $E_APTARE_IS_ONLINE
else
/usr/bin/ps -ef | grep -v grep | grep -i aptare | grep UpgradeManager
upgrademanager_running=$?
if [ "${upgrademanager_running}" -eq "0" ]; then
exit $E_APTARE_IS_UNKNOWN
fi
exit $E_APTARE_IS_OFFLINE
fi
Main.cf
The main.cf for the previous configuration is as follows. Please note, the following
configuration uses example values as required:
include "OracleASMTypes.cf"
include "types.cf"
include "CRSResource.cf"
include "CSSD.cf"
include "Db2udbTypes.cf"
include "MultiPrivNIC.cf"
include "/etc/VRTSvcs/conf/config/NetBackupTypes.cf"
include "OracleTypes.cf"
include "PrivNIC.cf"
include "SybaseTypes.cf"
cluster vcs_cluster (
UserNames = { admin = XXXXXXXXXX }
Administrators = { admin }
)
system node1 (
)Clustering Data Collectors with VCS and Veritas NetBackup (RHEL 7) 33
Main.cf
system node2 (
)
group aptare_grp (
SystemList = { node1 = 0, node2 = 1 }
)
Application aptare_app (
StartProgram = "/aptare-vol/mbs/bin/aptare_agent
start"
StopProgram = "/aptare-vol/mbs/bin/aptare_agent stop"
CleanProgram = "/aptare-vol/mbs/bin/aptare_agent
stop"
MonitorProgram =
"/opt/aptare_scripts/aptare_dc_monitor.sh"
)
DiskGroup aptare_dg (
DiskGroup = aptare-dg
)
Mount aptare_mnt (
MountPoint = "/aptare-vol"
BlockDevice = "/dev/vx/dsk/aptare-dg/aptare-vol"
FSType = vxfs
FsckOpt = "-y"
CreateMntPt = 1
)
Volume aptare_vol (
DiskGroup = aptare-dg
Volume = aptare-vol
)
requires group nbu_group online local hard
aptare_app requires aptare_mnt
aptare_mnt requires aptare_vol
aptare_vol requires aptare_dg
// resource dependency tree
//
// group aptare_grp
// {
// Application aptare_appClustering Data Collectors with VCS and Veritas NetBackup (RHEL 7) 34
Main.cf
// {
// Mount aptare_mnt
// {
// Volume aptare_vol
// {
// DiskGroup aptare_dg
// }
// }
// }
// }
group nbu_group (
SystemList = { node1 = 0, node2 = 1 }
AutoStartList = { node1, node2 }
)
DiskGroup nbu_dg (
DiskGroup = nbu-dg
)
IP nbu_ip (
Device @node1 = abc123
Device @node2 = abc123
Address = "11.222.33.44"
NetMask = "222.233.244.0"
)
Mount nbu_mount (
MountPoint = "/opt/VRTSnbu"
BlockDevice = "/dev/vx/dsk/nbu-dg/nbu-vol"
FSType = vxfs
FsckOpt = "-y"
)
NIC nbu_nic (
Device @node1 = abc123
Device @node2 = abc123
NetworkHosts = { "11.222.33.444", "11.222.33.445" }
)
NetBackup nbu_server (
ResourceOwner = unknown
ServerName = NBU_ServerClustering Data Collectors with VCS and Veritas NetBackup (RHEL 7) 35
Upgrading a Clustered Data Collector
ServerType = NBUMaster
MonScript = NONE
RSPFile = "/usr/openv/netbackup/bin/cluster/NBU_RSP"
GroupName = nbu_group
)
Volume nbu_vol (
DiskGroup = nbu-dg
Volume = nbu-vol
)
nbu_ip requires nbu_nic
nbu_mount requires nbu_vol
nbu_server requires nbu_ip
nbu_server requires nbu_mount
nbu_vol requires nbu_dg
// resource dependency tree
//
// group nbu_group
// {
// NetBackup nbu_server
// {
// IP nbu_ip
// {
// NIC nbu_nic
// }
// Mount nbu_mount
// {
// Volume nbu_vol
// {
// DiskGroup nbu_dg
// }
// }
// }
// }
Upgrading a Clustered Data Collector
1. Using Veritas Infoscale Availability (VCS), verify the service group can be
probed:
# /opt/VRTS/bin/hagroup -probe aptare_grp -sysClustering Data Collectors with VCS and Veritas NetBackup (RHEL 7) 36
Upgrading a Clustered Data Collector
2. Upgrade the portal and opt for upgrading Data Collector.
3. When Data Collector is getting upgraded, VCS will detect the upgrade scenario
and show the APTARE IT Analytics resource state as UNKNOWN. Once
upgrade is over, VCS resource state automatically shows state as ONLINE.Chapter 3
Clustering Data Collectors
with VCS and Veritas
NetBackup (Windows)
This chapter includes the following topics:
■ Clustering Data Collectors with VCS and Veritas NetBackup (Windows)
■ Prerequisites
■ Getting with Started with Data Collector Clustering
■ Main.cf
■ Upgrading a Clustered Data Collector
Clustering Data Collectors with VCS and Veritas
NetBackup (Windows)
These instructions cover configuring APTARE IT Analytics data collectors on a
Veritas Infoscale Availability (VCS) with NetBackup running on Microsoft Windows.
Prerequisites
■ Veritas NetBackup (NBU) is installed and configured on the Veritas Infoscale
Availability (VCS) with clustered nodes in a clustered mode.
■ Veritas NetBackup (NBU) data volume resides on a volume shared across
cluster nodes.Clustering Data Collectors with VCS and Veritas NetBackup (Windows) 38
Getting with Started with Data Collector Clustering
■ Data Collector is installed on a volume shared across cluster nodes.
■ Disk groups created are dynamic clustered disk groups.
Getting with Started with Data Collector Clustering
1. Install the Veritas NetBackup Data Collector on shared volume attached to the
active node.
2. On the same node, using the "services.msc" properties, set the startup type
as Manual for the APTARE Agent and WMI Agent services.
3. On all the remaining nodes in the cluster, switch all the groups to each of the
nodes and perform the following steps: install the services for the APTARE
Agent and WMI Proxy explicitly as:
■ APTARE Agent: /Aptare/mbs/bin/installservice.bat
■ WMI Agent:/WMIProxyServer/bin/installservice.bat
4. On the passive node, using the "services.msc" properties, set the startup type
as Manual for the APTARE Agent and WMI Agent services.
5. Update the drivers/etc/hosts file with IP and hostname mapping of aptareagent
portal on all the cluster nodes.
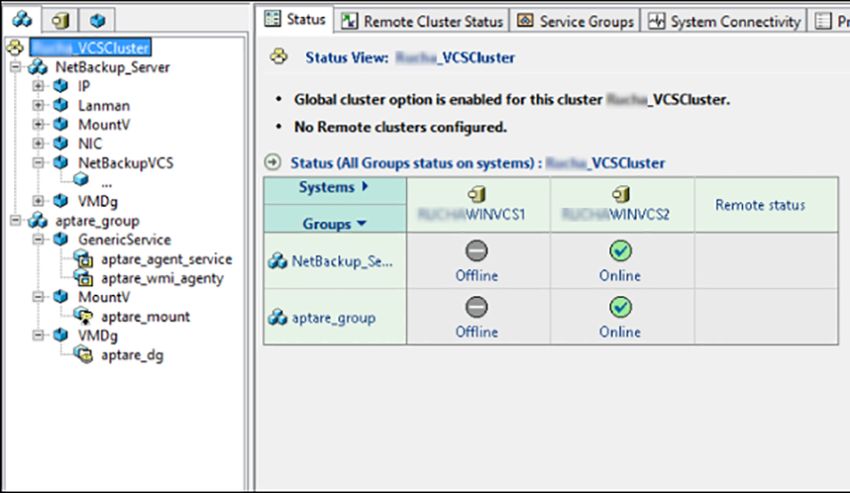
6. Using Veritas Infoscale Availability (VCS), create a separate Service group for
the APTARE Agent and WMI Proxy Agent. The following set of screen shots
show the visual representation in VCS. There are multiple methods to set up
the configuration. These instructions use the main.cf to setup.
See “Main.cf” on page 39.Clustering Data Collectors with VCS and Veritas NetBackup (Windows) 39
Main.cf
Main.cf
The main.cf for the previous configuration is as follows. Please note, the following
configuration uses example values as required:
include "types.cf"
include "C:\Program Files\Veritas\Cluster
Server\conf\config\NetBackupVCSTypes.cf"
cluster VCSCluster (
UserNames = { admin = XXXXXXXXXX, test1 = YYYYYYYYYY }
Administrators = { admin, test1 }
)
system WINVCS1 (
)Clustering Data Collectors with VCS and Veritas NetBackup (Windows) 40
Main.cf
system WINVCS2 (
)
group aptare_group (
SystemList = { WINVCS1 = 1, WINVCS2 = 2 }
)
GenericService aptare_agent_service
ServiceName = aptareagent
)
GenericService aptare_wmi_agenty (
ServiceName = APTAREWMIServer
)
MountV aptare_mount (
MountPath = "F:\\"
VolumeName = aptarevol
VMDGResName = aptare_dg
)
VMDg aptare_dg (
DiskGroupName = aptaredg
DGGuid = 8771eb0f-ae3c-4d7e-9dc2-d365a0158542
)
requires group NetBackup_Server online local hard
aptare_mount requires aptare_dg
aptare_agent_service requires aptare_wmi_agenty
aptare_wmi_agenty requires aptare_mount
// resource dependency tree
//
// group aptare_group
// {
// GenericService aptare_agent_service
// {
// GenericService aptare_wmi_agenty
// {
// MountV aptare_mount
// {
// VMDg aptare_dg
// }Clustering Data Collectors with VCS and Veritas NetBackup (Windows) 41
Main.cf
// }
// }
// }
group NetBackup_Server (
SystemList = { WINVCS1 = 1, WINVCS2 = 2 }
AutoStartList = { WINVCS1, WINVCS2 }
)
IP NetBackup_Server-IP (
Address = "11.222.33.44"
SubNetMask = "222.233.244.0"
MACAddress @WINVCS1 = XX-XX-XX-XX-XX-XX
MACAddress @WINVCS2 = XX-XX-XX-XX-XX-XX
)
Lanman NetBackup_Server-Lanman (
VirtualName = plutusvm39
IPResName = NetBackup_Server-IP
)
MountV NetBackup_Server-MountV-E (
MountPath = "E:\\"
VolumeName = nbuvol
VMDGResName = NetBackup_Server-VMDg-E
)
NIC NetBackup_Server-NIC (
MACAddress @WINVCS1 = XX-XX-XX-XX-XX-XX
MACAddress @WINVCS2 = XX-XX-XX-XX-XX-XX
)
NetBackupVCS NetBackup_Server-NBU (
ResourceOwner = unknown
ServerName = exampleserv1
ServerType = NBU
)
VMDg NetBackup_Server-VMDg-E (
DiskGroupName = nbudg
DGGuid = 292ff5dd-b7ef-49cf-972e-dc903fac35bd
)Clustering Data Collectors with VCS and Veritas NetBackup (Windows) 42
Upgrading a Clustered Data Collector
NetBackup_Server-IP requires NetBackup_Server-NIC
NetBackup_Server-Lanman requires NetBackup_Server-IP
NetBackup_Server-MountV-E requires NetBackup_Server-VMDg-E
NetBackup_Server-NBU requires NetBackup_Server-MountV-E
NetBackup_Server-NBU requires NetBackup_Server-Lanman
// resource dependency tree
//
// group NetBackup_Server
// {
// NetBackupVCS NetBackup_Server-NBU
// {
// MountV NetBackup_Server-MountV-E
// {
// VMDg NetBackup_Server-VMDg-E
// }
// Lanman NetBackup_Server-Lanman
// {
// IP NetBackup_Server-IP
// {
// NIC NetBackup_Server-NIC
// }
// }
// }
// }
Upgrading a Clustered Data Collector
1. Using Veritas Infoscale Availability (VCS), verify the service group can be
probed.Clustering Data Collectors with VCS and Veritas NetBackup (Windows) 43
Upgrading a Clustered Data Collector
2. Freeze the "aptare_grp" cluster resource temporarily while the portal is being
upgraded.
3. On the shared volume, ensure that the restore.txt file is not in the directory
/aptare-vol/upgrade/restore.txt.
4. In the APTARE IT Analytics portal, perform the data collector upgrade using
the Portal (Admin>Data Collection>Collector Upgrade); or wait for the
automatic upgrade if the Data Collector is configured for it.
5. Verify the data collector has been upgraded to higher version by validating
aptare-vol/aptare/upgrade/version.txt
6. In Veritas Infoscale Availability (VCS) unfreeze the "aptare_grp" cluster resource
after the data collector has upgraded successfully.Chapter 4
Firewall Configuration:
Default Ports
This chapter includes the following topics:
■ Firewall Configuration: Default Ports
Firewall Configuration: Default Ports
The following table describes the standard ports used by the Portal servers, the
Data Collector servers, and any embedded third-party software products as part of
a standard “out-of-the-box” installation.
Table 4-1 Components: Default Ports
Component Default Ports
Apache Web Server http 80
https 443
Linux Hosts SSH 22, Telnet 23
Managed Applications Oracle ASM 1521
MS Exchange 389
MS SQL 1433
File Analytics CIFS 137, 139
Oracle 1521
Oracle TNS listener portFirewall Configuration: Default Ports 45
Firewall Configuration: Default Ports
Table 4-1 Components: Default Ports (continued)
Component Default Ports
Tomcat - Data Receiver 8011, 8017
Apache connector port and shutdown port for Data
Receiver instance of tomcat
Tomcat - Portal 8009, 8015
Apache connector port and shutdown port for
Portal instance of tomcat
Windows Hosts TCP/IP 1248
WMI 135
DCOM TCP/UDP > 1023
SMB TCP 445
Table 4-2 Storage Vendors: Default Ports
Storage Vendor Default Ports and Notes
Dell Compellent 1433
SMI-S http (5988)
SMI-S https (5989)
Dell EMC Elastic Cloud Storage (ECS) REST API 80/443
Dell EMC Unity REST API version 4.3.0 on 443 or 8443
EMC Data Domain Storage SSH 22
EMC Isilon SSH 22
EMC Symmetrix SymCLI over Fibre Channel 2707
EMC VNX (CLARiiON) NaviCLI 443, 2163, 6389, 6390, 6391, 6392
EMC VNX (Celerra) XML API 443, 2163, 6389, 6390, 6391, 6392
EMC VPLEX https TCP 443
EMC XtremIO REST API https 443
HP 3PAR 22 for CLIFirewall Configuration: Default Ports 46
Firewall Configuration: Default Ports
Table 4-2 Storage Vendors: Default Ports (continued)
Storage Vendor Default Ports and Notes
HP EVA 2372
HPE Nimble Storage 5392, REST API Reference Version 5.0.1.0
Hitachi Block Storage TCP 2001
For the HIAA probe: 22015 is used for HTTP and 22016 is used
for HTTPS.
Hitachi Content Platform (HCP) SNMP 161
REST API https 9090
Hitachi NAS (HNAS) SSC 206
Huawei OceanStor Enterprise Storage 8080
IBM Enterprise TCP 1751, 1750, 1718
DSCLI
IBM SVC SSPC w/CIMOM 5988, 5989
IBM XIV XCLI TCP 7778
INFINIDAT InfiniBox REST API TCP 80, 443
Microsoft Windows Server 2012 R2, 2016
WMI 135
DCOM TCP/UDP > 1023
NetApp E-Series SMCLI 2436
NetApp ONTAP 7-Mode and Cluster-Mode ONTAP API
80/443
Pure Storage FlashArray REST API https 443
Veritas NetBackup Appliance 1556
Table 4-3 Data Protection: Default Ports
Data Protection Vendor Default Ports and Notes
Cohesity DataProtect REST API on Port 80 or 443Firewall Configuration: Default Ports 47
Firewall Configuration: Default Ports
Table 4-3 Data Protection: Default Ports (continued)
Data Protection Vendor Default Ports and Notes
Commvault Simpana 1433, 135 (skipped files)
445 (CIFS over TCP)
DCOM >1023
Dell EMC Networker Backup & Recovery Port used for Dell EMC NetWorker REST API connection. Default:
9090.
EMC Avamar 5555
SSH 22
EMC Data Domain Backup SSH 22
EMC NetWorker ■ NSRADMIN TCP 7937-7940
■ WMI Proxy range of ports
■ SSH 22 (Linux)
HP Data Protector 5555 WMI ports SSH 22 (Linux)
IBM Spectrum Protect (TSM) 1500
NAKIVO Backup & Replication Director Web UI port (Default: 4443)
Oracle Recovery Manager (RMAN) 1521
Rubrik Cloud Data Management REST API 443
Veeam Backup & Replication 9392
Veritas Backup Exec 1433
Veritas NetBackup 1556, 13724
WMI ports
SSH 22 (Linux)
Table 4-4 Network & Fabrics: Default Ports
Network & Fabrics Vendor Default Ports and Notes
Brocade Switch SMI-S 5988/5989
Cisco Switch SMI-S 5988/5989Firewall Configuration: Default Ports 48
Firewall Configuration: Default Ports
Table 4-5 Virtualization Vendors: Default Ports
Virtualization Vendor Default Ports and Notes
IBM VIO SSH 22, Telnet 23
Microsoft Hyper-V WMI 135
DCOM TCP/UDP > 1023
VMware ESX or ESXi,vCenter,vSphere vSphere VI SDK
https TCP 443
Table 4-6 Replication Vendors: Default Ports
Replication Vendor Default Ports and Notes
NetApp ONTAP 7-Mode ONTAP API
80/443
Table 4-7 Cloud Vendors: Default Ports
Cloud Vendor Default Ports and Notes
Amazon Web Services https 443
Microsoft Azure https 443
OpenStack Ceilometer 8774, 8777
Keystone Admin 3537
Keystone Public 5000
OpenStack Swift Keystone Admin 35357
Keystone Public 5000
SSH 22Chapter 5
CRON Expressions and
Probe Schedules
This chapter includes the following topics:
■ CRON Expressions and Probe Schedules
CRON Expressions and Probe Schedules
Many Data Collector policy configurations require a schedule. Native CRON
expressions are supported for fine-tuning a schedule. The format for the schedule
follows the CRON standard:
* * * * *
minutes hours day of month month day of week
Probe Schedule Allowed Values:
Table 5-1
Field Allowed Values
minutes 0-59 (0 is “on the hour”)
hours 0-23
day of month 1-31
month 1-12
day of week 0-6 (0 is Sunday)
■ APTARE IT Analytics supports a maximum of 80 characters in a CRON expression.CRON Expressions and Probe Schedules 50
CRON Expressions and Probe Schedules
Table 5-1 (continued)
Field Allowed Values
Special Characters:
■ A field may be an asterisk (*), which means the full range - i.e., “first” to “last”. However, a * in the minutes position
is not permitted, as this would excessively trigger the probe—every minute.
■ A forward slash (/) can be used to specify intervals.
■ Use a dash (-) to specify a range.
■ The CRON expression for the last day of the month, denoted by the letter L, is not supported.
Table 5-2
Probe Schedule Scheduled Run Time
Examples
0 14-15 * * 1 On the hour, every Monday, between 2 and 3pm
Note: A zero in the minutes position denotes the beginning of the hour.
30 9-13 * * 1-5 9:30, 10:30, 11:30, 12:30, and 13:30, Monday through Friday.
0 */2 * * * To run the probe every 2 hours, put */2 in the hour position. This schedules the probe at 2am,
4am, 6am, 8am, 10am, 12pm, 2pm, and so on.
*/30 * * * * Every 30 minutes
*/20 9-18 * * * Every 20 minutes between 9 am and 6 pm
*/30 * * * 1-5 Every 30 minutes, Monday through Friday
12*** 2:01 every day
30 9,11 * * * 9:30 and 11:30 every dayYou can also read